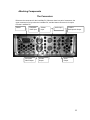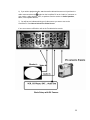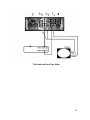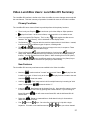
1
LunchBox DV
User’s Manual
©2006 Animation Toolworks, Inc.
18484 SW Parrett Mountain Road
Sherwood, OR 97140
USA
503-625-6438
Version 1.2
August 2006
2
Introduction
The LunchBox DV™ is an animation frame grabber capable of recording
individual frames or full motion video and audio, and playing them back, full
screen, at a user selectable 24 or 30 frames per second for the NTSC model,
or 25 frames per second for the PAL model.
The LunchBox DV is designed to be easy to use. Most users learn all they
need to know about the LunchBox DV by using it for a few minutes. But since
there are some useful features which are not so obvious, you might want to
scan the Table of Contents to help you decide which sections of this User's
Manual are worth reading. In particular, we recommend scanning through the
“How To” section. Briefly look at the left hand column, the descriptions of
what can be done with your LunchBox DV. When you need to perform these
actions, you can come back and read the right hand column.
If you need to contact Animation Toolworks, we can be reached at:
Animation Toolworks, Inc.
18484 Parrett Mountain Road
Sherwood, Oregon, 97140
USA
(503) 625-6438
web site: www.animationtoolworks.com
© 2006 Animation Toolworks, Inc. All rights reserved
First printing, May, 2006
Trademarks
LunchBox Sync®, LunchBox DV, Animation Toolworks, and their respective
logos are trademarks of Animation Toolworks, Inc. Other brands or products are the
trademarks or registered trademarks of their respective holders and should be treated as
such.
Copyright
3
Notice
The information contained in this manual is subject to change without notice.
Animation Toolworks Inc. (ATI) provides no warranty with regard to this manual and the
information it contains. ATI assumes no liability for any damages incurred directly or
indirectly from any technical or typographical errors or omissions contained herein, nor
for discrepancies between the product and the manual.
Protect Your Animation
The LunchBox DV stores your animation on a hard disc drive. These drives
are quite reliable. However, if you drop or strike your LunchBox DV, or your
electrical system suffers a harsh power surge, the hard drive may fail. Such
a failure could mean that you would no longer to be able to access the
video and/or audio on the hard disc drive.
If your animation is of value to you, it is your responsibility to protect it.
This means periodically storing your animation on other media, such as
video tape or on another hard drive, in case of a catastrophic failure of the
hard disc drive. The more the value of the animation to you, and the more
difficult it would be to recreate the animation, the more frequently you
should store the animation on other media.
4
Table Of Contents
Caring for the LunchBox DV
9
Operating Conditions
9
How to clean the LunchBox DV
9
Setting Up the LunchBox DV
10
Choosing components
Camera
Monitor
Video Cables
Audio Source
Audio Speakers
Audio Cables
Serial Port Cables
Power Strips
10
Attaching Components
The Connectors
The Basic Analog Setup
The Basic DV Camera Setup
The Recording Setup (Allows recording to video tape)
Download From Tape setup (Allows loading frames from a video tape)
Transfer to/from Computer Setup (Allows recording to/from a computer)
15
10
11
12
13
13
13
14
14
15
16
18
20
22
24
Two- Minute Tutorial
26
Video LunchBox Users: LunchBox DV Summary
27
Primary Functions
27
New Features
27
New Display
28
Persistence
28
Setup key,
28
Frame Capacity
30
Audio on the LunchBox DV
31
Capturing Audio
31
Playing Audio
32
Synchronizing Audio
32
Video on the LunchBox DV
33
Different Video Sources
33
Operating Without a Video Source
33
5
How to Select Your Video Source
33
Using Both Video Outputs
33
Firewire and DV
34
What is DV
34
What is Firewire
34
What You Need to Know
Firewire Cables
Attaching a DV Camera
Attaching a Computer
Transferring Video TO Your Computer
Transferring Video FROM Your Computer
Repeated Transfers To/From Your Computer
34
Scenario 1: Replacing a bad frame
37
Scenario 2: Accurate replacement or repositioning
37
Scenario 3: Saving images to video tape
37
Scenario 4: Loading images from video tape
38
Scenario 5: Shooting live- motion reference
38
Scenario 6: Animating to a live-motion reference
39
Scenario 7: Key frame animation
39
Scenario 8: Setting custom loop boundaries
39
Scenario 9: Changing a loop boundary
40
Scenario 10: Erasing custom loop boundaries
40
Scenario 11: Shooting time lapse video
40
Scenario 12: Clearing images to start over
40
Scenario 13: Switching Playback between 24 and 30 frames per second
41
Scenario 14: Capturing only Audio
41
Scenario 15: Synchronizing audio to your video
41
Scenario 16: Listening to all of your audio
42
Scenario 17: Listening only to part of your audio
42
Scenario 18: Inserting a frame
42
Scenario 19: Deleting a frame
42
Scenario 20: Capturing Audio with Video
43
Scenario 21: Shooting on 1s, 2s or 3s
43
Scenario 22: Increasing the Holds (exposures) for an image
43
34
34
35
35
35
36
6
Scenario 23: Removing the Holds (exposures) for an image
44
Scenario 24: Playback at 12fps or 15fps
44
Scenario 25: Creating an animatic
45
Scenario 26: Showing the frame number on the monitor
46
Scenario 27: Suppressing the frame number on the monitor
46
Scenario 28: Stopping playback at a particular frame
46
Scenario 29: Recording a sound-track on top of existing video
46
Scenario 30: Editing a different Reel
47
Scenario 31: Stepping into “Live” video at the end of frames
47
Scenario 32: Don’t step into “Live” video at the end of frames
47
Scenario 33: Save animation to a computer
48
Scenario 34: Record animation from a computer
49
LunchBox DV Reference
50
Basic Key functions:
50
Setup
50
Shoot
50
Backward
51
Forward
51
Live
51
Play
51
Yes/No Keys:
52
Yes Green Key
52
No Red Key
52
First/Last Keys:
52
First Image
52
Last Image
52
Editing Keys:
53
Mark
53
Hold
54
7
Insert
54
Delete
55
Audio Keys:
55
Start Audio Sooner
55
Start Audio Later
55
LunchBox DV Display
56
LunchBox DV Messages
57
Troubleshooting
58
Index
65
8
Caring for the LunchBox DV
Operating Conditions
Operating conditions for the LunchBox DV are the same as for most electronic
equipment. It should not be operated in a damp or hot environment. Operating
temperature should be in the range of 5º C to 45º C under normal relative humidity (noncondensing). High humidity decreases maximum temperature to 30º C. If the LunchBox
has just been transported in cold temperature, it should not be operated until the
LunchBox reaches room temperature. Care should be taken not to cover the vent holes
on the sides of the LunchBox DV.
You should avoid banging or dropping the LunchBox, especially while it is operating.
The recessed display is glass, so you should avoid contact with it.
The LunchBox DV must only be operated on 50 or 60 Hz, 110 or 220 volt AC power. The
cord fits snugly into its socket on the LunchBox DV, so make sure the power cord is
completely inserted into its socket in the side of the LunchBox DV.
The LunchBox DV is not user serviceable-- if it needs servicing, it must be returned to
Animation Toolworks for service.
How to clean the LunchBox DV
Disconnect the power cord, then wipe it with a dry or slightly damp sponge or cloth.
9
Setting Up the LunchBox DV
Choosing components
Camera
The video camera will usually be the component which limits the image quality of the
LunchBox DV system, so it's important to choose the right video camera for your needs.
If you require higher quality output, you will need a high resolution video camera. If you
are doing reference tests with a low resolution monitor, almost any video camera will do.
The LunchBox DV can accept input from an analog video camera (either composite or SVideo) or a DV camera. These are discussed below.
The LunchBox DV will work with CCD based cameras. These include most camcorders
or video cameras built since 1990. Camcorders are of two general types: analog (the
older ones, but they are still available) and DV (digital video). While camcorders will work
for most uses, they have some limitations:
•
•
•
•
Some camcorders turn off after a few minutes of not recording. This
necessitates having to frequently touch, and inadvertently move, the camera.
Some camcorders, especially the analog camcorders, have low video
resolution and poor lenses. Manufacturers put the money into a tape
transport mechanism and battery power system which you will not use while
animating with the LunchBox DV. DV camcorders are an exception to this
rule, and generally have video quality commensurate with their price.
Few camcorders have interchangeable lenses
Camcorders are often smaller and more delicate than alternatives. This can
make them less durable especially in a classroom setting.
The alternative to a camcorder is a video camera. For the same price, you can usually
get higher resolution in a video camera than in an analog camcorder. Low resolution
webcam-type cameras can be found for less than $100; high resolution color cameras
can cost over $2000. Many animators like to use cameras with a C mount lens system,
since this is the same system used on some 16mm film cameras, such as the Bolex.
Video cameras today have 1/6, 1/4 inch, 1/3 inch or 1/2 inch CCD arrays. 1/2 CCD
arrays are usually higher resolution cameras, and are more expensive. There are also
some DV cameras that have 3 CCDs, one for each primary color. The 3 CCD cameras
frequently have better color fidelity than the 1 CCD cameras, but can be frailer. Just as
with film, the different format cameras produce different results with the same lens. In
our experience, the following lens choices offer good results:
Camera
1/3 inch CCD
1/2 inch CCD
2-D on copy stand
3-D stop motion set
8 mm fixed focal length
12 mm fixed focal length
8-75 mm zoom
8-75 mm zoom
Some cameras can output S-Video, in addition to the normal “video out.” S-Video is
generally higher quality than the normal video out, which is also called composite video.
The LunchBox DV can accept either composite or S-Video as input. It will also output
either of these forms of video.
10
To use a DV (digital video) camera with the LunchBox DV, connect the Firewire port of
your digital video camera to the LunchBox DV’s Firewire connector using an appropriate
Firewire cable.
If you wish to use a digital still camera, you may do so if the camera has a video out
port, which is the analog video port. As of this writing, a minority of digital still cameras
have such a video port.
Whichever type of camera you choose (analog composite video, analog S-Video, or DV)
to use, you will need to tell the LunchBox the type you are using.
Animation Toolworks offers a selection of cameras and lenses which have been tested
with the LunchBox DV. Call for more information.
Monitor
You will need a video monitor with a "video" or "line" input. If your monitor only has an
"Antenna" or "Cable" input, you will not be able to connect it directly to the LunchBox DV.
Most consumer or professional video monitors will work well with the LunchBox DV. For
optimal image quality, we recommend a monitor which accepts S-Video (sometimes
labeled as “Y/C”) as input.
If you plan to frequently connect and disconnect the LunchBox DV and the monitor, we
recommend you find a monitor with BNC connectors instead of RCA jacks. RCA
connectors do not handle the stress of repeated use very well, and may start to fail after
a few hundred connections.
Animation Toolworks has monitors available for purchase. Call for more information.
11
Video Cables
Don't skimp on cables. If you've ever wasted an hour because a cable was defective you
know what we mean. We recommend using 75 ohm RG59 BNC video cables for your
composite video connections. You can also use good quality RCA jack type video
cables, but the connectors will wear out faster and you will need an adapter on the
LunchBox DV end of the cables. Do not use 50 ohm RG58 computer cables. Do not use
RCA jack type audio cables.
Composite Video Cables (BNC Connectors)
Adapters to convert BNC connector to RCA female (left) and RCA male (right)
If you are instead using S-Video, these connectors work just fine. Be sure to carefully
align the pins of the connector and of the cable.
SVideo Cables
For DV cameras, you will get the best image quality by using a Firewire cable. There are
two types/sizes of connectors for Firewire, 6-pin, which is used on the LunchBox DV and
some DV camcorders, and 4-pin (the smaller connector) which is used on some other DV
camcorders. Make sure your Firewire cable has the connector appropriate for your
camera, and a 6-pin connector for the LunchBox DV.
Firewire cables. 6-pin (left) for the LunchBox DV, and 4-pin (right) for your DV camcorder
(depending upon camcorder model)
12
Audio Source
Your audio source can be either analog, or digital video (DV).
Analog audio sources include any powered audio source with a standard audio line level
(~1V P-P). This includes tape decks, CD players, VCRs, computer audio ports, or the
audio out from a camcorder. "Line level" is the calibrated standard that lets your amplifier
work with every CD player and every CD without needing to change the volume. To do
anything "professional" you need an audio source with a line level output. Unpowered
audio sources, such as a passive microphone, will not provide acceptable audio
input to the LunchBox DV.
Headphone output (from iPods®, for example) is not a line level output. Its output level
varies with the device's volume control. If you use a headphone output instead of a line
level output you will need to play around with the volume control to get an acceptable
audio level for playback. If the headphone output is too high the audio will be clipped and
distorted, if it is too low you will need to jack up the audio level on the output speakers to
hear it, and background noise may be excessive. If you use a line level signal to drive
the LunchBox, the device's volume control will have no effect at all on the signal being
recorded.
Digital audio sources are usually from a DV camcorder. The LBDV only supports 16 bit
48KHz DV audio. Your camera may also support "12-bit" or "12-bit 32 KHz" audio. It is
important that you select "16-bit" or "16-bit 48KHz" if you intend to use audio captured
through your camera. If your audio playback is no longer sequential, with repeats and
skips, there is a good chance your DV camcorder is set to 12 bit audio.
Audio Speakers
Any powered speakers can be used. The audio output from the LunchBox DV is line
level. Alternately, you can connect the LunchBox DV’s audio output to an amplifier’s
audio input, or to a monitor’s audio input. Headphones or other unpowered speakers
will not work.
Audio Cables
The LunchBox DV uses 1/8" (3.5mm) mini-phono plugs for the audio in and audio out
jacks. Use a phono cable with a mini-plug on at least one end, or a converter to a miniplug. Please use a stereo mini-phono plug for each audio connector.
Stereo mini-jack
It is fine to use RCA type cables, with the proper mini jack adapters, for the audio (but do
not use them for the video). If you are driving the audio input to the LunchBox DV with a
mono device, use the RIGHT (RED) channel.
Stereo mini-jack (left), RCA jacks (right)
13
If you are using audio and video from a DV camera, then you do not need to use audio
cables. Both the audio and video are transported by the Firewire cable.
Serial Port Cables
The LunchBox DV uses a DB9 to DB9, female-to-female, serial cable when the serial
port is in use. The cable should be wired straight through—do not use a null modem
cable.
Serial (RS232) cable
The purpose of the serial port is to allow for LunchBox updates without your having to
return the LunchBox. It is not generally available for other uses.
Power Strips
A good power strip makes setup easier and can reduce problems with the video
equipment. Look for a power strip with a 15 Amp circuit breaker. We recommend using
a power strip with a surge protector built in-- they are inexpensive, and can protect all
your video equipment at once.
14
Attaching Components
The Connectors
Below are the connectors for the LunchBox DV. Wherever there is a pair of connectors, the
upper connector is for input into the LunchBox DV, and the bottom connector is for output
from the LunchBox DV.
RS232
Composite
Video Input
Composite
Video Output
SVideo
Input
SVideo
Output
Audio Input
Firewire
Both Input & Output
Audio
Output
15
The Basic Analog Setup
When to use this setup:
When you are using an analog video camera or camcorder and a monitor. This is the
simplest configuration, so start here if you are using an analog video camera or
camcorder.
Equipment:
• Power strip
• Analog Video Camera
• LunchBox DV
• Video Monitor
• Two 75 ohm BNC video cables, or, Two S-Video video cables
• Optional: Audio source, audio speakers, two audio cables
Please note: most cameras and monitors support composite video, which uses either
BNC or RCA type connectors. Your camera and monitor may support S-Video, which uses
round, black multi-holed connectors. The LunchBox DV supports either type of video. If you
have both types of connectors on your camera or monitor, we recommend that you select the
S-Video connectors, as S-Video provides a superior image.
1) Plug the Camera, LunchBox DV, and Monitor into the same power strip. Make sure
the cord for the LunchBox DV is firmly and completely inserted into the socket on the
LunchBox.
2) Attach a 75 ohm video cable from the round, metallic BNC connector above the
symbol on the LunchBox DV to the "Video out" connector on the camera. If your camera
has an RCA type connector, use a BNC to RCA adapter. If you are instead using a
camera that has an S-Video capability, attach an S-Video cable from the round, black,
multi-holed connector above the
connector on the camera.
symbol on the LunchBox DV to the S-Video
3) Attach a 75 ohm BNC cable from the round, metallic BNC connector above the
symbol on the LunchBox DV to the "Video in" or "line" or "aux" connector on the monitor.
If your monitor has an RCA type connector, use a BNC to RCA adapter. If you are
instead using a monitor that has an S-Video capability, attach an S-Video cable from the
round, black, multi-holed connector above the
Video in" connector on the monitor.
symbol on the LunchBox DV to the "S-
Note: Do not attempt to attach a cable to the monitor’s antenna connection.
4. Set the monitor to the correct video input mode. Frequently, the monitor will have a
"Video" mode, or a selection for "line" or "aux", instead of the video tuner. For
example, say you have attached the cable to the monitor’s “Video 3 In” connector.
Use the monitor’s buttons or menus for “Input”, or “Line In”, to select “Video 3” as the
Input.
5. If you wish to record audio, attach an audio cable with a stereo mini-jack from the
symbol on the LunchBox DV to the “Audio Out”
audio connector above the
connector on your audio source. See the section on Audio Source, above, for
acceptable devices.
16
6. If you wish to playback audio, attach an audio cable with a stereo mini-jack from the
audio connector above the symbol on the LunchBox DV to the “Audio In”
connector on your monitor, audio amplifier, VCR, or speakers. See the section on
Audio Speakers, above, for acceptable devices.
7. You will have to indicate which type of video source you want to use on the
LunchBox DV. See How to Select Your Video Source
If you encounter any difficulties, refer to the Troubleshooting section.
The Basic Setup with Analog Video Camera
17
The Basic DV Camera Setup
When to use this setup:
When you are using a DV camera or camcorder and a monitor. This is the simplest
configuration using a DV camera, so start here if you are using a DV camcorder.
Equipment:
• Power strip
• DV Camcorder or Camera
• LunchBox DV
• Video Monitor
• Firewire cable
• One 75 ohm BNC video cable, or, one S-Video video cable
• Optional: Audio source, audio speakers, two audio cables
Please note: your monitor must support composite video, which uses either BNC or RCA
type connectors. Your monitor may support S-Video, which uses round, black multi-holed
connectors. The LunchBox DV supports either type of video. If you have both types of
connectors on your camera or monitor, we recommend that you select the S-Video
connectors, as S-Video provides a superior image.
1) Plug the Camera, LunchBox DV, and Monitor into the same power strip. Make sure
the cord for the LunchBox DV is firmly and completely inserted into the socket on the
LunchBox.
2) Attach a Firewire cable from the Firewire connector above the
symbol on the
LunchBox DV to the Firewire connector on the camera.
Note: there are two types/sizes of connectors for Firewire, 6-pin, which is used on the
LunchBox and some DV camcorders, and 4-pin (the smaller connector) which is used on
some other DV camcorders. Make sure your Firewire cable has the connector
appropriate for your camera, and a 6-pin connector for the LunchBox DV.
3) Attach a 75 ohm BNC cable from the round, metallic BNC connector above the
symbol on the LunchBox DV to the "Video in" or "line" or "aux" connector on the monitor.
If your monitor has an RCA type connector, use a BNC to RCA adapter. If you are
instead using a monitor that has an S-Video capability, attach an S-Video cable from the
round, black, multi-holed connector above the
Video in" connector on the monitor.
symbol on the LunchBox DV to the "S-
Note: Do not attempt to attach a cable to the monitor’s antenna connection.
4) Set the monitor to the correct video input mode. Frequently, the monitor will have a
"Video" mode, or a selection for "line" or "aux", instead of the video tuner. For example,
say you have attached the cable to the monitor’s “Video 3 In” connector. Use the
monitor’s buttons or menus for “Input”, or “Line In”, to select “Video 3” as the Input.
5) If you wish to record audio from an analog source (CD player, iPod®, etc.), attach an
symbol on the
audio cable with a stereo mini-jack from the audio connector above the
LunchBox DV to the “Audio Out” connector on your audio source. See the section on
Audio Source, above, for acceptable devices. If you wish you can record audio from
your DV camcorder by attaching it to the Firewire connector on the LunchBox.
18
6) If you wish to playback audio, attach an audio cable with a stereo mini-jack from the
audio connector above the symbol on the LunchBox DV to the “Audio In” connector on
your monitor, audio amplifier, VCR, or speakers. See the section on Audio Speakers,
above, for acceptable devices.
7) You will have to indicate which type of video source you want to use on the
LunchBox DV. See How to Select Your Video Source
If you encounter any difficulties, refer to the Troubleshooting section.
Basic Setup with DV Camera
19
The Recording Setup (Allows recording to video tape)
When to use this setup:
When you are using an analog video or DV camera or camcorder and a monitor, and
want to record your animation from the LunchBox DV to video tape.
Equipment:
• Power strip
• Analog or DV Camera
• LunchBox DV
• Monitor
• Video Tape Recorder
• Three 75 ohm BNC video cables, or 3 S-Video cables; a Firewire cable if using a
DV camera
• Optional: Audio source, audio speakers, three audio cables
1) Plug the Camera, LunchBox DV, and Monitor, and Video Tape Recorder (VTR) into
the same power strip. Make sure the cord for the LunchBox DV is firmly and completely
inserted into the socket on the LunchBox.
2) a) If you are using an Analog Camera: Attach a 75 ohm video cable from the round,
metallic BNC connector above the
symbol on the LunchBox DV to the "Video out"
connector on the camera. If your camera has an RCA type connector, use a BNC to
RCA adapter. If you are instead using a camera that has an S-Video capability, attach an
symbol on
S-Video cable from the round, black, multi-holed connector above the
the LunchBox DV to the S-Video connector on the camera.
3) b) If you are using a DV Camera: Attach a Firewire cable from the Firewire connector
symbol on the LunchBox DV to the Firewire connector on the DV camera.
above the
For the DV camera attachments only, see the diagram in the section on The Basic DV
Camera Setup.
4) Attach a 75 ohm BNC cable from the round, metallic BNC connector above the
symbol on the LunchBox DV to the "Video in" or "line in" or "aux" connector on the video
tape recorder. If your video tape recorder has an RCA type connector, use a BNC to
RCA adapter. If you are instead using an S-Video video tape recorder, attach an S-Video
symbol on the
cable from the round, black, multi-holed connector above the
LunchBox DV to the "S-Video in" connector on the video tape recorder.
5) Attach a 75 ohm BNC cable from the "video out" or "monitor" connector on the video
tape recorder to the "Video in" or "line" or "aux" connector on the monitor. If both your
video tape recorder and monitor support S-Video, attach an S-Video cable from the “Svideo out” connector on the video tape recorder to the “S-Video in” on the monitor,
instead of the BNC cable.
6) Set the monitor to the correct video input mode. Frequently, the monitor will have a
"Video" mode, or a selection for "line" or "aux", instead of the video tuner. For example,
say you have attached the cable to the monitor’s “Video 3 In” connector. Use the
monitor’s buttons or menus for “Input”, or “Line In”, to select “Video 3” as the Input.
20
7) Select the LunchBox DV as the source input for the VTR. Most VTRs have an
"input", "input select", or "input source" selector switch. Select "line" or "aux" or "L1". On
some VTRs, this is done by changing the channel until “line" or "aux" or "L1" appears.
8) If you are using audio, attach an audio cable with a stereo mini-jack from the audio
symbol on the LunchBox DV to the “Audio Out” connector on
connector above the
your audio source. Also attach an audio cable with a stereo mini-jack from the audio
connector above the symbol on the LunchBox DV to the “Audio In” connector on video
tape recorder. Finally, connect the “Audio Out” of the video tape recorder to the “Audio
In” of the monitor.
9) Operate as described in “Scenario 3: Saving images to video tape” on page 37.
10) You will have to indicate which type of video source you want to use on the
LunchBox DV. See How to Select Your Video Source
If you encounter any difficulties, refer to the Troubleshooting section.
The Recording Setup
21
Download From Tape setup (Allows loading frames from a video
tape)
When to use this setup:
When you are using a video tape on a VCR as the source of your images to load onto the
LunchBox DV. You might do this to load reference footage, or for motion studies. You will
not need a video camera for this setup, as the VCR is the source of the video.
NOTE: if you want to download from your DV camera’s tape, use the The Basic DV
Camera Setup.
Equipment:
• Power strip
• LunchBox DV
• Monitor
• Video Tape Recorder
• Two 75 ohm BNC video cables, or two S-Video cables
• Two audio cables
1) Plug the LunchBox DV, Monitor, and Video Tape Recorder (VTR) into the same
power strip. Make sure the cord for the LunchBox DV is firmly and completely inserted
into the socket on the LunchBox.
2) Attach a 75 ohm video cable from the round, metallic BNC connector above the
symbol on the LunchBox DV to the "video out" or "monitor" connector on the video tape
recorder. If your video tape recorder has an RCA type connector, use a BNC to RCA
adapter. If your video tape recorder supports S-Video, attach instead an S-Video cable
from the round, black, multi-holed connector above the
to the S-Video connector on the video tape recorder.
symbol on the LunchBox DV
3) Attach a 75 ohm BNC cable from the round, metallic BNC connector above the
symbol on the LunchBox DV to the "Video in" or "line" or "aux" connector on the monitor.
If you are instead using a monitor that has an S-Video capability, attach an S-Video cable
from the round, black, multi-holed connector above the
to the S-Video connector on the monitor.
symbol on the LunchBox DV
4) Set the monitor to the correct video input mode. Frequently, the monitor will have a
"Video" mode, or a selection for "line" or "aux", instead of the video tuner.
symbol
5) If you are using audio, attach an audio cable from the connector above the
to “Audio out” connector on the video tape recorder. Then connect an audio cable from
the audio connector above the
symbol to the “Audio in” connector on the monitor.
6) Operate as described in “Scenario 4: Loading images from video tape” on page 38.
7) You will have to indicate which type of video source you want to use on the
LunchBox DV. See How to Select Your Video Source
If you encounter any difficulties, refer to the Troubleshooting section.
22
The Download From Tape Setup
23
Transfer to/from Computer Setup (Allows recording to/from a
computer)
When to use this setup:
When you want to transfer your animation between the LunchBox DV and a computer.
Your computer must have a Firewire port and video editing software.
Equipment:
• Power strip
• LunchBox DV
• Firewire cable
• Monitor
• Computer with a Firewire port and video editing software
• One 75 ohm BNC video cable, or one S-Video cable
• Optional: audio speakers, one audio cable
1) Plug the LunchBox DV and Monitor into the same power strip. Make sure the cord for
the LunchBox DV is firmly and completely inserted into the socket on the LunchBox.
2) Attach a Firewire cable from the Firewire connector above the
LunchBox DV to the Firewire connector on the computer.
symbol on the
3) Attach a 75 ohm BNC cable from the round, metallic BNC connector above the
symbol on the LunchBox DV to the "Video in" or "line in" or "aux" connector on the
monitor. If your monitor has an RCA type connector, use a BNC to RCA adapter. If
you are instead using an S-Video monitor, attach an S-Video cable from the round,
black, multi-holed connector above the
Video in" connector on the monitor.
symbol on the LunchBox DV to the "S-
4) Set the monitor to the correct video input mode. Frequently, the monitor will have a
"Video" mode, or a selection for "line" or "aux", instead of the video tuner. For
example, say you have attached the cable to the monitor’s “Video 3 In” connector.
Use the monitor’s buttons or menus for “Input”, or “Line In”, to select “Video 3” as the
Input.
5) If you are using audio, attach an audio cable with a stereo mini-jack from the audio
symbol on the LunchBox DV to the “Audio Out” connector on
connector above the
your audio source. Also attach an audio cable with a stereo mini-jack from the audio
connector above the symbol on the LunchBox DV to the “Audio In” connector on
video tape recorder. Finally, connect the “Audio Out” of the video tape recorder to the
“Audio In” of the monitor.
6) Operate as described in Scenario 33: Save animation to a computer, or Scenario 34:
Record animation from a computer
7) For recording video from a computer, see How to Select Your Video Source
If you encounter any difficulties, refer to the Troubleshooting section.
24
The Transfer to/from Computer Setup
25
Two- Minute Tutorial
1) Attach your analog video camera to the
input of the LunchBox DV, using either a
BNC or S-Video cable to the appropriate connector. Make sure your camera is turned on.
If you’re using a DV camcorder, instead attach your camera to the
of the LunchBox.
2) Attach your video monitor to the
output of the LunchBox DV, using either a BNC or SVideo cable to the appropriate connector.
3) Make sure your camera, monitor, and LunchBox DV are all plugged in. For best results,
plug all three into the same power strip. Turn on your LunchBox DV (the switch is located
adjacent to the power cord) after your camera and monitor are attached and turned on.
4) After some color bars on the monitor, you should see “Select Reel #” on the LunchBox’s
or
to select the numbered Reel (or storage area) on which
small display, click
you wish to work. When you have the desired Reel selected, press the Yes (Green) key.
5) The LunchBox DV has a cluster of black keys, in the yellow area, which perform all the
basic functions. Click the
6) Click the
key. You've captured the image.
key to see the captured image. Click
7) Animate a few frames, clicking the
indicates your frame number.
again to see the live image.
key after each frame. The numeric display
key. This plays your loop at 25 fps (PAL) or 30 fps (NTSC).
8) Click the
or
9) Click the
keys to move backwards or forwards through your frames.
Advance to the last frame you shot by clicking the
key.
10) Hold down the
key for one second. The LunchBox rapidly toggles between the live
camera feed and your last frame. This is called "flip-flop" mode. Move your character to
see how this works.
11) Click the
key while in flip-flop mode. The image is instantly captured, and you are
ready to shoot again. Animate a few more frames.
12) Click
to exit flip-flop mode.
13) Hold down
14) Hold down
for one second to see your loop continuously. Click any key to stop it.
or
. You will go forwards or backwards at a faster and faster rate.
and hold it down for about 8 seconds.
15) To delete all the frames in your Reel, press
When the question “Clear Reel?” appears, press the Yes (Green) key. The No key is Red.
That's all! You've mastered the basic operation of the LunchBox DV.
26
Video LunchBox Users: LunchBox DV Summary
The LunchBox DV interface is similar to the Video LunchBox, but some changes were made with
the new features. This brief summary of operation is intended for users of the Video LunchBox.
Primary Functions
The LunchBox DV has a cluster of black keys which perform all the primary functions:
•
•
There is only one Play key,
. It can be set up for either 24fps or 30fps operation.
plays from frame 1 to the current frame, unless special in or out marks are set.
•
There is no special Flip-Flop key. The Live key,
, which toggles the video source
between "live" and "memory", can be held down to start flip-flop mode.
•
The Shoot key,
, does not switch to real-time capture when it is held down. Instead,
it can be set for several different types of capture, including audio.
•
The
and
keys move you from one image to the next, in sequence. These
keys accelerate as they are held down longer.
•
, which sets the behavior of various keys.
puts you into
There is a Setup key,
setup mode, where you indicate which key's behavior you want to modify by pressing
that key. You then choose from a list of options. When choosing from a list of options,
or
keys to see different options, then press the Yes (Green) key to
use the
select the option you wish. Press the No (Red) key to cancel Setup.
New Features
The LunchBox DV has many new features not available in the Video LunchBox:
•
: used to mark an "in-mark" and "out-mark" frame.
Mark key,
in-mark to out-mark. If there is only an in-mark,
Hold down
•
will play from the in-mark to the end.
to clear both marks.
: Each image can be held for multiple frames by increasing its "hold
Hold key,
count". Holding down
•
will play from the
resets the hold to "1".
: New frames can be inserted in a clip. Insert acts like capture, except
Insert key,
it makes room for the new frame by pushing later frames forward. If you're looking at
frame #52 and hit
become #54.
, you will create a new frame #53, and the old frame #53 will
•
: Delete an unwanted frame. Hold down this key for 8 seconds to
Delete key,
delete all images in the Reel.
•
First,
, and Last,
, keys: Go to the first or last frame of a clip with a single
keystroke. If in-mark or out-mark frames exist,
and
take you to them instead.
27
•
Shoot key,
: Can be used to capture audio (either capture a reference clip before
capturing images, or dub audio after image capture). You can also capture video at
30fps, or real-time capture of both video with an audio track. Timelapse can also be shot
using
•
.
Audio Sooner,
, and Audio Later,
: Slides the audio clip relative to the video.
New Display
The LunchBox DV has an informational display. It is organized into 4 lines:
1) Current frame info: a symbol indicating live video or stored frame, current frame number,
and hold count
2) Loop info: if they exist, the [in-frame:out-frame]
3) General info: (e.g.-- Playing 24fps…)
4) Options list: which keys can be used in this situation (e.g.-- when capturing real-time,
"Any key to stop")
Next to the display are the green "Yes" key and the red "No" or "Cancel" key. They are used in
setup or whenever the display asks a question.
Persistence
The LunchBox DV does not lose its image data when the power is interrupted. This means you
can turn the box off overnight or longer without losing any frames. It also means once you set the
box the way you like (e.g., frame rate, flip-flop rate, shoot on twos, etc), you don't need to set it
again.
Persistence means you can no longer "clear" the box by unplugging it. To clear all images and
,
for several seconds until the display asks,
audio from the box, hold down the delete key,
"Clear Reel?" Hit Yes to confirm, or No to cancel. All images and audio will be cleared, but
settings such as playback rate will remain in place.
Setup key,
key allows you to customize the behavior of the LunchBox DV. For example, to select
The
the playback frame rate:
1. hit
. Display says, "Setup which key?"
2. hit
. Display says, " Play 30fps?"
3. hit
or
to see the options. Display says, "Play 24fps?"
4. hit Yes when you see the option you want, or No to cancel the operation
Several other keys can be "setup":
1. Capture single frames
2. Capture video at 30fps
28
3. Capture audio only
4. Capture audio and video at 30fps
5. Capture timelapse
1. Slow flip-flop speed
2. Medium flip-flop speed
3. Fast flip-flop speed
1. Playback at 24fps
2. Playback at 30fps
1. Set all frames to "ones"
2. Set all frames to "twos”
3. Set all frames to "threes”
1. Step to “Live” mode after the last frame
2. Don’t step to “Live” mode after the last frame
1. Turn on monitor display of frame numbers
2. Turn off monitor display of frame numbers
1. Change the Reel being edited.
2. If you hold down this key, you select which type of video input to use (composite, S-video
or DV).
29
Frame Capacity
The LunchBox DV has 18 (PAL) or 22 (NTSC) Reels. Each Reel has a capacity of 9,999 images.
The limiting factor in terms of storage of your animation is the number of different images you
have, not the number of frames. When your whole animation is shot and played back on ones,
then the number of images and the number of frames are the same, and you have a capacity of
9,999 frames. This is over 5 ½ minutes at 30 frames per second (fps), nearly 7 minutes at 24 fps,
and over 6 ½ minutes at 25 fps (PAL model).
you can increase your frame count significantly. For example, if you
Using the Hold key
playback your animation all on twos, the capacity becomes 19,998 frames. This is over 11
minutes at 30 fps, nearly 14 minutes at 24 fps, and over 13 minutes at 25 fps. If you have poses
which are held for many frames, for example, titles or credits, you can increase your frame
capacity further.
Audio capacity is in excess of 53 minutes per Reel. The amount of audio you store does not
affect the number of images you can store.
If frame capacity is a concern for your production, remember to capture each image only once
with the Shoot key
and alter the number of frames you want it exposed with the Hold key
.
By using different Reels for different projects or different animators, you don’t have to worry about
accidentally editing the wrong Reel. Each Reel has built in interference protection. Once you start
editing a Reel, your changes only apply to that Reel and no others. In a classroom setting, 18 or
22 students can independently store and edit their respective animation.
When your LunchBox DV powers up, you will see on the display “Select Reel #”. This allows you
to choose which Reel you would like to start editing. Reels are numbered from 1 to 18 or 22.
When you are editing, in the upper right corner of the display, you will see a “#” sign followed by a
number. This indicates which Reel number is being edited.
You can begin editing a different Reel by tapping the
want to edit with
or
key twice, select the Reel number you
, and then pressing the Yes (green) key.
30
Audio on the LunchBox DV
With the LunchBox DV, you can capture audio, playback audio, and synchronize your audio and
video.
Capturing Audio
There is one audio track per Reel contained within a LunchBox DV. A capture with audio erases
any existing audio on the Reel being edited. You can either capture audio only, or real-time audio
and video. The Shoot key,
Press
, is used to capture audio, in conjunction with the Setup key,
, and in response to the question “Setup which key?”, press
.
. A series of choices
or
. Choose either “Capture Audio” or “Capture A/V
can be scrolled through using
30fps” by pressing Yes (green key) when the desired choice is on the display. If you are just
starting a new project with an audio track to which you must animate, you probably will want to
Capture Audio. If you are creating an animatic, or plan to start with keyframe animation, you
probably want to Capture A/V.
When you capture audio, the LunchBox will assume you are using the same type of device
(analog or digital) for capturing audio as your video input source. That is, if your video input
source is Composite or SVideo, the LunchBox will attempt to capture audio from the analog audio
jacks. But if your video input source is Digital Video, the LunchBox will instead attempt to capture
audio from the DV jack. If you are using DV video but want to capture audio from your portable
music player (which has analog output through the headphone jack), there is no problem mixing
analog and digital video /audio sources. Once inside the LBDV all video and audio is treated the
same. However, prior to capturing such analog audio you will have to change the video input
source to Composite or SVideo. After capturing the audio, set the video input source back to DV
to be able to continue with DV. See How to Select Your Video Source.
Audio is synchronized to the frame at which the capture was entered- i.e., if you go to frame 1000
and capture audio, the beginning of the audio clip is at frame 1000, and all the old audio is
erased, including the audio before frame 1000. Likewise, if you do a real-time A/V capture
starting at 500, all the old audio is erased, including the audio before frame 500, and the audio is
synchronized with the video at 500.
Each Reel of the LunchBox DV has a capacity of 30 minutes of audio. No matter how much audio
you capture, it will have no effect upon how many frames of video you can capture.
Note:
If you are having difficulty recording analog audio, the probable cause is that you are not using a
line-level audio source. Please see section Audio Source
Note:
If you are having difficulty recording analog audio, check what video source you are using in the
upper left hand corner of the LunchBox DV display. If the display indicates DV but you attempted
to capture analog audio, the LunchBox is expecting to hear audio over the DV input. Please see
section Audio Source
Note:
If you are having difficulty recording DVaudio,for example, from a DV camcorder, the probable
cause is that your DV camcorder may not be set to 16bit audio. Check your camcorders menu for
audio, and make sure it is set to 16 bit and not set to 12 bit or other value.
The LunchBox DV only accepts standard, 16 bit 48KHz audio.
31
Playing Audio
a clip to the final video frame in the LunchBox DV, the audio continues to play until
When you
the end of the audio clip or until another key is hit to interrupt it. If there are 100 images and you
are pointing at image 100 when you hit
, the video will play through image 100, and the audio
will continue past then. If you back up one image (or at any image prior to the last one) and
the audio will stop when the video stops advancing.
,
You can hear the audio associated with an image when you use
or
to move a single
image at a time. If an image has a large hold count (the number of frames the image is exposed,
expressed as the number following the “x” on the display), there will likely be more audio at that
image than at an image with a hold count of one. Stepping through the images one at a time is a
convenient way to check your synchronization.
Synchronizing Audio
Audio sliding lets you choose an image at which the audio clip starts. When you click Slide Audio
Sooner,
, or Slide Audio Later,
, the audio starting point shifts by one image, and the
frame number of the audio start appears on the LunchBox display. When the audio is shifted
before the beginning of the video, the frame number displayed cannot be a real one-- it is a fake
one, which gives you a sense for how far earlier the audio is.
To synchronize your audio with your video, go to the last frame using
, then press
audio is starting too late, make a rough estimate of how late (in frames), then tap
have moved the audio close to your estimate. Then press
necessary. If your audio is starting too soon, use
. If the
until you
again, and repeat the process if
instead.
When you are done using
or
and press
, you may see a “Moving Audio” message.
The length of time required for this operation is dependent upon how many frames you have.
32
Video on the LunchBox DV
Different Video Sources
The LunchBox DV has three video inputs-- an S-Video connector, a composite video (BNC)
connector, and a DV (Firewire) connector.
Operating Without a Video Source
The LunchBox DV can also be operated with no video source if you simply wish to review images
already stored in the box, or if you are getting ready to import video from a computer but the
video stream has not yet started.
How to Select Your Video Source
The LunchBox DV can accept input from analog video cameras or DV cameras. The analog
video cameras come in two types: composite video and S-Video. On each Reel within the
LunchBox, the default (if you don’t select a video source) is for composite video. If you want
to use either and S-Video camera or DV camera, you need to indicate your choice.
1) Turn on the LunchBox DV by plugging it in, and then turning on the power switch
located next to the power cable.
2) When the question “Select Reel #” appears, select the Reel (work area) you wish to
or
work in by using the
Then press the Yes (green) key.
keys to get to the Reel number of your choice.
until question “Composite Video In?” or “SVideo In?” or
3) Press and hold down the
“DV in?” appears on the LunchBox display.
4) Select the type of video input you want for this Reel with the
get to your choice. Then press the Yes (green) key.
or
keys to
5) In the upper left hand corner of the LunchBox display you will see one of the
following indicators to let you know what the video source is for this Reel:
C
S
DV
Composite Video
S-Video
Digital Video
Using Both Video Outputs
The LunchBox DV simultaneously produces both S-Video and composite video outputs. You can
use either output or you can use both at the same time for different devices. For example, you
can use two different monitors, or you can use one signal to drive your monitor and the other to
drive your VCR. The S-Video output will produce a better image than the composite output, so it
should be the preferred output for making presentations or dubbing to video tape.
33
Firewire and DV
What is DV
DV is a standard digital format for encoding video and audio. Using the DV standard the
LunchBox DV can exchange video and audio with a DV camera or a DV capable computer.
What is Firewire
Firewire, also known as IEEE-1394, is a physical medium and protocols for communication
between electronic devices.
What You Need to Know
Firewire Cables
DV cables for consumer products usually have one of two types of connectors at each end. The
larger connector used to fit on devices like the LunchBox DV is called a 6-wire connector. There
is also a smaller 4-wire connector, which is frequently found on DV cameras. Computers that
have Firewire can have a connector for either 4-wire or 6-wire. You will have to look at your
computer's Firewire connector to see which it is.
To connect two Firewire devices together you need a cable that has the right type of
connector on each end: 6-wire to 6-wire, or 6-wire to 4-wire, or 4-wire to 4-wire.
Attaching a DV Camera
You connect a DV camera to the LunchBox DV with a Firewire cable. At the LunchBox, you
will need a cable with a 6-pin connector. Check your camera to see what type of connector is
needed at the other end of the cable for your camera.
A Firewire cable can only transfer video and audio in one direction at a time, so you need to
set the camera and LunchBox DV correctly to allow DV video and audio to flow in the right
direction. If you are using the DV camera as the video source for the LunchBox DV, set the
camera to "CAMERA" or "CAM", and select the DV input on the LunchBox DV by holding
. Use the
key to get to the question “DV In?”. Then press the
down the Setup key,
Yes (green) key. When the settings are correct it may take a moment or two to establish DV
communication between the camera and the LunchBox. When the connection is properly
established you should see the current camera image on the LunchBox monitor when the
LunchBox is in "live" mode.
If you want the DV from the LunchBox to flow to the camera, set the camera to the "VCR" or
"VTR" setting, and set the LunchBox to export DV when playing by pressing
and then
the
key. Use the
key to get to the question “Export DV?”. Then press the Yes
(green) key. When the connection is properly established you should see the same image on
the LunchBox monitor and the camera’s LCD. You can then use the "record" switch on the
camera to capture video and audio from the Lunchbox onto the DV tape in the camera.
34
Attaching a Computer
Your PC must have a Firewire connection and it must have DV editing software. You can
use programs like Windows Movie Maker or Adobe Premiere. The editing software will treat
the LunchBox like a camera. On a Macintosh, you can use iMovie or Final Cut Pro.
Transferring Video TO Your Computer
To capture LunchBox video into your editing software, you will need to make sure the
LunchBox is not trying to use the Firewire connection as an input. This is accomplished by
and then the
key. Use the
key to get to the question “Export
by pressing
DV?”. Then press the Yes (green) key. You will need to set the video editing software into an
"import" mode, and "play" the clip on the LunchBox while "capturing" it on the software.
For example, using Movie Maker, click on “Capture from video device”. Then provide a name
for your file, and select the desired video quality level. In the following screen, click “Parts of
the tape manually.” (Movie Maker assumes you are playing from a camcorder’s tape). If you
on the LunchBox, you will start capturing DV in
click “Start Capture” in Movie Maker and
Movie Maker.
In iMovie you move the slider switch below the video window from the "edit" mode (scissors)
to the "import" mode (camera). You should see the same image on the LunchBox monitor
and the iMovie video window. If you click "import" in iMovie and
will start capturing DV in iMovie.
on the LunchBox, you
Note about Exporting at 24 frames per second:
DV should always be exported in 30fps mode. If you want to produce a fake 24 fps DVD you
are better off exporting as 30fps and using your movie editing or DVD software to do the
conversion. If you export DV when in 24fps mode you will still get DV on the PC, but the
resolution will suffer.
Transferring Video FROM Your Computer
To put video and audio from the PC or Mac on to the Lunchbox, you will need to make sure
the LunchBox is trying to use the Firewire connection as an input. This is accomplished by by
. Use the
key to get to the question “DV In?”. Then press the
pressing and holding
Yes (green) key. You will need to set the software into an "export" mode, and perform a
realtime capture on the LunchBox. On the LunchBox, press
followed by
to get ready
to “Capture Video 30fps” or “Capture A/V 30fps” to capture both audio and video.
Once you have done that on the LunchBox DV, in Movie Maker, click on “Send to DV
camera” and then “Next”. After processing your video for a while, Movie Maker will begin
sending the DV to the LunchBox. Keep your eye on the monitor attached to the LunchBox,
on the LunchBox to begin the capture.
and when you see the video, immediately press
When the video is done, press any key on the LunchBox.
In iMovie, you select "share" from the file menu, then select the "video camera". You should
tell it to leave at least 10 seconds for the camera to get ready, then as soon as you see the
image on the LunchBox monitor hit "Capture"
35
Repeated Transfers To/From Your Computer
DV, like any compressed digital form, does suffer generational loss every time it is
compressed. Since the LBDV stores DV uncompressed, there is loss if you bounce a clip
back and forth between the PC and the LBDV. Compression artifacts become more
pronounced every time you do this. If you do it just once or twice you should be fine, but
repeat too much and it will be visible. This means that while you should use DV to backup to
the PC for protection against loss, you should not use the PC as temporary storage between
sessions.
36
How To
Scenario 1:
Replacing a bad
frame
I accidentally hit
I was ready
1) Click the
or
2) Click the
key to back up one frame before the bad frame
3) Click the
keys until you are at the bad frame
key to overwrite the bad frame
before
Scenario 2:
Accurate
replacement or
repositioning
I need to place a character
back on my set in the same
position it was in for frame
17
1) Click the
or
keys until you are at frame 17
2) Click and hold
key to enter flip flop mode. The monitor will
flicker between the stored frame with the character in position,
and the live video feed. As the character approaches the correct
position, the flickering appears less and less.
3) If the flip-flop mode changes too slowly for you, press the
. Use
until the question asking if you
key followed by
want Fast Flip-Flop appears, and then press Yes.
1) Set up the LunchBox DV with the video tape recorder as
described in “The Recording Setup (Allows recording to video
tape)”.
2) Select the LunchBox DV as the source input for the Video
Tape Recorder (VTR). When you are successful, the LunchBox
DV image will appear on your monitor.
3) Insert a tape in the VTR and cue it as desired.
Scenario 3:
Saving images to
video tape
4) Cue the LunchBox DV to the last frame of the loop.
I want to save my animation
for future reference
6) Place a lens cap on the camera for a black leader (optional).
5) Click
to switch to a live video feed.
7) Press "RECORD" on the VTR to start the recording.
8) Wait a few moments for the VTR to finish recording a leader.
(Most VTRs don't record cleanly for the first few seconds)
. You may want to do this a few times, pausing
9) Click
between each for some black space between recordings.
10) Stop the VTR.
37
1) Set up the LunchBox DV with the video tape recorder as
described in “Download From Tape setup (Allows loading frames
from a video tape)”.
2) NTSC model only: If you have been playing back at 24fps,
temporarily change to 30fps by clicking the
the
Scenario 4:
Loading images
from video tape
I want to restore a
previously saved animation
key followed by
key. Then answer Yes to the question, “Play 30fps?”.
3) Press the
key followed by
. Use
until the
question asking “Capture Real-time A/V” appears, then press
Yes.
4) Cue the VTR to slightly before the desired segment, and press
Play on the VTR.
5) A few seconds before the desired segment, click the
on the LunchBox DV.
key
6) When you see the end of the desired segment, press any key
to stop recording.
7) See Scenario 19 for deleting any unwanted frames.
8) NTSC model only: If you had temporarily changed to 30fps
playback, change back to 24fps. See Scenario 13: Switching
Playback between 24 and 30 frames per second
1) Use the "basic setup" with an analog video camera as the
source to the LunchBox DV, or use the “basic setup with DV
camera” with a DV camera.
Scenario 5:
Shooting livemotion reference
2) Click the
or
keys until you are at the frame you
want the live action to begin. Subsequent frames will be
overwritten.
I want to shoot the mouth of
a reference actor for lipsynch
3) Press the
key followed by
. Use
until the
question asking “Capture Video 30fps” appears. If you want the
until the question asking
audio as well as video, then use
“Capture A/V 30fps” appears. Then press Yes.
4) Press
on the LunchBox DV when the actor begins to
speak the line.
NOTE: Capturing
5) When the actor finishes the line, press any key.
Audio/Video in real time
will erase previously
captured audio tracks.
NOTE: If you do not use a progressive scan camera for this
capture, individual images will appear superimposed or
appear to move when viewed. They will play back normally.
You must use a progressive scan camera for realtime capture
if you want sharp still images.
38
1) Click the
to replace.
Scenario 6:
Animating to a
live-motion
reference
I have filled the LunchBox
DV with live motion as in
scenario 4 or 5, and now
wish to animate to it.
or
keys until you are at a frame you wish
2) Press the
key for one second to let you compare the
position of your character with your reference.
3) When your character is in position, click the
up one frame.
4) Click the
frame.
key to back
key to overwrite the reference with the animated
5) Proceeding in this manner, frame by frame, replaces the live
motion reference with your animated character.
1) Place a lens cap on the camera.
Scenario 7: Key
frame animation
2) Repeatedly tap the
until the desired number of frames are
filled with a black image. If the number of frames is large, you
could place the lens cap on the camera, and follow the directions
Scenario 5, Shooting Live Motion Reference.
I want to set up key frames
first, then fill in with
additional frames
3) Use the
keyframe.
or
keys to go the frame before each
4) Shoot each key frame using the
key.
5) Fill in the other frames as usual.
1) Use the
Scenario 8:
Setting custom
loop boundaries
I have 50 frames in the
LunchBox DV, and want to
examine a cycle from
frames 10-30.
or
key to get to frame 10.
key to mark this as the loop start. You will see
2) Press the
the frame number and a “[“ symbol appear in the display.
3) Use the
key to get to frame 30.
key to mark this as the loop end. You will see
4) Press the
the frame number and a “]“ symbol appear in the display.
Note: If you omit this step, the LunchBox DV will automatically
play from the “[“ point to the last frame as you add new frames.
5) Press
to view the loop. Hold the key down for one second
to view the cycle continuously.
39
Scenario 9:
Changing a loop
boundary
I've completed Scenario 8
and have narrowed down
my problem to someplace
between frames 10 and 20
within the cycle. I want to
view only those frames now.
Scenario 10:
Erasing custom
loop boundaries
1) Use the
key to get to frame 20.
key to mark this as the loop end. You will see
2) Press the
the frame number change from 30 to 20 in front of the “]“ symbol
in the display.
to view the loop. Hold the key down for one second
3) Press
to view the cycle continuously.
1) Press the
key and hold it down for about one second,
when “Marks cleared” appears on the display. The frame numbers
enclosed by the “[ : ]” will be cleared.
I'm finished examining a
cycle, and wish to restore
the LunchBox DV to normal
operation.
1) Press the
key followed by
. Use
until the
question asking “Capture timelapse” appears, then press Yes.
Scenario 11:
Shooting time
lapse video
I want to shoot a time lapse
video of the clouds moving
by my window. I choose to
shoot a frame every 15
seconds, so 1 hour of
weather will be viewed in 8
seconds.
2) Use the
or
key to select how much you want to
speed up time. A speed up of 60X means a minute of real time
becomes a second of video. A speed up of 3600X means an hour
of real time becomes a second of video. If you want to capture
one frame every 15 seconds of real time, the speed up is 30(fps,
NTSC model) times 15 seconds, or 450X. For PAL, the speed up
is 25(fps, PAL) times 15 seconds, or 375X. After you have
selected the rate of capturing frames, click Yes. (The maximum
speed up is 50,000X, or one frame every 28 minutes; it would
take about 6 months to fill up all 9,999 images in a Reel.)
3) You can now begin timelapse recording by pressing
stop timelapse recording, press any key.
Scenario 12:
Clearing images to
start over
If you are done with a stored
animation, you can erase a
Reel’s images and audio to
start out fresh.
. To
1) Hold down the delete key,
, for about 8 seconds until
“Clear Reel?” appears on the display of the LunchBox DV.
2) Press Yes if you want to erase all frames. Otherwise press No.
Only the current Reel has frames erased.
Warning:
The Reel’s images and audio will be erased
permanently!
40
Note: NTSC model only
Scenario 13:
Switching
Playback between
24 and 30 frames
per second
I want to switch from 30 fps
playback to 24 fps, or from
24 fps back to 30 fps.
Scenario 14:
Capturing only
Audio
I want to capture an audio
soundtrack to use with my
animation, but I don’t want to
capture video at the same
time.
NOTE: Capturing an
audio track will erase
previously captured
tracks.
1) Press the
I’ve captured the audio
track, but it doesn’t
synchronize with my frames.
.
2) If you had been playing back at 30fps, you will be asked “Play
or
to see
24fps?” on the display. If necessary, use
the 24fps question. Press the Yes key if you want 24 fps
playback. Otherwise, press No.
3) If you had been playing back at 24fps, you will be asked “Play
or
to see
30fps?” on the display. If necessary, use
the 30fps question. Press the Yes key if you want 30 fps
playback. Otherwise, press No.
1) If you have already captured some frames, use the
or
key to select the frame where you want your audio to start.
2) Press the
key followed by
. Use
until the
question asking “Capture Audio” appears, then press Yes.
3) Start your audio source playing, and at the same time, press
. The frame counter increments to indicate that you are in the
process of capturing the audio.
4) When you are done recording the audio, press any key to stop
the recording. Since you have not captured video, the frame
counter will return to the frame where you started. No new frames
have been added.
1) Press
Scenario 15:
Synchronizing
audio to your
video
key followed by
to go to the last frame.
key to listen to your audio. If you cannot hear all
2) Press the
of your audio, see Scenario 16.
key. Each
2) If your audio is starting too soon, press the
time you press it, you move the starting point of your audio track
one image later than it started before.
3) If your audio is starting too late, press the
key. Each time
you press it, you move the starting point of your audio track one
image earlier than it started before.
4) Listen to your audio again. If the synchronization is better than
it was, but not just right, continue pressing the
you did before.
or
key as
41
Scenario 16:
Listening to all of
your audio
I’ve captured my audio, now
I want to hear the whole
audio track, even if it plays
for a longer time than the
frames I’ve entered so far.
Scenario 17:
Listening only to
part of your audio
I’ve captured my audio, now
I want to hear only the audio
up until the frame in the
frame counter
Scenario 18:
Inserting a frame
I forgot to capture a few of
my drawings. I want them to
go after frame 789.
Scenario 19:
Deleting a frame
I accidentally hit
I was ready
before
1) If you have captured some frames, press
frame.
to go to the last
. You can press any key to stop listening to the
2) Press
audio before it is done playing.
3) If you cannot hear the first part of your audio, you have moved
it to before the first frame of the video you are playing. You can
move the audio later in the video stream by tapping the
until you can hear the beginning of the audio.
1) Use the
or
the audio to stop.
key
to move to the frame where you want
. The video and audio will play from the beginning
2) Press
until the current frame. If the current frame is the last frame, all of
your audio will be heard, even the audio that plays after the video
has stopped playing.
1) Click the
or
keys until you are at frame 789
2) Position your first drawing underneath the camera. Click the
key. You have just inserted a frame of this drawing after
frame 789. What had been frame 790 before is now frame 791. 3)
Click
once for each frame you wish to insert.
1) Click the
or
keys until you are at the bad frame
2) Click the
key to erase the bad frame
3) You will be asked “Delete frame # ?” on the display. Press the
Yes key if you want to delete the frame. Press the No key if you
are at the wrong frame.
42
Scenario 20:
Capturing Audio
with Video
1) Click the
or
keys until you are at the frame you
want the audio and video to begin. Subsequent frames will be
overwritten.
I want to capture audio and
video to use with my
animation.
2) Press the
key followed by
. Use
until the
question asking “Capture A/V 30fps” appears, then press Yes.
3) Start your video source playing, and at the same time, press
NOTE: Capturing an
.
audio track will erase
previously captured
tracks.
4) When you are done recording the video, press any key.
Scenario 21:
Shooting on 1s, 2s
or 3s
1) Press the
key followed by
. Use
until the
question asking “Shoot Twos” appears, then press Yes.
I want all of my frames to be
shot on 2s
Warning: Changing to 1s, 2s or 3s, by pressing the Yes key
erases all previously entered holds on all frames. If you plan
to shoot on 2s or 3s, it is a good idea to make this change
when starting a new project.
1) Click the
want to hold.
or
keys until you are at the frame you
2) In the display, you will see an “x” followed by a number. The
number is the exposures that image will be held.
Scenario 22:
Increasing the
Holds (exposures)
for an image
I want to hold a credits
image for one second
3) To increase the number of exposures, tap the
key.
When you do so, the number following the “x” will increase, letting
you know the number of exposures for the image.
4) Continue to tap the
key until you reach the desired
number of frames. To hold the image for one second, tap the
key until the number of exposures is 24 or 30 (NTSC), or
25 (PAL), depending upon your selected playback rate. If you hit
the
key too many times, press and hold down the
key. The number indicating the number of exposures will
be reset to 1.
43
Scenario 23:
Removing the
Holds (exposures)
for an image
I no longer want to hold a
frame for multiple exposures
1) Click the
want to hold.
or
keys until you are at the frame you
2) In the display, you will see an “x” followed by a number. The
number is the exposures that frame will be held.
3) To decrease the number of exposures, press and hold down
key. The number indicating the number of
the
exposures will indicate 1.
1) Press
followed by
. Press
until the question
asking “Shoot Twos” appears, then press Yes.
Scenario 24:
Playback at 12fps
or 15fps
I want to playback at 12 or
15 fps.
Note: NTSC model
only
3) Press
. If you were playing back at 24fps, your effective
frame rate is now 12fps. If you were playing back at 30fps, your
effective frame rate is now 15fps.
4) To return to your original rate of playback, repeat the above
instructions, but answer Yes to the question if you want Holds on
1s.
Warning: This scenario will remove any Holds you have set
. Do not use this scenario if you wish to retain
using
your hold counts. This scenario assumes you have been
shooting on 1s.
44
1) Make sure you can have captured your audio, as described in
Scenario 14.
2) Capture the first image for your first scene using the
key.
3) If the scene runs for more than 2 seconds of audio, press the
key at least one time for each additional 2 seconds of audio.
In our example below, we will have one image for each scene,
except scene 3 which has 2 of the same images.
4) Repeat steps 2 and 3 for the first image of each scene.
5) If you have an exposure sheet, use it as a guide. Otherwise,
estimate how long, in frames, the audio for each scene lasts. In
this example, let’s say scene 1 starts at frame 1, scene 2 starts at
frame 36, scene 3 starts at frame 78, and scene 4 starts at frame
168 and ends at frame 180.
Scenario 25:
Creating an
animatic
I’ve entered my audio track
using the Scenario for
Capturing Audio. Now I want
to create an animatic
consisting of four scenes.
6) Go back to the initial frame of the first scene using the
key. Increase the holds (see Scenario 22) on this frame by
, until the hold indicator says 35, or one less than
tapping
the frame number that marked the first image of scene 2.
7) Advance to the image for scene 2 by pressing
. Increase
until the hold indicator
the holds for scene 2 by tapping
says 42, the amount of frames scene 2 lasts. It is 42 because
scene 3 starts at 78, and scene 2 started at 36.
8) Advance to the image for scene 3 by pressing
. We want
to hold scene 3 for 168-78 = 90 frames. Increase the holds for the
until the hold
first of the 2 images of scene 3 by tapping
indicator says 60. Then advance to the second image of scene 3
by pressing
once. Increase the holds for the second of the 2
until the hold indicator
images of scene 3 by tapping
says 30. Now the amount of time scene 3 lasts is 60+30 = 90.
9) Advance to the image for scene 4 by pressing
Increase the holds for scene 4 by tapping
indicator says 12 (180-168).
once.
until the hold
key to go to the end, then press the
key. If
10) Use the
your animatic doesn’t synchronize exactly, change the holds on
the frames as described in Scenarios 22 and 23.
11) If you want to replace a scene with animation, refer to the
Scenarios on deleting and inserting frames.
45
Scenario 26:
Showing the frame
number on the
monitor
I want to see the frame
number of a stored image
while standing far from the
LunchBox DV
Scenario 27:
Suppressing the
frame number on
the monitor
1) Frame numbers are visible only when viewing a stored image.
in
If the frame number is not visible on the monitor, press
case you are viewing the live video. If the frame number is still not
visible, you need to turn on the display of frame numbers.
followed by
. You will be asked if you want to
2) Press
“Show frame #?”. Press Yes in response to this question.
3) Starting the next time you move to another frame, you will see
the frame number on the monitor.
1) Press
followed by
. You will be asked if you want to
“Hide frame #?”. Press Yes in response to this question.
2) After you move to another frame, you will no longer see the
frame number on the monitor when viewing a stored frame.
I want to look carefully at the
image on my monitor. How
do I get rid of the frame
numbers?
Scenario 28:
Stopping playback
at a particular
frame
1) During playback, tap the
or
when you reach the
bad frame. Playback will stop at the frame that was playing at the
time you pressed the key.
I noticed an error in my
animation during playback.
How do I stop playback at
that frame?
Scenario 29:
Recording a
sound-track on top
of existing video
How do I record audio while
I watch my video and
improvise a soundtrack?
1) During playback, improvise your audio and record onto an
audio tape deck or camcorder.
2) Hook up this audio tape deck or camcorder as the audio input.
3) Record audio as in Scenario 14: Capturing only Audio
46
1) The number of the Reel being edited is shown in the upper
right corner of the display. To edit a different Reel number, tap
Scenario 30:
Editing a different
Reel
How do I change to the Reel
I want to edit?
Scenario 31:
Stepping into
“Live” video at the
end of frames
followed by
2) Using
or
a second time.
, select the Reel number you want to edit.
3) Press the Yes (green) key. You are now editing your selected
Reel, and its number appears in the upper right corner of the
display.
1) To make sure you “step” through your frames and show the
Live video after the last frame, press
followed by
.
2) You will be asked if you want to “Go LIVE at end?” Press the
I am doing stop motion
animation. I want to see how
my puppet currently looks
compared to the previous
few frames. How can I
rapidly step back a few
frames from the end and
then forwards, ending in
Live video?
when you are
Yes (green) key. Afterwards, anytime you tap
viewing the last frame you will view the Live video.
Scenario 32: Don’t
step into “Live”
video at the end of
frames
1) To make sure you “step” through your frames but don’t show
How can I step forwards and
keep looking at the last
frame even when I step too
far forwards?
the Live video after the last frame, press
followed by
.
2) You will be asked if you want “No LIVE at end?” Press the Yes
when you are
(green) key. Afterwards, anytime you tap
viewing the last frame you will continue to view the last stored
image. You can view the Live video by pressing
once.
47
1) Setup your equipment for the transfer. See Transfer to/from
Computer Setup (Allows recording to/from a computer)
2) To indicate you want to Play your animation out over the DV
connection, press
Scenario 33: Save
animation to a
computer
I either want to do postproduction on a computer or
do a backup for security.
How can I transfer my
animation to a computer?
followed by
NOTE: If you have been playing your animation at 24fps (NTSC
model), for ease of editing in your software it is recommended that
you Export your animation at 30fps. See Scenario 13: Switching
Playback between 24 and 30 frames per second. When you have
finished exporting to your computer, use your video editing
software to convert the animation back to 24fps.
3) You will be asked “Play 24fps?” or “Play 30fps.” Tap
until
you are asked “Export DV?”. Press the Yes (green) key. If you
previously were using DV input, an “X” will now appear in the
upper left corner of the display to indicate the DV connection is
being used for Export, and that no other input has been selected.
The next time you press
your animation will be exported.
4) Cue the LunchBox DV to the last frame of the loop.
5) On your computer, start your video editing software and get it
ready to receive DV, as if from a DV camcorder.
6) Start recording in your video editing software. At the same
time, press
on the LunchBox DV.
7) After the animation has been transferred, Stop the recording
on your computer. If you are done with all of your transfers, on the
LunchBox select your video source. See How to Select Your
Video Source.
48
1) Setup your equipment for the transfer. See Transfer to/from
Computer Setup (Allows recording to/from a computer)
2) Select a Reel for capturing the animation by tapping
twice. When the question “Select Reel #” appears, select the Reel
or
keys
(work area) you wish to work in by using the
to get to the Reel number of your choice. Then press the Yes
(green) key. If the Reel is not empty, cue the LunchBox DV to
where you want to begin recording.
3) To indicate you want to receive DV input, press and hold down
until the question “Composite Video In?” or “SVideo In?”
the
or “DV in?” appears on the LunchBox display.
Scenario 34:
Record animation
from a computer
I want to restore animation I
previously saved on my
computer. How can I
transfer my animation from a
computer?
4) Tap
until you are asked “DV In?”. Press the Yes (green)
key. The display may tell you “No video signal”, but that is OK for
now.
5) On your computer, start your video editing software and get it
ready to export the video, as if to a DV camcorder. Your software
may have an option for “Save to DV camera” or “Tape output” or
something similar.
6) Get the LunchBox DV ready to record video by tapping the
key followed by
. Use
until the question asking
“Capture video 30fps” appears, then press the Yes (green) key. If
you want to capture video and audio, instead respond yes to the
question “Capture A/V 30fps”
7) Start the export of video within your video editing software. On
the LunchBox DV, press
to begin recording.
8) After the animation has been transferred, press any key on the
LunchBox DV to end recording. If needed, stop the export on your
computer. If you are done with all of your transfers, on the
LunchBox select your video source. See How to Select Your
Video Source
49
LunchBox DV Reference
The LunchBox DV front panel has 16 push-button keys. Many keys have one function when
it is depressed momentarily, and another when it is held down. Many of the keys can also be
configured using the
key
Basic Key functions:
Setup
The Setup key allows you to change the way other keys
behave.
, it asks you which key you want to set
When you press
up. Respond by pressing the key you wish to alter.
Choices for that key are then presented on the display.
To see other choices,
or
.
To accept a choice, press the Yes (green) key.
To cancel setting up a key, press the No (red) key.
Pressing
followed by
lets you select a different Reel
or
to select a Reel, followed by the
to edit. Use
Yes (green) key. You will then be operating upon the selected
Reel.
lets you setup your video
Pressing and holding down
input source (composite, S-Video, DV).
Shoot
The shoot key advances the frame counter by one frame, and
then captures a single frame of video.
In conjunction with
,
can also be used to
Capture single frames;
Capture video frames only (30 fps)
Capture audio only;
Capture video frames and audio in real-time (30 fps);
Capture timelapse.
After you press Yes, the next time you press
, you will
capture the type of input you have selected. Subsequent to
that capture,
reverts to capturing a single frame of video.
50
Backward
The backward key displays the previous stored image. The
audio around that image is played. When the backward key is
held down, the display of images accelerates until image 1 is
displayed.
Forward
The forward key displays the next stored image. The audio
around that image is played. When the forward key is held
down, the display of images accelerates until the last frame is
displayed.
, the forward key controls whether or
In conjunction with
not the live video will be displayed after the last frame is
reached. See Scenario 31: Stepping into “Live” video at the
end of frames.
Live
The Live key toggles the LunchBox DV between displaying
the "live" video feed from the camera, and the stored frame.
"Live" camera display shows an opened square on the display
of the LunchBox DV. A closed square is displayed when
stored frames are viewed.
If the live key is held down, the LunchBox DV switches quickly
between the "live" camera input and the image stored at the
current frame number (“flip-flop” mode.) While you are in flipflop mode, you can use the shoot key to shoot the current
scene. To leave flip-flop mode, tap the
key.
, you can change the rate of flip-flop to
In conjunction with
slow, medium or fast.
You may find that the Fast flip-flop speed useful for
repositioning a fallen puppet, while the slower speeds help
during frame to frame animation.
Play
The Play key plays a loop of frames, starting at frame 1 and
ending at the current frame. The rate of playback appears on
the LunchBox DV’s display.
To play all frames, use the
and then press
key to go to the last frame,
.
A portion of frames can be played, see the
key.
If
is held down for more than one second, the playback
loops continuously until another key is pressed. To stop
playback, press any key. Playback stops immediately and
displays the frame that was shown before
was hit. You
can stop playback at an earlier frame by tapping
or
when playback reaches the desired frame.
,
changes the rate of subsequent
In conjunction with
playback to either 24 or 30 fps (NTSC model only), or allows
the DV connection to be used for Export.
51
Yes/No Keys:
Yes
No
Green Key
Red Key
When you press some of the keys, you may be asked a
question on the display of the LunchBox DV. To answer the
question affirmatively, press Yes.
When you press some of the keys, you may be asked a
question on the display of the LunchBox DV. To cancel the
action, or to answer negatively, press No.
When playing back your animation, or when recording in realtime, you can press any key to stop the playback or capture.
The No key is a good key to get in the habit of using for that
purpose.
First/Last Keys:
The First Image key takes you to the first image in your
First Image
sequence. If you have used the
to show a subloop of
will display the first image in your
your sequence,
for one
subloop. With a subloop, if you hold down
second, it will go to the first image in the LunchBox instead of
the first image in your subloop.
, the First Image key controls whether
In conjunction with
or not frame numbers appear on the display.
Last Image
The Last Image key is a quick method for displaying the last
image in your sequence so you can play the entire animation.
If you have used the
sequence,
to show a subloop of your
will display the last image in your subloop.
for one second, it will go
With a subloop, if you hold down
to the last image in the LunchBox instead of the last image in
your subloop.
52
Editing Keys:
Mark
The Mark key is used to display a subloop, or a portion of your
animation. Only this subloop will be played when you
subsequently press
.
To create a subloop, use
or
to find the frame you
.
want to serve as the start of your subloop. Then, press
In the display you will see “[“ followed by the frame number
or
to find the
which starts your subloop. Next, use
frame you want to serve as the end of your subloop. Once
. In the display you will see “]“ preceded by
again, press
the frame number which ends your subloop. From this point
, only those frames defined by your
on, when you press
subloop will be displayed on your monitor.
and
To return to the display of all of your frames, press
hold it down for one second. You will know the subloop is
gone when the “[“ and “]” and the start and end frame
numbers are no longer on your display.
Special Note:
You can have a subloop which begins at a specified frame
and plays until the end of your frames, even as you add more
frames. Simply press
specify the end frame.
for the start frame, but do not
53
Hold
The Hold key allows you to change the number of exposures,
or frames, an image is displayed. For example, a hold of 24
will display the same image for one second at 24fps.
To increase the hold count for a frame, use
or
to
view the desired frame. An “x” followed by a number in the
upper right of the LunchBox DV display shows the number of
exposures, or frames, the image is held. To increase the
once
number of exposures (or the “hold count”), tap
for each additional exposure.
To return the hold count to 1, press
for one second.
An image can be held for a maximum of 60 exposures. If you
need more than 60 exposures, you need to set the holds on
more than one image.
Using
, you can dramatically increase the storage
capacity of the LunchBox DV. Or you can easily add title
frames. Or even create an animatic.
In conjunction with
,
changes the hold count for
all images to 1s, 2s, or 3s. This can be used to “shoot on 2s,”
for example, even after you are done shooting on 1s.
Note: when you change the hold count for all frames, you
wipe out any previously entered hold counts for individual
frames.
Insert
The Insert key allows you to place additional images in
between existing images.
To insert an image, use the
or
image you want to insert after. Then press
image will be captured.
key to find the
, and an
, the
For example, if you went to image 20 and pressed
new image would come after image 20, and become the new
image 21. Images which had previously been numbered 21
and on would now be numbered 22 and on.
54
Delete
The Delete key allows you to delete the image you are
currently viewing.
, you are asked if you want to delete the
When you press
specified image number. Answer by pressing Yes or No.
If you answer yes, the image will be deleted, and all
subsequent frames will be renumbered to be less than they
were. For example, if you have 2037 frames and delete frame
2001, what was frame 2002 becomes 2001, what was frame
2003 becomes frame 2002, and so on.
To clear all images and audio from the current Reel, hold
for about 8 seconds. You will then be asked if you
down
want to Clear the Reel. Hitting Yes will delete all images and
audio from the current Reel.
Warning:
Holding down
for about 8 seconds causes the
current Reel to be cleared, or wiped clean. To erase all
your Reel’s animation, you must confirm the removal by
pressing Yes.
Audio Keys:
Start Audio Sooner
Use the Start Audio Sooner key to synchronize your audio
with your animation. If your audio is coming in too late to
match your animation, tap
.
Each time you tap it, the audio will start one image sooner
than previously. On the display of the LunchBox DV, you will
see a counter near the bottom telling you at which frame the
audio now starts.
After you have moved the audio to your satisfaction, test the
synchronization by pressing
Start Audio Later
.
Use the Start Audio Later key to synchronize your audio with
your animation. If your audio is coming in too early to match
your animation, tap
.
Each time you tap it, the audio will start one image later than
previously. On the display of the LunchBox DV, you will see a
counter near the bottom telling you at which frame the audio
now starts.
After you have moved the audio to your satisfaction, test the
synchronization by pressing
.
55
LunchBox DV Display
The LunchBox DV has an informational display. It is organized into 4 lines:
1) Current frame info: a symbol indicating live video or stored frame, current frame number,
and hold count. In the upper right corner of the display, you will see the current Reel number.
In the upper left corner of the display, you will see either “C”, “S”, or “DV” indicating what the
video source is for this Reel. An “X” may appear here when you are Exporting DV.
2) Subloop information: if they exist, the [in-frame:out-frame] as set by
3) General information: (e.g.-- Playing 24fps…)
4) Options list: which keys can be used in this situation (e.g.-- when capturing real-time,
"Any key to stop")
Next to the display are the green "Yes" key and the red "No" or "Cancel" key. They are used in
Setup or whenever the display asks a question.
56
LunchBox DV Messages
Dubbing Audio
What it means: The LunchBox DV needs to make sure that your video and audio are
precisely synchronized. After you have completed a series of editing operations that might affect
this synchronization, the message "Dubbing audio" may appear indicating the audio and video
are being resynchronized.
What you can do: This message appears very briefly, usually just flashing on the display
for a moment.
Cleanup in progress
What it means: Sometimes, the LunchBox DV performs maintenance on its hard drive to
insure it is operating at peak efficiency. This operation is done when the LunchBox DV powers
up. It is only done when necessary, following a session in which insertion and deletion operations
were performed. When this maintenance operation is performed at power up, the message
“Cleanup in progress” appears on the display.
What you can do: You can either wait for the cleanup to finish, or you can begin using
the LunchBox DV and terminate the cleanup. If you choose to use the LunchBox before it finishes
its cleanup, the next time you power up, the LunchBox will again try to complete the cleanup. If
you repeatedly terminate the cleanup before it is done, you may eventually notice that playback
of your video may pause where it shouldn’t. If this happens, turn the LunchBox off and then on
again, and wait for the cleanup to finish. The playback pauses will no longer appear.
Depending upon how many inserts and deletes you performed, and where in the frame sequence
they were done, the cleanup operation may take several minutes.
Select Reel
What it means: There are at least 18 Reels on your LunchBox, each of which can be
edited independent of the others. You need to indicate which Reel number you wish to edit
before you can begin animating.
What you can do: Use the
or
key to indicate which Reel you wish to edit.
When the display shows the number of the Reel you want, press the Yes (green) key. You will
then be editing the Reel you have selected.
57
Troubleshooting
The LunchBox DV appears dead-- no display, no fan
1) Check the power cord-- it must be securely and completely inserted into the
socket on the left side of the LunchBox DV. It’s a stiff fit, so please check this
first.
2) Check the electrical outlet-- attach another device to it to make sure it is
working
3) Check that you turned on the power switch. It is located adjacent to the power
cord’s socket.
3) Contact Animation Toolworks for help!
I have no video output and when the LunchBox DV starts.
Something is wrong with the video input:
1) Make sure the analog camera or video source is connected to the
connector. If you are instead using a DV camcorder, attach it to the connector
above the
.
2) Wiggle the cables. If the video flickers, replace the cable.
3) Make sure the camera power is on and the camera is producing a signal. You
can check the camera by attaching it directly to the "video in" on the monitor.
4) Select the video source you want for the Reel you are using by pressing
or
key to select SVideo input,
and holding it down. Use the
Composite input, or DV input, then press the Yes key.
5) The LunchBox DV will not work reliably with a tube based video camera (for
example-- a surveillance camera that is more than 10 years old). Use a CCD
based camera (any modern camcorder or video camera). Contact Animation
Toolworks for a recommendation.
The live-mode video disappears after a few minutes
Some camcorders turn themselves off after a few minutes. Check the camcorder
manual to see if you can disable this feature. With some cameras you disable this
feature by removing the video tape.
The LunchBox DV display is on, but there is no video on the monitor
1) Check the cable between the LunchBox DV and the monitor. It should connect
to the
connector on the LunchBox DV, and the "Video In" or "Line"
connector on the monitor. It should not be connected to the "Antenna" or
"CATV" or "Cable" connector on the monitor.
58
2) Make sure the connections are securely attached. Wiggle the cable between
the LunchBox DV and the monitor. Replace the cable if the video flickers. Turn
the LunchBox DV off and then on, causing the LunchBox to search for the
video source again.
3) Most Common Problem: Make sure the monitor is set to accept its signal
from the "Video In" or "Line" connector. This may involve going into the
monitor’s program mode and selecting the input source for the monitor.
The video source you need to select will usually be called "line" or "aux".
Other monitors have a "Video" mode switch which switches between the
video jack and the internal TV tuner.
The LunchBox DV does not seem to work with my S-Video camera
Select the video source you want for the Reel you are using by pressing
holding it down. Use the
Yes key.
or
and
key to select SVideo input, then press the
I get the “no DV signal” message, and cannot see a live DV image
DV cameras sometimes have difficulty establishing communications with
computers or the LunchBox DV.
1) Make sure the firewire cable is connected and seated completely
2) Make sure the camera has power
3) Make sure the camera is set to a camera mode, and not "VCR" mode
4) If all above are correct, cycle the power on the camera
Playback sometimes pauses, or seems to get “stuck” for a while
1) This symptom may occur following several insertions and deletions of frames. If
so, the LunchBox DV needs to insure that its hard drive is operating at peak
efficiency.
(a) Turn the power switch to the LunchBox DV off for a moment.
(b) Turn the power switch to the LunchBox DV back on.
(c) If the message “Cleanup in progress” appears, wait until it is done. The
pauses should be gone.
The video output has a line or ripple moving slowly up or down the
screen
1) All video equipment used with the LunchBox DV should be connected to the
same branch circuit. The easiest way to do this is to have the camera,
monitor, LunchBox DV, and the Video Tape Recorder (VTR) all share a
common power strip.
59
2) Keep video cables as short as possible. Replace long, coiled up cables with
shorter cables.
3) Try moving video cables and power cables which drape across different pieces
of video equipment.
5) Try moving components which are close to each other. Move the LunchBox DV away
from the monitor, or move the monitor away from the VTR.
Some stationary objects on camera appear to move between frames
1) Your camera is compensating for varying light levels by changing the exposure
time. If your camera lets you disable the automatic exposure compensation,
try the manual exposure instead.
2) The contrast of the image is different than the previous image. With many
video monitors this will cause the image to grow or shrink slightly, making it
seem like objects at the edge of the screen are moving. A different monitor
may reduce the problem.
I cannot hear any audio on playback
1) You must be playing audio from a line-level audio source to record onto the
LunchBox DV. A microphone is usually not line level. An amplifier or a
camcorder usually output line level audio.
2) You must be using powered audio speakers. Headphones will not work. If on
playback you can very faintly hear the audio, your speakers are probably not
powered and are not amplifying the audio.
3) Try turning the volume on your audio source up near its maximum, and try
capturing audio again.
4) Check your audio cables. Where they plug into the LunchBox DV, they should
be stereo mini jacks. Stereo mini jacks have two circular grooves on the metal
connector, while mono jacks have only one groove.
5) If you are having difficulty recording analog audio, check what video source you
are using in the upper left hand corner of the LunchBox DV display. If the
display indicates DV but you attempted to capture analog audio, the LunchBox
is expecting to hear audio over the DV input. Please see section Audio
Source
My audio on playback is out of order
1) The audio source when you recorded the audio was probably from a DV
camcorder. Some cameras offer both 16 bit 48Khz, and 12 bit audio. The
LunchBox DV only accepts DV audio that is 16 bit 48KHz. Make sure your DV
camcorders settings are for 16 bit audio, then record your audio again.
60
Audio scrubbing (hearing pieces of audio as you step through the
frames) has stopped working.
1) Check your audio output cable at both ends, it may have come loose.
2) This symptom may occur following numerous insertions and deletions of
frames. If so, the LunchBox DV needs to insure that its hard drive is operating
at peak efficiency.
(a) Turn the power switch to the LunchBox DV off for a moment.
(b) Turn the power switch to the LunchBox DV back on.
(c) If the message “Cleanup in progress” appears, wait until it is done. Audio
scrubbing should be restored.
The video image is grainy; there are speckles in the dark regions
Your camera doesn't have enough light:
1) Open the aperture on the lens
2) Chose a slower exposure time if your camera has manual exposure
3) Use more lights
61
When I press
, nothing happens
plays from the first frame to the frame number on the display of the LunchBox
DV.
1) Check which frame you are on. Make sure it is not frame 1. If you are on frame
1,
will play from frame 1 to frame 1, making it appear as if nothing is
happening. Move to a different frame and try
again.
2) Look at the display of the LunchBox DV. If there is a question on the display, hit
the No (red) button, then try
again.
3) Look at the display of the LunchBox DV to see if Marks have been set correctly.
If you are unsure, hold the
again.
key down for at least one second, then try
Stored images appear to “move,” or have two images superimposed.
It is likely that you previously performed a realtime capture of video or audio and
video. If so, the camera used during the realtime capture did not have
progressive scan, or the progressive scan feature was turned off. Progressive
scan is a feature in some cameras which allow the whole image to be captured
at once, unlike other cameras which make two passes to capture the frame.
There is nothing wrong with your LunchBox, and these images will play back
normally. The only way to eliminate this is to use a camera that has the
progressive scan feature.
62
LunchBox DV Specifications
Model LBDV4000N
Playback: 24 or 30 fps, single step forward/backward
Video Input: NTSC Composite or S-Video (e.g., a camera, video tape player, or computer
NTSC output device), or DV over IEEE1394 (Firewire) link
Video Digitization: analog video digitized at 720x485 active pixels/ frame
(ITU
BT.656 Y:Cr:Cb 4:2:2)
Video Output: NTSC Composite or S-Video NTSC (e.g., monitor, video tape recorder, or
computer NTSC input device) or DV over IEEE1394 (Firewire) link
Video Connectors: NTSC Composite via BNC in, BNC out. S-Video via 6pin DIN in,
6pin DIN out. DV via 6-wire IEEE1394 (Firewire)
Realtime capture: 30 fps
Output modes: single frame; playback of frames; live input feed; 3 speed Flip-Flop
between single frame and live input feed
Image Hold Capacity: up to 60 per image
Audio Connectors: audio in via 1/8" (3.5mm) stereo mini-phono plug, audio out via 1/8"
(3.5mm) stereo mini-phono plug
Audio Signal: Standard audio line level (~1V P-P). 16-bit, 48KHz stereo sample rate
Video Capacity:
Audio Capacity:
22 Reels of 9,999 = 219,978 images
22 Reels of 30 minutes each = 11 hours
Electrical Input: 100-240V AC, 50/60Hz
Size: 9 7/8"x7 3/8"x4 3/4" (25x19x12 cm.)
Weight: 5 ¾ lb. (2.6 kg)
Warranty: 12 months
63
Limited Warranty
Note: Peripheral products (e.g., video cameras, video monitors, lenses, etc.) not
manufactured by Animation Toolworks are warranted separately by their manufacturers.
Warranty and service information for these products accompanied them at the time of
delivery.
Animation Toolworks, Inc. warrants the LunchBox DV against defects in material or
workmanship. Warranty duration for the LunchBox DV is one year from the date of
purchase. Animation Toolworks will repair, or at our option, replace any part that
becomes defective.
Conditions:
• If you need to ship the LunchBox DV, please pack it in its original carton, and
send it prepaid and insured, to
Within the US:
Animation Toolworks, Inc.
Production Department
3 Hazel Street
Hood River, OR 97031
USA
Outside the US:
ship to your local dealer
• Proof of the date of purchase is the burden of the product owner.
• This Warranty only applies for products under normal use.
• This Warranty only applies to the original purchaser. The warranty is not
transferable.
• Replacement parts supplied under this Warranty carry the unexpired portion of
the original Warranty.
• The liability of Animation Toolworks, Inc., if any, and purchaser’s exclusive
remedy for damages, shall not be greater than the actual purchase price of the
product with respect to which such claim is made. In no event shall Animation
Toolworks, Inc. be liable for any special, indirect, or consequential damages of
any kind.
What is not covered by this limited warranty:
• This Warranty does not apply to any part(s) of the LunchBox DV that have
been installed, altered, repaired, or misused, or if serial numbers have been
altered or removed.
• Damage due to an external electrical fault
• Damage due to severe operating conditions
• Damage due to accident
• Damage to or loss of any data, or costs of recovering such data
• Data loss that may occur during repair or replacement
• Normal cosmetic and mechanical wear
64
Index
2
24 fps, 35, 41, 48
3
Capturing
Audio/Video, 43
Capturing a frame. See Shoot key
Capturing Audio, 31
Cleanup in progress, 57
Clearing all contents, 40
Computer, 24, 35, 36, 48, 49
Connections. See Attaching Components
Connectors, 15, See Attaching Components
30 fps, 41
D
A
Animatics, 45
Animating
Key frame, 39
to a live-motion reference, 39
Attaching Components
Basic Analog Camera, 16
Basic DV Camera, 18
Recording, 20, 24, 37, 48, 49
Selecting Video Source, 33
Audio, 31
Analog source, 31
Capturing, 41
from analog source, 13
from DV source, 31
Listening to all, 42
Listening to part, 42
Playback, 42
Recording soundtrack, 46, 47
Audio & Video
Capturing, 43
Audio scrubbing, 61
Audio Source, 13
Audio Speakers
Choosing, 13
B
Deleting all contents, 40
Deleting frames, 42
Dubbing Audio, 57
DV, 34
E
Erasing all contents, 40
Export, 35, 48
Exposures
Decreasing, 44
Increasing, 43
F
Firewire, 34
Flip-Flop
Repositioning, 37
Forward key, 52
Frame Capacity, 30
Frame Numbers
On screen, 46
Frames
Replacing, 37
G
Basic Operation, 26, 27
Generational Loss, 36
C
Cables
Choosing, 12, 13
Connecting. See Attaching Components , See
Attaching Components
Camera
camcorders, 10
Choosing, 10
Lenses, 10
Capturing
Audio, 41
H
Holds
Decreasing, 44
Increasing, 43
How to clean the LunchBox Sync, 9
How to Select Video Source, 33
humidity, 9
65
I
Inserting frames, 42
Intervalometer, 40
K
Key frame animation, 39
L
Live video, 47
Live-motion reference, 38
Loading frames from video tape. See Attaching
Components:Download, See Attaching
Components:Download
Loading images from video tape, 38
Loop boundaries
Changing, 40
Erasing, 40
Setting, 39
M
Monitor
Choosing, 11
O
Operating Conditions, 9
Overwriting frames. See Replacing a bad frame
P
Persistence, 28
Playback
12 or 15 fps, 44
Audio, 42
On 1s, 2s, 3s, 43
Stopping at a frame, 46
Switching frame rate, 41
Troubleshooting, 59
Playing Audio, 32
Power Strips, 14
Progressive scan, 62
Protect Your Animation, 4
R
Real-time capture, 38
Recording to video tape
Saving images, 37
Reel, 26, 29, 30, 31, 47, 50, 57
Replacing a bad frame, 37
Repositioning, 37
RS232 Port, 14
S
Select Reel, 57
Serial Port, 14
Setup, 50
Setup key, 28
Shoot key, 50
Shooting
On 1s, 2s, 3s, 43
Specifications, 63
Stepping into “Live”, 47, 51
Subloops, 39, 40
S-Video, 10, 11, 12, 16, 18, 20, 22, 24, 26, 33
Troubleshooting, 59
Synchronizing Audio, 32
Synchronizing Audio & Video, 41
T
temperature, 9
Time lapse, 40
Trouble Shooting
Play does nothing, 62
Troubleshooting, 58
No audio, 60
No video on monitor, 58
Tutorial. See Basic Operation
V
VCR, 20, 22, 37, 38
Video, 33, See Troubleshooting
Operating Without a Video Source, 33
Order of Turning on Components, 33
Using Both Video Outputs, 33
Video LunchBox Users. See Basic Operation
Video Tape. See Recording to video tape
W
Warranty, 64
X
X, 43, 44
66