1
CruzPro
VAF110
AC Volts, Amps,
Frequency, kW Monitor
Table of Contents
Introduction . . . . . . . . . .
. . . . . . . . . . . . . . . . . . 3
Specifications . . . . . . . . . . . . . . . . . . . . . . . . . . . 4
Installation . . . . . . . . . . . . . . . . . . . . . . . . . . . . . .5
Operation . . . . . . . . . . . . . . . . . . . . . . . . . . . . . . .7
Key Functions . . . . . . . . . . . . . . . . . . . . . . . . . . . 7
Turning Alarms ON/OFF . . . . . . . . . . . . . . . . . . . . 7
Backlight Intensity . . . . . . . . . . . . . . . . . . . . . . . . 7
Display Volts/Amps/Frequency/kW . . . . . . . . . . . . . . 7
Setting High Volts Alarm . . . . . . . . . . . . . . . . . . 8
Setting Low Volts Alarm . . . . . . . . . . . . . . . . . 8
Setting High Frequency Alarm . . . . . . . . . . . . . . . . 8
Setting Low Frequency Alarm . . . . . . . . . . . . . . . . 8
Setting High Kw Alarm . . . . . . . . . . . . . . . . . 9
Calibrating the Voltmeter . . . . . . . . . . . . . . . . . . . . . 9
Auto-Zeroing the Ammeter . . . . . . . . . . . . . . . . 10
Calibrating the Ammeter . . . . . . . . . . . . . . . . . . . . . 10
Calibrating Frequency . . . . . . . . . . . . . . . . . . . . . 10
NMEA 0183 Sentences . . . . . . . . . . . . . . . . . . . . 11
Selecting NMEA 0183 or Generator On/OFF . . . . . . . . 11
Notes and Warnings . . . . . . . . . . . . . . . . . 12
Other CruzPro Products . . . . . . . . . . . . . . . . . . .
2003 BV Engineering
http://www.cruzpro.com
Page 2
16
VAF110AC
Made in New Zealand
Introduction
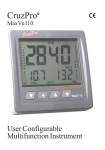
The CruzPro VAF110 provides accurate digital metering for AC
Volts, Amps, Frequency and Kilowatts. Low/High Voltage,
Low/High Frequency and High KW alarms are easily set. When
activated, the built-in 85 dB alarm will sound and the display will
flash the out-of-limit condition.
Volts can be displayed from 90 to 300 VACRMS. Amps can
be displayed from 0 to 150 amps. Killowatts are displayed from
0.0 to 45.0 kW in tenths.
The VAF110 outputs standard NMEA 0183 serial data sentences of AC volts, amps, frequency and kW. If the NMEA
0183 serial data is not required, then this output line can be
programmed to turn off a faulty generator.
Five levels of backlighting can be selected and the backlights can
be remotely turned ON/OFF. All set-up, calibration and alarm
values are saved to non-volatile memory. The VAF110 comes
complete with voltage and current transformers and is factory
calibrated to read within 1%. The large LCD display draws only
.035 amps and only .055 amps with full backlighting.
The VAF110 is powered with a power source of 9.5 to 33.0
VDC and transient protected.
Page 3
Specifications
Power supply: 9.50 to 33.00 VDC, .037 amps nominal
Operating temperature: 32 to 122 F ( 0 to 50 C)
Size: 4.3" x 4.3” x 3.5” deep (110 x 110 x 89 mm).
Display Data: AC Volts, AC Amps, Frequency, Kilowatts
Resolution: 1 VAC, 1 amp, 0.1 kW
Accuracy: Better than 1% for volts and 2% +/-1 digit for
amps, .05% for frequency. Volts, amps, frequency all front
panel adjustable.
Ranges: 90 to 300 VAC
0 - 150 Amps AC
30 - 100 Hz
0 - 45.0 kW
Supplied Transducers:
Voltage and Current transformers
Alarms: High/Low Voltage, High & Low Frequency, High kW
Display: 4 digit LCD, 5 levels of backlighting.
NMEA 0183: $IIXDR,U,xxx,V,VAF30,*CS for Volts
$IIXDR,I,yyy,A,VAF30,*CS for Amps
$IIXDR,F,zz.z,H,VAF30,*CS for Frequency
$IIXDR,G,aa.a,,VAF30,*CS for Kw
Generator Control: NMEA 0183 line programmable as
automatic generator shut-down control if generator volts/frequency/kW out of range.
Page 4
Installation
Before starting the installation, please read this entire section
first.
Finger tighten the screws that mount the instrument
bracket - It is not necessary or recommended to use tools.
l Drill a 2-1/8" (55mm) mounting hole where you desire to
mount the instrument (Figure 1).
l Connect the various wires from Cable 1 and Cable 2 as
shown in Figures 2 and Figure 3.
l Carefully check all your wiring against figures 2 and 3 and
then mount the instrument in the hole. Use only finger tension
to tighten the bracket hold-down nuts
Figure 1
Page 5
Figure 2
Figure 3
Page 6
Operation
Key Functions
V, A, F and Q) keys are used to select
The t, :, s and Q (V
what to display, set backlight levels, calibrate volts/amps/
frequency, turn alarms on/off, set alarms and set/change
constants. New information is automatically saved to nonvolatile memory.
Turning Alarms ON/OFF
Press the s key 1/2 second to turn alarms ON. In Voltage mode,
the alarm icon will light. Press the t key 1/2 second to turn
the alarms OFF.
Backlight Intensity
Press : the key 1/2 second to adjust the backlight level for
night viewing. Each time you press the : key 1/2 second, the
level will get brighter 1, 2, 3, 4, OFF, 1, 2, ... etc. The blue
backlight ON/OFF control wire in cable #2 must be switched
to +12/24V for the backlights to work.
Display Volts/Amps/Frequency/kW
Quick press the V, A, or F key to select Voltage, Amps or
Frequency display. To display Killowats, press the V and A
keys simultaneously.
Page 7
Setting High Volts Alarm
While viewing Volts, press and hold the s key for ten (10)
seconds until you hear a long beep. The High Volts alarm value
will be displayed. Use the t and s keys to set the desired alarm
value. Press the : key to save the High Volts alarm value to
memory.
Setting Low Volts Alarm
While viewing Volts, press and hold the t key for ten (10)
seconds until you hear a long beep. The Low Volts alarm value
will be displayed. Use the t and s keys to set the desired alarm
value. Press the : key to save the Low Volts alarm value to
memory.
Setting High Frequency Alarm
While viewing Frequency, press and hold the s key for ten (10)
seconds until you hear a long beep. The High Frequency alarm
value will be displayed. Use the t and s keys to set the desired
alarm value. Press the : key to save the High Frequency alarm
value to memory.
Page 8
Setting Low Frequency Alarm
While viewing Frequency, press and hold the t key for ten (10)
seconds until you hear a long beep. The Low Frequency alarm
value will be displayed. Use the t and s keys to set the desired
alarm value. Press the : key to save the Low Frequency alarm
value to memory.
Setting High Killowatts Alarm
Press the V and A keys simultaneously to view the kW
display. While viewing kW, press and hold the s key for ten
(10) seconds. You will hear a beep and the High kW alarm
value will be displayed. Use the t and s keys to set the
desired alarm value. Press the : key to save the High kW
alarm value to memory.
Calibrating the Voltmeter
The VAF110 is calibrated at time of manufacture, but can be
calibrated using the front panel keys. To calibrate the voltmeter,
press and hold the V and Q keys for 10 seconds (until you
hear a long beep) to enter into voltage calibration mode. Use
the t and s keys to make the displayed value read correctly.
Press the : key to save the calibration data to memory.
Page 9
Auto-Zeroing the Ammeter
Press the A key to display amps. Then press and hold the A
key for 10 seconds (until you hear a long beep) to auto-zero the
ammeter.
Calibrating the Ammeter
To calibrate amps, press and hold the A and Q keys for 10
seconds (until you hear a long beep) to enter into amps calibration
mode. Pass a known amount of current through the current
transformer (CT) and use the t and s keys to make the
displayed value read correctly. Press the : key to save the
calibration data to memory. A reasonably high value of current
should be used (30 amps minimum) to obtain an accurate
calibration.
Page 10
Calibrating Frequency
To calibrate frequency, press and hold the F and Q keys for
10 seconds (until you hear a long beep) to enter into frequency
calibration mode. Using a known frequency, press the t and
s keys to make the displayed value read correctly. Press the
: key to save the calibration data to memory.
NMEA 0183 Sentences
The VAF110 outputs serial data of voltage, amps, frequency
and kW in NMEA 0183 format. The sentences are output in
the following formats:
Volts:
Amps:
Frequency:
kW:
$IIXDR,U,xxx,V,VAF30,*CS
$IIXDR,I,yyy,A,VAF30,*CS
$IIXDR,F,zz.z,H,VAF30,*CS
$IIXDR,G,aa.a,,VAF30,*CS
*CS = Check Sum
Selecting NMEA 0183 or External Alarm Output
The NMEA 0183 serial data line can be programmed to
function as an external generator cut-off switch. In this way
the generator can be shut down automatically if the voltage
or frequency falls outside the alarm ranges set by the user.
Page 11
To toggle the data line between NMEA 0183 and Generator
Shut-Off, press and hold down both the t and s keys for 10
seconds (until you hear a long beep). The new output mode
is automatically saved to memory. A 5V signal in series with
270 ohms (10 mA Max.) is output to the generator shut-down
circuitry whenever an alarm condition exists and the alarms
are enabled (armed).
Notes and Warnings
a) During calibration or setting of alarm values, pressing and
holding down the t or s keys will cause the values to scroll
faster the longer you hold down the keys.
Page 12
Notes
Page 13
Notes
Notes
Other CruzPro Products
l
l
l
l
l
l
l
l
l
l
l
l
l
l
l
l
l
l
l
l
l
l
l
l
l
l
Depthsounders/w Keel Offset, Deep/Shallow/Anchor Drag Alarms
PC Based DSP Fishfinder for Windows98, NT, SE,XP, 2000
Speed/Temperature/Logs
Digital DC Volts Gauge/w Alarms
Digital DC Volts Gauge/w Alarms for 3 Battery Banks
DigitalAmpsGauge
DCVolts/Amps/Amp-HourMonitors
AC Volts/Amps/Freq/kW Monitors
LPG/Petrol Gas Detectors/Alarms
Bilge Water Alarms/w Stainless Steel Water Sensor
Intelligent Bilge Pump Controllers/w Stainlesss Steel Water Sensors
IntelligentWindlassController/ChainCounters
Digital Fuel Gauges & Fuel Consumption Calculator
Digital Tank Level Gauges for 1 or 3 Tanks /w Separate Alarms
Smart 4 step Alternator Regulator
Marine Security System/w Reliable Intrusion Sensors
RPM/EngineHours/ElapsedTimeGauges/wAlarm
Digital Engine Temperature Gauge/w Alarms
Digital Oil Pressure Gauge/w Alarms
Digital Temperature Gauges for 1 or 3 Areas /w Alarms
Digital Clock/Watch/Race Timers/w 8 Alarms
8 and 16 Amp Light Dimmers / Motor Speed Controller
Solar Panel Charge Controllers 6/8/9 & 20 Amps
4 & 8 Channel NMEA Combiners/RS-232 Convertors
Engine/ExhaustTemp.Monitor&DigitalPyrometer
NMEA 0183 Remote Data Repeater/w 4 Input Channels
email: [email protected]
website: www.cruzpro.com