1
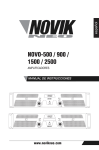
USER MANUAL BELAZ Parts Electronic Catalogue
1.
2.
3.
PROGRAM FEATURES ........................................................................................................... 3
SOFTWARE AND HARDWARE REQUIREMENTS................................................................. 4
INSTALLATION OF PARTS CATALOGUE ............................................................................. 5
3.1. STEP 1 «CHOOSING LANGUAGE OF INSTALLATION»
5
3.2. STEP 2 «W ELCOME»
5
3.3. STEP 3 «SELECTING TYPE OF INSTALLATION»
5
3.4. STEP 4 «CHOOSE DESTINATION LOCATION»
6
3.5. STEP 5 «SELECTING PROGRAM GROUP»
6
3.6. STEP 6 «READY TO START INSTALLATION»
7
3.7. STEP 7 «INPUT OF THE PASSWORD AND COPYING THE FILES»
7
3.8. STEP 8 «FINISH OF INSTALLATION»
7
4. WORKING WITH PARTS CATALOGUE ................................................................................. 8
8
4.1. START THE PROGRAM
4.2. HOW TO CHOOSE SYSTEM SETTINGS
8
4.3. REVIEW OF VEHICLE TYPES AND MODELS
10
4.3.1. Selecting vehicle type
10
4.3.2. Selecting vehicle model
10
4.3.3. Review of technical specification and manuals
10
4.4. PARTS CATALOGUE
12
4.4.1. Catalogue interface
12
4.4.2. Choosing unit or part
12
4.4.2.1. Choosing from the tree of units and parts ............................................................. 13
Searching in tree .........................................................................................................................13
Tree sorting .................................................................................................................................14
4.4.2.2. Choosing on the image ......................................................................................... 14
Hints of image review ..................................................................................................................15
4.4.2.3. Selecting in the list of units and parts .................................................................... 16
4.4.2.4. Searching required part......................................................................................... 17
4.4.3. Parts bookmarks
19
4.4.4. Reviewing information about the part
19
4.4.5. Printing of unit image
20
4.4.6. Reviewing unit operation and repair manuals
21
4.4.7. How to see all instructions related to the model
22
4.4.8. Part ordering system
22
4.4.8.1. Order composing................................................................................................... 23
4.4.8.2. How to create a customer ..................................................................................... 24
4.4.8.3. How to create an order.......................................................................................... 24
4.4.8.4. Creating an order based on an existing order. ...................................................... 24
4.4.8.5. Sorting orders........................................................................................................ 24
4.4.8.6. Order type/status................................................................................................... 25
4.4.8.7. Assigning current date to the order ....................................................................... 25
4.4.8.8. Adding chosen part or unit to the order ................................................................. 25
4.4.8.9. Manual input of order items................................................................................... 26
4.4.8.10. Reviewing and editing of the orders composed..................................................... 26
How to use Database Navigator ..................................................................................................27
4.4.8.11. Sending an order by Email .................................................................................... 27
Email properties...........................................................................................................................28
Instructions to mailing services for MAPI-compatible mailing system (in Windows systems)........28
5.
Profile Creation
28
Installation of mailing services
29
4.4.8.12. Export of order ...................................................................................................... 29
4.4.8.13. Order import .......................................................................................................... 30
4.4.8.14. How to send an order by fax ................................................................................. 30
4.4.8.15. How to print an order............................................................................................. 30
CONTACTS ............................................................................................................................ 32
Program features
1. Program features
The Program of BELAZ Parts Catalogue includes the following features:
! Model Range Catalogue
# List of vehicle models being in production, shown by sections.
# Illustrations on each model.
# Technical specifications of each model.
# Manuals on:
$
$
$
$
$
Maintenance and Lubrication Schedules
Operation
Assembly / Disassembly
Safety Regulations
Vehicle controls
! Parts Catalogue
# Quality colorful isometric images of parts and units providing clear vision of
parts and units on the monitor screen.
# Structured information on vehicle components (i.e. possibility to see the
contents of each unit), that lets “disassemble” the vehicle into units, units – in
parts and components, etc.
# Information about the components is shown in three ways:
$
$
$
Tree of units and parts (structured information, “assembly / disassembly feature).
Marks located on the image.
List of marks with numbers and names of the parts, indicating quantity of the parts
included into the unit.
# Part search system, both on part number and on part name; it’s enough to
know several digits or letters, to allow the program to show you the list of parts
and images, where required part is shown; you will be able to see the image
and locate the part on it at once.
# Printing of a page from the Catalogue including the list of the parts chosen.
# Parts ordering system
$
$
$
$
$
$
$
$
Provides faultless input of information with automatic indication of additional data – to
facilitate search of interchangeable parts and units.
Maintaining Customer Database.
Keeping of Database of the orders (creation, deletion, revision, edition) for a group of the
customers.
Order performance control system.
Printing of the order, thus meaning possibility to send the order by fax.
Export of the order to a text file like MSWord or Excel
Sending of the order by e-mail or copying on a disc if e-mail is not available.
Application of General Parts Search System.
3
Software and hardware Requirements
2. Software and hardware Requirements
The present Catalogue represents a program complex, to be installed and used on a PC
managed by Windows 95/ Windows 98 or OS Windows NT/ Windows 2000 with administrator
rights.
To install the program please comply with the following hardware requirements:
Hardware configuration
Processor
CD-ROM
RAM
Free space on hard disc
Monitor
Screen resolution
Color
4
Minimum
Pentium 100
12x
32MB
Recommended
Pentium >400
32x
64-128 MB
10-100 MB
(depending on supply pack and installation type)
15".
800x600
16 bits
>17”
>1152x864
24 or 32 bits
Installation of Parts Catalogue
3. Installation of Parts Catalogue
To install the catalogue on a PC use the file Setup.exe, located in the root directory of the
installation CD.
The installation is to be performed by steps:
3.1. Step 1 «Choosing language of installation»
Fig.1
3.2. Step 2 «Welcome»
Fig. 2
If you want to install the program, click “Next >”. To cancel the installation of the program, click
“Cancel”.
3.3. Step 3 «Selecting type of installation»
Fig.3
Full installation provides for faster access to databases and possibility to work without CD, but
program files will employ more memory of your PC – from 40Mb to 650 Mb – depending on
database type.
5
Installation of Parts Catalogue
CD installation requires constant presence of CD in your CD-Rom but will take much less space of
your PC (about 11 Mb).
3.4. Step 4 «Choose destination location»
Fig. 4
Destination folder by default is “C:\Program files\BELAZ\Catalogue”.
If it is needed to change the folder (lack of free space on a disc, etc.), click “Browse…” and select
desired directory in an appropriate window. Once required folder is chosen, you will return to the
“Choose destination location” window.
After the route is chosen correctly, click on the “Next >” button. To cancel the installation of the
program you may click “Cancel” button.
3.5. Step 5 «Selecting Program Group»
Fig. 5
The Program is installed by default into an "Art Mechanics" group. If you want you may change
the name of the group.
Proceed with clicking “Next >” button.
To cancel the installation of the program – click “Cancel”.
6
Installation of Parts Catalogue
3.6. Step 6 «Ready to Start Installation»
Fig. 6
The final step of the installation is copying of the files. Prior to start copying the files you may
check if the installation requirements were input correctly. Fig. 6. If you want to change something,
you may return by clicking “Back” button (availably on each step), and input the correct data.
If you are ready to proceed, click “Next >” button.
3.7. Step 7 «Input of the Password and Copying the Files»
Prior to start copying of the files, you’ll be requested to input the password (see Fig. 7), which is
supplied to you along with the CD or sent by e-mail, after receipt of program CD.
Fig. 7
Type the password into the “Password” field and then click “OK” button. Files copying will start
immediately, if you input correct password.
Please, wait until all the files are copied.
3.8. Step 8 «Finish of Installation»
After all the files are copied, the installation is finished. You have not to restart your PC.
7
Working with program Parts Catalogue
4. Working with Parts Catalogue
4.1. Start the Program
To start the Program double click “BELAZ Parts Catalogue” icon on your Desktop.
After the program is started, a window shown on the front page of this manual will appear on the
screen. It will disappear automatically or by clicking on it by the left button of the mouse. After this
you will see the main window of the program (Ошибка! Источник ссылки не найден.).
Choose vehicle series
Choose documentation on the model
List of models from
chosen
series
vehicle
Enter the Parts Catalogue
Here you may change the program properties,
including change of language
Fig. 8
4.2. How to choose system settings
To choose the settings of parts catalogue click “Settings” button (Fig. 8). The properties of Parts
Catalogue are shown on five bookmarks (Fig. 9):
•
•
•
•
8
General settings
Path to Files
WEB
EMail
System settings
Fig. 9
General Settings include:
$ Language used in the Program (can be changed without restarting the program)
$ Show total quantity of the given parts in the vehicle (if the computer is not too fast, it may
slow down the operations of changing the image of one part to another – you may
disable this function)
$ Show Part Numbers in a tree (can be unused to shorten the lines in the Part Tree)
$ Encircle the chosen part on the image (if the computer is not too fast, it may slow down
operations with graphics)
Paths to Files properties:
The mark
located on the right side from each type of the files allows to find and to choose a
folder for:
$ Image Catalogues (parts and units)
$ Text Files Catalogue (manuals and descriptions)
$ E-mail Files Export Catalogue (Email) – the place where files with orders will be
collected by exporting them to file
Note: After the Program is installed, all Ways to Files Properties are set correctly. The
need to change them may appear only when changing the routes of the Catalogue.
9
Working with program Parts Catalogue
WEB properties:
If a local version of our WEB-site is attached on a CD, you may select a source where to see it
from: the CD or the Internet.
To see the instructions and description of the units you may use the incorporated viewer (it starts
to work considerably faster, but can show not everything correctly), or you may use the default
program, for example Internet Explorer.
Email properties:
Email properties are required to send the order by email and have two bookmarks:
• «Settings» - information on how and where mail should be sent. Email address for
sending – obligatory.
• «Contact information» - data about sender. Firm name and Email – obligatory.
You may send an order through a MAPI-compatible mailing program, used by default by
Windows, for example Outlook Express, or you may send it by a Catalogue Program directly to
your mail server by using SMTP protocol.
Note: If you use the first way of emailing, please, make sure that the mailing program is
installed in Windows (MS Outlook Express for example). On the contrary it may cause slow
down of the program.
SMTP properties:
SMTP server - SMTP address of your mailing server (example: mail.artmech.com)
Port – 25, as a rule.
Name – Your Account Name on mailing server, usually identical to what is written to the left from
@ in Your Email.
Your Email – Your Email address should be indicated
Email address for sending the messages – address of mail recipient, i.e. the address where
the part orders will be sent (this property is recommended to be changed only after we inform you
about the change of the email address).
Note: All SMTP properties are obligatory.
4.3. Review of vehicle types and models
Before selecting model of vehicle select vehicle type.
4.3.1. Selecting vehicle type
To review a list of vehicle types click gray round button with a white arrow (Ошибка! Источник
ссылки не найден.). After starting the program a “Haul Trucks” type is always activated. The
type chosen determines a list of models shown in the window.
4.3.2. Selecting vehicle model
After the vehicle type is chosen, you may start choosing a vehicle model. The list of models is
located in the left side of the main window (Ошибка! Источник ссылки не найден.). It allows
you to choose the required model and see the catalogue, technical specification and available
manuals of this specific model.
In the future you will be able to choose the model directly in the catalogue.
4.3.3. Review of technical specification and manuals
To see the technical specification and manuals on the required model you should click on a
corresponding button or relevant wording, located in the right part of the main window (Ошибка!
Источник ссылки не найден.) (An exclusion from this is a “Catalogue” button located on a
10
Catalogue interface
distance from the other buttons). The information may be seen through a current WEB-browser
(Internet-viewer), like MS Internet Explorer or Netscape Communicator (Fig. 10) or a viewer
incorporated into the program.
Note: To return to the program you should close the WEB-browser. As long as you are
looking through information, it is IMPOSSIBLE to work with a catalogue.
Fig. 10
11
Working with program Parts Catalogue
4.4. Parts Catalogue
Click on a “Catalogue” button, located in the right lower part of the main window (Ошибка!
Источник ссылки не найден.). The main window of the program will close, and a Catalogue
window will appear wide-screen. When going out of the catalogue window, you will come to the
main window of the program again.
4.4.1. Catalogue interface
The general outlook of the Catalogue is shown on Fig. 11.
View number
Full path of unit location
Part description
View description
Model option
Navigator on
aspects of the
image
Options of
part tree
Change of level
(up/down)
Label of reference to view
Marked part
Tree of parts and units
Information about the part
Detailed information about the standard part
Order
editor
List of all text documents on chosen model
Part
order
Part
search
Image
printing
Fig. 11
4.4.2. Choosing unit or part
A part or a unit of the vehicle can be chosen by four ways:
• From the tree of units and parts
•
On the image
•
From the list of parts shown on the image
•
By part search
12
List of units and parts
Choosing unit or part
4.4.2.1. Choosing from the tree of units and parts
The tree of units and parts is located in the left part of the interface, and shows structure and
components of all units of the vehicle. The root element of the tree is the vehicle itself, and it
cannot be chosen in the tree - the cursor will be displaced to the first vehicle element. All vehicle
units, including vehicle itself, which may be disassembled into units and parts of lower level are
included in the tree.
The required unit or part may be chosen from the tree of units or parts, or on the image, or from
the list of units and parts located under the image on the page “List of parts on the image”. The
units are shown as
in the tree, and the parts are shown as
(this meaning the lowest
level). To open the unit structure, simply double click the icon corresponding to the unit by mouse
left button, or single click the square having “plus” sign on it (located on the left from the unit
image) by the same mouse button; after this the “plus” sign will change to “minus” sign (meaning
that the unit is open). The icon on the unit chosen will change to .
To control the tree of parts and units you may use the instrument panel located in the upper part
of the interface.
•
To enter the lower level, i.e. to open the unit, the
instrument panel.
•
To enter the upper level, i.e. the unit incorporating the given part, the
chosen on the instrument panel.
icon should be chosen on the
icon should be
Information about the part chosen is shown under the image of the unit, and contains part name,
part code, quantity of such parts in the unit, quantity of such parts in the vehicle, part weight, etc.
The complete way of entering the units of part chosen is indicated in the same place.
Searching in tree
In case of large quantity of parts on one level you may use search in a tree on the actual level.
Simply choose with a mouse pointer a level in a tree, where you would like to search and click the
right button on the mouse (or Ctrl+F) and choose “Search” in the context menu. Down the tree you
will see a field to enter the information to find and a button to search the following item containing
the data entered (Fig. 12).
Search the following coincidence
Search Field
Fig. 12
Search options may be chosen by the following way (Fig. 13):
•
•
•
Click on the button with icon
From the menu shown choose “Search in tree on…”
Then choose search options (by number or name, or initial part or by inclusion).
13
Working with program Parts Catalogue
Fig. 13
Tree sorting
The tree of units and parts can be sorted by number or name. This option may be chosen as
follows (Fig. 14):
•
•
•
Click on the button with icon
From the menu shown choose “Sort by…”
Choose the required kind of sorting
Fig. 14
4.4.2.2. Choosing on the image
The unit chosen is shown in the right part of the window as an axonometric image (diagram). The
parts and units incorporated into the unit chosen are numbered, and their numbers are shown on
the diagram as marks. The following marks are used:
- part marks are shown with blue,
- unit marks are shown with violet,
- marks of part references are shown with blue underlined,
- marks of view references contain the following text: “View No. X”, where “X” is the view
number. (see Fig. 15).
When the mouse cursor is getting closer to the mark, the cursor is changing its aspect to , all
marks with corresponding numbers are encircled in black, and in a short period of time you will be
able to see the name of the part or unit and its serial number near the mark (a number may not be
shown near some units; this means that they do no have numbers – they are simply illustrations).
Fig. 15
If then you click on the mark by the mouse left button, corresponding part or unit will be marked
out on the image, in the tree, and in the part list; an information about the part will also be shown.
The mark of the part chosen will be shown red, and encircled in red, and the mark of the unit
chosen will be shown as violet and encircled in red (see Fig. 11). When clicking on the view mark
there will be transition to another image corresponding to the view number. When clicking on the
mark of part reference, there will be transition to the corresponding part in the corresponding unit.
14
Choosing unit or part
There may be several marks on the image, and all of them will be marked out when chosen. If the
image is too large for the screen, and therefore the mark cannot be seen, the program will
automatically displace the image so that the mark be seen on the screen. Not all marks may be
seen in this situation (the image may contain several identical marks). Double click on the unit
mark will open the unit, i.e. the image of the unit will be open and the first part on the image will be
marked out. Several views (images) can be made to depict the unit. Not all parts may be seen on
any of the view; that means, that a mark of corresponding part may not be seen on the image;
consequently part will not be displayed in the under-image table, but part tree will feature complete
part list. The program will automatically go to the image, which has a mark with a part chosen. If
several images with chosen part are available the program will offer a selection of views having
this part on it. Should you want to look through all images yourself, you may use image navigator
(see Fig. 16).
List of views
To previous view
To following view
Current view
Fig. 16
Hints of image review
If the image does not fit into the window in full, you may proceed as follows:
$ Enlarge the window. There is a vertical strip (border) between the tree of units and parts
and the image. When you make the mouse cursor come close to the border, the cursor
will change its aspect to
, by pressing the mouse left button then you may displace
the border to the left or to the right, thus enlarging the space for tree of units and parts or
for unit image. In the same way you may change the vertical size of the image.
$
Use scrolling. If the unit image does not fit the screen size, scrolling will appear on the
screen allowing displacing the image in vertical/horizontal direction.
$
Move the image by pressing the mouse left button on it (the cursor will change its
aspect to closed hand).
$
Switch the full-screen mode
$
Change an image scale.
(see Fig. 11).
To change the image scale click on the unit image by mouse right button, and choose “Image
Scale” in the menu appeared on the screen, and required image percentage (see Fig. 17).
15
Working with program Parts Catalogue
Fig. 17
The scale values can be 50%, 75%, 100% and 125 %. After the image being enlarged, it usually
do not enter on the screen in full; in this case use horizontal and vertical scrolling to move through
the image.
.
4.4.2.3. Selecting in the list of units and parts
There is a list of parts and units incorporated into the unit chosen, located in the lower part of the
catalogue under the detailed information about the part. This list is similar to the table
accompanying image in the printed catalogue and include the following information:
• Icon defining part or unit (using the same icon system like in a tree)
• Mark number
• Part code
• Code OKPO
• Part name
• Quantity of the parts in the unit
• Note
To choose a part or unit just click with a mouse on a table line. The part or unit chosen will be
also shown in tree of units and parts and on the image.
All list of units and parts usually does not fit the screen. To look it through you will have to scroll it
up/down, or you may try to enlarge its height. To enlarge the height of the list of units and parts
make the mouse cursor come close to the lower border of the unit image. The mouse pointer will
change its aspect to:
. By pressing the mouse left button simply drug the border up or down
until the window is set up to the required size. If the first column of the table shows icon of a unit,
you may open the unit by double clicking the table line.
16
Searching required part
4.4.2.4. Searching required part
To find the required part by its number or name, press “Search” button located in the lower part of
the window, when being in catalogue review mode. The upper part of the appeared “Search”
dialog box (see Fig. 18) will show the field for entering part number and part name. The center of
the dialog box will show a list of all parts included into the vehicle model chosen. By a cursor strip
you may choose a part in the list. The lower part of the dialog box will show a list of all units of the
vehicle, having the part chosen or found – “Image where the part is”. To open the image showing
the unit chosen just press the button “Show image” located in the lower part of the dialog box.
List of parts and units found
Image of the part
chosen
List of models
having the unit
chosen
Indicator of presence
of the chosen part in
the chosen vehicle
List of units incorporating
the part marked out in
the list upwards
Image of the unit chosen,
which incorporates the
part
Open the part chosen
in the catalogue
Fig. 18
You may open any images inside the search window. Please, note that if you press “Cancel”
button, the program will automatically return to the image and the part that were active prior to
opening search window.
Program search engine provides powerful and easy way to find a required part, even if you know
its number or name partially. The search process may be performed as by part number, as by part
name, as well as by both parameters. You may search a required part in a given vehicle, in all
vehicles of one type, or in the whole vehicle range. If you want to search not in the current vehicle,
you should make a choice from the list of models, where the required part was found. If you
choose a part in a model other than a current one, a catalogue of the model chosen will be
opened, thus opening another tree, etc. The following are some examples to show how to search a
part in various situations.
Example 1.
It is required to find a part with “Bolt” name in a current vehicle, and you are sure that the part
name is absolutely correct.
How to proceed:
Set the “Search style” window in “Exactly” position
Set the “Search in” window in “Current model” position
17
Working with program Parts Catalogue
Type “Bolt” in the part name field. Please, note, that the first letter must be a capital letter,
otherwise the search process will fail.
Search results:
½"-13х1,77
½--13х1,38-
Bolt
Bolt
Part “020-025-30-2-2” is located in:
Installation of hydromechanical gear pipelines and hoses
Example 2.
It is required to find a part by the number, but you do not know exact number, only the digits “025”.
How to proceed:
Set the “Search style” window in “Analogous to include” position
Type “-025” in the part number field
Search results:
020-025-30-2-2
020-025-30-2-3
Ring
Ring
Part “020-025-30-2-2” is located in:
Pipelines and devices of brake system pneumatic drive
Control panel
Example 3.
It is required to find a bolt in a unit you know, but you don’t know its number
How to proceed:
Set the “Search style” window in “Analogous to start with” position
Type “Bolt” in the part name field.
Search results:
530-1302118
75483-2208079
……
Bolt
Bolt
……
Part “530-1302118” is located in:
Water radiator
Water radiator
18
Reviewing information about the part
In this case you will have to look through the units names. If the “Show Image” option is
engaged, you will see the image of the unit.
Example 4.
It is required to find a part on its partial number and partial name.
How to proceed:
Set the “Search style” window in “Analogous to include” position
Type partial name of the part in “part name” field, type partial number of the part you know in
“part number” field.
Proceed as above.
After you have found a part, you open it in the catalogue and the part is located on a bookmark.
4.4.3. Parts bookmarks
Parts bookmarks are used for quick opening of the part, which you previously found in the
catalogue. The part is located on a bookmark in the following cases:
• If the part is opened from a search window
• If other part is opened by using mark “part reference”
• By forced inclusion of the part in a bookmark, by pressing “Include part in a book-mark”
button (see Fig. 19)
Include part in a bookmark
Open part bookmarks
Fig. 19
The list of bookmarks shows:
• Part number
• Part name
• Unit name
• Unit number
• Model name
The part opens by choosing a corresponding line in a list of bookmarks. In case if the part is
chosen from another model, the current model will change automatically.
4.4.4. Reviewing information about the part
Standard parts possess additional information, because it is not possible to determine by the
image, what kind of bolt or nut is depicted on it. Moreover, sometimes it is needed information
about the dimensions, standards, etc. (see Fig. 20).
The detailed information includes the following:
•
Name of the part group (located in the upper part of the window).
19
Working with program Parts Catalogue
•
•
•
Part standard (located in the upper part of the window), if any.
List of dimensions with notes.
Part image, up to two illustrations (for example: general aspect and cutoff of the bearing).
The window with information about standard parts may be opened by clicking a button with an
icon of that part (located to the right from the part number). The button appears only if a
standard part is chosen.
Fig. 20
When changing window dimensions, the scale is being changed correspondingly. To see a fullscale image you should enlarge the additional information window until the image stops increasing,
or you may set an “Autosize” option (see Fig. 20). You may reduce an image endlessly by
reducing size of additional information window. The window may be tied to the right upper or lower
border, or may not be tied – in this case it will be possible to move the window through the screen.
If no additional information about the part is available, the window will be empty.
If Database of additional information is not supplied, the window of additional information will be
empty.
4.4.5. Printing of unit image
To compose and print a report containing unit image and a list of parts incorporated into that unit,
simply click on a “Print” button located in the lower part of the catalogue (see Fig. 11).
Printing is performed by a report manager incorporated into the program and showing you the
view of a report made (see Fig. 21). Report can be previewed and printed with a help of an
instrument panel with the icons (Fig. 10 left to right) allowing to:
$ Show the whole page of the report.
20
$
Show the page 1:1.
$
Show the order page wide.
$
Go to the first page.
Printing of unit image
$
Go to the previous page.
$
Go to the following page.
$
Go to the last page.
$
Set up printer properties.
$
Report printing.
$
Other options
Fig. 21
The lower left corner of the order shows current page and total number of pages in the report.
4.4.6. Reviewing unit operation and repair manuals
If Operation and Repair Manual is available for a certain part or unit, the color of the icons in the
lower left part of the catalogue will change from gray to colorful (see Fig. 11). By clicking the icons
you can look through the manual with a help of a standard Internet browser (see Fig. 10), installed
in your system, or with a browser incorporated into the program depending on setup configuration
(see Fig. 9).
Note: To return to the program just close the browse program.
21
Working with program Parts Catalogue
4.4.7. How to see all instructions related to the model
If you do not want to open a catalogue simply for reading an instruction to any unit or part, you
may open a list of all the documents available for the chosen model and find a required one.
The button to open a list of documents is located in the lower left corner of the catalogue window
to the left from “Design and operation” button (see Fig. 11).
You can open the document you have chosen by double clicking on a line with document name,
or by clicking a button “See document”. You can also open a part, which the document is
corresponded to.
Open a part in catalogue
See document
Fig. 22
4.4.8. Part ordering system
Built-in part ordering system is intended to:
$
Provide faultless input of information with automatic indication of additional information
to ease search process of interchangeable units and parts.
22
$
Maintain Customer Database.
$
Keep Database of the orders (creation, deletion, revision, edition).
$
Provide order performance control.
$
Print the order, thus meaning possibility to send the order by fax.
$
Export of the order to a text file like MSWord or Excel.
$
Send the order by e-mail or copy it to floppy disc.
$
Use General Parts Search System.
Part ordering system
Fig. 23
Order control panel
Order history control
panel
Order content control
panel
Order content
Part order history – parent
unit, model and quantity
Fig. 24
How to read colors of order items:
Light-blue
Partial manual order
Blue
All parts ordered manually
Pink
Part not found
Dark-blue
Part added to order history manually
White
Part added to order from catalogue
4.4.8.1. Order composing
To create an order proceed as follows:
• Create a customer (if needed).
• Create a new order.
• Enter necessary components into the order.
23
Working with program Parts Catalogue
4.4.8.2. How to create a customer
The program provides a possibility to create a database of your orders, as well as one of the
orders of other customers. To proceed you should first create a customer. Please, note, that you
do not need to create yourself as a customer. Your orders will be kept in the “Own” section. To
create another customer, please, choose section “Own” in “Orders” window, and click on the icon
“Create a Customer”. After the fields are filled in, click on the button with an image of a diskette,
thus saving the information about the customer in Database.
4.4.8.3. How to create an order
After the first start of the program you do not have any order saved. You should create an order.
Choose required customer in window “Orders”. To proceed with creation of an order, click a “New
Order” button (icon ) (see Fig. 24). Click “Yes” when the program asks you, if you want to create
a new order. Now the order is created and you may add components to it.
You may also input a name of the order in the line located to the right from the order number.
After the order name have been changed, click on the button located to the right from the order
name input field to save it into the Database.
4.4.8.4. Creating an order based on an existing order.
It happens, that you need to create an order similar to existing one, created by you earlier. In
such cases, in order not to create the whole order once again, there is a possibility to create a new
order based on an existing one. To proceed click on the icon “Use existing order”
in the window
“Orders” (see Fig. 24). Confirm creation of the order. That’s all, now your new order is fully
identical to the order you chose, but it has a new number and a current date. Now you can edit it
and send.
4.4.8.5. Sorting orders
To search a required order you may use order sorting for your convenience. You may sort the
orders by date of creation or by order number. Of course, you will search in a customer you
require. A sample of order tree is shown on Fig. 25. If sorted by date of creation, the orders will be
grouped by month and year of creation. When opening a group you will see all orders created
during a month. You may change kind of sorting by clicking on the icons located in the left upper
part of the window, above the tree. Recessed button displays current sorting.
Fig. 25
24
Part ordering system
4.4.8.6. Order type/status
An order may be included in one of the Order types:
• Draft Order.
• Working Order (contract in force).
• Ready Order (contract performed). Order archive. The order cannot be sent by e-mail.
The order type can be changed in the following manner:
1. “Draft Order” can be changed to “Ready Order” or “Working Order” (all items are marked as
“performed”).
2. “Working Order” can be changed to “Order Draft”. The order will automatically change its type
to “Ready Order” as soon as you mark all order items as “performed”.
3. “Ready Order” can be changed to “Working order” by simply deleting a “performed” mark from
any item of the order.
To change a type of an order click it in a tree by mouse right button and choose item “Change
order type” in menu. Then choose order type (see Fig. 26).
Fig. 26
To put or delete a mark of readiness of an order item, simply click by mouse right button on order
item line in “Readiness” column and select required operation from “Set/Delete” menu. When
putting a mark “performed”, a current date will be input as a date of a contract item performance.
4.4.8.7. Assigning current date to the order
If you have just made an order, you will not need to assign a date thereto as it will be set
automatically. But if it took several days to make an order, you can assign a current date thereto
prior to send the order. To proceed just click by mouse right button on the order and choose
“Assign current date to order” in menu (see Fig. 26).
4.4.8.8. Adding chosen part or unit to the order
•
Click on “Add to Order" button located in a lower part of the catalogue window (see Fig. 11). A
“Part Order” window will appear (see Fig. 27). This window will be seen together with a
catalogue window, and you will be able too work with a catalogue as usually (to search parts
in a tree, etc.).
• Check a number of the current order and a customer to whom belongs the order (if you have
several customers), it is shown in the left upper part of the window. If required, look through
the contents of your order by clicking “Orders” button. It is possible to browse and edit the
order in the “Orders” window (see Fig. 24). This will be described further.
• Choose a part to order either on the image or in the tree, or by clicking “Search” button.
• Input the quantity of the parts to order (obligatory).
Then click “Add to Order” button. As a result the part chosen will be added to the current order.
You can go on searching next part and adding it to the order without closing the “Part Order”
window.
Note: If the part is already in the order it will be marked red.
25
Working with program Parts Catalogue
Fig. 27
4.4.8.9. Manual input of order items
You can add to order the parts which are not available in current version of the catalogue by
applying to the window “Order”. This input is considered as imprecise because of possible errors
or misprints in the process of data manual input (typing) and in this case an adequate line will be
marked properly (see Fig. 24). To add part manually press “plus” button on the control panel of
order content and it will open dialog box.
If you have typed part number which is available in catalogue the fields “Part name”, “OKPO
Code” and “TNVAD code” will get filled automatically. You will have to define required quantity and
immediately after that the button “Add’ will become available. If the part is not available in the
catalogue you should type it name. The first three fields are obligatory the rest are recommended
to specify replacement of the parts.
After the part is added to the order manual input window will not shutdown and you will be able to
continue further addition of items. When finished press “Back” button.
Fig. 28
4.4.8.10. Reviewing and editing of the orders composed
You may quickly browse your order in “Part Order” window. Only the most important fields will be
displayed. For this purpose click on button located in the right lower part of the window. It is
26
Part ordering system
impossible to edit the order in this window. You may add quantity of the parts by additional
ordering of the same part.
The order can be edited only in “Orders” window. Positions can only be deleted or part quantity
can be changed (inside “Order route” section) except what you have typed manually where the
model number and unit number that have ordered part can be changed.
How to use Database Navigator
Navigator of Database is intended for browsing and editing the Database. It is shown on Fig. 5.
The functions of Navigator buttons are the following:
Fig. 29
•
•
•
•
•
•
•
•
•
•
First record (move cursor to the first record in Database)
Previous record (move cursor to the previous record)
Next record
Last record
Add record
Delete record
Edit record
End of editing
Cancel of editing
Refresh
The data in Database is shown in form of a table. Each line is an ITEM in Database. To come
from one line to another means coming from one item to another. For this purpose it is possible to
use arrows up/down or Navigator of database. There are fields in a line, where it is possible to
move with a help of left/right arrows or Navigator of Database.
Data change mode in the fields is named edition mode. To edit the item proceed as follows:
• Put the cursor on a line you require and click on it by mouse left button.
• Then click on a button “Edit record” in Navigator of Database.
• Input the data.
• After the data is input, click on “End of editing” button in the Navigator of Database.
If you made a mistake when inputting the data and wish to return to previous data, and the button
“End of editing” was not pressed yet, then by clicking “Cancel” button, the data will return to the
previous status.
Note: When you want to come to another item after editing, the “End of Editing” will
automatically appear.
Some buttons in the Navigator are shown as gray meaning that such operation is not currently
availablet. For example, “First line” and “Previous line” are unavailable on Fig. 29, because the
Database cursor is put on the first line, and previous line misses.
4.4.8.11.
Sending an order by Email
Fig. 30
To send an order, choose “Send order” item in the menu (Fig. 30).
The following procedure depends on the way of message sending, which can be known from
“Mail properties” section in the same menu.
27
Working with program Parts Catalogue
If the mail properties indicates – Default Windows Program, a message will appear, that the mail
was successfully sent to a mailing program. Otherwise, a message about mistake will appear.
If the mail is being sent on SMTP protocol, a window will appear showing a current connection
mode. Firstly the program should connect to a mailing server, than data transfer will start. If the
program could not connect to the server, check properties of SMTP protocol, as well as connection
to the Internet. Probably, your mailing server does not respond due to some faults inside it.
Email properties
Email properties may include Email address installed in the program (see clause Ошибка!
Источник ссылки не найден.), and used to send the order automatically, properties of Email in
Windows, or properties of SMTP protocol in the catalogue program.
If you use an external Windows program for message sending, so you should note that the
program uses MAPI interface. Therefore it is needed that a MAPI-compatible message system is
installed in your PC.
If you decide to send a message directly on SMTP (the most convenient option), you need:
• To consider, that data transfer is made on TCP IP protocol, therefore your system should
have installed such protocol. If you already use Internet, it should have already been
installed.
• To provide connection to the Internet.
• To know the properties of your Email box.
• Mailing server should support SMTP protocol.
Practically all of these points have to be installed and checked in any mailing program, therefore
there is nothing uncommon here. For SMTP properties, please, consult clause Ошибка!
Источник ссылки не найден..
Instructions to mailing services for MAPI-compatible mailing system (in Windows systems)
The main feature one should consider when establishing mailing service in Windows system is
Profile. “Profile” means a conjunction of such mailing services like:
• Internet Mail – access service to mailing server through Internet on SMTP/POP3 protocols.
• Microsoft Exchange Server – access service to the services of Microsoft Exchange Server (for
local and corporative nets managed by Windows NT) – information stock, global address
book, etc.
• Microsoft Mail – access to Microsoft Mail Postoffice
• Win UUCC/XP – access service to mailing server on UUCP protocol.
As well as information services:
• Personal address book
• Outlook Address Book – address book based on information catalogue created by Outlook,
Contact type.
• Personal folders – local information database, which can be made storage by default.
The system can use several various profiles.
Profile Creation
To create profile, open Control panel and start the Fax and Mail program. Click on Show
profile … button in the window appeared. A window “Post” will open, whose central part will
contain a list of Email profiles available in computer. A lower sliding window will display a
default profile.
To create new profile click on Add… button. Install the offered mailing services or choose
services manually from the list of available ones.
28
Part ordering system
Install the created profile as default.
Installation of mailing services
Internet Mail
Choose “Internet Mail” from a list of available mailing services.
In the window appeared (field “General”) indicate Account Name, User’s information
(Name, Company), email address (email box name), for example, [email protected].
Indicate names or IP-addresses of SMTP- or POP3- servers in the “Servers” window. Also
indicate information required for registration on POP3-server – Account Name (written to the
left of @ in the email address) and a password.
Indicate type of connection in the “Connection” window. If it is supposed to use already
installed connection to the Internet, indicate “Using local net” in the connection field. If
during each access it is required to connect to the Internet, consult your System
Administrator.
The window “Additional” shows the port numbers of SMTP- and POP3-servers used as
default. Consult you System Administrator, if it is required to change them. Usually it is not
needed.
Microsoft Exchange Server
Choose Microsoft Exchange Server in the list of accessible mailing services.
In the field “General” of appeared window indicate name of the Microsoft Exchange server
and the name of email box. If it is not required to connect to the Microsoft Exchange server
through indirect connection, put other fields as default.
4.4.8.12. Export of order
If you want to use information from the order in any other documents, or send it through a special
mailing program, or you don’t have email at all, but you have diskettes, - use export of order (see
Fig. 24 and Fig. 31).
You can create MSWord or Excel document, or you can write the order in a simple text file, or
create archive file of the catalogue. The archive file is the most convenient way of information
transfer, because:
• It contains the most complete information about the order
• It can be imported back to the parts catalogue
• It can be automatically processed by computer
From other export options an export to MS Excel is the most complete. Operations with versions
lower than MSOffice 2000 has not been tested.
If you need to export the order in a text file or archive file of the catalogue, the program will offer
you to choose a directory and file name, where to write the order in. The program automatically
choose a directory indicated in the program properties, field “Email files”, book-mark page “Ways
to Files” (see Ошибка! Источник ссылки не найден.).
Fig. 31
29
Working with program Parts Catalogue
4.4.8.13. Order import
To transmit an order between various programs you may export this order into catalogue archive
file inside one program and load this order into your Database by order import in the other program
(Fig. 32). You also have to specify the customer in which the order is to be placed (Fig. 33).
Fig. 32
Fig. 33
You will be offered to select the customer from proper Database and data from imported order. If
the customer with selected name does not exist it will be created automatically.
4.4.8.14. How to send an order by fax
When sending an order by fax it is advisable to use a fax-modem, through MicrosoftFax. In this
case the quality of transmission is considerably better, thus eliminating possible faults in the order.
If there is no such possibility – just print the order and send it by common fax transmission.
Note!!! The last way of transmission is the least advisable for you and for us, because
significant faults may arise during processing of the order. Please, use this way of
transmission as an additional one.
4.4.8.15. How to print an order
To print an order simply click on “Print” button in the “Orders” window (see Fig. 24).
Printing is performed by the incorporated report generator. Here you will be able to preview the
report made (see Fig. 32). The report may be seen and printed with a help of an instrument panel
with icons possessing the following functions (from left to right):
$ Show the whole report page.
$ Show report page 1:1.
$ Show report on page width.
$
$
$
$
$
$
$
30
Browse to the first report page.
Browse to the previous report page.
Browse to the following report page.
Browse to the last report page.
Printer properties.
Print report.
Etc.
Part ordering system
Fig. 34
The lower right corner of the report shows current page and total quantity of the pages in the
report.
Note: For printing and for report review in catalogue program make sure that a printer is
installed in the system prior to program start.
31
Contacts
5. Contacts
Firm-manufacturer:
Belarus, Minsk, Art-Mechanics Ltd.
Contact persons:
Victor Chernyi, Director
Pavel Novik, Expert – information technologies
Sergey Bezuglenko, Manager – information technologies
Contact details:
e-mail: [email protected] (please indicate subject – BELAZ Parts Catalogue)
tel./fax: (+375 17) 259-43-36
WEB: http://www.artmech.com
32