1
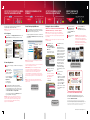
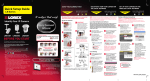
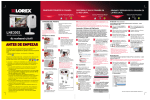
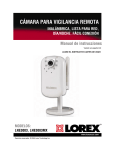
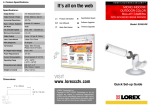
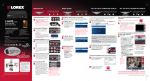
SET UP YOUR CAMERA FIRST
DISCOVER & VIEW YOUR CAMERA
ON THE LOCAL NETWORK
BASIC INSTALLATION GUIDE
Time: 10 Minutes
STEP 1
Hand Tools
Quick Setup Guide
+VTGCNN[KUVJCVGCU[
Set up Your Camera
a
BEFORE YOU START
This Network Camera is designed for easy installation.
However, before you continue, please read the following:
• Remote Surveillance Camera,
• Antenna
• Camera stand (base, stand and
screw knob)
• Masonary Plugs & Screws
• Power Adaptor
• Ethernet Cable
• Quick Start Guide
• Software CD (includes manuals)
f
Place the base of the
camera on a flat surface
and screw on the stand.
IMPORTANT
Connect the included network
cable to the LAN port on the
bottom of the camera. Connect
the other end of the network
cable to the router, switch, or
active wall port of your local
network.
STEP 2
Launching the DigiConsole Software
Before launching the program, please make sure your computer is connected
to the same local network as the camera and has access to the Internet.
The camera must be connected using the included Ethernet cable for initial
installation. It is recommended to setup the camera when your computer is
wired to the local network. If you are using the wireless connection on your
computer, please make sure you are connected to your wireless router (check
wireless name - SSID).
a
Insert the included
DigiConsole Software CD into
your CD/DVD-ROM drive.
b
If the software runs
automatically, please
proceed to Step 2, section d.
g
c
Plug the power adaptor into the
power port on the bottom of the
camera. Plug the other end to an
electrical outlet.
The Quick Start Guide must be followed in sequence without
skipping steps.
1. When setting up the camera, use Internet Explorer only
.
After the initial setup, you can view the camera using Internet
Explorer or later (with ActiveX), Mozilla Firefox, Safari, and Google
Chrome
2. Steps 1 - 3 should to be completed and your camera must be
connected wired before connecting the camera wirelessly.
3. When connecting the camera to a wireless network, consider the
following:
a. If your wireless router is not set up with wireless encryption, you
can start the installation process immediately.
b. If your wireless router is set up with encryption, note that Wi-Fi
wireless encryption supports only WEP open mode key (64 &
128bit).
c. If your wireless router is set up with the supported encryption
type mentioned above, please make sure you know the encryption
key. If you do not know the encryption key (encryption password),
please refer to your router’s manual in order to reset the key.
d. If your wireless router is set up with a different type of encryption
please refer to your router’s manual in order to change
encryption type to WEP.
e. The camera is compatible with Macintosh for viewing only.
Recording on Macintosh is not supported. To set up camera using
Macintosh, advanced knowledge is required. Please refer to
“Setting Up Using Macintosh” FAQ on LOREX web site
www.lorexcctv.com
c
If a security pop-up window
appears, click Unblock
and Continue to allow
DigiConsole to run.
NOTE: If the CD does not start
automatically, please go to “Computer”
(“My Computer” for Windows XP™ users)
and double click on the CD Drive to run
the application. Follow Step 2.
d
B A S I C I N S TA L LATIO N G U I D E
Hand Tools Skills - Easy
- Computer
NOTE: For initial setup, you will need Internet Explorer as your
default browser. Do not install DigiConsole until Step 2 is completed.
If the pop-up window
appears, click Run
DigiConsole.exe and
continue to Step 2, section c.
b
Time: 10 Minutes
NOTE: This quick start guide refers to a Windows Vista™, installation.
Pop-up security windows may differ in Windows XP™. Installation is
easy in both versions of the operating system.
Click Find to discover Lorex
cameras on your network.
Time: 10 Minutes Hand Tools
- Computer
STEP 3
Skills - Easy
Recording (Video Only)
Use DigiConsole to record (repeat Step 2, sections a - c to run from CD).
a
Click Install to start the
installation in the DigiConsole.
e
Double click to open the
DigiConsole icon from your
desktop.
b
Click Next at the bottom right
corner and when asked, read and
accept the license.
f
Find and detect your camera
(Step 2, section d)
c
The process takes few minutes.
Click OK to proceed with
installation.
g
Right click the camera icon
and select View live video.
Wait till you see the streaming
video.
d
Click the red X on top right corner
to close DigiConsole.
h
Right click the camera icon
and select Record Video
Image. You are now recording
on to your local computer.
NOTE: DigiConsole supports up to 6 cameras
and include basic recording option (ON or
OFF only). For advanced software DIGIplayer
please visit our web www.lorexcctv.com
Playback
Attach the screw knob to
the camera stand.
NOTE: Make sure the LED is lit
on the front of the camera. If not,
check that all cables are properly
connected.
Attach the wireless antenna to
the back of the camera.
d
Local Viewing
a
Double-click the camera to
launch DigiViewer in your
browser.
OPTION: If UPNP is enabled on your
computer open the “Network” (“My
Network Places” for Windows XP™
users) folder to view UPnP devices.
(UPNP is disabled by default in
Windows Vista™).
c
1
2
3
Screw the camera to the
camera stand.
e
5
4
1. Camera
2. Antenna
3. Power Adaptor Port
4. Ethernet Cable (LAN) Port
5. Reset
Tighten the screw knob to
secure the camera.
b
Enter admin in the username
and admin in the password
fields to access your camera.
The browser will prompt you
to install ActiveX.
Did you know?
LNE3003
Broadband Router and Computer
are required for local and remote
monitoring (not included).
BASIC INSTALLATION GUIDE
Skills - Easy
PACKAGE CONTENTS:
RECORD AND PLAYBACK YOUR CAMERA
ON THE LOCAL NETWORK
Depending on your browser
security settings, you can use the
“remember me” check option and
the next time you will view the
same camera using this browser
it will renumber user name and
password till you restart your
computer.
If a security pop-up window
appears, click Unblock
and Continue. Click the
warning on the browser bar
and select Install ActiveX
Control. Click Unblock or
Continue in any proceeding
security pop-ups.
Use DigiConsole to playback (repeat Step 2, sections a - c to run from CD).
NOTE: Playback requires Windows Media Player and Xvid codec. A link to Xvid can be
found on the Home page of DigiConsole.
a
Click Playback, if viewing
or recording is enabled on
DigiConsole, you will be prompted
to stop live viewing. Click OK.
b
Select the desired cameras and
recording date from the list to
play. Right click and select Play
Back Recorded Video.
c
Your default player (e.g.
Windows Media Player) will
play the selected video.
Congratulations! Your
camera is now ready to
record and playback on the
local network
Click the warning bar (it will turn from
yellow to blue) and select Install ActiveX.
d
Click Install to start the
installation. Click Unblock or
Continue in any security
pop-up. (This step is required
only for first time set-up).
Congratulations! Your camera is
now set-up for local viewing
LNE3003 Quick Setup Guide - English - R2
SET UP YOICS TO VIEW YOUR CAMERA
REMOTELY ANYWHERE ANYTIME
Powered by
™
STEP 4
BASIC INSTALLATION GUIDE
Time: 10 Minutes
NOTE: By default, the LNE3003 IP Camera is enabled for Yoics™ easyconnect remote access.
A: Yoics Sign-up
a
From DigiViewer, click Settings, Remote Access and then click
Register with Yoics at the bottom right of the Yoics section.
b
On the log-in website
page, enter the required
personal information
in the fields and click
Register.
Did you know?
Powered by
Hand Tools Skills - Easy
- Computer
Quicktime Player is required for Remote Viewing using Yoics.
http://www.apple.com/quicktime/download/
Depending on your browser
security settings, you can
use the “remember me”
check option and the next
time you will log in to Yoics
from this browser it will
remember user name and
password till you restart
your computer.
B: Camera Registration
a
On your Yoics account page, Click Yes on the Security Pop-up
Window.
b
Your new Camera is
detected and becomes
available to be added to
your Yoics account.
From the LOREX pop-up
window click Complete
Registration.
The Register New
Devices page opens.
c
VIEWING YOUR CAMERA VIA THE
INTERNET
You need to provide the LOREX Camera two different
registration names (The first will register your camera to
stream using web browser the second is to be able to view
using iPhone™/iPod touch™). Enter a name for the camera
in the Yoics Device Name. Click Register Now.
STEP 5
™
B ASIC INSTALLATION GUIDE
Time: 10 - 30
Minutes
Browse to http://lorex.yoics.com and log in using the user
name and password you created in Step 4, section b. Under
My Stuff, click the camera you want to view.
You may be prompted to install QuickTime or asked to enter
the Username and Password (default admin, admin) to login
to the camera.
Time: 10 Minutes
STEP 6
B A S I C I N S TA L LATIO N G U I D E
Hand Tools Skills - Easy
- Computer
Setting up the Camera to be Wireless
CAMERA must be PLUGGED INTO YOUR ROUTER BEFORE STARTING
THE WIRELESS SETUP. Steps 1 - 3 should to be completed.
NOTE: By default, the Wireless feature in the camera is disabled. If the
wireless connection is set up with encryption, you will be asked to provide
the encryption key. Wi-Fi wireless encryption supports only WEP open mode
key (64 & 128bit).
Time: 10 Minutes
STEP 7
a
From DigiViewer, click
Settings, Wireless and
then select Enabled when
scrolling down the Wireless
Mode option.
c
a
Using the Safari browser,
go to http://lorex.yoics.
com and log in using
your Yoics username and
password.
b
Click the camera you
want to view.
The Camera will scan for
available wireless network.
Workww
NOTE: Number of simultaneous connections possible to the camera
depends on Internet bandwidth.
You can share the camera with other Yoics users. Refer to the provided
manual on the http://www.yoics.com website.
EXPERT OPTION: If you have an external (WAN) static IP address
or you have registered with the free LOREX DDNS service, you
can configure your router to port-forward the incoming Internet
connections to the camera. Use the static IP address or your
customized lorexddns.net URL in the address field of your browser to
access your camera. Yoics registration is not required when using this
option. For more details, please refer to the instruction manual on the
CD.
NOTE: For security reasons change the default admin password
login to the camera. For more details, please refer to the instruction
manual on the CD.
Congratulations! Your
camera is now set-up for
remote viewing on any PC
b
Highlight the network you
want the camera to be
connected to.
If the wireless connection
is set up with encryption,
Please provide the
encryption key.
Click Connect.
Click OK on the pop-up
warning.
Wait approximately one
minute to allow the camera
to complete connection to the
wireless router. Go back to
DigiConsole (Step 2) and click
Find till you see the same
camera listed twice. Remove
the network cable and
continue to Step 6, section d.
If the camera is not listed
twice go back to Step 6,
section a, select Wireless
Mode: Disable. Wait till
camera is done updating,
then repeat Step 6, section a
again.
d
3. Double-click the camera to
launch DigiViewer in your
browser.
Skills - Easy
c
Enter the username and
password to log in to the
camera (default admin, admin).
OPTION: In newer versions of iPhone™
/iPod Touch™, you can bookmark the Yoics
website for quick access. Alternatively
create a shortcut on the application screen
for easy access. Check the reference
materials that came with your iPhone™ /
iPod touch™ for feature details.
Congratulations! Your camera is
now set-up for remote viewing on
your iPhone™ or iPod touch™.
Warehouse
1. Close the Internet
Browser
2. Go back to the
DigiConsole screen, right
click on the shown camera
and select Refresh. (If
DigiConsole was closed
earlier, run the software
again and click Find).
Tools
,
NOTE: Wireless cameras require a power source to operate. Use the included
camera power adaptor.
Office
LNP5220E, LNP5320E,
LND7220V, LNZ9320W
Day Care
LNE3003, LNP5220E
LNE3003 , LNP5220E,
LND7220V
Restaurant
Convenience Store
LND7220V, LNE3003
LNP5220E, LND7220V
Home Office
PROTECT EVERYTHING
THAT MATTERS
Add wired or wireless network cameras to
expand the “Envelope of Protection” for your
business, your home and your family
Drive Way / Parking Lot
LNP5320E, LNB6300V
Front Door
LNE3003
Nursery
LNE3003
LNE3003
Backyard
LNP5320E, LND7220V
It’s all on the Web www.lorexcctv.com
If the camera does not appear Under “My Stuff”, Press F5
on your keyboard to refresh the page.
OPTION: If you prefer to view your camera remotely more often, for
epitomized viewing, from the DigiViewer main menu, click Settings
and then click Device Setup. From the Video Streaming pull-down
menu, selecting the last option to change the video streaming
quality to a lower network bandwidth.
REMOTE VIEWING WITH
i Phone™ / iPod touch™
BASIC INSTALLATION GUIDE
Hand Tools Skills - Easy
- Computer
Remote Viewing using Web Browser
a
SET UP YOUR CAMERA ON THE
WIRELESS LOCAL NETWORK
For detailed setup information, please refer to your
User’s Manual. For additional information, please visit
our website www.lorexcctv.com
Congratulations! Your
camera is now set-up to
work Wireless.
Information in this document is subject to change without notice. As our products are subject to continuous
improvement, Lorex Technology INC. and our subsidiaries reserve the right to modify product design, specifi cations
and prices, without notice and without incurring any obligation. E&OE © 2009 LOREX. All rights reserved.
iPhone™, iPod touch™, Yoics™, and MSN™ are registered trademarks of their respective companies, registered in
the United States and other countries. iPhone™ and iPod touch™ are not included in this package.
LNE3003 Quick Setup Guide - English - R2