1
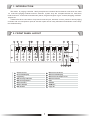
FRONT PANEL LAYOUT
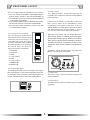
9. Monitor ZONE SELECT
The ZONE SELECT button (9) is used to select
one of the 8 zones to be monitored.Pressing the
zone select button will cycle through allzones in
sequence as follows:1,2,3,4, 5,6, 7, 8, and OFF.
A zone can be selected pressing the ZONE SELECT
button.Once the display shows the desired zone,
press the ENTER button to confirm and change
to the selected zone.
12. Monitor Volume
The Monitor Volume control knob (12) will control
the in-built Monitor Speaker volume level.
13. ESC
The ESC button (13) is used to cancel the selection
of source select,monitor zone select and BGM
function buttons.
14. ENTER
The ENTER button (14) is used to confirm selection
of source select,monitor zone select and BGM
function buttons.
Note:
The zone will only change after the ENTER button
is pressed, otherwise the source selection will be
returned to its previous setting after 10 seconds.
The monitor zone function enables the audio output
from a zone to be monitored through a small speaker
on the front panel.This is particularly useful when
controlling the audio in a remote zone or testing
the system.
15. BGM ALL
The BGM ALL button (15) is used to select the
same source for all 8 zones simultaneously.To
confirm the BGM ALL selection,press ENTER.
Note:
The BGM ALL selection will only be confirmed
after the ENTER button is pressed ,otherwise
the source selection will be return to previous
setting after 10 seconds.In the event power is
lost, the BGM ALL selection settings will be
saved and the unit will return to the previous
BGM ALL setting when powe red back on.
10. Monitor Zone LED Display
The Single Digit Monitor Zone LED Display (10)
will display the selected zone numbers,1-8.
11. Monitor Zone Output Level
The 5 LED Monitor Zone Output Level Meter(11)
will provide visual indication of the audio signal
level for a selected zone.
3