1
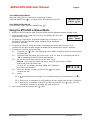
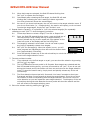
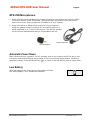
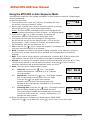
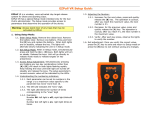
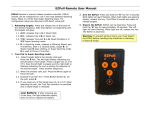
EZPull MTX-8VR Voice Release User Manual Overview EZPull MTX-8 VR is a voice release, multi-target controller for use in Five-Stand, FITASC, SuperSporting and other clay target sports that require multiple traps. EZPull MTX-8VR is designed to control up to 8 traps. The MTX-8VR can be used in several modes: Manual – Removing the microphone plug from the socket enables standard manual release mode. In manual mode you can release single targets or True Pairs. Voice Release is automatically activated when the microphone is plugged in. The target selection is manual and the release is voice activated. In manual mode you can release single targets, Report Pairs or True Pairs. EZPull MTX-8 VR also detects your gunshots. By counting gunshots, the system can determine that a shooting sequence has been completed. For example, if you shoot only one shot on a pair, you will not need to select targets again, just call “pull” and shoot. Automatic sequencing from six programmable 5-Stand menus. The voice release is not active during automatic sequencing. Auto: to Manual Target keys 1-8 Auto: Back Auto: Skip Auto: Fire Manual: True-Pair/Fire Enter/Select key On/Off/Exit White circle/arrows on a key means it is also used for navigation, modification and selection EZPull MTX-8VR User Manual Page 2 Turn EZPull MTX-8VR On When the EZPull MTX-8 is turned off, the display is blank. Press the ON/OFF key [ ]. The Main menu will display on the LCD. 1.MANUAL 2.AUTO 3. SETUP . OFF Turn EZPull MTX-8VR Off From the Main menu, press the ON/OFF key [ ]. Using the MTX-8VR in Manual Mode 1. Removing the microphone plug from the socket enables standard manual release mode. 2. From the Main menu, press the [1-A] key. The display will show the target selection menu. 3. To release a single target, press and release any of the keys 1 to 8. The Red LED will glow and the target released will be displayed for about 2 seconds. MANUAL MODE .PAIR . EXIT 4. To release a True-Pair using two hands: Simultaneously press any two keys 1 to 8. The Red LED will glow and the targets released will be displayed for about 2 seconds. 5. To release a True-Pair using one hand: 5.1. Press the Fire [ ] key. The display will show “TP ?” indicating that you should select the two traps. 5.2. Select the first trap using any of the keys 1 to 8. For trap #1, the display will show “TP 1” indicating that the first trap was selected. 5.3. Select the second trap using any of the keys 1 to 8. Notice: if you select the same trap twice, the MTX-8 will throw a "rafael" trailing pair from the same trap. For trap #2, the display will show “TP 1 + 2” indicating both traps are selected. TP 1 + 2 5.4. When the shooter is ready, press the Fire [ ] key again to throw the pair. 5.5. Notes: 5.5.1. If you selected only one target, you can abort the pair by pressing the Fire [ ] key 5.5.2. Once a pair is selected it is not possible to throw a single until the pair is released. 5.5.3. Once a pair is selected, as long as you did not press the Fire [ ] key, you can change the selection by pressing any other keys 1-8. 6. Exit manual mode by pressing the [ ] key. EZP_MTX8VR_UserGuide.doc For Version 1.1.0 EZPull MTX-8VR User Manual Page 3 Using the MTX-8VR in Voice Release Mode 1. Voice release mode is activated when the microphone is plugged in. 2. From the Main menu, press the [1-A] key. The display will show the target selection menu. MANUAL MODE .PAIR . EXIT 3. To release a Single target: 3.1. Press and release any of the keys 1 to 8. The display will show the target selected. For two seconds the display will show RP next to the target selected, indicating you can press the Fire [ ] key to select a report pair (see below). 3.2. The target is ready when the RP disappears and the Red LED starts blinking slow. Call “pull” to release the target. 3.3. Immediately after releasing the target, the Red LED will start blinking fast, indicating the unit is waiting to detect a gunshot. 3.4. As soon as you shoot the target, the unit will revert to the target selection menu. If you do not shoot (i.e., the target broke), the session will repeat, you do not need to select the target again, simply call “pull” and do it over. 1RP 1 4. To release a True-Pair: 4.1. Press the Fire [ ] key. The display will show “TP ?” indicating that you should select the two traps. 4.2. Select the first trap using any of the keys 1 to 8. For trap #1, the display will show “TP 1” indicating that the first trap was selected. 4.3. Select the second trap using any of the keys 1 to 8. Notice: if you select the same trap twice, the MTX-8 will throw a "rafael" trailing pair from the same trap. For trap #2, the display will show “TP 1 + 2” indicating both traps are selected. TP 1 + 2 4.4. When both traps are selected, the Red LED starts blinking slow. Call “pull” to release the pair. 4.5. You can also throw a True-Pair by using two hands: Simultaneously press any two keys 1 to 8. 4.6. Immediately after releasing the targets, the Red LED will start blinking fast, indicating the unit is waiting to detect two gunshots. 4.7. As soon as you shoot both targets, the unit will revert to the target selection menu. If you do not shoot twice (i.e., a target broke), the session will repeat, you do not need to select the target again, simply call “pull” and do it over. 5. To release a Report-Pair: 5.1. Press and release any of the keys 1 to 8. The display will show the target selected. For two seconds the display will show RP next to the target selected indicating that you should press the Fire [ ] key to select a report pair. 5.2. Quickly (within 2 second from selecting the first trap), while the display still shows RP next to the target selected, press the Fire [ ] key. The display will show “RP” indicating that you should select the second target. 5.3. Select the second trap using any of the keys 1 to 8. The display will show “TP 1 > 2” indicating both traps are selected EZP_MTX8VR_UserGuide.doc 1RP RP 1 ? RP 1 > 3 For Version 1.1.0 EZPull MTX-8VR User Manual Page 4 5.4. When both traps are selected, the Red LED starts blinking slow. Call “pull” to release the first target. 5.5. Immediately after releasing the first target, the Red LED will start blinking fast, indicating the unit is waiting to detect a gunshot. Your first gunshot will throw the second target. 5.6. As soon as you shoot both targets, the unit will revert to the target selection menu. If you do not shoot twice (i.e., a target broke), the session will repeat, you do not need to select the target again, simply call “pull” and do it over. 6. Repeat Practice Target(s): it is possible to “lock” the selected target(s) for repeatedly releasing on each “pull”. To lock the target(s) selection: 6.1. Follow steps above to select a Single, True-Pair or Report-Pair. 6.2. Once, the Red LED started blinking slowly, press and hold any of red colored keys. Keep holding the key for approximately 1 second. Release the key as soon a pad lock icon appears on the lower left corner of the display and the Red LED glows. 6.3. The target(s) selected is now locked. You do not need to press any keys to repeatedly release more targets. 6.4. Call “pull” for the target(s). When the session is over, you will see a progress bar indicating the time left until the session starts over (approximately 5 Seconds). 6.5. Press and quickly release any of the red colored key to unlock the selection and revert to the target selection menu. 1+3 7. Timeout and abort modes: 7.1. If you selected only the first target on a pair, you can abort the selection by pressing the Fire [ ] key again. 7.2. The Voice detection timeout period is 16 Seconds. Once targets are selected and the Red LED started blinking slowly, you have 16 seconds to call “pull”. If you do not call during the timeout period, the session will time out and revert to the target selection menu. To abort the session early, simply touch and quickly release any of the red colored keys. 7.3. The Shot detection timeout period is 6 seconds. You have 6 seconds to shoot your first target and then 6 more seconds to shoot the second target. If you do not shoot the number of shots corresponding with the target selection, the unit will revert to voice detection so you can repeat the same target selection. Touching any of the red colored keys during the shot detection timeout period will abort the session and the unit will revert to the target selection menu. 8. Exit voice release mode by pressing the [ ] key. EZP_MTX8VR_UserGuide.doc For Version 1.1.0 EZPull MTX-8VR User Manual Page 5 MTX-8VR Microphones: 1. Using MTX-8VR comes standard with a Lapel microphone: the shooter can strap the EZPull on a belt or place it in the vest pocket, clipping the lapel microphone to the vest or shirt close to the mouth. This arrangement is suitable for a “solo” shooter. 2. Using MTX-8VR on a Stand with the optional “plug microphone”: Using the optional “plug microphone” the unit can be placed in a stand positioned 2’ -4’ in front of the shooter. The Shooter presses the key for the desired target and has 16 seconds to call Pull Plug Microphone Lapel Microphone Automatic Power Down After a preset idle time (typically, 5 to 15 minutes) with no key presses, the MTX-8 will go into low power mode and the display will go blank. If this occurs during target release, (manual or automatic modes), press the ON/OFF key [ ] to return to the last activity prior to power down. Low Battery When the batteries are nearly empty, the display will show the “empty battery” icon. Replace the batteries. EZP_MTX8VR_UserGuide.doc For Version 1.1.0 EZPull MTX-8VR User Manual Page 6 Using the MTX-8VR in Auto Sequence Mode Auto Sequence mode the voice release is disabled. In Auto Sequence mode the 5-Stand target menu is preselected by the club’s personnel. 1. From the Main menu, press the [2-B] key. The display will show the number of shooters selection screen. #SHOOTERS ▲▼ 04 2. Use the ▲[3-C] and ▼ [8-H] keys to select the number of shooters then press the Fire [ ] key to accept and continue. Notice: The first shooter must always start on the first stand with the other shooters following the order of stands – no skipping stands! 3. Press the Fire [ ] key to start the game. The display will momentarily show the key functions used in this mode. FIRE ◄ BACK 4. The Display will now show the first target in the sequence. On the left side you will see the Stand number - STD:# and the Queue number - QUE:# number (In 5-Stand, all shooters shoot the first queue, then the second queue, etc.) STD: 1 QUE:1 ▲ MANL ►SKIP 2 5. Fire: Press the Fire [ ] key to release the target(s). The display will now show the next target(s) to be released. 6. Back: If targets are broken or you need to repeat a segment in the sequence, press the ◄ [4-D] key to go back. Note the STD:# and QUE:# to navigate back to the desired segment. 7. Skip: If you need to skip a segment in the sequence, press the ► [5-E] key to skip to the next segment. Note the STD:# and QUE:# to navigate to the desired segment. 8. Manual: If you need to momentarily switch to a fully manual mode, press the ▲ [3-C] key. The MTX-8 will operate in manual mode (see above). Press the [ ] key to return to automatic sequence mode at the last segment where you left it. 9. Pairs: There are three release modes for pairs: 9.1. True Pair: Press the Fire [ ] key - Two targets release simultaneously. Indicated by a “+” between the trap numbers 9.2. Report Pair: Press the Fire [ ] key - First target released. Red LED ON steady reminding you to act on report. Press the fire [ ] key again upon shooters gunshot (report) to throw the second target and advance to the next segment. Indicated by a “>” between the trap numbers. 9.3. Following Pair: Press the Fire [ ] key - First target released. Red LED blinks indicating you should wait the delay. The second target releases automatically after the number of seconds shown under the ~ symbol. Indicated by a “~” between the trap numbers. STD: 2 QUE:3 3+4 STD: 2 QUE:2 3>4 STD: 3 QUE:2 3~4 4 10. When the sequence is complete, the display shows “GAME OVER”. Press the Fire [ ] key to start over or the [ ] key to return to the main menu. EZP_MTX8VR_UserGuide.doc For Version 1.1.0 EZPull MTX-8VR User Manual Page 7 Special Setup Options The MTX-8 may be enabled for limited user access to certain setup parameters. To access setup: 1. From the Main menu, press the [3-C] key to select SETUP. The display will show “ENTER PASSWORD”. Enter any 4 digits from the 1-8 keys (example 1111). 2. If limited access is enabled, the display will show “LIMITED ACCESS” followed by the first setup item. Otherwise, if limited access is disabled, you will be “kicked” back to the Main Menu. 3. Using Setup: 3.1. Use the [4] or [5] keys to navigate between setup items. 3.2. Use the [3] or [8] keys to modify the value. 3.3. Press the Enter [ ] key to save the new value. 3.4. Press the SHIFT key [ ] to exit and return to the Main Menu. 4. Setup options: 4.1. MENU: Selects the menu number that will be used for Five-Stand automatic sequencing mode. 4.2. BACKLIT: If using the MTX-8 at night, set this parameter to 05 to enable LCD backlight after each key press. Otherwise set it to 00 to turn LCD backlight OFF. 4.3. SHOTCNT: Enables or disables gunshot detection. Set to 1 to detect gunshots for releasing a report target and count gunshots to determine when a shooting step is completed. Set to 1 to disable gunshot detection. Report pairs will be release as a following pair with the delay set by FPDLAY setup value. 4.4. VOICE: Controls the sensitivity to voice in voice release mode. A higher value is more sensitive to voice but also more sensitive to noise. 4.5. SHOT: Controls the sensitivity to a gunshot used to release the report target in voice release mode. A higher value is more sensitive to gunshot sound but may also pick gunshots from other shooters in the vicinity. EZP_MTX8VR_UserGuide.doc For Version 1.1.0