1
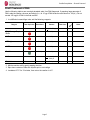
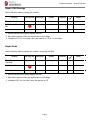
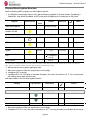
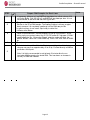
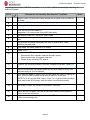
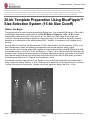
PacBio SampleNet – Shared Protocol
Please note: the s hared protoc ols desc ribed herein m may not have been validated by Pac ific Biosc iences and are provided as-is and
w without any warranty. Use of these protoc ols is offered to those customers who unders tand and ac cept the assoc iated term s and
®
c onditions and wish to tak e advantage of their potential to help prepare samples for analys is us ing the PacBio System.If any of thes e
protocols are to be used in a produc tion environment, it is the responsibility of the end user to perform the required validation.
20-kb Template Preparation Using BluePippin™
Size-Selection System (15-kb Size Cutoff)
Before You Begin
This procedure can be used to prepare size-selected libraries from 5 μg of sheared DNA using a 15-kb cutoff in
the BluePippin Size-Selection system.With the “0.75%, DF Marker S1 high-pass 15 kb – 20 kb” protocol,
size-selection cutoffs can be set to 15 kb up to 20 kb. This defines the lower edge of the range to be
collected. Because size selection is aggressive, library yield using a 15-kb cutoff m ay be heavily im pacted
depending on the distribution of the starting sheared DNA. Therefore, it is imperative to QC samples prior to
shearing.
Running DNA on Pulsed-Field Gel Electrophoresis (PFGE), Field-Inversion Gel Electrophoresis (FIGE), or any
other electrophoretic system that provides good separation and accurate fragment sizing is highly
recommended. High molecular weight DNA migrates as a band at approxi mately 48 kb (Bio-Rad 8-48 kb DNA
size standard) when run on PFGE or FIGE. See Sample 1 in Figure 1 as an example of genomic DNA with high
molecular weight. Although the sample appears to be slightly fragmented (smeared), the majority of the DNA is
high molecular weight as shown by a strong band at approxim at ely48 kb. With this DNA quality, proceed to
the shearing step outlined in the “Fragment and Concentrate” section.
If the sample is severely fragmented as in the Sample 2, you m ay eliminate the shearing step and proceed to
library construction directly. However, a 15-kb cutoff may not be appropriate for this sample since it could result
in a loss of the majority of the sample. Consider using a less aggressive sizing cutoff (6 kb - 10 kb).
48
15.0
10.1
Figure 1: FIGE (Pippin Puls e) of 5-Mb genome. Exam ples of high m olecular w eight DNA (Sam ple 1) and fragm ented DNA (Sample 2).
Page 1
PacBio SampleNet – Shared Protocol
A good shearing strategy is also key to constructing a good 20-kb library using a 15-kb cutoff. Use the
shearing procedure outlined in the “Fragment and Concentration” section. An example of sheared DNA using
the recommended procedure is shown in Figure 2. Ideally, the m ode of fragm ent distribution should be on or
larger than the 17-kb marker. Perform tests to determine the best shearing condition for your sample. Overshearing will result in very low yield.
With 15 kb as the size cutoff, 10 µg sheared gDNA going into the repair steps will typically generate sufficient
size-selected libraries for large-genome sequencing projects. This procedure is optimized for 5 µg of sheared
gDNA. If working with 10 µg of sheared gDNA, scale all the reaction volumes proportionally (e.g., if the input
amount of DNA is double the amount set forth in this procedure, double all the reaction volumes listed in the
tables).
Figure 2: Bioanalyzer trac e of a 20-k b E. c oli sheared DNA. Ideally, fragm ent distribution should m igrate on, or be larger than, the 17kb m arker (12000 ladder). If the m ode is smaller than 17 k b, a m ajority of the sam ple may be los t w hen us ing a 15-kb size s election
cutoff.
If using this protocol for the first time, we strongly recommend that you process a control sample first. Using
the DNA shearing methods and subsequent AMPure PB bead purification steps described below, you should
recover approximately 50%-80% of your input DNA (by m ass). Typical yields, from pre-purified DNA (where
smaller fragments are already eliminated as a result of the shearing process) are between 80-100%.
Insert Size Target
20 kb
Insert Size Range
Sheared and
Concentrated DNA
Amount
Ligation
5 μg
Blunt
15 kb to 20 kb (size-selected
using BluePippin system)
DNA Handling:
When constructing large insert libraries, we highly recommend using gentle mixing instead of vortexing.
Vigorous vortexing can potentially damage large fragments. Gentle mixing can be done on a rotator (same
rotator used for MagBead binding) at room temperature for 20 minutes.
Page 2
PacBio SampleNet – Shared Protocol
BluePippin™ System Recommendations:
Refer to the table of recommendations below for guidelines when using the BluePippin system. Yield, after the
size-selection step, depends on shear distribution.
Mass of
SMRTbell
Library
< 2 µg
>600 ng
>5 µg
Size Selection
Cut-off
Requirement
4,000 to
5,000 kb
6,000 kb
to 10,000 kb
15,000 kb
to 20,000 kb
Recommended
Cutoff (bp)
BP start BP end*
Cassette Definition File
Version
Mar
-ker
4,000
50,000
0.75%DF Marker S1 high-pass 4-10kb v2
v2
S1
5,000
50,000
0.75%DF Marker S1 high-pass 4-10kb v2
v2
S1
6,000
50,000
0.75%DF Marker S1 High-Pass 6-10kb v3
v3
S1
7,000
50,000
0.75%DF Marker S1 High-Pass 6-10kb v3
v3
S1
8,000
50,000
0.75%DF Marker S1 High-Pass 6-10kb v3
v3
S1
9,000
50,000
0.75%DF Marker S1 High-Pass 6-10kb v3
v3
S1
10,000
50,000
0.75%DF Marker S1 High-Pass 6-10kb v3
v3
S1
15,000
50,000
0.75%DF Marker S1 high-pass 15-20kb
0
S1
16,000
50,000
0.75%DF Marker S1 high-pass 15-20kb
0
S1
17,000
50,000
0.75%DF Marker S1 high-pass 15-20kb
0
S1
18,000
50,000
0.75%DF Marker S1 high-pass 15-20kb
0
S1
19,000
50,000
0.75%DF Marker S1 high-pass 15-20kb
0
S1
20,000
50,000
0.75%DF Marker S1 high-pass 15-20kb
0
S1
*BP end should always be set to 50,000
Page 3
Kit Part
Number
PAC20KB
or
BLF7510
PAC20KB
or
BLF7510
PAC20KB
or
BLF7510
PAC20KB
or
BLF7510
PAC20KB
or
BLF7510
PAC20KB
or
BLF7510
PAC20KB
or
BLF7510
PAC20KB
or
BLF7510
PAC20KB
or
BLF7510
PAC20KB
or
BLF7510
PAC20KB
or
BLF7510
PAC20KB
or
BLF7510
PAC20KB
or
BLF7510
PacBio SampleNet – Shared Protocol
Fragment and Concentrate DNA
Gentle mixing is recommended for large-insert libraries (20 kb), 15-kb size selected. Typical yields after
shearing and AMPure purification are 50-70%, depending on the quality and purity of the input gDNA.
Use a Covaris® g-TUBE® device to shear > 10 μg DNA sample. The most up-to-date guidance on how to use the
g-TUBE device, along with recommended centrifuges and centrifugation speeds, can be found in the g-TUBE
device user manual available for download from the Covaris website or the Shared Protocols page of
SampleNet, with the recommendations below. It is highly recommended to perform test shears first to
ensure fragment distribution is on or above the 17-kb marker of the Bioanalyzer instrument.
1. Dilute your DNA concentration to 100-300 ng/μL in Elution Buffer (EB). PacBio recommends a sample volume
of at least 100 μL.
2. Shear at 4800 rpm for 2 minutes in an Eppendorf® MiniSpin plus.
3. Check for residual volum e remaining in the upper chamber. If present, spin again at 4800 rpm for an
additional two minutes. Repeat this spin cycle until most if not all of the sample has passed through the orifice.
4. If a small volume persists, perform a final spin at 8000 - 10000 rpm to push everything through the orifice.
Do not do this step if a large volume of your sample is still present in the upper chamber. You m ay
also use a pipette to remove the residual volume that does not make it through the orifice.
4. Invert and spin at 4800 until all samples have passed through the orifice.
5. Recover your sample into a 1.5 or 2.0 mL LoBind microcentrifuge tube. Add EB if necessary to adjust
volume to 100 μL for the concentration step below.
Page 4
PacBio SampleNet – Shared Protocol
ST EP
1
Concentrate DNA
Add 0.45X volume of AMPure® PB magnetic beads.
μL of sample X 0.45X =
μL of beads
Note that the beads must be brought to room temperature and all AMPure PB bead
purification steps should be performed at room temperature.
Before using, mix the bead reagent well until the solution appears hom ogenous.
Pipette the reagent slowly since the bead mixture is viscous and precise volumes
are critical to the purification process.
2
Mi x bead/DNA solution thoroughly by tapping the tube gently. Do not pipet to mix.
3
Quickly spin down the tube (for 1 second) to collect the beads.
4
Allow the DNA to bind to beads by gentle end-over-end rotation for 20
minutes at room temperature. We recommend using a VW R tube rotator.
5
Spin down the tube (for 1 second) to collect beads.
6
Place the tube in a magnetic bead rack until the beads collect to the side of the tube
and the solution appears clear. The actual time required t o collect the beads to the
side depends on the volume of beads added.
7
With the tube still on the magnetic bead rack, slowly pipette off cleared
supernatant and save in another tube. Avoid disturbing the bead pellet.
If the DNA is not recovered at the end of this Procedure, you can add equal
volumes of AMPure PB beads to the saved supernatant and repeat the AMPure PB
bead purification steps to recover the DNA.
8
W ash beads with freshly prepared 70% ethanol.
Note that 70% ethanol is hygroscopic and should be prepared FRESH to achieve
optim al results. Also, 70% ethanol should be stored in a tightly capped
polypropylene tube for no m ore than 3 days.
– Do not remove the tube from the m agnetic rack.
– Use a sufficient volume of 70% ethanol to fill the tube (1.5 mL for 1.5 m L tube
or 2 m L for 2 m L tube). Slowly dispense the 70% ethanol against the side of
the tube opposite the beads. Let the tube sit for 30 seconds.
– Do not disturb the bead pell et.
– After 30 seconds, pipette and discard the 70% ethanol.
9
10
Repeat step 8.
Rem ove residual 70% ethanol.
– Rem ove tube from m agnetic bead rack and spin to pellet beads. Both the
beads and any residual 70% ethanol will be at the bottom of the tube.
– Place the tube back on m agnetic bead rack.
– Pipette off any rem aining 70% ethanol.
11
Check for any remaining droplets in the tube. If droplets are present, repeat step
10.
Page 5
Notes
PacBio SampleNet – Shared Protocol
ST EP
Concentrate DNA
12
Rem ove the tube from the m agnetic bead rack and allow beads to air-dry (with the
tube caps open) for 30 to 60 seconds.
13
Calculate appropriate volum e of Elution Buffer.
ng X 0.5 / (
ng/μL) =
μL of Elution Buffer needed
The m inimum DNA concentration required to proceed to the next step (End-Repair)
is 140 ng/μL with preferred m ass of at least 5 μg.
14
Add the Pacific Biosciences® Elution Buffer volum e (calculated in step 13) to your
beads. Close the tube and tap with finger to mix. Do not pipet to mix.
– Elute the DNA by gentle rotation/mixing for 20 minutes at room temperature.
– Spin the tube down to pellet beads, then place the tube back on the m agnetic
bead rack.
– Perform concentration m easurem ents. Verify your DNA concentration using a
Nanodrop® or Qubit® quantitation platform . If the DNA concentration is
estim ated to be equal to or below 12 ng/μL, a Qubit system reading is
required. W hen perform ing a Qubit system reading, ensure that your sam ple
is within the range of the Qubit kit you are using. For proper concentration
calculations, incorporate the dilution factor (used when diluting your sam ple)
to be within range of the Qubit kit and the dilution factor when diluting your
sam ple with the working solution. The latter part of this dilution factor can be
calculated autom atically by the Qubit system.
– Discard the beads.
15
Perform qualitative and quantitative analysis using a Bioanalyzer® instrum ent.
Note that the Bioanalyzer instrument has different kits in its offering and the
appropriate kit, based on insert size, should be used.
Dilute the sam ples appropriately before loading on the Bioanalyzer chip so that the
DNA concentration loaded falls well within the detectable m inimum and maxim um
range of the assay. Refer to Agilent Technologies’ guides for specific information on
the range of the specific kit you m ight be using.
Note that typical yield, at this point of the process (i.e. post-shearing and after one
0.45X AMPure PB bead purification), is approxim ately 50%-80%.
16
The sheared DNA can be stored for up to 24 hours at 4°C or at -20°C for longer
duration.
17
Actual recovery per μL and total availabl e sam ple m aterial:
Page 6
Notes
PacBio SampleNet – Shared Protocol
ExoVII Treatment of DNA
Use the foll owing table to rem ove single-stranded ends from DNA fragm ents. If preparing larger am ounts of
DNA, scale the reaction volum es accordingly (i.e., for 10 μg of DNA scale the total volum e to 100 μL). Do not
exc eed 100 ng/μL of DNA in the final reaction.
1. In a LoBind microcentrifuge tube, add the following reagents:
Reagent
Sheared DNA
Tube Cap Color
Stock Conc.
Volume
μL for 5.0 μg
−
Final Conc.
−
DNA Dam age Repair
Buffer
10 X
5.0 μL
1X
NAD+
100 X
0.5 μL
1X
ATP high
10 mM
5.0 μL
1 mM
dNTP
10 mM
0.5 μL
0.1 mM
ExoVII
10 U/μL
1.0 μL
0.2 U/μL
H2O
μL to adjust to
50.0 μL
−
50.0 μL
Total Volume
2. Mix the reaction well by gently tapping the tube.
3. Spin down contents of tube with a quick spin in a m icrofuge.
4. Incubate at 37°C for 15 minutes, then return the reaction to 4°C.
Page 7
−
−
Notes
PacBio SampleNet – Shared Protocol
Repair DNA Damage
Use the foll owing table to prepare your reaction.
Reagent
DNA (ExoVII treat ed)
Tube Cap Color
Stock Conc.
−
25 X
DNA Dam age Repair
Mi x
Total Volum e
Volume
Final Conc.
50 μL
−
2.0 μL
1X
52.0 μL
−
Notes
1. Mix the reaction well by gently tapping the tube.
2. Spin down contents of tube with a quick spin in a m icrofuge.
3. Incubate at 37°C for 20 minutes, return the reaction to 4°C for 1 to 5 minutes.
Repair Ends
Use the foll owing table to prepare your reaction, then purify the DNA.
Reagent
DNA (Dam age
Repaired)
End Repair Mi x
Tube Cap Color
Stock Conc.
−
20 X
Total Volum e
Volume
Final Conc.
52.0 μL
−
2.5 μL
1X
54.5 μL
−
1. Mix the reaction well by gently tapping the tube.
2. Spin down contents of tube with a quick spin in a m icrofuge.
3. Incubate at 25°C for 5 m inutes, return the reaction to 4°C.
Page 8
Notes
PacBio SampleNet – Shared Protocol
ST EP
Purify DNA
1
Add 0.45X volum e of AMPure PB beads to the End-Repair reaction. (For detailed
instructions on AMPure PB bead purification, see the Concentrate DNA section.)
2
Mi x the bead/DNA solution thoroughly by gently tapping the tube.
3
Quickly spin down the tube (for 1 second) to collect the beads. Do not pellet beads.
4
Allow the DNA to bind to beads by gentle rotation for 20 minutes at room
temperature. W e recomm end using a VW R tube rotator.
5
Spin down the tube (for 1 second) to collect beads.
6
Place the tube in a m agnetic bead rack to collect the beads to the side of the tube.
7
Slowly pipette off cleared supernatant and save (in another tube). Avoid disturbing
the bead pell et.
8
W ash beads with freshly prepared 70% ethanol.
9
Repeat step 8.
10
Rem ove residual 70% ethanol.
– Rem ove tube from m agnetic bead rack and spin to pellet beads. Both the
beads and any residual 70% ethanol will be at the bottom of the tube.
– Place the tube back on m agnetic bead rack.
– Pipette off any rem aining 70% ethanol.
11
Check for any rem aining droplets in the tube. If droplets are present, repeat step
10.
12
Rem ove the tube from the m agnetic bead rack and allow beads to air-dry (with
tube caps open) for 30 to 60 seconds.
13
Elute the DNA off the beads in 20 μL Elution Buffer. Mix by gently tapping the
tube, elute by rotating the tube for 20 minutes at room temperature.
14
Optional: Verify your DNA amount and concentration using a Nanodrop or
Qubit quantitation platform, as appropriate.
15
Optional: Perform qualitative and quantitative analysis using a Bioanalyzer
instrum ent with the DNA 12000 Kit. Note that typical yield at this point of the
process (foll owing End-Repair and one 0.45X AMPure PB bead purification) is
approxim ately between 80-100% of the total starting m ateri al.
16
The End-Repaired DNA can be stored overnight at 4°C or at -20°C for longer
durations.
17
Actual recovery per μL and total availabl e sam ple m aterial:
Page 9
Notes
PacBio SampleNet – Shared Protocol
Prepare Blunt-Ligation Reaction
Use the foll owing table to prepare your blunt-ligation reaction:
1. In a LoBind microcentrifuge tube (on ice), add the following reagents in the order shown. If preparing a
Master Mi x, ensure that the adapter is NOT mixed with the ligase prior to introduction of the inserts.
Reagent
Tube Cap Color
Stock
Volume
Final Conc.
Notes
Conc.
DNA (End Repaired)
−
19.0 μL to 20.0 μL
20 μM
Annealed Blunt
Adapter (20 μM)
10* μL
5 μM
Mix before proceeding
Tem plate Prep Buffer
10 X
4.0 μL
1X
ATP low
1 mM
2.0 μL
0.05 mM
Mix before proceeding
Ligase
1.0 μL
30 U/μL
H2O
−
−
Total Volum e
−
−
μL to adjust to
40.0 μL
40.0 μL
0.75 U/μL
−
−
*Note that this increase in adapter during ligation mi ni mi zes the incidence of chi me ras. Adapter di mers are the n efficiently removed during si ze s election in the Bl uePippi n
System. T his is not reco mmended for libraries which are not being si ze selected using the BluePippin Syste m.
2.
3.
4.
5.
Mix the reaction well by gently tapping the tube.
Spin down contents of tube with a quick spin in a m icrofuge.
Incubate at 25°C overnight.
Incubate at 65°C for 10 minutes to inactivate the ligase, then return the reaction to 4°C. You m ust proceed
with adding exonuclease after this step.
Add exonuclease to rem ove fail ed ligation products.
Reagent
Tube Cap Color
Stock Conc.
Volume
40 μL
Ligated DNA
Mix reaction well by pipetting
ExoIII
100.0 U/μL
1.0 μL
ExoVII
10.0 U/μL
1.0 μL
42 μL
Tot al Volume
1. Spin down contents of tube with a quick spin in a m icrofuge.
2. Incubate at 37°C for 1 hour, then return the reaction to 4°C. You must proceed with purification after this step.
Page 10
PacBio SampleNet – Shared Protocol
Purify SMRTbell™ Templates
ST EP
Purify SM RTbell Templates
1
Add 0.45X volum e of AMPure PB beads to the exonuclease-treated reaction. (For
detail ed instructions on AMPure PB bead purification, see the Concentrat e DNA
section).
2
Mi x the bead/DNA solution by gently tapping the tube.
3
Quickly spin down the tube (for 1 second) to collect the beads. Do not pellet
beads.
4
Allow the DNA to bind to beads by gentle rotation for 20 minutes at room
temperature. W e recomm end using a VW R tube rotator.
5
Spin down the tube (for 1 second) to collect beads.
6
Place the tube in a m agnetic bead rack to collect the beads to the side of the
tube.
7
Slowly pipette off cleared supernat ant and save (in another tube). Avoid
disturbing the bead pellet.
8
W ash beads with freshly prepared 70% ethanol.
9
Repeat step 8.
10
Rem ove residual 70% ethanol.
– Rem ove tube from m agnetic bead rack and spin to pellet beads. Both the
beads and any residual 70% ethanol will be at the bottom of the tube.
– Place the tube back on m agnetic bead rack.
– Pipette off any rem aining 70% ethanol.
11
Check for any rem aining droplets in the tube. If droplets are present, repeat step
10.
12
Rem ove the tube from the m agnetic bead rack and allow beads to air-dry (with
tube caps open) for 30 to 60 seconds.
13
Elute the DNA off the beads in 31 μL of Elution Buffer. Mix by gently tapping the
tube, elute by rotating the tube for 20 minutes at room temperature
Page 11
Notes
PacBio SampleNet – Shared Protocol
BluePippin™ Size Selection
Follow the recomm endations below and the BluePippin User Manual and Quick Guide (to www.sagescience.com ) to size-select your ~20-kb SMRTbell tem plates using the BluePippin instructions. Be sure you
have revi ewed the recomm endations listed in the User Bulletin - Guidelines for Preparing 20 kb SMRTbell™
Templates.
Note that you must use the BluePippin “0.75%, DF Marker S1 high-pass 15 kb – 20 kb” protocol for this
procedure. It is highly recommended to upgrade the BluePippin Software to v6.20 to enable simultaneous
sample elution and the auto-lights off feature. If you have upgraded to v6.20, skip this section and proceed
to "Prepare DNA Samples for Each Lane". See the table below for features of each software version.
Software Version
< 6.11
6.11
6.20
Elution
Blue LED Lights
One sample at a time
Simultaneous elution
Simultaneous elution
Turn off manually
Turn off manually
Auto lights off
If you have not upgraded to v6.20 and are running v6.11 or lower, follow the instructions below on how to
"Calibrate and Turn Off LEDs". During the elution step, sam ples m ay be exposed to blue LEDs as they are
queued for elution. This exposure m ay result in dam age to the SMRTbell tem plates. W e recomm end turning
off the blue LEDs for all lanes exc ept the S1 Marker lane.
If you are running v6.11 or lower, it is recomm ended to run the BluePippin system overnight when running
several sam ples. Separation tim e is approxim ately 3 hours and elution tim e is approxim ately 45 m inutes.
ST EP
Calibrate and Turn Off LEDS
1
Place the calibration fixture on the nest of the instrument and close the lid. Click
“Calibrate” from the main screen. Click “Calibrate” in the calibration pop up window.
2
After calibration passes, click “Exit”.
3
From the main screen, click on the BluePippin logo located in the lower right corner.
4
Enter the password “pips” to display advanced user tabs.
5
Select the “LED Setup Tab”.
6
Adjust the LED Counts to zero in the lanes that you want to turn off the LED. Double
click on the LED count to highlight the number and enter “0”.
Notes
IMPORTANT: Do not change the LED count in the lane that will contain the S1
reference marker.
7
Click on “Apply (Enter)” to save calibration values.
8
Verify that the LEDs are turned off.
9
The instrument is now ready for use. Note that instrument calibration (step 1)
will turn on all LEDs.
For other applications that do not require LEDs to be turned off, set the instrument to hide the “advanced tabs”:
1. Click on the BluePippin logo in the lower right corner of the main screen.
2. Do not enter a password in the pop up window.
3. Click “OK”.
Page 12
PacBio SampleNet – Shared Protocol
ST EP
1
2
3
4
Prepare DNA Samples for Each Lane
If necessary, dilute up to 5 μg SMRTbell tem plates into a final volum e of 30
μL Elution Buffer. Run 500 ng to 5 μg SMRTbell tem plates per lane. It’s not
recomm ended to start with less than 500 ng per lane.
Bring the Loading Solution to room tem perature, then add 10 μL of the Loading
Solution to the 30 μL DNA sample. The Loading Solution is viscous so pipet
slowly to ensure it is com pletely transferred into the DNA sam ple. Mix
by gentle mixing; do not vortex. Spin briefly to collect the
contents at the bottom .
Follow the m anufacturer’s recomm endations to set up a run protocol. W hen
setting up the run protocol, select the “0.75% DF m arker S1 high-pass 15-20kb”
cassette definition file. Choose the “Range” selection m ode, and enter the
desired “BPstart” value from 15000-20000 bp. Enter a “BP End” value of 50000
bp.
Start the run.
Collect eluate into a 1.5 or 2.0 m L LoBind microcentrifuge tube. Note that
volum es m ay vary from approxim ately 40 to 60 μL. Proceed directly to AMPure
purification at this point.
5
Note: It is highly recomm ended to wait at least 45 minutes aft er the run
term inates before rem oving the eluted DNA. This has shown an increase in
recovery of SMRTbell libraries.
Page 13
Notes
PacBio SampleNet – Shared Protocol
Concentrate size-selected SMRTbell tem plates in a 1.5 or 2.0 mL LoBind microcentrifuge tube using 1X
AMPure PB beads.
ST EP
Concentrate and Quantify Size-Selected Templates
1
Measure volum e of eluate and overlay sam ple with an equal volum e of AMPure
PB beads.
2
Mi x the bead/DNA solution thoroughly by gently tapping the tube.
3
Quickly spin down the tube (for 1 second) to collect the beads.
4
Allow the DNA to bind to beads by gentle rotation for 20 minutes at room
temperature. W e recomm end using a VWR tube rotator.
5
Spin down the tube (for 1 second) to collect beads.
6
Place the tube in a m agnetic bead rack to collect the beads to the side of the
tube.
7
Slowly pipette off cleared supernat ant and save (in another tube). Avoid
disturbing the bead pellet.
8
W ash beads with freshly prepared 70% ethanol.
9
Repeat step 8.
10
Rem ove residual 70% ethanol.
– Rem ove tube from m agnetic bead rack and spin quickly.
– Place the tube back on m agnetic bead rack.
– Pipette off any rem aining 70% ethanol.
11
Check for any rem aining droplets in the tube. If droplets are present, repeat step
10.
12
Rem ove the tube from the m agnetic bead rack and allow beads to air-dry (with
tube caps open) for 30 to 60 seconds.
13
Elute DNA from beads by adding 10 μL EB onto beads. Mix gently by tapping the
tube. Elute the DNA by gentle mixing using a rotator for 20 minutes.
NOTE: For up to 5 μg input DNA, elute in 10 μL. For > 5 μg input DNA (if multiple
lanes were pooled for this step), scale the elution volum e proportionat ely.
14
Spin briefly t o collect the contents at the bottom of the tube.
15
Return sam ple to m agnetic rack and let stand until beads are well-separat ed.
Collect to the side of the tube.
16
Transfer supernatant containing size-selected SMRTbell templates to a new
LoBind m icrocentrifuge tube.
Page 14
Notes
PacBio SampleNet – Shared Protocol
ST EP
Concentrate and Quantify Size-Selected Templates
17
Use 1 μL of purified SMRTbell tem plates to m ake a 1:5 dilution in EB, and
m easure the DNA concentration using a Qubit fluorom eter. Retain the rem aining
4 μL of diluted sam ple for QC by FIGE.
Notes
NOTE: Typical yields of size-selected, ~20 kb SMRTbell library from
500 ng - 5 μg input m aterial are 20-40%.
Anneal and Bind BluePippin™ Size-Selected SMRTbell™ Templates
Use the Binding Calculator to anneal sequencing prim er at 0.833 nM concentration and bind polym erase at
0.500 nM concentration. These are the default concentrations required for 20 kb libraries. Note that you m ust
have the PacBio DNA/Polym erase Kit and use LoBind m icrocentrifuge tubes for this step.
Before adding the primer to the SMRTbell template, the primer must be heated to 80ºC followed by a rapid cooldown to 4ºC. The conditioned primer can then be added to the SMRTbell template in 1X Primer Buffer, followed
by incubation at 20 ºC for 30 minutes.
For polymerase binding, incubation at 30ºC for 30 minutes is sufficient. Instructions for polymerase binding are
provided by the calculator.
For more information about using the Binding Calculator, see the Pacific Biosciences Template Preparation and
Sequencing Guide and QRC - Annealing and Binding Recommendations.
Prepare for MagBead Loading
Optimal loading of size-selected ~20 kb tem plates using P6 polym erase can be achieved using an onplate concentration of ~0.100 nM. An initial loading test on-plate concentration of 0.100 nM is highly
recommended.
For efficient binding to Magnetic Beads, bound com plexes (at 0.500 nM concentration) m ust be diluted in the
appropriate ratio of MagBead Binding Buffer and MagB ead W ash Buffer. Follow the Binding Calculator instructions to dilute your sam ple for MagBead binding.
Control Complex Dilution
If you will be using the PacBio Control Com plex, dilute the DNA Control Complex according to the volum es and
instructions specified in the Calculator.
Sequence
To prepare for sequencing on the instrum ent, refer to the RS Remote Online Help system or Pacific Biosciences
Software Getting Started Guide for m ore inform ation. Follow the touchscreen UI to start your run. Note that you
must have a DNA Sequencing Kit and SMRT® Cells for standard sequencing.
W hen sequencing size-sel ected ~20 kb SMRTbell tem plates prepared by this m ethod, be sure to indicate the
m agnetic bead collection protocol, a 20,000 bp insert size, stage start, and 240 m inute m ovies when setting up
your run protocol in RS Rem ote.
For Research Use O nly. Not for use in diagnostic procedures. © Copyright 2015, Pacific Biosciences of California, Inc. All rights reserved. I nformation in this document is
subject to change without notice. Pacific Biosciences assumes no responsibility for any errors or omissions in this document. Certain notices, terms, conditions and/o r use
restrictions m ay pertain to your use of Pacific Biosciences products and/or third p arty products. Please refer to the applicable Pacific Biosciences Terms and Conditions of S
ale and to the applicable license terms at http://www.pacificbiosciences.com/lice nses.html. Pacific Biosciences, the Pacific Biosciences logo, PacBio, S MRT, SMRTbell and
Iso-Seq are trademarks of Pacific Biosciences. BluePippin and SageELF are tradem arks of Sage Science, Inc. NGS-go and NGSengine are tradem arks of GenDx. All other
tradem arks are the sole property of their respective owners.
Page 15