1
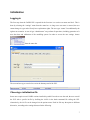
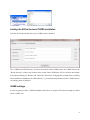
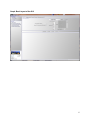
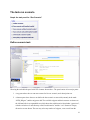
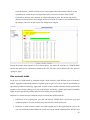
The Graphical User Interface for CAPRI version 2014 Wolfgang Britz Institute for Food and Resource Economics Chair of Economic and Agricultural Policy University of Bonn Bonn, July 2014 Acknowledgments Many people have over the years contributed to the development, maintenance and application of the CAPRI modelling system. After more than ten years since a first prototype was constructed, it is almost impossible to list them all and name their specific contributions. The author opted for this rather technical paper to refrain from citing the different (working) papers which shed more light on methodological questions, but rather refers in general to the CAPRI documentation. Nevertheless, it is only fair to mention Hans-Josef Greuel and Andrea Zintl, who both long before CAPRI was born have already developed software concepts and code which underlined to a large extent until 2006 the DBMS of CAPRI, and in parts, its Graphical User Interface. Finally, Alexander Gocht contributed over the last years to the Java code underlying the GUI. Eriona Dashja, a student assistance, checked in 2011 the user manual against the actual interface, changed the text where necessary and corrected typos. The work described in here would have been impossible without the funds by different donors, mainly the EU Commission, with regards to changes in 2009 until 2013 especially under the FP 7 project CAPRI-RD All errors in text and code remain with the author. The author Dr. Wolfgang Britz is a senior researcher and lecturer with the Institute for Food and Resource Economics at the University of Bonn, and has co-ordinated since several years the activities based on the CAPRI modelling system. His responsibilities further on include the methodological concept of CAPRI and, to a larger extent, its software implementation. Contact: Dr. Wolfgang Britz Institute for Food and Resource Economics, University Bonn Nussallee 21 D-53115 Bonn Tel.: ++49-(0)-228-732502 [email protected] 2 Content Background ................................................................................................................................................... 6 Initialization................................................................................................................................................... 7 Logging in ................................................................................................................................................. 7 Choosing a initialization file ..................................................................................................................... 7 Linking the GUI to the local CAPRI installation ...................................................................................... 8 GAMS settings .......................................................................................................................................... 8 SVN settings .............................................................................................................................................. 9 Getting help ................................................................................................................................................. 11 Basic layout of the GUI ............................................................................................................................... 12 The different work steps .............................................................................................................................. 14 Build database ......................................................................................................................................... 14 The work step “Generate baseline” ............................................................................................................. 17 The task run scenario................................................................................................................................... 19 Define scenario task ................................................................................................................................ 19 Run scenario tasks ................................................................................................................................... 20 Interaction with GAMS ............................................................................................................................... 24 Exploiting results......................................................................................................................................... 25 Drawing a map showing the nitrate surplus for EU27 at regional level in the base year ........................ 26 Drawing a map of the High Nature Value Farmland indicator for Belgium & Luxembourg for the base year .......................................................................................................................................................... 27 Drawing a map showing changes between the base year and the ex-ante results from the baseline... 31 Drawing a map with the base year results next to one showing changes from the base year to the baseline results .................................................................................................................................... 34 Using the GDX viewer: an example: loading data from the spatial downscaling ................................... 36 Tracking the iteration behaviour of CAPRI , .............................................................................................. 40 Background ............................................................................................................................................. 40 How to use the tracking tool.................................................................................................................... 40 Some technical background ................................................................................................................. 40 Starting the tracking tool and reloading .............................................................................................. 40 Available tables ................................................................................................................................... 41 Index ............................................................................................................................................................ 42 4 5 Background The use of the CAPRI modelling system is increasing, and the user group becomes more diversified. Whereas in the first years, almost all users had directly contributed to model development and were familiar with the underlying GAMS code, more and more users now get to know about the system during training sessions, and have only a limited knowledge of GAMS and the CAPRI GAMS code. Already the very first version of CAPRI, operational from 1999 onwards, features a Graphical User Interface (GUI) to supports users to apply CAPRI for simulations and exploit results. The so-called new GUI in use since 2012 builds on a toolkit developed by Wolfgang Britz called GGIG (GAMS Graphical Interface Generator, http://www.ilr.uni-bonn.de/agpo/staff/britz/ggig_e.htm). That toolkit is not only used for CAPRI, but also for other GAMS and R based projects. It allows designing the GUI via a XML file rather than by direct Java programming. That implies that CAPRI developers will not only code GAMS, but also add, change or remove controls from the interface. Hence, changes to the interface are now more frequent than in the past. The GUI user guide will therefore possibly not document all detailed settings, especially quite specialized settings for debugging purposes. It is generally documented to use the defaults for any non-documented features. As the CAPRI GUI is based on a toolkit shared with others, the same holds on parts of its documentation which therefore consists to three documents: 1. The GGIG programmer guide – that document is only relevant for CAPRI coders who add or change controls on the interface. 2. The GGIG user guide: that essential document explains how the different elements of the interface can be operated, e.g. how to work with tables and graphs, how to use the batch execution utility etc.. It is shared with other projects and comprises to a larger extent content found in earlier CAPRI user guides. 3. The CAPRI GUI guide, the current document, which discusses the specifics of the CAPRI GUI and comprises some examples not relevant for other projects using GGIG. 6 Initialization Logging in The first step when the CAPRI GUI is opened for the first time is to set the user name and level. This is done by selecting the “settings” menu from the menu bar. As long as no user name is entered, the user cannot change its type and will only have exploitation rights. The user type “runner” has additionally the right to run scenarios. A user of type “administrator” can perform all operations, including generation of a new data base and calibration of the modelling system. In order to access the user settings, choose from the menu bar. The user and user types can also be seen in the bottom panel of the GUI: Choosing a initialization file Some users require several CAPRI versions installed in parallel. In order to ease the task, the user can call the GUI with a specific ini-file by defining the ini-file in the batch command file calling the GUI. Alternatively, the ini file can be changed via the options menu. Each ini-file may then point to different directories, according to the settings discussed in the following. 7 Linking the GUI to the local CAPRI installation Next, the GUI needs to know where your CAPRI system is installed. The “CAPRI model files directory” points to the location of the GAMS sources for CAPRI whereas the “Result directory” points to the location where results from CAPRI tasks will be read from and written from; and accordingly for “Restart” and “Data Files” directories. Changing these settings allows switching between different installations for advanced users, e.g. when different branches from the CAPRI software versioning system are installed. GAMS settings In order to generate results, a GAMS installation and license are required. The relevant settings are found on the “GAMS” tab: 8 The “Path to Gams.exe” points to the actual GAMS engine to use. Currently, versions 22.8 and higher are supported. It is recommended to use GAMS 23.3 and above to benefit from calling CONOPT in memory. The button “get the number of processors …” will retrieve the number of available processors in the computer. The “Scratch Directory” will be passed to GAMS and determines where GAMS stores temporary files. A directory on a local disk (not one on a file server) should be chosen. The “GAMS options” field allows the user to send its own settings to GAMS, e.g. as shown above, the page width used in GAMS listings and the number of maximal process dirs generates by GAMs. The number of processors used in GAMS will determine how many parallel GAMS processes will be started with threads are in use. The relative processor speed is used in the pre-steps of the market model to determine from the solution time of the sub-model when the next more complex sub-model or the full model will be solved. Going above 100% might speed up solving the market model. SVN settings CAPRI is hosted on the SVN software versioning system (see e.g. http://en.wikipedia.org/wiki/Apache_Subversion) which ensures that CAPRI users and developers can operate smoothly in a distributed network. For developers who need to upload changes made to CAPRI code to the server (a process called “commit”), TortoiseSVN (http://tortoisesvn.tigris.org/) is the recommended tool. TortoiseSVN is integrated nicely into windows, but it might take a while until the logic behind the SVN operations is fully understood by a novice user. For users which do not contribute to the code basis of CAPRI or use TortoiseSVN in other contexts, installing and learning to master TortoiseSVN as an additional tool is an unnecessary burden. Therefore, the client based SVN basic operations which allow a user to keep its local copy synchronized with the 9 server are now embedded in the java code of the GUI. For those who only need read-only access to the CAPRI server repository, an installation of TortoiseSVN is no longer necessary. The changes necessary in the GUI can be summarized as follows. Firstly, new SVN related entries in the initialisation file can be edited by the user. And secondly, a new dialogue allows starting an update. The following sections give a quick overview over the new functionalities. The set-up of the SVN related information is discussed in the general GGIG user Guide. 10 Getting help The “Help menu” allows opening the online help system, which can be invoked by pressing “F1”. A copy of the content is also stored on the CAPRI web page and can be accessed via the second menu item. “Open GUI document on CAPRI web page” will open the current document. 11 Basic layout of the GUI The GUI is generally structured as seen below. The left upper hand panel allows the selection of the different CAPRI work steps. The left lower hand panel lists the tasks belonging to the work steps. In both cases, only one button will be active. The right hand side offers controls depending on the properties of the task, grouped on different panes. There are buttons allowing starting the task, and a window which collects information at runtime. The footer lists the user name and type, and comprises a progress bar. For tasks linked to a GAMS program, the buttons as shown below will be active: “compile GAMS”: starts the GAMS compiler, but does not execute the program. A listing file will be generated. Used to test if a program compiles without errors. “run GAMS”: tries to execute the GAMS program. A listing file will be generated where possible compilation or run-time errors are reported. “stop GAMS”: sends a “signal interrupt” to the GAMS engine. It may take a while until GAMS reacts and stops with an error message after running its finalization routines. “show results”: open the scenario exploiter Note: for exploiters, the three buttons referring to GAMS will not be visible. The same holds for runners and the work steps “Build data base” and “Generate baseline”. 12 Graph: Basic layout of the GUI 13 The different work steps Each work step may comprise different tasks. No task will require starting more than one GAMS program, but some tasks will start the very same GAMS program with different settings. Some tasks will not start GAMS, but other tools inside the GUI. The different work steps are shown in a panel in the lower left corner of the GUI, and are presented by socalled radio-buttons, which means, that only one button can be selected at any time. Graph: the work step panel Each work step may comprise several tasks, which are shown in the second panel, below the work step panel. The content of the panel hence changes when the user selects a different work step. Again, the different task panels comprise radio buttons for selections purposes. Note: Some utilities which were in older version of the GUI listed as “work steps” can now found under “Utilities” in the menu bar such as the GDX Viewer. Build database Graph: the task panel for “build database” Building up the data base is the logical starting point in sequences of work steps. A new data base for the model needs to be constructed either after updates of the underlying statistical raw data, or after methodological changes in the code affecting content and structure of the data base. Controlling if 14 updating the model yielded satisfactory results, possibly for the different tasks, is a time demanding task which requires in-depth knowledge about the quality of the different in-going data and the logical relations between the different elements of the data base. Users interested in ex-ante policy analysis are usually better off by taking the data base as given, and consequently, the work step is disabled for users which have no “administrator” status. The work step consists of six different tasks: 1. Prepare national data base: Generation of complete and consistent time series at national level, mainly based on Eurostat data (CoCO, from Complete & Consistent). CoCo runs per Member State simultaneously for all years, if data from other Member States are used to derive fallbacks as an? EU average, only the raw statistical data are used. The user can only choose which countries to run, and which years to cover. 2. Finish national data base: Completion of the CoCo data by time series on consumer prices and certain feeding stuffs. In both cases, it turned out that only the complete and consistent time series for all Member States from 1. provide a good basis for that step. The step is hence run simultaneously for all Member States and years, based on the results of the CoCo task. Here, only the years to cover can be chosen by the user. 3. FSS selection routine: Determines the definition of farm type groups. 4. Build regional data base, time series, Generation of time series at regional level (CAPREG). The treatment of years in CAPREG is not identical. For all years, activity levels, output coefficients and input coefficients (excluding feed inputs) are generated. However, only for the base period, a three year weighted average around the chosen base year, feed input coefficients are estimated and the supply models are calibrated based on techniques borrowed from Positive Mathematical Programming. The user can hence choose for which Member States to run CAPREG, for which years and for which base year. Equally, the farm type module may be switched on or off. 5. Build regional data base (CAPREG). Currently the same as three, only that the base year data will be loaded instead of time series. 6. Build global data base (GLOBAL): Building up the international data base. The step includes aggregation of Supply Utilization Accounts and bilateral trade flow matrices from FAO to the product and country definitions of CAPRI, aggregation of the supply and demand elasticities from the World Food Model to the product and country, estimation of bi-lateral transport costs and conversion of the FAPRI baseline to the product and regional aggregation of CAPRI. 15 7. Build HSMU data base (CAPDIS_GRID): spatial downscaling of regional results for the base year to 1x1 km grid cells. The underlying methodology for the different work steps is described in detail in the CAPRI model documentation. The sequence of the tasks as described above follows the work flows. It should be mentioned that certain preparatory steps, as downloading updated data from EuroStat, and converting these data into GAMS tables read by CoCo and CAPREG are no yet integrated in the GUI. The actual controls available will depend on task. Please use the “F1” button to open the online help to get detailed information on settings for the tasks. 16 The work step “Generate baseline” Graph: the task panel for “Generate baseline” For manifold reasons discussed in methodological papers, economic models as CAPRI are not suited for projections, but as tools for counterfactual analysis against an existing comparison point or an existing set of ex-ante time series. The point in time or these time series are called “base line” or “reference run”. CAPRI “runners” which use the model for ex-ante policy simulation do not need to construct their own baseline, but are typically better off by sticking to the baseline provided on a yearly basis along with the latest version of the GAMS code, data base and software. Accordingly, the step and the included tasks are only for user type “administrator”. According to current planning, the baseline will be updated in close cooperation with DG-AGRI twice a year in early summer and early winter, following the release of a new “medium term market outlook” by DG-AGRI. The CAPRI baseline is a mix of trends, expert knowledge and automated checks for logical consistency, and is constructed by a sequences of tasks: 1. Generation of ex-post results. Albeit not strictly necessary for the base line, the ex –post results often prove quite helpful when analysing the reference run. The ex-post results are model run for the base at base year policy and other exogenous parameters, inflated to the chosen simulation year. 2. Generation of the trend projection. The trend projection task is rather time consuming, and may run several days when the farm types are included. It consists of several sub-tasks. Firstly, independent trend lines for many different variables and all regions are estimated, and for each of these trends lines, statistics as R², variance of the error terms etc. are calculated. These results, together with the base period data and the policy shifts, are used to define so-called supports, i.e. 17 the most probable values for the final projection. These sub-tasks are relatively fast. The final consistency sub-task is broken down in two iterations. In the first iteration, only the Member States consistency problems are solved. For the different projection years, the problem will look for minimal deviation from the supports – which may be interpreted as a priori information in a Bayesian interpretation – such that different necessary logical relations between the data are not violated – the data information in a Bayesian estimator. These relations define e.g. production as the product of yield and activity level or force close market balances. The details can be found in the methodological documentation. Once that step is done, the Member states are added up to the EU level, and new support are defined which take given expert projection into account, currently mainly a baseline provided by DG-AGRI. In the second round, the Member State problems are solved again, and then, problems for all NUTS II regions in each Member State, and, for all farm types inside of each NUTS II region. 3. Baseline calibration market model. In that task, the results from the trend projection as Member State level serve as the major input to generate the baseline, along with input from GLOBAL and CAPREG. 4. Baseline calibration supply model. In that task, the prices from the calibration of the market model are taken as given and the regional or farm type supply models are calibrated. That step can be performed independently for the different countries. 5. HSMU Baseline. Downscales the regional or farm type results from the baseline to clusters of 1x1 km grid cells and calculates indicators at that level. These are up-scaled again to NUTS 2. 6. Calibrate CGE. Calibrates the regional CGEs to the baseline calibration results of the supply models at NUTS2 level. 7. Run test shocks with CGE. Allows to test the CGEs on selected predefined shocks. 18 The task run scenario Graph: the task panel for “Run Scenario” Define scenario task Choosing the task adds the panel with GUI elements shown above. The panel consist of two major panes: 1. A top pane where the user can enter a name for his new scenario, and a description text. 2. A bottom pane where the user can define the base scenario to start with (currently in the trunk “MTR_RD.gms”) and the snippet to add. The available snippets and their structure are shown on the left hand side in an expandable tree which shows the sub-directories found under “gams\scen”, with the exclusion of a sub-directory called “baseScenarios” and the “.svn” directories. Empty directories are not shown. The user may select any number of snippets, even several from the 19 same sub-directory. Double-clicking on one of the snippets shows the content of the file on the right hand side, so that the user can inspect the code as seen below in more detail. GAMS keywords are shown in red, comments in yellow and strings in green. He can also edit the file – changes are shown in blue. Once changes had been saved, the tree shows a (user modified) behind the category. The user can also remove the changes from snippets. Storing the scenario then generates a file as shown below, user name, the reference to CAPMOD.GMS and the date and time are automatically added by the GUI. The files will be added to the files stored in “gams\pol_input”. Run scenario tasks At the core of CAPRI stands its simulation engine, which iteratively links different types of economic models: aggregate programming models at regional or farm type level, with an explicit representation of agricultural production technology, aggregated versions of these models at Member States model linked together to derive market clearing prices for young animals, and finally, a global spatial multi-commodity model for main agricultural products and selected secondary processed products. Differences in results between simulations may be rooted in three different blocks: 1. Differences in the in-going base year data and baseline. CAPRI allows several base years and calibration points to co-exist, and users may choose the base and baseline year. 2. Difference in what economic models are linked together and in the regionalisation level as the user may switch the market modules on or off, may run the model at Member State NUTS II and 20 farm type level or with the regional CGEs switch on or off. The CGE can also used in stand-alone mode. 3. And finally, the most common, differences in the exogenous assumptions including the policy definition. Graph: The interface for the tasks “Run scenario” The following discusses the major settings: General Settings Scenario description: the GAMS file which comprises the settings for policy and further exogenous variables for a simulation. The files are stored in “gams\pol_input” or sub-directories thereof and must be valid GAMS code. Use a text editor as e.g. the GAMS GUI to manipulate the files and generate new ones. Pressing F2 opens the file in the editor, if one is defined via the settings menu. Generate GAMS child processes on different threads: uses parallel GAMS processor to exploit multi-processor machines. Use new global version: should be on. Refers to the latest release from FAOSTAT. EU28: Include Croatia into EU aggregate and uses flexible EU aggregates depending on the time point. Base year: determines the three year average underlying the regional (see Build regional data base) and global data base (see Build regional data base) and the trends (see Generate trend projection). Simulation years: the years for which results are generated and trends are loaded. Countries: if the global market model is switched off (run scenario without market model), the user may run a simulation for selected Member States, only. 21 Regional break down: the level of regional dis-aggregation in the supply part. It is not longer recommended to use the “Member State” level for production runs. Modules and algorithm Global market model: Switch the spatial global market model for agricultural products on and off. If switched off, output prices will be fixed to the baseline results. If switched on, the supply model will work with prices provided by the global market model, and the global market model will be iteratively calibrated to the results of the supply models aggregated to Member State level. Endogenous bio-fuel markets in global market model: Renders supply, demand and trade for bio-ethanol and bio-diesel endogenous. Policy blocks: Change the policy presentation in the model such e.g. TRQs for the whole of the EU are present, and not at level of EU15 etc. Endogenous margins between trade blocks and country prices: Renders the difference the average producer prices for a trade block (e.g. EU15) and the countries in that trade block, and the margin between the Armington aggregator prices and the consumer price endogenous depending on the countries net trade position. Still experimental, default is off. Endogenous young animal markets: Allows fixing young animal markets to the results of the baseline (no longer endogenous). Should normally be switched on. Regional CGEs: Switches the regional CGEs on and off. Number of iterations: with market models switched on, CAPRI sequentially calibrates the market models to supply model results which are solved at prices from the market models. Usually, the model will automatically converge in between 5 and 20 iterations. It is best to use 99 iterations as the default setting. User lower price iterations weights after iteration: That setting allows fine tuning the convergence process. Normally, a 50:50 weights between current and last iterations prices is used. 22 The lower weights give less weight to the current iteration and more to past ones which might help in some cases with convergence. Update Hessian until iteration: The price elasticities for supply and feed demand for countries with supply models are iteratively updated until the given number of iteration is reached. Reporting The panel allows switching certain part of the post-model reporting on and off. It is usually recommended to use all reports as the reporting part cannot (yet) used independently. If only core results are needed and computing time matters, these reports can be switched off. Debug options Those are options useful when debugging the model which switch either model listings on/off or stop execution at certain points. Methodological switches CGEs Please consult the methodological documentation of the regional CGEs for a detailed discussion of these options. 23 Interaction with GAMS The interaction with GAMS consists of three parts: Generating GAMS code based on user input Starting GAMS Controlling the GAMS run There are two types of input files generated based on user input. The first one are so-called scenario files and define the exogenous drivers for a CAPRI run as population growth, macro-economic environment or policy definitions. Here, the final aim is to integrate the scenario editor from SEAMLESS into the CAPRI user interface. The scenario files are typically stored for longer period on disk, both to provide templates for other scenarios as well as for documentation purposes. The name of the file to load is passed to GAMS either as an argument or stored in an input file with a fixed name. The second types are rather small files with a fixed name which typically comprise the information for which years and regions to run the GAMS program along with a small number of methodological switches. These files are overwritten with each start of the related GAMS code. GAMS is started as a sub-process in an own thread. The output from GAMS which is typically shown in command processor window is redirected into a pipe and its content read from there and shown in a window on the CAPRI user interface, so that the user can check GAMS execution at run time. The code allows filtering out specific statements generated by GAMS to be shown in the windows title bar to give an indication about program progress. There are two final control mechanisms. Firstly, the return code by GAMS which indicates if the GAMS program was correctly compiled and then executed. Typical execution time errors are math errors as division by zeros or read/write errors on external files. Secondly, the user can apply different type of exploitation tools to check the logical content of the results. 24 Exploiting results For each work step, pressing the “Exploit results” button: Will load the exploit result exploitation panel. Graph: The interface in ”exploitation” mode The right hand side comprises a set of drop-down boxes from which up to five different scenarios (or result files) can be selected. The first element in each box is empty. The left hand side shows, depending on the work step, selection control for countries, the regional level, base year and simulation year. Operating these control filters out files from the disk shown in the dropdown boxes. In the example above, only results files for the base “04”, simulation year “20” and the regional level 2 (= NUTS2) can be selected. 25 Drawing a map showing the nitrate surplus for EU27 at regional level in the base year First, we need to select “Exploit data base results” in the work step selection panel, and then choose the radio button “Show CAPREG base year data”. Then, in the Member States drop-down list, right click the mouse, and select “EU27”. The “Load and show button will then load the results. Next, select a different selection of tables by pressing on the button below “Table”, which currently shows the topic “Supply details”. In the drop-down list, go-to “Environment” and select “Nutrient balances, mapping view”. 26 The following map should appear. You may select different elements of the balance now by using the drop-down box below “activity” or change the nutrient, by using the drop-down box under “nutrient”. Drawing a map of the High Nature Value Farmland indicator for Belgium & Luxembourg for the base year Firstly, we need to select “Exploit data base results” in the work step selection panel, and then choose the radio button “Show HSMU base year data”. Then, in the Member States drop-down list, Belgium & Luxembourg must be selected, as shown below. 27 Pressing the “load and show” button will then bring up the first table links to the HSMU results as shown below. Now, according to the guidelines for RD indicators, HNV is to be found under “Pressures and benefits”, which is stored as another table. So opening the drop down list for the tables allows us to select the correct table. Next, we need to find the correct item and in order to do so, the drop-down list for the items must be selected and the indicator 23 selected, as seen below. 28 Those numbers should now be shown as a map. To do so, select “Map” from the drop-down list where “Table” is shown. The “hour glass” cursor is shown and the geometry will be loaded which may take a few seconds. Afterwards, the standard map comes up (green-yellow-red color model, quantile classification, polygons shrinked, no area weights, zeros included in classification). Now, for the HNV indicator ranging from 010, where 10 is the best possible index value, and real zeros indicate missing values, the following settings could be appropriate: Equal interval classification with 10 classes Zeros treated as missing values And, using area weights may be appropriate so that the frequency graph below the maps shows the share of UAA in each of the ten classes As linear scale works nicer for our example, and, as the data only ranges to 9.88, we should round the number to an integer (use the “tools” button , and choose “0” in the “Fraction digits” scroll- down box.) 29 That should give the following map, which then can be exported to other applications via the clipboard or can be send to the printer : 30 Drawing a map showing changes between the base year and the ex-ante results from the baseline When scenarios or different points are compared with each other, it is often useful to draw maps which show relative or absolute changes. The following map is the typical starting point when the baseline is analyzed: two maps with identical class definitions, one for the base and one for the projection year. 31 In order to draw a map with changes, we must first get rid of the base year by de-selecting the first map. This is done by using the “column selection” button which is found in the upper right corner of the window. When the button is double-clicked, a dialog opens, and one can select the projection year with the mouse, only. Afterwards, the left map will no longer be present. Next, we need to change the absolute values shown in the map to relative changes to the base year. That can be accomplished by using the tool dialogue (press button). In the tool dialogue, select “only percentage differences” in the drop-down box labeled “comparison output”, and then put the “data dimension used for comparisons” to “Years”. The “Element used for comparisons” should be “2002”. After pressing o.k., the map will change as shown. 32 Now, there are two things we would most probably like to change: the number of digits shown in the legend, and getting rid of very large values shown in the legend. The number of digits can be changed with the “tool” dialogue by changing the fraction digits. Large numbers can be excluded from the classification by increasing the “Number of regions with larger numbers to exclude from class definition”, in the example below the number had been set to 20. 33 Drawing a map with the base year results next to one showing changes from the base year to the baseline results There are two ways to draw different maps. If more then one column is selected in the underlying table view, several maps with identical coloring and scaling will be drawn as shown in the sample above. That is not advisable – in our example we need two different scales: one appropriate for the absolute values and one appropriate for changes. In order to do so choose “View Handling”, “New Data View” and then “Tile vertical”. We will then see something similar to the one shown below. Now, in the left hand side, only the results for the base year should be shown. That can be accomplished by deselecting the column for “2013” – use the column selection button to do so. The very same trick should be applied for the other view, only deselecting the results for “2002”. Now we see something as below: 34 Now, for the map with the results for 2013, we should switch to percentage difference to the year “2002” by opening the “tool” dialog . There, under “Comparison output”, choose ”Only percentage difference”, Select “Years” under “Data dimension used for comparisons” and ensure that “2002” is selected in “Element used for comparisons”. Now we should get a result as below. Now, for both views, the output should be switched to maps, and there we are … 35 Using the GDX viewer: an example: loading data from the spatial downscaling The option described here is introduced for completeness. The names of the file generated by the disaggregation programs start with “XOBS_” followed with the two character code of the Member state, then an underscore followed by the base year and the simulation year, and if applicable, the code for the simulation which is identical to the name of the GAMS files used from “pol_input” which was used to run the scenario. 36 If one wishes to see the information for several Member States simultaneously, one may click on “Load gdx file” again and add additional files. Afterwards, the lines with the parameters “XOBS” should be selected. 37 Pressing load selected tables will open the following dialogue, choose As otherwise, the program will introduce a new dimension for the data loaded from the different files, and you will not be able to see the information for “DK” and “SE” together in one map. Afterwards, the selected records will be loaded from the files. Depending on the amounts of records, that may take several seconds. Before turning to the mapping view, only one column should be selected. Press on the button left of “SWHE” in the table headers (”Open selection dialog for table column”), and select with the mouse one of the codes, then press o.k. The table should now comprise only one column. Afterwards use the drop-down list with the viewing options and 38 choose map as shown below. Choose “HSMU.” to select the geometry for the HSMUs. The program will now load the geometry for the HSMU and draw the map which takes several seconds. 39 Tracking the iteration behaviour of CAPRI , Background CAPRI uses an iterative link between the supply and market modules. In some cases, a complete model run may take quite some time. Knowledge about the intermediate results during iterations may help to decide about the success of the current run. That is especially due during debug exercises where structural changes are introduced. Since quite a while, CAPRUI therefore comprises instruments to check the outcome already during the model’s execution. For quite a while, a XML-XLST solution was used, which is now replaced by a GXJAVA one which is discussed in here. How to use the tracking tool Some technical background The tracking tool requires as the normal CAPRI GUI the installation of Java run time engine. The tracking tool can be found in “GAMS\XMLITER”, and consists of three components: 1. The java code stored in “CAPRI.JAR”. The JAVA call is stored in a batch file called “stepReport.bat” 2. A XML based definition of the tables, found in “iter-tables.xml” 3. A GDX files produced by the GAMS code of CAPRI at the end of each iteration termed “stepOutput.gdx” Starting the tracking tool and reloading The tracking tool can be started by the batch “Stepreport.bat”, e.g. by a double-click in the Windows explorer. It will open an application as shown below. The basic functionality of the table viewr is equal to the CAPRI GUI and described there. There is however one difference: with the “reload” button at the bottom of the application, the GDX file can be reloaded from disk. Attention: under GAMS22.8, the reload may be prevent the GAMS program to write to the GX file. Please use reload only during the iteration of the supply model. 40 Available tables There are table to track the change in quantities (supply and feed) from the supply models, for the activities and premiums, and for prices. The latter one shows both the prices returned from the market models, as the ones sent to the next solve of the supply models. A further tables reports the seconds needed for the different steps. 41 Index CAPRI installation 8 map with percentage changes 31 drawing several maps 34 Online help 11 Gams settings 8 SVN settings 9 Loggin in 7 42