1
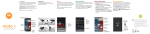
Topo Jojo
®
The Touchless Mouse
Welcome!
Congratulations on your purchase of Northridge Associate’s Topo Jojo. Given proper care, this
pointing device should provide years of trouble-free service. Jojo’s operation is based on an
infrared illumination source and multiple infrared micro-cameras mounted in the base. The
camera information is fed to an advanced, special-purpose microprocessor that communicates
with your computer via a wired USB interface. Topo Jojo is 100% solid state and contains no
moving parts.
Please read this manual before putting Jojo into service. Some operators may find it difficult to
operate at first, but a little practice will quickly overcome this.
Removable Active
Area Indicator Frame
Left Click Sensor
Right Click Sensor
Indicator Lights
Connecting the Pointing Device
With your computer turned on, simply plug the unit directly into any USB port or powered
USB hub on your computer. Due to Jojo’s power requirements, it probably will not work on
unpowered hubs or over extremely long distances.
When the green light stops flashing, Jojo is ready for use. If the green light does not stop
flashing, unplug the unit, then wait a few seconds before plugging it back in. If it fails to work
plugged into a powered hub, connect it directly to the computer.
A flashing yellow light indicates that the unit is experiencing a bright ambient light level that
would prevent proper operation. It is particularly sensitive to sunlight, incandescent and
halogen lights that contain a high level of infrared. This condition can normally be remedied
by aiming the lights differently, by moving the device to a different location or by changing the
frame angle. Highly reflective surfaces, such as a glass table top should be avoided.
A conventional mouse or touch pad may be used simultaneously with Jojo if your computer has
an available USB port. Jojo’s pointer has been setup to operate with the default settings
provided by your OS (Operating System). Your OS also allows you to customize the pointing
device in a variety of ways. For instance, you can swap the functions of Jojo’s click sensor
buttons, change the size or shape the cursor to make it more visible, enhance the cursor
precision, and alter the cursor speed. Consult your OS manuals for additional details.
Adjust the Angle
Each Jojo is supplied with a base riser to lift the back of the unit to a more convenient height.
The base riser can be attached in two positions with two supplied screws to give either 5
degrees or 10 degrees of additional angle.
Operation
The active area is defined by a 4.25 x 5.0 inch rectangular cutout in the base and is vertically
bounded by the top and bottom surfaces of the frame. Two infrared cameras in the base detect
finger movements within this active area. Operation is the same as a conventional mouse,
except no physical contact is required. A cylindrical object, such as a pen may be substituted in
lieu of a finger as long as it is non-reflective. The active area indicator frame may be removed
by removing the two # 6 nuts on the bottom of the unit for use in a confined area.
Removable Act ive Ar ea
I ndicat or Window Fr ame
Top Sur face
Base Riser
Right Click Sensor
L eft Click Sensor
Cursor Motion
To move the cursor on the computer display, drop your index finger slightly below the top
surface within, but above the active area frame. You will hear a click when the device finds
your finger and the blue lamp will illuminate. Move your finger, and the cursor will follow on
the screen. The slower you go, the more precise the motion of the cursor will be. Move your
finger quickly and the cursor will move greater distances.
Move the cursor to the desired position, then carefully lift your finger up (perpendicular to the
active area frame) until a second click sound is heard. If you reach the edge of the window and
have not moved the cursor far enough, lift your finger out of the active area then reintroduce it
at the other end of the window. You may then continue moving the cursor.
Correct
Incorrect
Click Sensors
Jojo does not have physical buttons as a conventional mouse, but has two “Click Sensors” that
detect when a finger is within about one inch from the sensor. The sensors are located on the
front of the frame. These perform the same functions as the mouse left and right buttons. To
perform a left mouse button click, sweep your finger past the left “Click Sensor”. To perform a
double click, sweep your finger past it twice rapidly. You will observe the yellow indicator lamp
on continuously when your finger is detected.
To hold the mouse button down, hold your other hand or thumb in front of the “Click Sensor”.
Another option is to turn on “ClickLock” in the mouse settings for your computer. To use this
feature, activate the “Click Sensor” for about one second, and the computer will act as though
the mouse button is held down. To release it, simply activate the “Click Sensor” again. Note
that this will also affect the way other pointing devices or a touchpad operate.
Indicator Lights
Green
On
Ready for use
Off
No power or not connected
Flashing
Not recognized by computer
Blue
On
Off
A finger or other pointer is detected
No pointer is detected
Yellow
Off
On
Flashing
Normal condition
One Click Sensor is activated
Excessive ambient light or infrared light is shining into the
unit for proper operation. Reposition the unit or decrease
the lighting.
Note that all three indicators will illuminate briefly when the unit is first powered up,
accompanied by a confirming beep.
While Learning
During your learning process, it may be easier if you increase the size of the cursor. In
Windows XP, open the Control Panel. Under Settings, select the Mouse Properties icon by
double clicking it. In Vista and Windows 7, right click, select Personalize, then select Change
Mouse Pointer. Select the Pointers tab, then you may select one of the large or extra large
Schemes.
It also may be easier if you slow down the speed of the cursor while getting used to the
touchless mouse. Select the Pointers Option tab. Then slow the pointer speed under the Motion
section. We also suggest that you select Display pointer trails under the Visibility section.
Tips
• If the unit fails to operate at first, try a reboot of the computer with Jojo plugged into a
USB port.
• Take care to only use one finger to move the cursor. If you use more than one finger, it
may not be as easy to position the cursor and motion will not be smooth.
• Notice how close to the window your finger needs to be to turn the blue lamp on. You
don’t need to go much further, and going too far makes it harder to keep the cursor stable
it is as you lift out.
• Do not allow your knuckles or other parts of your hand get into to the active area. This
will make the cursor unstable.
• You can use a pen, pencil, or similar object as a pointer instead of your finger. Very shiny,
dark or thin objects do not work well.
• The more carefully you lift your finger out of the active area, the more accurately you can
position the cursor.
• Keep the area in front of the “Click Sensor” clear so it doesn’t accidentally mistake an
object for a mouse click.
• Keep a few inches of the tabletop clear and free of mirrors behind the unit.
• Long sleeves or jewelry can accidentally trigger the “Click Sensors”. Keep these items
clear of the sensor zones.
• Do not rest your hand on the top surface of the unit.
Options
A wall mount bracket is available to mount the Jojo to a vertical surface when horizontal
workspace is limited. The user must supply the screws when mounting the bracket.
Troubleshooting
Problem
Solution
The green light does not come on
The unit is not getting power from the USB port. Be
sure it is plugged into a live port and the computer is
turned on.
The green light flashes continuously
The unit has power but is not recognized by the
computer. Try unplugging and plugging in again. If
plugged into a USB hub, try plugging directly into the
computer.
The yellow light is flashing
Bright lights are shining into the unit and inhibiting
proper operation and any lights with excessive
infrared content will adversely affect the sensors. Aim
the unit differently, or reposition any incandescent or
halogen lights.
The yellow light is on continuously
One of the “Click Sensors” is continuously seeing
something in front of it. Remove any nearby objects.
The Click Sensors trigger accidentally
An object such as a shirtsleeve is hanging down in
front of the sensor. A very shiny object several inches
away can also cause this problem.
The cursor jumps around
unexpectedly
Be sure that only a single object is in the active area.
More than one finger can cause this, as well as having
your hand so low that the device sees other parts of
your hand.
The cursor jumps when you lift your
finger, even when lifted straight up
and very carefully
A light colored or shiny object next to or behind the
unit can cause this. Use care to lift your finger
perpendicular to the frame.
A pen, pencil or other object used as a
pointer is not recognized, or does not
work reliably
Shiny, dark or thin objects may not work as pointer.
Try a different object as a pointer.
Cleaning
CAUTION - Do not submerse or autoclave this product.
Topo Jojo is constructed of surgical grade Stainless Steel, however it contains sensitive optics
and electronic components that will be damaged by high temperatures or immersion in liquids.
Cleaning is best accomplished by gently wiping the external surfaces with a soft cloth or
commercially available swabs moistened with Isopropyl Alcohol. More aggressive solvents
should be avoided.
Do not disassemble the unit as this will void the warranty. There are no serviceable
components within.
Specifications
All specifications are subject to change without notice.
Interface:
USB
Compatibility:
Windows XP, Vista, Windows 7, Linux
Size:
7” X 6.5” X 2”
Active Area:
4.25” X 5.0”
Weight:
1.30 pounds
Ambient Temperature:
32 to 100F
Relative Humidity:
10% to 90% non-condensing
Altitude:
-1,000 to +10,000 feet
Options:
Wall mount bracket.
Calibration:
Self-calibrating. No adjustments required.
USB Cable length
6.0 Feet
In-Warranty Service
To return this product for warranty service, please do the following:
•
Call Technical Support at (805) 577-9600 to request a Return
Merchandise Authorization (RMA) number. Returned merchandise will
not be accepted without this number.
•
Clearly identify the outside of the carton with the RMA number and the
unit serial number.
•
Return the merchandise as specified by our Technical Support
department.
Northridge Associates
Shipping Address
Northridge Associates LLC
1925 Angus Avenue, Suite B
Simi Valley, CA 93063
Attn: Technical Support
Out-of-Warranty Service
Service on units no longer covered by our warranty is handled in the same manner as above except
that there is a fixed fee for the repair or refurbishment of the unit. Units returned for repair may
be repaired or replaced at our option.
Limited Warranty
If this product fails to perform on your particular system, it may be returned for a full money back
refund within the first 30 days after purchase.
Northridge Associates LLC warrants this product to be free from defects in materials and
workmanship under normal use for a period of one year from the date of purchase. Units replaced
or repaired under this warranty are warranted only for the remaining unexpired portion of the
original warranty period.
Northridge Associate’s sole and exclusive obligation under this limited warranty is to repair or
replace at Northridge Associate’s option all products that are returned to Northridge Associates or
the applicable service center within the warranty period and found by us to be defective.
Replacement parts may be either new or reconditioned at Northridge Associate’s option. The Buyer
is responsible for properly packing the unit to be returned. Buyer shall ship the unit prepaid at
Buyer’s expense. Northridge Associates will return the unit to the Buyer freight prepaid at
Northridge Associate’s expense. Customs charges and other special charges are the responsibility
of the Buyer.
This warranty shall immediately be null and void if, in Northridge Associate’s sole judgment, the
unit has been altered, disassembled or repaired other than with authorization from Northridge
Associates, has been subject to misuse, abuse, negligence or accident, damaged in shipment or
subjected to improper environmental conditions. This warranty is null and void for units that have
had the serial number or nameplate defaced or removed. This warranty will remain in effect
notwithstanding Buyer’s shipment to third parties.
Northridge Associates shall not be responsible or liable for any special, incidental or consequential
damages or loss arising from the use of this product. This warranty is in lieu of, and Buyer waives,
all other warranties, expressed or implied, arising by law or otherwise, including without
limitation any implied warranty of merchantability or fitness for a particular purpose. The
remedies stated in this warranty are exclusive.
Topo Jojo
®
The Touchless Mouse
NORTHRIDGE ASSOCAITES LLC
1925 ANGUS AVENUE, SUITE B SIMI VALLEY, CA 93063 805-577-9600
Patents Pending