1
Zabbix Manual [Zabbix]
11/21/13, 4:25 PM
Zabbix Manual
Welcome to the user manual for Zabbix 2.0 software. These pages are created to help our users successfully
manage their monitoring tasks with Zabbix, from the simple to the more complex.
2.0/manual.txt · Last modified: 2012/05/23 11:27 by martins-v
Except where otherwise noted, content on this wiki is licensed under the following license:CC AttributionNoncommercial-Share Alike 3.0 Unported [http://creativecommons.org/licenses/by-nc-sa/3.0/]
https://www.zabbix.com/documentation/2.0/manual
Page 1 of 1
13. Discovery [Zabbix]
12/5/13, 1:33 PM
13. Discovery
2.0/manual/discovery.txt · Last modified: 2011/12/27 17:55 by martins-v
Except where otherwise noted, content on this wiki is licensed under the following license:CC AttributionNoncommercial-Share Alike 3.0 Unported [http://creativecommons.org/licenses/by-nc-sa/3.0/]
https://www.zabbix.com/documentation/2.0/manual/discovery
Page 1 of 1
1 Network discovery [Zabbix]
12/5/13, 1:34 PM
1 Network discovery
Overview
Zabbix offers automatic network discovery functionality that is effective and very flexible.
With network discovery properly set up you can:
speed up Zabbix deployment
simplify administration
use Zabbix in rapidly changing environments without excessive administration
Zabbix network discovery is based on the following information:
IP ranges
Availability of external services (FTP, SSH, WEB, POP3, IMAP, TCP, etc)
Information received from Zabbix agent
Information received from SNMP agent
It does NOT provide:
Discovery of network topology
Network discovery basically consists of two phases: discovery and actions.
Discovery
Zabbix periodically scans the IP ranges defined in network discovery rules. The frequency of the check is
configurable for each rule individually.
Each rule has a set of service checks defined to be performed for the IP range.
Discovery checks are processed independently from the other checks. If any checks do not find a service (or
fail), other checks will still be processed.
Every check of a service and a host (IP) performed by the network discovery module generates a discovery
event.
Event
Generated
Service Up
Every time Zabbix detects active service.
Service Down
Every time Zabbix cannot detect service.
Host Up
If at least one of the services is 'up' for the IP.
Host Down
If all services are not responding.
Service Discovered If the service is back after downtime or discovered for the first time.
Service Lost
If the service is lost after being up.
Host Discovered
If host is back after downtime or discovered for the first time.
Host Lost
If host is lost after being up.
Actions
https://www.zabbix.com/documentation/2.0/manual/discovery/network_discovery
Page 1 of 2
1 Network discovery [Zabbix]
12/5/13, 1:34 PM
Discovery events can be the basis of relevant actions, such as:
Sending notifications
Adding/removing hosts
Enabling/disabling hosts
Adding hosts to a group
Removing hosts from a group
Linking hosts to/unlinking from a template
Executing remote scripts
These actions can be configured with respect to the device type, IP, status, uptime/downtime, etc. For full
details on configuring actions for network-discovery based events, see action operation and conditions pages.
Interface creation when adding hosts
When hosts are added as a result of network discovery, they get interfaces created according to these rules:
the services detected - for example, if an SNMP check succeeded, an SNMP interface will be created
if a host responded both to Zabbix agent and SNMP requests, both types of interfaces will be created
if uniqueness criteria are Zabbix agent or SNMP-returned data, the first interface found for a host will
be created as the default one. Other IP addresses will be added as additional interfaces.
if a host responded to agent checks only, it will be created with an agent interface only. If it would start
responding to SNMP later, additional SNMP interfaces would be added.
if 3 separate hosts were initially created, having been discovered by the “IP” uniqueness criteria, and
then the discovery rule is modified so that hosts A, B and C have identical uniqueness criteria result, B
and C are created as additional interfaces for A, the first host. The individual hosts B and C remain. In
Monitoring → Discovery the added interfaces will be displayed in the “Discovered device” column, in
black font and indented, but the “Monitored host” column will only display A, the first created host.
“Uptime/Downtime” is not measured for IPs that are considered to be additional interfaces.
2.0/manual/discovery/network_discovery.txt · Last modified: 2012/07/09 13:38 by martins-v
Except where otherwise noted, content on this wiki is licensed under the following license:CC AttributionNoncommercial-Share Alike 3.0 Unported [http://creativecommons.org/licenses/by-nc-sa/3.0/]
https://www.zabbix.com/documentation/2.0/manual/discovery/network_discovery
Page 2 of 2
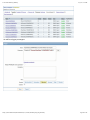
Configuring a network discovery rule [Zabbix]
12/5/13, 1:34 PM
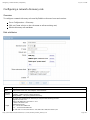
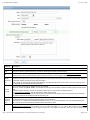
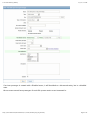
Configuring a network discovery rule
Overview
To configure a network discovery rule used by Zabbix to discover hosts and services:
Go to Configuration → Discovery
Click on Create rule (or on the rule name to edit an existing one)
Edit the discovery rule attributes
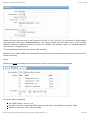
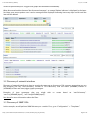
Rule attributes
Parameter Description
Name
Unique name of the rule. For example, “Local network”.
Discovery
by proxy
What performs discovery:
no proxy - Zabbix server is doing discovery
<proxy name> - this proxy performs discovery
IP range
The range of IP addresses for discovery. It may have the following formats:
Single IP: 192.168.1.33
Range of IP addresses: 192.168.1.1-255
IP mask: 192.168.4.0/24
Supported IP masks:
/16 - /32 for IPv4 addresses
/112 - /128 for IPv6 addresses
List: 192.168.1.1-255,192.168.2.1-100,192.168.2.200,192.168.4.0/24
https://www.zabbix.com/documentation/2.0/manual/discovery/network_discovery/rule
Page 1 of 5
Configuring a network discovery rule [Zabbix]
12/5/13, 1:34 PM
Note: Each IP address should be included only once; having multiple rules for a single IP address can have
unexpected behavior such as having deadlocks and/or duplicate hosts in the database. The same could happen if
two hosts having the same DNS name are included in separate discovery rules.
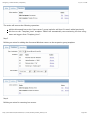
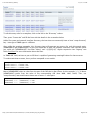
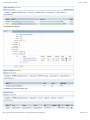
Delay
(seconds)
This parameter defines how often Zabbix will execute the rule.
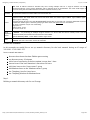
Checks
Zabbix will use this list of checks for discovery.
Supported checks: SSH, LDAP, SMTP, FTP, HTTP, POP, NNTP, IMAP, TCP, Zabbix agent, SNMPv1 agent, SNMPv2 agent,
SNMPv3 agent, ICMP ping.
A protocol-based discovery uses the net.tcp.service[] functionality to test each host, except for SNMP which queries
an SNMP OID. Zabbix agent is tested by querying an item. Please see agent items for more details.
The 'Ports' parameter may be one of following:
Single port: 22
Range of ports: 22-45
List: 22-45,55,60-70
Uniqueness criteria may be:
Device
IP address - no processing of multiple single-IP devices. If a device with the same IP already exists it will be
uniqueness
considered already discovered and a new host will not be added.
criteria
Type of discovery check - either SNMP or Zabbix agent check.
Status
Active - the rule is active and will be executed by Zabbix server
Disabled - the rule is not active. It won't be executed.
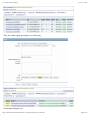
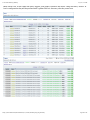
A real life scenario
In this example we would like to set up network discovery for the local network having an IP range of
192.168.1.1-192.168.1.255.
In our scenario we want to:
discover those hosts that have Zabbix agent running
run discovery every 10 minutes
add a host to monitoring if the host uptime is more than 1 hour
remove hosts if the host downtime is more than 24 hours
add Linux hosts to the “Linux servers” group
add Windows hosts to the “Windows servers” group
use Template_Linux for Linux hosts
use Template_Windows for Windows hosts
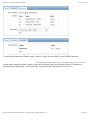
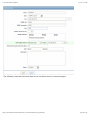
Step 1
Defining a network discovery rule for our IP range.
https://www.zabbix.com/documentation/2.0/manual/discovery/network_discovery/rule
Page 2 of 5
Configuring a network discovery rule [Zabbix]
12/5/13, 1:34 PM
Zabbix will try to discover hosts in the IP range of 192.168.1.1-192.168.1.255 by connecting to Zabbix agents
and getting the value from system.uname key. The value received from the agent can be used to apply
different actions for different operating systems. For example, link Windows servers to Template_Windows,
Linux servers to Template_Linux.
The rule will be executed every 10 minutes (600 seconds).
With this rule is added, Zabbix will automatically start the discovery and generating discovery-based events for
further processing.
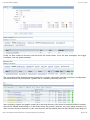
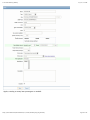
Step 2
Defining an action for adding the discovered Linux servers to the respective group/template.
The action will be activated if:
the “Zabbix agent” service is “up”
the value of system.uname (the Zabbix agent key we used in rule definition) contains “Linux”
Uptime is more than 1 hour (3600 seconds)
https://www.zabbix.com/documentation/2.0/manual/discovery/network_discovery/rule
Page 3 of 5
Configuring a network discovery rule [Zabbix]
12/5/13, 1:34 PM
The action will execute the following operations:
add the discovered host to the “Linux servers” group (and also add host if it wasn't added previously)
link host to the “Template_Linux” template. Zabbix will automatically start monitoring the host using
items and triggers from “Template_Linux”.
Step 3
Defining an action for adding the discovered Windows servers to the respective group/template.
Step 4
Defining an action for removing lost servers.
https://www.zabbix.com/documentation/2.0/manual/discovery/network_discovery/rule
Page 4 of 5
Configuring a network discovery rule [Zabbix]
12/5/13, 1:34 PM
A server will be removed if “Zabbix agent” service is 'down' for more than 24 hours (86400 seconds).
2.0/manual/discovery/network_discovery/rule.txt · Last modified: 2013/08/22 17:01 by martins-v
Except where otherwise noted, content on this wiki is licensed under the following license:CC AttributionNoncommercial-Share Alike 3.0 Unported [http://creativecommons.org/licenses/by-nc-sa/3.0/]
https://www.zabbix.com/documentation/2.0/manual/discovery/network_discovery/rule
Page 5 of 5
2 Active agent auto-registration [Zabbix]
12/5/13, 1:34 PM
2 Active agent auto-registration
Overview
It is possible to allow active Zabbix agent auto-registration, after which the server can start monitoring them.
This way new hosts can be added for monitoring without configuring them manually on the server.
Auto registration can happen when a previously unknown active agent asks for checks.
The feature might be very handy for automatic monitoring of new Cloud nodes. As soon as you have a new
node in the Cloud Zabbix will automatically start the collection of performance and availability data of the host.
Active agent auto-registration also supports the monitoring of added hosts with passive checks. When the
active agent asks for checks, providing it has the 'ListenIP' or 'ListenPort' configuration parameters defined in
the configuration file, these are sent along to the server. (If multiple IP addresses are specified, the first one is
sent to the server.)
Server, when adding the new auto-registered host, uses the received IP address and port to configure the
agent. If no IP address value is received, the one used for the incoming connection is used. If no port value is
received, 10050 is used.
Configuration
Configuring active agent auto-registration requires that you set up an action for agent auto-registration and
have required parameters set in the agent configuration file.
Setting up network discovery is not required to have active agents auto-register.
Action for active agent auto-registration
Go to Configuration → Actions, select Auto registration as the event source and click on Create action:
In the Action tab, give your action a name
In the Conditions tab, no conditions are required
In the Operations tab, add relevant operations, such as - 'Add host', 'Add to host groups' (for example,
Discovered hosts), 'Link to templates', etc.
If the hosts that will be auto-registering are likely to be supported for active monitoring only (such as hosts
that are firewalled from your Zabbix server) then you might want to create a specific template like
Template_Linux-active to link to.
Agent configuration file
Make sure that you have the Zabbix server identified in the agent configuration file - zabbix_agentd.conf
ServerActive=10.0.0.1
Unless you specifically define a Hostname in zabbix_agentd.conf, the system hostname of agent location will
be used for naming the host. The system hostname in Linux can be obtained by running the 'hostname'
command.
https://www.zabbix.com/documentation/2.0/manual/discovery/auto_registration
Page 1 of 2
2 Active agent auto-registration [Zabbix]
12/5/13, 1:34 PM
Restart the agent after making any changes to the configuration file.
2.0/manual/discovery/auto_registration.txt · Last modified: 2013/05/16 12:36 by richlv
Except where otherwise noted, content on this wiki is licensed under the following license:CC AttributionNoncommercial-Share Alike 3.0 Unported [http://creativecommons.org/licenses/by-nc-sa/3.0/]
https://www.zabbix.com/documentation/2.0/manual/discovery/auto_registration
Page 2 of 2
3 Low-level discovery [Zabbix]
12/5/13, 1:34 PM
3 Low-level discovery
Overview
Low-level discovery provides a way to automatically create items, triggers, and graphs for different entities on a
computer. For instance, Zabbix can automatically start monitoring file systems or network interfaces on your
machine, without the need to create items for each file system or network interface manually. Additionally it is
possible to configure Zabbix to remove unneeded entities automatically based on actual results of periodically
performed discovery.
In Zabbix 2.0, three types of item discovery are supported out of the box:
discovery of file systems;
discovery of network interfaces;
discovery of SNMP OIDs.
A user can define their own types of discovery, provided they follow a particular JSON protocol.
The general architecture of the discovery process is as follows.
First, a user creates a discovery rule in “Configuration” → “Templates” → “Discovery” column. A discovery rule
consists of (1) an item that discovers the necessary entities (for instance, file systems or network interfaces) and
(2) prototypes of items, triggers, and graphs that should be created based on the value of that item.
An item that discovers the necessary entities is like a regular item seen elsewhere: the server asks a Zabbix
agent (or whatever the type of the item is set to) for a value of that item, the agent responds with a textual
value. The difference is that the value the agent responds with should contain a list of discovered entities in a
specific JSON format. While the details of this format are only important for implementers of custom discovery
checks, it is necessary to know that the returned value contains a list of macro → value pairs. For instance, item
“net.if.discovery” might return two pairs: ”{#IFNAME}” → “lo” and ”{#IFNAME}” → “eth0”.
Low-level discovery items - vfs.fs.discovery, net.if.discovery are supported since Zabbix agent version 2.0.
On a Zabbix proxy the return value of low-level discovery rule is limited to 4000 characters with Oracle DB and
2048 characters with IBM DB2.
These macros are then used in names, keys, and other prototype fields that are basis for creating real items,
triggers, and graphs for each discovered entity. These macros can be used:
for item prototypes in
names
keys
SNMP OIDs
calculated item formulas
SSH and Telnet scripts
database monitor item parameters
for trigger prototypes in
names
expressions (insofar as when referencing an item key prototype)
for graph prototypes in
https://www.zabbix.com/documentation/2.0/manual/discovery/low_level_discovery
Page 1 of 16
3 Low-level discovery [Zabbix]
12/5/13, 1:34 PM
names
When the server receives a value for a discovery item, it looks at the macro → value pairs and for each pair
generates real items, triggers, and graphs, based on their prototypes. In the example with “net.if.discovery”
above, the server would generate one set of items, triggers, and graphs for the loopback interface “lo”, and
another set for interface “eth0”.
The following sections illustrate the process described above in detail and serve as a how-to for performing
discovery of file systems, network interfaces, and SNMP OIDs. The last section describes the JSON format for
discovery items and gives an example of how to implement your own file system discoverer as a Perl script.
3.1 Discovery of file systems
To configure the discovery of file systems, do the following:
Go to: Configuration → Templates
Click on Discovery in the row of an appropriate template
Click on Create discovery rule in the upper right corner of the screen
Fill in the form with the following details
https://www.zabbix.com/documentation/2.0/manual/discovery/low_level_discovery
Page 2 of 16
3 Low-level discovery [Zabbix]
12/5/13, 1:34 PM
Parameter
Description
Name
Name of discovery rule.
Type
The type of check to perform discovery; should be Zabbix agent for file system discovery.
Key
An item with “vfs.fs.discovery” key is built into the Zabbix agent on many platforms (see supported item key list for
details), and will return a JSON with the list of file systems present on the computer and their types.
Update
interval (in
sec)
This field specifies how often Zabbix performs discovery. In the beginning, when you are just setting up file system
discovery, you might wish to set it to a small interval, but once you know it works you can set it to 30 minutes or more,
because file systems usually do not change very often.
Note: If set to '0', the item will not be polled. However, if a flexible interval also exists with a non-zero value, the item
will be polled during the flexible interval duration.
Flexible
intervals
You can create exceptions to Update interval. For example:
Interval: 0, Period: 6-7,00:00-24:00 - will disable the polling at the weekend. Otherwise default update interval will be
used.
If multiple flexible intervals overlap, the smallest Interval value is used for the overlapping period.
See Time period specification page for description of the Period format.
Note: If set to '0', the item will not be polled during the flexible interval duration and will resume polling according to
the Update interval once the flexible interval period is over.
Keep lost
resources
period (in
days)
This field allows you to specify for how many days the discovered entity will be retained (won't be deleted) once its
discovery status becomes “Not discovered anymore” (max 3650 days).
Note: If set to “0”, entities will be deleted immediately. Using “0” is not recommended, since just wrongly editing the
filter may end up in the entity being deleted with all the historical data.
The filter can be used to only generate real items, triggers, and graphs for certain file systems. It expects POSIX
Extended Regular Expression. For instance, if you are only interested in C:, D:, and E: file systems, you could put
{#FSNAME} into “Macro” and "^C|^D|^E" regular expression into “Regexp” text fields. Filtering is also possible by file
https://www.zabbix.com/documentation/2.0/manual/discovery/low_level_discovery
Page 3 of 16
3 Low-level discovery [Zabbix]
Filter
12/5/13, 1:34 PM
system types using {#FSTYPE} macro (e. g. "^ext|^reiserfs").
You can enter a regular expression or reference a global regular expression in “Regexp” field.
In order to test the regular expression you can use “grep -E”, for example:
for f in ext2 nfs reiserfs smbfs; do echo $f | grep -E '^ext|^reiserfs' || echo "SKIP: $f"; done
Description Enter a description.
Status
Enabled - the rule will be processed.
Disabled - the rule will not be processed.
Not supported - the item is not supported. This item will not be processed, however Zabbix may try to periodically set
the status of the item to Enabled according to the interval set for refreshing unsupported items.
Zabbix database in MySQL must be created as case-sensitive if file system names that differ only by case are to
be discovered correctly.
Discovery rule history is not preserved.
Once a rule is created, go to the items for that rule and press “Create prototype” to create an item prototype.
Note how macro {#FSNAME} is used where a file system name is required. When the discovery rule is processed,
this macro will be substituted with the discovered file system.
https://www.zabbix.com/documentation/2.0/manual/discovery/low_level_discovery
Page 4 of 16
3 Low-level discovery [Zabbix]
12/5/13, 1:34 PM
If an item prototype is created with a Disabled status, it will be added to a discovered entity, but in a disabled
state.
We can create several item prototypes for each file system metric we are interested in:
https://www.zabbix.com/documentation/2.0/manual/discovery/low_level_discovery
Page 5 of 16
3 Low-level discovery [Zabbix]
12/5/13, 1:34 PM
Then, we create trigger prototypes in a similar way:
And graph prototypes too:
https://www.zabbix.com/documentation/2.0/manual/discovery/low_level_discovery
Page 6 of 16
3 Low-level discovery [Zabbix]
12/5/13, 1:34 PM
Finally, we have created a discovery rule that looks like shown below. It has five item prototypes, two trigger
prototypes, and one graph prototype.
The screenshots below illustrate how discovered items, triggers, and graphs look like in the host's configuration.
Discovered entities are prefixed with a golden link to a discovery rule they come from.
Items (similarly, triggers and graphs) created by a low-level discovery rule cannot be manually deleted. However,
they will be deleted automatically if a discovered entity (file system, interface, etc) stops being discovered (or
does not pass the filter anymore). In this case the items will be deleted after the days defined in the Keep lost
https://www.zabbix.com/documentation/2.0/manual/discovery/low_level_discovery
Page 7 of 16
3 Low-level discovery [Zabbix]
12/5/13, 1:34 PM
resources period field pass; triggers and graphs will be deleted immediately.
When discovered entities become 'Not discovered anymore', an orange lifetime indicator is displayed in the items
list. Move your mouse pointer over it and a message will be displayed indicating how many days are left until the
item will be deleted.
3.2 Discovery of network interfaces
Discovery of network interfaces is done in exactly the same way as discovery of file systems, except that you use
the discovery rule key “net.if.discovery” instead of “vfs.fs.discovery” and use macro {#IFNAME} instead of
{#FSNAME} in filter and item/trigger/graph prototypes.
Examples of item prototypes that you might
“net.if.in[{#IFNAME},bytes]”, “net.if.out[{#IFNAME},bytes]”.
wish
to
create
based
on
“net.if.discovery”:
See above for more information about the filter.
3.3 Discovery of SNMP OIDs
In this example, we will perform SNMP discovery on a switch. First, go to “Configuration” → “Templates”.
https://www.zabbix.com/documentation/2.0/manual/discovery/low_level_discovery
Page 8 of 16
3 Low-level discovery [Zabbix]
12/5/13, 1:34 PM
To edit discovery rules for a template, click on the link in the “Discovery” column.
Then, press “Create rule” and fill the form with the details in the screenshot below.
Unlike file system and network interface discovery, the item does not necessarily have to have “snmp.discovery”
key - item type of SNMP agent is sufficient.
Also, unlike the previous examples, this discovery item will generate two macros for each discovered entity:
{#SNMPINDEX} and {#SNMPVALUE}. In case you would like to filter out loopback interfaces from returned values
you could put ”{#SNMPVALUE}” into filter “Macro” and “^([^l]|l$)[^o]?” regular expression into “Regexp” text
fields. See above for more information about the filter.
In “SNMP OID” field, we have to put an OID that is capable of generating meaningful values for these macros.
To understand what we mean, let us perform snmpwalk on our switch:
$ snmpwalk -v 2c -c
IF-MIB::ifDescr.1 =
IF-MIB::ifDescr.2 =
IF-MIB::ifDescr.3 =
public 192.168.1.1 IF-MIB::ifDescr
STRING: WAN
STRING: LAN1
STRING: LAN2
Macro {#SNMPINDEX} takes its value from the part of the OID that is after ifDescr (in this example: 1, 2, 3). Macro
{#SNMPVALUE} comes from the value of the corresponding OID (here: WAN, LAN1, LAN2). Thus, our
“snmp.discovery” item would return three sets of macro → value pairs:
{#SNMPINDEX} -> 1
{#SNMPINDEX} -> 2
{#SNMPINDEX} -> 3
{#SNMPVALUE} -> WAN
{#SNMPVALUE} -> LAN1
{#SNMPVALUE} -> LAN2
https://www.zabbix.com/documentation/2.0/manual/discovery/low_level_discovery
Page 9 of 16
3 Low-level discovery [Zabbix]
12/5/13, 1:34 PM
The following screenshot illustrates how we can use these macros in item prototypes:
https://www.zabbix.com/documentation/2.0/manual/discovery/low_level_discovery
Page 10 of 16
3 Low-level discovery [Zabbix]
12/5/13, 1:34 PM
Again, creating as many item prototypes as needed:
https://www.zabbix.com/documentation/2.0/manual/discovery/low_level_discovery
Page 11 of 16
3 Low-level discovery [Zabbix]
12/5/13, 1:34 PM
As well as trigger prototypes:
https://www.zabbix.com/documentation/2.0/manual/discovery/low_level_discovery
Page 12 of 16
3 Low-level discovery [Zabbix]
12/5/13, 1:34 PM
And graph prototypes:
A summary of our discovery rule:
https://www.zabbix.com/documentation/2.0/manual/discovery/low_level_discovery
Page 13 of 16
3 Low-level discovery [Zabbix]
12/5/13, 1:34 PM
When server runs, it will create real items, triggers, and graphs, based on the values “snmp.discovery” returns. In
host's configuration they will be prefixed with a golden link to a discovery rule they come from.
https://www.zabbix.com/documentation/2.0/manual/discovery/low_level_discovery
Page 14 of 16
3 Low-level discovery [Zabbix]
12/5/13, 1:34 PM
3.4 Creating custom LLD rules
It is also possible to create a completely custom LLD rule, discovering any type of entities - for example,
databases on a database server.
To do so, a custom item should be created that returns JSON, specifying found objects and optionally - some
properties of them. The amount of macros per entity is not limited - while the built-in discovery rules return
either one or two macros (for example, two for filesystem discovery), it is possible to return more.
The required JSON format is best illustrated with an example. Suppose we are running an old Zabbix 1.8 agent
(one that does not support “vfs.fs.discovery”), but we still need to discover file systems. Here is a simple Perl
script for Linux that discovers mounted file systems and outputs JSON, which includes both file system name
and type. One way to use it would be as a UserParameter with key “vfs.fs.discovery_perl”:
#!/usr/bin/perl
$first = 1;
print "{\n";
print "\t\"data\":[\n\n";
for (`cat /proc/mounts`)
{
($fsname, $fstype) = m/\S+ (\S+) (\S+)/;
$fsname =~ s!/!\\/!g;
print "\t,\n" if not $first;
$first = 0;
print
print
print
print
"\t{\n";
"\t\t\"{#FSNAME}\":\"$fsname\",\n";
"\t\t\"{#FSTYPE}\":\"$fstype\"\n";
"\t}\n";
}
https://www.zabbix.com/documentation/2.0/manual/discovery/low_level_discovery
Page 15 of 16
3 Low-level discovery [Zabbix]
12/5/13, 1:34 PM
print "\n\t]\n";
print "}\n";
An example of its output (reformatted for clarity) is shown below. JSON for custom discovery checks has to
follow the same format.
{
"data":[
{
{
{
{
{
{
{
{
{
{
{
{
{
"{#FSNAME}":"\/",
"{#FSNAME}":"\/sys",
"{#FSNAME}":"\/proc",
"{#FSNAME}":"\/dev",
"{#FSNAME}":"\/dev\/pts",
"{#FSNAME}":"\/",
"{#FSNAME}":"\/lib\/init\/rw",
"{#FSNAME}":"\/dev\/shm",
"{#FSNAME}":"\/home",
"{#FSNAME}":"\/tmp",
"{#FSNAME}":"\/usr",
"{#FSNAME}":"\/var",
"{#FSNAME}":"\/sys\/fs\/fuse\/connections",
"{#FSTYPE}":"rootfs"
"{#FSTYPE}":"sysfs"
"{#FSTYPE}":"proc"
"{#FSTYPE}":"devtmpfs"
"{#FSTYPE}":"devpts"
"{#FSTYPE}":"ext3"
"{#FSTYPE}":"tmpfs"
"{#FSTYPE}":"tmpfs"
"{#FSTYPE}":"ext3"
"{#FSTYPE}":"ext3"
"{#FSTYPE}":"ext3"
"{#FSTYPE}":"ext3"
"{#FSTYPE}":"fusectl"
},
},
},
},
},
},
},
},
},
},
},
},
}
]
}
Then, in the discovery rule's “Filter” field, we could specify ”{#FSTYPE}” as a macro and “rootfs|ext3” as a regular
expression.
You don't have to use macro names FSNAME/FSTYPE with custom LLD rules, you are free to use whatever names
you like.
2.0/manual/discovery/low_level_discovery.txt · Last modified: 2013/05/17 15:45 by martins-v
Except where otherwise noted, content on this wiki is licensed under the following license:CC AttributionNoncommercial-Share Alike 3.0 Unported [http://creativecommons.org/licenses/by-nc-sa/3.0/]
https://www.zabbix.com/documentation/2.0/manual/discovery/low_level_discovery
Page 16 of 16
![1 Getting Zabbix [Zabbix]](http://vs1.manualzilla.com/store/data/005748780_1-c6fae7d52ae49b905c6dc80adee0ad61-150x150.png)
![1 Manual structure [Zabbix]](http://vs1.manualzilla.com/store/data/005957850_1-702bebeaffa08ff074416c0b3ac2050f-150x150.png)

![14. Distributed monitoring [Zabbix]](http://vs1.manualzilla.com/store/data/005830336_2-51982406f79fcf7c554e6482a06becfc-150x150.png)