1
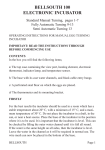
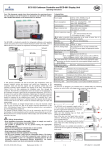
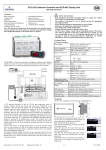
user manual
Uvicord SII
i
80-1304-10 Edition AK
1
Important Information
Uvicord, FPLC and Drop Design are trademarks of GE Healthcare Bio-Sciences Ltd.
AGE Healthcare are trademarks of General Electric Company.
All goods and services are sold subject to the Conditions of Sale of the
company within the General Electric Company group wich supplies them.
A copy of the these terms and conditions is available on request.
GE Healthcare Bio-Sciences AB
Björkgatan 30, SE-751 84 Uppsala
Sweden
GE Healthcare Bio-Sciences Ltd
GE Healthcare Place
Little Chalfont Bucks, Buckinghamshire HP7 9NA
England
GE Healthcare Bio-Sciences Corp
800 Centennial Avenue,
Piscataway, New Jersey 08855
USA
GE Healthcare Europe GmbH
Postfach 5480
D-79021 Freiburg
Germany
GE Healthcare Bio-Sciences KK
Sanken Building, 3-25-1
Shinjuku-ku, Tokyo 169-0073
Japan
2
Contents
1.
Introduction ....................................................................... 3
2.
General description ............................................................ 4
2.1 Basic principle .............................................. 4
2.2 Front panel controls ..................................... 5
2.3 Back panel controls ...................................... 6
3.
Installation ......................................................................... 7
3.1 Site Requirements ......................................... 7
3.2 Unpacking .................................................... 7
3.3 Electrical connections ................................... 7
3.4 Installation of the filter ................................. 8
3.5 Installation of the UV lamp .......................... 9
3.6 Installation of the flow cell for
Standard Chromatography ......................... 10
3.7 Installation of HiFlo flow cells
for industrial applications. ......................... 13
3.8 Installation and connection of
HPLC/FPLC flow cells ............................... 14
3.9 Connecting a recorder or
printer plotter ............................................. 16
3.10 Connecting an integrator ............................ 18
4.
Operation ......................................................................... 17
4.1 Start up ...................................................... 17
4.2 Stabilisation time ........................................ 17
4.3 Selection of Time constant .......................... 17
4.4 Baseline adjustment .................................... 18
4.5 Shutdown ................................................... 18
5.
Maintenance ..................................................................... 19
5.1 Instrument housing .................................... 19
5.2 General precautions ................................... 19
5.3 Cleaning the flow cells................................ 19
General recommendations .......................... 19
Particulate contaminants ............................ 19
Non-particulate contaminants .................... 19
5.4 Disassembling HPLC/FPLC
flow cells .................................................... 21
5.5 Interference filters....................................... 25
5.6 Other optical surfaces................................. 25
6.
Technical Specifications.................................................... 28
3
4
1. Introduction
1. Introduction
GE Healthcare Uvicord™ SII Code No. 18-1004-50 is a
compact single beam UV-monitor with flow-through cell for monitoring
the eluant from various column separations. Available wavelengths,
selected by a combination of lamp and interference filter are 206, 226,
254, 280, 313, 365 and 405 nm.
GE Healthcare Uvicord SII is housed up in one combined
optical and electronic unit. This detector simultaneously produces two
absorbance outputs - one fixed at 2 AUFS and one selectable from
0.005 - 2 AUFS in 9 steps. Thus, with the selection of the appropriate
absorbance range, Uvicord SII enables monitoring of both high and low
concentration substances simultaneously with a dual-channel recorder.
Substances such as non-aromatic peptides, amino acids, lipids,
nucleotides and certain carbohydrates have strong absorption at
206 nm whereas at higher wavelengths they show little or no absorption. Furthermore, most proteins also exhibit greater absorption at 206
nm than they do at 280 nm. By employing all fully integrated
electronics and the very latest detection principles Uvicord SII performs
to specification at ambient temperature and under cold room
conditions.
5
2. General description
2. General description
2.1 Basic principle
Light from the high frequency excited gas discharge lamp is filtered by
the interference filter before passing through the measuring cell. The
light transmitted through the measuring cell is focused onto the
measuring detector and converted to an electrical signal. This signal is
directly proportional to the light intensity and is amplified by the
following linear amplifier, the gain of which is controlled by the “Zero“
adjust potentiometer.
Filtered light also falls on the Reference Detector. The reference signal is
then amplified in the reference amplifier. This signal is directly proportional to the light intensity. It is used to control the lamp driver for
obtaining constant and stable light from the lamp. The reference signal
is also connected to the Logarithmic Converter. The Log-Converter
receives both the reference signal and the measured signal. The ratio
between these two signals is tranformed by the converter and conveyed
to the two output amplifiers. One of the Output Amplifiers has preset
fixed gain which produces 1 volt and 100 mV outputs corresponding to
2 Absorbance Units. The other output amplifier has its gain controlled
by the range switch. The full scale output signal from this amplifier is
100 mV which corresponds to a full scale absorbance of 0.005 to 2 AU,
depending upon the range switch setting. This output signal is also fed
through the output filter which time constant is selectable by a front
panel switch.
A zero indicator connected to the output signal is used to adjust the
baseline to a reading close to the zero volt. The final zero adjustment is
then carried out on the recorder.
In order to ensure stable emission and long lamp life the lamp holder is
thermostated. The thermostat is set to switch on heating when the lamp
temperature goes below ambient temperature (>22°C).
Fig. 1. Block Diagram
6
2. General description
2.2 Front panel
controls
Fig. 2. Front panel
No.
Item
Description
1
Lamp holder
The chosen monitoring wavelength determines which
lamp shall be used. Each lamp type is identified by a
figure (1) or (2) on the end of lamp. Choice of lamp
1 or 2 is determined by the selected monitoring
wavelength.
2
Filter holder
The filter holder has a spring-loaded locking
mechanism for quick release of the filter. The holder
can be inserted into the instrument either way.
3
Cell holder
The complete cell holder is quickly removed by
unscrewing the knob (15) on the back panel.
4
or
Time constant selector
Selector for the desired time constant (0.5, 1, 2, 5,
10 s).
5
Baseline adjust
Ten-turn potentiometer to adjust the absorbance
baseline on the recorder outputs.
6
Baseline indicators
Two lamp indicators for remote recorder baseline
setting.
7
Absorbance range
selector
Selector for the desired absorbance range 0.005,
0.01, 0.02, 0.05, 0.1, 0.2, 0.5, 1 or 2 AU full scale
deflection).
8
Indicator lamp
Indicates power is on.
7
2. General description
2.3 Back panel
controls
11
10
9
12
13
14
15
16
17
18
Fig. 3. Back panel
No.
Item
Description
Mains power inlet
Inlet for the mains cable.
10
Mains power switch
The Uvicord SII is turned on by pressing the
upper half of the rocker switch. The indicator
lamp will light to show that mains voltage is on.
11
Fuse holder
Main fuses:
2 x for 220-240 V, 125 mAL
2 x for 100-120 V, 250 mAL
9
12
Mains voltage selector
240V.
Selects mains voltage 100, 115, 120, 220,
13
to
With the calibration potentiometer it is possible
Calibration potentiometer
compensate for tolerances in optical path length.
8
14
Mounting bracket
For attaching to laboratory rod.
15
Cell holder release knob
For quick release and optical alignment of flow
cell.
16
Integrator output
Output for integrator 2 AUFS = 1V.
17
Absorbance output
Output for potentiometric recorders.
18
Fixed 2 AU output
2:nd channel output for potentiometric recorder
with a dual pen.
3. Installation
3. Installation
3.1 Site
Requirements
Uvicord SII should be installed on a stable, flat surface away from all
sources of vibration. The atmosphere should be free of both excess
humidity and corrosive or contaminated vapours which may form
deposits on the components in the optical path.
Uvicord SII can be installed either in a coldroom or at the ambient
temperature in the laboratory. To minimise drift, the temperature
should be kept constant. Uvicord SII should be positioned away from
all sources of draught, heat and direct sunlight. Uvicord SII should be
placed away from any compressor and the fan stream from coldboxes
and coldrooms.
To ensure stable emission and long lamp life, the lamp holder is
thermostated. The thermostat is preset to automatically switch on a
heater when the lamp temperature falls below 30°C.
One mains power point is required to operate Uvicord SII. Separate
power points are required for all ancillary equipment, such as a
recorder or printer plotter.
The power consumption of the monitor is 20 VA.
3.2 Unpacking
Note: It is important that the interference filters, lamps and flow cells
should not be handled during unpacking. For protection of these
items, they can remain in their packing materials until required
for use.
Carefully unpack Uvicord SII. Check the contents against the packing
list supplied. Inspect for any damage that may have occurred during
transit. Report any damage immediately to the local GE Healthcare
representative and to the transport company concerned. Save
the packing material if future transport can be forseen.
3.3 Electrical
connections
The instrument is supplied with mains cables and fuses for both 100120 V and 220-240 V operation.
1. Ensure that the mains power switch (3:10) on the back panel is in
the OFF, 0 position.
2. Check that the mains voltage selector (3:12) on the back panel is set
to the mains voltage in the laboratory. If necessary, use a coin or a
screwdriver to adjust the selector to the appropriate voltage.
Note: Use the 220 V setting for 230 V mains outlet.
3. Select the correct value of fuse from the fuse kits supplied. For 100120 Volt operation, use the 250 mA fuse supplied. For 220-240 Volt
operation, use the 125 mA fuse supplied. Insert the fuse into the fuse
cap, and then fit the fuse cap into the fuse holder on the back panel
(3:11) of the instrument.
9
3. Installation
4. Connect the instrument to a grounded mains outlet (3:9).
Note: Do NOT switch on.
3.4 Installation of
the filter
Note: Special care must be taken when handling interference filters. Do
NOT touch the filter surface. The filters should not be allowed to
come in contact with any liquid or exposed to temperatures
above 60°C. For directions on cleaning interference filters, refer
to Section 5.4.
19
Fig. 4. The interference filter with holder
1. Select the appropriate filter for the wavelength to be used.
2. To mount the filter into the filter holder, depress the spring loaded
lock (4:19) on the filter holder. Using forceps, gently insert the filter.
Release the lock to hold the filter firmly in position. Either surface of
the filter can face towards the lamp.
3. Insert the filter holder into the filter holder housing. The filter holder
may be inserted into the monitor either way up.
10
3. Installation
3.5 Installation of
the UV lamp
Note: Particular care should be taken to avoid touching the transparent
tube of the lamp. Handling the lamp with the fingers will leave
deposits which will subsequently burn into the surface.
1. Select the appropriate lamp for the wavelength (Fig. 5).
Select lamp type 1 for 206, 226 and 280 nm.
Select lamp type 2 for 254, 313, 365 and 405 nm.
2. Insert the lamp into the lamp holder on the left side of the instrument (Fig. 6).
Note: Once the lamp is installed and stabilised, Uvicord SII should not
be bumped or tilted since this may cause a disturbance in the
distribution of active material inside the lamp, resulting in
changes in light intensity.
Warning: If lamp type 2 is accidentally broken, carefully remove all
mercury and glass to prevent mercury poisoning. Follow
local safety regulation when disposing of mercury waste.
Fig. 5. The UV lamps with
the type number indicated
Fig. 6. Inserting the UV lamp.
11
3. Installation
3.6 Installation of
the flow cell
for Standard
Chromatography
The flow cell (80-1080-47) included in Standard Chromatography, 801080-49 flow cell holder has a path length of 2.5 mm or 5 mm and is
designed for flow rates up to 1 l/h. The flow cell and the cell holder are
supplied unmounted. Carefully unpack the parts supplied and follow
the instructions below for mounting the flow cell in the holder. When
assembled, insert the flow cell into the Uvicord SII and tighten it in
position using the knob (3:15) on the back panel.
For alternative flow cells to 80-1080-49 flow cells holder, see section 7.
Fig. 7 a. Fit the cell collars onto the cell holder spring.
Fig. 7 b. Feed the flanged tubing into each cell collar.
12
3. Installation
Fig. 7 c. Clean the flow cell with lens tissue. Use forceps to insert the flow cell into the
neck of the tubing.
Fig. 7 d. Push the spring-loaded lever upwards and then insert the flow cell into the
holder. Turn the cell so that the side with the required path length is next to the
aperture. Release the lever to secure the cell in position.
13
3. Installation
Fig. 7 e. Loosen and remove
the connector screws and
split ferrules and then feed
the tubing through the inlet
and outlet on the back of
the cell holder. Fit the split
ferrule and connector
onto the tubing and then
tighten the connector
until fully finger-tigh.
Fig. 7 f. The cell can now be inserted into Uvicord SII and secured in position by
tightening the knob in the back panel. The inlet of the flow cell is the lower connector.
14
3. Installation
3.7 Installation of
HiFlo flow
cells for
industrial
applications.
Fig. 8. Industrial HiFlo
flow cell
Two types of HiFlo cells are available for use with Uvicord SII in
industrial applications where high flow rates are required.
80-1080-50
Flow cell holder, complete with HiFlo cell, 1 mm path
length, back pressure <1 bar at flow rate 100 l/h.
80-1080-51
Flow cell holder, complete with HiFlo cell, 2.5 mm
path length, back pressure <1 bar at flow rate 350 l/h.
HiFlo cells are supplied mounted in the holders, ready to be istalled
directly into the cell housing. Insert the HiFlo cell holder into the cell
housing and tighten it into position using the knob (3:15) on the back
panel.
15
3. Installation
3.8 Installation and
connection of
HPLC/FPLC
flow cells
Code No.
Material
GE Healthcare HPLC/FPLC™ flow cells are available in,
titanium and in stainless steel (Figs. 9 a) for use when the cell could be
exposed to corrosive materials. Each flow cell is supplied mounted in
the holder, ready for immediate installation into the Uvicord SII. All
flow cells have a maximum pressure limit of 25 bar. The cells are
described below.
Path length
Cell volume
Capillary OD
Capillary ID
Flow rate
Backpressure
80-1251-83 titanium
2.5 mm
8 µl
1.6 mm
0.35 mm
20 ml/min
<1 bar
80-1251-84 titanium
1.5 mm
5 µl
1.6 mm
1.0 mm
100 ml/min
<1 bar
Fig. 9 a.
80-1251-83/80-1251-84
1. Insert the flow cell holder into the cell housing and secure by tightening the knob (3:15) on the back panel.
2. Remove the rubber cover from the end of both the inlet and the
outlet tubes.
3. Before use, flush the flow cell with at least 50 ml methanol at a flow
rate of 1 ml/min.
4. Connect to the HPLC/FPLC system, following the guidelines below.
The inlet and outlet capillaries of both types of titanium HPLC/FPLC
flow cells have an OD of 1.6 mm. Wherever possible dilution and loss
of resolution should be prevented by connecting the column outlet
directly to the flow cell inlet.
16
3. Installation
For connections to the titanium flow cells, use titanium compression
screws (18-1002-32) and inert polymer ferrules (80-1027-55).
When making any connection, fit the compression screw onto the
tubing and then fit the ferrule with the cone pointing towards the end of
the tubing. Push the tubing firmly into the connector and tighten the
compression screw until finger-tight. To seal the connection, use a 1/4
inch wrench to tighten the compression screw a further 1/6th of a turn
for inert polymer ferrule or 1/12th of a turn for stainless steel. Take
great care not to damage the connector by overtightening the
compression screws.
At the outlet of the flow cell, connect a Teflon tube < 0.8 mm ID to the
flow cell outlet (upper connector). It is recommended that the outlet of
the waste tube should be placed about one meter above the cell. This
will maintain a positive pressure in the flow cell and will prevent the
formation of air bubbles. This pressure will also reduce sensitivity to
fluctuations in flow from the HPLC/FPLC pump.
3.9 Connecting a
recorder or
printer plotter
There are two 100 mV signal output ports on the back panel. These are
for use with GE Healthcare recorders, REC 111, REC 112 or
similar instruments.
One output (3:17), marked 0.1V REC 0.005 - 2 AU, provides the
absorbance signal selected with the range selector switch on the front
panel (2:7). The other output (3:18), marked 0.1 V 2 AU, provides the
fixed 2 AU range signal.
Fig 10 shows how to connect one or both outputs to a 2-channel
GE Healthcare REC 112 recorder using the two 80-1080-53
recorder cables supplied.
Red
Black
Red
Black
Fig. 10.
17
4. Operation
4. Operation
4.1 Start up
Note: Always ensure that all liquids passing through the flow cell are
degassed to prevent any air bubble formation in the cell. Liquids
must be filtered to remove any particulate material and prevent
blockage.
1. Check that the correct filter and lamp for the desired wavelength
have been fitted. Ensure that the correct flow cell is in position.
2. If the instrument has been switched off, turn on the mains power
switch (3:10) and refer to Section 4.2, to restabilise the instrument.
The LAMP ON indicator on the front panel illuminates.
Note: If the UV lamp does not ignite, remove the lamp and gently rub
the glass bulb with a clean cloth to produce a small static charge.
Re-insert the lamp.
4.2 Stabilisation
time
At normal laboratory temperatures, the UV lamp requires 30 minutes to
stabilise sufficiently for work in the 2 AU to 0.5 AU ranges. A
stabilisation period of 4 hours is required for work in the 0.2 AU to
0.005 AU ranges. When the Uvicord SII is in constant use, it is
recommended that it remains switched on. Uvicord SII can be switched
off when not in use for periods of one week or more.
For coldroom operation below 10°C, install Uvicord SII in the
coldroom at the desired running temperature at least 12 hours before
the start of a run. This is necessary to allow the instrument housing to
equilibrate to the temperature of the cold room. Once this equilibration
has taken place, the stabilisation times given for normal laboratory
temperatures are valid.
To ensure stable emission and long lamp life, the lamp holder is
thermostated. The thermostat is preset to switch on a heater
automatically when the lamp temperature falls below 30°C.
4.3 Selection of
Time constant
18
After stabilisation, use the Time constant selector switch (2:4) to
set the desired time constant.
0.5 seconds
- Fast response for normal conditions.
1 or 2 seconds
- Slow response for suppressing short term noise.
5 or 10 seconds
- Slowest response for maximum suppression of
noise.
4. Operation
4.4 Baseline
adjustment
1. Adjust the zero position (right hand side of the chart) on the recorder
by short circuiting the input or pressing the zero check knob on the
recorder.
2. Adjust with the zero knob on the recorder.
3. Set the absorbance range selector at 2 AU, (Fig. 2:7).
4. Turn the baseline adjust knob (Fig. 2:5) until both base line indicator
lamps are extinguished. If the left indicator lamp is alight turn the
knob to the right and the recorder pen will move to the right. If the
right indicator lamp is alight turn the knob to the left.
5. Set the absorbance range selector at 0.5 AU, 0.1 AU, 0.02 AU, 0.005
AU and repeat (4) between each absorbance range setting.
6. Set the operating absorbance range.
7. Adjust the zero point on the recorder to get the base line (normally 5
to 10 divisions to allow for negative trends).
4.5 Shutdown
1. On completion of the chromatographic run, flush the flow cell either
pure solvent or the buffer used in the chromatographic run. To
prevent the deposition of salts from aqueous buffers, flush the cell
with distilled water after use, if necessary after disconnecting from
the column.
Note: Never allow aqueous buffers to dry out in the cell. Either
continue to flush through with buffer or leave the cell filled
with distilled water.
2. Leave Uvicord SII switched on. The monitor should only be switched
off if it is not going to be used again for more than one week.
19
5. Maintenance
5. Maintenance
5.1 Instrument
housing
Wipe the surfaces regularly with a damp cloth. Let the instrument dry
completely before use.
5.2 General
precautions
To ensure trouble free running, users are advised to observe the
following precautions:
- All liquids passing through the flow cell should be free of suspended
particles.
- All liquids should be degassed to prevent air bubble formation in the
flow cell.
- Never allow buffer solutions to dry out in the flow cell. Always rinse
the flow cell thoroughly with distilled water after use.
- Handle interference filters with care. Never touch the optical
surfaces or expose them to temperatures above 60°C.
- When not in use, always store interference filters in the container in
which they were supplied.
5.3 Cleaning the
flow cells
General recommendations
For trouble free operation of the Uvicord SII, it is essential that the flow
cell is free of any particulate matter and contaminant films. Ensure that
the flow cell is never allowed to dry out without having been
thoroughly rinsed. Liquids containing dissolved salts, proteins or other
solutes will dry out, leaving contaminants on the inner optical surface
of the flow cell.
The flow cell can be inspected for contaminants without disconnecting
it from the chromatography system. To do this, unscrew the cell holder
release knob on the back panel (3:15) and pull the flow cell holder
carefully out of the instrument. If contamination is visible, follow the
cleaning instructions in the next sections.
Note: For care and maintenance of the stream splitter flow cells please
refer to the separate instruction sheet supplied with the cells.
Particulate contaminants
1. Disconnect from the chromatography system and then remove the
flow cell holder from the Uvicord SII.
2. Connect a syringe to the outlet tubing (upper) and back-flush the cell
with water and then small volumes of clean 50% (v/v) ethanol in
water. Collect the rinsing liquid in a clean beaker.
3. Examine the cell and the contents of the rinsing liquid beaker from
time to time to check that all the particles have been washed out.
20
5. Maintenance
4. Rinse the cell with about 100 ml of distilled water. Replace it in the
Uvicord SII and reconnect to the chromatography system.
Non-particulate contaminants
Most non-particulate contaminants, e.g. denatured proteins, salts, etc.
can be removed by flushing the cell with a warm solution of laboratory
detergent or other appropriate solvent. Finally, rinse the cell thoroughly
with distilled water or clean solvent.
Oily deposits, which increase the tendency to trap bubbles, can be
removed by rinsing the flow cell first with a non-polar solvent (e.g.
hexane), then with a polar solvent (e.g. isopropanol) and finally with
distilled water.
If the flow cell has been used with aqueous solutions, it should be rinsed
in the following sequence:
- Warm aqueous laboratory detergent solution
- Distilled water
- Polar solvent
- Non-polar solvent
- Polar solvent
- Distilled water
5.4 Disassembling
HPLC/FPLC
flow cells
Titanium HPLC flow cell (80-1251-83/80-1251-84)
To disassemble the titanium flow cells, follow the instructions below.
Note: Inner and outer packings and ferrules cannot be reused.
Parts required
80-1251-85
Packing set, including 4 inner and 4 outer Teflon
packings
or
80-1252-96
Window set, including 2 quartz windows, 4 inner and 4
outer Teflon packings
80-1027-55
Inert polymer ferrules
80-1250-92
Titanium capillary 0.35 mm ID, 1/16" (1.6 mm) OD, for
80-1251-83
80-1250-93
Titanium capillary 1.0 mm ID, 1/16" (1.6 mm) OD, for
80-1251-84
21
5. Maintenance
Fig 11 a. Loosen the two
securing screws and remove
the flow cell block from the
black holder
Fig. 11 b. Use a 1/4 inch
wrench to loosen the
compression screws. Remove
the capillary tubing.
Fig. 11 c. Use a screwdriver
to remove the split securing
screw.
22
5. Maintenance
Fig. 11 d. Use an applicator
stick or scalpel to remove the
outer packing.
Fig. 11 e. Turn the cell
upside down and tap it to
remove the quartz window.
Remove the inner packing.
Fig. 11 f. Disassemble the
other side of the flow cell in
the same way. Flush both
sides with alcohol to clean
the inner surfaces.
Alternatively, immerse in
alcohol in an ultrasonic bath.
23
5. Maintenance
Fig. 11 g. Clean the quartz
windows using lint-free tissue
soaked in alcohol.
Reassemble both sides of the
cell using new inner and
outer packings. If necessary,
select new titanium capillary.
Fit a new ferrule onto the
capillary and refit the
capillary to the flow cell
block. Tighten using a 1/4
inch wrench.
Fig. 11 h. Feed the inlet and
outlet ends through the black
holder. Refit the flow cell
block to the black holder.
Flush the cell through with
alcohol again to check for
leaks.
24
5. Maintenance
5.5 Interference
filters
For optimum performance, it is essential that the interference filters are
clean and free of any particulate material. Do not touch the interference
filters. Should the filter become contaminated with dust, finger prints or
oil, proceed as follows:
- Carefully take the filter from the filter holder without touching or
scratching the surface (see Section 3.4).
- Use lens cleaning tissue dipped in ethanol to gently clean both sides
of the filter surface.
- Place the clean filter back into the filter holder or into its protective
box.
- Interference filters should never be exposed to temperatures above
60°C.
5.6 Other optical
surfaces
Clean all other optical surfaces by wiping the surface with a
clean, lint-free cloth, moistened with carbon tetrachloride,
ethanol, or another suitable pure solvent.
25
6. Technical Specifications
6. Technical Specifications
Operating wavelengths
206, 226, 254, 280, 313, 365 and 405 nm.
Absorbance ranges
0.005, 0.01, 0.02, 0.05, 0.1, 0.2, 0.5, 1 and
2 AUFS.
Noise
<1x10⁻⁴ AU measured peak to peak in a
dry cell.
Drift
<5x10⁻⁴ AU/h at constant temperature.
Environment
+0 to +30 °C, 20-95% relative humidity,
84-106 kPa (840-1060 mbar) atmospheric
pressure.
Recorder outputs
100 mV for selected absorbance range and
100 mV for fixed 2A range.
Integrator output
1 V = 2 AU.
Power consumption
20 W.
Mains Voltage
100/115/120/220-230/240V, 50-60 Hz.
Dimensions (LxWxH)
313 x 131 x 147 mm.
Weight
4.3 kg.
EMC standards
This product meets the requirement of the
EMC Directive 89/336/EEC through the
harmonized standards EN 50081-2
(emission) and EN 50082-1 (immunity)
Note: This is a class A product. In a
domestic environment this product
may cause radio interference in which
case the user may be required to take
adequate actions.
Note: The declaration of conformity is valid
for the instrument when it is :
• used in laboratory locations
• used in the same state as it was delivered
from GE Healthcare Bio-Sciences AB except
for alteration described in the
User Manual
Safety standards
26
• used as "stand alone" unit or
connected to other CE labelled
GE Healthcare products or
other products as recommended
This product meets the requirement of the
Low Voltage Directive (LVD) 73/23/EEC
through the harmonized standard
EN 61010-1.
7. Accessories and Spare Parts
7. Accessories and
Spare Parts
Please order accessories and spare parts according to the designation
and code numbers given below.
Designation
Code No.
Pieces
Interference filter for 206 nm
80-1071-11
1
Interference filter for 254 nm
80-1071-12
1
Interference filter for 280 nm
80-1071-13
1
Interference filter for 226 nm
80-1071-14
1
Interference filter for 313 nm
80-1071-15
1
Interference filter for 365 nm
80-1071-16
1
Interference filter for 405 nm
80-1071-17
1
Filter holder
80-1080-63
Lens cleaning tissue
80-1193-78
50
Lamp type 1, for 206, 226 and 280 nm
18-1004-94
1
Lamp type 2, for 254, 313, 365 and 405 nm
18-1004-95
1
Designation
Code No.
Pieces
Flow cell holder and quartz glass flow cell,
unmounted, 70 µl cell volume, 2.5 or 5 mm path
length for Standard Chromatography.
80-1080-49
1
Flow cell holder, complete with inert flow cell for
HPLC/FPLC, titanium, 8 µl cell volume, 2.5 mm path
length, back pressure at 20 ml/min <1 bar, 25 bar
pressure limit.
80-1251-83
1
Flow cell holder, complete with inert flow cell for
HPLC/FPLC, titanium, 5 µl cell volume, 1.5 mm path
length, back pressure at 100 ml/min <1 bar, 25 bar
pressure limit.
80-1251-84
1
Flow cell holder, complete with HiFlo cell, 1 mm path
length, back pressure at 100 l/h <1 bar.
80-1080-50
1
Flow cell holder, complete with HiFlo flow cell, 2.5 mm 80-1080-51
path length, back pressure at 350 l/h <1 bar.
1
Filters
Lamps
Flow cells
27
7. Accessories and Spare Parts
Alternative flow cells for the 80-1080-49 flow cell holder
Path
length
(mm)
Volume
(ml)
Cross
section
Max flow rate
at 150 cm
water head
(l/h )
Cells
Code No.
Pieces
2.5 or 5
2.5
3
0.07
0.03
0.1
rectangular
rectangular
circular
1
1
1
80-1080-47
80-1080-52
80-1080-66
1
1
1
Designation
Code No.
Pieces
Accessories and Spare Parts
Packing set for 2510-100/101 inert HPLC cells
includes; Teflon packings for quartz windows,
2 sets of 4
80-1251-85
Window set for 2510-100/101 inert HPLC cells
includes; 2 quartz windows, Teflon packings,
2 sets of 4
80-1252-96
Packing set for 2138-104 stainless steel HPLC cell
includes; Teflon packings for quartz windows,
2 sets of 4
80-1044-21
Window set for 2138-104 stainless steel HPLC cell
includes; 2 quartz windows, Teflon packings,
2 sets of 4
80-1044-22
Inert polymer ferrule
80-1027-55
5
Compression screw, titanium
18-1002-32
5
Inert capillary, precut titanium OD 1/16" (1.6 mm),
ID 0.35 mm, 125 mm long.
80-1250-92
1
Inert capillary, precut titanium OD 1/16" (1.6 mm),
ID 1.0 mm, 125 mm long.
80-1250-93
1
Recorder cable (BNC-Banana) for connecting
GE Healthcare recorder and integrator
80-1080-53
1
Mains cable US
19-2447-01
1
Mains cable EUR
19-2448-01
1
19-2925-01
1
Cables
Electrical Spares
Fuse cap for 220 V (EUR)
28
5. Maintenance
29
30
Printed in Sweden by TK i Uppsala AB, 2003