1
SYSTEM3 POS USER MANUAL
ond confirmation message will appear ‘YYou are successfully logged
in.’. This same message will appear if you attempt to use the clock
in function again before clocking out.
If a name other than yours appears when attempting to log in,
choose ‘No’ when prompted, and try again. If it happens again,
ensure you’ve got YOUR card, or double check your number. It
may have been changed by your manager.
Clock Out’ button by
At the end of your shift, highlight the ‘C
touching it. Either key in your ID number on the number pad or
swipe your card. The screen will change to ‘Please Wait,
Gathering Data’. When System3 is finished gathering your time
and attendance data, it will print a chit(receipt) detailing your
hours. If you’ve been using System3’s POS features, and have accidentally left a bill open, a list of open bills and which terminals
they’re on will print instead. If this is the case, you are not
clocked out, and must close ALL bills before being allowed to
Once the E-mail window is displayed, choose from the following
options:
A. Select Specific Employees
To send a message to a specific employee, or employees:
1. Select the employee(s) from the list that you would like the
message to go to.
2. Ensure that the ‘SSelected’ button is filled with a black circle. (If
it doesn’t have a black circle, just touch it)
Delivery Date & Time’ are correct. (To cor3. Check that the ‘D
rect them, touch the portions of the date or time that you would
like to change, and then use the up/down arrows to change them.
4. Check that the ‘EExpiry Date & Time’ are correct. You can
change them as detailed in Step 3 above. The expiry date and
time control how long the message will be kept unread in
System3 memory, before being deleted.
Eg: If a message is sent to an employee, and they don’t read
it before the expiry date, the message will be automatically deleted from memory.
5. Fill the subject of the message in the ‘SSubject’ line, by touching
the white box. An on-screen keyboard will pop up, allowing you
to type the subject. When done press ‘EEnter’
Message’ by touching the
6. Fill the message in the box marked ‘M
white box. Again, an on screen keyboard will pop up allowing you
to fill in the body of the message.
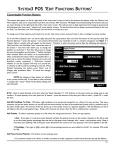
FIGURE 2: The E-Mail Screen
clock out.
7. Press the ‘Send’ button to send the message, or the ‘Cancel’
button to cancel the message.
If the number of hours on the chit does not match your own calculations, alert a manager in order to correct the situation
B. Select Specific Job Codes
To send a message to all people in a specific Job Code(s),
E-Mail (Staff Messaging)
Not to be confused with internet based e-mail, System3’s E-mail
function is designed to be used as a staff to staff, or manager to
staff messaging system. To use this feature, you must have been
given proper access in your employee security setup.
Highlight the' Send E-mail’ button by touching it, and either type
in your number, or swipe your card. This will bring up a box as
shown in Figure 1-1. Along the left side is a list of All Employees.
To the right is a list of Job Codes, and above that are a number of
Switches that you can use to determine who the e-mail is delivered to. The last options to decide on are Delivery Date/Time,
and Expiry Date/Time, which determine when the message is
sent.
The ‘Subject’ field allows you to fill in a subject line for the e-mail,
and the ‘Message’ box allows you to type an actual message to be
delivered.
There are several different ways to send messages among staff.
1. Select the Job Codes from the Job Code list that you would like
the message to go to.
2. Make sure that the ‘SSelected’ button is deselected (no
black circle in the box).
3. Follow steps 3-7 above.
C. To All Employees
To send a message to all employees.
All Employees’ button
1. Select the ‘A
2. Follow steps 3-7 listed above under ‘...Selected Employees.’
D. Select All Logged In Employees
To send a message to all employees currently logged-in.
-02-