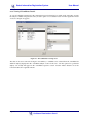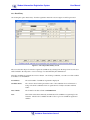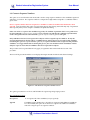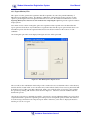
1
The Garrison, St. Michael 20, Barbados
℡: (246)436-6361, Fax: (246)429-5421
e-: (General):
e-: (Registration):
[email protected]
[email protected]
Student Information Registration System
User Manual
Content
Table of Figures.........................................................................................................................................................................2
1. Starting SIRS .........................................................................................................................................................................3
1.1. How to Start ....................................................................................................................................................................3
1.1.1 Changing the Password.............................................................................................................................................4
1.2. Using the Buttons............................................................................................................................................................4
2. The Menu Options .................................................................................................................................................................6
2.1. Main Menu......................................................................................................................................................................6
2.2. Registration Menu...........................................................................................................................................................7
2.2.1. Adding a New Candidate .........................................................................................................................................8
2.2.1.1. Candidate Subjects.........................................................................................................................................12
2.2.1.2. Candidate Fees...............................................................................................................................................16
2.2.2. Querying for Candidates ........................................................................................................................................17
2.2.3. Editing a Candidate's Information .........................................................................................................................19
2.2.4. Viewing a Candidate's Information........................................................................................................................21
2.2.5. Viewing all Candidates - List.................................................................................................................................22
2.2.6. Viewing all Candidates Details..............................................................................................................................24
2.2.8. Batch Entry ............................................................................................................................................................25
2.2.8.1. Candidate Group Selection ............................................................................................................................27
2.3. Generate Sequence Numbers ........................................................................................................................................28
2.4. Projections ....................................................................................................................................................................30
2.5. Importing/Exporting Files.............................................................................................................................................32
2.5.1. Import Candidate Personal Data ............................................................................................................................34
2.5.1.1. Post Imported Candidate Personal Data .......................................................................................................35
2.5.2. Export Database Fields ..........................................................................................................................................36
2.5.3. Export Fees ............................................................................................................................................................38
2.5.5. Export Ministry Files .............................................................................................................................................39
2.5.6. Import Registration Files .......................................................................................................................................41
2.5.7
Export SBA Files .............................................................................................................................................42
2.5.8
Import SBA Files .............................................................................................................................................44
2.6. Producing the Reports...................................................................................................................................................45
2.7. Summary Menu.............................................................................................................................................................46
2.7.1. Subject Entries .......................................................................................................................................................47
2.7.2. Centre Entries By Subject......................................................................................................................................48
2.7.2.1. Candidate Listings..........................................................................................................................................49
2.7.3. Centre Entries ........................................................................................................................................................50
3.1
Menu Options ..............................................................................................................................................................52
3.1.1
SBA Data Capture Menu .........................................................................................................................................52
3.1.2
Teacher Assignment.................................................................................................................................................54
4. Exiting The Application.......................................................................................................................................................57
Appendix 1 – List of Some Reports That are Currently Available ..........................................................................................58
Index ........................................................................................................................................................................................60
Page 1
Caribbean Examinations Council
Student Information Registration System
User Manual
Table of Figures
Figure 1 – The Centre Logon Screen.................................................................................................................................... 3
Figure 2 – The Password Administration Screen............................................................................................................... 4
Figure 3 – The SIRS Application Main Menu..................................................................................................................... 6
Figure 4 – The Registration Menu........................................................................................................................................ 7
Figure 5 – The CSEC Registration Screen ........................................................................................................................... 8
Figure 6– The CAPE Registration Screen............................................................................................................................ 9
Figure 7– The Subject Warning Message Screen.............................................................................................................. 11
Figure 8 – The Candidate Subjects Screen ........................................................................................................................ 12
Figure 9 - Candidate Subjects and Options Screen.......................................................................................................... 13
Figure 10 – Option tab on Candidate Subjects CSEC option screen ............................................................................. 14
Figure 10b – Option Information pop-up screen on Candidate Subjects CSEC option screen ................................. 14
Figure 11 - Option information Screen for CAPE ............................................................................................................ 15
Figure 12 – The Candidate Fees Screen ............................................................................................................................. 16
Figure 13 – The Candidate Search Screen ......................................................................................................................... 17
Figure 14 - Edit Candidate Screen...................................................................................................................................... 19
Figure 15 – Viewing Candidate information .................................................................................................................... 21
Figure 16 – The Form displayed when viewing all Candidates' Information - List ................................................... 22
Figure 17 – The Candidate Viewing Screen...................................................................................................................... 24
Figure 18 – The Subject Batch Entry Screen...................................................................................................................... 25
Figure 19 – The Candidate Selection Screen..................................................................................................................... 27
Figure 20 – The Generate Sequence Number Screen....................................................................................................... 28
Figure 21 – The Generate Sequence Number Message ................................................................................................... 29
Figure 22 – The Repeating Process Prompt ...................................................................................................................... 29
Figure 23 – The Centre Project Subject Information Screen ........................................................................................... 30
Figure 24 – The Registration School Centre Import/Export Menu Screen .................................................................. 32
Figure 25 – The Ministry Users Import/Export Menu Screen ....................................................................................... 33
Figure 26 – The “Centre User” Import Candidate Personal Information Screen ........................................................ 34
Figure 27 – The Candidate Selection Screen..................................................................................................................... 35
Figure 28 – The Exporting Fields Screen showing the Choose Field Tab..................................................................... 36
Figure 29 – The Exporting Fields Screen showing the Filter Tab .................................................................................. 37
Figure 30 – The Fees Re-Calculation Screen ..................................................................................................................... 38
Figure 31 – The Ministry Files Export Screen................................................................................................................... 39
Figure 32 – Centre tab on the Ministry Export Screen .................................................................................................... 40
Figure 33 – The Files from Ministry Import Dialog Screen ............................................................................................ 41
Figure 34- The Ministry SBA Files Export Screen............................................................................................................ 42
Figure 35 - The School's Ministry Files Export Screen .................................................................................................... 43
Figure 36 - The SBA Files From School Import Dialog Screen....................................................................................... 44
Figure 37 – The Reports Screen .......................................................................................................................................... 45
Figure 38 – The Summary Menu........................................................................................................................................ 46
Figure 39 – The Subject Information Screen ..................................................................................................................... 47
Figure 40 – The Centre Subject Information Screen ........................................................................................................ 48
Figure 41 – The “Centre” Candidate Listing by Subject Screen..................................................................................... 49
Figure 42 – The Centre Information Screen ...................................................................................................................... 50
Figure 43 – The “Centre Entry” Candidate Information Screen .................................................................................... 51
Figure 44- SBA Data Capture Window ............................................................................................................................. 52
Figure 45 - Teacher Assignment Window - Query Section ............................................................................................ 54
Figure 46 - Teacher Assignment Window - Assign Section ........................................................................................... 56
Figure 47 – The Quit Program Message Box .................................................................................................................... 57
Page 2
Caribbean Examinations Council
Student Information Registration System
User Manual
1. Starting SIRS
1.1. How to Start
To start the Student Information Registration System, (SIRS) use the icon on the desktop labeled "SIRS". Select
the icon and double click (using the left mouse button). The user will be presented with a screen titled "LOGON"
as seen in Figure 1.
The "LOGON" screen is the point of entrance to the CXC registration application.
Figure 1 – The Centre Logon Screen
To Log-On
To gain access to the application the user must complete all four sections on the "LOGON" screen shown above
in Figure 1.
User:
This will be a name assigned by the administrator and provided to the user. This user name will
determine the functions accessible.
Password:
Like “User” the password is assigned by the administrator and provided to the user and
controls access to the application. The password should not be shared among other users.
Period:
The period for which the registration is to be effective has to be selected from the drop-list
provided. The drop list is accessible by clicking on the down-arrow.
Centre:
The Centre for which entry to be completed must be selected.
After completing all the sections click on "OK" or press <enter> on the keyboard. However, the user should
change his/her password at the first log on to the application.
Provided all the information is correctly entered on the LOGON screen the user will be presented with the
"Main Menu" screen. If the information is incorrect, an error message will be presented. The user must respond
to the error message and then correct the information on the "LOGON" screen and either click on "OK" or press
<enter> on the keyboard.
Page 3
Caribbean Examinations Council
Student Information Registration System
User Manual
1.1.1 Changing the Password
On entering the correct log-on information, the user can then change the password by clicking on the "Change
Password" button.
The screen displayed below in Figure 2 is presented to the user.
Figure 2 – The Password Administration Screen
The username is displayed in inactive mode in the "Username" fields as illustrated above.
To change the password, simply type the new password in the "Password" field. Reenter the new password in
the “Verify” field and clicking the “Ok” button. You are then required to select to confirm the password change
for the user by click the “Ok” button. Once the change is successful a message prompt will be displayed;
clicking “Ok” will close the message screen and present the log-on screen.
Click on "Cancel" to cancel the change password process.
On returning to the log-on screen, the user must enter the new password in the "Password" field to successfully
logon to the SIRS application.
Moving within a form
To move from one field to the next the user can either use the tab key on the keyboard or use the mouse to
position the cursor.
1.2. Using the Buttons
At most seven buttons are enabled on the lower portion of most forms, each providing the user with a different
function. Each button is described below:
The section "Candidate Subjects" details the use of this button.
This is active for subjects requiring option papers to be selected, for example, Visual
Arts. The candidate is limited to selecting from only the options allowed for the subject.
It is recommended that the user ensures that the appropriate number of options
required for the subject is entered.
The "Add" button is used to facilitate the keying of a new record.
The "Undo" button is used to delete the last data keyed onto the form.
The "Delete" button is used to permanently delete (remove) the selected record.
Page 4
Caribbean Examinations Council
Student Information Registration System
User Manual
The "Save" button is used to store a permanent copy of the selected record.
The “Clear” button is used to clear the fields from the screen
The “Edit” Button allows the user to edit specific field entries on the screen
The “Print” button is used to print the current record.
The section “Fees” details the use of this button.
The "Close" button is used to exit the screen and returns the user to the previous menu
or sub-menu.
The “New Query” button is used to clear the fields of the previous criterion set so that a
new criterion can be built in the fields.
The “Apply Query” button is used to run the query against the criterion set.
The “Ok” button is use to accept and close the screen.
The “Cancel” button abandons what was currently changed or entered on the screen.
The "Search" button is used to activate a search operation against the field that the cursor
is in. Fill in the search criteria in the “Find what” text box of the “Find and Replace”
screen (MS Access) or the relevant fields on the “Candidate Search Dialog” screen.
Click the “Find Next” or “Apply Query” button (depending on the screen displayed to
execute the search criteria).
Clicking “CXC” on the left portion of any menu returns the user to the previous menu. However, clicking
“CXC” on the “Main Menu” brings up a prompt asking if the user wants to quit the application. Press the “Yes”
button to quit or “No” to return to the Main Menu.
Page 5
Caribbean Examinations Council
Student Information Registration System
User Manual
2. The Menu Options
2.1. Main Menu
On logging onto the SIRS application, the user will be presented with the following screen shown in Figure 3.
Figure 3 – The SIRS Application Main Menu
The Main Menu offers the user seven options as described below:
1.
Registration Menu:
Provides access to the registration menu.
2.
Generate Sequence Numbers:
Generates sequence numbers and assigns them to an alphabetically
sorted candidate listing.
3.
Projections:
Provides options for the number of candidates to be registered for the
following Year’s examination period.
4.
Import/Export Menu:
Provides options for the transmitting (export) and/or receiving
(import) of files.
5.
Reports:
Provides access to the various reports provided by the application.
6.
Summary:
Provides the user with access to the summary screen which provides a
count of the candidates registered at each centre.
7.
SBA Capture
Menu Option available only from January 2008 after patch is applied
Page 6
Caribbean Examinations Council
Student Information Registration System
User Manual
2.2. Registration Menu
On clicking on the "Registration Menu" button on the Main Menu, Figure 4 is presented to the user.
Figure 4 – The Registration Menu
From the "Registration Menu" the user manages candidate registration data, using one of six options available.
The registration data captured is relevant only for the examination period selected during logon.
The available options are:
1.
Add new Candidate:
This is used to capture the registration data for the first time a candidate
registers for the selected examination period.
2.
Edit Candidate:
This is used to edit the information relating to a candidate registered for the
selected examination period.
3.
View Candidate:
This is used to view individual candidate information without the ability to
change the data displayed.
4.
View Candidate – List:
From here the data for all candidates registered is displayed in a list for the user
to view.
5.
View Candidate Details:
The user has the ability to view all the candidates registered while viewing the
subject of a selected candidate as well as the options for a particular subject.
6.
Batch Entry:
Groups the allocation of candidates to a specific subject. Subjects with “options”
such as “Visual Arts” can be allocated via this Batch Entry screen.
Page 7
Caribbean Examinations Council
Student Information Registration System
User Manual
2.2.1. Adding a New Candidate
On selecting the option "Add New Candidate" from the registration menu, Figure 5 below will be presented.
Figure 5 – The CSEC Registration Screen
Page 8
Caribbean Examinations Council
Student Information Registration System
User Manual
Figure 6– The CAPE Registration Screen
Fields Displayed
Period:
This field displays the period for which the registration data is valid and is based on the
period selected during logon. The value displayed in this field cannot be changed on
this form.
Centre Code:
The value here is the number used to represent the centre at which the candidate is
registering. If the application for registration is being done at a center, the centre code
value cannot be changed. If the application for registration is being done at the
ministry, the centre code value can be changed.
Sequence Number:
A value will be displayed only after the "Generate Sequence Number" process has been
completed. No value is to be entered in this field.
Candidate Number:
The value here is the candidate number assigned to the candidate on registration. A
value will only be displayed in this field after the "Generate Sequence Numbers" process
has been completed.
New:
Only select this check box if the candidate is registering for the first time to take a
particular examination. Therefore, the candidate should not have a previous
registration number. This check box should be selected if the candidate will be writing
CSEC examinations for the first time during January 2008 or May-June 2008 sitting. In
the case of CAPE examinations, the “New” check box should be selected for candidates
who will be writing CAPE examinations at the May-June 2008 sitting or after.
Page 9
Caribbean Examinations Council
Student Information Registration System
User Manual
Candidate Name:
A candidate's name is captured in three fields, first name, middle name and last name.
Of these, the last name must be entered. Each component is limited to a maximum of 30
characters (apostrophes and special symbol like “é” are not accepted). These fields are
not case sensitive; all characters will automatically convert to upper case when you
proceed to the next field.
Date of Birth:
The format for entering the date of birth is DD/MM/YYYY. This field must be entered.
On completion of this field, the data is displayed in the form DD-MMM-YYYY in the
second date field so the user can easily verify that the data entered is correct. (If
10/11/1976 was entered as the date of birth, the date displayed in the second field would
be 10-Nov-1976). The age of the candidate is displayed in the third date of birth field.
Gender:
This field can accept one of two values (F - female or M - male).
Previous Period:
The period for which the previous candidate number is relevant is selected from the
drop down list.
Previous Candidate # : This field captures the candidate’s number at an earlier sitting. In the case of CSEC
examinations, a previous candidate number would only be valid if the candidate has
written the examination(s) at the January 2004 CSEC sitting and/or at a subsequent
sitting. With respect to CAPE examinations, a previous candidate number would only
be valid if the candidate has written the examination(s) at the May-June 2003 sitting
and/or at a subsequent sitting.
When registering for CAPE examinations, a previous CSEC candidate number should
not be used; likewise, when registering for CSEC examinations, a previous CAPE
candidate number should not be used. Furthermore, if a candidate has more than one
previous candidate number, the number of the most recent May-June sitting is
preferred. However, if the candidate is registering as a ‘Resit’ in any subject, the
previous candidate number should be the number used when the candidate first took
the subject
Form:
This field is available only for CCSLC registration and is used to indicate the form level
of the candidate
Class:
This field is used to capture the class number for the specific candidates. This field is
required if the candidate sequence number is to be controlled by class grouping. (Only
available for Schools/Centres).
User Field1:
This is a free field that users can use for their benefit.
User Field4:
This is a free field that users can use for their benefit.
User Field5:
This is a free field that users can use for their benefit.
Universities:
This field allows users to select the universities that the candidate has applied to. The
‘Other’ option enables the user to enter the name of any other university not specified.
Email:
This field enables the user to enter the email address of the candidate being registered.
Cell Phone# :
This field enables the user to enter the cell phone number including area code for
candidate being registered.
Page 10
Caribbean Examinations Council
Student Information Registration System
Associate Degree
User Manual
This field uses a drop down list to identify any one of the nine degree options available
to the candidate. The default is “none” should the candidate opt to defer during this
registration period (CAPE only).
The buttons in the lower portion of the form are explained in the “Using the Buttons” section. Clicking the
“Add” button before subjects have been assigned to the users will not only display a message window
indicating that the current data has been saved but also a separate message, as in Figure 7, which identifies that
subjects were not assigned to the candidate.
Figure 7– The Subject Warning Message Screen
Page 11
Caribbean Examinations Council
Student Information Registration System
User Manual
2.2.1.1. Candidate Subjects
An important element of the registration process is the selection of subjects for the respective candidate.
Access to the "Candidate Subjects" screen as shown below in figure 8 is obtained by using the "Subjects"
button from the Add Candidate Screen, Edit Candidate Screen or View Candidate Screens.
The user is reminded that this button is only activated after all the personal data has been entered on the
"Registration" screen.
Figure 8 – The Candidate Subjects Screen
The Candidate subject screen is divided into two sections and two views.
The section on the left side of the screen is the display screen and the section on the right side of the screen is the
input screen.
The fields on the display section of the screen are explained below:
Candidates:
This area shows the current candidate personal detail, which includes the centre
number, the sequence no, candidate name, gender and date of birth.
Candidate’s Subject: This area shows the list of candidate subjects currently registered. It displays Resit status,
Alternate status, Repeated status, Self-Tutored status, Teacher Information for the
specific subject.
Candidate’s Option:
This area provides a drop down list of subject options for the specific subjects currently
registered by the candidate.
Page 12
Caribbean Examinations Council
Student Information Registration System
User Manual
Figure 9 - Candidate Subjects and Options Screen
The tabs on the input section of the screen are explained below:
Subject Details tab:
This tab provides the following information:
Subject Field:
This field provides a drop down list of subjects available for this session.
For new candidates the only option available for registering is ‘Self Tutored’ for
candidates with previous registration details the options include ‘Resit’, ‘Alternate’ (for
private centres only), ‘Repeat’ (for January entrants only). For subjects with SBA, the
default is SBA for new candidates.
Resit:
When registering for CSEC examinations, this check box should be used to indicate that
the candidate has chosen to reuse the moderated SBA marks in the particular subject(s)
from the previous year’s May-June sitting. The marks obtained must be at least 50% of
the total moderated SBA marks. In the case of registering a candidate for CAPE
examinations, this check box should be used to indicate that the candidate has chosen to
reuse the moderated IA marks in the particular subject(s) from either of the past two
years’ May-June sittings. Any moderated IA marks can be carried forward for resit
purposes.
ALT (Alternative):
This field should be selected by candidates registered at Private centres and who have
chosen to take the alternative paper to SBA
Repeat:
This check box can only be selected for January candidates who have completed the
subjects at the same proficiency/unit at an earlier sitting
Page 13
Caribbean Examinations Council
Student Information Registration System
User Manual
Self Tutored:
This check box is used to indicate that the candidate did not receive school/institutional
training for the particular subject and is necessary for CXC’s future analysis.
Teacher:
This field uses the dropdown listing for the teachers who teach the subject in that school.
User Field 2:
This field captures any kind of data required by the school centre and ministry.
User Field 3:
This field captures any kind of data required by the school centre and ministry.
Option Details tab:
This tab shows a drop down list of subject options for the specific subjects currently
registered by the candidate (see figure 10 below)
Figure 10 – Option tab on Candidate Subjects CSEC option screen
Figure 11b – Option Information pop-up screen on Candidate Subjects CSEC option screen
Page 14
Caribbean Examinations Council
Student Information Registration System
User Manual
Figure 12 - Option information Screen for CAPE
Page 15
Caribbean Examinations Council
Student Information Registration System
User Manual
2.2.1.2. Candidate Fees
The Fees module is a feature of the application that assists in the maintenance of candidates’ fee payment. This
is achieved through the selection of the “Fee” button from the Add Candidate Screen to displays the “Candidate
Fees screen seen in Figure 12.
Figure 13 – The Candidate Fees Screen
The “Candidate Fees” screen in Figure 12 shows the following sections:
Top:
Displays the name of the candidate, the number of subjects that candidate is
registered to take, along with the number of Orals, SBAs and Practicals that
those subjects carry.
Expected Fees For Candidate:
Can not be edited. The total fees that the candidate is required to pay is given
here and is based on local fees data inputted by the Administrator under the
Administrator “Setup Menu” module.
Fees Paid By Candidate:
Changes can be made and allows for the inputting of fees or dollar amount that
the candidate paid.
Bottom:
Shows the grand total fees expected, paid and what remains outstanding.
User Field 6:
This field captures any kind of data required by the school centre and ministry.
User Field 7:
This field captures any kind of data required by the school centre and ministry.
Page 16
Caribbean Examinations Council
Student Information Registration System
User Manual
2.2.2. Querying for Candidates
The “Candidate Search” screen displayed in Figure 13 is used to locate candidates in the database. The Top
portion of the form is used to build or set the criteria and the Results portion displays all candidates that met the
criteria.
Figure 14 – The Candidate Search Screen
Candidates meeting a combination of or all the fields listed below can be used to set the criteria.
Class:
Use this field to display all candidates from a given class or grade level.
Sequence Number:
Use this field to display candidates with a particular sequence number. Each candidate
should have a unique sequence number.
New:
Field indicates if candidate is new to CXC.
Previous Period:
The period for which the previous candidate number is relevant is selected from the
drop down list.
Previous Candidate # : This field captures the candidate’s number at an earlier sitting. In the case of CSEC
examinations, a previous candidate number would only be valid if the candidate has
written the examination(s) at the January 2005 CSEC sitting and/or at a subsequent
sitting. With respect to CAPE examinations, a previous candidate number would only
be valid if the candidate has written the examination(s) at the May-June 2005 sitting
and/or at a subsequent sitting.
Page 17
Caribbean Examinations Council
Student Information Registration System
User Manual
When registering for CAPE examinations, a previous CSEC candidate number should
not be used; likewise, when registering the CSEC examinations, a previous CAPE
candidate number should not be used. Furthermore, if a candidate has more than one
previous candidate number, the number of the most recent May-June sitting is
preferred. However, if the candidate is registering as a ‘Resit’ in any subject, the
previous candidate number should be the number used when the candidate first took
the subject
First Name:
This field is used to display candidates with a particular first name.
Last Name:
This field is used to display candidates with a particular last name
Gender:
To display a particular gender category of candidates, use either M - male or F - female
in this field.
Date of Birth:
To display candidates with a certain date of birth, use this field.
When the criteria have been set, run the query/search by clicking on the “Apply Query” button. The results to
the query will be shown in the Results section of the screen under the following headings:
School:
This column displays the candidate’s school code.
Class:
The column displays the candidate’s form number.
Sequence Number:
This column shows the three-digit unique sequence number assigned to the
candidate.
Last Name:
The candidate’s last name is shown in this column.
First Name:
The candidate’s first name is shown in this column.
Middle Name:
The candidate’s middle name or initial is shown in this column.
Date of Birth:
This column displays the candidate’s date of birth.
Gender:
This column displays the candidate’s gender.
When the candidate being searched for has been located, select that candidate’s record by clicking on the
appropriate row and pressing the “OK” button (see “Using the Button” section for further information on the
use of the button found on this screen). This action displays the candidate’s personal data in a new screen.
A new query can be generated by selecting the “New Query” button to clear the previous query criterion and
results.
Page 18
Caribbean Examinations Council
Student Information Registration System
User Manual
2.2.3. Editing a Candidate's Information
The edit function allows the user to modify the registration data relating to a specific candidate. On selecting
the option "Edit Candidate" from the registration menu, the screen shown in Figure 14 will be presented. This
screen allows the user to locate the specific candidate. See the section “Querying for Candidates”. Once the
candidate has been located and selected the personal details will be displayed on a screen to Figure 13 where
modifications can be made to the candidate’s registration data.
Figure 15 - Edit Candidate Screen
Candidate information can only be modified prior to completing the file transfer to the Ministry/Local Registrar
in the respective territories or to C.X.C. Once this transfer is completed, further changes can only be made
using the amendment options. The fields presented for modification includes:
Period:
This field displays the period for which the registration data is valid and is based on the
period selected during logon. The value displayed in this field cannot be changed on
this form.
Centre Code:
The value here is the number used to represent the centre for which the candidate is
registering. The centre code value cannot be changed on this form if the user of the
application is at one of the school centres.
Sequence Number:
A value will be displayed only after the "Generate Sequence Numbers" process has been
completed. No value is to be entered into this field.
Candidate Number:
The value here is the candidate number assigned to the candidate on registration. A
value will only be displayed in this field after the "Generate Sequence Numbers" process
has been completed. No value is to be entered into this field.
New:
Field indicates if candidate is new to CXC.
Page 19
Caribbean Examinations Council
Student Information Registration System
User Manual
Candidate Name:
A candidate's name is captured in three fields, first name, middle name and last name.
Of these, the first name and last name are both compulsory and must be entered. Each
component is limited to a maximum of 30 characters (apostrophes and special symbol
like ‘é’ are not accepted*). These fields are not case sensitive; all characters will
automatically convert to upper case when you proceed to the next field.
Date of Birth:
The format for entering the date of birth is DD/MM/YYYY. This field is compulsory
and must be entered. On completion of this field, the data is displayed in the form DDMM-YYYY in the second date field so the user can easily verify that the data entered is
correct. (If 10/11/1976 was entered as the date of birth, the date displayed in the second
field would be 10-Nov-1976). The age of the candidate is displayed in the third date of
birth field.
Gender:
This field can accept one of two values (M - male or F - female). The data can be entered
into this field by either the keyboard or by selecting from the drop-down list.
Class:
This field is used to capture the class code (number) for the specific candidates. This
field is required if the candidate sequence number is to be controlled by class grouping.
(Only available for Schools/Centres).
The “Add” button on the screen is disabled nevertheless; the other buttons can be used. By the select the
“Audit” button the user can view the amendment log as it pertains to this candidate. The “Close” button will
close the screen and return the user to the “Candidate Search “ screen where another candidate can be selected
from the “Results” list or a new query generated to find another set of candidates.
Page 20
Caribbean Examinations Council
Student Information Registration System
User Manual
2.2.4. Viewing a Candidate's Information
The view function displays the registration data for the highlighted candidate.
On selecting the option "View Candidate" from the registration menu the screen in Figure 15 is presented. The
screen allows the user to locate the specific candidate. See the section “Querying for Candidates”. Once the
candidate has been located and selected the registration data will be displayed on a screen similar to Figure 13.
Changes are not permitted via this form only at the “Edit Candidate” mode (see “Editing a Candidate
Information” section).
To view the candidate’s subjects select the “Subject” button.
N.B.
The “Add”, “Undo”, “Delete” buttons are disabled on the screen.
Figure 16 – Viewing Candidate information
Page 21
Caribbean Examinations Council
Student Information Registration System
User Manual
2.2.5. Viewing all Candidates - List
On selecting the option "View Candidate - List" from the registration menu the screen shown is displayed. This
form displays all candidates registered for the examination period selected at log-on.
Figure 17 – The Form displayed when viewing all Candidates' Information - List
Fields Displayed
Seq No:
The values displayed here are the centre code of the school at which the candidate is
registered and the sequence number of the candidate. The sequence number of the
candidate is assigned on generation of sequence numbers and can be used to display reports
pertaining to a particular candidate.
Class:
The class number or grade level is displayed if entered. This is only available to schools.
First Name:
The value here is the first name of the registered candidate.
Middle Name:
The value here is the middle name or initial of the registered candidate.
Last Name:
The value here is the last name of the registered candidate.
Date Of Birth:
The value here is the date of birth of the registered candidate. The format for this field is
DD/MM/YYYY.
Gender:
The value here represents the gender of the candidates who have been registered. If the
value is ‘F’, the candidate is female; if ‘M’, the candidate is male.
# Candidates:
The value here is the calculated total number of candidates listed. No data is to be
entered in this field.
Page 22
Caribbean Examinations Council
Student Information Registration System
User Manual
The buttons found on this screen are explained in the “Using the Buttons” heading.
N. B.
The screen displayed in Figure 14 is only for viewing. To view the next screen full of candidates or
the next candidate (in some cases), press the "pgdn" (page down) key. To view the previous screen,
press the "pgup" (page up) key.
Page 23
Caribbean Examinations Council
Student Information Registration System
User Manual
2.2.6. Viewing all Candidates Details
To view all candidates registered for the examination period selected at log-on while at the same time viewing
the subject a candidate is registered to take, select the option "View Candidate Details" from the registration menu.
A screen as in Figure 17 appears.
`
Figure 18 – The Candidate Viewing Screen
The data on this screen cannot be changed. Nevertheless, a candidate can be selected from the Candidate list
and their subject(s) displayed in the “Candidate Subject” section of the screen. Also the options for a particular
subject, once selected, will appear in the “Candidate’s Options” section. Select the “Close” button to close the
form and return to the registration menu.
Page 24
Caribbean Examinations Council
Student Information Registration System
User Manual
2.2.8. Batch Entry
On selecting the option "Batch Entry" from the registration menu the screen is Figure 18 will be presented.
Figure 19 – The Subject Batch Entry Screen
The user selects the subject for which to register the candidates by selecting from the drop-down list. The user
will be limited to the subjects he or she is in charge of as determined by the administrator.
Select the candidates by using the down arrow button. On selecting a candidate, a second row will be enabled
to facilitate a second addition.
# Candidates:
The total number of candidates registered is displayed.
Candidate Name:
The values in these fields represent the name of the candidate whose information is
being viewed. The candidate's name is captured in two fields, Last Name and First
Name.
Date of Birth:
The format for the date of birth is DD/MM/YYYY.
New:
This field is selected automatically and indicates if the candidate is registering for the
first time. Therefore the candidate should not have a previous candidate registration
number.
Page 25
Caribbean Examinations Council
Student Information Registration System
User Manual
Resit:
This check box is used to indicate that the candidate is a resit candidate, that is, the
candidate had attempted the respective subject and proficiency at a previous period no
more than one year earlier. This will be used to determine the candidate's eligibility to
carry-forward the previous SBA score.
ALT (Alternative):
This field is used to capture information on the alternative paper to SBA and is used to
indicate that the candidate has opted to attempt the paper classified accordingly.
Repeat:
This check box is used to indicate that the candidate is a repeat candidate, that is, the
candidate had previously attempted the respective subject and proficiency/unit.
User Field 2:
This field captures any kind of data required by the centre and ministry.
User Field 3:
This field captures any kind of data required by the centre and ministry.
To select a candidate for batch entry, click on the down arrow button to the left side of the Last Name field. This
action displays a list (for selection) all the candidates whose personal information has been entered in the system
either during the "Add a New Candidate" process or during the "Import Candidate Personal Data" process.
The buttons on this screen are explained in the “Using the Buttons” headings. Select the “Save” button to save
the data entered or the “Close” button to save and close the screen and return to the registration menu.
Page 26
Caribbean Examinations Council
Student Information Registration System
User Manual
2.2.8.1. Candidate Group Selection
Instead of selecting a candidate record by record as explained previously, a group can be selected by clicking
the Select button found on the subject batch entry window seen on Figure 18. Once this button is selected the
Candidate Selection screen seen in Figure 19 is presented with the candidates entered at the registration screen
or imported.
Figure 20 – The Candidate Selection Screen
The “Available Candidates” section of the candidate selection screen shown in Figure 19 list all candidates
with the exception of the ones selected previously from the subject batch entry screen seen in Figure 18. To
select a group of candidates from this list hold down the Ctrl and or Shift key on the keyboard and then
highlight the candidates required. The selection can then be moved to the “Selected Candidates” section by
clicking the right arrow button in the middle of the two sections.
To remove candidates from the “Selected Candidates” section involves selecting the candidates and clicking the
left arrow button in the middle.
Click the “OK” button to close the screen and display the candidates, listed in the “Selected Candidates”
section, unto the “Subject Entry Batch Entry” screen.
Page 27
Caribbean Examinations Council
Student Information Registration System
User Manual
2.3. Generate Sequence Numbers
This option is accessed from the main menu and is used to assign sequence numbers to the candidates registered
at the time of execution. The sequence number is a unique three-digit number assigned to a candidate within a
given centre.
Once a sequence number has been assigned to a candidate it cannot be modified after the data has been
exported. Users should use this option screen in Figure 20 only after having entered the majority of registration
data especially if they wish to keep the candidates in alphabetical listing.
If the user wishes to sequence the candidates by gender, all candidate registration data for one gender must
be entered then the "generate sequence numbers" process must be run and then the candidate registration data
for the other gender must be entered and the "generate sequence numbers" process run again.
Only candidates who have been registered for subjects will be assigned sequence numbers. If only the
personal information has been keyed for a candidate but no subjects have been selected for that candidate,
on running the "generate sequence numbers" process, no sequence number will be assigned to that particular
candidate. It is suggested that before running this process, the user should check the "Candidates without
subjects" report to ensure that all candidates have been registered for subjects.
The procedure can be repeated but will only apply to registration data entered after the last run of the
procedure.
The user will be presented with the screen displayed in Figure 20 and should select the desired settings.
Figure 21 – The Generate Sequence Number Screen
The options presented are as follows and fall under the sequencing and grouping sections.
The Sequencing Section:
Re-sequence:
To re-sequence all of the candidates (not yet exported).
Append:
If candidates in the database have already been sequenced and additional candidates
have been added, this option allows the user to sequence the additional candidates
without loosing the previous sequence numbers.
Page 28
Caribbean Examinations Council
Student Information Registration System
User Manual
The Grouping Section:
This section contains radio buttons that allow grouping by gender, class, class gender, or simply all candidates.
The individual centre users will not be able to change the period or the centre displayed. The centre should
correspond to the respective centre number for which the candidate is registered and the period is that which is
selected at log-on.
Only the Ministry users will be allowed to change the centre, in the situation where the Ministry completes the
registration for multiple centres.
If the procedure is completed successfully then the confirmation box shown in figure 21 will be displayed.
Figure 22 – The Generate Sequence Number Message
If the procedure failed then an error dialogue box will be displayed. A failure usually occurs if no new
candidates were registered between the previous time the "Generate Sequence Numbers" process was run and the
current attempt.
The user is then given the option of repeating this process:
Figure 23 – The Repeating Process Prompt
If the user selects “No”, the form is closed and the Main Menu is shown. If the user selects “Yes” the "Generate
Sequence Form" is displayed once more.
Page 29
Caribbean Examinations Council
Student Information Registration System
User Manual
2.4. Projections
The Projections screen allows the user to set the number of candidates expected to be registered for the
following examination period as is access by selecting Projections from the Main Menu. Projections are recorded
by Centre and Subject and the user simply enters the number of candidates on the screen shown in Figure 23.
Figure 24 – The Centre Project Subject Information Screen
Fields Displayed:
Centre:
The desired Center is chosen via the drop-down list provided here. Otherwise at the school
centre level this field shows the centre name and is disabled.
Type:
3 possible values, “ALL” show all subjects for which candidates are entered at the Centre,
“ENTERED” show only those subjects for which projections have been completed and
the third option “NONE” will show those subjects for which projections have not yet
been entered.
Centre:
The centre code is displayed.
Subject:
This field shows the subject chosen. To see a list of subjects to choose from select the down
arrow next to the field. If a new subject is to be offered for the next year’s examination cycle
this subject can be added by selecting from the drop list provided.
Page 30
Caribbean Examinations Council
Student Information Registration System
# Entries:
User Manual
This field displays the total number of candidates projected for the subject selected.
Fields at bottom of the form:
# Subjects:
This field displays the total number of subjects for which the Center is registered to give.
# Entries:
This field displays the total number of candidates registered for that entire Centre.
The various buttons available on the form provide the same function as described under the heading “Using the
Buttons.
Page 31
Caribbean Examinations Council
Student Information Registration System
User Manual
2.5. Importing/Exporting Files
This option available from the Main Menu provides the external interface for the SIRS application, that is, it
allows the distribution of data files and the loading of maintenance data.
Two versions of this both shown in Figure 23 and Figure 24 respectively are presented which differ based on the
installation, that is, Centre or Ministry installation.
The form shown in Figure 22 is presented to the user at a registration school centre.
Figure 25 – The Registration School Centre Import/Export Menu Screen
The options on this menu include:
Import Candidate Personal Data:
This option allows the centre users to import candidates’ personal
information in the event that the data has already been saved as a
“.csv” file. The format for the “.csv” file is specified in the
Administration Manual.
Export Database Fields:
Offers the user the functionality to extract selective data from the
Electronic Registration database. The data is extracted into a user
specified folder and filename.
Export Fees:
With this option the user can generate a fee distribution by subject for
the centre, to an ”.xls” file for using in MS Excel or MS Word.
Export Ministry Files:
This option is used to generate the registration data files required to be
sent to the Ministry.
Import Registration Files:
This option gives the user the ability to import registration data. This
can be useful when registration data has been prepared on another
computer and needs to be consolidated unto one system.
Page 32
Caribbean Examinations Council
Student Information Registration System
User Manual
Export SBA Files:
This option is used to generate the SBA data files required to be sent to
the Ministry
Import SBA Files:
This option gives the user the ability to import SBA data. This can be
useful when SBA data has been prepared on another computer and
needs to be consolidated unto one system.
On the other hand, the screen shown below in Figure 25 is the menu presented at the Ministry.
Figure 26 – The Ministry Users Import/Export Menu Screen
The Options are as follows:
Export Database Fields:
Offers the user the functionality to extract selective data from the
Electronic Registration database. The data is extracted to a user
specified folder and filename.
Export Fees:
With this option the ministry can generate a fee distribution by subject
for a particular centre, to an”.xls” file for use in MS Excel or MS Word.
Export Ministry Files:
This option is used to generate the files containing the candidate
information for those candidates registered at the Ministry. This file
will then be submitted to CXC.
Import Registration Files:
This option is used to import the registration data files provided by the
centres.
Export SBA Files:
This option is used to generate the SBA data files required to be sent to
the Ministry
Import SBA Files:
This option gives the user the ability to import SBA data. This can be
useful when SBA data has been prepared on another computer and
needs to be consolidated unto one system.
Page 33
Caribbean Examinations Council
Student Information Registration System
User Manual
2.5.1. Import Candidate Personal Data
This option is unique to the Centres and will be used to import personal information for candidates in the event
that the data was already saved as a .csv file.
On selecting the option "Import Candidate Personal Data" from the Centre User's Import/Export Menu, the
screen displayed in Figure 26 will be presented.
Figure 27 – The “Centre User” Import Candidate Personal Information Screen
Click on the "Browse" button to select the path of the file from which the data is to be imported.
This file must be a .csv file of format
(FIRSTNAME, MIDDLENAME, LASTNAME, DATEOFBIRTH, GENDER, CLASS)
The valid format for the DATEOFBIRTH is DD/MM/YYYY e.g. if the date of birth of the candidate is 10th
August 1979, the DATEOFBIRTH field would show 10/08/1979.
On selecting the path of the file, click the "Import Candidate Personal Information" button to import the data.
A confirmation message box will appear informing the user that the file selected will be imported. If the file is
still required click the “Yes” button otherwise select “No”.
On successful import of the data a message box informing the user that the import was successful will be
displayed.
Imported candidates are not active registration candidates until they have been posted. (They will not be
viewed from any of the registration options until this posting process is completed).
Therefore, to post the candidates to the active database, click the "Post Imported Candidate Personal Data"
button and highlight the candidates to be "posted as active candidates".
Page 34
Caribbean Examinations Council
Student Information Registration System
User Manual
2.5.1.1. Post Imported Candidate Personal Data
On selecting the option "Post Imported Candidate Personal Data" button from the Centre User Import Candidate
Personal Data option, the form displayed in Figure 27 will be presented.
Figure 28 – The Candidate Selection Screen
The Available Candidates list on the left shows a list of all candidates imported during the "Import Candidate
Personal Data" process.
To select a candidate to post as being an active candidate, highlight the candidate in the available candidates list
and click on the
button. The candidate should now be seen in the Selected Candidates list on the right.
To remove a candidate from the selected candidates list, highlight the candidate in the list on the right and click
on the
button.
Only candidates who have been selected to be posted as being active candidates can be registered for
subjects in the registration menu. The personal data of candidates not posted will not be accessed from the
registration menu.
To post the candidates selected, click on "Ok" otherwise click on "Cancel" to cancel the process.
Page 35
Caribbean Examinations Council
Student Information Registration System
User Manual
2.5.2. Export Database Fields
A user has the functionality to extract selective data from the Electronic Registration database. The data is
extracted into a user specified folder and filename. Use the “Choose Fields” tab to select the fields from the list
provided. Highlight the first field required then select a directional arrow; the operation can be reversed by
using the opposite directional arrow. The ‘Up’ and ‘Down’ buttons allow the user to select the position of the
exported field in the output file. For example the user may prefer the ‘SBA Subject’ to be the first field in the
exported database, by using the ‘Up’ botton, the user may position the field at the top of the selected field
listing.
On selecting the option from the menu the following screen in Figure 28 is presented which allows the
specification for the data extraction.
Figure 29 – The Exporting Fields Screen showing the Choose Field Tab
Page 36
Caribbean Examinations Council
Student Information Registration System
User Manual
The filter tab limits the extraction of data and the user needs to fill the specific fields as required.
Figure 30 – The Exporting Fields Screen showing the Filter Tab
After completing the filter or without any filters specified (then all the data is extracted) the user then selects the
button “Prepare Data”. This action then returns the results, which can be viewed by going to the “View” tab. If
the information presented is as required by the user then proceed to select the “Output” button. The output file
is then created when the user specifies a location and file name for the from the “Please Input a File Name”
screen displayed.
Page 37
Caribbean Examinations Council
Student Information Registration System
User Manual
2.5.3. Export Fees
The Export fees Menu command allows for the exporting of fees data for a particular centre to a “.csv” file
format from the screen shown in Figure 30.
Figure 31 – The Fees Re-Calculation Screen
Basically, the user selects the centre from the Centre drop-down box, if the particular centre is not displayed
already. Next, the fee information which given the total fees for the particular centre is generated by clicking
the “Prepare Data” button. A message box appears indicating that the preparation has been completed; select
the “Ok” button to close the message. The fees values used in the generation are based on the fees assigned
under the “Administration Maintain Local Fees Menu”. Using the “Output” button will present a screen where
a location and file name are expected in order to save the information produced to a “.xls” file.
Page 38
Caribbean Examinations Council
Student Information Registration System
User Manual
2.5.5. Export Ministry Files
This option is used to generate the registration data files required to be sent to the particular Ministry of
Education by the individual centres. The Ministry of Education of the particular territory will also use this
option for producing the territorial registration data files to be sent to the Caribbean Examinations Council.
Exporting Ministry files must not be done without first completing the option to generate sequence numbers
and projections.
Users must exercise caution in using this option since registration data exported cannot be edited after the
export option has been taken. Any modification to registration data after the export option must be done as an
amendment options after the late registration date has become effective. Reference the sections on "edit
candidate".
On selecting this option the screen displayed in Figure 31 below will be presented.
Figure 32 – The Ministry Files Export Screen
The user will use the ‘Add’ button which will provide a windows browser to determine where on the directory
structure the file created will be saved. Select the drive, folder and sub-folder, where necessary, then click "Ok"
from the browse for folder screen that is displayed. Make a note of the file name, if necessary, and complete
the operation by clicking "Ok" from the screen shown in Figure 31. Otherwise select the “Cancel” button to
abandon the process.
Once the process has been completed successfully, a message box appears indicating that the process has been
completed and if the operation is required again. If the process is not required again, select the “No” button to
close the message and return to the “Import/Export” Menu. Otherwise, select “Yes” to display the Status to
start the process all over again.
Page 39
Caribbean Examinations Council
Student Information Registration System
User Manual
Figure 33 – Centre tab on the Ministry Export Screen
The ‘Centre’ tab on the Ministry Export screen shows a listing, see Figure 32 above, of the all the centres in the
territory. The user can then sort by Code or by Name.
The ‘Status’ tab
N. B. The file that is produced has the centre code followed by the systems’ data without the year and has a
“.zip” extension.
For example: A file produced by centre 030034 on 15 September, 2005 will have the file name 0300341509.ZIP.
If the file was produced at the ministry the filename will be in the same format as discussed previously
but would begin with a three letter abbreviation of the particular territory.
For example: A file produced by the Barbados ministry will have the filename BAR1509.ZIP.
Page 40
Caribbean Examinations Council
Student Information Registration System
User Manual
2.5.6. Import Registration Files
This option allows the Ministry of Education of any territory to ability to consolidate the registration data files
submitted by the various centres in the territory into a single database. It can also assist the individual centres
with the consolidation of registration data files from various entities of that centre.
On selecting the option "Import Registration Files" from the Centre or Ministry User Import/Export Menu the
“Files from School Import Dialog” screen similar to Figure 33 will be presented.
Figure 34 – The Files from Ministry Import Dialog Screen
To select the registration data file, select the “Browse” button which will display the “Browse for folder” screen.
From this new screen, select the drive, folder and sub-folder, where necessary and then the actual file and click
the "Ok" button to select and exit the browse screen and return to the “File form school import dialog” screen.
Execute the import operation by clicking "Ok" button from the screen shown in Figure 33. The “Cancel” button
is used to cancel the operation.
Once the process has been completed successfully, a message box appears indicating that the process has been
completed and if the operation s required again. If the process is not required again, select the “No” button to
close the message and return to the “Import/Export” Menu. Otherwise, select “Yes” to display the Status to
start the process all over again.
Page 41
Caribbean Examinations Council
Student Information Registration System
2.5.7
User Manual
Export SBA Files
The option is used to generate the SBA files required to be sent to the particular Ministry of Education by the
individual centres (see Figure 34 below). The Ministry of Education of the particular territory will also use this
option for producing the territorial SBA files to be sent to the Caribbean Examinations Council (see Figure 34
below).
Exporting Ministry files must not be done without first completing the option to generate sequence numbers
Users must exercise caution in using this option since SBA data exported cannot be edited after the export
option has been taken.
On selecting this option the screen displayed in Figure 32 below (if a ministry is installed) will appear.
Figure 35- The Ministry SBA Files Export Screen
Page 42
Caribbean Examinations Council
Student Information Registration System
User Manual
Figure 36 - The School's Ministry Files Export Screen
The user will use the “Add” button to determine where on the directory structure the file created will be saved.
Select the drive, folder and sub-folder, where necessary, and then click “Ok” from the browser for folder screen
that is displayed. Make note of the file name, if necessary, and complete the operation by clicking “Ok” from the
screen shown in Figure 33 above. The screen will show the status information for the activity being performed.
By selecting the “Cancel” button the process will be abandoned.
Once the process has been completed successfully, a message box appears indicating that the process has been
completed and if the operation is required again. If the process is not required again, select the “No” button to
close the message and return to the “Import/Export” Menu. Otherwise, select “Yes” to display the Status clearly
as seen in Figure 32 above to start the process all over again.
The Centre tab of the export screen enables the ministry to select a specific centre for export. The filter buttons as
end of the screen enables the user to sort the centers for display by name or by the centre code. The status as
indicated earlier shows the status of the file being export.
N.B The file that is produced has the centre code followed by the systems’ data without the year and has a
“.sba” extension.
For example:
A file produced by centre 030042 on 15 September, 2006 will have the file name
0300421509.SBA.
If the file was produced at the ministry the filename will be in the same format as discussed previously but
would have begin with a three letter abbreviation of the particular territory.
For example: A file produced by the Barbados ministry in June will have the filename 8BAR1509.SBA
Page 43
Caribbean Examinations Council
Student Information Registration System
2.5.8
User Manual
Import SBA Files
This option allows the Ministry of Education of any territory the ability to merger the SBA files submitted by the
various centres in the territory into a single database. It can also assist the individual centres to merge all of the
SBA files from various entries of that centre.
On selecting the option “Import SBA Files” from the Centre or Ministry User Import/Export (Figure 34 and
Figure 35 respectively) the “Files from School Import Dialog” screen in Figure 36 below will be appear.
Figure 37 - The SBA Files From School Import Dialog Screen
To select the SBA files, select the “Add” button which will display the “Browse for folder” screen. From this
new screen, select the drive, folder and sub-folder, where necessary and then the actual file and click the “Ok”
button to select and exit the browse screen and return to the “File from school import dialog” screen. Execute
the import operation by clicking “Ok” button from the screen shown in Figure 15. The “Cancel” button is used
to cancel the operation. The “Remove” removes the selected file from the menu.
Once the process has been completed successfully, a message box appears indicating that the process has been
completed and if the operation is required again. If the process is not required again, select the “No” button to
close the message and return to the “Import/Export” Menu. Otherwise, select “Yes” to display the Status clearly
as seen in Figure 36 above to start the process all over again.
Page 44
Caribbean Examinations Council
Student Information Registration System
User Manual
2.6. Producing the Reports
The user accesses all reports by selecting the "Reports" option from the Main Menu. On clicking on this "reports"
button, the following screen in Figure 37 is displayed.
Figure 38 – The Reports Screen
Various reports are available from the “Choose required report” drop-down list (see appendix 1 for a listing of
some of these reports). Some of the reports provide the user with the option to display the report for a
particular centre or for a particular candidate. To display the report for a particular centre, enter the centre code
of the centre in the "Centre No:" field. To display the report for a particular candidate, enter the sequence
number of the candidate in the "Seq No" field. It is advantageous before completing the "Seq No" to use the
"View Candidate - List" or "View Candidate" options to validate the candidate sequence number. The ‘subject’
drop down button option allows the user to view SBA subject details.
The reports produced can either be:
1.
Displayed in Microsoft Word by using the Preview button on the screen. From within Word the report
can then be edited, searched, printed or saved as a Word document.
2.
Sent directly to a printer by using the Print button. The printer used is the default Windows printer.
Page 45
Caribbean Examinations Council
Student Information Registration System
User Manual
2.7. Summary Menu
On selecting the "Summary" option from the Main Menu, the form shown below in Figure 38 is presented to the
user.
Figure 39 – The Summary Menu
Page 46
Caribbean Examinations Council
Student Information Registration System
User Manual
2.7.1. Subject Entries
When selecting “Subject Entries" from the menu, the screen below in Figure 39 appears. The user is allowed to
select the Subject and obtain a list of the centres that offer that subject (when log on as a ministry user), and how
many candidates are registered to take the examination at that location.
Figure 40 – The Subject Information Screen
A count of the number of Centers and Total number of Candidates registered is also shown at the base of the
form.
Fields Displayed
Subject:
This field shows the subjects chosen.
Centre:
The value here is the number used to represent the centre for which the candidates were
registered.
Name:
This field displays the name of the centre corresponding to the centre code. At the centre
level only that particular centre is displayed.
# Entries:
This field displays the total number of candidates registered for that particular centre.
Fields at bottom of the form
# Centres:
This field displays the total number of centres for which candidates have been registered.
At the centre level this value will always be one.
# Entries:
This field displays the total number of candidates registered for all the centres.
The “Candidate Listing” button will display a screen (see x) showing all the candidates registered to take the
subject examination. The fields displayed are only for viewing purposes and cannot be edited.
Page 47
Caribbean Examinations Council
Student Information Registration System
User Manual
2.7.2. Centre Entries By Subject
This option displays a screen similar to Figure 40 where the user is allowed to select a centre via the drop-down
list provided (not applicable for school centres). This form displays the list of subjects which the as well as the
number of candidates registered for these examinations. At the base of the form the user has the option to view
the listed candidates for any of the subjects listed.
Figure 41 – The Centre Subject Information Screen
Fields Displayed:
Centre:
The desired Center is chosen via the drop-down list provided here. In the case of a school
centre the School name will be displayed and this cannot be changed.
Subject:
This field shows the subjects available.
# Entries:
This field displays the total number of candidates registered for that particular subject at the
centre selected.
Fields at bottom of the form
Subject:
This field displays the total number of subjects for which the centre is registered to give.
# Entries:
This field displays the total number of candidates registered for all the centres.
The various buttons available on the form provide the same function as described under the heading "Using the
Buttons" with the exception of the “Candidate Listing” button whose function is described under “Candidate
Listings” heading.
Page 48
Caribbean Examinations Council
Student Information Registration System
User Manual
2.7.2.1. Candidate Listings
This screen (Figure 41), which is for viewing purposes only, shows the Candidates’ information for a
corresponding subject. Personal information, the previous candidate numbers and the paper option chosen are
presented here.
Figure 42 – The “Centre” Candidate Listing by Subject Screen
Page 49
Caribbean Examinations Council
Student Information Registration System
User Manual
2.7.3. Centre Entries
The screen (see Figure 42) displayed on the selection of “Centre Entry” from the” Summary” menu shows the
list of the various centres and the number of candidates registered at that center. At the base of the form the
user has the option to view the listed candidates for any of the subjects listed.
Figure 43 – The Centre Information Screen
Fields Displayed:
Centre:
The value here is the number used to represent the centre for which the candidates were
registered.
Name:
This field displays the name of the centre corresponding to the centre code.
# Candidates:
This field displays the total number of candidates registered for that particular centre.
Fields at bottom of the form:
# Centres:
This field displays the total number of centres for which candidates have been registered.
# Candidates:
This field displays the total number of candidates registered for all the centres.
The various buttons available on the form provides the same function as described under the heading "Using the
Buttons" with the exception of the Candidate Listing button whose function has been described in the “Candidate
Listing 2” section.
Page 50
Caribbean Examinations Council
Student Information Registration System
User Manual
By selecting the Candidate listing Button provided on the "Center Entries Screen", the screen below in Figure 43
is displayed.
Figure 44 – The “Centre Entry” Candidate Information Screen
This screen itemises the candidates that are registered at a given centre. It should be noted that this screen is for
viewing purposes hence, modifications cannot be made. The total number of candidates is displayed in the “#
Candidates” field. They are a number of buttons at the lower portion of the screen which have been explained
in the “Using the Buttons” heading.
Page 51
Caribbean Examinations Council
Student Information Registration System
3.1
Menu Options
3.1.1
SBA Data Capture Menu
User Manual
SBA Data Capture is used to enter the SBA (School Based Assessment) scores which are associated with the
student’s subjects.
On selecting the option SBA Data Capture the screen is displayed as shown in Figure 44, (without populated
data).
Figure 45- SBA Data Capture Window
Fields Displayed
Centre:
Displays the centre.
Subject:
On selecting the required subject, the column to the right is populated showing the
“Profile Name” for the subject. This field shows the subjects available for the SBA.
Option:
This field shows the options available for the subject.
Teacher:
This field shows the list of teachers available for the subject.
Sequence Number:
This is a three digit number. The sequence number of the candidate is assigned by an
automated generation of sequence numbers. It can be used to identify particular candidates
and to produce information pertaining to that candidate.
Last name:
The candidate’s last name is listed based on an already entered data. This component is
limited to a maximum of 30 characters (apostrophes and special symbol like “é” are not
accepted).
Page 52
Caribbean Examinations Council
Student Information Registration System
User Manual
First name:
The candidate’s first name is shown. This component is limited to a maximum of 30
characters (apostrophes and special symbol like “é” are not accepted).
Rank:
The estimated position which the candidate may receive overall from the teacher. This
must be selected from a drop down list.
Estimated Grade:
This is the estimated grade which the candidate may receive overall.
P1:
Allows the user to enter the first profile within the marking scheme. (This may not be
relevant for all subjects.)
P2:
Allows the user to enter the second profile within the marking scheme. (This may not
be relevant for all subjects.)
P3:
Allows the user to enter the third profile within the marking scheme. (This may not be
relevant for all subjects.)
P4:
Allows the user to enter the fourth profile within the marking scheme. (This may not be
relevant for all subjects.)
Total:
This is an automatically generated figure.
No SBA:
This checkbox is used when no SBA is submitted or required as is the case of “resit”
and “transfer” candidates
Fields at bottom of screen:
# Candidates:
The value here is the calculated total number of candidates listed. No data is to be
entered in this field.
Assign:
The “Assign” button is used to allocate each teacher to particular students.
Search:
The “Search” button is used to activate a search operation.
Undo:
The “Undo” button is used to delete the last data keyed onto the form, as long as it has
not been saved.
Save:
The “Save” button is used to store a permanent copy of the selected record.
Close:
The “Close” button is used to exit the screen and returns the user to the previous menu
or sub-menu.
Page 53
Caribbean Examinations Council
Student Information Registration System
3.1.2
User Manual
Teacher Assignment
After the user has clicked on the “Assign” button, the following window will appear on screen.
Figure 46 - Teacher Assignment Window - Query Section
The Assign Window has two sections called “Query” and “Assign” respectively. When the screen is on the
“Query” section, it searches for candidates in a particular subject.
The fields displayed are:
Centre Code:
The value here is the number used to represent the centre in which the candidate has
been registered. The centre code value cannot be changed on this form if the user is at
one of the school centres.
Class:
Use this field to display all candidates from a given class.
First Name:
This field is used to display candidates with a particular first name.
Last Name:
This field is used to display candidates with a particular last name.
Gender:
To display a particular gender category of candidates, use either M- male or F- female
in this field.
Subject:
A subject is selected from this field to run a query of the all the candidates registered for
that subject.
Page 54
Caribbean Examinations Council
Student Information Registration System
User Manual
The buttons at the bottom are as follows:
New Query:
A new query is generated by selecting the “New Query” button to clear the previous
query criterion and results.
Apply Query:
By clicking the “Apply Query” button, the results are shown on the screen to the query.
Cancel:
The “Cancel” button abandons what was changed or entered on the screen.
After clicking on the “Apply Query” button, the results to the query will be shown in the Results section of the
screen under the following headings:
School:
This column displays the candidate’s school code.
Class:
This column displays the candidate’s form number.
Sequence Number:
This column shows the three-digit unique sequence number assigned to the candidate.
Last Name:
The candidate’s last name is shown in this column.
First Name:
The candidate’s first name is shown in this column.
Middle Name:
The candidate’s middle name or initial is shown in this column.
Date of Birth:
This column displays the candidate’s date of birth.
Gender:
This column displays the candidate’s gender.
After the results have been displayed, click on a candidate and click the
button on the upper right hand
corner of the screen to move the candidate to the Assign section of the window individually.
NB: To move more than one candidate at a time, highlight the candidates then click the button mentioned
above. To move all of the candidates at one time, click on the
button.
After the candidates have been move over to the Assign section, click on the Assign tab button and the
following window will appear.
Page 55
Caribbean Examinations Council
Student Information Registration System
User Manual
Figure 47 - Teacher Assignment Window - Assign Section
The field displayed above is:
Teacher:
A teacher is selected from the drop down box to be assigned to the candidates.
The selected candidate(s) will be shown in the Selected section of the screen under the following headings:
School:
This column displays the candidate’s school code.
Class:
The column displays the candidate’s form number.
Sequence Number:
The column shows the three-digit unique sequence number assigned to the candidate.
Last Name:
The candidate’s last name is shown in this column.
First Name:
The candidate’s first name is shown in this column.
Middle Name:
The candidate’s middle name or initial is shown in this column.
Date of Birth:
The column displays the candidate’s date of birth.
Gender:
This column displays the candidate’s gender.
Page 56
Caribbean Examinations Council
Student Information Registration System
User Manual
The buttons at the bottom are as follows:
Assign:
By clicking on the “Assign” button, the teacher will be assigned to the candidate(s) for
that particular subject.
Cancel:
The “Cancel” button abandons what was currently changed or entered on the screen.
If too many candidates have been moved to the Assign section, to delete them one by one click the
button on the upper right hand corner of the window. Note To delete more than one candidate at a time by
using the button mention above if more than one candidate is highlighted. To delete all the candidates at one
time, click on the
button.
4. Exiting The Application
To exit the application the user must reverse through the screens accessed. This will involve a combination of
the following actions.
On a form the "Close" button will be available; this will take the user back one step in the application.
At a screen the user will view the letters "CXC" on the left edge, click in this area with the mouse and the user
will be taken back one screen at a time. This action should be repeated until the message box shown in Figure 47
is presented.
Figure 48 – The Quit Program Message Box
At this prompt the user should click on the "Yes" button to exit the application or the "No" button to cancel the
operation.
Page 57
Caribbean Examinations Council
Student Information Registration System
User Manual
Appendix 1 – List of Some Reports That are Currently Available
Report Name
Description
AGE DISTRIBUTION
Reports on the Age distribution of candidates based on the Age Boundaries
AGE DISTRIBUTION - BY SUBJECT
Report on the Age distribution of candidates by subject based on the Age Boundaries
AGE DISTRIBUTION - BY TERRITORY
Reports on the age distribution of candidates by Territory based on the Age Boundaries
AGE DISTRIBUTION BY CENTRE
CANDIDATE SUBJECTS
Reports on the Age distribution of candidates by centre based on the Age Boundaries
Reports on the subjects registered by candidate
Reports on the Subjects registered by candidates in a Spreadsheet using 'R' to designate
resit or 'S' to designated SBA
Reports on the Subjects registered by candidates in a Spreadsheet using 1 to designate
the candidate being registered
Reports on all candidates registered but not yet sequenced
Reports on all candidates registered but without subjects assigned
Reports on all possible duplicate candidates registered.
Reports on the projections entered for the centre
Reports on candidate personal data by class
Reports on summary all the export activity for this session
Reports on all fees (expected and received) received from candidates
Reports on all fees (expected and received) received from schools
Reports on all fees (expected and received) received from Territories
Produces a final register report by subject and by school
Produces a final register report by school
Reports on summary all the import activity for this session
Produces a report on all candidates that are flagged as late
Produces a report on all late entries
Produces a report on all late entries by centre
Produces a report of local fees summary received by candidate
Produces a report of local fees summary received by school
Produces a report that shows a list of candidates without sequence numbers
Produces a report that shows a list of candidates without sequence numbers who were not
exported
Produces a report on new or updated entries
Reports on candidates who are not registered as 'New' but no previous candidate number exists
CANDIDATE SUBJECTS (XLS)
CANDIDATE SUBJECTS II (XLS)
CANDIDATES WITHOUT SEQUENCE NO
CANDIDATES WITHOUT SUBJECTS
CENTRE POSSIBLE DUPLICATES
CENTRE PROJECTIONS
CLASS REGISTER
EXPORT SUMMARY
FEES RECEIVED (FROM CANDIDATES)
FEES SUMMARY SCHOOL
FEES SUMMARY TERRITORY
FINAL REGISTER
FINAL REGISTER SCH
IMPORT SUMMARY
LATE CANDIDATES
LATE ENTRIES
LATE ENTRIES - BY CENTRE
LOCALFEES RECEIVED
LOCALFEES SUMMARY SCHOOL
MISSING SEQUENCE NO
MISSING SEQUENCE NO - EXPORTED
NEW OR UPDATED ENTRIES
NO PREVIOUS CANDIDATE
Page 58
Caribbean Examinations Council
Student Information Registration System
Report Name
NO PROJECTIONS
PROJECTIONS
User Manual
Description
SBA - NO RANK OR EXPECTED GRADES
SBA - ORDER OF MERIT
Reports on subjects without projections
Reports on projections for subjects
Form generated for users to provide the rank oe expected grade not for the SBA
component but for the subject overall
A form providing detail on the order of merit for each subject
SBA SAMPLES
SBA SCORES
SBA SCORES BY TOTALS
This report shows a sample of candidates with SBA scores and teachers for each subject. It
also shows their sequence numbers, ranks, estimated grades, their total allotted scores.
This report shows the SBA scores allotted to each candidate in each subject
This report shows the SBA scores allotted to each candidate in each subject. The report is
SBA SUBJECT ENTRIES
SCHOOL ENTRIES
SCHOOL SUBJECT ENTRIES
SCHOOL SUMMARY DETAILLED (XLS)
SCHOOL SUMMARY LIST (XLS)
SSUBJECT ENTRIES
SUBJECT ENTRIES
SUMMARY
SUMMARY DETAILLED (XLS)
SUMMARY LIST
SUMMARY LIST (XLS)
SUMMARY OF SUBJECT ENTRIES (XLS)
RESITS (XLS)
TERRITORY ENTRIES
TFINAL SUBJECT LISTING
TSUBJECT ENTRIES
The report shows the territory name, the centre, each subject and the total number of
entries for it. The report also shows the total number of entries for that specific centre and
the territory.
Reports on number of entries by centre
Reports on number of entries by subject
Provides detailed summary spreadsheet of candidate subject entries with options
Provides summary spreadsheet of candidate subject entries
Report on subject entries by centre
Report on total subject entries
Spreadsheet
Spreadsheet
Spreadsheet
Spreadsheet
Spreadsheet
Spreadsheet
Report on total subject entries by territory
Final register by centre and subject
Reports on subject entries by territory
Some of reports are driven by the type of installation (Ministry or School).
Page 59
Caribbean Examinations Council
Student Information Registration System
User Manual
Index
add, 8
Add, 4
Add candidate, 8
Add new candidate, 8
Add subjects, 12, 15
Adding a new candidate, 8
Amendments, 6
Buttons, 4
Candidate subjects, 12, 15
Close, 4
Delete, 4
Edit, 18
Edit a candidate, 18
Editing a candidate's information, 18
Exiting, 56
Export, 6, 37, 38, 40
Export SBA Files, 41
Files for CXC, 40
Files from Ministry, 40
Generate Sequence Numbers, 6
Import, 6
Import SBA Files, 43
Leave application, 56
List all candidates, 21
Log on, 3
Logging on, 3
Ministry Files, 37, 38
new candidate, 8
Quit, 56
Register for subjects, 12, 15
Registration Menu, 6
Reports, 6, 44
Save, 4
SBA Data Capture, 51
Search, 4
Sequence numbers, 27
Start, 3
Starting application, 3
Subjects, 4, 12, 15
Summary, 6
Teacher Assignment, 53
Undo, 4
Use buttons, 4
Using the buttons, 4
View a candidate, 20
View all candidates, 21
Viewing a Candidate's Information, 20
Viewing all candidates' information, 21
Page 60
Caribbean Examinations Council