1
Version 4.1.3
Part No. 302305-D Rev 00
August 1999
4401 Great America Parkway
Santa Clara, CA 95054
NetID User’s Guide
Copyright © 1999 Nortel Networks
All rights reserved. Printed in the USA. August 1999.
The information in this document is subject to change without notice. The statements, configurations, technical data,
and recommendations in this document are believed to be accurate and reliable, but are presented without express or
implied warranty. Users must take full responsibility for their applications of any products specified in this document.
The information in this document is proprietary to Nortel Networks NA Inc.
The software described in this document is furnished under a license agreement and may only be used in accordance
with the terms of that license. A summary of the Software License is included in this document.
Trademarks
NORTEL NETWORKS is a trademark of Nortel Networks.
Bay Networks, is a registered trademar.
Microsoft, MS, MS-DOS, Win32, Windows, and Windows NT are registered trademarks of Microsoft Corporation.
All other trademarks and registered trademarks are the property of their respective owners.ALL Writers: Use this
section only for software manuals.
Restricted Rights Legend
Use, duplication, or disclosure by the United States Government is subject to restrictions as set forth in subparagraph
(c)(1)(ii) of the Rights in Technical Data and Computer Software clause at DFARS 252.227-7013.
Notwithstanding any other license agreement that may pertain to, or accompany the delivery of, this computer
software, the rights of the United States Government regarding its use, reproduction, and disclosure are as set forth in
the Commercial Computer Software-Restricted Rights clause at FAR 52.227-19.
Statement of Conditions
In the interest of improving internal design, operational function, and/or reliability, Nortel Networks NA Inc. reserves
the right to make changes to the products described in this document without notice.
Nortel Networks NA Inc. does not assume any liability that may occur due to the use or application of the product(s)
or circuit layout(s) described herein.
Portions of the code in this software product may be Copyright © 1988, Regents of the University of California. All
rights reserved. Redistribution and use in source and binary forms of such portions are permitted, provided that the
above copyright notice and this paragraph are duplicated in all such forms and that any documentation, advertising
materials, and other materials related to such distribution and use acknowledge that such portions of the software were
developed by the University of California, Berkeley. The name of the University may not be used to endorse or
promote products derived from such portions of the software without specific prior written permission.
SUCH PORTIONS OF THE SOFTWARE ARE PROVIDED “AS IS” AND WITHOUT ANY EXPRESS OR
IMPLIED WARRANTIES, INCLUDING, WITHOUT LIMITATION, THE IMPLIED WARRANTIES OF
MERCHANTABILITY AND FITNESS FOR A PARTICULAR PURPOSE.
In addition, the program and information contained herein are licensed only pursuant to a license agreement that
contains restrictions on use and disclosure (that may incorporate by reference certain limitations and notices imposed
by third parties).
®
Nortel Networks NA Inc. Optivity Network Management Software License Agreement
NOTICE: Please carefully read this license agreement before copying or using the accompanying Optivity network
management software or installing the hardware unit with pre-enabled Optivity network management software (each
of which is referred to as “Software” in this Agreement). BY COPYING OR USING THE SOFTWARE, YOU
ACCEPT ALL OF THE TERMS AND CONDITIONS OF THIS LICENSE AGREEMENT. THE TERMS
ii
302305-D Rev 00
EXPRESSED IN THIS AGREEMENT ARE THE ONLY TERMS UNDER WHICH NORTEL NETWORKS WILL
PERMIT YOU TO USE THE SOFTWARE. If you do not accept these terms and conditions, return the product,
unused and in the original shipping container, within 30 days of purchase to obtain a credit for the full purchase price.
1. License Grant. Nortel Networks NA Inc. (“Nortel Networks”) grants the end user of the Software (“Licensee”) a
personal, nonexclusive license: a) to use the Software either on a single computer or, if applicable, on a single
authorized device identified by host ID; b) to copy the Software solely for backup purposes in support of authorized
use of the Software; and c) to use and copy the associated user manual solely in support of authorized use of the
Software by Licensee. This license applies to the Software only and does not extend to Nortel Networks Agent
software or other Nortel Networks software products. Nortel Networks Agent software or other Nortel Networks
software products are licensed for use under the terms of the applicable Nortel Networks NA Inc. Software License
Agreement that accompanies such software and upon payment by the end user of the applicable license fees for such
software.
2. Restrictions on use; reservation of rights. The Software and user manuals are protected under copyright laws.
Nortel Networks and/or its licensors retain all title and ownership in both the Software and user manuals, including
any revisions made by Nortel Networks or its licensors. The copyright notice must be reproduced and included with
any copy of any portion of the Software or user manuals. Licensee may not modify, translate, decompile, disassemble,
use for any competitive analysis, reverse engineer, distribute, or create derivative works from the Software or user
manuals or any copy, in whole or in part. Except as expressly provided in this Agreement, Licensee may not copy or
transfer the Software or user manuals, in whole or in part. The Software and user manuals embody Nortel Networks’
and its licensors’ confidential and proprietary intellectual property. Licensee shall not disclose to any third party the
Software, or any information about the operation, design, performance, or implementation of the Software and user
manuals that is confidential to Nortel Networks and its licensors; however, Licensee may grant permission to its
consultants, subcontractors, and agents to use the Software at Licensee’s facility, provided they have agreed to use the
Software only in accordance with the terms of this license.
3. Limited warranty. Nortel Networks warrants each item of Software, as delivered by Nortel Networks and properly
installed and operated on Nortel Networks hardware or other equipment it is originally licensed for, to function
substantially as described in its accompanying user manual during its warranty period, which begins on the date
Software is first shipped to Licensee. If any item of Software fails to so function during its warranty period, as the sole
remedy Nortel Networks will at its discretion provide a suitable fix, patch, or workaround for the problem that may be
included in a future Software release. Nortel Networks further warrants to Licensee that the media on which the
Software is provided will be free from defects in materials and workmanship under normal use for a period of 90 days
from the date the Software is first shipped to Licensee. Nortel Networks will replace defective media at no charge if it
is returned to Nortel Networks during the warranty period along with proof of the date of shipment. This warranty
does not apply if the media has been damaged as a result of accident, misuse, or abuse. The Licensee assumes all
responsibility for selection of the Software to achieve Licensee’s intended results and for the installation, use, and
results obtained from the Software. Nortel Networks does not warrant a) that the functions contained in the software
will meet the Licensee’s requirements, b) that the Software will operate in the hardware or software combinations that
the Licensee may select, c) that the operation of the Software will be uninterrupted or error free, or d) that all defects
in the operation of the Software will be corrected. Nortel Networks is not obligated to remedy any Software defect
that cannot be reproduced with the latest Software release. These warranties do not apply to the Software if it has been
(i) altered, except by Nortel Networks or in accordance with its instructions; (ii) used in conjunction with another
vendor’s product, resulting in the defect; or (iii) damaged by improper environment, abuse, misuse, accident, or
negligence. THE FOREGOING WARRANTIES AND LIMITATIONS ARE EXCLUSIVE REMEDIES AND ARE
IN LIEU OF ALL OTHER WARRANTIES EXPRESS OR IMPLIED, INCLUDING WITHOUT LIMITATION
ANY WARRANTY OF MERCHANTABILITY OR FITNESS FOR A PARTICULAR PURPOSE. Licensee is
responsible for the security of its own data and information and for maintaining adequate procedures apart from the
Software to reconstruct lost or altered files, data, or programs.
4. Limitation of liability. IN NO EVENT WILL NORTEL NETWORKS OR ITS LICENSORS BE LIABLE FOR
ANY COST OF SUBSTITUTE PROCUREMENT; SPECIAL, INDIRECT, INCIDENTAL, OR CONSEQUENTIAL
DAMAGES; OR ANY DAMAGES RESULTING FROM INACCURATE OR LOST DATA OR LOSS OF USE OR
PROFITS ARISING OUT OF OR IN CONNECTION WITH THE PERFORMANCE OF THE SOFTWARE, EVEN
IF NORTEL NETWORKS HAS BEEN ADVISED OF THE POSSIBILITY OF SUCH DAMAGES. IN NO EVENT
302305-D Rev 00
iii
SHALL THE LIABILITY OF NORTEL NETWORKS RELATING TO THE SOFTWARE OR THIS AGREEMENT
EXCEED THE PRICE PAID TO NORTEL NETWORKS FOR THE SOFTWARE LICENSE.
5. Government Licensees. This provision applies to all Software and documentation acquired directly or indirectly
by or on behalf of the United States Government. The Software and documentation are commercial products, licensed
on the open market at market prices, and were developed entirely at private expense and without the use of any U.S.
Government funds. The license to the U.S. Government is granted only with restricted rights, and use, duplication, or
disclosure by the U.S. Government is subject to the restrictions set forth in subparagraph (c)(1) of the Commercial
Computer Software––Restricted Rights clause of FAR 52.227-19 and the limitations set out in this license for civilian
agencies, and subparagraph (c)(1)(ii) of the Rights in Technical Data and Computer Software clause of DFARS
252.227-7013, for agencies of the Department of Defense or their successors, whichever is applicable.
6. Use of Software in the European Community. This provision applies to all Software acquired for use within the
European Community. If Licensee uses the Software within a country in the European Community, the Software
Directive enacted by the Council of European Communities Directive dated 14 May, 1991, will apply to the
examination of the Software to facilitate interoperability. Licensee agrees to notify Nortel Networks of any such
intended examination of the Software and may procure support and assistance from Nortel Networks.
7. Term and termination. This license is effective until terminated; however, all of the restrictions with respect to
Nortel Networks’ copyright in the Software and user manuals will cease being effective at the date of expiration of the
Nortel Networks copyright; those restrictions relating to use and disclosure of Nortel Networks’ confidential
information shall continue in effect. Licensee may terminate this license at any time. The license will automatically
terminate if Licensee fails to comply with any of the terms and conditions of the license. Upon termination for any
reason, Licensee will immediately destroy or return to Nortel Networks the Software, user manuals, and all copies.
Nortel Networks is not liable to Licensee for damages in any form solely by reason of the termination of this license.
8. Export and Re-export. Licensee agrees not to export, directly or indirectly, the Software or related technical data
or information without first obtaining any required export licenses or other governmental approvals. Without limiting
the foregoing, Licensee, on behalf of itself and its subsidiaries and affiliates, agrees that it will not, without first
obtaining all export licenses and approvals required by the U.S. Government: (i) export, re-export, transfer, or divert
any such Software or technical data, or any direct product thereof, to any country to which such exports or re-exports
are restricted or embargoed under United States export control laws and regulations, or to any national or resident of
such restricted or embargoed countries; or (ii) provide the Software or related technical data or information to any
military end user or for any military end use, including the design, development, or production of any chemical,
nuclear, or biological weapons.
9. General. If any provision of this Agreement is held to be invalid or unenforceable by a court of competent
jurisdiction, the remainder of the provisions of this Agreement shall remain in full force and effect. This Agreement
will be governed by the laws of the state of California.
Should you have any questions concerning this Agreement, contact Nortel Networks, 4401 Great America Parkway,
P.O. Box 58185, Santa Clara, California 95054-8185.
LICENSEE ACKNOWLEDGES THAT LICENSEE HAS READ THIS AGREEMENT, UNDERSTANDS IT, AND
AGREES TO BE BOUND BY ITS TERMS AND CONDITIONS. LICENSEE FURTHER AGREES THAT THIS
AGREEMENT IS THE ENTIRE AND EXCLUSIVE AGREEMENT BETWEEN NORTEL NETWORKS AND
LICENSEE, WHICH SUPERSEDES ALL PRIOR ORAL AND WRITTEN AGREEMENTS AND
COMMUNICATIONS BETWEEN THE PARTIES PERTAINING TO THE SUBJECT MATTER OF THIS
AGREEMENT. NO DIFFERENT OR ADDITIONAL TERMS WILL BE ENFORCEABLE AGAINST NORTEL
NETWORKS UNLESS NORTEL NETWORKS GIVES ITS EXPRESS WRITTEN CONSENT, INCLUDING AN
EXPRESS WAIVER OF THE TERMS OF THIS AGREEMENT.
iv
302305-D Rev 00
Contents
Preface
Before You Begin .............................................................................................................xxi
Text Conventions ............................................................................................................xxii
Acronyms ....................................................................................................................... xxiii
Related Publications .......................................................................................................xxv
How to Get Help ............................................................................................................xxvi
Chapter 1
Introduction to the Management Console
Running the Management Console and Logging In .......................................................1-2
Signed Java Applets ................................................................................................1-2
NetID Login ..............................................................................................................1-3
Management Console Interface .....................................................................................1-4
Personal Views ........................................................................................................1-5
Bookmarks ...............................................................................................................1-6
Bookmarks within personal views ......................................................................1-6
Creating a bookmark .........................................................................................1-6
Creating a bookmark folder ...............................................................................1-7
Renaming a bookmark folder ............................................................................1-7
Deleting a bookmark or bookmark folder ...........................................................1-7
Status Bar ................................................................................................................1-7
Display .....................................................................................................................1-7
Special Keys ............................................................................................................1-8
Setting Preferences ..................................................................................................1-8
Setting Logging Preferences .............................................................................1-8
Setting Confirmation Preferences ......................................................................1-9
Setting the Number of Buckets for Domains and Subnets ..............................1-10
Errors and Warnings .............................................................................................. 1-11
Viewing Errors and Warnings ..........................................................................1-12
302305-D Rev 00
v
Viewing External Update Messages ................................................................1-13
Viewing the Trace Log .....................................................................................1-13
Refreshing the Cache ............................................................................................1-14
Replacing the Initial HTML Page ............................................................................1-14
Copy and Paste ......................................................................................................1-15
Completing Tasks with the Management Console ........................................................1-16
Getting Help ..................................................................................................................1-16
Canceling a Task ..........................................................................................................1-16
Session Timeout ...........................................................................................................1-16
Address Limit ................................................................................................................1-17
Multiple Management Console Windows .....................................................................1-17
Running NetID Utilities .................................................................................................1-18
Logging Out of NetID ....................................................................................................1-18
Exiting from NetID ........................................................................................................1-19
Chapter 2
User IDs and Access Privileges
Changing a Password ....................................................................................................2-2
Chapter 3
Domain Names
Managing Domain Names ..............................................................................................3-2
Access Privileges .....................................................................................................3-2
Adding a Domain Name ...........................................................................................3-3
Granting User Access on a Subdomain Basis .........................................................3-4
Entering Custom Field Information ...........................................................................3-5
Adding a New Resource Record to a Domain Name ...............................................3-5
Creating an Alias ......................................................................................................3-7
Creating a Personal View .........................................................................................3-9
Updating a Domain Name ......................................................................................3-10
Updating More Than One Domain Name at a Time ............................................... 3-11
Moving a Domain Name .........................................................................................3-12
Deleting a Domain Name .......................................................................................3-12
Updating or Deleting a Resource Record ..............................................................3-13
vi
302305-D Rev 00
Chapter 4
Networks
Subnetworking ................................................................................................................4-1
Subnet Masks ..........................................................................................................4-2
Setting the Length of the Subnet Mask ....................................................................4-2
CIDR ........................................................................................................................4-2
Managing a Network with NetID .....................................................................................4-3
Access Privileges .....................................................................................................4-4
Adding a Network .....................................................................................................4-4
Granting Access Privileges to the Subnets on the Network .....................................4-6
Creating a Personal View .........................................................................................4-7
Updating a Network ..................................................................................................4-8
Deleting a Network ...................................................................................................4-9
Chapter 5
Subnets
Managing Subnets ..........................................................................................................5-2
Access Privileges .....................................................................................................5-2
Adding a Subnet .......................................................................................................5-3
Multinetting ...............................................................................................................5-4
Assigning Host Access Privileges ............................................................................5-5
Entering Custom Field Information ...........................................................................5-6
Setting Default DHCP Option Information ................................................................5-6
Entering Subnet Model Information ..........................................................................5-7
Creating a Personal View .........................................................................................5-9
Partitioning a Subnet ..............................................................................................5-10
Joining a Subnet .................................................................................................... 5-11
Updating a Subnet ................................................................................................. 5-11
Updating a Group of Subnets .................................................................................5-12
Deleting a Subnet ...................................................................................................5-12
Chapter 6
Host Addresses
Managing Host Addresses .............................................................................................6-3
Access Privileges .....................................................................................................6-3
Adding a Host Address ............................................................................................6-3
Specifying Custom Field Values ...............................................................................6-5
302305-D Rev 00
vii
Creating an Alias ......................................................................................................6-6
Updating Alias Information ................................................................................6-7
Deleting Alias Information ..................................................................................6-7
Setting Host Address BootP/DHCP Options ............................................................6-7
Setting Address Protocol Information .......................................................................6-8
Creating a Personal View .......................................................................................6-10
Address Ranges ..................................................................................................... 6-11
Defining a Range of Static Addresses ................................................................... 6-11
Setting Automatic Naming for an Address Range ..................................................6-12
Defining a Range of Dynamic Addresses ..............................................................6-14
Setting Autonaming for a Dynamic Address Range ........................................6-15
Restricting the Kinds of Hosts That Receive Dynamic Addresses ..................6-17
Defining a Range of Reserved Addresses .............................................................6-18
Updating Host Address or Address Range Information .........................................6-19
Updating More Than One Address at a Time ........................................................6-19
Deleting a Host Address or Range of Addresses ...................................................6-20
Moving Hosts to Another Subnet ...........................................................................6-22
Resizing a Range of Addresses .............................................................................6-24
Chapter 7
Client Pools
Managing Client Pools ....................................................................................................7-1
Creating a Client Pool ..............................................................................................7-1
Creating a Personal View .........................................................................................7-3
Placing Clients in a Client Pool ................................................................................7-4
Placing Clients on a Dynamic Range in a Client Pool ..............................................7-5
Updating a Client Pool .............................................................................................7-5
Renaming a Client Pool ...........................................................................................7-6
Deleting a Client Pool ...............................................................................................7-6
Chapter 8
DHCP Servers
Managing DHCP Servers ...............................................................................................8-1
Defining a DHCP Server ..........................................................................................8-1
Creating a Backup DHCP Server .............................................................................8-2
Creating a Personal View .........................................................................................8-3
viii
302305-D Rev 00
Updating a DHCP Server .........................................................................................8-4
Deleting a DHCP Server ..........................................................................................8-4
Chapter 9
DNS Zones and Name Servers
Managing DNS Zones ....................................................................................................9-2
Access Privileges .....................................................................................................9-2
Creating a DNS Zone ...............................................................................................9-2
Setting BIND Directives on a DNS Zone ..................................................................9-5
Creating a Personal View .........................................................................................9-6
Updating a DNS Zone ..............................................................................................9-7
Updating More Than One DNS Zone at a Time .......................................................9-7
Deleting a DNS Zone ...............................................................................................9-8
Deleting More Than One DNS Zone at a Time ........................................................9-8
Creating a Name Server ..........................................................................................9-8
Setting BIND Directives on a Name Server .............................................................9-9
Configuring the DNS Server to Accept Underscores in Domain Names ................9-10
Creating a Personal View ....................................................................................... 9-11
Updating a Name Server ........................................................................................ 9-11
Deleting a Name Server .........................................................................................9-12
Forwarders ...................................................................................................................9-12
Assigning Forwarders ............................................................................................9-13
Deleting a Forwarder ..............................................................................................9-14
Adding a Name Server to a Zone ...........................................................................9-14
Setting Zone Transfer Information .........................................................................9-15
Adding a Zone to a Name Server ...........................................................................9-16
Updating Name Servers for a Zone .......................................................................9-18
Deleting a Name Server from a Zone ....................................................................9-18
Chapter 10
Importing
Running From the Command Line in Windows NT ......................................................10-1
Before Importing a File .................................................................................................10-2
Checking for Acceptable Format .....................................................................10-2
Locating File to be Imported ............................................................................10-2
Troubleshooting Import Error Messages .........................................................10-3
302305-D Rev 00
ix
Status Applet ................................................................................................................10-3
Refreshing the Cache ...................................................................................................10-3
Access Privileges ...................................................................................................10-4
DNS Database File Import ............................................................................................10-4
Importing a DNS Database File Using the Management Console .........................10-6
BIND 4.9.5 File ................................................................................................10-6
BIND 8.1.1 File ................................................................................................10-7
Importing a DNS Database File Using Command Line Parameters ......................10-8
UNIX Host File Import ...................................................................................................10-9
Importing a UNIX Host File Using the Management Console ..............................10-10
Importing a UNIX Host File Using Command Line Parameters ........................... 10-11
BootP File Import ........................................................................................................10-12
Importing a BootP File Using the Management Console .....................................10-12
Importing a BootP File Using Command Line Parameters ..................................10-13
Custom Import ............................................................................................................10-14
When Network Number Is the Key Field .......................................................10-14
When Subnet Address Is the Key Field .........................................................10-15
When Host Address Is the Key Field .............................................................10-16
When Domain Name Is the Key Field ...........................................................10-17
When MAC Address Is the Key Field ............................................................10-18
When Client ID Is the Key Field .....................................................................10-19
Preparing a Custom File for Importing .................................................................10-19
Assigning Column Headings to All Fields ............................................................10-20
Importing a Custom File Using the Management Console ...................................10-20
Importing a Custom File Using Command Line Parameters ................................10-22
Chapter 11
Exporting
Running From the Command Line in Windows NT ...................................................... 11-2
Before Exporting a File ................................................................................................. 11-2
Personal View and Access Privileges .......................................................................... 11-3
Status Applet ................................................................................................................ 11-3
Custom IP Export ......................................................................................................... 11-3
Creating a Custom Export Template ...................................................................... 11-4
Exporting a Custom IP File Using the Management Console ................................ 11-7
Exporting a Custom IP File Using Command Line Parameters ............................. 11-9
x
302305-D Rev 00
DNS Database Export .................................................................................................. 11-9
Exporting a DNS Database Using the Management Console .............................. 11-10
Exporting a DNS Database Using Command Line Parameters ........................... 11-10
BootP Database Export .............................................................................................. 11-11
Exporting a BootP Database Using the Management Console ........................... 11-11
Exporting a BootP File Using Command Line Parameters .................................. 11-12
UNIX Host File Export ................................................................................................ 11-13
Exporting a UNIX Host File Using the Management Console .............................. 11-13
Exporting a UNIX Host File Using Command Line Parameters ........................... 11-14
NetID Database Export ............................................................................................... 11-15
Exporting the Entire Database Using the Management Console ......................... 11-15
Exporting the Entire Database Using Command Line Parameters ...................... 11-16
Chapter 12
Reporting
Running From the Command Line in Windows NT ......................................................12-2
Personal View and Access Privileges ..........................................................................12-2
Network Address Utilization Report ..............................................................................12-2
Generating a Network Address Utilization Report with the Console ......................12-3
Generating an Address Utilization Report Using the Command Line ....................12-5
DHCP Server Summary Report ....................................................................................12-7
Generating a DHCP Server Summary Report Using the Console .........................12-7
Generating a DHCP Server Summary Report Using the Command Line ..............12-8
Access Privileges Report ..............................................................................................12-8
Generating an Access Privileges Report Using the Console .................................12-9
Generating an Access Privileges Report Using the Command Line ....................12-12
Generating a Group Membership Report Using the Command Line ...................12-14
Audit Report ................................................................................................................12-14
Generating an Audit Report Using the Management Console .............................12-15
Generating an Audit Report Using Command Line Parameters ..........................12-17
Chapter 13
Alarms
Viewing Alarms .............................................................................................................13-2
Deleting Alarms Log Entries .........................................................................................13-4
Viewing the number of alarms log entries ..............................................................13-4
302305-D Rev 00
xi
Deleting alarms log entries .....................................................................................13-4
Chapter 14
Ping Audit
Using the Ping Audit Utility ...........................................................................................14-1
Personal View and Access Privileges ....................................................................14-2
Status Applet ..........................................................................................................14-2
Running From the Command Line in Windows NT ................................................14-2
Setting Parameters and Running a Ping Audit in the Management Console .........14-3
Setting Parameters and Running a Ping Audit with the Command Line ................14-4
Viewing Ping Audit Results in the Management Console ......................................14-5
Viewing Ping Audit Results Using the Command Line ...........................................14-6
Chapter 15
Searching, History, and Maintenance
Searching the Database ...............................................................................................15-1
Running a Search ..................................................................................................15-2
Working with an Object on a Search ......................................................................15-3
Viewing the History of Objects ......................................................................................15-4
Checking the History of an Object ..........................................................................15-4
Deleting Object History Transactions .....................................................................15-4
Viewing the Number of Object History Transactions .......................................15-5
Deleting Object History Transactions ..............................................................15-5
Backing Up the Database .............................................................................................15-5
Restoring a Previous Copy of the Database ................................................................15-6
Appendix A
Managing the DNS
Appendix B
Managing DHCP
Why DHCP? .................................................................................................................. B-1
The NetID DHCP Server ............................................................................................... B-2
Lease Time .................................................................................................................... B-3
How Lease Time Works .......................................................................................... B-3
DHCP Redundancy ....................................................................................................... B-3
NetID’s DHCP Redundancy .................................................................................... B-4
Backup Servers ............................................................................................................. B-5
xii
302305-D Rev 00
Configuring NetID to Use DHCP Redundancy .............................................................. B-5
Client Pools ................................................................................................................... B-6
Appendix C
DHCP Options
Appendix D
Import, Export, Report and Ping Audit
Command Line Arguments
Import Command Line Parameters ............................................................................... D-1
NetID Database Import ........................................................................................... D-2
DNS Database Import and BootP File Import ......................................................... D-2
UNIX Host File Import ............................................................................................. D-3
Custom Import ......................................................................................................... D-4
Export Command Line Parameters ............................................................................... D-4
Custom Export ........................................................................................................ D-5
DNS Database Export ............................................................................................. D-5
BootP Database Export ........................................................................................... D-6
UNIX Host File Export ............................................................................................. D-6
NetID Database Export ........................................................................................... D-7
Report Command Line Parameters ............................................................................... D-7
Network Address Utilization Report ........................................................................ D-8
DHCP Server Summary Report .............................................................................. D-9
Access Privileges Report ........................................................................................ D-9
Group Membership Report .................................................................................... D-11
Audit Report .......................................................................................................... D-11
Ping Audit Command Line Parameters ....................................................................... D-13
Ping Audit Utility .................................................................................................... D-13
Ping Sync Utility .................................................................................................... D-14
Appendix E
MAC Types
Glossary
Index
302305-D Rev 00
xiii
Figures
Figure 1-1.
Security Warning ......................................................................................1-2
Figure 1-2.
Management Console Interface ...............................................................1-4
Figure 1-3.
Buckets ..................................................................................................1-10
Figure 1-4.
Errors and Warnings Log Dialog Box .....................................................1-12
Figure 1-5.
Java Security Dialog Box .......................................................................1-15
Figure 1-6.
Session Error Message Box ..................................................................1-17
Figure 3-1.
Domain Names Root Object ....................................................................3-1
Figure 4-1.
IP Address Root Object ...........................................................................4-3
Figure 6-1.
Management Console with Expanded Subnet Tree ................................6-1
Figure 6-2.
Error Message .......................................................................................6-21
Figure 6-3.
Warning Message .................................................................................. 6-22
Figure 9-1.
Zones and Name Servers Root Objects ..................................................9-1
Figure 12-1. Network Address Utilization Report .......................................................12-5
Figure 12-2. Access Privileges by Object Report ..................................................... 12-11
Figure 12-3. Group Object Access Report ............................................................... 12-11
Figure 12-4. Group Membership Report ..................................................................12-12
Figure 12-5. Audit by IP Tree Object Report ............................................................12-17
Figure 15-1. Search Subnet Dialog Box .....................................................................15-2
Figure A-1.
Partial Domain Name Tree ..................................................................... A-1
Figure A-2.
Resolvers and Name Servers ................................................................. A-2
Figure A-3.
Zones ...................................................................................................... A-3
302305-D Rev 00
xv
Tables
Table 1-1.
Logging Preferences ................................................................................1-9
Table 6-1.
Protocol Tab Check Box Procedures .......................................................6-9
Table 6-2.
Dynamic Range Autonaming .................................................................6-15
Table 6-3.
Steps for Deleting an IP Address That Is a DHCP Server .....................6-22
Table 6-4.
Buttons in the Paste Hosts Dialog Box ..................................................6-24
Table 7-1.
MAC Address and Client Identifier Procedures .......................................7-4
Table 9-1.
Forwarders BIND Directives ..................................................................9-13
Table 9-2.
Name Server Reference Modifications .................................................9-19
Table 10-1.
DNS Database File Import Utility Actions ..............................................10-5
Table 10-2.
DNS Import Command Parameters .......................................................10-9
Table 10-3.
UNIX Host File Import Utility Actions .....................................................10-9
Table 10-4.
UNIX Host File Command Line Parameters ........................................ 10-11
Table 10-5.
BootP File Import Utility Actions ...........................................................10-12
Table 10-6.
BootP File Import Command Line Parameters ....................................10-13
Table 10-7.
Network Number Key Field Utility Actions ...........................................10-15
Table 10-8.
Subnet Address Key Field Import Utility Actions ..................................10-16
Table 10-9.
Host Address Key Field Import Utility Actions ......................................10-17
Table 10-10. Domain Name Key Field Import Utility Actions ....................................10-18
Table 10-11. Client ID Key Field Import Utility Actions .............................................10-19
Table 10-12. Custom File Import Utility Command Line Parameters ........................10-23
Table 11-1.
IP Address Export Fields ....................................................................... 11-4
Table 11-2.
Custom Export Address Filter Option Buttons ....................................... 11-5
Table 11-3.
Custom Export Column/Row Heading Buttons ...................................... 11-6
Table 11-4.
Custom Export Field Separator Buttons ................................................ 11-6
Table 11-5.
Custom Export Command Line Parameters .......................................... 11-9
Table 11-6.
DNS Database Export Command Line Parameters ............................. 11-11
Table 11-7.
BootP Export Command Line Parameters ........................................... 11-12
Table 11-8.
UNIX Host File Command Line Parameters ........................................ 11-14
Table 11-9.
NetID Database Export Command Line Parameters ........................... 11-16
302305-D Rev 00
xvii
Table 12-1.
xviii
Network Utilization Report Command Line Parameters ........................12-6
Table 12-2.
DHCP Report Command Line Parameters ............................................12-8
Table 12-3.
Access Privileges Report Types ..........................................................12-10
Table 12-4.
Access Privileges Report Command Line Parameters ........................12-13
Table 12-5.
Access Privileges Flags and Parameters ............................................12-13
Table 12-6.
Grouplist Report Command Line Parameters ......................................12-14
Table 12-7.
Steps for Generating Audit Reports .....................................................12-16
Table 12-8.
Audit Report Command Line Parameters ............................................12-18
Table 12-9.
Audit Report Flag Parameters .............................................................12-19
Table 13-1.
Message Types ......................................................................................13-2
Table 14-1.
Ping Audit Command Parameters .........................................................14-4
Table 14-2.
Optional Ping Audit Command Parameters ...........................................14-5
Table 14-3.
Nidsync Command Parameters .............................................................14-7
Table 14-4.
Synchronization Command Parameters ................................................14-7
Table C-1.
BootP/DHCP Options .............................................................................. C-2
Table C-2.
CMU-Only BootP/DHCP Options ............................................................ C-8
Table D-1.
Standard Flags and Values .................................................................... D-1
Table D-2.
NetID Database Import Command Line Parameters .............................. D-2
Table D-3.
DNS Database and BootP File Import Parameters ................................. D-3
Table D-4.
UNIX Host File Command Line Parameters ........................................... D-3
Table D-5.
Custom Import Command Line Parameters ........................................... D-4
Table D-6.
Custom Export Command Line Parameters ........................................... D-5
Table D-7.
DNS Database Export Command Line Parameters ................................ D-5
Table D-8.
BootP Database Export Command Line Parameters ............................. D-6
Table D-9.
UNIX Host File Command Line Parameters ........................................... D-7
Table D-10.
NetID Database Export Command Line Parameters .............................. D-7
Table D-11.
Network Utilization Report Command Line Parameters ......................... D-8
Table D-12.
DHCP Report Command Line Parameters ............................................. D-9
Table D-13.
Access Privileges Report Command Line Parameters ......................... D-10
Table D-14.
Access Privileges Flags and Parameters ............................................. D-10
Table D-15.
Grouplist Report Command Line Parameters ....................................... D-11
Table D-16.
Audit Report Command Line Parameters ............................................. D-12
Table D-17.
Audit Report Flag Parameters .............................................................. D-13
Table D-18.
Ping Audit Utility Command Line Parameters ....................................... D-14
Table D-19.
Optional Ping Audit Command Line Parameters .................................. D-14
302305-D Rev 00
Table D-20.
Ping Sync Utility .................................................................................... D-15
Table D-21.
Synchronization Command Line Parameters ....................................... D-15
Table E-1.
MAC Types ............................................................................................. E-1
302305-D Rev 00
xix
Preface
This guide describes how to use the Nortel Networks® NetID® Management
Console to manage your network’s IP adddress space. It covers procedures for
which a user does not require system administrator access privileges. Consult this
guide if you are responsible for any of the following tasks:
•
Administering network addresses and names
•
Administering naming and addressing services (DNS, BootP, DHCP)
The NetID Management Console requires users to have system administrator
access to perfrom certain other tasks such as creating user IDs, importing network
information, and setting system options. For information on Management Console
tasks that require system administrator privileges, refer to the NetID System
Administrator’s Guide.
Before You Begin
Before using this guide, you should do the following:
302305-D Rev 00
•
Read the release notes and known anomalies documentation.
•
Install and license the NetID product family (refer to Installing NetID).
xxi
NetID User’s Guide
Text Conventions
This guide uses the following text conventions:
angle brackets (< >)
Indicate that you choose the text to enter based on the
description inside the brackets. Do not type the
brackets when entering the command.
Example: If the command syntax is:
ping <ip_address>, you enter:
ping 192.32.10.12
bold text
Indicates command names and options and text that
you need to enter.
Example: Enter show ip {alerts | routes}.
Example: Use the dinfo command.
braces ({})
Indicate required elements in syntax descriptions
where there is more than one option. You must choose
only one of the options. Do not type the braces when
entering the command.
Example: If the command syntax is:
show ip {alerts | routes}, you must enter either:
show ip alerts or show ip routes, but not both.
brackets ([ ])
Indicate optional elements in syntax descriptions. Do
not type the brackets when entering the command.
Example: If the command syntax is:
show ip interfaces [-alerts], you can enter either:
show ip interfaces or show ip interfaces -alerts.
italic text
Indicates file and directory names, new terms, book
titles, and variables in command syntax descriptions.
Where a variable is two or more words, the words are
connected by an underscore.
Example: If the command syntax is:
show at <valid_route>
valid_route is one variable and you substitute one value
for it.
xxii
302305-D Rev 00
Preface
screen text
Indicates system output, for example, prompts and
system messages.
Example: Set Trap Monitor Filters
separator ( > )
Shows menu paths.
Example: Protocols > IP identifies the IP option on the
Protocols menu.
vertical line ( | )
Separates choices for command keywords and
arguments. Enter only one of the choices. Do not type
the vertical line when entering the command.
Example: If the command syntax is:
show ip {alerts | routes}, you enter either:
show ip alerts or show ip routes, but not both.
Acronyms
This guide uses the following acronyms:
302305-D Rev 00
ARP
Address Resolution Protocol
BootP
Bootstrap Protocol
CIDR
Classless inter domain routing
CNAME
canonical name
CMU
Carnegie Melon University
DHCP
Dynamic Host Configuration Protocol
DNS
Domain Name Service
FTP
File Transfer Protocol
GUI
Graphical User Interface
HDLC
High-level Data Link Control
HINFO
host information
ICMP
Internet Control Message Protocol
IGRP
Internet Gateway Routing Protocol
IP
Internet Protocol
xxiii
NetID User’s Guide
xxiv
ISDN
Integrated Services Digital Network
ISO
International Organization for Standardization
ITU-T
International Telecommunication
Union-Telecommunication Standardization Sector
(formerly CCITT)
LAN
local area network
MAC
media access control
MAU
media access unit
MDI-X
medium dependent interface crossover
MTU
maximum transmission unit
NIS
network information server
NS
Name Server
NTP
Network Time Protocol
OSI
Open Systems Interconnection
OSPF
Open Shortest Path First
POP
Post Office Protocol
PPP
Point-to-Point Protocol
PTR
Pointer (resource records)
RIP
Routing Information Protocol
RR
resource record
SMDS
Switched Multimegabit Data Service
SNMP
Simple Network Management Protocol
SOA
Start of Zone Authority
TCP/IP
Transmission Control Protocol/Internet Protocol
Telnet
Telecommunications Network
TFTP
Trivial File Transfer Protocol
URL
Uniform resource locator
VLSM
Variable Length Subnet Mask
WAN
wide area network
WKS
Well-Known Services
302305-D Rev 00
Preface
Related Publications
For more information about using NetID, refer to the following publications:
•
Installing NetID (Bay Networks part number 302303-C)
Provides information about installing and configuring NetID software.
•
NetID System Administrator’s Guide (Bay Networks part number 303859-D)
Provides an overview and procedures of tasks performed by a NetID system
administator, including setting up users, templates, custom fields, and system
options.
•
NetID Release Notes, Version 4.1.3 (Bay Networks part number 303861-D)
Contains last minute information about NetID.
You can print selected technical manuals and release notes free, directly from the
Internet. Go to support.baynetworks.com/library/tpubs/. Find the product for
which you need documentation. Then locate the specific category and model or
version for your hardware or software product. Using Adobe Acrobat Reader, you
can open the manuals and release notes, search for the sections you need, and print
them on most standard printers. You can download Acrobat Reader free from the
Adobe Systems Web site, www.adobe.com.
You can purchase selected documentation sets, CDs, and technical publications
through the collateral catalog. The catalog is located on the World Wide Web at
support.baynetworks.com/catalog.html and is divided into sections arranged
alphabetically:
302305-D Rev 00
•
The “CD ROMs” section lists available CDs.
•
The “Guides/Books” section lists books on technical topics.
•
The “Technical Manuals” section lists available printed documentation sets.
xxv
NetID User’s Guide
How to Get Help
If you purchased a service contract for your Nortel Networks product from a
distributor or authorized reseller, contact the technical support staff for that
distributor or reseller for assistance.
If you purchased a Nortel Networks service program, contact one of the following
Nortel Networks Technical Solutions Centers:
xxvi
Technical Solutions Center
Telephone Number
Billerica, MA
800-2LANWAN (800-252-6926)
Santa Clara, CA
800-2LANWAN (800-252-6926)
Valbonne, France
33-4-92-96-69-68
Sydney, Australia
61-2-9927-8800
Tokyo, Japan
81-3-5402-7041
302305-D Rev 00
Chapter 1
Introduction to the Management Console
The NetID Management Console is the user interface that you run on a Web
browser to manage your network information. With the Management Console,
users without system administrator access privileges can manage network, subnet,
host, Domain Name Service (DNS), and zone information. NetID system
administrators use the Management Console to set up user access privileges,
customize NetID, and set system options. You can also use the Management
Console to run the NetID import, export, report, and ping audit utilities. The
Management Console allows you to run the NetID alarm viewer and to help you
to monitor the status of your NetID servers.
This chapter covers the following topics:
302305-D Rev 00
•
“Running the Management Console and Logging In” on page 1-2
•
“Management Console Interface” on page 1-4
•
“Personal Views” on page 1-5
•
“Bookmarks” on page 1-6
•
“Copy and Paste” on page 1-14
•
“Getting Help” on page 1-16
•
“Canceling a Task” on page 1-16
•
“Session Timeout” on page 1-16
•
“Address Limit” on page 1-17
•
“Multiple Management Console Windows” on page 1-17
•
“Running NetID Utilities” on page 1-17
•
“Logging Out of NetID” on page 1-18
•
“Exiting from NetID” on page 1-18
1-1
NetID User’s Guide
Running the Management Console and Logging In
The NetID Management Console is an entirely Java based program that you can
run with a Java 1.1-compliant Web browser. For information on version numbers
of compliant Web browsers, refer to the CD installation booklet Installing NetID.
Signed Java Applets
Nortel Networks now uses signed Java applets. Signed applets are trusted, and
allow you to access many of the system resources. Some of the benefits of signed
applets include the following:
•
They can read and write files to the local file system.
•
They can use the operating system’s clipboard feature.
•
They allow you to print.
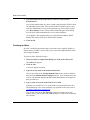
The first time you log in to NetID, the following dialog box appears (Figure 1-1):
Figure 1-1.
1-2
Security Warning
302305-D Rev 00
Introduction to the Management Console
Enable the Always trust content from Nortel Networks Inc. check box and click
on Yes. If you choose No, you cannot use NetID without exiting and logging back
in. The NetID Login dialog box appears.
NetID Login
To run the Management Console, follow these steps:
1.
Open your Java 1.1-compliant Web browser.
2.
Type the URL for the computer on which your NetID Application Server
is installed in the appropriate field.
The NetID Login dialog box appears. (Note that the first time you log in, a
security warning appears, asking if you wish to accept signed Java applets.
Refer to “Signed Java Applets” on page 1-2.)
3.
In the User ID field, type your user ID.
4.
In the Password field, type your password.
5.
Click on OK.
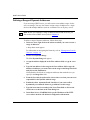
The NetID Management Console interface appears (Figure 1-2):
302305-D Rev 00
1-3
NetID User’s Guide
Tool Bar
Root objects
List Area
Status Bar
Figure 1-2.
Management Console Interface
Management Console Interface
When you run the NetID Management Console, the NetID Management Console
interface appears (refer to Figure 1-2 on page 1-4).
The information that appears in the NetID Management Console is organized
hierarchically under the following root objects:
1-4
•
IP Address
•
Domain Names
•
Zones
•
Name Servers
•
DHCP Client Pools
•
DHCP Servers
•
Setup (appears only if the user has Setup access privileges. For more
information on user IDs and access privileges, refer to Chapter 2).
302305-D Rev 00
Introduction to the Management Console
A root object is the base level of a tree hierarchy. Except for the Setup root object,
each root object in the NetID tree represents a category of IP information (IP
addresses, domain names, DHCP servers, and so on).
Double-clicking on an object displays a list of items that are organized under that
object in the list area. For example, if you double-click on the IP Address root
object, a list of networks appears in both the tree area on the left and the list area
on the right (refer to Figure 1-2 on page 1-4). Double-clicking on a network
displays the list of subnets on that network, and so on.
You can also click on the plus sign that appears beside the object to view the next
level of the hierarchy. If you no longer want to view the objects in the hierarchy,
click on the minus sign that appears beside the object.
You cannot delete any of these root objects.
The Setup root object appears only if you have Setup administrative privileges.
Personal Views
A personal view is a NetID feature that allows the NetID system administrator to
limit the network information that a particular user can see in the GUI. The
personal view feature prevents users from seeing areas of the network to which
they do not have access. If you have a personal view of the hierarchy, you will see
only objects which your NetID system administrator has assigned to your personal
view. Users with Root Domain Names and Root Address access privileges can
also create a personal view on individual objects.
Note: Take care when creating a personal view for a user. Personal view is not
the same thing as access privileges. A NetID system administrator could place
an object to which a user does not have access in that user's personal view. The
user would be able to see the object, but would be unable to modify it. In
addition, a system administrator could give a user access to an object, but
forget to place that object in the user's personal view. The user would be
unable to work with the object, even though the user has access to it.
A user with personal view can see and work with only the objects that their NetID
system administrator has assigned to their personal view. In addition, a user with
personal view cannot perform the following tasks:
•
302305-D Rev 00
Run an import, export, report or ping audit through the GUI.
1-5
NetID User’s Guide
•
Check server alarms.
This document includes notes with each individual procedure that personal view
affects.
Bookmarks
The bookmark is a NetID feature that allows users to access a specific object
without having to navigate through the object tree. Bookmarks are stored in the
Bookmarks folder at the top of the object tree. You can store your bookmarks in
the root folder or you can organize your bookmarks into a series of subfolders.
You can assign bookmarks to all object types, except Setup objects.
Bookmarks within personal views
Since bookmarks are user-defined and personal views are administrator-defined, it
is not possible to set a bookmark for an object that falls outside the limits of a
user’s personal view. If a user’s personal view is changed so that a pre-existing
bookmark can no longer be viewed, that bookmark no longer appears in the
Bookmarks folder.
Creating a bookmark
1.
In the object tree, browse to the object for which you want to create a
bookmark.
2.
Right-click on the object, and click on Create Bookmark.
The New Bookmark dialog box opens.
3.
Browse to the folder to which you want to add the bookmark.
For information on creating a new bookmark folder, see the next procedure.
4.
Click on the folder, and click on OK.
An icon for the bookmarked object appears in the bookmark folder. The type
of icon depends on the type of object that is bookmarked.
You can also create a bookmark for an object simply by copying it to the
clipboard, and then pasting it to the Bookmarks folder.
1-6
302305-D Rev 00
Introduction to the Management Console
Creating a bookmark folder
1.
Right-click on the bookmark folder under which you want to add a
folder, and click on Create Bookmark Folder.
The New Bookmark Folder dialog box opens.
2.
Type a name for the folder in the New Folder Name box.
Renaming a bookmark folder
1.
Right-click on the bookmark folder you want to rename, and click on
Rename Bookmark Folder.
The Rename Bookmark Folder dialog box opens.
2.
Type a new name in the New Folder Name box.
Deleting a bookmark or bookmark folder
1.
Click on the bookmark or bookmark folder you want to delete.
2.
From the Edit menu, choose Delete.
The folder and all of its contents are deleted.
Status Bar
A status bar at the bottom left of the Management Console displays messages that
describe the item in the Management Console that you have currently selected.
Display
You can change the width of the columns that appear in the list area by clicking on
the line that separates the column headers and dragging it to the position you
want.
You can also change the sort order of the column. A column with numeric
information is sorted either in numeric or reverse-numeric order; a column with
alphabetic information is sorted either in alphabetic or reverse-alphabetic order.
To change the order in which information is displayed, click in a column header,
and the information will appear in the opposite order.
302305-D Rev 00
1-7
NetID User’s Guide
For example, if you click in the Network Number column header, NetID sorts the
items in the list in numeric or reverse-numeric order. If you click in the Network
Name column header, NetID sorts the items in the list in alphabetic or
reverse-alphabetic order.
Special Keys
There are a number of keys on your keyboard that allow you to perform particular
functions in NetID. Some of these keys include the following:
•
Tab (use to move between fields in a dialog box)
•
Shift and click the mouse (use to choose a block of information from a list)
•
Ctrl and click the mouse (use to choose a number of individual pieces of
information from a list)
•
Enter (use instead of the OK button)
Setting Preferences
NetID allows you to set a number of user preferences to customize the types of
messages that NetID displays and the appearance of the interface. NetID allows
you to set the following preferences:
•
Logging
•
Confirmation
•
Buckets
Setting Logging Preferences
To set the types of notification and logging messages that NetID displays, follow
these steps:
1.
In the Edit menu, choose Preferences.
The Edit Preferences dialog box appears.
2.
1-8
In the Logging tab, Enable the check boxes to set preferences for logging
and notification.
302305-D Rev 00
Introduction to the Management Console
Table 1-1 describes the logging options.
Table 1-1.
Logging Preferences
Option
Description
Enable Tracing
NetID displays all messages that go between the
Application Server and the local Management Console.
Send Trace Data to Java
Console
If you enable tracing, NetID displays the log messages in
the Trace Log dialog box (refer to “Viewing the Trace Log”
on page 1-13). Enabling this check box displays the trace
log messages in the Java console.
3.
Click on OK.
To view the logging messages, you need to open the Trace Log dialog box
(refer to “Viewing the Trace Log” on page 1-13).
Setting Confirmation Preferences
By default, NetID does not display confirmation messages whenever it
successfully completes a task. NetID allows you to specify that it display
confirmation messages.
To set confirmation preferences, follow these steps:
1.
In the Edit menu, choose Preferences.
The Edit Preferences dialog box appears.
2.
Click on the Confirmation tab.
The Confirmation tab appears.
3.
Enable the Show Status Dialog on Success check box if you want NetID to
display a message each time it successfully completes a task.
4.
Click on OK.
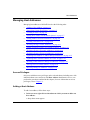
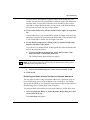
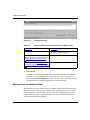
Setting the Number of Buckets for Domains and Subnets
A bucket is like a folder that contains a specified amount of domain and subnet
information. When you set a bucket size, NetID displays domain and subnet
information in smaller, more manageable portions determined by the bucket size
(refer to Figure 1-3).
302305-D Rev 00
1-9
NetID User’s Guide
Buckets
Figure 1-3.
Buckets
For example, if you have 900 domains and you set the bucket size to 100, NetID
displays 9 buckets of 100 domains each. The bucket size also determines how
many buckets NetID will create on each level of the hierarchy. For example, if
you have 12,000 domains and you set the bucket size to 100, NetID creates 100
parent buckets containing 120 domains. Because the number of domains in each
bucket is larger than the number you specified, NetID creates child buckets under
each parent bucket to hold the extra domains. With this feature, NetID will never
display more subnets or domains than the bucket size you specify. With the
bucket feature, you can view only the domain and subnet information with which
you want to work.
Although NetID allows you to turn off buckets, it will enforce buckets if you have
too large a subnet or domain name space, in order to ensure optimum
Management Console performance. The bucket threshold feature sets a minimum
bucket size of 1024. Should your subnet or domain name space contain more than
1024 objects, NetID implements the bucket feature automatically (buckets will
appear in the GUI). You can set the bucket threshold to a higher number (up to a
maximum of 50,000) if you still do not want buckets to appear. Note that the
performance of the Management Console may be slower without buckets.
1-10
302305-D Rev 00
Introduction to the Management Console
To set the number of buckets, follow these steps:
1.
In the Edit menu, choose Preferences.
The Edit Preferences dialog box appears.
2.
Click on the Buckets tab.
The Buckets tab appears.
3.
Type the number of buckets you want in the Bucket Size field.
If you do not want to use buckets, set the bucket size to 0 (zero). The
minimum number of buckets you can use is 5, and the maximum is 50,000.
If you choose 0 (zero) for the bucket size, the Bucket Threshold field is
enabled. If you have a large subnet or domain name space, NetID will enforce
buckets even if you do not want to use them, at the minimum number of 1024
(the default). Nortel Networks recommends that if this happens, you specify a
number of buckets in the Bucket Size field, or change the threshold to a
higher number (to a maximum of 50,000).
4.
Click on OK.
Errors and Warnings
NetID allows you to view both local error and warning messages, and external
notification messages if you have turned notification on (refer to “Setting Logging
Preferences” on page 1-8). Messages help you to monitor the changes that are
happening on your network.
Viewing Errors and Warnings
To view all of the errors and warnings that NetID has generated as a result of tasks
you have performed using the Management Console, follow these steps:
1.
In the View menu, choose Errors and Warnings Log.
The Errors and Warnings Log dialog box appears:
302305-D Rev 00
1-11
NetID User’s Guide
Figure 1-4.
Errors and Warnings Log Dialog Box
2.
View the latest warnings and errors.
3.
(Optional Step) Click on Clear to delete all of the information displayed.
If you click on Clear, the next time you open the dialog box, only errors and
warnings that NetID has generated since the last time you opened this dialog
box will appear.
4.
Click on Close.
Viewing External Update Messages
The external updates log displays all of the notification messages that NetID has
generated as a result of tasks you and external users have performed using the
Management Console. Before you can view these messages, you need to set the
tracing preferences in the Logging dialog box (refer to “Setting Logging
Preferences” on page 1-8).
To view external notification messages, follow these steps:
1.
In the View menu, choose External Updates Log.
The External Updates Log dialog box appears.
1-12
302305-D Rev 00
Introduction to the Management Console
2.
(Optional Step) Click on Clear to delete all of the information displayed.
If you click on Clear, the next time you open the dialog box, only notification
logs that NetID has generated since the last time you opened this dialog box
will appear.
3.
Click on Close.
Viewing the Trace Log
The trace log displays all of the messages that go between the Application Server
and the local Management Console. Before you can view these messages, you
need to set the tracing preferences in the Logging dialog box (refer to “Setting
Logging Preferences” on page 1-8).
To view trace log messages, follow these steps:
1.
In the View menu, choose Trace Log.
The Trace Log dialog box appears.
2.
(Optional Step) Click on Clear to delete all of the information displayed.
If you click on Clear, the next time you open the dialog box, only trace logs
that NetID has generated since the last time you opened this dialog box will
appear.
3.
Click on Close.
Refreshing the Cache
The NetID Management Console displays a lot of cached database information.
When multiple users are modifying the database information at the same time,
temporary inconsistencies in the cached information can occur. NetID verifies
cached values when you add or update information. Errors may occur when two
users attempt to modify related database information at the same time, or when a
user performs an import.
These errors are temporary and you can eliminate them by refreshing the cached
values. To refresh the cache, choose View > Refresh. NetID updates all of the
information on the selected object.
302305-D Rev 00
1-13
NetID User’s Guide
Replacing the Initial HTML Page
You may want to replace the initial NetID login HTML page that appears when
you first run the Management Console. To replace the initial HTML page with
one from your own organization, follow these steps:
1.
Go to the netid_home/templates directory on the computer on which your
NetID Application Server is installed.
2.
Open the NetID_login.html file in a text editor.
3.
Make a copy of the existing NetID_login.html file.
4.
Locate the <APPLET> element (near the bottom of the file).
5.
Copy the entire <APPLET> element.
The <APPLET> element contains the following lines:
<APPLET
code="nid/windows/tBaseApplet.class"
archive="nidappgui.jar"
name="Login"
width=1
height=1 ></APPLET>
6.
Paste the copied <APPLET> element into your HTML file.
7.
Rename your new HTML file NetID_login.html.
8.
Copy your HTML file to the netid_home/templates directory on the
machine on which your NetID Application Server is installed.
Copy and Paste
With the NetID signed applet feature, you can use your operating system’s
clipboard to copy text between fields in dialog boxes. For example, you can copy
an IP address and paste it into the IP Address field in the New DHCP Server
dialog box.
To copy text, follow these steps:
1-14
1.
Highlight the text that you want to copy.
2.
From the Edit menu, choose Copy.
302305-D Rev 00
Introduction to the Management Console
The first time you use the copy command, the following message appears
(Figure 1-5):
Figure 1-5.
3.
Java Security Dialog Box
Enable the Remember This Decision check box.
If you do not enable the check box, the security prompt will appear each time
you use the copy feature.
4.
Click on Grant.
5.
Place the cursor in the field into which you want to copy the information.
6.
From the Edit menu, choose Paste.
Completing Tasks with the Management Console
You can complete a task with the Management Console in any of the following
ways:
302305-D Rev 00
•
Click on an item in the tree or list area and then click the right mouse button to
display a menu from which you can choose a command.
•
Click on an item in the tree or list area and then choose a command from one
of the menus that appears at the top of the Management Console window.
1-15
NetID User’s Guide
•
Click on an item in the tree or list area and then click on one of the toolbar
icons. The toolbar icons change depending on the type of object you have
selected.
The procedures in this guide describe how to complete a task by using the right
mouse button where applicable. You can also use one of the menus that appear at
the top of the Management Console window to see the available menu commands
for that particular object. Where applicable, this guide displays the toolbar icon
that allows you to begin the task in the margin to the left of the procedure.
Getting Help
The NetID Management Console contains both general online help and
context-sensitive help. For general help, choose Contents or Index from the Help
menu to view the table of contents and index. The index is fully text searchable.
For context-sensitive help, click on the Help button that appears in most of the
dialog boxes.
Canceling a Task
All of the procedures in this user’s guide explain how to complete a particular
task. If, at any time, you decide that you do not want to complete a task that you
have started, simply click on the Cancel button.
Session Timeout
If too much time passes before you enter information into the Management
Console, it will time out and log you out. The following message appears:
Figure 1-6.
Session Error Message Box
Click on OK and select Log in from the File menu.
1-16
302305-D Rev 00
Introduction to the Management Console
The default timeout period is 30 minutes, but you may want to set a different time.
For information on setting the Management Console timeout period, talk to your
system administrator.
Address Limit
With NetID 1500, you are licensed to have only 1500 addresses in your database.
When you reach this number, NetID displays a warning message. NetID allows
you to exceed your address allotment by 10 percent before it will not allow you to
add any more addresses. If you require more than 1500 addresses, you should
contact Nortel Networks to purchase a different version of NetID (for information
on contacting Nortel Networks, refer to ““How to Get Help” on page -xxvi).
Multiple Management Console Windows
You can open more than one Management Console window at a time. When you
open a second Management Console window, you are running another copy of the
program. You cannot move items between the windows, but having more than one
Management Console window open at a time allows you to view information in
different subtrees at the same time.
To open a second Management Console window, open a new browser window in
your browser software and follow the instructions in Running the Management
Console and Logging In. To be able to open more than one browser window, you
must disable cookies in your Web browser. For information on how to disable
cookies, refer to your Web browser documentation.
Running NetID Utilities
NetID allows you to run the NetID import, export, report, and ping audit utilities
directly from the Management Console interface.
To run one of these tools from the Management Console interface, choose the
particular tool you want to run from the File menu.
Note: Users with personal view cannot run these utilities from the
Management Console. They can run them only from the command line on the
computer on which the NetID Application Server is installed.
302305-D Rev 00
1-17
NetID User’s Guide
The following table lists the NetID utilities and the chapters that contain
information about them.
For information about
Refer to
Import utility
Chapter 10
Export utility
Chapter 11
Report Utility
Chapter 12
Ping Audit utility
Chapter 14
Logging Out of NetID
To log out of NetID, follow these steps:
1.
In the File menu, choose Log out.
A message box appears.
2.
Click on Yes.
The NetID Management Console window goes blank. To log back in, choose
Log in from the File menu.
Exiting from NetID
To exit from the NetID Management Console, follow these steps:
1.
In the File menu, choose Exit.
A message box appears.
2.
Click on Yes.
The NetID Management Console closes, and returns to the initial Web
browser window. To log back in, make sure the URL of the computer on
which your NetID Application Server is installed still appears in the Location
field, and press Enter.
1-18
302305-D Rev 00
Introduction to the Management Console
302305-D Rev 00
1-19
Chapter 2
User IDs and Access Privileges
Your NetID system administrator has assigned a user ID to each person in your
organization who will use the NetID Management Console. NetID uses the user
ID and access privileges to determine who is authorized to use the NetID
Management Console and the types of tasks they can perform with it.
There are three administrative access privileges your NetID system administrator
can assign to a NetID user:
•
Setup administrative access (allows the user to create users, groups, custom
fields, templates, BootP/DHCP option types, and resource record types).
•
Root Domain Names administrative access (allows the user to define
top-level domain names and zones).
•
Root Address administrative access (allows the user to define networks).
Your NetID system administrator can assign any combination (or none) of these
privileges to each NetID user. Even when a user has no administrative access
privileges, that user may still have access to IP address space on a per network,
subnet, and subdomain basis.
NetID also allows your NetID system administrator to group users with common
access privileges under a common name. Having users organized into groups
makes it easier when you are assigning network, subnet or subdomain. You can
simply assign the entire group to the object, and each individual in the group will
have access to that object.
302305-D Rev 00
2-1
NetID User’s Guide
Changing a Password
When creating user IDs and access privileges, your system administrator assigns
each user a password. For security reasons, you will want to change your
password the first time you login to NetID. You may also want to change your
password occasionally.
To change your password, follow these steps:
1.
From the File menu, choose Change Password.
The Change Password dialog box appears.
2.
Type your old password in the Old Password field.
3.
Type the new password in the New Password field.
4.
Type the password again in the Confirm Password field.
If you type the incorrect password in the Old Password field, NetID prompts
you. Click on OK, and go back to step 2 of this procedure. You cannot change
your password unless you enter the correct old password.
5.
2-2
Click on OK.
302305-D Rev 00
Chapter 3
Domain Names
This Chapter removed - This functionaly is reserved for future
302305-D Rev 00
3-1
Chapter 4
Networks
Removed - beyond scope of normal administration tasks.
302305-D Rev 00
4-1
Chapter 5
Subnets
Removed - beyond scope of normal administration tasks
302305-D Rev 00
5-1
Chapter 6
Host Addresses
You can view all of the host addresses and address ranges on the
currently-selected subnet by expanding the subnet root objects in the IP Address
> Network root objects (refer to Figure 6-1). When you click on a different subnet
root object in the tree area, NetID updates the list display to show the hosts on that
subnet.
Figure 6-1.
302305-D Rev 00
Management Console with Expanded Subnet Tree
6-1
NetID User’s Guide
NetID displays the word Pending Delete in the Status column for deleted
unexpired addresses. Deleted unexpired addresses are static or dynamic addresses
that you have deleted but that have a hold time. NetID tracks these addresses until
the hold time expires.
When you add or update a host address, you may set the following information:
•
Custom field information
•
Aliases
•
BootP/DHCP options
•
DHCP lease time
•
Domain name
•
Time to live
•
MAC address and type
•
Personal view
When you add or update a host address range, you may set the following
information:
•
Custom field information
•
BootP/DHCP options
•
DHCP lease time
•
Autonaming
•
Restricted access
•
Client pool
•
Personal view
NetID uses tabs to organize this host information. When you add or update a host,
you set this information through separate tabs displayed in the host or range dialog
box. For clarity, this guide provides a separate procedure for entering the
information on each tab.
6-2
302305-D Rev 00
Host Addresses
Managing Host Addresses
Managing host addresses with NetID involves the following tasks:
•
“Adding a Host Address” on page 6-3
•
“Specifying Custom Field Values” on page 6-5
•
“Creating an Alias” on page 6-6
•
“Setting Host Address BootP/DHCP Options” on page 6-7
•
“Setting Address Protocol Information” on page 6-8
•
“Creating a Personal View” on page 6-10
•
“Defining a Range of Static Addresses” on page 6-11
•
“Setting Automatic Naming for an Address Range” on page 6-12
•
“Defining a Range of Dynamic Addresses” on page 6-14
•
“Defining a Range of Reserved Addresses” on page 6-18
•
“Updating Host Address or Address Range Information” on page 6-19
•
“Updating More Than One Address at a Time” on page 6-19
•
“Deleting a Host Address or Range of Addresses” on page 6-20
•
“Moving Hosts to Another Subnet” on page 6-22
•
“Resizing a Range of Addresses” on page 6-24
Access Privileges
Only users with host access privileges on the selected subnet, including users with
inherited subnet access and users with Root Address administrative access, can
perform the procedures outlined in this chapter (for more information on access
privileges, refer to Chapter 2).
Adding a Host Address
To add a host address, follow these steps:
1.
In the tree area, right-click on the subnet on which you want to add a new
host address.
A drop-down menu appears.
302305-D Rev 00
6-3
NetID User’s Guide
For information on navigating the hierarchy, refer to “Management Console
Interface” on page 1-4.
NetID allows you to create a static host on a dynamic or reserved address
range. Choose the dynamic or reserved range on which you want to create a
static host, and follow the rest of this procedure.
2.
Choose New Host.
The New Host dialog box appears.
If you are using subnet models, the Subnet Models dialog box appears.
For information on subnet models refer to “Entering Subnet Model
Information” on page 5-7.
a.
In the type list, click on the type of address you want to create.
b.
Click on OK.
Selecting a host type determines the default settings for some of the host
fields in the New Host dialog box. The New Host dialog box appears.
3.
Accept the address displayed in the Host field, or type in a new one.
NetID displays the next available host address in the subnet range for the host
type as specified in the subnet model. If you selected a subnet model, this
field may not be editable.
4.
Type a host name in the Domain Name field.
NetID displays the default domain name for the subnet or the name
determined by the host template for the host type specified by the subnet
model. If you selected a subnet model, this field may not be editable.
You can also click on the domain name lookup button to choose a domain
name from the domain name lookup dialog box. Users with personal view
will see only domains that their NetID system administrator has assigned to
their personal view.
Note: You can click on Apply Template to apply information from an
existing host template. When you click on Apply Template, the Host
Templates dialog box appears. Choose a template from the list and click on
OK. The information from that template appears in the appropriate fields.
5.
6-4
Type the data link layer address associated with the IP address in the
MAC Address field.
302305-D Rev 00
Host Addresses
The MAC address is a required field when the address is BootP-served.
6.
Choose the MAC type from the MAC Type drop-down list.
NetID uses the information in this field to validate the MAC address. For a list
of MAC types that NetID supports, refer to Appendix E.
7.
Type a value (in seconds) in the Time To Live field.
You can click on the clock icon to display the Time dialog box. You can enter
the time to live in days, hours, minutes and seconds and NetID converts the
value into seconds.
Normally you would leave this field blank to use the default time to live. The
default time to live is the minimum you specified for the zone (refer to
“Creating a DNS Zone” on page 9-2).
8.
(Optional Step) Click on the tabs to add more information.
For more information, refer to these procedures:
9.
•
Specifying Custom Field Values
•
Creating an Alias
•
Setting Host Address BootP/DHCP Options
•
Setting Address Protocol Information
•
Creating a Personal View
Click on OK.
Specifying Custom Field Values
A custom field displays customized information like the department or floor of a
particular host. Only users with Setup administrative access can create the custom
field definitions that appear in the Custom tab. Users with Root Address
administrative access or access to a particular host can enter data into the custom
fields.
To specify custom field values, follow these steps:
1.
In the New Host or Update Host dialog box, click on the Custom tab.
The Custom tab appears.
2.
302305-D Rev 00
Click in the Value field beside the field name for which you want to enter
data.
6-5
NetID User’s Guide
3.
Type information in the Value field, or choose a value from the
drop-down list.
Your system administrator may have created a drop-down list of finite values
for individual custom fields. Some custom fields are editable only by users
who have administrative access to the particular type of root object (in this
case, Root Address access). These custom fields still appear in the dialog
box, but users without administrative access cannot edit them.
If you applied a host template when you created the host address, NetID
displays the custom field values defined in the template.
4.
Click on OK.
Creating an Alias
An alias is another domain name that you associate with a single IP address or
domain name (CNAME). Aliases allow you to associate multiple domain names
with a single IP address.
To create an alias, follow these steps:
1.
In the New Host or Update Host dialog box, click on the Aliases tab.
The Aliases tab appears.
2.
Click on Add.
A new row appears in the list.
3.
Type a new host name in the Domain Name field.
You can also click on the Lookup Domain Name icon to choose a domain
name from the Domain Name Lookup dialog box. Users with personal view
will see only domains that their NetID system administrator has assigned to
their personal view.
4.
Type a value (in seconds) in the Time To Live field.
Normally you would leave a “0” in this field to use the default time to live.
The default time to live is the minimum you specified for the zone (refer to
“Creating a DNS Zone” on page 9-2).
You can also click on the Set Time To Live icon to set the time in days,
minutes, hours, and seconds in the Time dialog box. NetID converts the time
into seconds.
6-6
302305-D Rev 00
Host Addresses
5.
Choose Yes from the CNAME drop-down list if you are creating an alias
with a canonical name type resource record.
CNAME creates a link between the alias name and the primary domain name
with a CNAME-type resource record. A non-CNAME address (copy address)
creates a direct link between the alias name and the address with an
Address-type resource record. Choose No if you are using duplicate address
type resource records.
6.
Click on OK.
Updating Alias Information
To update alias information, follow these steps:
1.
In the New Host or Update Host dialog, click on the Aliases tab.
The Aliases tab appears.
2.
Click on the entry in the alias list and change the information you want.
3.
Click on OK.
Deleting Alias Information
To delete alias information, follow these steps:
1.
In the New Host or Update Host dialog, click on the Aliases tab.
The Aliases tab appears.
2.
Click on the entry in the alias list and click on Delete.
3.
Click on OK.
Setting Host Address BootP/DHCP Options
BootP/DHCP options are the configuration options for the host. For a list of
BootP/DHCP options, refer to Appendix C.
To set host address BootP/DHCP options, follow these steps:
1.
In the New Host or Update Host dialog box, click on the DHCP Options
tab.
The DHCP Options tab appears.
302305-D Rev 00
6-7
NetID User’s Guide
If you already set options at the global or subnet levels, these options appear
in the Options tab. You cannot delete these options, but you can change the
values assigned to them by clicking in the Value field and typing in a new
value.
2.
Click on the Add button.
A new row appears in the list.
3.
Choose the vendor type from the Vendor drop-down list (usually
Standard).
4.
Choose a group from the Group drop-down list.
NetID allows users to collect options into predefined or user-defined groups.
When you choose a group, NetID displays only the options that have been
placed in that group in the Name drop-down list. Only system administrators
can define DHCP option groups. For more information on DHCP options and
groups, refer to Appendix C.
5.
Choose the name of the option from the Name drop-down list (for an
explanation of the options, refer to Appendix C).
6.
Type a value in the Value field.
7.
Repeat steps 2 through 6 until you have added all of the options you want.
To delete any of the options you created at the host level, click on the option
and click on the Delete button.
You can also click on Apply Template to include the information from an
existing host template.
8.
Click on OK.
Setting Address Protocol Information
The Protocol tab specifies the mode for the host address. IP host addresses can be
served by a Dynamic Host Configuration Protocol (DHCP) server, using DHCP
or by a Bootstrap Protocol (BootP) server.
The types of host addresses you can create in NetID are:
6-8
•
Static (the address is fixed to a particular device. This is the default mode.)
•
DHCP Client (the address is available for DHCP assignment).
•
BootP Client (the address is fixed and managed by BootP).
302305-D Rev 00
Host Addresses
To set address protocol information, follow these steps:
1.
In the New Host or Update Host dialog box, click on the Protocol tab.
The Protocol tab appears.
2.
From the DHCP/BootP Server drop-down list, choose the DHCP or
BootP server responsible for the address.
You can also choose All DHCP Servers.
3.
Enable the DHCP Client check box or BootP Client check box or both.
4.
Follow the directions in the table for the check box you selected:
Table 6-1.
Selected Check
Box
Step
DHCP Client
a. Type a client ID in the Client ID field.
b. Type the length of time (in seconds) you want the
client’s lease to last in the Lease field (or click on the
clock icon to set the lease time).
BootP Client
a. Type the address of the BootP server that will serve
this client in the BootP Server field.
b. Type the name of this BootP client’s BootP file in the
BootP File field.
5.
302305-D Rev 00
Protocol Tab Check Box Procedures
Click on OK.
6-9
NetID User’s Guide
Creating a Personal View
A personal view is a NetID feature that allows the NetID system administrator to
limit the network information that a particular user can see in the GUI. The
personal view feature prevents users from seeing areas of the network to which
they do not have access. If you have a personal view of the hierarchy, you will see
only objects which your NetID system administrator has assigned to your personal
view. Only users with NetID administrative privileges can create a personal view.
Users with Root Domain Names and Root Address access privileges can also
create a personal view on individual objects.
Note: Take care when creating a personal view for a user. Personal view is not
the same thing as access privileges. A NetID system administrator could place
an object to which a user does not have access in that user's personal view. The
user would be able to see the object, but would be unable to modify it. In
addition, a system administrator could give a user access to an object, but
forget to place that object in the user's personal view. The user would be
unable to work with the object, even though the user has access to it.
You can create a personal view for a host, static range, reserved range or dynamic
range.
To include a host or address range in a user’s personal view, follow these steps:
1.
In a host or address range dialog box, click on the View tab.
The View tab appears.
2.
In the All Users list, double-click on the user whose personal view
includes this host.
You can choose more than one user by holding the [Shift] key (to choose a
contiguous block of users) or the [Ctrl] key (to choose a group of users that is
not contiguous).
The user or users you selected appears in the View Granted To column.
To remove a user from the View Granted To column, click on the user and
click on the move arrow, or double-click on the user.
3.
6-10
Click on OK.
302305-D Rev 00
Host Addresses
Address Ranges
You can create these types of address range in NetID: static, dynamic and
reserved.
A static range is a group of addresses where each address is assigned to a specific
device (refer to “Defining a Range of Static Addresses”).
A dynamic range is a group of addresses that a DHCP server assigns. These
addresses have a lease time. When the lease expires, they are available for the
DHCP server to reassign (refer to “Defining a Range of Dynamic Addresses”).
A reserved range is a group of addresses to which only specified users have
access (refer to “Defining a Range of Reserved Addresses”).
When an address from an address range is allocated by a DHCP server, NetID
displays the address in the list area. When the address expires, it no longer appears
in the list area.
If you delete a dynamic address range, NetID deletes all of the unallocated
addresses. NetID will not delete addresses from the range that are currently in use.
The address stays in the database until the client that is using it sends a message to
the DHCP server releasing the address, or the lease expires. The message Pending
Delete appears in the Status column for that address in the list area.
NetID also allows you to create a static host on a dynamic or reserved range.
Defining a Range of Static Addresses
You may want to create a range of static addresses to make creating multiple static
addresses easier.
To create a range of static addresses, follow these steps:
1.
In the tree area, right-click on the subnet on which you want to add a
static address range.
A drop-down menu appears.
For information on navigating the hierarchy, refer to “Management Console
Interface” on page 1-4.
2.
Choose New Static Range.
The New Static Range dialog box appears.
302305-D Rev 00
6-11
NetID User’s Guide
3.
Accept the address displayed in the First Address field, or type a new
one.
4.
Type the last address in the range in the Last Address field or type the
number of addresses you want to have in the range in the Range Size
field, and click on the Find button.
NetID finds the first block of contiguous addresses that match the size you
specify in the Range Size field.
5.
(Optional Step) Click on the Autonaming tab to set autonaming
information (refer to “Setting Automatic Naming for an Address
Range”).
6.
Click on OK.
The address range appears in the list. Note that the icon
range indicates the type of address range that it is.
beside the address
Setting Automatic Naming for an Address Range
The autonaming tab allows you to specify automatic naming for the addresses in
your address range. To specify automatic naming for an address range, follow
these steps:
1.
In the New Static Range/Update Static Range dialog box, click on the
Autonaming tab.
The Autonaming tab appears.
2.
Enable the Automatic check box to include the automatic naming
specification.
3.
Type the label prefix in the Label Prefix field.
This is the text that will appear before the number component of the name.
4.
Type the label suffix in the Label Suffix field.
This is the text that will appear after the number component of the name.
6-12
302305-D Rev 00
Host Addresses
5.
Set the domain component by clicking the Use Subnet Default option
button or the Use Other option button.
If you choose Use Subnet Default, NetID appends the subnet default domain
name to the end of the address. To choose a different domain name, click in
the Use Other option button and click on the domain name icon. The Lookup
Domain Name dialog box appears. Users with personal view will see only
domains that their NetID system administrator has assigned to their personal
view. Click on the domain name you want to choose and click on OK.
6.
Click on the Decimal, Hexadecimal, or Custom option button to choose
the numbering system you want to use.
If you choose Custom, NetID will use the indexing format that you specify in
the system options dialog box (for more information on the system options
dialog box, refer to the chapter on configuration options in the NetID System
Administrator’s Guide).
7.
Enable the Width check box if you want to specify the number of
characters that appear in the index portion of the host address.
NetID adds 0s to the index so that each index is the same length.
8.
Type a number in the width field.
9.
Enable the Label check box if you want the entire label to be a certain
length.
NetID adds 0s to the components in the address so that the label and index
components are the same length.
You must specify the length by typing the number in the Width field. The
number you enter must be greater than the combined length of the label prefix
and label suffix you specified. If the label prefix and label suffix you have
specified are longer than the number you enter in the width field, the dialog
box will not close until you enter a larger number.
10. Type a number in the Start field.
This is the number NetID will start with when assigning an IP address. With
each subsequent address you add, NetID increases the number by one. If you
want the numbering to decrease from the start number, click in the box beside
Decrement.
11. Click on OK.
302305-D Rev 00
6-13
NetID User’s Guide
Defining a Range of Dynamic Addresses
If you are using a DHCP server, you will want to create address ranges for the
server to manage. You may also want to assign a range of addresses to a single
device with multiple addresses (such as a terminal server or IP proxy server).
Note: Before you can define a range of addresses that is DHCP-served, you
first need to create a DHCP server (refer to Chapter 8).
To define a range of dynamic addresses, follow these steps:
1.
In the tree area, right-click on the subnet on which you want to create a
range of addresses.
A drop-down menu appears.
For information on navigating the hierarchy, refer to “Management Console
Interface” on page 1-4.
2.
Choose New Dynamic Range.
The New Dynamic Range tab appears.
3.
Accept the address displayed in the First Address field, or type in a new
one.
4.
Type the last address in the range in the Last Address field or type the
number of addresses you want to have in the range in the Range Size field
and click on the Find button.
NetID finds the first block of contiguous addresses that match the size you
specify in the Range Size field.
6-14
5.
From the Served by drop-down list, choose the server that you want to be
responsible for the dynamic address range.
6.
Enable the Allow Automatic BootP check box if you want to allow
dynamically-served BootP clients to get addresses on this range.
7.
Type the lease time (in seconds) in the Lease Time field or click on the
clock icon to set the time in the Time dialog box.
8.
In the Boot Server (SI ADDR) field, type the IP address of the TFTP
server where the host will obtain its configuration information.
302305-D Rev 00
Host Addresses
9.
(Optional Step) You may also want to click on the other tabs to add other
information. Refer to the following procedures:
•
“Setting Autonaming for a Dynamic Address Range” on page 6-15
•
“Setting Host Address BootP/DHCP Options” on page 6-7
•
“Restricting the Kinds of Hosts That Receive Dynamic Addresses” on
page 6-17
•
“Creating a Personal View” on page 6-10
10. Click on OK.
The address range appears in the list. Note that the icon beside the address
range indicates the type of address range that it is.
Setting Autonaming for a Dynamic Address Range
There are four different ways NetID handles automatic naming for a dynamic
address range, depending on what you specify in the dynamic range Autonaming
tab.
Table 6-2 lists how NetID handles automatic naming for a dynamic range.
Table 6-2.
Dynamic Range Autonaming
Autonaming Tab Setting
Result
No settings specified in
Autonaming tab.
The host will not receive a label.
Autonaming is specified, but
accept client label is not
specified.
The host will receive the label that NetID assigns to it.
Autonaming is specified, and
accept client label is specified.
If the host suggests a label for itself, NetID will allow
the host to keep the label. If the host does not suggest
a label, NetID will assign it one.
Autonaming is not specified, but
accept client label is.
If the host suggests a label for itself, NetID will allow
the host to keep the label. If the host does not suggest
a label, the host will not receive one.
To specify automatic naming for a dynamic address range, follow these steps:
1.
302305-D Rev 00
In the New Dynamic Range/Update Dynamic Range dialog box, click on
the Autonaming tab.
6-15
NetID User’s Guide
The Autonaming tab appears.
2.
Click in the box beside Use Autonaming to include the automatic naming
specification.
Note: As you enter autonaming information, NetID displays this information
in the Name Preview field.
3.
Type the label prefix in the Prefix field.
This is the text that will appear before the number component of the name.
4.
Type the label suffix in the Suffix field.
This is the text that will appear after the number component of the name.
5.
Type a number in the Start field.
This is the number NetID will start with when assigning an IP address.
6.
From the Next Index drop-down list, choose how you want NetID to
apply autonaming.
Choose Increment if you want the numbering to increase the number by one
with each subsequent address, or choose Decrement if you want numbering to
decrease by one.
7.
From the Index Type drop-down list, choose the numbering system you
want to use.
If you choose Custom, NetID will use the numbering format that you specify
in the system options dialog box. (See your system administrator to find out
what type of numbering format you should use.)
8.
Enable the Set Width Constraints check box if you want to specify the
number of characters that appear in the index portion of the host
address.
NetID adds zeroes to the index so that each index is the same length.
9.
Type a number in the width field.
NetID adds zeroes to the components in the address so that the label and index
components are the same length.
6-16
302305-D Rev 00
Host Addresses
You must specify the length by typing the number in the Width field. The
number you enter must be greater than the combined length of the label prefix
and label suffix you specified. If the label prefix and label suffix you have
specified are longer than the number you enter in the width field, the dialog
box will not close until you enter a larger number.
10. Choose either Index Only or Entire Label from the Apply To drop-down
list.
Choose Index Only if you want NetID to validate the length of the label and
add zeroes to the label to correspond to the label width, or choose Entire Label
if you want NetID to validate only the length of the label.
11. Set the domain component by clicking in the Use Subnet Default radio
button or the Other radio button.
If you choose Use Subnet Default, NetID appends the subnet default domain
name to the end of the address.
a.
To choose a different domain name, choose the Use Other radio
button and click on the domain name icon.
The Lookup Domain Name dialog box appears.
Note: Users with personal view will see only the domain names their system
adminstrator has assigned to them.
b.
Click on the domain name you want to choose and click on OK.
12. Click on OK.
Restricting the Kinds of Hosts That Receive Dynamic Addresses
You may want to restrict a range of dynamic addresses to a particular group of
hosts. NetID allows you to group IP addresses into a client pool. You can then
specify that the DHCP server responsible for the dynamic range assigns addresses
from that range only to clients listed in the client pool.
To restrict the kinds of hosts that receive dynamic addresses, follow these steps:
1.
In the New Dynamic Range or Update Dynamic Range dialog box, click
on the Client Pools tab.
The Client Pools tab appears.
302305-D Rev 00
6-17
NetID User’s Guide
If no client pools exist, you must create them (refer to “Creating a Client
Pool” on page 7-1).
2.
In the All Client Pools list, double-click on the client pool to which you
want to restrict the address range.
You can choose more than one client pool by holding the Shift key (to choose
a block of contiguous client pools) or the Ctrl key (to choose a block of client
pools that is not contiguous).
The client pool you selected appears in the Client Pools column.
To remove a group, double-click on the group in the Client Pools column.
You can also use the move arrows to move items between the columns.
3.
Repeat step 2 until you have added all of the client pools you want.
4.
Click on OK to exit.
Defining a Range of Reserved Addresses
You may want to define a range of addresses to which only specified users have
access. To create a range of reserved addresses, follow these steps:
1.
In the tree area, right-click on the subnet on which you want to create a
range of reserved addresses.
A drop-down menu appears.
For information on navigating the hierarchy, refer to “Management Console
Interface” on page 1-4.
2.
Choose New Reserved Range.
The New Reserved Range dialog box appears.
3.
Accept the address displayed in the First Address field, or type in a new
one.
4.
Type the last address in the range in the Last Address field or type the
number of addresses you want to have in the range in the Range Size field
and click on the Find button.
NetID finds the first block of contiguous addresses that match the size you
specify in the Range Size field.
5.
Click on the Access tab.
The Access tab appears.
6-18
302305-D Rev 00
Host Addresses
6.
In the Users and Groups list, double-click on the user or group to which
you want to grant access privileges on the subnet.
You can choose more than one user by holding the Shift key (to choose a
block of contiguous users) or the Ctrl key (to choose a group of users that is
not contiguous).
The user or users you selected appears in the Access Granted To column.
To remove a user from a group, double-click on the user in the Access
Granted To column. You cannot remove a user who has inherited access.
You can also use the move arrows to move items between the columns.
7.
Click on OK.
Updating Host Address or Address Range Information
You can update any information except the actual host address or the address
range start and end fields. With static ranges you can update only custom field and
personal view information. Only users with access to a reserved address range can
modify the addresses on that range.
To update a host address, follow these steps:
1.
In the tree area, right-click on the host address or address range you
want to update.
A drop-down menu appears.
For information on navigating the hierarchy, refer to “Management Console
Interface” on page 1-4.
2.
Choose Update Address or Update Range from the drop-down menu.
The Update Host or Update Range dialog box appears.
3.
Type new information into the fields and tabs (for directions, refer to the
procedures on pages 6-5 to 6-8).
4.
Click on OK.
Updating More Than One Address at a Time
NetID allows you to update the time to live and the information in the Custom
and DHCP Options tabs of multiple addresses with a single operation. To update
more than one address at a time, follow these steps:
302305-D Rev 00
6-19
NetID User’s Guide
1.
In the tree area, expand the IP Address root object.
2.
Expand the network object that contains the subnet on which you want to
update the address or address range.
3.
In the list, hold down the Shift key (to choose a block of contiguous
addresses) or the Ctrl key (to choose a block of addresses that is not
contiguous) and right-click on each host you want to update.
4.
Choose Update Address.
The Multi-Update Host dialog box appears.
5.
Type the information in the fields you want to change.
When you type a new value into a field, the new value replaces the old value
on all of the selected hosts.
6.
Click on OK.
Note: If you decide that you want to delete information that you assigned to a
group of addresses, you can do so only with each individual address and not by
selecting the group. In the tree area click on the individual address and choose
Update Address from the Options menu. Remove the information that you
want to delete from the field it is in and click on OK.
Deleting a Host Address or Range of Addresses
With dynamic addresses, NetID deletes all of the unallocated addresses in the
address range you selected. NetID will not delete addresses from the range that
are currently in use. The address stays in the database until the client that is using
it sends a message to the DHCP server releasing the address, or the lease expires.
When this happens, NetID deletes it.
If the address is static and the system options specify a hold time for deleted
addresses (only your NetID system administrator can set system options), NetID
marks the address as deleted but does not remove it from the database until the
lease time expires. You cannot reuse the deleted address until after the hold time
expires.
Only users with access to a reserved range of addresses can delete an address from
the range.
6-20
302305-D Rev 00
Host Addresses
To delete an address or range of addresses, follow these steps:
1.
In the tree area, right-click on the address or range of addresses that you
want to delete.
A drop-down menu appears.
For information on navigating the hierarchy, refer to “Management Console
Interface” on page 1-4.
2.
Choose Delete Address or Delete Range.
A message box appears, asking if you want to delete the selected address or
address range.
If you try to delete an address that is a DHCP server that has a range of
addresses assigned to it, or if you delete an IP address that is a DHCP server
that is not serving an address range, an error message appears (refer to
Figure 6-2 and Figure 6-3). Follow the directions in Table 6-3 to complete the
procedure.
Figure 6-2.
302305-D Rev 00
Error Message
6-21
NetID User’s Guide
Figure 6-3.
Warning Message
Table 6-3.
Steps for Deleting an IP Address That Is a DHCP Server
If Figure 6-2 appears:
If Figure 6-3 appears:
a. Click on OK.
a. Click on Yes. (If you click on No, NetID
does not delete the IP address.)
b. Delete the DHCP server in the DHCP
Servers root object. (For directions, refer
to “Deleting a DHCP Server” on page
8-4).
c. Follow the steps in “Deleting a Host
Address or Range of Addresses” on page
6-20 to delete the host address.
3.
Click on OK.
NetID does not delete the domain names associated with the host addresses
unless your system administrator selected one of the delete domain name
options in the System Options dialog box. This means you could end up with
domain names in your database that have no resource records.
Moving Hosts to Another Subnet
NetID allows you to move hosts from one subnet to another while preserving their
attributes. You can either copy or cut the hosts. (Copying the hosts is an easy way
to do bulk address creation.) Since all MAC addresses for BootP hosts must be
unique, when you paste a copy buffer NetID converts all Static BootP hosts to
static hosts with no MAC addresses.
6-22
302305-D Rev 00
Host Addresses
When you have successfully pasted addresses that you cut, NetID deletes the
addresses on the old subnet. With dynamic addresses, NetID deletes all of the
unallocated addresses in the address range you selected. NetID will not delete
addresses from the range that are currently in use. The address stays in the
database until the client that is using it sends a message to the DHCP server
releasing the address, or the lease expires. When this happens, NetID deletes it,
and it becomes available immediately on the new subnet.
If the address is static and the system options specify a hold time for deleted
addresses (only your NetID system administrator can set system options), NetID
marks the address as deleted but does not remove it from the database until the
hold time expires. You cannot reuse the deleted address until after the hold time
expires.
To move hosts to another subnet, follow these steps:
1.
In the tree area, expand the IP Address root object.
2.
Expand the network object that contains the subnet from which you want
to move the addresses or address ranges.
3.
In the list, hold the Shift key (to choose a group of contiguous hosts) or
the Ctrl key (to choose a group hosts that is not contiguous) and click on
all of the hosts you want to move.
4.
From the Edit menu, choose Cut or Copy.
If you choose Cut, the hosts disappear from the host list.
5.
In the tree area, click on the subnet to which you want to move the hosts.
6.
In the Edit menu, choose Paste.
The Paste Hosts dialog box appears.
7.
Change the values in the New Address and New Name fields by typing
data directly in the fields or by following the directions in Table 6-4.
Note: NetID calculates the new address from the subnet offset of the old
address and displays it in the New Address column. (For example, if the old
address was five spaces above the old subnet address the new address will be
five spaces above the new subnet address.) If there is a problem with the new
address and an existing address (for example, the address at the offset is
already allocated), NetID leaves the field blank. The New Name field initially
displays the old domain name.
302305-D Rev 00
6-23
NetID User’s Guide
Table 6-4.
Buttons in the Paste Hosts Dialog Box
Click on ...
If you want to...
First Available
paste hosts to the first available addresses in the new subnet.
Offset
maintain the original subnet offset when allocating addresses to hosts
on the new subnet.
New Parent
specify a new parent domain name component for all domain names
(choose the new parent from the Find Domain Name dialog box and
click on OK).
Clear Names
clear all the fields in the New Name column.
Old Names
return to the original name mapping.
8.
Click on OK.
NetID validates the data you entered and if it detects an error, an error
message appears. Correct the error and click on OK again.
NetID does not delete the domain names associated with the host addresses
unless your NetID system administrator selected one of the delete domain
name options in the System Options dialog box. This means you could end
up with domain names in your database that have no resource records.
Resizing a Range of Addresses
NetID allows you to change the size of an address range after you have created it.
To resize a range of addresses, follow these steps:
1.
In the tree area, right-click on the address range you want to resize.
A drop-down menu appears.
For information on navigating the hierarchy, refer to “Management Console
Interface” on page 1-4.
2.
From the Options menu, choose Resize Range.
The Resize <type of range> Range dialog box appears.
3.
Change the addresses in the First Address and Last Address fields or
type a number in the Range Size field and click on Find.
NetID resizes the address range.
4.
6-24
Click on OK.
302305-D Rev 00
Chapter 7
Client Pools
A client pool is a group of one or more client IDs or MAC addresses collected
under a single name. Client pools allow you to restrict a range of dynamic
addresses to a particular group of hosts.
Managing Client Pools
Managing client pools involves the following tasks:
•
“Creating a Client Pool” on page 7-1
•
“Creating a Personal View” on page 7-3
•
“Placing Clients in a Client Pool” on page 7-4
•
“Placing Clients on a Dynamic Range in a Client Pool” on page 7-5
•
“Updating a Client Pool” on page 7-5
•
“Renaming a Client Pool” on page 7-6
•
“Deleting a Client Pool” on page 7-6
Creating a Client Pool
NetID allows you to place a number of hosts into a single group called a client
pool. Client pools allow you to restrict a range of dynamic addresses to a
particular group of hosts.
To create a client pool, follow these steps:
1.
In the tree, right-click on the DHCP Client Pools root object.
A drop-down menu appears.
302305-D Rev 00
7-1
NetID User’s Guide
For information on navigating the hierarchy, refer to “Management Console
Interface” on page 1-4.
2.
Choose New Pool.
The New Client Pool dialog box appears.
3.
Type a name for the client pool in the Name field.
4.
Enable the Record check box if you want to enable recording.
Recording is a method of gathering all the information that is currently in a
client pool.
5.
Click on the appropriate radio button for the type of identifier you want
NetID to use for recording.
6.
Click on the Access tab.
The Access tab appears.
7.
In the Users and Groups list, double-click on the user or group you want
to add to the client pool.
You can choose more than one user by holding the [Shift] key (to choose a
block of users) or the [Ctrl] key (to choose a number of individual users).
The user or users you selected appears in the Access Granted To column.
To remove a user from a group, double-click on the user in the Access
Granted To column. You can also click on the arrows to move information
between the columns.
8.
7-2
Click on OK.
302305-D Rev 00
Client Pools
Creating a Personal View
A personal view is a NetID feature that allows the NetID system administrator to
limit the network information that a particular user can see in the GUI. The
personal view feature prevents users from seeing areas of the network to which
they do not have access. If you have a personal view of the hierarchy, you will see
only objects which your NetID system administrator has assigned to your personal
view. Only users with NetID administrative privileges can create a personal view.
Users with Root Domain Names and Root Address access privileges can also
create a personal view on individual objects.
Note: Take care when creating a personal view for a user. Personal view is not
the same thing as access privileges. A NetID system administrator could place
an object to which a user does not have access in that user's personal view. The
user would be able to see the object, but would be unable to modify it. In
addition, a system administrator could give a user access to an object, but
forget to place that object in the user's personal view. The user would be
unable to work with the object, even though the user has access to it.
To include a client pool in a user’s personal view, follow these steps:
1.
In the tree, right-click on the client pool that you want to include in a
personal view.
A drop-down menu appears.
For information on navigating the hierarchy, refer to “Management Console
Interface” on page 1-4.
2.
Choose Update Client Pool.
The Update Client Pool dialog box appears.
3.
Click on the View tab.
The View tab appears.
4.
In the All Users list, double-click on the user whose personal view
includes this client pool.
You can choose more than one user by holding the [Shift] key (to choose a
contiguous block of users) or the [Ctrl] key (to choose a group of users that is
not contiguous).
The user or users you selected appears in the View Granted To column.
302305-D Rev 00
7-3
NetID User’s Guide
To remove a user from the View Granted To column, click on the user and
click on the move arrow, or double-click on the user.
5.
Click on OK.
Placing Clients in a Client Pool
After you have created a client pool (refer to “Creating a Client Pool” on page
7-1), you must identify the clients you want to appear in the client pool. To place
clients in a client pool, follow these steps:
1.
In the tree, right-click on the client pool to which you want to add clients.
A drop-down menu appears.
For information on navigating the hierarchy, refer to “Management Console
Interface” on page 1-4.
2.
Choose New Client Pool Entry.
The New Client Pool Entry dialog box appears.
3.
Follow the steps in Table 7-1 to identify a client by its MAC address or by
its client identifier.
Table 7-1.
MAC Address and Client Identifier Procedures
MAC Address
Client Identifier
a. Click on the MAC Address option
button.
a. Click in the Client Identifier option button.
b. Type the MAC address for the client
in the MAC Address field.
b. Type the client identifier for the client in the
Client Identifier field.
c. From the MAC Type drop-down list,
choose the MAC type (for a list of the
MAC types that NetID supports, refer to
Appendix E).
c. Type a description of the client in the
Description field.
d. Type a description of the client in the
Description field.
4.
7-4
Click on OK.
302305-D Rev 00
NetID User’s Guide
The Update Client Pool dialog box appears.
3.
Click on the Access tab.
The Access tab appears.
4.
Add or delete users from the list by double-clicking on them.
5.
Click on OK.
Renaming a Client Pool
You may want to change the name of a client pool you have created. To rename a
client pool, follow these steps:
1.
In the tree area, right-click on the client pool you want to rename.
2.
Choose Rename Pool.
The Rename Client Pool dialog box appears.
3.
Type a new name for the client pool in the Name field.
4.
Click on OK.
Deleting a Client Pool
To delete a client pool, follow these steps:
1.
In the tree area, right-click on the client pool you want to delete.
2.
Choose Delete Pool.
A message box appears asking if you want to delete the client pool.
3.
7-6
Click on OK.
302305-D Rev 00
Client Pools
Placing Clients on a Dynamic Range in a Client Pool
With NetID, you can add client pool entries associated with a specific dynamic
range to single client pool. NetID adds all the client pool entries to the assigned
client pool with one operation.
To add client pool entries associated with a dynamic range, follow these steps:
1.
Under the IP Address root object, right-click on the dynamic range you
want to add to the client pool.
A drop-down list appears.
2.
Choose Create New Client Pool Entries.
The Create Client Pool Entries dialog box appears.
The Take Client Pool Entries on this Dynamic Range field shows the range
you have selected. This field is not editable.
3.
Choose the client pool to which you want to add these entries from the
And Add Them To This Client Pool drop-down list.
4.
Choose the identifier type you want NetID to use from the If They
Contain A: drop-down list.
5.
Click on OK.
NetID saves the client pool entries in the new client pool.
Updating a Client Pool
When you update a client pool, you can change only the users and groups who
have access to the pool, and the personal view information. To change the name of
the client pool, you must use the rename pool option (refer to “Renaming a Client
Pool” on page 7-6).
To update a client pool, follow these steps:
1.
In the tree area, right-click on the client pool you want to update.
A drop-down menu appears.
For information on navigating the hierarchy, refer to “Management Console
Interface” on page 1-4.
2.
302305-D Rev 00
Choose Update Pool.
7-5
Appendix B
Managing DHCP
The Dynamic Host Configuration Protocol (DHCP) is an extension of the
Bootstrap Protocol (BootP). You can use DHCP to assign IP addresses and host
names to IP hosts automatically and to distribute IP configuration information.
Why DHCP?
Each machine on your network requires its own IP address and configuration
information. The machine’s IP address is the identifier that other networked
machines use to recognize that machine. The computer’s configuration
information includes, among other items, the network domain name, the address
of network servers and gateways, and the subnet mask.
Without DHCP or BootP, each time your organization adds a device to its
network, the system administrator must go to the new device and manually assign
the IP address and configuration information. When devices change offices or
users, or leave the network altogether, the configuration information changes as
well.
DHCP makes network management easier by automating and centralizing IP
address administration and by providing this information automatically to each
networked device when it is needed. DHCP can allocate the following types of
address:
•
302305-D Rev 00
Static DHCP addresses - These are addresses that a DHCP server fixes to a
client by a unique key as in the standard BootP model. This key is usually the
Media Access Control (MAC) address or a DHCP client ID.
B-1
NetID User’s Guide
•
Dynamic DHCP addresses - These are addresses that a DHCP server
allocates to clients for fixed periods of time, called lease times. The client
computer can extend the lease so that it continues to use the same dynamic
address. When the client leaves the network, the client typically releases the
address, and the DHCP server can assign the address to another client. The
DHCP server can also reclaim the address when the lease expires.
•
Static BootP addresses - These are addresses that a DHCP server allocates
with an indefinite lease. The lease is never released.
•
Automatic BootP addresses - These are BootP addresses that are
dynamically-served.
The NetID DHCP Server
For the NetID DHCP server to operate, you must install the NetID Server
Manager on one of the computers on your network (typically the same computer
as the one that contains your NetID database). The DHCP server communicates
only with the NetID Server Manager. The NetID Server Manager communicates
with the database (for more information on NetID server setup, refer to the
chapter on setting up DHCP in the NetID System Administrator’s Guide). This
setup allows you to have multiple DHCP servers, while reducing the number of
connections to the database and the amount of traffic on your network, as the
Server Manager connects to the database as required.
Since the NetID DHCP server uses the information in the NetID database to
assign IP addresses and host configuration information, you need to set up your
network configuration using the NetID Management Console before the NetID
DHCP server can operate correctly.
Using the NetID Management Console, you configure a DHCP server and make
addresses available for dynamic allocation. You may want to ensure DHCP
redundancy by specifying a backup server for each of your DHCP servers (refer to
“Defining a DHCP Server,” page 8-1). You also specify IP configuration options
associated with those addresses. Some of the information you specify includes the
following:
B-2
•
The type of address (static DHCP or dynamic).
•
The lease time for dynamic addresses or static DHCP addresses.
302305-D Rev 00
Managing DHCP
When the address lease expires or the client leaves the network and releases the
address, the NetID DHCP server notifies the NetID database through the Server
Manager. The address the client was using goes back into the pool of dynamic
addresses, and is then available for the DHCP server to reassign when a new client
joins your network. The name associated with the host (if there was one) is no
longer registered and becomes available for another client to use.
Lease Time
Lease time is the length of time that a computer can use a dynamic IP address.
You define the lease time when you use the NetID Management Console to set up
your IP address configuration information (refer to the chapter on setting up
DHCP in the NetID System Administrator’s Guide).
How Lease Time Works
When a client has an address with a fixed lease time, it will contact the DHCP
server and attempt to renew the lease half-way through the lease time. This is
called the renewal time. In most cases, the DHCP server renews the client’s
address and the lease time for that address. For example, if your computer has an
address with a lease time of one hour, it asks to renew the address approximately
half an hour after it has started to use it. When the DHCP server renews the
address, your computer is able to use the address for another hour. This process
continues until the client is no longer connected to the network.
Occasionally the client does not receive an answer from the DHCP server
(perhaps because the server is down at the renewal time). At the rebind time (by
default 87.5 % through the lease time), the client attempts to rebind with another
DHCP server. When it rebinds, it receives another IP address.
DHCP Redundancy
DHCP redundancy is a process that allows you to have more than one DHCP
server be responsible for a range or ranges of IP addresses. DHCP redundancy
ensures that when a DHCP server fails, clients on your network will continue to
receive IP addresses.
302305-D Rev 00
B-3
NetID User’s Guide
NetID’s DHCP Redundancy
NetID offers DHCP redundancy through a server-to-server protocol with a
primary and a backup server. A primary DHCP server is a DHCP server that is
configured with a set of ranges and will serve addresses in those ranges to DHCP
clients. A backup DHCP server is a DHCP server that communicates with a
primary DHCP server and will serve the ranges of the primary server when the
backup server can no longer communicate with the primary server.
Using the NetID Management Console, users can assign one backup server to
each primary DHCP server on the network. Any primary server can have only one
backup server, but a server can be a backup for any number of primary servers.
Any server that does not have a backup server assigned to it is operating without
DHCP redundancy.
Upon startup, the backup server receives its configuration from the primary
server. The backup server then waits for any servers for which it is configured as a
backup to send it a keep-alive message. When the backup server receives a
keep-alive message, it resets its keep-alive timer and waits for another message.
Whenever the primary server receives configuration information from the NetID
Server Manager it sends it to the backup server. The primary server continues to
send periodic keep-alive messages to its backup server.
If any of the primary DHCP servers for which the backup server is acting have not
contacted the backup server within a certain time, the backup server considers the
primary to be down and begins to serve the address ranges for the primary server
that has failed. The backup server continues to serve the address ranges until it
receives a message from the primary server that the primary has resumed
operation.
When the primary server resumes operation it contacts the backup server. The
backup server sends changed lease information to the primary server for which it
has been acting. Leases will have changed if the backup DHCP server has
allocated a new lease or released/renewed an existing lease. The backup server
returns to a non-serving mode, waiting for and responding to keep-alive messages
from the primary server.
B-4
302305-D Rev 00
Managing DHCP
Backup Servers
There is no set number of primary servers for which a backup server should be
responsible. You should keep the following issues in mind when deciding how
many primary servers to assign to a backup server:
•
The total number of IP addresses for which the backup server is responsible.
•
Memory requirements.
•
Network traffic.
When determining the total number of IP addresses for which the backup server is
responsible, remember that your backup server may also be operating as a primary
server with its own set of address ranges. To determine the total number of IP
addresses for which the backup server is responsible, include the number of
addresses for each primary server that the backup server is responsible for, plus
the number of addresses the backup server is serving in its configuration as a
primary server.
Keep in mind that each IP address in a DHCP server’s configuration requires
approximately 200 bytes of memory, whether those addresses are configured for
backup or primary mode. Remember that as the number of addresses a DHCP
server is serving increases, so does the amount of traffic to the DHCP server. The
lease time also has an effect on the traffic rate: the longer the lease times, the
lower the amount of traffic.
Configuring NetID to Use DHCP Redundancy
To configure NetID so that you can use DHCP redundancy, you must complete
the following tasks:
302305-D Rev 00
1.
Set up and configure at least two DHCP servers on your network (refer
to “Defining a DHCP Server,” page 8-1).
2.
Assign a backup server to each primary server on your network for
which you want DHCP redundancy (refer to “Creating a Backup DHCP
Server,” page 8-2).
B-5
NetID User’s Guide
Client Pools
A client pool is group of one or more client IDs or MAC addresses collected under
a single name. NetID allows you to place a number of hosts into a single group
called a client pool. Client pools allow you to restrict a range of dynamic
addresses to a particular group of hosts. For more information on creating client
pools, refer to Chapter 7, “Client Pools”.
B-6
302305-D Rev 00
Glossary
Alias
An alias is another domain name that you associate with a single IP address or
domain name (CNAME). Aliases allow you to associate multiple domain
names with a single IP address.
Alternate Server
Manager
An alternate Server Manager is a NetID Server Manager configured to act as a
backup when another Server Manager stops operating.
Autonaming
Autonaming is the process in NetID that generates a host name automatically
whenever you create a new host, based on the information you specify in the
host template.
Backup server
A backup DHCP server is a DHCP server that communicates with a primary
DHCP server and will serve the ranges of the primary server when the backup
server can no longer communicate with the primary server (in other words,
when the primary server is down).
BootP client address
A BootP client address is an IP address that is fixed and managed by BootP.
Buckets
A bucket is like a folder that contains a specified amount of domain and
subnet information. When you set a bucket size, NetID displays domain and
subnet information in smaller, more manageable portions determined by the
bucket size.
Caching server
A caching server is a DNS server that holds non-authoritative cached copies
of resource records. Every server acts as a caching server for zones for which
it is neither a master nor slave server.
Channel
A channel is a logging phrase that you use to associate output methods, format
options and severity levels for DNS debug messages.
Classless Interdomain
Routing (CIDR)
Classless interdomain routing (CIDR) is a method that allows you to change
the size of a network, thereby altering the number of hosts available on the
network and eliminating the distinction of network classes.
302305-D Rev 00
Glossary-1
NetID User’s Guide
Client pool
A client pool is a group of one or more client IDs or MAC addresses collected
under a single name. Client pools allow you to restrict a range of dynamic
addresses to a particular group of hosts.
Critical error
A critical error is type of message generated by NetID servers that indicates a
serious problem that means your server will no longer operate.
Custom field
A custom field is extra information that you associate with any subnet, host or
domain.
Custom field
definition
A custom field definition is the field name and data type you use in NetID to
create custom fields.
Debug
Debug refers to a type of message that the NetID servers generate.
Deleted unexpired
address
A deleted unexpired address is a deleted IP address that has a lease time that
has not yet expired. NetID does not delete the address until the lease time
expires.
DHCP client address
A DHCP client address is an address that is available for DHCP assignment.
DHCP Option types
BootP/DHCP option types are identifiers that the BootP/DHCP protocol uses
to categorize configuration information.
DHCP redundancy
DHCP redundancy is a process that allows you to have more than one DHCP
server be responsible for a range or ranges of IP addresses. DHCP redundancy
ensures that when a DHCP server fails, clients on your network will continue
to receive IP addresses.
Domain Name Service
(DNS)
The domain name service (DNS) associates meaningful hierarchical names
with network resources and retrieves resource information based on names.
The domain name space forms a tree structure and each node in the tree has an
associated label.
Dynamic DNS
Dynamic DNS is a method to update a running DNS server.
Dynamic range
A dynamic range is a group of addresses that a DHCP server assigns. These
addresses have a lease time. When the lease expires, they are available for the
DHCP server to reassign
Error
An error is a type of message generated by NetID servers that indicates a
serious problem that may mean your server stops operating.
Expired address
An expired address is an IP address whose lease time has expired.
Fixed-Length
Subnetworking
Fixed-length subnetworking is the process of dividing your network into
subnets that each contain the same number of IP addresses.
Glossary-2
302305-D Rev 00
Glossary
Forwarders
Forwarders are name servers that handle queries from other name servers. In
the process, they build up a large cache of information.
Hold time
The hold time is the user-specified time that NetID should keep an address
before deleting it.
Inverse Address
Mapping
(in.addr.arpa)
The inverse address mapping subdomain of the domain name space maps IP
addresses to domain names.
Joining
Joining is the term used to describe the process of combining subnets on a
VLSM network.
Keepalive time
The keepalive time is the amount of time between the keepalive messages that
the primary DHCP server sends to its backup DHCP server.
Lease time
Lease time is the length of time that a computer can use a dynamic IP address.
List area
The list area is the column on the right side of the Management Console
interface.
Media Access Control
(MAC address)
A MAC address is a unique 48-bit number (usually represented as a 12-digit
hexadecimal number) that is encoded in the circuitry of a device to identify it
on a local area network.
Master server
A master server is the primary server for a zone. This is the server with
primary responsibility for the zone information. BIND 4.9.5 uses the term
“primary server” instead of master server.
Multinetting
Multinetting is a process that allows you to have multiple subnets on the same
physical interface.
Note
A note is a type of message generated by NetID servers that includes basic
information on regular server functionality (for example, connection between
servers, IP address assignment).
Partitioning
Partitioning is the term used to describe the process you must use to create
new subnets on a VLSM network.
Personal View
A personal view is a NetID feature that allows the NetID system administrator
to limit the network information that a particular user can see in the GUI. The
personal view feature prevents users from seeing areas of the network to
which they do not have access.
Primary server
A primary server is the DNS server that is responsible for a zone. This term is
used in BIND 4.9.5. BIND 8.1.1 uses the term “master server.”
302305-D Rev 00
Glossary-3
NetID User’s Guide
Rebind time
The rebind time is the time (usually at 87.5 percent through the lease time) at
which a DHCP client attempts to rebind with another DHCP server to obtain a
new IP address. This occurs when a client does not receive a response from its
DHCP server (perhaps because the server was down during renewal time).
Refresh time
The refresh time is the time a DNS server should wait between attempts to
refresh zone information from a slave (secondary) name server
Renew time
The renew time is the time at which a DHCP client attempts to renew the lease
on its address. This usually occurs halfway through the lease time.
Reserved range
A reserved range is a group of addresses to which only specified users have
access.
Resource record
A resource record is information such as the address, CNAME, and WellKnown Service (WKS) that is associated with a domain name.
Retry time
The retry time is the length of time the DNS server must wait between
unsuccessful refresh attempts.
Root address access
Root address access is the access privilege in NetID that allows users to define
networks.
Root domain names
access
Root domain names access is the access privilege in NetID that allows users to
define top-level domain names and zones.
Root object
A root object is the base level of a tree hierarchy. In the Management Console,
root objects appear in the left column.
Secondary server
A secondary server is any DNS server (besides the primary) that contains
DNS information for a zone. BIND 4.9.5 uses the term secondary to describe
this type of server. BIND 8.1.1 uses the term “slave.”
Setup access
Setup access is the access privilege in NetID that allows a user to create users,
groups, custom fields, templates, BootP/DHCP option types, and resource
record types.
Slave server
A slave server is any DNS server (besides the master) that contains DNS
information for a zone. BIND 4.9.5 uses the term secondary to describe this
type of server.
Start of Zone (SOA)
The Start of Zone (SOA) is a resource record that specifies the domain name
at the top of the zone.
Static address
A static address is an IP address that is fixed to a particular device.
Static range
A static range is a group of addresses where each address is assigned to a
specific device.
Glossary-4
302305-D Rev 00
Glossary
Subnet mask
A subnet mask is a 32-bit number that identifies the subnet component of an
address. A bit-wise logical AND between an address and its subnet mask
produces the subnet number.
Subnet model
A subnet model classifies hosts on a subnet by type and defines default host
attributes. Subnet models associate address ranges with host types and set
attributes for new hosts through the automatic application of host and DHCP
templates. They also assist with automatic naming.
Subnetworking
Subnetworking is the process of dividing your network address space into
smaller areas called subnets to make administration easier.
Time to live
The time to live is the time that indicates how long the information should be
considered valid after it is retrieved from an authoritative source.
Unallocated address
An unallocated address is an IP address that is DHCP-served but that has not
been assigned to a client.
Variable-length
subnetworking
Variable-length subnetworking is the process of dividing your network into
subnets that may each contain a different number of available IP addresses.
Warning
A warning is a type of message generated by NetID servers that indicates
something has occurred that is not normal and requires attention, but the
server can continue to operate.
Zone
A zone is a small portion of your DNS space. Breaking the DNS space into
zones makes it easier for your DNS servers to manage information.
302305-D Rev 00
Glossary-5
Index
A
access privileges
assigning on a subdomain, 3-4
assigning on a subnet, 4-6
groups, 2-1
import, 10-4
local access, 2-1
none, 2-1
root address, 2-1
root domain names, 2-1
setup, 2-1
Access Privileges by Object Report sample, 12-11
access privileges report, 12-8
generating in command line, 12-12
generating in Console, 12-9
Access tab, 3-4
updating, 6-7
assigning
forwarders, 9-13
host access privileges, 5-5
subnet access privileges, 4-6
Audit by IP Tree Object Report sample, 12-17
audit report, 12-14
generating in command line, 12-17
generating using Console, 12-15
automatic addresses, B-2
automatic naming
address range, 6-12
B
acronyms, xxiii
backing up database, 15-5
active server management, 13-1
backup DHCP server, B-4
creating, 8-2
definition, Glossary-1
adding
clients to client pool, 7-4
domain names, 3-3
name server to a zone, 9-14
resource records, 3-5
subnets, 5-3
zones, 9-2, 9-3
BIND 4.9.5
importing DNS database file, 10-6
BIND 8.1.1
importing DNS database file, 10-7
adding See also creating
BIND directives
setting, 9-9
address See host addresses
BIND Directives tab, 9-10
alarms
servers, 13-1
viewing, 13-2
Bookmarks, 1-6
creating, 1-6
creating folders, 1-7
deleting folders, 1-7
renaming folders, 1-7
within Personal Views, 1-6
Alarms log, 13-4
deleting entries, 13-4
viewing entry count, 13-4
alias
creating, 3-7, 6-6
deleting, 6-7
302305-D Rev 00
BootP
export, 11-11, 11-12
Index-1
dynamic address range, 6-14
host addresses, 6-3
networks, 4-4
personal view, 3-9, 4-7, 5-9, 6-10, 7-3, 8-3, 9-6
reserved address range, 6-18
static address range, 6-11
BootP export, 11-11
BootP file
importing, 10-12
BootP/DHCP option types
definition, Glossary-2
BootP/DHCP options
setting host, 6-7
bucket, 1-10, Glossary-1
definition, 1-10, Glossary-1
buckets tab, 1-11
C
critical error messages, 13-2
custom
importing, 10-14
custom field information
entering, 3-5, 5-6
entering host, 6-5
custom IP export, 11-3
cache
refreshing, 1-14, 10-3
custom IP file
exporting, 11-7, 11-9
cancelling a task, 1-16
customer support, xxvi
Change Reference dialog box, 8-5
cutting
hosts, 6-23
changing
password, 2-2
client pool, 7-1, B-6
adding clients to, 7-4
creating, 7-1, B-6
definition, Glossary-2
deleting, 7-6
renaming, 7-6
updating, 7-5
client pools
managing, 7-1
personal view, 7-3
CNAME
check box, 3-8, 6-7
command line
importing DNS database file, 10-8
importing UNIX host file, 10-11
using in Windows, 10-1, 11-2, 12-2
command line parameters
ping audit, 14-5
conventions, text, xxii
cookies, 1-17
creating
alias, 3-7, 6-6
backup DHCP server, 8-2
client pool, 7-1, B-6
Index-2
D
database
backing up, 15-5
exporting, 11-15, 11-16
restoring previous copy, 15-6
searching, 15-2
database file import, 10-4
debug messages, 13-2
defining
DHCP server, 8-1
dynamic address range, 6-14
static address range, 6-11
definition, 1-10, Glossary-1
deleting
address range, 6-20
addresses, 6-21
alias information, 6-7
client pool, 7-6
domain names, 3-12
forwarders, 9-14
name servers, 9-19
networks, 4-9
resource record, 3-13
slave, 9-14
subnets, 5-12
302305-D Rev 00
zones, 9-8
managing, 3-2
moving, 3-12
updating, 3-10
updating multiple, 3-11
DHCP lease information
setting default, 5-6
DHCP Options tab, 5-6
DHCP redundancy, 8-2
definition, B-3, Glossary-2
dynamic addresses, B-2
restricting, 6-17
DHCP server
defining, 8-1
E
DHCP server summary report, 12-7
generating with command line, 12-8
generating with Console, 12-7
entering
custom field information, 3-5, 5-6
host custom field information, 6-5
subnet model information, 5-7
DHCP server summary report sample, 12-7
DHCP servers
creating backup server, 8-2
deleting, 8-4
managing, 8-1
personal view, 8-3
updating, 8-4
dialog box
Change Reference, 8-5
Errors and Warnings, 1-12
New DHCP Server, 8-1
New Host, 6-4
New Static Range, 6-11
Save Template As, 12-4
Search, 15-2
Select Custom Import Template, 10-21
Status, 10-7
DNS database
exporting, 11-10
DNS database export, 11-9
DNS database file
import with command line, 10-8
importing, 10-6
importing BIND 4.9.5, 10-6
importing BIND8.1.1, 10-7
error messages, 13-2
import, 10-3
errors, 13-2
viewing, 1-11
Errors and Warnings dialog box, 1-12
exit, 1-19
expire time, 9-3
exporting
BootP, 11-11, 11-12
custom IP file, 11-7, 11-9
database, 11-15, 11-16
DNS database, 11-10
from the command line in Windows, 11-2
personal view, 11-3
UNIX host file, 11-13, 11-14
using command line in Windows, 11-2
F
fixed-length subnetworking, 4-2
definition, Glossary-2
formats
import, 10-2
domain name
personal view, 3-9
forwarders
assigning, 9-13
definition, 9-12, Glossary-3
deleting, 9-14
domain name service, A-1
definition, Glossary-2
G
domain names, A-1
adding, 3-3
deleting, 3-12
generating
access privileges report, 12-9, 12-12
DNS zones See zones
302305-D Rev 00
Index-3
audit report, 12-15, 12-17
DHCP server summary report, 12-7, 12-8
group membership report, 12-14
network address utilization report, 12-3, 12-5
getting help, 1-16
group membership report
generating in command line, 12-14
Group Membership Report sample, 12-12
Group Object Access Report sample, 12-11
groups
access privileges, 2-1
H
history
checking, 15-4
viewing, 15-4
host access privileges
assigning, 5-5
host address range
automatic naming, 6-12
deleting, 6-20
dynamic, 6-14
reserved, 6-18
resizing, 6-24
static, 6-11
updating, 6-19
host addresses
creating, 6-3
cutting, 6-23
defining a dynamic range, 6-14
deleting, 6-21
dynamic, 6-20
managing, 6-3
moving, 6-23
pending delete, 6-11
updating, 6-19
updating multiple, 6-19
hosts
personal view, 6-10
HTML page
replacing, 1-14
Index-4
I
import
access privileges, 10-4
database file, 10-4
DNS database file, 10-6
using command line in Windows, 10-1
import files
location, 10-2
import formats, 10-2
importing
BootP file, 10-12
custom, 10-14
DNS database file, 10-8
personal view, 10-4
UNIX host file, 10-9, 10-10, 10-11
in-addr.arpa zone See inverse address mapping
inverse address mapping, 9-3
IP offset, 5-8
J
joining
subnets, 5-11
K
keep-alive
definition, Glossary-3
L
lease time, B-3
definition, Glossary-3
locating import files, 10-2
log out, 1-18
logging in
Management Console, 1-3
logging messages
setting preferences, 1-8
login screen
replacing, 1-14
302305-D Rev 00
M
mailbox, 9-2
Management Console
logging in, 1-3
multiple windows, 1-17
running, 1-3
managing
client pools, 7-1
DHCP servers, 8-1
domain names, 3-2
host addresses, 6-3
networks, 4-3
subnets, 5-2
zones, 9-2
Network Address Utilization Report sample, 12-5
networks
adding, 4-4
deleting, 4-9
managing, 4-3
updating, 4-8
New DHCP Server dialog box, 8-1
New Host dialog box, 6-4
New Static Range dialog box, 6-11
note messages, 13-2
notification messages
setting preferences, 1-8
O
message types, 13-2
minimum time, 9-3
moving
domain names, 3-12
hosts, 6-23
multinetting
definition, 5-4
setting, 5-4
Multinetting tab, 5-4
multiple Management Console windows, 1-17
Object history, 15-4
deleting transactions, 15-5
transaction count, 15-5
P
partitioning
subnets, 5-10
password
changing, 2-2
pending delete, 6-11
N
name server
adding to a zone, 9-14
name servers
creating, 9-9
deleting, 9-19
setting BIND directives, 9-9
updating, 9-18
zone transfer information, 9-15
NetID database export, 11-15
NetID servers
error messages, 13-2
network
personal view, 4-7
network address utilization report, 12-2
generating in command line, 12-5
generating in Console, 12-3
302305-D Rev 00
personal view
client pools, 7-3
creating, 3-9, 4-7, 5-9, 6-10, 7-3, 8-3, 9-6
DHCP servers, 8-3
domain name, 3-9
exporting, 11-3
hosts, 6-10
importing, 10-4
network, 4-7
ping audit, 14-2
reporting, 12-2
server alarms, 13-1
subnets, 5-9
zones, 9-6
ping audit, 14-1
command line parameters, 14-5
personal view, 14-2
running from command line, 14-4
running from Console, 14-3
Index-5
setting parameters, 14-3
viewing results, 14-5
viewing results in Console, 14-5
previous database copy, 15-6
restricting
dynamic addresses, 6-17
ping audit results
viewing in command line, 14-6
retry time, 9-3
preferences
setting, 1-8
setting logging, 1-8
setting notification, 1-8
root address access privileges, 2-1
primary DHCP server, B-4
definition, Glossary-1
product support, xxvi
right mouse button
menu, 1-16
root domain names access privileges, 2-1
running
Management Console, 1-3
NetID utilities, 1-18
publications
hard copy, xxv
related, xxv
S
R
search
update on, 15-3
refresh time, 9-3
Search dialog box, 15-2
refreshing
cache, 1-14, 10-3
searching
database, 15-2
renaming
client pool, 7-6
Select Custom Import Template dialog box, 10-21
replacing
initial HTML page, 1-14
server alarms
personal view, 13-1
report
access privileges, 12-8
audit, 12-14
DHCP server summary, 12-7
from the command line in Windows, 12-2
network address utilization, 12-2
using command line in Windows, 12-2
server debug messages, 13-2
reporting
personal view, 12-2
reserved address range
creating, 6-18
resizing
address range, 6-24
resource record
deleting, 3-13
resource records
adding, 3-5
updating, 3-13
restoring
Index-6
Save Template As dialog box, 12-4
serial number, 9-2
servers
error messages, 13-2
session timeout, 1-16
setting
address protocol information, 6-9
BIND directives, 9-9
default DHCP lease information, 5-6
host BootP/DHCP options, 6-7
multinetting, 5-4
preferences, 1-8
subnet mask length, 4-2
zone transfer information, 9-15
setup access privileges, 2-1
slave
deleting, 9-14
SOA See Start of Zone
special keys, 1-8
302305-D Rev 00
Start of Zone
definition, 9-2
U
static address range
defining, 6-11
unexpired address, 6-11
static addresses, B-1
status bar, 1-7
Status dialog box, 10-7
subdomain
assigning access privileges on, 3-4
subnet mask
setting length, 4-2
subnet model
entering, 5-7
subnet offset, 6-23
subnets
adding, 5-3
deleting, 5-12
joining, 5-11
managing, 5-2
partitioning, 5-10
personal view, 5-9
updating, 5-11
updating multiple, 5-12
subnetworking
fixed-length, 4-2
none, 4-1
variable-length, 4-2
support, Nortel Networks, xxvi
T
tab
Access, 3-4
buckets, 1-11
DHCP Options, 5-6
Multinetting, 5-4
Zone Transfers, 9-16
UNIX host file
exporting, 11-13, 11-14
importing, 10-9
importing command line, 10-11
updating
address, 6-19
address range, 6-19
alias information, 6-7
client pool, 7-5
DHCP server, 8-4
domain names, 3-10
multiple addresses, 6-19
multiple domain names, 3-11
multiple subnets, 5-12
multiple zones, 9-7
name servers, 9-18
networks, 4-8
resource records, 3-13
subnets, 5-11
zones, 9-7
V
variable-length subnetworking, 4-2
definition, Glossary-5
viewing
alarms, 13-2
errors, 1-11
history, 15-4
ping audit results in command line, 14-6
ping audit results in Console, 14-5
warnings, 1-11
VLSM See variable-length subnetworking
W
technical publications, xxv
warning messages, 13-2
technical support, xxvi
warnings
servers, 13-1
viewing, 1-11
text conventions, xxii
timeout, 1-16
troubleshooting
import error messages, 10-3
302305-D Rev 00
windows
multiple Management Console, 1-17
Index-7
Z
zone transfers
setting, 9-15
Zone Transfers tab, 9-16
zones
adding, 9-3
adding name servers to, 9-14
creating, 9-2
definition, 9-1, Glossary-5
deleting, 9-8
managing, 9-2
personal view, 9-6
updating, 9-7
updating multiple, 9-7
Index-8
302305-D Rev 00
302305-D Rev 00
Index-9