1
11. Copy the Utilities Directory from the Install CD to your hard drive. Recommended path:
C:\Workspace\YMCRPR8C25\Utilites
12. Add a shortcut to the LEM GUI
(lem.exe) to your desktop for easy access.
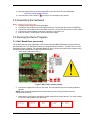
2.0 Assembling the Hardware
Note:
1.
2.
3.
4.
5.
Handle all kit parts with care.
Carefully remove all parts from the packaging.
Connect the 4-wire cable to the motors white connector. Connect the other end to J2 (MOTOR).
Connect the 5-wire cable to the motors black connector. Connect the other end to J3 (HALL SEN).
Connect the Power Supplies round barrel connector to connector J1A.
Insert the “figure 8” end of the line cord into the power supply.
3.0 Running the Demo Programs
3.1. HALL Based Demo (pre-loaded)
The kit ships with two demo applications, HALL based 6-step and Back-EMF based 6-step as well as a
Windows based UI. The HALL based 6-step is pre-programmed into the MCU. The demo will run on the
board when power is applied. The application allows the user to control the motor with the program using
the switches and potentiometer on the YMCRPR8C25 board.
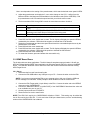
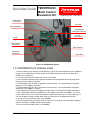
1. Verify Jumper settings per figure 1.
Figure 1: HALL Demo Jumper settings
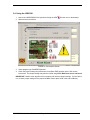
2. Connect the supplied line cord to a wall outlet .The Hall based 6-step motor control Application
will start.
NOTE: Power should be applied and removed at the line cord, leaving the barrel connector
connected to the board.
3. Observe the LCD sequence through the splash screens for the demo start-up. The motor is ready
to run when display reaches the last screen.
Renesas
Technlgy
YMCRPR8C
6-Step
HALL
APPL
YMCRPR8C25 Quick Start Guide, rev. 1.1 Page 2 of 9
Carrier
12kHz
C: nnnn
M: 0000