1
Broadcast
User Guide
Contents
1
Before Installation . . . . . . . . . . . . . . . . 1
2
P2 Option . . . . . . . . . . . . . . . . . . . . . . . 2
3
VARICAM Option . . . . . . . . . . . . . . . . 12
4
XDCAM Option . . . . . . . . . . . . . . . . . . 16
5
GXF Option . . . . . . . . . . . . . . . . . . . . . 27
6
Infinity Ingest . . . . . . . . . . . . . . . . . . . 29
7
K2 Option . . . . . . . . . . . . . . . . . . . . . . 35
version 4.6
F095801252
Notices & Warranties
Notice to Reader
Grass Valley makes no warranty of any kind with regard to this material, including, but not limited to, the implied
warranties of merchantability and fitness for a particular purpose. Grass Valley shall not be liable for errors
contained herein or for incidental consequential damages in connection with the furnishing, performance, or use
of this material.
This document contains proprietary information which is protected by copyright. All rights are reserved.
No part of this document may be photocopied, reproduced or translated into another language without the prior
written consent of Grass Valley.
Transfer or resale of this product without the prior written consent of Grass Valley. shall infringe the copyright.
CANOPUS, EDIUS, and the corresponding logos are registered trademarks of Canopus Co., Ltd.
HDV is a registered trademark of Sony Corporation and Victor Company of Japan, Limited.
Dolby, Dolby, and the Double D symbol are registered trademarks of Dolby Laboratories.
They are manufactured based on their own license.
In this manual, EDIUS series are called "EDIUS".
The information in this document is subject to change without notice.
The screens and their colors shown in this manual are subject to change without notice.
Warranty
Grass Valley warrants that the enclosed PRODUCT MEDIA will be free from defects for ninety (90) days after
purchase of the SOFTWARE. The SOFTWARE and any related documentation are provided "AS IS" and without
warranty of any kind. Grass Valley specifically does not warrant that the SOFTWARE will run uninterrupted
or error-free. The sole and exclusive remedy for a defect in the PRODUCT MEDIA is for Customer to notify
Grass Valley of the defect in writing within the respective warranty period, to return the PRODUCT MEDIA to
Grass Valley, and follow any other reasonable procedures which Grass Valley may establish. Grass Valley's sole
obligation shall be to provide Customer with a performing copy of the PRODUCT MEDIA within a reasonable
time after receiving notification of the defect or to refund the purchase price and terminate this License
Agreement, at Grass Valley's option. The foregoing warranty does not apply if Customer mishandles, alters, or
improperly uses or stores the PRODUCT MEDIA.
Grass Valley has gone to considerable effort to make the user manual as accurate as possible at the time of
printing. Grass Valley cannot assume, however, any responsibility for any inaccuracies that may be contained
in the manual. In no event will Grass Valley be liable for direct, indirect, special, incidental, or consequential
damages resulting from any defect or omission in the manual even if advised of the possibility of such damages.
Grass Valley IS NOT RESPONSIBLE FOR ANY LOST PROFITS, LOST SAVINGS OR OTHER INCIDENTAL
OR CONSEQUENTIAL DAMAGES ARISING OUT OF THE USE OF, OR INABILITY TO USE, THIS
PRODUCT. THIS INCLUDES DAMAGE TO PROPERTY AND, TO THE EXTENT PERMITTED BY LAW
DAMAGES FOR PERSONAL INJURY. THIS WARRANTY IS IN LIEU OF ALL OTHER WARRANTIES OF
MERCHANTABILITY AND FITNESS FOR A PARTICULAR PURPOSE.
EDIUS
Broadcast User Guide
January 25, 2008
Copyright © 2008 Thomson
All rights reserved.
1
Before Installation
Thank you for purchasing Grass Valley product.
This is the manual for "EDIUS Broadcast".
License Agreement
This product includes Grass Valley Software License Agreement, which is a legal
agreement between you and Grass Valley, for the Grass Valley software product(s)
included in this package. By installing, copying, or otherwise using the software (all
within the limitations set forth in the agreement), you agree to be bound by the terms of
this license agreement. If you do not agree to the terms of this license agreement, DO
NOT install or use the software.
1 Before installation
2
P2 Option
How to Use P2 Option
Using P2 Importer - Import
Connect P2 device to the computer and confirm that the power of P2 device is turned ON.
Notes
• The attached USB hardware key must be inserted to the computer's USB
port when using EDIUS Broadcast.
• Options for AVC-Intra are optional. If you have AVC-Intra Option you
can import AVC-Intra formats.
1
Start EDIUS.
2
Click EDIUS mark, and select "Tools" → "P2 SELECT".
EDIUS Broadcast
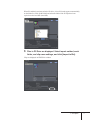
When P2 card has been inserted in the P2 drive, a list of P2 cards appears automatically
on the folder list. Click [Add Folder] and select the folder if the P2 clips have been
copied on to the local disk (hard disk).
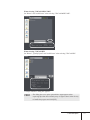
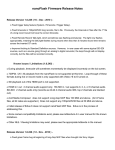
3
Files in P2 Drive are displayed. Select import method, work
folder, and clip name settings, and click [Import to Bin].
Clips are displayed on EDIUS bin window.
2 P2 Option
Select the import method of P2 files.
Direct Import
Import files directly from P2 drive.
Copy and Import
Copy files on hard disk at the time of import, and display
in the bin.
Method
Combine Files and Import
Convert image/audio files into one MXF file and copy on
the hard disk at the time of import, and display in the bin.
Setup the clip names for the thumbnails displayed in the bin.
UserClipName
Define User clip name.
Clip Name in Bin
ClipName
Use Clip name.
Prefix (ClipName)
Specify characters added at the beginning of the clip name.
Work Folder
Select folder for copying P2 files.
Copy to under
project folder, when
EDIUS is Running.
Check it to copy P2 files into the project folder you
are editing when starting up EDIUS, regardless of the
setting of Work Folder.
POINT
EDIUS Broadcast
• P2 clips can be used in the same way as AVI clips when using EDIUS.
Realtime performance level when editing from hard disk is equal to that
of AVI files. The performance when editing directly from P2 drive is 2
realtime streams in DV and 1 realtime stream in DVCPRO 50*.
* Actual measurements were taken in-house. USB performance depends
on the system being used.
Transferring P2 Data in Background
Select "Copy and Import" when importing P2 data to copy P2 files in background while
editing. Use this option, for example, to delete contents of P2 card for some reason.
When selected "Copy and Import" in Method, data transfer is processed in background
and P2 icon is flashing in the task tray while the operation.
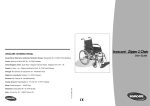
Checking the Progress of Background Transfer
1
Right-click the flashing icon and click "Information".
2 P2 Option
The dialog box to show the progress of transfer appears.
EDIUS Broadcast
Editing Proxy Clip
When handling proxy clips in laptop type video editing systems or in offline editing,
edit a temporary project file and copy it to the source server or PC hard disk, import
the file to the actual project file in which source clips are saved, and relink files. The
procedure is as follows.
POINT
1
• To import proxy clips, P2 viewer is required to be installed. P2 viewer is
available for no charge on Panasonic Web site.
• HD P2 clips and P2 proxy clips can be edited.
• When using a format supported by DVCPRO (Ex. 1280 x 1080 59.94i),
sources are imported directly from P2 card. HD P2 clips are not copied
to the hard disk of a laptop type non-linear video editing systems.
• P2 proxy clips are imported directly from an SD card. P2 proxy clips
saved on a P2 card are not supported.
Edit a temporary project file as a proxy clip.
Select a format supported by DVCPRO (Ex. 1280 x 1080 59.94i) for the editing format.
For the details on starting up EDIUS, project settings or editing, refer to the reference
manual.
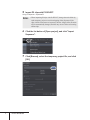
2
Click the list button of the [Save project], and click "Save
As".
3
Enter a file name in "Save As" dialog box and save it to the
source server.
4
Create a master project file on the PC to edit the project.
Select editing format according to the output format.
For the details on starting up EDIUS or project settings, refer to the reference manual.
2 P2 Option
5
Import P2 clips with P2 SELECT.
Using P2 Importer - Import ►P2
Notes
6
• When importing P2 clips with P2 SELECT, change the work folder by
each temporary project to avoid overlapping of the clip name. If the
clips with the same name are imported, the first 4 digits of the file name
will be automatically changed, and this may cause a failure of restoring
offline clips.
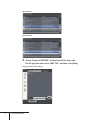
Click the list button of [Open project], and click "Import
Sequence".
7
Click [Browse], select the temporary project file, and click
[OK].
EDIUS Broadcast
8
Click "Open the clip restoration dialog" in "Find offline clip"
dialog box.
9
Select "Relink (select folder)" from "Restoration Method"
list, and select the folder where P2 clips are imported.
When selecting multiple offline clips and selecting "Relink (select folder)", all clips in
the folder are restored.
Notes
• When selecting "Relink (select folder)" and the restoration fails, select
"Relink (select file)" for the restoration method, and select an XML file.
10 Click [Close].
2 P2 Option
Using P2 Clip - Writing Back on P2 Card
Connect P2 device to the computer and confirm that the power of the device is turned ON.
1
Click [Export] - "Print to File" or "Print to File(Display
Timecode)".
Notes
2
• Data is exported as 16-bit audio when the project preset is set to 24-bit
audio.
Select the exporter plug-in and click [OK].
Select "P2 Clip". If your current timeline is in SD resolution, the P2 clip for SD will
appear. If your current timeline is using DVCPRO HD preset, HD P2 Clip appears.
SD resolution
10
EDIUS Broadcast
HD resolution
Notes
3
• "P2 Clip" is not listed when the timeline preset is set to HD. "HD P2
Clip" is not listed when the timeline preset is set to SD.
Select P2 card for rewriting, and set the name and Codec.
* The displayed contents differs depending on the selected exporter plug-in.
When selecting "P2 Clip"
POINT
When selecting "HD P2 Clip"
• Metadata can also be set.
• The number of total frames is required to be even number for 720p
export. Select the process method.
• When the output format of DVCPRO HD and the project preset of
EDIUS are different, the clip is stretched to be output, so that the frame
rate and the field order correspond to each other.
2 P2 Option
11
3
VARICAM Option
How to Use VARICAM Option
Using VARICAM Option
Before using VARICAM Option, EDIUS system and AJ-HD1400/AJ-HD1200A are
required to be connected with an IEEE1394 cable.
Notes
• The attached USB hardware key must be inserted to the computer's USB
port when using EDIUS Broadcast.
1
Start EDIUS.
2
Select the preset to use from the "Output format" in the
"Project Settings" dialog box shown at the startup.
960x720 59.94p:
When exporting to a tape or a file, outputs in 720/59.94p.
960x720 23.98p over 59.94p:
When exporting to a tape or a file, outputs in 720/23.98p over 59.94p.
960x720 29.97p over 59.94p:
When exporting to a tape or a file, outputs in 720/29.97p over 59.94p.
960x720 24p over 60p:
When exporting to a tape or a file, outputs in 720/24p over 60p.
960x720 25p over 60p:
When exporting to a tape or a file, outputs in 720/25p over 60p.
960x720 50p over 60p:
When exporting to a tape or a file, outputs in 720/50p over 60p.
960x720 50p:
When exporting to a tape or a file, outputs in 720/50p.
960x720 25p over 50p:
When exporting to a tape or a file, outputs in 720/25p over 50p.
12
EDIUS Broadcast
Notes
• To enable input/output through IEEE1394, set the frequency of VCR to
59.94Hz, even when the material has been shot in the frame frequency
of 60.00Hz.
• If the TC of the starting frame on the timeline is not set to 00, the TC
of the output stream and the sequence of the active stream information
may not match.
3
Select "Capture" to open "Input Settings" dialog box.
4
Select "Generic OHCI Input" for "Input device", and select a
preset to use.
DVCPRO HD 720/59.94p:
Use this when capturing materials taken with VARICAM without referring active
frame information or capturing contents taken with AJ-HDX900, which format signals
are 720/59.94p, 720/29.97p or 720/23.98p.
DVCPRO HD 720 Constant Rate Shooting over 59.94p:
DVCPRO HD 720 Constant Rate Shooting over 60p:
Select the corresponding profile to the frame frequency of the VARICAM used while
shooting. Only the frames where active frame information is set will be captured.
DVCPRO HD 720/50p:
Use this when capturing contents taken with AJ-HDX900, which format signals are
720/50p and 720/25p.
3 VARICAM Option
13
Notes
• If the frame rate of the project is different from that of the material,
the speed of the audio will be changed according to the duration, thus
changing the audio pitch. Adjust the audio with a waveform editing
software or the Pitch Shifter in the VST Plug-in, if necessary.
• The following functions may not work properly on the files captured in
"DVCPRO HD 720 Constant Rate Shooting over 59.94p" or "DVCPRO
HD 720 Constant Rate Shooting over 60p" preset.
- Match frame jump
- Import/Export EDL
- Restore offline clip
• Import/Export EDL is not supported in the VARICAM option presets.
• Video output is not supported while editing.
Exporting Clips
You can export clips which have been edited on EDIUS, to your AJ-HD1400 or AJ-HD1200A.
1
Click [Export] - "Print to Tape" or "Print to Tape(Display
Timecode)".
Notes
• The audio sampling rate differs depending on whether the frame
frequency is 59.94Hz or 60.00Hz.
• When the frame rate is changed in one shot, the lip sync will be shifted.
If necessary, use a waveform editing software to adjust the lip sync
before exporting.
To shoot video taking advantage of the characteristics of VARICAM
To realize smooth slow-motion or quick-motion, making full use of the
characteristics of VARICAM, the desired speed of the result clip should be
calculated in advance.
The final playback speed is calculated as below.
Playback speed (%) = 14
EDIUS Broadcast
Frame rate of the timeline
Frame rate during video shooting
x 100
"Under-crank" and "Over-crank"
• Under-crank
Method to shoot video in slow speed, which enables visual effects such as warp
effect, strobe effect or ghost effect.
• Over-crank
Method to shoot video in high speed, which enable smooth video with higher
frame rate, and enables slow-motion in higher quality.
Notes on setting quick-motion using under-crank method
• Shoot video in a lower frame rate than the frame rate of the playback.
Ex. Shoot video in 15p and create timeline in 30p, then the clip will be played
in quick-motion, twice as fast as the original speed.
• Select the corresponding capture format ("DVCPRO HD 720 Constant Rate
Shooting over 59.94p" or "DVCPRO HD 720 Constant Rate Shooting over 60p")
to the frame frequency of VARICAM used while shooting. When captured in
this mode, only the active frames will be captured, making the file available for
variable frame rate editing.
Notes on setting slow-motion using over-crank method
• Shoot video in a higher frame rate than the frame rate of the playback.
Ex. Shoot video in 45p and create timeline in 30p, then the clip will be played
in slow-motion at 2/3 of the original speed.
• Select the corresponding capture format ("DVCPRO HD 720 Constant Rate
Shooting over 59.94p" or "DVCPRO HD 720 Constant Rate Shooting over 60p")
to the frame frequency of VARICAM used while shooting. When captured in
this mode, only the active frames will be captured, making the file available for
variable frame rate editing.
In case the clip does not need to be in slow-motion/quick-motion
• Select 60p (59.94p) as the capture format.
• When captured in this mode, the clip will maintain the actual duration at the time
of shooting. As the speed setting can be applied, both slow-motion and quickmotion can be realized, while this is not the best method to make full use of the
features of VARICAM.
For more information, refer to the manual for VARICAM or the web page of Matsushita
Electric Industrial Co., Ltd.
3 VARICAM Option
15
4
XDCAM Option
How to Use XDCAM Option
Downloading from XDCAM Recorder
You can download data to the local disk through a network with a device connected to
the LAN, or through a device connected to i.LINK. The following procedure describes
how to download data from a device connected to i.LINK.
POINT
• Refer to the attached XDCAM manual for the information on Network
settings and IEEE1394 connection.
• XDCAM option supports SAM mode.
Notes
• The attached USB hardware key must be inserted to the computer's USB
port when using EDIUS Broadcast.
1
16
EDIUS Broadcast
Click EDIUS mark, and click "Tools" → "XDCAM SELECT".
2
Select the drive where the device connected to i.LINK.
POINT
3
• When you download data from a device with LAN connection through
network, select the address and click [Connect].
Right-click the clip to store in the bin of EDIUS, and click
"Register to BIN".
The clip is stored in the bin.
4 XDCAM Option
17
POINT
• It is recommended to check "Proxy download" in "Download" tab. The
icon [P] appears on the thumbnail in the bin. The icon [X] appears when
it is not checked.
• Click "File" on the menu bar, click "Proxy clip handling" and select the
data type and the range to download in "Proxy clip handling" dialog
box, to download proxy data or high-res data later.
• Proxy clips that do not have high-res data cannot be handled in clip
rendering or partial rendering.
• To download a file through a network with a device connected to the
LAN, click [Setting] on Canopus XDSelect screen to display "Setting"
dialog box.
• Set the server, auto-uploading when data is exported from the
application and download destination in "Setting" dialog box, and click
[OK]. Then, click [Connect] in "Canopus XDSelect" dialog box.
18
EDIUS Broadcast
Setting for Import 1
Click "Settings" on the EDIUS menu bar, and click "Plug-in
Settings".
"Plug-in settings" dialog box appears.
2
Click "Plug-in settings" tree, and click "XDCAM Importer".
Use proxy when editing directly on disc.
Use a proxy file for normal edit when directly editing the clip on
XDCAM disc. Use a high-resolution file when printing to file or tape.
4 XDCAM Option
19
Refer to proxy on disc when there is neither a high-resolution nor
proxy available.
Refer to the proxy file on XDCAM disc corresponding to the clip when
there is only a metadata of the clip downloaded to the local drive.
When proxy is edited, high-resolution audio is used if available.
(VFAM drive only)
For data on VFAM drive, use high-resolution audio data to edit proxy.
3
Set each item and click [OK].
Importing from Local Drive 20
1
Start "XDCAM SELECT".
2
Right-click the "Local Drive", and click "New reference".
3
Specify a local folder and click [OK].
EDIUS Broadcast
4
Right-click the clip to store in the bin of EDIUS, and click
[Register to BIN].
The clip is stored in the bin.
Uploading to XDCAM Recorder from the Timeline
1
Click [Export] - "Print to File" or "Print to File(Display
Timecode)".
"Select Exporter Plug-in" dialog box appears.
2
Select the exporter plug-in and click [OK].
Select "XDCAM DV" or "XDCAM MPEG IMX" when editing in SD resolution preset.
Select "XDCAM HD" when editing in HD resolution preset.
4 XDCAM Option
21
SD resolution
HD resolution
3
Check "Upload to XDCAM", confirm that the file name and
the file type has been set to "MXF File", and then click [Save].
When selecting "XDCAM DV"
22
EDIUS Broadcast
When selecting "XDCAM MPEG IMX"
Set "Bitrate" and "AudioFormat" when selecting "XDCAM MPEG IMX".
When selecting "XDCAM HD"
Set "Bitrate", "Quality/Speed" and "AudioFormat" when selecting "XDCAM HD".
"Canopus XDSelect" dialog box appears.
POINT
• The dialog box to set up the option before output appears when
exporting clips that do not include proxy or high-res data. Select the way
to handle the progress and click [OK].
4 XDCAM Option
23
4
Select "Upload" tab, check if the clips to upload are listed
and click [Upload].
Copy of the files starts.
POINT
5
Click [OK].
POINT
24
EDIUS Broadcast
• Click [Add], select the file and click [Open], to add files to upload.
• The name of the file to be created in XDCAM Recorder is automatically
set. To check the file name, click [Result].
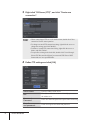
Importing XDCAM EX Clip
Notes
1
• Before importing XDCAM EX clips, you need to install the XDCAM
EX Clip Browser attached to XDCAM EX camera.
Click EDIUS mark and click "Tools" → "XDCAM EX Clip
Browser".
2
Select a folder containing a clip to import in "Information"
window of S x S memory card.
4 XDCAM Option
25
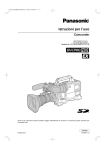
3
Drag and drop the clip to the bin window of EDIUS.
The clip is stored in the bin.
POINT
26
EDIUS Broadcast
• When importing split clips stored in multiple S x S memory cards, drag
and drop the split clips from "Information" window of S x S memory
cards to "Information" window of the local disk. The split clips are
merged after all split clips stored in multiple S x S memory cards are
copied to local disk. Then, drag and drop the merged clip to the bin
window of EDIUS.
5
GXF Option
How to Use GXF Option
Using GXF Option
Notes
1
• The attached USB hardware key must be inserted to the computer's USB
port when using EDIUS Broadcast.
Click [Export], and click "Print to File" or "Print to
File(Display Timecode)".
"Select Exporter Plug-in" dialog box appears.
Notes
• Data is exported as 16-bit audio when the project preset is set to 24-bit
audio.
5 GXF Option
27
2
Click "Canopus GXF SpeedEncoder", and click [OK].
"Canopus GXF SpeedEncoder" screen appears.
3
Define the server and click [OK].
* The server that can be selected differs depending on the system environment.
Export of the files starts.
28
EDIUS Broadcast
6
Infinity Ingest
How to Use Infinity Ingest
Using Infinity Ingest
Connect Infinity device to the computer and confirm that the power of Infinity device is
turned ON.
Notes
1
• Install the drivers attached to the Infinity device before installing
Infinity Ingest.
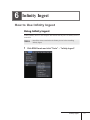
Click EDIUS mark and click "Tools" → "Infinity Ingest".
6 Infinity Ingest
29
The drive name and volume label of the drive connected with Infinity device are listed
in folder view. When the clip is copied to the local disk (hard disk), click [Add Folder]
and select the folder.
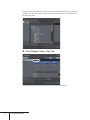
2
Click "Playlists" tab or "Clip" tab.
A list of the playlists/clips in the selected device or folder is displayed.
30
EDIUS Broadcast
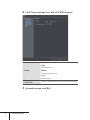
3
Select the playlist or clip of importing and click [Register].
The clip is registered to the bin window of EDIUS.
Storing location
folder
Copy into the
project folder.
Register
Transfer
Close
POINT
Select a folder to use as copy destination of the playlist/
clip. To change the destination, click [Select] and select
a folder.
Check it to copy files into the current project folder while
EDIUS is running, regardless of the setting of "Storing
location folder".
Register the file directly in the bin of EDIUS.
Copy the file into the folder specified in "Storing location
folder" and register it in the bin of EDIUS. The list of
the transferred files are displayed when data transfer has
completed.
Close the main window. Infinity Ingest and background
processing are not terminated.
• The playlist is registered as a sequence clip in the current folder in the
bin window of EDIUS. When registering the playlist, a folder with the
same name as the playlist is created in the bin and all clips used in the
playlist are registered.
• When registering clips, a folder with the same name as the playlist is
created and clips are registered in the folder.
• Right-click the clip, and click "Play by EDIUS" while EDIUS is
running, to play the clip in Player.
6 Infinity Ingest
31
Transferring Files in Background Click [Transfer] when registering the clip, to copy the file into the selected folder in
background and to save in the bin simultaneously. Use this option in such cases as
deleting contents of the device for some reason.
When selected [Transfer] to register the clip, data transfer is processed in background
and Infinity Ingest icon in the task tray changes at certain intervals during the
operation.
Checking the Progress of Background Transfer
1
32
EDIUS Broadcast
Right-click the icon and click "Information".
The dialog box to show the progress of transfer appears.
Setting for Import You can make the settings of video codec for importing an MXF file of JPEG 2000
format.
1
Click "Settings" on the menu bar of EDIUS, and click "Plugin Settings".
6 Infinity Ingest
33
2
Click "Plug-in settings" tree, and click "MXF Importer".
Select a layer to decode.
High
Decode all layers.
Quality
Middle
Decode half of the layers.
Low
Decode a layer.
Downsample
Coefficient
3
34
EDIUS Broadcast
Specify a downsample (scaling) coefficient for decoding.
Set each item and click [OK].
7
K2 Option
How to Use K2 Option
Using K2 Option
Notes
• The attached USB hardware key must be inserted to the computer's USB
port when using EDIUS Broadcast.
1
Start up EDIUS.
2
Click the EDIUS mark and click "Tools" → "K2 Connect".
7 K2 Option
35
3
Right-click "K2 Server (FTP)", and click "Create new
connection".
POINT
4
36
• When connecting to FTP server for the first time, double-click "New
connection" for the same operation.
• To change a created FTP connection setting, right-click the server to
change the settings, and click "Modify".
• To delete a created FTP connection setting, right-click the server to
delete, and click "Delete".
• To open files existing in the local disk, double-click "Local Storage".
Select GXF files and click [Open], to transcode GXF files to MXF
format and save in a specified folder.
Define FTP settings and click [OK].
Server Name
Enter the address of the server.
Bin
The address of the bin is shown. Normally, you can use
the address as is.
Username/
Password
Enter user name and password required when connecting.
Save the username
and password.
Check it to register user name and password.
EDIUS Broadcast
The clips on the server are listed.
POINT
• To connect to a previously set FTP server, select the server and click
[Connect].
• To reload updated clip list from the server, click [Reload].
• When entering a keyword in "Search keyword", clips which match the
keyword are listed.
5
Click [Settings].
6
Set destination to save clips and click [OK].
7 K2 Option
37
Downloaded clip
(Server)
Specify the destination to save clips downloaded from
FTP server.
Specify the destination to save GXF files imported from
the local disk. GXF files are transcoded when imported.
Transcoded clip
(Local)
Same as original clip
Select it to save GXF files in the same location as the
original file.
Choose a folder
Select it to save GXF files in a different location from the
original file. Click [Location] to specify a folder.
When EDIUS is
running, use the
current project
folder for clip
destination.
7
Check it to automatically save files in a folder specified
as the project destination, while running EDIUS.
Select clips to store in the bin and click [Download].
Download is started.
Click [Task list], then "Task List" dialog box appears and currently downloaded clips
appear on the list. When the download is completed, clips disappear from the list.
38
EDIUS Broadcast
The status of download is displayed on the clip in the bin. When download is
completed, the icon [H] disappears.
POINT
• K2 Connect downloading and conversion process will continue even
after EDIUS is closed.
• To abort downloading and conversion process, click [Abort] in "Task
List" dialog box. Alternatively, you can right-click K2 icon in the task
tray and click "Abort".
• Select name option for clip to save in the bin from "Clipname" or
"Clipname with prefix". Select "Clipname" to save the clip with the
current file name. Select "Clipname with prefix" to add optional text to
the current file name.
• Uncheck "Add Imported clip to the EDIUS bin" not to store downloaded
files in the bin automatically.
• Click [Close] to close the dialog box. To stop K2 Connect residence,
right-click K2 icon in the task tray and click "Close".
Notes
• The save destination of the clips already displayed in "Task List" dialog
box cannot be changed.
7 K2 Option
39