1
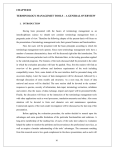
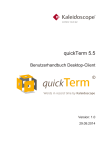
quickTerm 5.6.0
User Manual PlugIn
Version: 1.1
02/09/2015
Table of Contents
Table of Contents
2
1
Installing the Studio Plug-In
3
1.1
quickTerm Studio Plug-In Requirements
3
1.2
Installing the Plug-In
3
2
Configuring the Studio Plug-In
4
3
quickTerm Studio Plug-In
7
3.1
Submitting Term Requests
7
3.2
Request an Alternative Term
10
quickTerm 5.6.0 - User Manual PlugIn
Installing the Studio Plug-In
quickTerm Studio Plug-In Requirements
1
1 Installing the Studio Plug-In
1.1 quickTerm Studio Plug-In Requirements
Before installing the quickTerm Plug-In, make sure that your system meets
the following requirements:
▪ SDL Trados Studio 2014 or higher
▪ Microsoft .net Framework 4.5
1.2 Installing the Plug-In
a) Start the installer.
b) Select which installation type to choose.
⇨ The plug-in will now be installed.
Defective installation during running Studio instance
If Studio is running during the installation of the plug-in, this can lead to a
corrupt installation. Please close Studio before installing the plug-in.
quickTerm 5.6.0 - User Manual PlugIn
3
2
Configuring the Studio Plug-In
2 Configuring the Studio Plug-In
"Configuration" Screen
Please follow these steps before you can use the SDL Trados Studio Plug-In
for quickTerm:
a) Click on "Configuration" in the quickTerm group of the "Add-In" Tabs of
Studio.
b) Enter your quickTerm user name and password in the respective fields.
As an alternative, you can also use Windows authentication. In this case
select "Use Windows authentication".
4
quickTerm 5.6.0 - User Manual PlugIn
Configuring the Studio Plug-In
2
c) In the "Server URL" field enter the address of your quickTerm server
(e.g. http://quickterm.testserver.at:8022/QTService).
d) Click on "Authenticate".
⇨ The Plug-In will now try to log into the server using your credentials.
a) Select the tenant for which you want to use the Plug-In.
b) Click on "Authenticate".
⇨ The Plug-In will read all necessary data for the configuration and your
personal settings from the quickTerm server.
a) If required, you can now fine-tune the Plug-In configuration:
"Termbase": Select the termbase which you want to use and configure.
"Field for Context": Select the field in your termbase in which you want
the context sentences (the source segment from Studio) to be written.
"Field for User": Select the field in your termbase in which you want to
store the user name.
"Field for Filename": Select the field in your termbase in which you want
to store the file name.
"Field for target language": Select the field in your termbase in which you
want to store the target-language of the current translation project.
"Field for project name": Select the field in your termbase in which you
want to store the Studio project name of the current translation project.
"Source language": Select the default source language. You can change
this later directly in the term request.
"Target language": Select the default target language. You can change
this later directly in the term request.
"Separator": If you want to write several values into a picklist field, you
can separate them using the separator character defined here (max. 2
characters).
b) Click on "Save configuration".
⇨ The configuration will be saved for your Studio profile. You can now
proceed to use the Plug-In.
Transferring the Configuration
By clicking on "Save as" and "Import" you can transfer the configuration from
one machine to another machine. To do this, proceed as follows:
a) Click on "Configuration" in the quickTerm group of the "Add-In" Tabs of
Studio.
b) Click on "Save as".
quickTerm 5.6.0 - User Manual PlugIn
5
2
Configuring the Studio Plug-In
⇨ This will open a dialog where you can select a path and a filename for
the export file.
a) Select the desired location and file name, then click on "Save".
⇨ The configuration will now be written into that file.
a) Now copy this file to the target machine.
b) On the target machine, click on "Configuration" in the quickTerm group
of the "Add-In" Tabs of Studio.
c) Click on "Import".
⇨ This will open a dialog where you can select the configuration file to be
imported.
a) Select the file you want to import.
b) Click on "Open".
⇨ The configuration has now been imported into the target machine.
Shortcuts
You can call up both the term request dialog and the configuration dialog
using keyboard shortcuts. Please follow the steps in the Trados Studio
documentation to enable this.
6
quickTerm 5.6.0 - User Manual PlugIn
quickTerm Studio Plug-In
Submitting Term Requests
3
3 quickTerm Studio Plug-In
3.1 Submitting Term Requests
"Term request" dialog
To request a term, proceed as follows:
quickTerm 5.6.0 - User Manual PlugIn
7
3
quickTerm Studio Plug-In
Submitting Term Requests
a) Click on the button "Term request" in the "Add-Ins" ribbon of SDL Trados
Studio. Or hit the shortcut key you have set up during configuration (see
Configuring the Studio Plug-In [➙ 4]).
NOTICE! Note that you can highlight the source and/or target-language
term in Studio and it will automatically be copied into the term request
dialog.
b) The "Request a term" dialog opens.
c) If you have several termbases available, select the termbase for which
the request is being made.
d) Select the desired source language.
e) If you are authorized to make multilingual term requests, you can switch
to a bilingual term request by checking the Bilingual request box. In this
case, you have the option to specify a source and target language.
f) "Comment"
This field lets you add a comment to your term request. This is not stored
in the termbase but provides the terminologist with additional information
when processing the request.
a) Enter the required information in the available fields under "Your
request". Please contact your terminologist for information about the
meaning of these fields.
NOTICE! Depending on the configuration, many fields can be
automatically filled, such as file name, context etc.
Some fields are text fields, meaning you can enter any text.
However, other fields provide a drop-down list, because there are only a
limited number of possible values. Depending on the configuration, the
values can also appear in a tree structure, allowing you to collapse and
expand branches and select any sub-node in the tree.
Other fields may appear with a hyperlink icon
, which means you can
save links here. The hyperlink icons – as well as the Add new term
and Remove term buttons
– can be enabled or disabled by the
client administrator for each user group using the Enable advanced
editor features setting. When you click on the hyperlink icon, a separate
screen "Edit cross-links" opens. In this screen you can insert the text for
three types of hyperlinks: to another term, to another entry, and to an
external object (with http://...).
Mandatory fields are highlighted in yellow, and read-only fields are
highlighted in gray.
8
quickTerm 5.6.0 - User Manual PlugIn
quickTerm Studio Plug-In
Submitting Term Requests
3
Finally, if you are working with Acrolinx as the terminology type, you
have the option of saving images and attachments not only in
quickTerm, but also in Acrolinx. This is only possible for fields defined as
"Multimedia". Click on the "Browse" icon next to a field of this type and
select a PDF document. This is then shown as an attachment next to a
disk icon
at the bottom and can only be removed from the relevant
field, if required, using the delete icon. An example of this is shown in the
above "Term request" screenshot.
b) Name, E-mail and Custom notification phone:
These three fields help to identify anonymous end users so they can be
sent notifications (by e-mail or telephone). They can be defined as
mandatory fields in the General Group Settings for end users. If the user
enters an e-mail address here, then quickTerm can notify this user via email about what happens to the term request.
c) Auto-fill:
A Customization field can be defined in server management in the
Termbase Settings. Check this box if you want this field to be auto-filled
in the term request; otherwise you can add this information manually.
These details can be obtained from your terminologist.
d) Creator user:
Depending on how your internal processes are defined, you have the
option to enter your name here so that the terminologist will know who
the term request came from, and so that you can continue to use the
MultiTerm entry as "Creator". This can also be disabled in
Administration.
e) Priority
You can assign three different priority levels to your request: "low" "normal" - "high". The priority is linked to internal processes and can also
be linked to e-mail notifications.
f) Click on the orange paper clip to attach a file to the term request.
⇨ The file is added. To attach further files click on the paper clip again. To
remove files that have been added, click on the "x" symbol that appears
in front of each file.
a) Click on "Save".
⇨ The terminologist receives an email and can process the request in his/
her request management. When the terminologist closes the request,
you are notified by e-mail with an explanation of what happened to your
request.
quickTerm 5.6.0 - User Manual PlugIn
9
3
quickTerm Studio Plug-In
Request an Alternative Term
Changing the source or target language
If you change the language of the request but have already entered data,
then quickTerm will ask whether you want to keep the data you have
entered so far and use it for the new language.
3.2 Request an Alternative Term
To request an alternative term, proceed as follows:
a) Click on the button "Term request" in the "Add-Ins" ribbon of SDL Trados
Studio. Or hit the shortcut key you have set up during configuration (see
Configuring the Studio Plug-In [➙ 4]).
NOTICE! Note that you can highlight the source and/or target-language
term in Studio and it will automatically be copied into the term request
dialog.
⇨ The "Request a term" dialog opens.
b) If you have several termbases available, select the termbase for which
the request is being made.
c) Select the desired source language.
d) If you are authorized to make multilingual term requests, you can switch
to a bilingual term request by checking the Bilingual request box. In this
case, you have the option to specify a source and target language.
e) "Comment"
This field lets you add a comment to your term request. This is not stored
in the termbase but provides the terminologist with additional information
when processing the request.
f) If the term has not automatically been copied from Studio, then you can
enter a new term for which you want to request an alternative term.
g) Then click on "Search for source term".
⇨ The plug-in now shows all entries for this source term.
a) Select the entry for which you want to suggest an alternative term.
⇨ Note that all language-independent fields are now hidden from the term
request form.
a) Enter the required information in the available fields under "Your
request". Please contact your terminologist for information about the
meaning of these fields.
NOTICE! Depending on the configuration, many fields can be
automatically filled, such as file name, context etc.
10
quickTerm 5.6.0 - User Manual PlugIn
quickTerm Studio Plug-In
Request an Alternative Term
3
Some fields are text fields, meaning you can enter any text.
However, other fields provide a drop-down list, because there are only a
limited number of possible values. Depending on the configuration, the
values can also appear in a tree structure, allowing you to collapse and
expand branches and select any sub-node in the tree.
Other fields may appear with a hyperlink icon
, which means you can
save links here. The hyperlink icons – as well as the Add new term
and Remove term buttons
– can be enabled or disabled by the
client administrator for each user group using the Enable advanced
editor features setting. When you click on the hyperlink icon, a separate
screen "Edit cross-links" opens. In this screen you can insert the text for
three types of hyperlinks: to another term, to another entry, and to an
external object (with http://...).
Mandatory fields are highlighted in yellow, and read-only fields are
highlighted in gray.
Finally, if you are working with Acrolinx as the terminology type, you
have the option of saving images and attachments not only in
quickTerm, but also in Acrolinx. This is only possible for fields defined as
"Multimedia". Click on the "Browse" icon next to a field of this type and
select a PDF document. This is then shown as an attachment next to a
disk icon
at the bottom and can only be removed from the relevant
field, if required, using the delete icon. An example of this is shown in the
above "Term request" screenshot.
b) Name, E-mail and Custom notification phone:
These three fields help to identify anonymous end users so they can be
sent notifications (by e-mail or telephone). They can be defined as
mandatory fields in the General Group Settings for end users. If the user
enters an e-mail address here, then quickTerm can notify this user via email about what happens to the term request.
c) Auto-fill:
A Customization field can be defined in server management in the
Termbase Settings. Check this box if you want this field to be auto-filled
in the term request; otherwise you can add this information manually.
These details can be obtained from your terminologist.
d) Creator user:
Depending on how your internal processes are defined, you have the
option to enter your name here so that the terminologist will know who
quickTerm 5.6.0 - User Manual PlugIn
11
3
quickTerm Studio Plug-In
Request an Alternative Term
the term request came from, and so that you can continue to use the
MultiTerm entry as "Creator". This can also be disabled in
Administration.
e) Priority
You can assign three different priority levels to your request: "low" "normal" - "high". The priority is linked to internal processes and can also
be linked to e-mail notifications.
f) Click on the orange paper clip to attach a file to the term request.
⇨ The file is added. To attach further files click on the paper clip again. To
remove files that have been added, click on the "x" symbol that appears
in front of each file.
a) Click on "Save".
⇨ The terminologist receives an email and can process the request in his/
her request management. When the terminologist closes the request,
you are notified by e-mail with an explanation of what happened to your
request.
Changing the source or target language
If you change the language of the request but have already entered data,
then quickTerm will ask whether you want to keep the data you have
entered so far and use it for the new language.
12
quickTerm 5.6.0 - User Manual PlugIn