1
MiniDV
Thank you for choosing
HD digital video recorder,
a mini DV with 1.44 inch TFT display enhance visibility
during recording. This hand lleld portaHe product is sitable
rc in nrious ocasion and a best €hoice for gift
for
This user manual provides installation, user guidelines
and technical specificationl please red oretrlly be.fde us
and lcep in good condition for nftere. Wb hoF thb pEduct
will satisfu pur Eguir€nEnt in digital lKdEE in a long time.
Warranty
nis prDdrrt rrEts
FCC 6a
G rcquiEffitb grffifte
E
saftty
Product Description
vids records with 1.44 inch TFI
is designed with leading functionality such as
digital video and audio recording, USB data transfer,
USB charging etc.
This is a mini HD digital
display,
it
EU Environmental Protection
Wast6 slectri@l prcducls sh@ld not b6 dispc€d
of with household wast6. Pl€s recyde wheB
facilities Bxist,Chsk wiol your L@l Aulhodty
Btail€r for recycling advi@.
tr
X
I
Product Characterisics
o
.
.
.
.
.
.
.
.
.
.
.
.
.
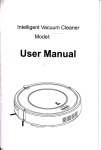
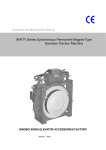
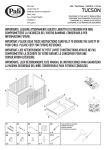
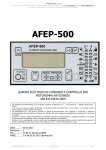
Product Structure
Hand held mimi device
PC
carema with wide angle recording
formatfor
AVI
PC
direct replay
,PG format picture:1280 x 960
2 mega pixals HD video camera
supportlSGTFcard
High
Data
sped rerding
port:
in Epid-change lighting
eNironment
USB1.1/USB2.0
Video output ff0x480x30 perframe persecond
Support WindowsxP,/VISTA/WindowsT
AV
outputand earphone connection
Built-in Lithium batterywith 2.5 hrs life
Connectto PC as camera
simple operation with single display. Auto turn-off
ffiffi
tSBorEtih
---\:
Miroplw
t'El
r_-
Reset Key
When ths devie is l@ked,
to restore to nomal-
u& a
metal pin io pre$ the reset key
Produc't func{ions
ThEE rcrking rrcde : vil@ @rding, photo taking, play bac*
(ln$rt Mim SD €d before use)
Video recording
Tum Power button to ON, push mode button to Ml, the dsice
is ready for vido reording. Push shutter key to start mording.
Red dot on left top corner of display will blink push shutter key
again to stop recording and save.
Photo shooting
tED light
o
Red light will
when @nnec-t to PC or power $pply for battery
charging. Red light will tum ofi when baftery is tul.
ln vid@ @ding modE,ih6 red light will fash slqdy.Ftr fite sving
and data excfiange, the Ed light will flash quickly.
Tum Power button to ON, push mode button to M2, the dwice
is ready for photo shooting. CameE icon will display on top left
comer of display, push shutter key for photo shooting and sve.
Play Back
When the dryice is ON, push PlayBack button,the dsice is ready
to play. For AV push shutter key to start For photo wiw, push
Page Up or Page Down to scroll.
PC
File delete
button to
File delete only available in PlayBack mode Push DEL
push
prcmpt deletion, push Page Down button to @nfirm deletion'
To
camera mode
us
as PC @mera, instalt the prbgEm in the cD disk' in Power
oFF mode. press Shutkey to enter into PC camera mode-
again to delete.
display
ln Power ON mode, the battery i@n on iop right corner of
will blink for low battery. The device will save flle and turn off
automati€llY
card is
ln Power ON mode, display lnsert Card i@n if no memory
tull'
detected. Disk Full will be displayed to alert memory
Computer
USg Interface
2 minutes
ln Power On mode,the devie to automatiGlly lum ofi after
to PC Connec't
The devi@ will be in USB drive mode when @nnect
to power supply for battery charging.
into
ln Power OFF mode, hold shutkey, connect to PC to enter
PccAM mode
connect to TV with AV wire, for play back'
-8-
to PC without pressing Shutkey, the devi@ will
be re@gnized as USB for data sharing'
Connecting
-9-
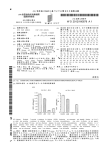
Production Certification
@@
Specifications
Pixal
lLux
Batter
Continuous
Power
370mAH
2.5hrs
20OmA/3 7v
-10" - 60.
-85%RH
C€@
@FA
Slight temperature rise is nomal when the devi@
is charging.
Remove the charger from the bas for traveling
2.0 meqa CMOS
72"
Minimum
temperature
10'-70.
L.44fFT
card
stze
format
Picture format
UsB
port
l6G max
( 1280x 960
usB1.1/2.0
,5ysrem
time
Windows
Around 2 hrs
About
78\45
Production specjfication will be changed without prior
notice
-1
0-
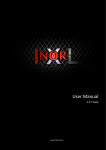
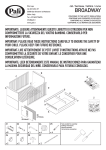
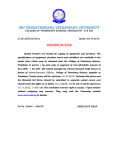
Accessories
EE
miB{tt&H .tilfi+flIft.AFHffFd\rs,
tFHiltrrc,
1.CD disk
2.Power Charger
3.USB data cable
1.44frFrEtfiE'ttq7*frostnt.
I EE€Sfra, TEE+LE9SFfl.
-I
|.
4.TV output cable
+mc+fl88i+otH,Hts{ilnBr0r*tFH, Es,
TfiEgFfrESIE;, EfiGE. T#. q#ETTINN
fr
{lr*.
ft
ftfrilEa Hilt+fl8, il*rfr B6+
^fl*fi 6I*Pfi lgtEg0i*,Rr+l(UE'TE
flff ,
!
1
I
d
re*u
6FE EFcc&c E+fl *tlttilEff 6,GEF6, Eg
GEEHEER[t.
FETE
..
tlTFHE-iltrH1.44$rF:rEfr Fffi Ed\tilfi filR
fr fl,; !1 € t jLSft SJ&BF& r::,Elf...*t. : u 5 8H.#i t€ f,,
USBTIE+&ET.
It UA,f},EF.W ; jtE
r& fr.l
H
!
FEtflt
FfiHfiT
>Ed\tl,tigi+ , GtrrGE
>PC€&XD€E , g.frE.i*,&, EflA+Em6+tr;
> AVXIfI{UFjPfi'J, EGPCEE#&
frT-r
'ii'dl;li
€4UlE
rra l['ll
**-iil
ll
>iPGEHffi*1280 x 960;
>{EffiE
,2ooE'ri=frF&*
>Htil6*r,
llll
---hl[il
arnmrs 1l
>fttlH16GrFf;
iEEs&ElEIts&
ll
>fiffi&Etr6ts : usB1.1/'Us82.o;
rir\ Efi#x
ilii${
ri'rr il rF+E
ll#tr:
ll ll
i[
\l]U
>&ESl S : 540x480 px30tt/B;
>IERS
>
: WINDOWS2000/XPlVISTA;
AV*EE,ETdI,EEI;
>6
IErgts,
EJft2. tJ\SJffi
:--
*GH
>BE!EIETE&*E&JTGH;
>{!r(t4{f , -fFftfEEzi, EilXdl.
u
E-sro
'
t&E
.
.g
R#4 gETE'EryTE,H1*EFf; ilE&l[Nry
f ht{t
PctfinI[gE
.
a{+RE'EE&HdTr€c&flt&. -&&D E L*t+E
a\EEGi(flJffi. E&PAGEDowN*t , +EEEEEfllh ,
Ei
fr
flll #J
h5
su*
fE
E&
HE
I e.
Efi trlfi 6T(fr io{E[Efl. g
6tfi
F
*
su*
H9EE;EGISi+#iaEa.
!
ft(lE
JF
ER
EftHPcE&*fi #, tft Q#ffi #)EXfi BgSitEE, E
*{1&*T'fr H.H U I K EYEETETBffi TUfr Pd&*lTT.
fi e ##t
ffi
&ruSJ
EEiB€IIE, IIFI
t^EH*Xfr. *illHt+H
&fl
.
Elrfl,fi dT(Eil}Gl€il.. Eex4;SEf .
EFr€
Ez\EE -t,HEtrE, ilEf, ff ItE+Erf,lfEffi , E#+
EEt Sfild k f u (+ffi EtqEttgB).
is
II
Efi tlHfr T'.,2rls6fiEGrnfF.
ut/\*fr&t.
*T'Efl fi 6 TEE EETST
E#48tr[UhfrEEfr.
,F D E
fi
d[
E*f[H*T&ES
HUT
KEYitTE*TBMrutr
&fi.
ffi
TVSi S S
TE*Bfl , EJfi IiAVS
S D6E.
Ufi #i
T,
PCCA M
Ei'5I8&E&,m;i€fiGsHUr.KEYr,il/4.RHCE
sxool +ffiFtrE9i[E,,FEIg&fi
disB.
ri::,:rr
-
l
:lj1:
I
i _
:
:
(@l
-a\
r--r---rj
IAIOI
'enemstB,;+riEtii**#ii;.
FgfiAEE.LryT,
.t::
rn#4ifi,
il