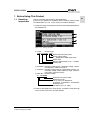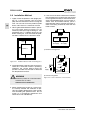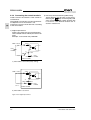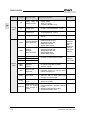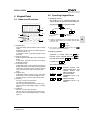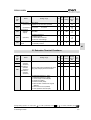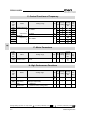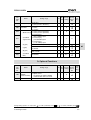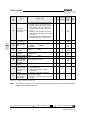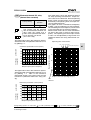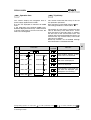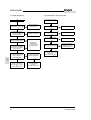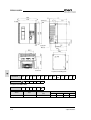
1
me_C11ST_A3.fm Seite 1 Dienstag, 2. November 1999 3:28 15
Solutions for Drives
C11S
Solutions for Drives
European headquarter:
FVR
Fuji Electric GmbH
Lyoner Str. 26
D-60528 Frankfurt am Main
Tel.: +49-69-66 90 29-0
Fax: +49-69-66 90 29-58
e-mail: [email protected]
Internet: http://www.fujielectric.de
Germany:
Fuji Electric GmbH
Head of sales
Lyoner Str. 26
60528 Frankfurt am Main
Tel.: +49-69-66 90 29-47
Fax: +49-69-66 90 29-58
[email protected]
Fuji Electric GmbH
Sales area Südwest
Drosselweg 3
72666 Neckartailfingen
Tel.: +49-71 27-92 28 00
Fax: +49-71 27-92 28 01
[email protected]
Fuji Electric GmbH
Sales area West
Dolmanstr. 46
51427 Bergisch Gladbach
Tel.: +49-22 04-96 03 88
Fax: +49-22 04-96 03 89
[email protected]
Fuji Electric GmbH
Sales area Mitte/Nord
Lyoner Str. 26
60528 Frankfurt am Main
Tel.: +49-69-66 90 29-47
Fax: +49-69-66 90 29-58
Switzerland
Italy
Spain
France
Fuji Electric GmbH
Zweigniederlassung
Altenrhein
IG-Park
CH-9423 Altenrhein
Tel.: +41-71-8 58 29 49
Fax: +41-71-8 58 29 40
[email protected]
Fuji Electric GmbH
Centro Direzionale
Viale Colleoni 3, Taurus
I-20041 Agrate Brianza,
Milano
Tel.: +39-0 39-6 89 03 23
Fax: +39-0 39-6 89 04 46
[email protected]
Fuji Electric GmbH
Parc Technòlògic del
Vallés-Nr. 023
E-08290 Cerdanyola,
Barcelona
Tel.: +34-93-58 24-3 33/5
Fax: +34-93-58 24-3 44
[email protected]
Fuji Electric GmbH
PERIPARC
Immeuble "les NARCISSES"
56, rue des Hautes Pâtures
F-92000 Nanterre, Paris
Tel.: +33-1-55 66 04-90
Fax: +33-1-55 66 04-99
[email protected]
5RGEKCNKUGFFGCNGT
MGB-C11EN99.9
Subject to technical changes
+PUVTWEVKQPOCPWCN
Fuji Electric-General-Purpose Inverter FVR-C11S-7EN Series
Single-phase 230V 0.1 - 2.2kW
FVR-C11S-EN
Contents
Safety Instructions ................................... 1
1 Before Using This Product ........... 1-1
1-1
1-2
1-3
1-4
1-5
Receiving Inspections ...................
Appearance ..................................
Handling the Product ....................
Carrying ........................................
Storage and transportation ...........
1-1
1-2
1-3
1-4
1-4
2 Installation and Connection ........... 2-1
2-1 Operating Environment ................. 2-1
2-2 Installation Method ........................ 2-2
2-3 Connection .................................... 2-3
2-3-1 Basic connection .................... 2-3
2-3-2 Connecting the main circuit
and ground terminals ............. 2-4
2-3-3 Connecting the
control terminals ..................... 2-6
2-3-4 Connection examples ........... 2-12
2-4 Others ......................................... 2-21
2-4-1 Harmonic component ........... 2-21
2-4-2 Noise .................................... 2-21
2-4-3 Leakage current ................... 2-21
3 Operation ............................................ 3-1
3-1 Inspection and Preparation
before Operation ........................... 3-1
3-2 Operation Method ......................... 3-1
3-3 Trial Run ....................................... 3-2
4 Keypad Panel .................................... 4-1
4-1 Names and Functions ................... 4-1
4-2 Operating Keypad Panel ............... 4-1
5 Selecting Function ........................... 5-1
5-1 Function Selection List .................. 5-1
5-2 Details of Each Function ............... 5-7
6 Protective Function ......................... 6-1
6-1 List of protective functions ............ 6-1
6-2 Alarm Reset .................................. 6-3
7 Troubleshooting ............................... 7-1
7-1 In case of tripping ......................... 7-1
7-2 Other trouble ................................. 7-7
8 Maintenance and Inspection .......... 8-1
8-1 Daily Inspection .............................
8-2 Periodic Inspection ........................
8-3 Electrical measurements
in the Main Circuit .........................
8-4 Insulation Test ...............................
8-5 Parts Replacement .......................
8-6 Inquiries about the Product and
Guarantee of the product ..............
8-1
8-1
8-5
8-6
8-7
8-7
9 Specifications .................................... 9-1
9-1
9-2
9-3
9-4
Standard Specifications ................ 9-1
Common Specifications ................ 9-2
Dimensions ................................... 9-8
Selection of Peripheral Device .... 9-11
10 Options ............................................ 10-1
10-1 Built-in Options ............................ 10-1
10-2 External Options ......................... 10-1
11 Applicable reactors ....................... 11-1
12 Compliance with standards ........ 12-1
12-1 UL/cUL standards [Applicable to
products with UL/cUL mark] ......... 12-1
12-1-1 General ................................. 12-1
12-1-2 Precautions ........................... 12-1
12-2 Compliance with EMC directive
in EU [Applicable to products
with CE mark] .............................. 12-2
12-2-1 General ................................ 12-2
12-3 Compliance with low voltage directive
in EU [Applicable to products
with TÜV or CE mark] .................. 12-2
12-3-1 General ................................. 12-2
12-3-2 Precautions ........................... 12-2
13 Electromagnetic
Compatibility (EMC) ....................... 13-1
13-1 General ....................................... 13-1
13-2 RFI Filters ................................... 13-1
13-3 Recommended Installation
Instructions .................................. 13-3
FVR-C11S-EN
Safety Instructions
WARNING
Read this operation manual carefully and familiarize yourself with the operation of the inverter
before installation, connection (wiring), operation or maintenance and inspection of the device. Be familiar with the inverter, safety
information, and safety signs before using the inverter.
In this instruction manual, safety signs are classified into the following categories.
Improper operation may result in death
or serious injury.
CAUTION
Improper operation may result in slight
to medium injury or property damage.
Note:
Safety Instructions
More serious situations than those covered by the CAUTION sign can result
depending on the circumstances. It is
important that you always follow the instructions.
1
FVR-C11S-EN
Compliance with UL/cUL standards [Applicable to products with UL/cUL mark]
CAUTION
1. [WARNING] Take care of electric shock. Be sure to turn the
inverter off before starting work.
2. [CAUTION] When the charge lamp is lit, the inverter is still charged
at a dangerous voltage.
3. [WARNING] There are two or more live parts inside the inverter.
4. The inverter is approved as a part used inside a panel. Install it inside a panel.
5. Perform wiring to the input, output and control terminals of the inverter, referring to the table below. Use UL certified round crimp
terminal to the input and output terminals with insulation cover or
covered with reduced tube to obtain the insulation distance. Use a
crimping tool recommended by the terminal manufacturer when
fabricating crimp terminals.
6. Install a fuse in the power supply to the inverter, referring to the table below.
Voltage
Inverter type
Tightening torque
[Nm]
L1/L, L2/N Control
U, V, W section
Applicable wire diameter
[AWG] (mm2)1)
L1/L, L2/N
U, V, W
Control
section
Fuse
[A] 2)
Recommended fuse
Gould Bussmann
Company Company
FVR0. 1C11S-7EN
6
A4J6
JKS6
FVR0. 2C11S-7EN
6
A4J6
JKS6
10
A4J10
JKS10
Singlephase FVR0. 4C11S-7EN
200V FVR0. 75C11S-7EN
input
FVR1. 5C11S-7EN
FVR2. 2C11S-7EN
1.2
1.8
14 (2.1)
0.4
20 (0.5)
15
A4J15
JKS15
12 (3.3)
30
A4J30
JKS30
10 (5.3)
40
A4J40
JKS40
1) Use copper wires of allowable maximum temperature 60 or75 °C.
2) Use UL certified "quick breaking fuse".
7. Connect the power supply satisfying the characteristics shown in
the table below as an input power supply of the inverter. (Short
circuit rating)
2
Inverter type
Input max. voltage
Input current
FVR0. 1-2. 2C11S-7EN
AC240V
5,000 A or less
Safety Instructions
FVR-C11S-EN
Compliance with low voltage directive in
EU [Applicable to products with TÜV
mark]
CAUTION
1. Safe separation for control interface of this
inverter is provided when this inverter is installed in overvoltage category II. PELV
(Protective Extra Low Voltage) circuit or
SELV (Safety Extra Low Voltage) circuit
from external controller is connected to the
interface directly.
2. Basic insulation for control interface of this
inverter is provided when this inverter is installed in overvoltage category III. An insulation transformer has to be installed
between power supply mains and this inverter when SELV circuit from external
controller is connected to this inverter directly. Otherwise supplementary insulation
between control interface of this inverter
and environment must be provided.
3. The ground terminal G should always be
connected to the ground. Don’t use only
RCD as the sole method of electric shock
protection. Dimensions of external PE conductor should be same as dimensions of
input phase conductor and capable for
possible fault.
6. The inverter has to be installed in environment of pollution degree 2. If the environment is pollution degree 3 or 4, the
inverter has to be installed in a cabinet of
IP54 or higher.
7. Use a prescribed wire according to the
EN60204 Appendix C.
8. Install the inverter, AC or DC reactor, output filter in an enclosure that meets the
following requirement, to prevent a human body from touching directly to these
equipment.
1) When a person can touch easily on each
connecting terminal or live parts, install
the inverter, AC or DC reactor, output filter in an enclosure with minimum degree of protection of IP4X.
2) When a person can not touch easily on
each connecting terminal or live parts,
install the inverter, AC or DC reactor,
output filter in an enclosure with a minimum degree of protection of IP2X.
9. It is necessary to install the inverter in appropriate method using an appropriate
RFI filter to conform to the EMC directive.
It is customer’s responsibility to check
whether the equipment, the inverter is installed in, conforms to EMC directive.
4. Use MCCB or MC that conforms to EN or
IEC standard.
5. Where RCD (Residual-current-operated
protective device) is used for protection in
case of direct or indirect contact, only RCD
of type B is allowed on the supply side of
this EE (Electric equipment). Otherwise another protective measure shall be applied
such as separation of the EE from the environment by double or reinforced insulation or isolation of EE and supply system
by the transformer.
Safety Instructions
3
FVR-C11S-EN
Compliance with low voltage directive in EU [Continued]
CAUTION
Nominal
Power
applied
supply
motor
voltage
[kW]
Use of wires specified in Appendix C of EN 60204 is recommended.
Inverter type
Recommended wire size [mm2]
Molded case circuit
breaker (MCCB) or
earth leakage
Input circuit 2)
circuit breaker
DCR 2)
single phase
Output
(ELCB)1)
200V [L1/L, L2/N] circuit 2) circuit Control
Rated current [A]
[P1]
wiring
[U, V, W]
[P(+)]
With
Without
With
Without
DCR reactor 3) DCR reactor 3)
0.1
FVR0. 1C11S-7EN
0.2
FVR0. 2C11S-7EN
0.4
FVR0. 4C11S-7EN
0.75
FVR0. 75C11S-7EN
10
16
1.5
FVR1. 5C11S-7EN
16
20
2.2
FVR2. 2C11S-7EN
20
32
6
Single
phase
200V
6
10
2.5 4)
2.5 4)
2.5 4)
2.5 4)
0.5
4.0 4)
4.0 5)
6.0 5)
2.5 5)
4.0 5)
1) The applicable frame and series of the molded case circuit breaker (MCCB) and
earth leakage circuit breaker (ELCB) vary according to the capacity of the
transformer of the equipment. For details of selection, refer to the concerning
technical documents.
2) The recommended wire size for the main circuit is the case for the low voltage
directive at ambient temperature 40 °C.
3) The power supply impedance without a reactor is considered to be the
equivalent of 0.1% of the inverter capacity, with 10% current imbalance
accompanied by the voltage imbalance.
4) Crimp terminals up to 7.4 mm in width (including tolerance) can be used.
5) Crimp terminals up to 9.5 mm in width (including tolerance) can be used.
6) Use the grounding cable of a size equal to or larger than that of the input power
supply cable.
4
Safety Instructions
FVR-C11S-EN
Instructions on use
CAUTION
WARNING
1. This inverter is designed to drive a threephase induction motor and is not usable for
a single-phase motor or any other purposes.
There is a risk of fire.
2. This inverter may not be used as is for an
elevator, life-support system, or other purpose directly affecting the safety of humans.
Safety precautions should be established
and practiced in terms of the entire system,
rather than the independent device.
Otherwise, an accident could occur.
Instructions on transport/installation
1. Do not carry the device by holding just the
surface cover.
Inverter may be dropped causing injury.
2. Do not allow foreign matter such as lint, paper dust, small chips of wood or metal, and
dust to enter the inverter or adhere to the
heat sink.
Otherwise, a disaster such as burning
could occur.
3. Do not install or operate damaged inverter
or an inverter with a missing part.
Otherwise injury could occur.
4. Do not step on the product.
Otherwise injury could occur.
5. When stacking up in tiers, do not exceed
the number of tiers indicated on the packing carton.
Otherwise injury could occur.
WARNING
1. Attach the device to an incombustible material such as metal.
Otherwise fire could occur.
2. Do not place the device near inflammables.
Otherwise fire could occur.
Safety Instructions
5
FVR-C11S-EN
Instructions on wiring
CAUTION
WARNING
1. When the inverter is connected to power,
connect it via a line-protection molded case
circuit breaker or an earth-leakage circuit
breaker (Residual current operated protective device).
Otherwise fire could occur.
2. Be sure to connect the ground wire.
Otherwise electric shock or fire could
occur.
3. Ensure that a licensed specialist
performs the wiring work.
4. Check before starting the wiring that the
power is off (OPEN).
Otherwise electric shock could occur.
5. Do not wire up the inverter until it has been
installed securely.
Otherwise electric shock or injury could
occur.
1. Check that the number of phases and the
rated voltage of this product correspond to
the number of phases and voltage of the
AC power supply.
Otherwise fire could occur.
2. Do not connect the AC power supply to the
output terminals (U, V, W).
Otherwise injury could occur.
3. Check the output terminals (U,V,W) for the
phase order and connect them to the motor
correctly.
Otherwise fire could occur.
4. Do not connect a braking resistor directly to
the DC terminals [P(+), N(-)].
Otherwise fire could occur.
5. Noise is generated from the inverter, motor, and wiring. Take care that this noise
does not cause malfunctions in peripheral
sensors and equipment.
Otherwise accidents could occur.
6. The inverter has to be grounded in accordance with the national and local safety
specification.
Otherwise electric shock could occur.
6
Safety Instructions
FVR-C11S-EN
Instructions on operation
WARNING
1. Be sure to put on the surface cover before
turning the power ON (CLOSE).
Never remove the cover while the power is
applied to the inverter.
Otherwise electric shock could occur.
2. Never operate switches with wet fingers.
Otherwise electric shock could occur.
3. The interior of the inverter may remain
charged after turning off the power.
Therefore, never attempt to remove the
surface cover except for wiring service and
periodic maintenance.
Otherwise electric shock could occur.
WARNING
I
5. Never touch the inverter terminals when
energized even if it has stopped.
Otherwise electric shock could occur.
6. Never touch the keys on the keypad panel
with a pointed object such as a needle.
Otherwise electric shock could occur.
CAUTION
1. Never touch the heat sink because they
become very hot.
Otherwise burns could occur.
2. The inverter can set high-speed operation
easily. Carefully check the limit of the motor and machine before changing the setting.
Otherwise injuries could occur.
3. Do not use the inverter brake function for
mechanical holding.
Otherwise injuries could occur.
1. When the retry function is selected, the inverter may automatically restart after tripping, depending on the cause of the trip.
(Design the machine to secure personal
safety in the event of restart.)
Otherwise accident could occur.
2. Operating conditions may occasionally be
different from the preset acceleration/deceleration time or speed because of activation of the stall prevention function.
In such a case, personal safety must be secured through adequate machine design.
Otherwise accident could occur.
3. The stop key is effective only when a function setting has been established.
Therefore install an emergency switch independently. When operation via the external signal terminal is selected, the STOP
key on the keypad panel will be disabled.
There is a risk of accidents.
4. Operation starts suddenly if alarm reset is
done with an running signal input. Check
that no running signal is input before alarm
reset.
Otherwise accidents could occur.
Safety Instructions
7
FVR-C11S-EN
Instruction on maintenance/inspection,
and replacement
Instruction on disposal
CAUTION
WARNING
1. Do not commence inspection work until at
least five minutes after the power has been
turned off (OPEN).
(In addition, make sure that the charge
lamp has gone off and check that the DC
voltage between terminals P(+) and N(-)
does not exceed 25V DC.)
Otherwise electric shock could occur.
2. Only qualified personnel should perform
maintenance and inspection or replacement operations.
(Take off all metal objects (watch, ring,
etc.) before starting.)
(Use well-insulated tools.)
Otherwise electric shock or injury could
occur.
Since this product contains lead solder,
it must be treated as industrial waste
when it is disposed of. Entrust it to a
waste processing company when disposing it.
General instructions
The figures in this operation manual may
show the inverter with covers and safety
screens removed to explain the structure in
details. Therefore, be sure to replace the covers and screens to their original positions and
operate the inverter according to the instruction manual.
3. Never modify the product.
Otherwise electric shock or injury could
occur.
8
Safety Instructions
FVR-C11S-EN
1-1 Receiving
Inspections
Unpack and check the product as explained below.
If you have any questions or problems with this product, please contact
FUJI ELECTRIC Co., Ltd., or your local FUJI inverter distributor.
1) Check the ratings name plate to confirm that the delivered product is
the ordered one.
Figure 1-1-1 Ratings nameplate
TYPE:
Inverter Type
FVR 0.75 C11S - 7 EN
Series Extension (EN series)
Power voltage series:
7
Single-phase 200V input series
Series name
Nominal applied motor: 0.75
0.75kW
Product type
씯
씯
SOURCE: Number of input phases, rated input voltage, rated in-
put frequency, rated input current
OUTPUT: Number of output phases, rated output capacity, rat-
ed output voltage, output frequency range, rated output current, overload capacity
SER. No.: Product number
9 1 1725R0001
Production lot serial number
Production month:
1 to 9: January to September,
X: October, Y: November, Z: December
Production year:
Last digit of year (9: 1999)
2) Check for damaged parts, missing parts, and dents or other damage
on the covers or the main unit upon delivery.
1 Before Using This Product
1-1
1
1 Before Using This Product
FVR-C11S-EN
1-2 Appearance
1
1-2
Surface cover
Keypad panel
Frequency setting POT (VR) (built-in POT)
Ratings nameplate
Heat sink
Cooling fan (1.5 kW or more)
Charge lamp CRG
Control terminal block
Main circuit terminal block
Single-phase 200V[ G,L1/L,L2/N,P1,P(+)]
Main circuit terminal block
[P(+),N(-),U,V,W, G]
1 Before Using This Product
FVR-C11S-EN
1
1-3 Handling the Product
Remove the surface cover as explained below.
1) For FVR0.1 to 0.75C11S-7EN
Grasp the upper and lower parts of the cover
with both hands and pull it to the front of the
inverter.
1 Before Using This Product
2) For FVR1.5 to 2.2C11S-7EN
Expand the lower part of the cover horizontally, lift the cover to the front, and then remove
it.
1-3
FVR-C11S-EN
Always hold the main unit while carrying this product.
If it is carried by the cover or parts and not the main unit, the product
may be damaged or dropped.
Force must not be applied to the inverter cover during carrying because
it is made of plastic.
1-5 Storage and
transportation
Store and transportation this product under the conditions listed in
Table 1-5-1.
1
1-4 Carrying
Item
Specifications
Storage temperature Transportation
temperature
-25 to +65 °C
Condensation or formation of ice must not be
caused by sudden temperature changes.
Relative humidity
5 to 95% 1)
Atmosphere
The product must not be exposed to dust, direct sunlight, corrosive gas, inflammable gas, oil mist, vapor, water drops, or vibration. There must be no
salt in the atmosphere.
Air pressure
86 to 106kPa (During storage)
70 to 106kPa (During transportation)
Table 1-5-1
Storage and transportation environment
1) A large change in temperature within this humidity range may cause condensation
or formation of ice. Do not store this product at a place where such changes occur.
[Storage precautions]
1. Do not locate this product directly on a floor; place it on a rack or
shelf.
2. To store the product in a severe atmosphere, pack it in vinyl sheet.
3. If the product must be stored at a place where it may be affected by
humidity, insert a drying agent such as silica gel and pack it in vinyl
sheet.
1-4
1 Before Using This Product
FVR-C11S-EN
2 Installation and Connection
Install this product at a place satisfying the conditions listed in
Table 2-1-1.
2
2-1 Operating
Environment
Item
Specifications
Place
Indoor
Ambient temperature
-10 to +50 °C
Ambient relative humidity
5 to 95%RH (No condensation allowed)
Atmosphere
The product must not be exposed to dust, direct sunlight, corrosive
gas, inflammable gas, oil mist, vapor, or water drops.
There must be no salt in the atmosphere. Condensation must not
be caused by sudden changes in temperature.
Altitude
1000 m or less (Air pressure : 86kPa to 106kPa)
Vibration
3mm: 2 ~ 9 Hz or less
9.8 m/s2: 9 ~ 20 Hz or less
2 m/s2: 20 ~ 55 Hz or less
1 m/s2: 55 ~ 200 Hz or less
Table 2-1-1
Operating environment
2 Installation and Connection
2-1
FVR-C11S-EN
2-2 Installation Method
2
1. Tightly fasten the product in the upright position on a strong structure using four bolts
(M4) with the characters FVR-C11 facing the
front. Be sure not to turn the product upside
down, and install it on a horizontal surface.
2. Heat is generated while the inverter is operating, so the gaps shown in Figure 2-2-1 are
necessary for the passage of cooling air. The
generated heat is radiated upward by the
built-in cooling fan, so do not install this product below a device that is sensitive to heat.
5. If two or more inverters need to be installed in
the same device or control panel, they should
be arranged horizontally to minimize the influence of heat between them. If two or more inverters must be installed vertically, place a
plate between them to prevent the upper inverter from being affected by heat from the
lower inverter.
Inverter
Inverter
Air supply
Air supply
10cm
1cm
FVR-C11
1cm
a) Horizontal arrangement
10cm
Figure 2-2-1 Installation direction and surrounding space
3. The temperature of the heat sink increases to
about 90 °C while the inverter is operating.
Therefore, the surface behind where the
product is located must be able to withstand
this temperature increase.
Inverter
Plate
Air
supply
Inverter
b) Vertical arrangement
WARNING
Install this product on a nonflammable
material such as metal.
Otherwise fire could occur.
Figure 2-2-2 How to install two or more inverters
4. When installing this product in a control panel, carefully consider the ventilation to prevent the ambient temperature of the inverter
from exceeding the specified value. Do not
install it in a hermetically sealed box from
which heat is not radiated fully.
2-2
2 Installation and Connection
FVR-C11S-EN
WARNING
Do not allow foreign matter such as
lint, paper dust, small chips of wood or
metal, and dust to enter the inverter or
adhere to the heat sink.
1. Always connect the ground wire.
Otherwise electric shock and fire could
occur.
Otherwise, a disaster such as burning
could occur.
2. Ensure that a licensed specialist performs
the wiring work.
3. Check before starting the wiring that the
power is off.
Otherwise electric shock could occur.
2-3 Connection
Remove the surface cover to connect the terminal blocks. Correctly connect them according to
the following procedures.
2-3-1 Basic connection
1. Always connect the power to the main power
supply input terminal of the inverter. If it is
connected to another terminal, the inverter
will be damaged (see Figure 2-3-1).
2. Always ground the ground terminal to prevent
disasters such as fire and electric shock and
to minimize noise.
3. Use a reliable crimp terminal for connection
between a terminal and wire.
4. After terminating the connection (wiring),
check the following items:
a. Whether the connection is correct
b. Whether all necessary connections have
been made
c. Whether there is a short-circuit or ground
fault between terminals and wires
5. Connection modification after power-on
The smoothing capacitor in the direct current
part of the main circuit cannot be discharged
quickly after the power is turned off. Use a
multimeter to check that the voltage of the direct current (DC) is reduced to the safety
range (25V DC or less) after the charge lamp
goes off to avoid danger. Check that the voltage is zero before short-circuiting a circuit because the residual voltage (electric charge)
may cause sparks.
2 Installation and Connection
2-3
2
CAUTION
FVR-C11S-EN
2-3-2 Connecting the main circuit and ground terminals
Symbol
Name
Explanation
Main power supply input
Connects single-phase power
(Single-phase 200V input).
U, V, W
Inverter output
Connects 3-phase motor.
P1, P(+)
For connection of DC
reactor
Connects input power- factor correcting DC reactor
(optional).
P(+), N(-)
For DC intermediate
circuit
Connected to DC link circuit terminal
(for DC bus connection).
For inverter grounding
Ground terminal for inverter chassis (case).
L1/L,L2/N
2
G
Table 2-3-1
Functions of main circuit and ground terminals
1) Main power supply input terminal
Single-phase 200V [L1/L,L2/N]
G L1/L
L2/N
P1
P(+)
For single-phase 200V input
FVR-C11S-7EN
P(+) N(-)
U
V
W
G
Figure 2-3-1 Arrangement of main circuit and ground
terminals
1. Connect the main power supply input terminals to the power supply via a molded
case circuit breaker for circuit protection or
earth leakage circuit breaker. An earthleakage circuit breaker which can also detect DC current is recommended. Phasesequence matching is unnecessary.
2. It is recommended that a magnetic contactor is connected to prevent any failure or
accident from becoming serious by disconnecting the inverter from the power supply
when the inverter protective function operates.
3. Do not turn on or off the main power supply
to start or stop the inverter; instead, use the
control circuit terminal FWD/REV or the
RUN/STOP key on the keypad panel. If it
is unavoidable to turn the main power supply on or off to start or stop the inverter, it
must not exceed once per hour.
2-4
2) Inverter output terminal [U, V, W]
1. Connect these terminals to the 3-phase
motor with the correct phase-sequence. If
a motor rotation direction does not correspond to the correct rotation direction, exchange any two of the U, V, and W phases.
2. Do not connect a phase-advance capacitor or surge absorber to the inverter output.
3. A very long wiring length between the inverter and the motor causes a high frequency current to flow due to floating
capacity between cables, making the inverter trip, increasing the leakage current
and deteriorating the accuracy in the current display. To prevent such trouble, the
wiring length to the motor should not exceed 50 meters.
When the inverter is operated in the low
noise mode (carrier frequency: 8 to 15
kHz) and the wiring length is long, add an
optional output circuit filter (OFL filter).
2 Installation and Connection
3) DC reactor connecting terminal [P1, P(+)]
1. Use this terminal to connect a input powerfactor correcting DC reactor (optional).
Remove the jumper connected in the factory before connecting the DC reactor (see
Figure 2-3-2).
P1
P(+)
FVR-C11S-7EN
4) Inverter grounding terminal [ G]
Always ground the inverter grounding terminal [ G] for safety and noise reduction.
Grounding of the metal frames of electric
equipment has to be done in accordance with
the national and local safety specifications in
force.
1. In Japan, the 200V system must be connected to a ground electrode provided with
class D grounding, according to the electrical equipment technical standard.
Voltage
system
Type of grounding work
Grounding
resistance
200V
Class D
grounding
100 Ω
maximum
a) Connection diagram
Top of inverter
Barrier
Table 2-3-2
Grounding of device according to
electrical equipment technical standard
2. Connect a thick and short wire to the
grounding terminal of the inverter for connection with a ground electrode prepared
exclusively for the inverter system.
b) Cutting of barrier
CAUTION
Figure 2-3-2 Connection of DC reactor
2. Use diagonal cutting pliers to cut the surface cover barriers from P1, P(+) terminals
before connection.
3. If no DC reactor is used, do not remove the
jumper.
1. Check that the number of phases and the
rated voltage of this product correspond
to the number of phases and voltage of the
AC power supply.
Otherwise fire could occur.
2. Do not connect the AC power supply to the
output terminals (U, V, W).
Otherwise injury could occur.
3. Do not connect a braking resistor directly to
the DC terminals P(+), N(-).
Otherwise fire could occur.
2 Installation and Connection
2-5
2
FVR-C11S-EN
FVR-C11S-EN
2-3-3 Connecting the control terminals
2
Table 2-3-4 lists the functions of the control circuit terminals.
The method of connecting a control circuit terminal depends on how its function is set.
Connect the control circuit terminals according
to the set functions.
2) Run/stop command terminal [FWD, REV]
These terminals are left open in the factory.
key on the keypad panel
Pressing the
starts forward operation. When function F02
is set at 0 or 1, the terminal functions are as
shown in Table 2-3-3.
1) Digital input terminal
Figure 2-3-3 shows the circuit configuration.
Use a reliable contact without poor contact for
input.
Example: FUJI control relay HH54PW
FWD or others
4.7k
+24 to
+27VDC
CM
0V
SW7
F1
+24 to
+27VDC
P24/CM
P24
FVR-C11S-7EN
a) When SW7 is set to CM (factory setting)
FWD or others
4.7k
CM
0V
SW7
P24/CM
F1
P24
+24 to
+27VDC
40mA max.
FVR-C11S-7EN
b) When SW7 is set at P24
Figure 2-3-3 Digital input terminal
2-6
2 Installation and Connection
F02
When SW7 is set at CM
When SW7 is set at P24
0
When +24 to +27 VDC is supplied to
key on the
FWD - P24/CM, pressing the
keypad panel starts forward operation.
When +24 to +27 VDC is supplied to
key on the
REV - P24/CM, pressing the
keypad panel starts reverse operation.
When +24 to +27 VDC is supplied to both
FWD - P24/CM and REV - P24/CM, the inverter
decelerates to stop.
When FWD is short-circuited to P24/CM and the
key on the keypad panel is pressed, forward operation starts.
When REV is short-circuited to P24/CM and the
key on the keypad panel is pressed, reverse operation starts.
When both FWD - P24/CM and REV - P24/CM
are short-circuited, the inverter decelerates to
stop.
1
When +24 to +27 VDC is supplied to
FWD - P24/CM, forward operation starts.
When +24 to +27 VDC is supplied to
REV - P24/CM, reverse operation starts.
When +24 to +27 VDC is supplied to both
FWD - P24/CM and REV - P24/CM, the inverter
decelerates to stop.
Short-circuit FWD to P24/CM for forward operation, or REV to P24/CM for reverse operation.
Short-circuiting both FWD - P24/CM and REV P24/CM brings the inverter to deceleration and
stop.
Table 2-3-3
Description of function F02
CAUTION
WARNING
In case P24 is short-circuited with 0V
by outer circuit when SW7 is set to P24
side, poly switch (F1) turns the power
off. To recover the power, open the
short circuit and turn the inverter off to
allow the temperature to lower.
The STOP key is valid only when the
function has been set. Prepare
another switch for emergency stop.
When operation using an external signal terminal is selected, the operation
cannot be stopped using the STOP
key on the keypad panel.
Otherwise accidents could occur.
3) Analog input terminal (13, 12, 11, C1)
Use these terminals to connect external input
analog voltage and analog current and frequency setting device (POT). For connecting
a contact to this circuit, use a twin contact for
fine current signal.
Do not use a contact for terminal 11.
2 Installation and Connection
2-7
2
FVR-C11S-EN
FVR-C11S-EN
*Note the following when wiring:
2
1) Surge absorber connection
When the exciting coil of the magnetic contactor or relay in the control circuit or inverter
peripheral circuit is opened or closed, a surge
voltage (noise) is generated with a sudden
current change. Due to this surge voltage,
the inverter control circuit or peripheral equipment may malfunction. If so, directly connect
a surge absorber to both ends of the coil.
(See Figure 2-3-4).
Contact
Shield
FWD
P24/CM
To ground terminal
Frequency
setting POT
DC relay
AC relay
3) Shielding sheath connection
Connect one end of the shielding sheath of a
shielded or twisted-pair shielded wire to the
ground terminal as shown in Figure 2-3-6. Do
not connect the other end.
SK
Shield
+
Ry
MC
13
12
11
D
-
SK: Surge absorber
D: Diode
Figure 2-3-4 Surge absorber connection diagram
To ground terminal
Figure 2-3-6 Connection of sheath of shielded wire
2) Control circuit wiring
1. Wires connected to control circuit terminals must be 0.5mm2 shielded wire or
twisted vinyl wire. Remove the sheath as
shown in Figure 2-3-5 and then connect it.
CAUTION
Noise is generated from the inverter,
motor, and wiring. Take care that this
noise does not cause malfunctions in
peripheral sensors and equipment.
Otherwise accidents could occur.
6 ±1mm
Figure 2-3-5 End treatment
2. Keep the wiring of the main circuit, external relay sequence circuit and control circuit as far away from each other as
possible. If they must be adjacent, cross
them at right angles.
3. Use a twisted-pair shielded wire for long
wiring distances.
2-8
2 Installation and Connection
FVR-C11S-EN
4) Control terminal arrangement, screw size,
and tightening torque.
Screw size: M2.5
Tightening torque: 0.4 Nm
30A 30B 30C FM
X1
X2
X3 FWD REV
P24
11
/CM
12
13
2
Figure 2-3-7 shows the control terminal block
arrangement.
C1
Figure 2-3-7 Control terminal block arrangement
5) Remove the plate at the bottom of the surface
cover before performing inverter control wiring and reinstall it after the wiring as shown in
Figure 2-3-8.
Plate
Control wiring
Figure 2-3-8 How to pull out the control wiring
2 Installation and Connection
2-9
FVR-C11S-EN
Classification
Terminal
symbol
Terminal name
z
Used as power supply for frequency
setting device
(POT: 1 to 5 kΩ).
(+10VDC 10mADC max.)
13
Power supply for
variable resistor
12
Frequency setting
voltage input
z
0 to +10VDC/0 to 100%,0 to +5VDC/0
to 100% (Input impedance : 22 kΩ)
C1
Frequency setting
current input
z
4 to 20mADC/0 to 100%
(Input impedance : 250 Ω)
11
Analog common
z
Common terminal for analog input
signals
z
Forward operation with
FWD-P24/CM ON and
deceleration-stop with
FWD-P24/CM OFF
(Switch SW7 to P24)
2
Analog
input
Digital
input
FWD
Forward operation
/Stop command
REV
Reverse
operation
/Stop command
X1
Digital input 1
X2
Digital input 2
X3
Digital input 3
(SS1)
(SS2)
Multistep
frequency
selection
(BX)
Coast to stop
command
(RST)
Alarm reset
(THR)
External alarm
input
Write-enable command for keypad
(WE-KP)
(data change allowed)
2-10
Remarks
Detailed specifications
Deceleration-stop
with
FWD-P24/
CM and
REV-P24/
CM ON
z
Reverse operation with
REV-P24/CM ON and
deceleration-stop with
REV-P24/CM OFF
(Switch SW7 to P24)
z
The functions listed below can be set
Set with
by the X1 to X3 terminal functions.
functions
E01 to E03
z
Up to four steps speed operation can
be selected with SS1 and SS2
ON/OFF signals.
z
Inverter output is cut immediately and
the motor coasts to a stop (no alarm
output) if BX goes on.
z
The inverter releases the status held
after stop with an alarm when RST
changes from ON to OFF.
z
The inverter stops with an alarm if
THR is set to OFF.
z
Data rewriting for each function with
the keypad panel is rejected if WE-KP
is OFF.
Rewriting with keypad panel is
allowed if WE-KP is ON.
z
2 Installation and Connection
FVR-C11S-EN
Digital
input
Terminal
symbol
Terminal name
Detailed specifications
(Hz/PID)
PID control cancel
z
z
PID control cancel with Hz/PID ON
PID control with Hz/PID OFF
z
Operation based on command from
RS485 with LE ON
Inverter single operation with LE OFF
(LE)
Link operation
selection
z
z
Output/
Input
Analog
output
P24/CM
FM, 11
DC Power supply (SW7 set to P24)
(+24 to +27 VDC, 40mA max.)
Common terminal for digital input
signal (SW7 set to CM) (factory setting)
Power Supply/
Digital Common
z
Analog monitor
Data selected between the following
items is output with DC voltage:
z Output frequency
z PID feedback value
z Output current
z DC link circuit voltage
* Up to two analog voltmeters (input
impedance : 10 kΩ) can be connected.
Note: Output waveform: An AC pulse
is output with consistent frequency and variable duty.
The average DC voltage is proportional to output frequency and
output current
(frequency : 121.6 Hz).
Contact
output
30A
30B
30C
If the inverter is stopped with an alarm,
the non-voltage contact signal (1SPDT)
is output
(Contact rating: 250V AC, 0.3 A, Power
Alarm output for factor = 0.3)
(48V DC, 0.5A for Low-voltage Directive
any fault
or 42V DC, 0.5A for UL/cUL)
* Whether an alarm is generated with an
exciting operation or non-exciting operation can be switched.
Optional
DX+
DX-
RS485 communication input/output
z
z
z
Remarks
2
Classification
Switching of
P24/CM terminal with
switch SW7
Terminal for RS485 communication
Installed
(when option board is installed)
on optional
DX+ : Non-inverted signal,
board.
DX- : Inverted signal
Table 2-3-4 Functions of control circuit terminals
2 Installation and Connection
2-11
FVR-C11S-EN
2-3-4 Connection examples
1) Keypad panel operation
E
2
When power-factor
correcting
DC reactor is used
P1
P(+)
P1
MCCB
Single-phase
200V input
series
200 to 240V
50/60Hz
2)
P(+)
P(+)
N(-)
U
L1/L
V
W
L2/N
G
M
3
G
PRG
RESET
RUN
FUNC
DATA
STOP
Frequency setting POT (VR)
+10VDC
13
12
22k
Pulse output
11
C1
FM
0V
Analog monitor
250
30A
4.7k
FWD
0V
REV
30B
30C
Alarm output for
any fault
X1
SW7
X2
P24
X3
P24/
CM
CM
SW7
F1
P24
CM
+24 to +27 VDC
Figure 2-3-9 Wiring diagram of keypad panel operation
2-12
2 Installation and Connection
FVR-C11S-EN
2
1) The RUN and STOP keys on the keypad panel can be used to start and stop the operation
and the frequency setting POT (VR) can be
used to set a frequency only by connecting
the power supply and motor with functions set
in the factory. Forward rotation is set in the
factory.
2) Remove the jumper between the P1 and P(+)
terminals before connecting the optional power-factor correcting DC reactor.
3) Connect the surge absorber in parallel to coils
(such as coils of the magnetic contactor and
solenoid) near the inverter.
2 Installation and Connection
2-13
FVR-C11S-EN
2) External operation
(When external power supply is used)
E
2
When power-factor
correcting
DC reactor is used
3)
P(+)
P1
MCCB
Single-phase
200V input
series
200 to 240V
50/60Hz
P1
P(+) P(+)
N(-)
U
V
W
L1/L
L2/N
G
M
3
G
PRG
RESET
RUN
FUNC
DATA
STOP
Frequency setting POT (VR)
Frequency setting
voltage input
(0 to +10VDC)
12
11
Frequency setting
current input
(4 to +20mADC)
+10VDC
13
C1
22k
Pulse output
0V
FWD
Reverse
operation
command
REV
FM
250Ω
To ground terminal
30A
4.7kΩ
Forward
operation
command
0V
30B
30C
X1
SW7
X2
P24
X3
P24/
CM
24VDC
Analog
monitor
Analog
meter
SW7
To 11 terminal
Alarm output for
any fault
CM
F1
P24
CM
+24 to +27 VDC
To ground terminal
Figure 2-3-10 Wiring diagram of external operation (When external power supply is used)
2-14
2 Installation and Connection
FVR-C11S-EN
2
1) Use this connection to start, stop the operation and set the frequency with external signals. 0 to 10V DC can be set while function
F01 is set to 1 and +4 to +20mA DC can be
set while function F01 is set to 2. Set function
F02 to 1.
2) Set SW7 at CM
3) Remove the jumper between the P1 and P(+)
terminals before connecting the optional power-factor correcting DC reactor.
4) Connect the surge absorber in parallel to coils
(such as coils of the magnetic contactor and
solenoid) near the inverter.
5) Use twisted or shielded wire as control signal
wire. Connect the shield to the ground terminal.
2 Installation and Connection
2-15
FVR-C11S-EN
3) External operation
(When internal power supply is used)
2
When power-factor
correcting
DC reactor is used
E
3)
P(+)
P1
Single-phase
200V input
series
200 to 240V
50/60Hz
P1
P(+) P(+)
N(-)
U
V
W
L1/L
L2/N
G
M
3
G
PRG
RESET
RUN
FUNC
DATA
STOP
Frequency setting POT (VR)
Frequency setting
voltage input
(0 to +10VDC)
+10VDC
13
12
22k
Forward
operation
command
Pulse output
0V
11
Frequency setting
current input
(4 to +20mADC)
Analog
monitor
FM
250
To ground terminal
C1
30A
To 11 terminal
30B
Alarm output for
any fault
4.7k
FWD
Reverse
operation
command
0V
30C
REV
X1
SW7
X2
P24
X3
P24/
CM
Analog
meter
SW7
CM
F1
P24
CM
+24 to +27 VDC
To ground terminal
Figure 2-3-11 Wiring diagram of external operation (When internal power supply is used)
2-16
2 Installation and Connection
FVR-C11S-EN
2
1) Use this connection to start, stop the operation and set the frequency with external signals. 0 to 10V DC can be set while function
F01 is set to 1 and +4 to +20mA DC can be
set while function F01 is set to 2. Set function
F02 to 1.
2) Set SW7 at P24.
3) Remove the jumper between the P1 and P(+)
terminals before connecting the optional power-factor correcting DC reactor.
4) Connect the surge absorber in parallel to coils
(such as coils of the magnetic contactor and
solenoid) near the inverter.
5) Use twisted or shielded wire as control signal
wire. Connect the shield to the ground terminal.
2 Installation and Connection
2-17
FVR-C11S-EN
4) Connection to PLC
(When external thermal O/L relay is used)
2
External thermal O/L
relay
Single-phase
200V input
series
200 to 240V
50/60Hz
P1
MCCB
P(+) P(+)
N(-)
L1/L
U
L2/N
W
M
3
V
G
G
PRG
RESET
RUN
FUNC
DATA
STOP
To X3
terminal
To
output
terminal
of PLC
Frequency setting POT (VR)
13
12
Analog
monitor
+10VDC
22k
Pulse output
11
0V
C1
250
FM
30A
4.7k
30B
0V
FWD
30C
REV
X1
To ground
terminal
To 11 terminal
Alarm output for
any fault
SW7
P24
X2
DC24V
Analog
meter
F1
X3
(THR)
P24/
CM
SW7
CM
P24
CM
+24 to +27 VDC
PLC
External thermal
O/L relay
DC24V :
PLC power supply
To ground terminal
Figure 2-3-12 Connection example of PLC terminal (using THR function terminal)
2-18
2 Installation and Connection
FVR-C11S-EN
1) Set SW7 at CM.
2
2) In the figure above, the power is supplied to
the external thermal relay from the power
supply of the PLC. If the power supply of the
PLC is turned off while the inverter remains
turned on, OH2 trips.
3) To prevent OH2 from tripping upon shutdown
of the PLC, deselect the THR terminal function and use the electronic relay of the inverter.
CAUTION
When SW7 is set at P24, possibly
causing inner parts to damage.
2 Installation and Connection
2-19
FVR-C11S-EN
5) Connection to PLC (When analog signal is input from PLC)
P1
P(+) P(+)
N(-)
External thermal relay
MCCB
2
Single-phase
200V input
series
200 to 240V
50/60Hz
U
L1/L
M
3
V
W
L2/N
G
G
PRG
RESET
To X3
To
terminal output
terminal
of PLC
RUN
FUNC
DATA
STOP
Frequency setting POT (VR)
13
12
+10VDC
22k
11
C1
Analog
monitor
Pulse output
Analog
meter
FM
0V
250
30A
4.7k
30B
0V
FWD
30C
REV
X1
To ground
terminal
To 11 terminal
Alarm output for
any fault
SW7
P24
X2
X3
(THR)
DC24V
PLC
DC24V :
PLC power supply
P24/
CM
SW7
CM
CM
F1
P24
External
thermal
O/L relay
+24 to +27 VDC
To ground terminal
Figure 2-3-13 Connection example of PLC terminal (when analog signal is input from PLC)
1) Set SW7 at CM.
2) With this connection, the power is supplied from the PLC power supply to the external thermal O/L relay.
So, OH2 trip is activated by PLC power-off with the inverter turned on.
3) To prevent inverter trip with OH2 when the PLC power being turned off, do not select the THR terminal function and
use the inverter electronic thermal O/L relay.
CAUTION
2-20
When SW7 is set at P24, poly switch (F1) activates a current limit to
turn the power off.
2 Installation and Connection
FVR-C11S-EN
2-4-1 Harmonic component
A harmonic component which may influence the
phase-advance capacitor and generator is included in the inverter input current. If necessary,
connect a power-factor correcting DC reactor
(DCR) (option) for the inverter.
2-4-3 Leakage current
Leakage current flows through the inverter I-O
wiring and motor stray capacitance when the inverter transistor is turned on and off.
Table 2-3-3 lists the countermeasures for the
problems caused by the leakage current.
2
2-4 Others
Problem
2-4-2 Noise
1. Set the carrier
frequency lower.
When noise generated from the inverter may affect peripheral equipment, and noise generated
from peripheral equipment may malfunction the
inverter, the following basic countermeasures
should be taken.
1) When noise affects other devices via power
and ground wires
z
z
z
z
z
z
z
1
Separate the ground of the inverter and
that of the affected device.
Connect a noise filter to the inverter power
wire.
Use an isolation transformer to separate
the power supply of the inverter and that of
the affected device.
2) When another device is affected by induction
or radiation
Separate the main circuit wiring of the inverter from the control wiring and wiring of
the affected device.
Encase the inverter main circuit wiring in a
metal tube and ground the metal tube near
the inverter.
Encase the inverter in a metal rack and
ground the rack.
Connect a noise filter to the inverter power
wire.
Countermeasures
Trip of earth
leakage
circuit
breaker
on main
power
supply side
2. Shorten the wiring
between the inverter
and motor.
3. Increase the
ELCB/RCD sensitivity
current.
4. Replace the
ELCB/RCD with an
ELCB/RCD that is designed for high frequencies.
1. Set the carrier frequency lower.
2
Trip of external thermal
O/L relay
Table 2-3-3
2. Increase the thermal
O/L relay set value.
3. Use the inverter electronic thermal O/L
relay.
Countermeasures for leakage current
3) When noise generated from peripheral equipment affects the inverter
z
z
z
Use twisted or twisted-pair shielded wires
for the inverter control wiring. Ground the
shields.
Connect a surge absorber in parallel to the
coil of the magnetic contactor and solenoid.
If the power supply includes much distortion of the waveform or surge, connect an
impedance matching AC reactor for coordination of power supply.
2 Installation and Connection
2-21
FVR-C11S-EN
3 Operation
3-1 Inspection
and Preparation before
Operation
Check the following before operation:
1) Check whether the connection is correct.
For single-phase 200V series, check whether the power supply is
connected correctly to the L1/L and L2/N terminals. Also check
whether the inverter grounding terminal G is securely connected.
2) Check for short-circuits and ground faults between terminals and between live parts.
3
3) Check for loose terminals, connectors, and screws.
4) Check whether the motor is separated from mechanical equipment.
5) Set switches to OFF before turning on the power so that the inverter
will not start or operate abnormally at power-on.
6) Check the following after power-on:
a) Check for alarms displayed on the keypad panel.
WARNING
1. Always install the surface cover before turning on the power.
Do not remove the surface cover during conduction.
Otherwise electric shock could occur.
2. Do not operate a switch with wet hands.
Otherwise electric shock could occur.
3-2 Operation
Method
There are various operation methods. Select a method depending on
the purpose and operation specifications with reference to Chapters 4
and 5. Table 3-2-1 lists operation methods used generally.
Operation method
Frequency setting
Running command
Operation by
using keypad
panel
Built-in frequency setting
POT (VR) or UP/DOWN
key
RUN/STOP key
Operation by
using external
signal terminal
Setting by using analog
voltage, analog current,
and external POT (VR)
Contact input (switch)
z When SW7 is set at CM
Connect external power supply and connect
terminal FWD with the (+) terminal of the
external power supply,
or connect terminal REV with the (+)
terminal of the external power supply.
z When SW7 is set at P24
Connect terminal FWD with P24/CM or
connect terminal REV with P24/CM.
Refer to section 2-3-3.
Table 3-2-1 General operation method
3-1
3 Operation
FVR-C11S-EN
3-3 Trial Run
Operation method
Frequency setting
Running command
Operation by
using keypad
panel
(When built-in POT (VR) is used)
The frequency increases when
the variable resistor is turned
clockwise and reduces when it is
turned counterclockwise.
The motor accelerates when the
variable resistor is turned clockwise during operation and decelerates when it is turned
counterclockwise.
Operation starts when the RUN key is
pressed.
The motor decelerates and stops when
the STOP key is pressed.
Operation by
using external
signal terminal
(When the UP/DOWN key is
used)
Frequency increases when the
UP key is pressed.
It reduces when the DOWN key
is pressed.
z
When SW7 is set at CM
Connect external power supply and
turn FWD (REV) on to start. Turn it off
to bring the inverter to deceleration
and stop.
z
When SW7 is set at P24
Turn FWD (REV) on to start. Turn it off
to bring the inverter to deceleration
and stop.
Operation is not stopped although the
STOP key is pressed.
Refer to section 2-3-3.
Table 3-3-1 Running command
3 Operation
3-2
3
The motor rotates when a frequency value and running command are
input from the keypad panel or external signal terminal.
Refer to Table 3-3-1.
Use a low frequency (about 5Hz) for trial runs.
A frequency can be set using the built-in frequency setting POT (VR) ,
and forward/stop can be performed using the keypad panel with the
functions set in the factory.
FVR-C11S-EN
Check the following items:
a) Rotation direction
b) Whether rotation is smooth (whether there
is a motor buzzing noise or abnormal vibration)
c) Whether acceleration and deceleration are
smooth
d) Whether the inverter cooling fan is rotating
(1.5kW or more)
3
If no abnormality is detected, check the item
again by increasing the frequency.
Even if the output from the inverter is stopped,
you will be get an electric shock when you touch
the main circuit terminals such as inverter output
terminals U, V and W if the voltage is supplied to
the main power supply input terminal.
The smoothing capacitor in the inverter has
been charged when the power is turned off and
it is not discharged immediately. Before touching the electric circuit, wait until at least five minutes have elapsed after power-off and the
charge lamp is off, indicating the voltage is already low.
After checking normality in the above trial run,
start operation.
WARNING
1. The STOP key is valid only when the function has been set.
Assign another switch to emergency stops.
Otherwise accidents could occur.
2. Operation starts suddenly if alarm reset is
done with an running signal input. Check
that no running signal is input before alarm
reset.
Otherwise accidents could occur.
CAUTION
Do not touch the heat sink.
Otherwise burns could occur.
3-3
3 Operation
FVR-C11S-EN
4 Keypad Panel
4-2 Operating Keypad Panel
4-1 Names and Functions
1) Switching monitor
The display can be switched between frequency display and output current display by
pressing the
in Operation mode.
6 0. 0
1. 2 A
Current 2)
Frequency 1)
Digital display
In program mode: Shows function codes and data
codes.
In Operation mode: Shows the output frequency
and output current, etc.
In Trip mode: Shows a code indicating the causes
of the trip.
Program (Reset) key
Switches between Operation mode and Program
mode.
In Trip mode: Resets the trip status and change
to Operation mode.
Function/Data key
In Operation mode: Switches between frequency
display and output current display during stopped
and running. In Program mode: Used to read and
write various function codes and function data
items.
Up/down keys
In Operation mode: Used to increase and reduce
the frequency (motor speed).In Program mode:
Used to change a function code and data value.
RUN key
This key is used to start operation.
The LED is on during operation.
This key does not function when the data code
from the external signal (digital input) is selected
(F02 = 1).
STOP key
This key is used to stop operation.
This key does not function when the data code
from the external signal (digital input) is selected
(F02 = 1).
4 Keypad Panel
1) Frequency is displayed as a percentage with the least
significant digit in PID control operation (function H20
is set to 1 or 2):
1 0. 0. for 10%
1 0 0. for 100%
2) The reference frequency is displayed when the
key is pressed in current indication.
2) Stopping operation
Operation is started when the
is
pressed, and is stopped when the
is
pressed while function F 0 2 is set to a value other than
1.
The rotation direction is:
F 0 2 =
F 0 2 =
F 0 2 =
0 : Forward rotation with
FWD-P24/CM ON, and
reverse rotation with
REV-P24/CM ON
2 : Forward rotation
(FWD/REV input is ignored.)
3 : Reverse rotation
(FWD/REV input is ignored.)
4-1
4
FVR-C11S-EN
3) Changing frequency
The frequency increases when the
is pressed and decreases
when the is pressed while function F 0 1 is set to
0.
The change speed is increased when the
same time as the or .
Note:
is pressed at the
Do not turn the power off for five seconds after monitor switching or function setting, to prevent Er1 occurrence.
4) Setting function
Procedure
Display
4
Press the
mode.
key to set the program
2
Press the
key to select a function.
3
Press the
4
Press the
5
Press the
6
Changing another function
Press the
to cancel the program
mode.
1
6 0. 0
F 0 0
F 0 1
key to display data.
1)
1
key to change the data.
2
to save the data.
F 0 2
6 0. 0
1) The function code display changes as shown below.
The
4-2
o 0 1 to o 1 1 are displayed only with o 0 0 set to
F 0 0
F 0 1
F 3 6
E 0 1
E 0 3
C 0 1
o 1 1
o 0 0
H 2 5
H 0 1
P 0 0
C 0 7
1.
4 Keypad Panel
FVR-C11S-EN
5 Selecting Function
5-1 Function Selection List
F: Fundamental functions
Name
Setting range
Min. Factory
Unit
unit setting
Change
User
during
setoperating
tion
Data protection
0: Data change enabled,
1: Data protected
-
-
0
X
Frequency
command
0: Key operation ( , key)
1: Voltage input (terminal [12])
(0 to +10VDC)
2: Current input (terminal[C1])
(4 to 20mADC)
3: Voltage input + current input
(terminals[12]+[C1])
4: Analog (VR built in inverter)
-
-
4
X
F02
Operation
method
0: Key operation
(rotation direction: By terminal block)
1: External signal (digital input)
2: Key operation
(forward rotation)
3: Key operation
(reverse rotation)
-
-
2
X
F03
Maximum output frequency
50 to 120Hz
Hz
1
50
X
F04
Base frequency
25 to 120Hz
Hz
1
50
X
F00
F01
F05
F06
-
Data cannot be changed.
-
-
0
0
F07
Acceleration
time
0.0 to 60.0s
0.01 second is set when 0.0 is specified.
s
0.1
6.0
F08
Deceleration
time
0.1 to 60.0s
s
0.1
6.0
F09
Torque boost
0,1 : Variable torque characteristic
2 to 31: Constant torque characteristic
-
1
13
Change during operation: X = impossible,
5 Selecting Function
= possible (enabled by using
),
5
Function
code
No.
-
= possible (enabled by using
)
5-1
FVR-C11S-EN
Function
code No.
F10
Name
Electronic
thermal overload
relay for motor
(Select)
Setting range
0: Inactive
1: Active (for 4-pole standard motor)
2: Active (for 4-pole FUJI inverter motor)
F11
(Level)
20 to 135% of inverter rated current
F12
(Thermal
time
constant)
0.5 to 10.0min
5
F14
Restart after momentary power
failure (Select)
0: Inactive (Trip and alarm when power failure occurs)
1: Inactive (Trip and alarm when power recovers)
2: Active (Momentarily stops and restarts at
setting frequency of before power failure)
3: Active (Momentarily stops and restarts at
starting frequency)
F15
Frequency
limiter
(High)
0 to 120Hz
F16
(Low)
F17
Gain
(for frequency
setting signal)
0: For 0 to 10VDC (4 to 20 mA DC)
1: For 0 to 5VDC (4 to 12 mA DC)
F18
Bias frequency
-120 to 120Hz
F20
DC injection brake
Fixed to 3Hz
(Starting
freq.)
-
Factory
setting
-
1
A
0.01
Typical
value of
FUJI
4-pole
motor
min
0.1
5.0
-
-
0
Hz
1
0 to 120Hz
Change
User
during
opera- setting
tion
X
70
0
-
-
0
X
Hz
1
0
Hz
-
3.0
-
F21
(Level)
0 to 100%
%
1
50
F22
(Braking
time)
0.0 s (Inactive), 0.1 to 30.0 s
s
0.1
0.0
Hz
1
1
-
-
0.0
-
Hz
1
1
X
F23
F24
F25
Starting
frequency
Stop frequency
1 to 6Hz
Data cannot be changed.
1 to 6Hz
Change during operation: X = impossible,
5-2
Min.
Unit
unit
= possible (enabled by using
),
X
= possible (enabled by using
)
5 Selecting Function
FVR-C11S-EN
Function
code
No.
F26
F27
F30
Name
Setting range
Motor sound
0 to 15kHz
(carrier freq.) 0.75kHz is set when 0 is specified
(sound tone )
FM terminal
(Voltage
adjust)
(Function)
F36
30Ry operation
mode
kHz
1
15
-
-
0
0 to 200%
%
1
100
0:
1:
2:
3:
-
-
0
-
-
0
0: Level 0
2: Level 2
1: Level 1
3: Level 3
Output frequency
Output current
PID feedback amount
DC link circuit voltage
0: Excited when tripped
1: Normally excited
Change
User
during
setoperating
tion
X
5
F31
Min. Factory
Unit
unit setting
E: Extension Terminal Functions
Function
code
No.
E01
E02
E03
Name
X1 terminal
(function
selection)
X2 terminal
(function
selection)
X3 terminal
(function
selection)
Setting range
Min. Factory
Unit
unit setting
Change
User
during
setoperating
tion
-
-
0
X
-
-
2
X
-
-
3
X
Use the code values listed below to select
[X1], [X2] and [X3] terminal functions.
0:
1:
2:
3:
4:
5:
Multistep frequency 1 (SS1)
Multistep frequency 2 (SS2)
Coast-to-stop command (BX)
Alarm reset (RST)
External alarm (THR)
Write enable command for keypad
(WE-KP)
6: PID control cancel (Hz/PID)
7: Link operation selection (LE)
Change during operation: X = impossible,
5 Selecting Function
= possible (enabled by using
),
= possible (enabled by using
)
5-3
FVR-C11S-EN
C: Control Functions of Frequency
Function
code
No.
Name
C01
Jump frequency1
Setting range
C02
2 0 to 120Hz
C03
3
C04
C05
Min. Factory
Unit
unit setting
(Hysteresis) 0 to 30Hz
2
C07
3
0
1
0
1
0
1
3
0.1
0.0
0.1
0.0
0.1
0.0
Hz
Hz
Multistep
frequency 1
C06
1
0.0 to 120Hz
Hz
Change
User
during
setoperating
tion
5
P: Motor Parameters
Function
code
No.
P00
Name
Motor
characteristics
Setting range
0 to 10
Min. Factory
Unit
unit setting
-
-
Change
User
during
setoperating
tion
2
H: High Performance Functions
Function
code
No.
Name
Setting range
Change
User
during
setoperating
tion
100
Hr
1
0
-
The contents of the last four alarms are
displayed sequentially.
-
-
---
-
1: Initialized
(return to factory setting value)
-
-
0
X
H01
Operation time
Operation time accumulation
H02
Trip history
H03
Data
initialization
Change during operation: X = impossible,
5-4
Min. Factory
Unit
unit setting
= possible (enabled by using
),
= possible (enabled by using
)
5 Selecting Function
FVR-C11S-EN
Function
code
No.
Name
Setting range
Min. Factory
Unit
unit setting
Change
User
during
setoperating
tion
Retry (count)
0: No retry
1: Retry (Count is fixed to 5.)
-
-
0
H06
Cooling fan on/
off control
0: Inactive
1: Active
-
-
0
H20
0: Inactive
PID control
1: Active (forward operation)
(Mode select)
2: Active (reverse operation)
-
-
0
X
H21
0: Terminal [12]
(0 to +10VDC) Input
(Feedback
1: Terminal [C1]
signal select)
(4 to 20mADC)Input
2: Terminal [12]
(+1 to +5VDC) Input
-
-
1
X
H22
(P-gain)
0.01 to 10.0 times (1to1000%)
-
0.01
0.01
H23
(I-gain)
0.0s : Inactive
0.1 to 999s
s
0.1
0.0
H24
(D-gain)
0.00s : Inactive
0.01 to 10.0s
s
0.01
0.00
H25
(Feedback
filter)
0.0 to 60.0s
s
0.1
0.5
5
H04
O: Optional Functions
Function
code
No.
Name
Setting range
Min. Factory
Unit
unit setting
o00
0: Option inactive
Option selection
1: Option active
(RS485
Set 0 when the optional RS485
communication)
communication unit is not used.
-
-
0
o01
Station address
-
-
1
1 to 31
Change during operation: X = impossible,
5 Selecting Function
= possible (enabled by using
),
Change
User
during
setoperating
tion
= possible (enabled by using
)
5-5
FVR-C11S-EN
Function
code
No.
Name
Setting range
Min. Factory
Unit
unit setting
Change
User
during
setoperating
tion
5
o02
0: Er8 trip with eight continuous communication errors or check sum errors
1: Er8 trip after the time (o03) set in the
timer elapses with eight continuous
Selection of
communication errors or check sum
operation in error
errors
occurrence
2: Er8 trip if communication does not recover until the time (o03) set in the timer elapses
3: Retry and operation continuation with
communication or check sum error
-
-
0
o03
Selection of time
1 to 60s
set in timer
s
1
2
o04
Transmission
rate
0: 19200bps
2: 4800bps
4: 1200bps
1: 9600bps
3: 2400bps
-
-
1
o05
Data length
selection
0:8bits
1:7bits
-
-
0
o06
Parity bit
selection
0: No parity
2: Odd parity
1: Even parity
-
-
0
o07
Stop bit selection 0:2bits
-
-
0
o08
Communication
discontinuation
detection time
0: No detection,1 to 60s
s
1
0
o09
Response
interval
0.00 to 1.00
s
0.01
0.01
v
o10
0: Selection of frequency setting
RS485
selected with F01
command selection (frequency 1: Selection of frequency setting
setting)
from RS485
-
-
0
X
o11
0: Selection of operation command
RS485
command selecselected with F02
tion (operation
1: Selection of operation command from
command)
RS485
-
-
0
X
Table 5-1-1
Note:
Table of Function Selection List
For details on "o01" to "o11", refer to the instruction manual that came with the optional
RS485 serial communication unit.
Change during operation: X = impossible,
5-6
1:1bit
= possible (enabled by using
),
= possible (enabled by using
)
5 Selecting Function
FVR-C11S-EN
5-2 Details of Each Function
Operation method
Data protection
Factory setting
Change during
operation
0
X
1 Data is protected.
F01
or
key
Frequency command
Factory setting
Change during
operation
4
X
The following five values can be selected:
0 Key operation [
2
X
0 Key operation [
0 Data can be changed.
+
Change during
operation
The following four values can be selected: refer
to Table 2-3-3.
Set data can be locked to prevent it from being
changed by mistake when using the keypad
panel:
Data is changed when the
are pressed simultaneously.
Factory setting
key]
1 Voltage input
(terminal 12) (0 to + 10VDC)
2 Current input
(terminal C1) (4 to 20mADC)
3 Voltage input (terminal 12)
+ current input (terminal C1)
key]
The motor runs when the
key is
pressed and decelerates to stop when
the
key is pressed. The direction
of rotation depends on the FWD and
REV terminals as follows.
When the external power supply is
used (Set SW7 at CM.)
+24 to +27 VDC
supplied to FWD - P24/CM: Forward
+24 to +27 VDC
supplied to REV - P24/CM: Reverse
Operation is impossible when
+24 to +27 VDC is supplied to both or
none of FWD - P24/CM and
REV - P24/CM.
When the internal power supply is used
(Set SW7 at P24.)
FWD - P24/CM short-circuited: Forward
REV - P24/CM short-circuited: Reverse
Operation is impossible when both the
FWD and REV terminals or none of
them are short-circuited with the
P24/CM terminal.
4 Analog setting (POT built in inverter)
CAUTION
High-speed operation can be set by
the inverter easily. Carefully check the
limit of the motor and machine before
changing the setting.
Otherwise injuries could occur.
Change during operation: X = impossible,
5 Selecting Function
= possible (enabled by using
),
= possible (enabled by using
)
5-7
5
F00
F02
FVR-C11S-EN
1 External signal operation (Digital input)
(FWD, REV)
When the external power supply is
used (Set SW7 at CM):
Forward operation with +24 to +27 VDC
supplied to FWD - P24/CM and deceleration to stop with them open.
Reverse operation with +24 to +27 VDC
supplied to REV - P24/CM and deceleration to stop with them open.
No operation with +24 to +27 VDC
supplied to both FWD - P24/CM and
REV - P24/CM.
F03
Maximum output frequency
5
2 Keypad operation
(forward rotation) [
50Hz
X
5 0
The maximum output frequency
can be set with a resolution of 1 Hz
in a range between 50 and 120 Hz.
1 2 0
Maximum voltage
V
f
Maximum
output frequency
key]
The motor runs forward when the
key is pressed and deceleratesto-stop when the
key is pressed.
FWD and REV terminal input is ignored.
3 Keypad operation
(reverse rotation) [
Change during
operation
This function sets the maximum output frequency.
to
When the internal power supply is used
(Set SW7 at P24):
Forward operation with FWD - P24/CM
short-circuited and deceleration to stop
with them open.
Reverse operation with REV - P24/CM
short-circuited and deceleration to stop
with them open.
No operation with both FWD - CM and
REV - CM short-circuited.
Factory setting
CAUTION
High-speed operation can be set by
the inverter easily. Carefully check the
limit of the motor and machine before
changing the setting.
Otherwise injuries could occur.
key]
The motor runs in reverse when the
key is pressed and deceleratesto-stop when the
key is pressed.
FWD and REV terminal input is ignored.
Note:
This function can be changed only
while the FWD and REV terminals
are open.
Change during operation: X = impossible,
5-8
= possible (enabled by using
),
= possible (enabled by using
)
5 Selecting Function
FVR-C11S-EN
F04
Base frequency
F07
Factory setting
Change during
operation
Factory setting
50Hz
X
6. 0s
This function sets a base frequency (branch
point between constant torque characteristic
and constant output characteristic).
The base frequency can be set
with a resolution of 1 Hz in a range
between 25 and 120 Hz..
Change during
operation
The time taken to increase from
0.0 Hz to the maximum output frequency can be set in an increment
of 0.1 s step in a range between
0.0 and 60.0 s.
0. 0
to
6 0. 0
2 5
to
Acceleration time
0.01 is set when 0.0 is specified.
1 2 0
Deceleration time
Factory setting
Change during
operation
5
F08
Set a frequency matching the motor characteristics.
A value exceeding the maximum frequency can
be set but the output voltage is reduced.
6. 0s
Maximum voltage
0. 1
to
V
6 0. 0
f
The time taken to increase from
the maximum output frequency to
0.0 Hz can be set in a range between 0.1 and 60.0 s. (In an increment of 0.1 s step)
Base
frequency
F05
F06
Factory setting
Change during
operation
0
X
Data cannot be changed.
Change during operation: X = impossible,
5 Selecting Function
= possible (enabled by using
),
= possible (enabled by using
)
5-9
FVR-C11S-EN
Torque boost
F09
Factory setting
F10
Electronic thermal O/L relay
(Select)
Change during
operation
Factory setting
13
Change during
operation
1
This function can choose between 32 types of
boost according to the load type and motor characteristics.
This function is used to select between the following three values:
0
0 Inactive
For square law torque loads
(fan, pump)
to
1 Active
.........
4-pole standard motor
2 Operation (inverter motor)
...
4-pole FUJI inverter motor
1
Lower
2
5
to
F11
Higher
3 1
Electronic thermal O/L relay
(Level)
Factory setting
Higher
Change during
operation
Motor rated current
Output
voltage
Lower
Square law torque
0. 1 4
to
2 2. 3
Output frequency f
Set
8 when using a FUJI inverter motor
(FV motor).
This function sets the operation
level of an electronic thermal O/L
relay by using an ampere value according to the motor rated current.
20 to 135% of the inverter rated
current can be set.
Values less than 9.99A can be set
in 0.01A step and values more
than 10.0A can be set in 0.1A step.
Set the value obtained by multiplying the motor
rated current by coefficient K in the table below
according to the wiring length between the inverter and motor.
Inverter capacity
0.1C11S-7EN
0.2C11S-7EN
0.4C11S-7EN
0.75C11S-7EN
to
2.2C11S-7EN
Change during operation: X = impossible,
5-10
= possible (enabled by using
),
Wiring length
40m 50m 100m 200m
External thermal is
K=1.2
recommended.
K=1
K=1.1
K=1.2
K=1
K=1.1
0m
K=1
= possible (enabled by using
)
5 Selecting Function
FVR-C11S-EN
Electronic thermal O/L relay
(thermal time constant)
Factory setting
Change during
operation
5. 0min
This function sets the operating
time of the electronic thermal O/L
relay when the current that is
150% of the operation level flows.
0.5 to 10.0 min. can be set
(in 0.1 min. step).
0. 5
to
1 0. 0
The graph below shows the electronic thermal
O/L relay operating characteristics. Output current values for the electronic thermal operating
levels (values set with function F11) are plotted
horizontally and operating times for output current are plotted vertically.
This graph is for F10 = 1 with the base frequency
of 50Hz. The characteristics for output frequencies exceeding the base frequency are the same
as the characteristics for the base frequency.
When function F10 is set to 2, the characteristics
are always the same as those for the base frequency. The operating time with output current
of 150% can be adjusted by using function F12
(electronic thermal O/L relay (thermal time constant)).
The figure below shows the continuous permissible current with F10 (electronic thermal O/L relay [Select]) = 1.
Operating time characteristics
1Hz
Continuous permissible current (F10=1)
5Hz 20Hz 30Hz
50Hz (Base frequency)
5
F12
20
100
80
15
Continuous
current (%)
60
40
20
0
0
0.2
0.4
0.6
0.8
1
Output frequency/base frequency
The figure below shows the continuous permissible current with F10 (electronic thermal O/L relay [Select]) = 2. 100% of the continuous
permissible current is the current value set with
function F11 (electronic thermal O/L relay [Level]).
Operating time (minute)
permissible
120
10
5
0
0
50
100
150
200
Output current/set operating level (%)
Set
with F12
permissible
Continuous permissible current (F10=2)
120
100
80
Continuous
current (%)
60
40
20
0
0
0.2
0.4
0.6
0.8
1
Output frequency/base frequency
Change during operation: X = impossible,
5 Selecting Function
= possible (enabled by using
),
= possible (enabled by using
)
5-11
FVR-C11S-EN
F14
Restart after momentary
power failure (Select)
Frequency limiter (High)
F15
Factory setting
Change during
operation
0
X
This function determines whether operation is
restarted upon recovery from momentary power
failure:
Factory setting
70Hz
Frequency limiter (Low)
F16
Factory setting
0 Inactive
5
Failure while inverter is stopped:
The stop status is continued after
recovery from the failure.
Failure during operation:
LU indication is held immediately
due to undervoltage and the inverter
trips with alarm output.
1 Inactive
Change during
operation
Change during
operation
0
This function sets the upper and lower limits of
output frequencies.
0
to
0 to 120Hz can be set with a resolution of 1Hz.
1 2 0
Failure while inverter is stopped:
The stop status is continued after
recovery from the failure.
Failure during operation:
LU indication is held upon recovery
from the failure and the inverter trips
with alarm output.
If the upper limit and lower limit settings are reversed, the upper limit is valid and the lower limit
is ignored.
Hence, the operation is always performed with
the upper limit regardless of the frequency setting.
2 Active
The inverter restarts with the frequency
at the momentary power failure when
0.5s elapses after recovery from the fail
3 Active
The inverter restarts with the starting
frequency when 0.5s elapses after recovery from the failure.
2,
3 = valid upon recovery from the failure
with LU being on.
The table below lists approximate LU indication
times for a momentary power failure during operation.
Inverter Type (kW)
0.1 0.2 0.4 0.75 1.5 2.2
Time (s)
0.6 1.2 2.6
Change during operation: X = impossible,
5-12
4.8
3.0 5.0
= possible (enabled by using
),
= possible (enabled by using
)
5 Selecting Function
FVR-C11S-EN
F17
Gain
(for frequency setting signal)
Factory setting
Change during
operation
0
X
This function outputs the frequency obtained by
multiplying the reference frequency by a ratio.
F18
Bias frequency
Factory setting
Change during
operation
0
This function outputs a frequency biased for the
analog frequency setting.
-1 2 0
0 The maximum frequency is output at
+10VDC (20mA DC).
1 The maximum frequency is output at
+5VDC (12mADC).
-120 to 120Hz can be set with
a resolution of 1Hz.
to
1 2 0
100%
Frequency
5
This function selects an analog input signal level
with a value from
1 to
4 that is set by
function F 0 1 .
setting
When this function is used with function F 1 8
(bias frequency ), the gain set with this function
is valid and the gained frequency is biased.
Bias (positive)
0%
0
1
0
+10VDC
Bias
(negative)
4
20mADC
20mAdc
100%
Frequency
setting
F20
0
+5
+10Vdc
4
12
20mAdc
DC injection brake
(starting frequency)
Factory setting
Change during
operation
3.0Hz
X
This function sets 3.0Hz (fixed) as the starting
frequency of DC injection brake.
F21
DC injection brake (Level)
Factory setting
Change during
operation
50%
This function sets a DC brake current level.
Levels can be set in 1% unit by assuming the
level of the inverter rated current to be 100%.
Change during operation: X = impossible,
5 Selecting Function
= possible (enabled by using
),
= possible (enabled by using
)
5-13
FVR-C11S-EN
F22
DC injection brake (Braking time)
These functions set a starting or stop frequency
in a range from 1 to 6Hz in 1Hz step.
Change during
operation
Factory setting
1
1Hz
6
6Hz
to
0.0s
This function sets the DC injection braking time.
0.0
: No DC injection braking
0.1 to 30.0 : DC injection braking time 0.1 to 30s
(in 0.1s step)
Output frequency in forward/reverse operation
0.2Hz
Starting frequency setting
Stop frequency setting
Output Freq.
Stop frequency setting
Starting frequency setting
3Hz
FWD
Time
5
REV
Output voltage
Starting frequency < stop frequency
DC injection brake
Stop frequency setting
Starting frequency setting
t
CAUTION
Do not use the inverter brake function
for mechanical holding.
Otherwise injuries could occur.
F23
Starting frequency
F25
Stop frequency
Factory
setting
Change during
operation
F23
1Hz
X
F25
1Hz
X
Change during operation: X = impossible,
5-14
If the set frequency is lower than the stop frequency, the inverter output is 0Hz.
= possible (enabled by using
),
= possible (enabled by using
)
5 Selecting Function
FVR-C11S-EN
F24
FM terminal (voltage adjust)
F30
Factory setting
Change during
operation
0. 0
Change during
operation
Factory setting
100%
Data cannot be changed.
Motor sound (carrier freq.)
F26
Factory setting
This function regulates the frequency meter voltage level output to the FM terminal in the range
from 0 to 200% (in 1% step).
(Full scale about 0VDC)
0
Change during
operation
to
15kHz
(Full scale about 11VDC)
2 0 0
This function changes the motor tone quality by
changing the carrier frequency.
0
Choose among 16 types according
to the usage conditions.
to
Output
voltage
100%
5V
50%
1 5
50%
Data code 0 : 0.75kHz (Low carrier)
1 : 1kHz
2 : 2kHz
15 : 15kHz (High carrier, low noise)
Note:
5
200%
11V
10V
100%
Output/full scale
Note:
Output to the FM terminal is pulse output with constant frequency and variable duty.
When the inverter is operating at 9kHz
or higher carrier frequency, the carrier
frequency for may be reduced to 8kHz
automatically to protect the inverter.
Variable
Approx. 13V
Fixed to 121.6Hz
F27
Motor sound (sound tone)
Factory setting
Change during
operation
0
This function adjusts the motor operation sound
when a value of 7 or less is set with function F26.
0 Level 0
to
3 Level 3
Change during operation: X = impossible,
5 Selecting Function
= possible (enabled by using
),
= possible (enabled by using
)
5-15
FVR-C11S-EN
F31
FM terminal (Function)
E01
E02
Factory setting
Change during
operation
E03
X1 terminal (function selection)
X2 terminal
X3 terminal
0
This function selects the contents of output to
the FM terminal.
0 Output frequency
(maximum output frequency = 100%)
1 Output current
(inverter rated current x 2 = 100%)
2 PID feedback value (full scale = 100%)
5
3 DC link circuit voltage
(500VDC = 100%)
F36
Factory
setting
Change during
operation
E01
0
X
E02
2
X
E03
3
X
0 Multistep frequency selection 1 (SS1)
1 Multistep frequency selection 2 (SS2)
f3
f2
Output
frequency
f1
f4
30Ry operation mode
Factory setting
Change during
operation
0
X
0
(Excited
when
tripped)
1
(Normally
excited)
Normal operation
ON
(SS1)-P24/CM
ON
(SS2)-P24/CM
This function sets the operation mode of alarm
output for any fault (30Ry).
F36
t
FWD-P24/CM
Tripped
30A
30A
30B
30B
30C
30C
30A 1)
30A
30B
30B
30C
30C
ON
ON
f1: Frequency selected with F01
(keypad panel/analog/freq. setting POT )
f2: Frequency selected with C05
f3: Frequency selected with C06
f4: Frequency selected with C07
OFF input is assumed if SS1 or SS2 is not selected.
1) The status without inverter power supply is the same as
the status when inverter is tripped.
Change during operation: X = impossible,
5-16
= possible (enabled by using
),
= possible (enabled by using
)
5 Selecting Function
FVR-C11S-EN
2 Coast-to-stop command (BX)
Inverter output is cut when the BX terminal is connected to the P24/CM terminal.
OFF input is assumed when BX is not
selected.
3 Alarm reset (RST)
The alarm output is released between
the RST and P24/CM terminals when
power is turned on.
The trip status is released between the
RST and P24/CM terminals when power is turned off.
(Refer to 6-2 Alarm Reset on page 6-3)
7 Link operation selection (LE)
Operation setting can be done by commands from RS485 when the LE terminal is connected to the P24/CM
terminal.
A command from RS485 is ignored
when the LE terminal is disconnected
from the P24/CM terminal.
ON input is assumed when LE is not selected.
LE is valid only when function o 0 0 is
set to
1 (option operation).
5
4 External alarm (THR)
Inverter trips with OH2 when the THR
terminal is disconnected from the P24/
CM terminal.
ON input is assumed when THR is not
selected.
5 Write enable command for keypad
(WE-KP)
Function change from the keypad panel
is disabled when the WE-KP terminal is
disconnected from the P24/CM terminal.
Function change from the keypad panel
is enabled when the WE-KP terminal is
connected to the P24/CM terminal.
ON input is assumed when WE-KP is
not selected.
6 PID control cancel (Hz/PID)
PID control operates when the Hz/PID
terminal is disconnected from the P24/
CM terminal and does not operate
when they are connected.
OFF is assumed when the Hz/PID is
not selected.
Hz/PID is valid only when function
H 2 0 is set to
1 or
2.
(PID control operation).
Change during operation: X = impossible,
5 Selecting Function
= possible (enabled by using
),
= possible (enabled by using
)
5-17
FVR-C11S-EN
C01
C02
Jump frequency 1, 2, 3
C03
Factory
setting
C05
C06
Multistep frequency 1
Multistep frequency 2
C07
Multistep frequency 3
Factory
setting
Change during
operation
C01
0.0Hz
C05
0.0Hz
C02
0.0Hz
C06
0.0Hz
C03
0.0Hz
C07
0.0Hz
5
These functions jump frequencies to prevent
overlap between the load mechanical resonance
point and inverter output frequency.
Up to three jump points can be set.
These function do not operate when 0Hz is set.
No frequency is jumped during acceleration and
deceleration.
If three continuous frequencies are set, the total
of the three jump widths is set as the jump width.
These functions set a multistep frequency from 0
to 120Hz in 0.1Hz step (for 99.9 Hz or less) or
1Hz step (for 100Hz or more) by switching the
external contact signal.
The ON and OFF of terminal function SS1/SS2
(see explanation of E01, E02, and E03) switches
between the frequencies set by these functions
C05, C06, and C07.
P00
Output frequency
Motor characteristics
Jump width
Jump frequency
Change during
operation
Factory setting
Change during
operation
Jump width
Jump frequency
2
Jump width
Jump frequency
This function removes abnormalities in the output current such as current vibration.
Jump frequency
0 Current vibration is not suppressed.
C04
Jump frequency (Hysteresis)
to
1 0 Current vibration is minimized.
Factory setting
Change during
operation
3Hz
This function sets a jump width in a range from 0
to 30Hz in 1Hz step.
Change during operation: X = impossible,
5-18
= possible (enabled by using
),
= possible (enabled by using
)
5 Selecting Function
FVR-C11S-EN
Operation time
H02
This function displays the integration time of
power supply applied to the inverter.
0 to 655 are displayed to indicate 0 to 65500
hours.
If the integration time exceeds 65500 hours,
65500 is displayed continuously. While the total
of power supply times is less than one hour, the
times are not integrated.
Trip history
This function memorizes the history of the last
four protection operations.
key.
Each data item can be called using the
The calling procedure is shown below:
The contents of a new alarm is stored in the data
area for the history of the latest alarm. At this
time, the history of the latest alarm is stored in
the data area for the second latest alarm. The
histories of the second and third latest alarms are
moved in this way and the history of the fourth
latest alarm is deleted.
Stored trip histories are not deleted although
data initialization is executed with H03.
No.
Procedure
Display
example
1
Call H 0 2
H 0 2
2
Press the
key
5
H01
Remarks
Press the
key
OU 2
The contents (history) of the
latest alarm are displayed.
3
Press the
key
Press the
key
OH 2
The contents of the second latest alarm are displayed.
4
Press the
key
Press the
key
OC 1
The contents of the third latest
alarm are displayed.
5
Press the
key
Press the
key
- - -
The contents of the fourth latest alarm are displayed. (This
example is for no history.)
6
Press the
key
Change during operation: X = impossible,
5 Selecting Function
E n d
= possible (enabled by using
),
= possible (enabled by using
)
5-19
FVR-C11S-EN
H03
Data initialization
H06
Cooling fan on/off control
Factory setting
Change during
operation
Factory setting
0
X
0
This function initializes data items set with all
functions to values set in the factory.
0 Manually set value
1 Initialized (factory set value)
5
when the
taneously.
and
When the
0 : ON-OFF No control (always on)
to
1 : ON-OFF Control
(The fan is turned off when the inverter
temperature becomes low after operation is stopped.)
to
The display is changed from
0 to
1
keys are pressed simul-
H20
PID control (Mode select)
Factory setting
Change during
operation
0
X
key is pressed under this
condition, initial data is written and a frequency
set by the built-in POT (VR) is displayed automatically.
0 : Inactive
1 : Active (forward)
H04
Change during
operation
Retry
Select a PID
control operation.
2 : Active (reverse)
Factory setting
Change during
operation
0
The feedback signal value (%) is displayed by
assuming the full scale to be 100% when a PID
control operation is selected.
This function selects a retry operation if the inverter is tripped.
0 : No retry
to
1 : The retry count is fixed to 5 and retry
starts when 0.5s elapses after tripping.
Retry is attempted only for an overcurrent/overvoltage trip that occurs during operation.
Change during operation: X = impossible,
5-20
= possible (enabled by using
),
= possible (enabled by using
)
5 Selecting Function
FVR-C11S-EN
H21
PID control
(Feedback signal select)
H24
Factory setting
Change during
operation
1
X
PID control (D-gain)
Factory setting
Change during
operation
0.00s
This function sets a derivative time.
This function selects a PID control feedback signal.
: No derivative
0. 0 0
0. 0 1 to 1 0. 0 : Derivative time 0.01 to
10.0s (in 0.01s step)
0 Terminal 12 (0 to +10VDC)
1 Terminal C1 (4 to 20mADC)
2 Terminal 12 (+1 to +5VDC)
H22
PID control (P-gain)
Factory setting
Factory setting
Change during
operation
Change during
operation
0.5s
This function sets a filter time constant of PID
feedback.
0.01
This function sets a P-gain.
0. 0 1 to 1 0. 0 P-gain from 0.01 to 10.0
times (1 to 1000%)
(in increment of 0.01 step)
H23
PID control (Feedback filter)
5
H25
0. 0 to 6 0. 0 : Time constants 0.0 to 60.0s
(in 0.1s step)
PID control (I-gain)
Factory setting
Change during
operation
0.0s
This function sets an integral time.
0. 0
: No integration
0. 1 to 9 9 9 : Integral time 0.1 to 999s
(in 0.1s step for 99.9s or less, 1s step for 100s or
more)
Change during operation: X = impossible,
5 Selecting Function
= possible (enabled by using
),
= possible (enabled by using
)
5-21
FVR-C11S-EN
PID control
In PID control, an output frequency is adjusted to
a feedback value.
Use F 0 1 to set a frequency and H 2 1 to
make the feedback value and the reference value
equal.
PID arithmetic unit
Reference
frequency
Deviation
Kp ⋅ (1 +
+
-
1
s ⋅ Ti
+ s ⋅ Td)
Switching
between FWD
and REV
operation
Inverter
output
M
P
Feedback value
(sensor)
5
FVR-C11S-EN
Reverse
operation
Forward
operation
o00
Deviation
Deviation
Output
frequency
Output
frequency
Deviation is positive and
frequency decreases.
Deviation is positive and
frequency increases.
Option selection
(RS485 communication)
Factory setting
Kp : P-gain
Td : Derivative time
Ti : Integral time
For explanations of "o01" to "o11", refer to
the instruction manual that comes with the
optional RS485 serial communication unit.
Change during
operation
0
0 : Option inactive
1 : Option active
Always set
0 when the optional RS485 serial communication unit is not used. If
1 is
set, Er 8 occurs.
Change during operation: X = impossible,
5-22
= possible (enabled by using
),
= possible (enabled by using
)
5 Selecting Function
FVR-C11S-EN
6 Protective Function
Alarm Name
When the protective function is activated, inverter output is instantly cut
off (while the motor coasts until it is stopped), and an alarm is issued,
and the details of the alarm are displayed on the keypad panel.
Keypad
panel
display
Overcurrent
Overvoltage
Undervoltage
Overheating of
heat sink
6 Protective Function
Contents of operation
OC1
During
acceleration
OC2
During
deceleration
OC3
While running at
constant speed
OU1
During
acceleration
OU2
During
deceleration
OU3
While running at
constant speed
If the inverter output current momentarily exceeds the overcurrent detection level because of
an overcurrent in the motor or the short-circuit in
the output circuit, the output is shut down, an
alarm is issued, and the inverter is tripped.
If the DC voltage of the main circuit exceeds the
overvoltage detection level because of an increase in the regenerating current from the motor, etc., output is shut down, an alarm is issued,
and the inverter is tripped. However, protection
against inadvertent overvoltage loading (e.g.
high-voltage line) might not be provided.
LU
If the DC voltage of the main circuit falls below the undervoltage detection level because of a lowered power supply, output is shut down
to protect the inverter. If the restart function after momentary power
failure is not activated, an alarm is issued and the inverter is tripped.
If the restart function is activated, the inverter restarts automatically
with no alarm.
For further details of the protective function, refer to the descriptions
of Function F14.
OH1
If the temperature of the heat sink used for cooling the rectifier diodes
and IGBTs rises because of cooling fan failure, etc., protective function is activated to stop operation, an alarm is issued, and the inverter
is tripped.
6-1
6
6-1 List of protective functions
FVR-C11S-EN
Alarm Name
Keypad
panel
display
Contents of operation
External Alarm
OH2
If the control circuit terminal THR (functional change of X1 to X3 terminals) is set to OFF, an alarm is issued and the inverter is tripped.
Motor
overload
OL
If the motor current exceeds the operating level set by the electronic
thermal O/L relay, output is shut down to protect the motor, an alarm
is issued, and the inverter is tripped.
Inverter
overload
OLU
If the output current exceeds the inverter rated overload current, output is shut down, an alarm is issued, and the inverter is tripped.
Memory Error
Er1
If memory error occurs, such as a missing or invalid data, output is
shut down, an alarm is issued , and the inverter is tripped.
CPU Error
Er3
If CPU error occurs because of noise, etc., output is shut down, an
alarm is issued , and the inverter is tripped.
Er8
If an error occurs in serial communication via the RS485, output is
shut down, an alarm is issued , and the inverter is tripped. For further
details, refer to the instruction manual for RS485 communication
cards.
RS485
Communication
Error
6
Table 6-1-1
6-2
List of Protective Functions
6 Protective Function
FVR-C11S-EN
To release the trip status, enter the reset command by pressing the reset key or from terminal (RST) after removing the cause of the trip.
Since the reset command is an edge operation, be sure to input a comON
OFF as shown in Figure 6-2-1.
mand string such as OFF
When releasing the trip status, set the operation command to OFF.
When the operation command is set to ON, check that operation starts
after resetting.
If the cause of tripping is Er1, reset the error and initialize data. If the
inverter is not reset, contact Fuji Electric.
씯
6-2 Alarm Reset
씯
10ms or more
Reset command
Keypad panel
display
Alarm output
OFF
Normal display
ON
Alarm display
OFF
ON
OFF
Normal display
OFF
Trip
WARNING
6 Protective Function
6
Figure. 6-2-1 How to input the reset command
If alarm reset is activated with operation signal ON, the inverter suddenly restarts which may be hazardous. Be sure to disable the operating signal when releasing the trip status:
Otherwise fire could occur.
6-3
FVR-C11S-EN
7 Troubleshooting
7-1 In case of
tripping
In the event the inverter tripping, diagnose by the help of the alarm display as shown below.
1) Overcurrent (OC)
Overcurrent
during
deceleration
OC2
Overcurrent
during
acceleration
OC1
Overcurrent
while running at
constant speed
OC3
Yes
Are the motor connecting terminal (U,V,W)
short-circuited or grounded?
No
No
No
Yes
Load excessive?
No
Can torque
No boost amount be
reduced?
No
No
Deceleration
time setting
too short compared
with load?
Torque
boost amount
correct?
7
Yes
Yes
Acceleration
time setting too
short compared
with load?
Reduce
torque boost
amount.
Remove
short-circuit
or ground.
Reduce load
or expand
inverter
capacity.
No
No
Has load changed No
suddenly?
Yes
Yes
Faulty inverter or error
’because of
noise.
Contact
Fuji Electric.
No
Yes
Prolong
time setting.
Yes
Can the
acceleration
time setting be
prolonged?
No
Reduce load or
expand inverter
capacity.
7-1
Can the
deceleration
time setting be
prolonged?
Prolong
time setting.
Yes
No
Braking method
needs investigation. Consult with
Fuji Electric.
Suppress load
fluctuation or
expand inverter
capacity.
7 Troubleshooting
FVR-C11S-EN
2) Overvoltage(OU)
Overvoltage
during acceleration OU1
Overvoltage
during deceleration OU2
No
Power supply voltage within specified value?
Yes
z Fix supply volt-
Overvoltage while
running at constant
speed OU3
Yes
age to within upper limit of
specifications.
z If caused by momentary voltage
surge from power supply, consider installing a
power-factor
correcting DC
reactor.
Yes
z Eliminate sud-
Does OU activate when load is removed suddenly.
No
No
Yes
Occurs on
completion of steep
acceleration?
Yes
Prolong accelerating time.
Yes
No
Main circuit DC voltage exceeds protection level?
Yes
No
den change of
load.
z Consider increasing inverter
capacity.
Yes
Prolong decelerating time.
Can decelerating Yes
time be prolonged?
No
Can accelerating
time be prolonged?
No
Can the moment of inertia of load be
reduced?
No
Yes
Reduce moment
of inertia.
No
Yes
Can regenerating load be reduced?
No
No
DC injection brake
used?
Reduce regenerating load.
No
No
Consider using DC
injection brake.
Yes
Review braking method. Contact Fuji Electric.
7 Troubleshooting
7-2
7
Faulty inverter or
error because of
noise. Contact Fuji
Electric.
No
Yes
FVR-C11S-EN
3) Undervoltage(LU)
4) Overheating of heat sink (OH1)
LU
Heat sink overheating
(OH1)
Yes
Has (momentary)
power failure occurred?
Reset and restart
operation.
(If F14 is 0,1)
Yes
Reduce load.
No
Replace cooling fan.
Yes
Remove obstacles.
No
No
Faulty parts or loose
connection in power
control circuit?
Load excessive?
Yes
Replace faulty parts
and fix connection.
Cooling fan rotating?
Yes
No
Cooling air passage
blocked up?
Power supply voltage No
within specified value?
Yes
Any load requiring large
starting current within Yes
the same power distribution group?
No
Modify power
distribution
system to satisfy
specified value.
7
No
Probably faulty control
circuit of inverter or
error because of noise,
etc.
Contact Fuji Electric.
7-3
Arrange peripheral
conditions to secure
specified value.
Yes
No
Does LU activate when
circuit breaker or mag- Yes
netic contractor
switched to ON?
Ambient temperature No
within specified value?
Power transformer
capacity adequate?
Probably faulty inverter
or error because of
noise, etc.
Contact Fuji Electric.
Yes
Probably faulty
inverter.
Contact Fuji Electric.
7 Troubleshooting
FVR-C11S-EN
5) External alarm input (OH2)
6) Inverter overload (OLU) or motor overload
(OL)
OH2
OLU
Signal from external
device connected
No
between control circuit
terminals
THR - P24/CM?
Connect alarm signal
contact. Short-circuit
between terminals
THR - P24/CM if no
signal is input.
Yes
Is the alarm function of No
the external device
operating correctly?
Yes
Remove the cause of
alarm function
activation.
Probably faulty
inverter or error because of noise.
Contact Fuji Electric.
OL
Do characteristics of electronic
thermal O/L relay No
and those of motor overload
match?
Connect thermal
O/L relay
externally.
Yes
Is electronic ther- No
mal O/L relay setting correct?
Set to correct
level.
Yes
Load excessive?
No
Probably faulty
inverter or error
because of
noise, etc.
Contact
Fuji Electric.
Yes
7
Reduce load or
increase inverter
capacity
7 Troubleshooting
7-4
FVR-C11S-EN
7) Memory error (Er1) CPU error (Er3)
Abnormal
display or indication goes out
Memory error Er 1
Analog frequency set to negative
value?
CPU error Er 3
No
Yes
Reset analog frequency to positive
value.
Turn power OFF then ON again after CHARGE lamp has gone out.
Is data displayed No
on LED?
Yes
Inverter is normal.
Continue
operation.
Noise source
nearby?
Yes
Remedy faulty
parts.
No
Probably faulty
inverter. Contact
Fuji Electric.
7
7-5
7 Troubleshooting
FVR-C11S-EN
8) RS485 Communication Error (Er8)
[In case RS485 communication is not used*]
Communication
Error Er8
o00 is set to 1?
No
Probably faulty
inverter.
Contact Fuji Electric.
Yes
Set o00 to 0.
For Er8 measures when using RS485,
refer to the instruction manual for optional RS485 communication card.
7
*
7 Troubleshooting
7-6
FVR-C11S-EN
7-2 Other trouble
1) When motor does not rotate.
Note:
Verify the function settings for the operation commands and
frequency setting values on the keypad panel.
Motor does not start.
Does charge lamp light?
No
Yes
Remedy failed function
and start after resetting
alarm.
Yes
Are circuit breaker and
magnetic contactor on No
power supply side
switched ON?
Yes
Voltage of main power
supply input terminals
normal?
Alarm displayed on
keypad panel?
No
No
Keypad
panel
Check for failures such
as low voltage,
phase failure, loose
connection, and poor
contact, and remedy
accordingly.
Yes
Possibly of faulty
inverter.
Contact Fuji Electric.
Is the operation method
the keypad panel or
input signal?
If no error is detected,
continue operation.
Investigate cause of
failed switching, and
turn them ON if there is
no problem.
Input
signal
Yes
Does motor run if RUN
key is pressed?
7
No
No
Forward or reverse
operation command
given?
Yes
No
Yes
External wiring between
control circuit terminals Yes
FWD, REV - P24/CM
connected correctly?
Replace faulty switch or
relay.
No
Press UP key and set
frequency.
Remedy wiring error.
Yes
No
Does inverter start when
UP key pressed?
No
Does frequency setting No
No
exceed starting and
stop frequency.
Yes
Setting of built-in
POT (VR) and
connections of external Yes
circuit wiring between
control circuit terminals
13,12,11,C1 or X1, X2,
X2 - P24/CM correct?
Replace faulty
frequency setting
POT (VR), signal
converter, switch,
or relay contacts as
appropriate.
Yes
(Continued)
7-7
7 Troubleshooting
FVR-C11S-EN
(Continued)
Yes
Yes
Execute correct
frequency setting.
Yes
Are the frequency
limiter (High) and the
frequency setting lower
than starting frequency?
No
Inverter output terminals No
(U,V,W) supplied with
proper voltage?
Defective motor.
No
Load excessive?
Probably faulty inverter.
Contact Fuji Electric.
Yes
Yes
Motor wiring correct?
No
Remedy wiring error.
Yes
Setting of torque boost
amount correct?
Yes
Load is excessive, resulting in motor lock.
Lighten load. Also,
check that the brake is
adequately released if
mechanical brake is
used.
No
7
Raise torque boost
amount.
The motor does not rotate if the following commands are given.
1. An operation command is given while
coast-to-stop command is output to the
control terminals.
2. Both operation command FWD and REV
are input.
7 Troubleshooting
7-8
FVR-C11S-EN
2) When motor rotates but the speed does not change.
Motor rotates but speed
does not change.
Yes
Change the
setting.
Maximum frequency setting too low?
No
Yes
Upper/lower frequency
limiter activating?
No
Does speed change when Yes
freq. setting POT(VR)
turned
No
clockwise or counter
clockwise?
Built-in POT (VR)
Which frequency
setting method
is in use:
built-in POT (VR),
keypad panel,
analog signal,
or multistep
frequency?
Yes
Does the speed change
when UP or DOWN key
depressed?
Keypad panel operation
No
Can the frequency
setting signal
(0 to +10V, 4 to 20mA)
be changed?
Analog signal
7
No
Remedy wiring error.
Yes
Frequencies for each
multistep selecting
frequency different?
Yes
No
Multistep
frequency
External wiring
connections between
control terminals
X1,X2,X3 - P24/CM
connected correctly?
No
No
External wiring
connections between
control terminals
13,12,C1 - 11 correct?
Yes
No
Change the setting
frequency.
Yes
Setting of
acceleration/
deceleration time
excessively long?
No
Probably faulty
inverter or error
because of noise, etc.
Contact Fuji Electric.
Replace faulty
frequency setting
POT(VR) or signal
converter as
appropriate.
Yes
Change setting to
correct acceleration/
deceleration time for load.
7-9
7 Troubleshooting
FVR-C11S-EN
In the following cases, change of motor speed is
also restricted.
1. Bias frequency (F18) setting value is large.
2. Signals are input from both control terminals 12 and C1 and there is no significant
change in the added value.
(When F01 is 3)
3. Load is excessive and stall prevention
function is activated.
3) When motor stalls during acceleration
Motor stalls during
acceleration
Acceleration time Yes
setting too short?
Prolong time
setting.
No
Yes
Special
motor
in use?
No
No
Motor
terminal voltage
lowered?
Yes
Consult with
Fuji Electric.
Reduce moment
of inertia of load
or increase
inverter capacity.
7
Moment of inertia Yes
of motor or load
excessive?
Use thicker cable
for wiring
between inverter
and motor, or
shorten wiring
length.
No
Torque of load
excessive?
Yes
Reduce torque of
load or increase
inverter capacity.
7 Troubleshooting
No
Setting of torque No
boost amount
correct?
Increase torque
boost amount.
Yes
Probably faulty
inverter or error
because of noise,
etc. Contact
Fuji Electric.
7-10
FVR-C11S-EN
4) When motor generates abnormal heat
Motor generates abnormal heat
V/f pattern fitted to mo- No
tor?
Change the setting.
Yes
Motor been
continuously operated Yes
at extremely low
speed?
Use motor exclusive to
inverter.
No
Load excessive?
Yes
Lighten load or increase motor capacity.
Yes
Faulty motor.
No
Is the output voltage
(at terminals U,V,W)
balanced?
No
Probably faulty inverter.
Contact Fuji Electric.
7
7-11
7 Troubleshooting
FVR-C11S-EN
5) When function change disabled
Function change is
disabled.
Any of E01, E02, E03
set to 5?
Yes
Short-circuit between
terminals X1,X2,X3
corresponding to
function set to 5 and
P24/CM terminal.
No
F00 set to 0?
No
Set F00 to 0.
Yes
Attempt made to
Yes
change an
unchangeable function
during operation?
Change function after
stopping inverter.
No
Function to be changed Yes
F00 or H03?
Press STOP key and
UP or DOWN key
simultaneously.
Function to be changed
F02?
Yes
FWD or REV
terminal connected to
P24/CM terminal?
7
No
Open FWD and REV
command.
No
Function to be changed Yes
F05, F06, F24, H01 or
H02?
Change other
functions.
No
Contact Fuji Electric.
7 Troubleshooting
7-12
FVR-C11S-EN
8 Maintenance
and Inspection
Execute the daily inspection and periodic inspection for preventing a fault and ensuring
long-term reliability.
Note the following regarding the work.
8-1 Daily Inspection
During the operation and conduction, the visual
inspection for abnormal operation is executed
from the outside without removing the covers.
Inspections are usually done to check the following:
1. The expected performance (satisfying the
standard specification) is obtained.
WARNING
1. Start inspection five minutes or more after
turning off the power supply. (Check that
the charge lamp (CRG) goes off, and
check the voltage is 25V DC or below between terminals P(+) and N(-).
There is danger of electric shock.
2. Only the designated person can perform
the maintenance and replace components.
(Take off any metal objects such as a
watch or ring.)
(Use insulated tools.)
3. Never modify the inverter.
There is danger of electric shock or injury.
2. The environment satisfies the standard specification.
3. The keypad panel display is normal.
4. There are no abnormal sound, vibrations or
unpleasant odors.
5. There are no overheating marks or discoloration.
8-2 Periodic Inspection
8
The periodic inspection must be executed after
stopping the operation and cutting off the power
source and removing the surface cover.
After power-off, time is needed for the smoothing
capacitors in the DC section in the main circuit to
discharge. To prevent electric shock, make sure
that the voltage falls down to the safety value
(25VDC and below) using a multimeter after the
charge lamp (CRG) goes off.
8-1
8 Maintenance and Inspection
FVR-C11S-EN
Check part
Environment
Voltage
Keypad panel
Check item
How to inspect
Evaluation criteria
1. Check the ambient air temperature, humidity, vibration, atmosphere (dust, gas
oil mist, waterdrops)
1. Measure by visual inspection and
the meter.
1. The specified standard value must be
satisfied.
2. With visual
spection
in-
2. No foreign matter or
dangerous objects
left near the inverter?
Are the voltages in the main
circuit and the control circuit
normal?
Measure with the
multimeter.
The specified standard
value must be satisfied.
1. Is the display hard to read?
1., 2. Visual
inspection
1., 2. The display can
be read and is not
abnormal.
1. With Visual inspection
and
hearing
1., 2., 3., 4., 5.
Not abnormal.
2. Are foreign matter or dangerous objects such as
tools not left around the
equipment?
2. Are the characters complete?
1. Abnormal sound or vibration?
Structure such
as a frame or
cover
2. Loose bolts (part to be
tightened) ?
3. Deformation or damage?
4. Discoloration by
overheating?
2. Tighten more
3., 4., 5.
With visual
inspection
Comon
1. Loose and missing bolts?
1. Tighten more
2. Deformation, cracks, damage, and discoloration by
overheating and deterioration in the equipment and
the insulation?
2., 3. Visual
inspection
3. Stains and dust?
8 Maintenance and Inspection
1., 2., 3.
Not abnormal.
8
Main circuit
5. Stains and dust?
Note: A discolored
short-circuiting
bar does not
indicate a
problem.
8-2
FVR-C11S-EN
Check part
Main circuit
Conductor
and wire
Terminal
block
Smoothing
capacitor
Check item
How to inspect
Evaluation criteria
1., 2. Visual
inspection
1., 2. Not abnormal.
Not damaged?
Visual inspection
Not abnormal.
1. Electrolyte leakage, discoloration, crazing, and swelling of a case?
1., 2. Visual
inspection
1., 2. Not abnormal.
1. Discoloration and distortion
of a conductor by overheating?
2. Cracks, crazing, and discoloration of the wire sheath?
2. Is a safety valve not out,
and are any valves protruding excessively?
3. Measure using
the capacitance
measuring
instrument (Note)
3. The capacitance is
initial value x 0.85 or
more.
3. Measure the capacitance if
necessary
Main circuit
1. Unpleasant smell and crazing of the insulation by overheating
8
8-3
1. Olfactory and visual inspection
2. Visual inspection
or use a multimeter by removing a
connection
on
one side.
1. Not abnormal.
2. Less than about
±10% of the indicated resistance value
Resistor
2. No open circuit?
Transformer
and
reactor
Abnormal buzzing or
unpleasant smell?
Aural, olfactory, and
visual inspection
Not abnormal.
Magnetic
contactor
and relay
1. Rattling when operating?
1. Aural
1., 2. Not abnormal.
2. Roughness of contact?
2. Visual inspection
8 Maintenance and Inspection
FVR-C11S-EN
Check part
Check item
Control
PC board
and
connector
2. Unpleasant smell or
discoloration?
3. Cracks, damage, deformation, or excessive rust?
1. Tighten more.
2. Olfactory and
visual inspection
Evaluation criteria
1., 2., 3., 4.
Not abnormal.
3., 4. Visual
inspection
4. Electrolyte leakage or a
deformed mark on the
capacitor?
Cooling
fan
(1.5 kW
minimum)
1. Abnormal sound or
vibration?
2. Loose of bolts?
3. Discoloration
by overheating?
1. Aural and visual
inspection. Turn
with hand. (Make
sure power is off)
1. The fan must rotate
smoothly.
2., 3. Not abnormal
2. Tighten more
3. Visual inspection
Ventilation way
Table 8-2-1
Note:
Clogging-up or foreign substance on heat sink or intake/
exhaust ports?
Visual inspection
Not abnormal
Periodic inspection list
Use a capacitance measuring instrument available on the market which is
easy to use.
8 Maintenance and Inspection
Remark: If the equipment is stained, wipe it with
a cleaning cloth, which is chemically
neutral.
Vacuum-clean the dust.
8-4
8
Cooling system
Control circuit
1. Loose screws or connectors?
How to inspect
FVR-C11S-EN
8-3 Electrical
measurements in the
Main Circuit
The indicated values depend on the meter types because of harmonic
components included in the voltage and current of the main power supply (input) and the output (motor) side of the inverter. Therefore, when
measuring with a meter for the commercial power frequency, use the
meters shown in Table 8-3-1.
The power-factor cannot be measured using the power-factor meter
available on the market which measures the phase difference between
voltage and current. When the power-factor must be measured, measure the power, voltage, and current on the input side and output side.
Then, calculate the power-factor using the following formulas:
Single-phase
Power factor =
Electric power [W]
Input (power supply) side
Item
Voltage
waveform
x 100 [%]
Voltage [V] x Current [A]
Current
waveform
Output (motor) side
Voltage
waveform
DC circuit
Current
waveform
Ammeter
Voltmeter
Wattmeter
Ammeter
Voltmeter
Wattmeter
AR
VR
WR
AU,V,W
VU,V,W
WU,W
Meter
type
Movingiron type
Rectifier
or
movingiron type
Power
meter
Movingiron type
Rectifier
type 1)
Power
meter
8
Meter
name
Symbol
Table 8-3-1
-
P(+), N(-)
FM, 11
Terminal
section
DC
voltmeter
V
Movingcoil type
-
Meter for measuring the main circuit
1) When measuring the output voltage by rectifier type meter, an error may occur.
Use a digital AC power meter for good accuracy.
8-5
8 Maintenance and Inspection
FVR-C11S-EN
N(-)
P(+)
WR
AR
WU
AU
U
L1/L
VR
VU
L2/N
Inverter
Power supply
[In the case of single-phase input series]
+ V —
VV
WW
AW
W
11
V
+
M
3
AV
V
Inverter
FM
Motor
VW
—
Figure 8-3-1 Diagram for connections of meters
8-4 Insulation
Test
As much as possible, do not test the inverter with a megger because an
insulation test was done at shipping from the factory. If a megger test
must be done, test as described below. If the test method is incorrect,
there is a possibility of damaging the product. Incorrect use of test specifications for the dielectric strength test may damage products like megger test. If the dielectric strength test must be conducted, contact your
local distributor or nearest Fuji’s sales office.
1. Test with a 500V DC megger.
2. If the test voltage is connected to the control circuit, remove all
connection wires to the control circuit.
3. Connect the main circuit terminals using common wires as shown
in Figure 8-4-1
4. Execute a megger test only between the common wire connected
to the main circuit and the ground (terminal G).
5. If the megger indicates 5MΩ or more, it is normal.
(This is the value measured with an inverter only.)
Inverter
G
G
L1/L
L2/N
P1
P(+)
P(+)
N(-)
U
V
W
Megger
Figure 8-4-1 Megger Test
8 Maintenance and Inspection
8-6
8
1) Megger test for the main circuit
FVR-C11S-EN
2) Insulation test in the control circuit
The megger test and the dielectric strength test
must not be executed in the control circuit because those parts will be damaged and cannot
be repaired.
Use a high-resistance multimeter for the control
circuit.
1. Remove all external wiring from the control
circuit terminals.
2. Execute a continuity test between
grounds. If the result is 1MΩ or more, it is
normal.
3) External main circuit and sequence control
circuit
Remove wiring from all the terminals of the inverter in order not to apply the test voltage to
the inverter.
8-5 Parts Replacement
The life expectancy of a part depends on the
type of the part and the environment and the usage conditions. Parts should be replaced as
shown in Table 8-5-1.
For spare parts, please contact Fuji distributor.
Standard
term for
replacement
Comments
Cooling fan
3 years
Exchange for a new
part
5 years
Exchange for a new
part
(Decide after a
check)
Aluminum
electrolytic
capacitor
on the PC
board.
7 years
Exchange for a new
part
(Decide after a
check)
Other parts
-
Decide after a check
8
Part name
Smoothing
capacitor
Table 8-5-1
8-7
8-6 Inquiries about the Product
and Guarantee of the product
1) For inquiries
If there is damage, a fault in the product, or a
question about the product, provide the following
information to your local distributor or nearest
Fuji’s sales office:
a) Inverter type
b) SER. No. (equipment serial number)
c) Purchasing date
d) Inquiry contents (e.g., damaged part and
the extent of damage, questions, phenomenon, and status of a fault)
2) Guarantee of the product
The product guarantee term is one year after
purchase or 18 months from the year and month
of manufacture on the nameplate, whichever expires first.
However, the product will not be repaired free of
charge in the following cases, even if the guarantee term has not expired:
1. The cause is incorrect use or inappropriate
repairing and modification.
2. The product is used outside the standard
specified range.
3. The cause is dropping after purchasing or
damage during transport.
4. The cause is earthquake, fire, storm or
flood damage, lightening, abnormal voltage, or other natural calamities and secondary disasters.
Parts replacement
8 Maintenance and Inspection
FVR-C11S-EN
9 Specifications
9-1 Standard Specifications
Item
Specifications
FV R 0.1C 11S -7
FV R 0.2C 11S -7
FV R 0.4C 11S -7
FV R 0.75C 11S -7
FV R 1.5C 11S -7
FV R 2.2C 11S -7
Nominal applied
[kW]
motor 1)
0.1
0.2
0.4
0.75
1.5
2.2
Rated output
capacity 2) [kVA]
0.26
0.53
0.95
1.5
2.6
3.8
7.0
10.0
Voltage
[V]
z
Rated current [A]
3-phase, 200V/50Hz, 200, 220, 230V/60Hz
(Proportional to input voltage)
0.7
1.4
2.5
4.0
Overload
capacity
z
150% of rated current for 1 min.
Rated frequency
z
50, 60Hz
Phases, Voltage,
Frequency
z
Single-phase 200 to 240V 50/60Hz
Voltage/
frequency
variations
z
Voltage: +10% to -10%, Frequency: +5% to -5%
z
When the input voltage drops 165V or more, the inverter can be operated
continuously. When the input voltage drops below 165V from rated voltage, the inverter can be operated for 15ms.
Capability for
voltage dip 3)
Rated input
current 6)
(with DCR)
[A]
1.2
2.0
3.5
6.5
11.8
17.7
(without DCR)
2.3
3.9
6.4
11.4
19.8
28.5
Required power
supply capacity 4)
[kVA]
0.3
0.4
0.7
1.3
2.4
3.6
9 Specifications
9
Input power supply
Output ratings
Inverter type
9-1
FVR-C11S-EN
Braking
Item
Specifications
Braking torque 5)
[%]
150
100
50
30
z
Starting frequency: 3Hz (fixed), Braking current (0 to 100%),
Braking time ( 0.0 to 30.0s)
Protective structure
(IEC60529)
z
Closed type IP20
Cooling method
z
Self-cooling
DC injection
braking
Mass
[kg]
0.6
z
0.6
0.7
0.9
Fan cooling
1.6
2.2
Notes:
1) A 4-pole standard motor is assumed as a nominal
applied motor.
2) Inverter output capacity (kVA) at 220V.
3) When a momentary power failure occurs, while rated
voltage is applied 85% of load of nominal motor is
given.
4) When an optional power-factor correcting DC reactor is
used.
5) Average braking torque where an unloaded motor
decelerates and stops from 60Hz operation. (Varies
according to the motor efficiency)
6) The specification is calculated on assumption that the
inverter is connected to a 500 kVA-equivalent power
transformer.
9-2 Common Specifications
Item
Setting
Output frequency
9
9-2
Specifications
Maximum
output frequency
z
50 to 120Hz (in 1Hz steps)
Base
frequency
z
50 to 120Hz (in 1Hz steps)
Starting
frequency
z
1 to 6Hz (in 1Hz steps)
z
0.75 to 15kHz
(Vector-distribution PWM control selectable at
7kHz or less)
When operating at a carrier frequency of 9kHz or
above, the frequency may automatically drop to
8kHz to protect the inverter.
Carrier
frequency
Remarks
9 Specifications
FVR-C11S-EN
Specifications
Remarks
z
Analog setting: 1.0% of maximum frequency
(at 25 10°C)
z
Keypad panel setting: 0.01% of maximum
frequency (at -10 to +50°C)
z
Analog setting: 1/256 of Maximum frequency
z
Keypad panel setting: 0.1Hz (99.9Hz or less),
1Hz (100Hz or more)
z
Output voltage proportional to input voltage.
Base frequency adjustable from 50 to 120Hz.
z
Manual setting by code 0 to 31.
(setting for variable torque load available)
z
150% or more (at 6Hz)
z
Sinusoidal PWM control
(with simplified current-vibration suppression)
z
Keypad operation:
Accuracy
Setting resolution
Voltage/freq.
Characteristic
Torque boost
Starting torque
Control method
Control
(Multistep)
(Linked operation)
Acceleration/
deceleration time
9 Specifications
key:
Input signal: Forward/Reverse/Stop command,
Coast-to-stop command,
Trip command (External alarm),
Alarm reset
Operation method
Frequency setting
or
z
Keypad operation: Digital setting by
or
key
z
Built-in potentiometer
z
Analog input: 0 to +5VDC, 0 to +10VDC,
4 to 20mADC
z
Up to 4 multistep frequencies can be set in 2-bit
external signal by terminal function selection
z
Setting by RS485 serial communication (Option)
z
0.01 to 60.0s
(Independently adjustable acceleration and
deceleration)
9
Output frequency
Item
9-3
FVR-C11S-EN
Item
z
High and low limits can be set for output frequency
between 0 to 100% in Hz
z
The bias frequency can be set from -100 to +100%
in Hz.
z
5VDC or 10VDC gain can be selected.
Frequency jump
control
z
Jump frequency (3 points) and jump hysteresis
width (1 point) can be preset.
Restart after momentary power failure
z
Inverter restarts without causing inverter-trip when
power supply recovers.
PID control
z
PID control function is provided standard.
z
IP20
z
Natural cooling for 0.75kW or less.
Fan cooling for 1.5kW or more.
z
Output frequency, output current, and PID
reference value/feedback value.
The CRG lamp is on when the capacitor is
charged.
z
Function code and data code
Frequency limiter
Control
Bias frequency
Gain (frequency
setting signal)
Enclosure
(JEM 1030)
Cooling method
Indication
Specifications
Running, stopped
Program mode
Remarks
9
9-4
9 Specifications
FVR-C11S-EN
Item
Specifications
Remarks
[Cause of trip by code]
OC1 (Overcurrent: during acceleration)
z OC2 (Overcurrent: during deceleration)
z OC3
(Overcurrent: while running at constant speed)
z OU1 (Overvoltage: during acceleration)
z OU2 (Overvoltage: during deceleration)
z OU3
(Overvoltage: while running at constant speed)
z LU (Undervoltage)
z OH1 (Overheating: Heat sink)
z OH2 (Overheating: External alarm)
z OL (Overload: Motor)
z OLU (Overload: Inverter)
z Er1 (Memory error)
z Er3 (CPU error)
z Er8 (RS485 communication error)
z Lin (Input phase failure)
Tripped
Running, Tripped
Overload
Overvoltage
Protection
Overcurrent
Incoming surge
Undervoltage
Overheating
Short-circuit
9 Specifications
z
Fault history data is stored and indicated for the
past four trips. Data is retained while power is off.
z
Internal electronic thermal overload relay protects
inverter overload.
z
Detect the excessive DC link circuit voltage to stop
inverter.
z
Detect overcurrent due to overload on inverter output side to protect inverter
z
Detect incoming surge voltage between AC power
and the earth to protect inverter.
z
Detect the DC link circuit undervoltage to stop inverter
z
Detects the cooling fan fault or abnormal temperature rise of inverter to protect inverter.
z
Detect overcurrent due to short-circuit on inverter
output side to protect inverter.
9
Indication
z
9-5
FVR-C11S-EN
Item
Ground fault
Motor protection
Protection
Input phase failure
protection (only for
3-phase 200V series)
Specifications
z
Detects overcorrect due to ground fault on inverter
output side to protect inverter. (Detect at starting)
z
Protect general-purpose motor or FUJI inverter
motor with electronic thermal overload.
z
The inverter is protected against phase failure on
the input side or over-current due to inter-phase
imbalance.
z
Controls frequency to prevent OC trip in case of
the output current exceeds the limit value during
acceleration.
z
Lowers the frequency to hold almost constant
torque in case of the output current exceeds the
limit value during constant speed running.
z
Controls frequency to prevent OU trip in case of
the DC link circuit voltage exceeds the limit value
during deceleration.
z
"Retry" function can be set for the protective functions OC1 to OC3 and OU1 to OU3.
(No. of times of retry: 5, waiting time: 0.5s fixed.)
z
At 2000Vac for 1 min. between any main circuit
terminals and ground. (10mA or less)
z
At 500VDC megger test between any main circuit
terminals and ground (5MΩ or more)
z
Indoor use only. Do not install a dusty location
(Degree of pollution: 2) or expose to direct
sunlight, corrosive gases, flammable gases.
Stall prevention
Retry
Dielectric
strength test
Megger test
9
Environment
Installation location
9-6
Ambient
temperature
z
Ambient
humidity
z
5 to 95% RH (No condensation)
Altitude
z
1000 m or less
Remarks
-10 to +50°C
9 Specifications
FVR-C11S-EN
Specifications
Remarks
z
3 mm: 2 to less than 9 Hz
z
9.8m/s2: 9 to less than 20 Hz
z
2m/s2: 20 to less than 55 Hz
z
1m/s2: 55 to less than 200 Hz
Storage temperature
z
-25 to +65°C
Storage humidity
z
5 to 95% RH (No condensation)
Higher harmonics
current suppression
z
Terminal for connecting power-factor correcting P1, P(+)
terminal
DC reactor (DCR) is provided as standard.
Charging
suppression resistor
z
Charging suppression resistor is built-in for all inverter unit.
Cooling fan ON/OFF
control
z
Cooling fan can be automatically stopped when inverter is stopped.
Vibration
9
Others
Environment
Item
9 Specifications
9-7
FVR-C11S-EN
9-3 Dimensions
Terminal 2
4 - 5 x 6 holes
Terminal 3
Terminal 1
4 - 5 x 6 holes
Detailed diagram for 5 x 6 hole
Up/down or right/left symmetry
9
TERMINAL 1
TERMINAL 2
30A
30B
30C
G L1/L
FM
X1
X2
L2/N
P1
P(+)
V
W
G
X3
FWD REV
P24/
CM
11
12
13
C1
Single phase 200V series
TERMINAL 3
Series
Single
phase
200V
9-8
P(+)
N(-)
U
Dimensions (mm)
Type
Nominal applied motor
(kW)
FVR0.1C11S-7EN
0.1
FVR0.2C11S-7EN
0.2
85
73.5
32.2
15
48.2
FVR0.4C11S-7EN
FVR0.75C11S-7EN
0.4
0.75
115
140
103.5
128.5
42.2
67.2
25
50
58.2
83.2
D
80
D1
68.5
D2
27.2
D3
10
D4
43.2
9 Specifications
FVR-C11S-EN
Terminal 2
Terminal 1
Terminal 3
Layout of mounting hole
TERMINAL 1
30A
TERMINAL 2
30B
30C
G L1/L
FM
X1
X2
L2/N
P1
P(+)
V
W
G
X3
FWD REV
P24/
CM
11
12
13
C1
Single phase 200V series
TERMINAL 3
P(+)
N(-)
U
Series
Type
Nominal applied motor
(kW)
D
Single phase 200V
FVR1.5C11S-7EN
1.5
149
9 Specifications
Dimensions (mm)
D1
D2
D3
137.5
64
81.2
9-9
9
1.5C11
FVR-C11S-EN
Terminal 2
Terminal 1
Terminal 3
2.2C11S
Layout of mounting hole
9
TERMINAL 1
30A
TERMINAL 2
30B
30C
G L1/L
FM
X1
X2
L2/N
P1
P(+)
V
W
G
X3
FWD REV
P24/
CM
11
12
13
C1
Single phase 200V series
TERMINAL 3
P(+)
N(-)
U
Series
Type
Nominal applied motor
(kW)
Single phase 200V
FVR2.2C11S-7EN
2.2
9-10
Dimensions (mm)
D
137
D1
125.5
D2
89.2
D3
72
9 Specifications
FVR-C11S-EN
FVR0.1C11S-7EN
0.2
FVR0.2C11S-7EN
0.4
FVR0.4C11S-7EN
Input circuit
Single-phase
200V
[L1/L, L2/N]
Not
Not
Using using Using using
with
with
with
with
DCR. reactor. DCR. reactor.
3)
6
Output
circuit
[U,V,W]
Recommended wire size (mm2)
Input circuit
Single-phase
200V
[L1/L, L2/N]
Not
Using using
with
with
DCR. reactor.
3)
10
10
16
1.5
FVR1.5C11S-7EN
16
20
2.2
FVR2.2C11S-7EN
20
32
4)
4)
2.5
2.5
3)
6
0.75 FVR0.75C11S-7EN
4)
4)
SC-05
2.5
2.5
0.5
4)
4.0
SC-5-1
5)
5)
5)
5)
4.0
6.0
2.5
4.0
Peripheral device selection
1) The frame size and the series for the applicable molded-case circuit breaker
(MCCB) and earth-leakage circuit breaker (ELCB or RCD) differ according to the
capacity of transformer in the facility. Refer to each technical document for details.
2) The recommended wire size in the main circuit is for when the ambient
temperature is 40°C and conforming to LVD requirements. The wire size in ( ) is
minimum size for IV wire when no necessary of conforming to LVD.
3) Power supply impedance without a reactor must be 0.1% or equivalent by
converting to the inverter capacity. Based on the voltage imbalance, a current
imbalance of 10% is expected.
4) Crimp terminals up to 7.4mm in width (including tolerance) can be used.
5) Crimp terminals up to 9.5mm in width (including tolerance) can be used.
9 Specifications
9-11
9
Table 9-4-1
Magnetic
contactor (MC)
Control wiring
0.1
Molded case circuit breaker 1)
(MCCB)
Earth-leakage
circuit breaker
(ELCB or RCD)
rated current (A)
DCR circuit 2)
[P1][P(+)]
Inverter type
It is recommended to use a prescribed wire according to the EN60204
Appendix C.
Output circuit 2)
[U,V,W]
Nominal applied motor (kW)
Single-phase 200V
Power supply voltage
9-4 Selection of
Peripheral
Device
FVR-C11S-EN
10 Options
10-1 Built-in
Options
There is an optional built-in card for RS485 serial communication.
Ask at the inverter distributor for details.
10-2 External Options
Molded case circuit
breaker
The molded case circuit breaker (MCCB) is connected for protecting the
main circuit wiring to the inverter and for turning power on and off.
The rated current or the rated interrupting capacity varies according to the
power supply specifications.
For input power-factor
correcting
AC reactor (ACR)
DC reactor (DCR)
This is connected in the following cases.
1. When the power transformer capacity is more than 500 kVA
2. To reduce input harmonic current
The input power factor is improved to 0.75 to 0.85 (ACR).
The input power factor is improved to 0.9 to 0.95 (DCR).
3. If there is a thyristor load in the same power supply, if the capacitor for
power-factor correcting is turned on or off, or if the surge voltage in the
power supply is large (ACR only)
* The DC reactor is unnecessary when the AC reactor is used.
Magnetic contactor
(MC)
The inverter can be operated without connecting the magnetic contactor.
When the inverter protective function is activated, this should be connected to turn off the power for safety.
Surge absorber
This is connected to suppress the surge generated by the exciting coil
when switching on or off the magnetic contactor and the control relay.
S2-A-0 (for magnetic contactor), S1-B-0 (for mini control relay)
Frequency
setting POT
(VR)
This is connected when the frequency is set from the control circuit terminal using inverter power.
Table 10-2-1 External Options
10
10-1
10 Options
FVR-C11S-EN
11 Applicable reactors
Applicable inverter type
Input power-factor correcting DC reactor (DCR)
FVR0.1C11S-7EN
DCR2-0.2
FVR0.2C11S-7EN
DCR2-0.4
FVR0.4C11S-7EN
DCR2-0.75
FVR0.75C11S-7EN
DCR2-1.5
FVR1.5C11S-7EN
DCR2-2.2
FVR2.2C11S-7EN
DCR2-3.7
Table 11-1-1 List of applicable reactors
Connection method
Power
supply
Motor
L1/L
U
V
Input powerfactor correct- P1
ing DC reactor
G
W
G
G
P1
P(+)
Connection method of Input power-factor correcting DC reactor (DCR)
11
Fig. 11-1-1
P(+)
L2/N
M
3
11 Applicable reactors
11-1
FVR-C11S-EN
12 Compliance with standards
12-1 UL/cUL standards
[Applicable to products with
UL/cUL mark]
POWER INPUT
G
L1/L
L2/N
FUSE
(See instruction
manual for rating.)
P1
P(+)
12-1-1 General
The UL standards stand for Underwriters Laboratories Inc. and they are safety standards aiming at prevention of fire and other accidents in
the United States, thereby providing protection
for operators, service personnel and other persons.
The cUL standards are established by UL in the
view of compliance with the CSA standards. The
effect of products certified for the cUL standards
is equal to that of products certified for the CSA
standards.
[THR]
P(+)
N(-)
U
V
W
[CM]
G
THRMAL
OL RY
M
3~
12-1-2 Precautions
Fig. 12-1-1
Recommended wiring
When using the UL/cUL certified product, refer
to "Compliance with UL/cUL standards" on page
2.
For connection, refer to Fig. 12-1-1.
z
z
z
z
z
z
z
Open Type Equipment "indoor use only"
Suitable for use on a circuit capable or delivering not more than 5,000 rms symmetrical
amperes, 240V maximum.
When Protected by Class J Fuses.
Use 60/75 C CU wire only.
A Class 2 circuit wired with Class 1 wire.
Field wiring connection must be made by a
UL Listed and CSA Certified closed-loop terminal connector sized for the wire gauge involved. Connector must be fixed using the
crimp tool specified by the connector manufacturer.
Solid state motor overload protection is provided in each model.
12
12-1
12 Compliance with standards
FVR-C11S-EN
12-2 Compliance with EMC
directive in EU [Applicable to
products with CE mark]
12-2-1 General
The CE mark indicated on the FVR-C11S series
concerns with European minister directorate directive 89/336/EEC concerning the environmental electromagnetic compatibility EMC, and other
directives are not included.
The CE mark does not prove that the entire machine or system housing our product complies
with the EMC directive. Therefore indication of
the CE mark to the entire machine or system will
be done at the responsibility of the manufacturer
or the machine. This is because:
1. The CE mark attached on our product supposes operation of the product under certain
conditions. Satisfaction of the conditions is up
to the manufacturer of the machine.
12-3 Compliance with low voltage
directive in EU [Applicable to
products with TÜV or CE
mark]
12-3-1 General
The general purpose inverter is applicable for
the low voltage directive in EU. Compliance of
the FVR-C11S series with EN 50178/1997 has
been obtained from a testing organization in EU
and compliance with the low voltage directive is
asserted.
12-3-2 Precautions
Refer to "Compliance with low voltage directive
in EU" on pages 2 and 3 when using our product
as one complying with the low voltage directive
in EU.
2. Generally speaking, various devices are used
in a machine or system as well as our product. Therefore consideration for the entire
machine or system must be paid by the manufacturer of the machine.
The EMC directive includes immunity to the incoming noise and emission of outgoing noise.
The general purpose inverter houses an internal
element switching at a high speed which generates electric noise.
Applicable standards
Immunity: EN 61800-3
Emission: EN 61800-3
12
Above-mentioned "certain conditions" include
installation of a dedicated RFI filter in a metallic
control panel.
Refer to in exclusive Instruction Manual for RFI
Filter for details.
12 Compliance with standards
12-2
FVR-C11S-EN
13 Electromagnetic
Compatibility (EMC)
13-1 General
In accordance with the provisions described in
the European Commission Guidelines Document on Council Directive 89/336/EEC,
Fuji Electric Co., Ltd. has chosen to classify the
FVR-C11S range of Inverters as "Complex
Components".
Classification as a "Complex Components" allows a product to be treated as an "apparatus",
and thus permits compliance with the essential
requirements of the EMC Directive to be demonstrated to both an integrator of FVR Inverters
and to his customer or the installer and the user.
FVR Inverters is supplied ‘CE-marked’, signifying compliance with EC Directive 89/336/EEC
when fitted with specified filter units installed
and earthed in accordance with this sheet.
This Specification requires the following performance criteria to be met.
EMC product standard EN61800-3/1996
Immunity:
Second environment
(Industrial environment )
Emission:
First environment
(Domestic environment )
13-2 RFI Filters
It is strongly recommended that the appropriate
FVR input filter is used, as shown in the followings, to limit RF current flowing into the main
supply circuit.
Without an input filter a FVR installation may not
meet statutory requirement. FVR Inverters contain high-power semi-conductor devices which
are switched at high speeds to synthesize a
near-sinusoidal current wave form across the
frequency range of output.
Rapidly-changing voltages and currents will
generate some degree of electromagnetic emission. Emissions will be predominantly conducted
through the motor and the mains supply cables,
although some radiated emissions will be detected in close proximity to the drive system.
It is essential that precautions are taken both at
the design stage and at the time of installation to
prevent radio frequency interference (RFI) from
the drive system affecting sensitive equipment in
close proximity.
The RFI filters range are designed especially for
the FVR Inverter and help to ensure EMC compliance of machinery and installations using the
Inverters.
The Inverters may be mounted on top of the filter
using the integral fixing positions, the intention
being that valuable space inside wiring cabinets
may be saved. (Refer to Table 13-2-1)
Finally, it is customer’s responsibility to
check whether the equipment conforms to
EMC directive.
13
13-1
13 Electromagnetic Compatibility (EMC)
FVR-C11S-EN
Applied
Inverter
Filter Type
Rated
Current
FVR0.1C11S-7EN
FVR0.2C11S-7EN
EFL-0.2C11-7
4A
FVR0.4C11S-7EN
FVR0.75C11S-7EN
EFL-0.75C11-7
12A
FVR1.5C11S-7EN
EFL-1.5C11-7
20A
FVR2.2C11S-7EN
EFL-2.2C11-7
29A
Max.
Rated
Voltage
1ph
240Vac
Mount
Dimensions
Dims Y x X
LxWxH [mm]
[mm]
Wiring
L’ [mm]
Total1)
Weight [kg]
Inverter
Fixings
Fig.
180x86x38
155.5x60
125
Approx. 0.7
M4 x 12
(4)
Fig.
13-2-1
180x86x38
155.5x60
125
Approx. 0.7
M4 x 12
(4)
Fig.
13-2-1
190x117x46
165x89
140
Approx. 1.2
M4 x 16
(4)
Fig.
13-2-2
240x148x46
216x118
150
Approx. 1.5
M4 x 16
(4)
Fig.
13-2-2
Table 13-2-1 RFI filters Dimensions
Note:
For detail, refer to the instruction manual
that came with the RFI filters.
Remark: The EMC compliance tests have been
carried out on the basis of the
EN61800-3. Measurements were
done with 50m motor cable (EN55011/
class A) and 10m motor cable
(EN55011/ class B).
Remark: To minimize the conducted radio disturbance in the power distribution system, the length of motor cable should
be as short as possible. And it is user’s
responsibility to confirm that the apparatus, which the inverters installed in,
conforms to EMC directive when longer motor cable is used or other installation conditions are different from those
described in this manual.
Load wiring to
inverter input
Load wiring to
inverter input
LOAD
LOAD
Inverter
fixing
positions
Inverter
fixing
positions
LINE
Earth
Stud
Mains
input
terminals
RFI Filters
Earth
Stud
Mains
input
terminals
Fig. 13-2-2
RFI Filters
13
Fig. 13-2-1
LINE
13 Electromagnetic Compatibility (EMC)
13-2
FVR-C11S-EN
13-3 Recommended Installation
Instructions
It is necessary that these instructions must be
followed to conformed to EMC Directive.
Follow the usual safety procedures when working with electrical equipment. All electrical connections to the filter, Inverter and motor must be
made by a qualified electrical technician.
(Refer to Fig. 13-3-1 and Fig. 13-3-2)
1. Use the correct filter according to
Table 13-2-1.
2. Install the Inverter and filter in the electrically
shielded metal wiring cabinet.
3. The back panel of the wiring cabinet of board
should be prepared for the mounting dimensions of the filter. Care should be taken to remove any paint etc. from the mounting holes
and face area of the panel. This will ensure
the best possible earthing of the filter.
4. Use the screened cable for the control , motor
and other main wiring which are connected to
the Inverter, and these screens should be securely earthed.
5. It is important that all wire lengths are kept as
short as possible and that incoming mains
and outgoing motor cables are kept well separated.
Metal Wiring Cabinet
RCD or
MCCB
RFI
filter
L
L
N
N
1ph
Power supply
Fig. 13-3-1
Inverter
L1/L U
V
L2/N W
Screened Motor Cable
Motor
M
3
Screening must be electrically
continuous and earthed at the
cabinet and the motor.
Recommended Installation
13
13-3
13 Electromagnetic Compatibility (EMC)
FVR-C11S-EN
When power-factor correcting
DC reactor is used.
Power supply
1-phase
200 to 240V
50/60Hz
P1 P(+) P(+) N(-)
RFI Filter
L
L
Metal Wiring
Cabinet
L1/L
Motor
U
M
V
N
N
L2/N
W
G
Frequency setting voltage input
(0 to +10VDC)
G
13
In case of motor power
cable, fix a part of shield by
a cramp.
12
11
Frequency setting current
input (+4 to +20mADC)
Forward operation
command
Reverse
operation
command
C1
FWD
3
Analog
monitor
FM
30A
REV
30B
X1
30C
Analog meter
To 11 terminal
Alarm output
for any fault
X2
X3
P24/CM
In case of speed control cable,
fix a part of shield by a cramp
as well motor power cable.
Recommended installation detail inside the enclosure (SW7 set to P24)
13 Electromagnetic Compatibility (EMC)
13
Fig. 13-3-2
13-4
Solutions for Drives
European headquarter
Fuji Electric FA Europe GmbH
Goethering 58
D-63067 Offenbach/Main
Tel.: +49-69-66 90 29-0
Fax: +49-69-66 90 29-58
[email protected]
http://www.fujielectric.de
Germany
Fuji Electric FA Europe GmbH
Vertriebsgebiet South
Drosselweg 3
72666 Neckartailfingen
Tel.: +49-71 27-92 28 00
Fax: +49-71 27-92 28 01
[email protected]
Fuji Electric FA Europe GmbH
Vertriebsgebiet North
Friedrich-Ebert-Str. 19
35325 Muecke
Tel.: +49-64 00-95 18 14
Fax: +49-64 00-95 18-22
[email protected]
Schwitzerland
Spain
Fuji Electric FA Europe GmbH
Zweigniederlassung
Altenrhein
IG-Park
9423 Altenrhein
Tel.: +41-71-8 58 29 49
Fax: +41-71-8 58 29 40
[email protected]
Fuji Electric FA Espana
Ronda Can Fatjó 5, Edifici D, Local B
Parc Tecnològic del Vallès
08290 Cerdanyola,
Barcelona
Tel.: +34-93-58 24-3 33/5
Fax: +34-93-58 24-3 44
droyfujielectric.de
Distributor:
MGB-C11EN99.09
Technische Änderungen vorbehalten