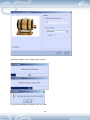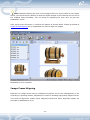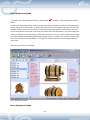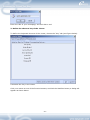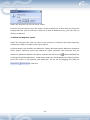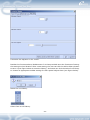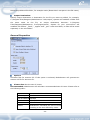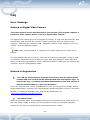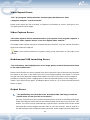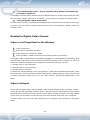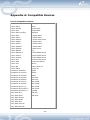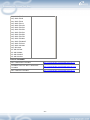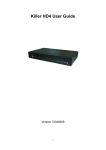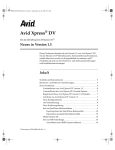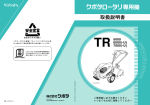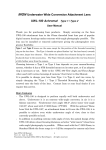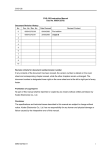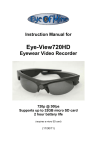
1
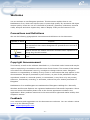
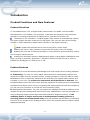
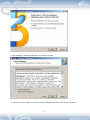
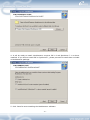
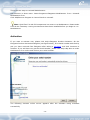
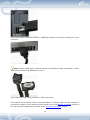
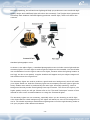
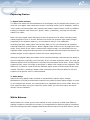
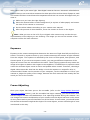
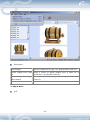
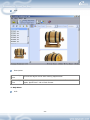
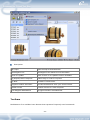
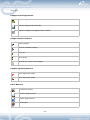
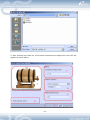
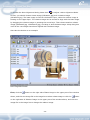
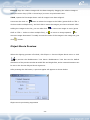
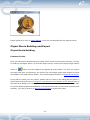
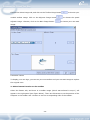
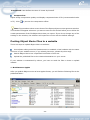
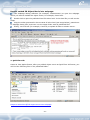
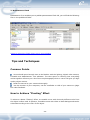
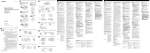
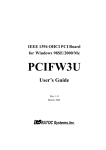
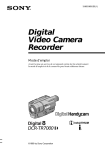
Modelweaver 3.00 User Manual
Welcome ........................................................................................ 2
Introduction .................................................................................. 3
Product Functions and New Features......................................... 3
On-line Documentation and Updates ......................................... 4
Main Steps of Creating a 3D Object Movie ................................. 4
Before you begin,........................................................................... 5
Computer Preparations.............................................................. 5
Photography Preparations ....................................................... 13
Launching Modelweaver 3.00 ...................................................... 18
Software Interface, Menu and Toolbars ................................... 18
Capturing Automatically or Importing Existing Video or Images
................................................................................................ 25
Frame Editing .......................................................................... 31
Object Movie Preview .............................................................. 36
Object Movie Building and Export ............................................ 37
Posting Object Movie Files to a website................................... 46
Tips and Techniques .................................................................... 48
Common Points........................................................................ 48
How to Achieve "Floating" Effect ............................................. 48
Lighting Technique .................................................................. 49
Using Special Background ....................................................... 50
Shooting Metal and Reflective Objects..................................... 50
Centering the Objects on the turntable.................................... 51
FAQ.............................................................................................. 52
Error Message.......................................................................... 52
Related to Digital Video Camera .............................................. 54
Other Troubleshooting............................................................. 55
Technical Support .................................................................... 55
Appendix A: Compatible Devices.................................................. 56
-1-
Welcome
You are welcome to use Easypano products. This document explains how to use
Modelweaver 3.00, which can help the user to create high quality 3D, interactive VR object
movies quickly. Users can use it in the fields of products, garments, collections, arts and
crafts, antiques and other objects they want to display vividly on the Internet or CD.
Conventions and Definitions
We use the following typographical conventions and definitions in this document:
Typeface or Icons
Purpose
Italic
Used to emphasize new terms and concepts at the point where they
are introduced. Also used to designate the quoted terms or menus of
the software
Used to arouse the readers' attention towards certain operations or
Note
Tip
things they should consider
Used to offer some extra techniques on how to use Modelweaver
3.00
Copyright Announcement
This manual, as well as the software described in it, is furnished under license and may be
used or copied only in accordance with the terms of such license. The content of this manual
is furnished for informational use only, is subject to change without notice. Easypano
assumes no responsibility or liability for any errors or inaccuracies that may appear in this
documentation. Except as permitted by such license, no part of this publication may be
reproduced, stored in a retrieval system, or transmitted, in any form or by any means,
electronic, mechanical, recording, or otherwise, without the prior written permission of
Easypano.
Modelweaver 3.00 and Easypano are trademarks of Easypano Holdings Inc. Microsoft,
Windows and Internet Explorer are registered trademarks of Microsoft Corporation. About
more on license information please refer to the license agreement included in the
applications. Other products mentioned in this manual have rights and marks held by their
respective owners.
Feedback
Your comments and suggestions on this document are welcome. You can submit a ticket
here or by the following email:
Email: [email protected]
-2-
Introduction
Product Functions and New Features
Product Functions
To use Modelweaver 3.00, a Digital Video Camera and a Turntable, such as Kaidan
Motorized PiXi™-M Turntable, are necessary. It provides an extremely easy automatic
approach of creating professional 3D Object Movie, and has the functions of:
The ability to use a FireWire™-enabled digital video camera to automatically capture
the object images and then create the 3D VR object (The user can also utilize existing
images or video captured by digital video cameras or still digital cameras.)
Note: Digital still cameras can be used if they have a video mode.
Enabling the user to edit, optimize and preview the quality of the 3D images.
Enabling the end user to observe the object in every direction and interactively control
the VR object with the mouse
Creating the 3D object movies in Modelweaver Applet (a java applet embedded in html
page, no plug-in required), QuickTime™ VR(QTVR) format or Flash format in order to
publish the 3D Objects to a web server or CD.
Product Features
Modelweaver 3.00 has the following advantages over other object movie creating software:
A. Timesaving. The user can use a digital video camera to automatically capture and
import the images into the computer quickly (existing images or video can also be used).
Modelweaver 3.00 is especially designed to be used with your Digital Video Camera and
turntable, so the user can produce an interactive 3D Object Movie in minutes. The
bundled software saves the user's time and high expenses of creating a more complicated
professional VR object movie. Once your lighting and capturing device have been prepared,
you can use your computer to control the most necessary steps.
B. Misalignment Elimination. The user can adjust the misalignment and boundaries of the
images and preview the adjusted result at any time. Modelweaver 3.00 has provided two
ways of aligning images (Point Alignment Mode and Move Alignment Mode), so the
wobbling defect in object movies due to misalignment in taking pictures or
shooting videos can be eliminated easily. Also this software has the ability of redefining
the zone of the images of the 3D Object Movie, which has ensured that the objects can be
displayed optimally.
-3-
C. Customization of logo and toolbar. The user can use their own logo and toolbar in the
viewer to promote their own products. The user can customize the downloading waiting
logo, functional buttons in the 3D Object Movie viewer.
D. Integration into web page and CD. The user can embed the object movie into web
pages and multimedia CDs easily. Flash, Java Applet and QuickTime VR formats are
available so the object movie can be integrated into web pages and multimedia
CDs.
What's new in Modelweaver 3.00
Support Flash output
No limit to the dimension of the viewer in the publish settings.
The flash output is compatible with Tourweaver 3.00 and later version.
Means of activation changed
On-line Documentation and Updates
The contents of this manual can also be found in the Help menu of the software (Help>Help
Topics). In addition, the software updating and supplementary manual can be found at:
http://www.easypano.com
Main Steps of Creating a 3D Object Movie
To create and output a 3D Object Movie, 6 main steps are needed:
Step 1: Preparing the hardware (the object, computer, background, lighting, digital video
camera, or other capturing devices, such as a still digital camera and Turntable) and
installing Modelweaver 3.00
(refer to Computer Preparations and Photography Preparations)
Step 2: Launching Modelweaver 3.00 and Importing the video or images
(refer to Capturing Automatically or Importing Existing Video or Images)
Step 3: Editing the images (refer to Frame Editing)
Step 4: Previewing the 3D Object Movie (refer to Object Movie Preview)
-4-
Step 5: Creating the 3D Object Movie and saving it as a Modelweaver Applet or QTVR
(QuickTime VR) file (refer to Object Movie Building and Export)
Step 6: Exporting the Object Movie file to a website or CD and viewing the result
(refer to Posting Object Movie Files to a website)
The following sections will help you to learn more about how to use Modelweaver 3.00 to
create a 3D Object Movie step by step. To learn more details, please refer to the Tips and
Techniques section of this manual where you may find some useful hints.
Before you begin,
Computer Preparations
Computer System Requirements
To use Modelweaver for Windows, you will need:
Operating system
Microsoft Windows 2K/XP/Vista
Computer hardware
PIII 800MHz or faster processor.
FireWire(tm) (iEEE1394)-enabled (On-board, PCI card or PCMCIA)
128 MB RAM
100 MB available hard disk space
Video display of 800*600 pixels or higher with 256 colors
Network interface card or modem must be installed for activation
Capturing device
Camcorder/Webcams/Digital cameras (Movie mode)
Turntable
Kaidan Motorized PiXi-M(tm) recommended. For more information about Kaidan's
turntables please visit http://www.kaidan.com.
Others
IE5.0, Netscape Navigator: 7.0 under Windows and 5.0 under Mac, Firefox 1.0 or later
version
-5-
Sun JRE 1.4.1_02 (Java Runtime Environment) or later version under Microsoft
Windows OS
QuickTime7.0
(full
components)-Choose
all
the
components
when
installing
QuickTime7.0
DirectX8.1 or later version
To view object movies, you will need:
Operating system
Microsoft Windows 2K/ XP/Vista; Mac OSX10.2 or later version
Computer Hardware
PC: PII400 or faster processor; Mac OSX: G3-400MHz or faster processor
128MB RAM
Video display of 800*600 pixels or higher with 256 colors
Others
IE5.0, Netscape Navigator: 7.0 under Windows and 5.0 under Mac, Firefox 1.0 or later
version
To view Java Applet, Sun JVM or Microsoft JVM (Java Virtual Machine) is necessary.
To view QTVR, QuickTime 5.0 or later versions is necessary.
To view Flash Object, flash player 9.0 or later version is necessary. Please download
Flash Player 9.0 and install it.
Software Install and Uninstall Instructions
Install Modelweaver 3.00 Trial Version
Download the trial version of Modelweaver 3.00 from Easypano website.
Close all other Windows applications which are currently running.
Double click the Modelweaver installation package to run the installation application.
1. Click Next to go to the License Agreement.
-6-
2. After reading the important agreement, click Next to continue.
3. Select the folder where you wish to install Modelweaver then click Next to continue.
-7-
4. It will be ready to install. Modelweaver requires JRE 1.6 and Quicktime 7.1 or above
installed. If you did not install JRE or Quicktime 7, please proceed to install them included
in Modelweaver package.
5. Click Install to start installing the Modelweaver software.
-8-
6. Click Finish to complete the installation.
Uninstall Modelweaver 3.00
-9-
There are two ways to uninstall Modelweaver:
Use shortcut in Start menu. Start>Programs>Easypano>Modelweaver 3.00> Uninstall
Modelweaver 3.00.
Click Add/Remove Program in Control Panel to uninstall.
Note: QuickTime7.0 with full components is a must to run Modelweaver. Please make
sure all the necessary running environments have been installed before you begin to run
Modelweaver.
Activation
If you want to activate now, please click Help>Easypano Product Activation. On the
Easypano Product Activation dialog box (see figure below), fill in Serial number with the Key
pair you have received from Easypano after taking a purchase, and click Continue to
activate. If you still have not got the Serial Number, please click Help>Buy Now to order
Modelweaver 3.00 online and receive your serial number.
The following Activate online screen appears after the software being activated
successfully.
- 10 -
Please see more info about Product Activation.
Tip: If you want to move your software from current computer to a new one or plan to
upgrade your hardware, transferring license should be done in advance. This feature
deactivates the product on your current machine so it can be reactivated on the new or
upgraded computer. See here for info about transfer license.
Connection to Digital Video Camera
Connect the FireWire™ (iEEE1394) cable to the FireWire cable port of your digital video
camera.
- 11 -
Connect the other end of the FireWire™ (iEEE1394) cable to the FireWire cable port of your
computer.
Note: Some digital video cameras identify the FireWire2 cable as FireWire™ cable,
while some identify it as iEEE1394 or iLink™.
4 pin (left) and 6 pin (right) FireWire™ cable connectors
This manual has provided further recommendations of digital video camera settings to
enhance the quality of your object movies. Please refer to the Before you begin section of
this manual. More details can be found in the Tips and Techniques section.
- 12 -
Although we recommend connecting the digital video camera to the computer to use
Modelweaver 3.00 to create the object automatically, it is not a must. Modelweaver 3.00
still allows the user to import existing images or video to create object movies. Please refer
to the Capturing Automatically or Importing Existing Video or Images section of this manual
to learn how to utilize the existing photos or video.
Photography Preparations
As a kind of photography, the capturing of digital images (including the capture of a 3D
Object Movie) is a technique of capturing the effect of light on different materials, surfaces
and environments. Below are some useful recommendations when using Modelweaver 3.00
to create high definition images.
Background Preparation
The user should use a backdrop with a uniform color, which will be used to separate the
object from the background. Be sure the background contrasts sufficiently with your object,
i.e. you should shoot light color objects before a darker background and vice versa. In this
way, your object can stand out from the background to save the time that would be
normally spent on editing the images. The "Lighting Requirements" section of this manual
will help you choose the correct ways of lighting the background according to the objects
you shoot. You can find more information about the background set in the "Tips and
Techniques" section of this manual.
Lighting Requirements
During the production of high quality images, lighting is one of the most important factors.
Generally speaking, the better the lighting, the better the image quality will be. You should
change the lighting according to the different materials, shapes and sizes of the objects.
Below are some useful lighting hints:
Prepare an illuminative setting for the photography, which will be used in lighting your
object. Be sure the lighting is even, for example the lighting from several hot lamps. Do not
use strobe lighting or flashlight. Also you should avoid using fluorescent lamps because they
give out flickering light which can be detected by the camera.
- 13 -
Generally speaking, the soft and even lighting will help you produce an even result with high
quality. Bright and undiffused light will induce the extremely "hot"(bright white) spots and
extremely dark shadows. Diffused lighting produces a softer light, which will reduce the
contrast.
Standard photographic scene
As shown in the above figure, a standard photographic scene includes a main light and two
accessory lights. The main light is used to light the object on the turntable. You should take
into consideration how the light is cast on the object, because when the lighting location is
too high, too low or too partial, irregular shadows will appear and your object images will
look different than the original one.
The Accessory lights are used to produce a gentle and even background, which will make
your object stand out. And the accessory lights can accompany the main light to light the
heavy shadow area which is produced by the main light. Generally speaking, a well-lit
background should provide same lighting from top to bottom. The evener the light is, the
higher quality result you will get. Please refer to the "Tips and Techniques" section of this
manual to learn more recommendations on using the accessorial lights.
The accessory lights are not necessary, especially when you are shooting a well-lit light
color object before a dark background, the object will stand out more if the background is
not lit. You should experiment with different lighting sets to find the right shooting mode to
suit your purpose under different situations.
- 14 -
Capturing Device
1. Digital Video Camera
To capture the video into the Modelweaver 3.00 software via your digital video camera, you
must set your digital video camera at normal "recording" mode (not at "Playback" mode or
"VCR" mode). On most digital video camera, this mode is called "movie" mode. In addition,
setting your digital video camera to "photo" mode, (if possible), will help the software
capture live video.
Most new-style digital video cameras also have a special kind of video recording mode,
called progressive scan or P-scan. Because this mode can produce high quality images
(especially in the dynamic capture), we recommend using it. The traditional
recording-and-play mode (often used for play back on TV) has interlaced two separate
scanning fields into a whole frame. When a digital video camera is set at progressive scan
mode, every frame of the video is captured as a whole image, not interlaced from two
separate fields. Using the scanning area in the traditional shoot mood also can capture the
needed images, but the object's rotation will cause image blurring.
Although any digital video camcorders can be used theoretically, cameras with the ability to
lock the exposure (manually) will work best. If you use auto-exposure mode, you may get
different exposures of the object as it turns from one orientation to the other. These varying
exposures may cause one image to be lighter or darker with respect to its neighbors. This
difference in exposure could cause the resultant object movie to flicker and pulsate when
viewed. Therefore, choosing a digital video camcorder which has the ability to lock the
exposure to a specific value is recommended.
2. Other Ways
Apart from using digital video cameras to automatically capture object images,
Modelweaver 3.00 has provided other means for the users to import object images. In order
to use a digital still camera, the camera has to be equipped with a movie mode. Once you
have captured video using your camera's movie mode, you can then import the movie
directly into the software.
White Balance
White balance is a name given to the method of color correction to deal with different
lighting conditions. Normally the human eye compensates for different lighting conditions,
but when taking shots with a digital camera the camera has to find a white area to correct
- 15 -
other colors cast by the same light. Most digital cameras have an automatic white balance
feature that you can override to measure the white point from a white sheet of paper or card.
The camera will then record that color temperature and use it to correct all images until you
reset it.
Make sure you have the right lighting.
Move the camera before a white background (or a piece of white paper) and ensure
the lens of the camera is uncovered.
Set the white balance according to your camera user manual.
After the process of white balance, move the camera to focus on the object.
Note: What you see on the LCD of your digital video camera may not be the true
representation of the object you are shooting. The image you see on the monitor of the
computer will be the best reference.
Exposure
Exposure is the camera settings that determine the amount of light that falls on the film or
sensor. The built-in exposure meter in your camera measures the amount of light reflected
from the subject .The exposure is affected by the choice of film speed, lens aperture, and
shutter speed. If you use auto-exposure mode, you may get different exposures of the
object as it turns from one orientation to the other. These varying exposures may cause one
image to be lighter or darker with respect to its neighbors. This difference in exposure could
cause the resultant object movie to flicker and pulsate when viewed. Therefore, choosing a
digital video camcorder that has the ability to lock the exposure to a specific value is
recommended. Please use the monitor of your computer, not the viewfinder or LCD of your
camera to judge the quality of the image, because the final result will look mostly like the
result you see on the monitor.
Frame Adjusting
Once your object has been put on the turntable (refer to the Using Kaidan Motorized
PiXi™-M Turntable section), and the turntable has begun rotating, you should make sure
that the object is within the Modelweaver 3.00 capturing window during the rotation. You
can change the location and direction of your camera until the object has been in the center
of every frame and no part of it has fallen out of the frame. In most cases, you should locate
the camera at the same height as the object. For most objects, a more natural angle of view
is achieved in this way.
- 16 -
Please use the video playback in the capture window in the Capture images from digital
video camera interface to frame the image, not the viewfinder or eyepiece on the camera to
frame the image. Later, you can edit the images and crop off unnecessary margins (refer to
the Frame Adjusting section below). We recommend you to frame the images correctly
before reaching the final result.
Turntable Requirements
In the final object movie, the object will rotate a full 360 degrees. To achieve this effect, you
should use a motorized turntable - Kaidan Motorized PiXi™-M Turntable (see Figure below).
This turntable is a continuous motion turntable with an in-line on/off switch. When the
power is on, the object will rotate at a given speed on the turntable. During the rotation, the
camera will acquire the images of the object from the complete rotation of the turntable.
Kaidan Motorized PiXi-M Turntable
You should put the turntable on a clean, smooth and even surface, like a desktop or a table
top. Placing the object upon the turntable is relatively straightforward. For most
symmetrical objects, you simply place the object on the center of the turntable. If you think
the object might slip as you the turntable rotates, use some double-sticky tape or modeling
clay. Kaidan offers a variety of optional pedestals that screw into the threaded center hole
of the PiXi™-M. These pedestals are helpful if you need to elevate the object in order to view
the object from slightly below or if you want to shoot it straight on.
Certain asymmetrical objects, such as shoes, need to be placed with more consideration. A
shoe, for example, looks best when the center of the heel is placed at the center of rotation.
It looks more natural in this position as if someone was modeling the shoe by pivoting their
ankle. Each object is different and you'll need to plan and experiment to achieve the best,
most natural results.
- 17 -
To learn more about the Kaidan Motorized PiXi™-M Turntable, please refer to the turntable
user manual or visit http://www.kaidan.com.
Launching Modelweaver 3.00
Software Interface, Menu and Toolbars
Software Interface
Modelweaver 3.00 has a main interface as shown below.
A. Image file selection window:
All selected images are listed in this window, you can add or subtract images from the list.
B. Image preview window:
- 18 -
This window will show a scaled down view of the image selected in the image file selection
window.
C. Image alignment adjusting window:
This window will show all the images needed to be adjusted.
D. Title of interface:
As being the main interface of Modelweaver 3.00, this interface is called "Modelweaver
3.00".
E. Menu:
Modelweaver 3.00 has a drop down menu that provides all the main functions to the user.
Refer to Menu for more information.
F. Toolbars:
Modelweaver3.00 has a set of buttons that represent frequently used commands. Refer to
Toolbars for more information.
G. Information of version and VM memory:
The version information is shown at the lower left corner. VM (Virtual Machine memory)
information is shown at the lower right corner, where the total and free VM memories are
shown.
Menu
This section gives an overview of the menu commands and related keyboard shortcuts of
the main interface of Modelweaver 3.00.
1. File menu
GUI:
- 19 -
Description:
Open Images
Open the image files of .jpg, .gif, .png formats (CTRL+O).
Extract images from video Extract a series of object images from a video file of
file
QuicktTme™, avi formats (CTRL+E).
Capture images from digital Capture a series of object images from a digital video camera
video camera
(CTRL+D).
Exit
Exit Modelweaver 3.00.
2. Adjust Menu
GUI:
- 20 -
Description:
Insert images
Remove
selected
images
Insert one or multiple images into the image list.
Remove one or multiple selected images from the image list.
Move up
Move the selected image up in the image list.
Move down
Move the selected image down in the image list.
Reverse the order of
the images
Point alignment
Reverse the order of the images in the image list.
Select the "Point Alignment Mode". Images can be adjusted to a
common point in all the images.
Select the "Move Alignment Mode". Images can be aligned by using a
Move alignment
base image and aligning the remaining images to the base image by
overlapping.
Customize viewer
Customize the appearance and the adjustment of the viewer.
3. Export Menu
- 21 -
GUI:
Description:
Preview Object
Movie
Export
Preview the object movie after making adjustments.
Object Build the object movie and save it into an .htm or html file in Modelweaver
Movie
Applet, QuickTime™ VR or Flash format.
4. Help Menu
GUI:
- 22 -
Description:
Help Topics
Opens the help file of Modelweaver.
www.easypano.com
Visit easypano.com website for more information
Check for Update
Check if there is an updated version available
Bug Report/Feature Request
Submit Bugs or feature requests
Buy Now
Purchase in online store
Easypano Product Activation
Activate Modelweaver with your serial number
Transfer License
Transfer license to a new computer
About Easypano Modelweaver
Copyright information of Modelweaver.
Toolbars
Modelweaver 3.00 toolbars have buttons that represent frequently used commands.
- 23 -
They are:
Images importing buttons:
Open images
Extract images from video file
Capture images from digital video camera
Image selection buttons:
Insert images
Remove selected images
Move up
Move down
Reverse the order of the images
Images adjusting buttons:
Point alignment mode
Move alignment mode
Other Buttons:
Customize viewer
Preview object movie
Export object movie
Help topics
- 24 -
Capturing Automatically or Importing Existing Video or
Images
Modelweaver 3.00 has provided three methods to import object images that will be the
sources of the Object Movies. Using the file menu as shown below or the toolbar, the user
can open existing images, extract images from a video file, or automatically capture images
from a digital video camera.
Importing Existing Images
When the Open Images is selected, an interface as shown below will appear:
Users can choose the appropriate folder in the left box in the above figure and click
the
button to choose images one by one or just click the
button to choose all the
images in the chosen folder. Chosen images will be shown in the right box as shown below.
- 25 -
Users can also click
or
to remove the chosen images from the right box.
Importing Existing Video
Modelweaver 3.00 also allows you to import a video from an existing video file. This is
suitable in a situation when you have captured a video before using the software, and now
plan to use the existing video to create an object movie. Modelweaver 3.00 can import
Windows video files (. AVI), or the file recognized by QuickTime (.mov). By selecting the
Open the video file under the File menu or clicking on the
button you can open a
Windows video format image file or a QuickTime video.
Before importing, you should record the video with your digital video camera beforehand.
When the digital video camera begins to capture, the turntable should have been rotating
with a certain speed and then the object rotating video will be captured.
Note: Please ensure the digital video camera has recorded at least one rotation of the
object.
1. When the Extract images from a video file is chosen, an interface as shown below will
appear. The user can choose images from QuickTime or .avi video files:
- 26 -
2. After choosing the video file, an interface named Extract images from video file will
appear as shown below.
- 27 -
The interface as shown above gives users the ability to set the relative parameters of the
object images extracted. The interface has 6 parts: A-F, which is explained below:
A. Capture window and its toolbar:
After the video is imported, the video can be played back in this window. The user can play,
pause and stop the video by clicking the buttons (as in the traditional video players, such as
Media Player, QuickTime) on the toolbar at the bottom of the window.
B. Time message:
When the video is playing, at the bottom of the window, the video elapsed time and total
length of video is shown. The time is measured in seconds.
C. Turntable period setting:
The user can select the length of the object rotation time for extracting the object images.
The time is measured in seconds.
D. Frame numbers setting:
The user can decide the total number of the extracted images here by clicking in the drop
down menu. Modelweaver 3.00 has provided four choices here - Web dialup (12 frames),
Web broadband (16 frames), CD (24 frames) or "User define". Users can make choices
according to their needs. The higher the number of frames, the larger the final object movie
file size will be and increase the download time.
The above figures are the image extraction process
E. Startup time setting:
The user can decide when to start the extraction. The first frame will be the beginning of the
object movie (also can be changed in the later adjusting process). As for the exact time of
the corresponding frame, the user can view the elapsed time in the B area when the object
video is playing the needed frame and pause it.
- 28 -
F. Start or Cancel:
When all the above parameters are set, the user can click on the Start button to start the
automatic process of extracting images or the Cancel button for later extraction.
After clicking the Start button, Modelweaver 3.00 will begin to extract the object images and
show the interfaces as shown above.
You can also use the existing video stored on the DV tape of your digital video camera, and
proceed with the steps below:
You should connect the digital video camera and the computer with the Fire Wire cable.
Set the digital video camera on VCR mode (a mode that allows you to see the DV tape
playback through the viewfinder of the digital video camera - refer to your digital video
camera's user manual to learn more details). You can see a video feedback that is read from
the tape on the video capture window.
Use the button on your digital video camera to control the playback until you find the
video period needed on the DV tape.
When the needed video on the DV tape is played, click the Start button.
Note: Please ensure that the DV tape has recorded at least 360 degrees of rotation.
Capturing Automatically with Digital Video Camera
It is the most notable feature of Modelweaver 3.00 that in addition to importing existing
images or videos to creating 3D Object Movies, it also captures the live video fed from a
digital video camera to automatically create an object movie.
When
Capture images from a digital video camera is chosen, and if a video capture
device has been plugged in via a FireWire™ cable properly, an interface will appear as
shown below.
- 29 -
Capturing images from a digital video camera
The process of image extraction from the video
- 30 -
When the turntable begins to rotate, the user can see a live video feed of the object rotation
in the capture window. The user should frame and focus the object in that window and click
the Start button, then the software will automatically capture the images of the rotating
object and the dialog boxes as shown above will appear.
Tip: Whatever angle of the object appearing in the preview window when you click the
Start button, will be the first frame of the 3D Object Movie. If you plan to choose the front
of the object as the first angle of viewing the object, you should click the Start button when
the front of the object appears in the capture window. If the video captured is unsatisfactory,
you can click Start again to start a new capture after making any adjustments.
Modelweaver 3.00 captures a period of video (the default time length is 15 seconds).The
user can change it by typing the number in the "Turntable period (second)" field.
Note: You need to quit all other applications when capturing the images from the
digital video camera, because the process of capturing video consumes a considerable
amount of memory. In using Modelweaver 3.00 we strongly recommend using a digital
video camera and a Kaidan Pixi™-M continuous motion turntable.
Frame Editing
Frame Adjusting
After the image-importing procedure, a new interface named Define the zone of images will
appear as shown below.
- 31 -
Modelweaver 3.00 has the ability of rotating and defining the zone of the images. Users can
change the direction of the images and redefine the boundary of the images.
The series of the acquired object images will appear in the right column of the interface.
After clicking on one of the images, it will appear in the left preview window. In the preview
window, you can find a yellow rectangular boundary around the object. You can use the
mouse to drag the blue arrows on the yellow cropping bars to redefine the zone of the image.
The user can also click on the
buttons to rotate the selected image counterclockwise
or clockwise (see Figure below).
The process of image rotation
Defining the zone of images gives you the ability to center the object displayed in the center
of the frame window, and crop off some unnecessary background. This not only reduces the
file size of your object movie, but also produces a more clean-cut result.
- 32 -
Note: Because defining the zone of the image will act on every frame of your object
movie, you should check carefully so that the object images in some frames are not out of
the cropped frame boundary. You can keep on adjusting the zone until you get the
satisfactory result.
After clicking the OK button, a window will appear as shown below. Please go ahead to
Image Frame Aligning for an explanation on how to align the images.
Modelweaver 3.00 interface
Image Frame Aligning
Because one image frame may be misaligned to others due to the misalignment in the
recording or shooting session, adjustment is useful in building high quality object movies.
Two kinds of alignment modes (Point Alignment Mode and Move Alignment Mode) are
provided in Modelweaver 3.00.
- 33 -
Point Alignment Mode
To choose the Point Alignment Mode, please click
or Adjust->Point Alignment Mode
menu.
In the Point Alignment Mode, there is a red cross that is used to reference a common point
on the object in all the frames. Initially, the red cross is on the upper left corner of all of the
images. Please move the red cross to a unique point of the object in all frames. You can
move the position of the red cross by a left mouse click for Windows or by just clicking the
mouse for Macs on the first image. When the position of the red cross is determined, drag
the other images (PIC00002.jpg-PIC00012.jpg) one by one with your mouse or arrow keys
from the second to the last frame to change the relative position of the images and the
red-cross.
Take the buckle as an example:
Point Alignment Mode
Move Alignment Mode
- 34 -
To choose the Move Alignment Mode, please click
or Adjust->Move Alignment Mode.
At first, you should choose a base image (PIC00001.jpg) and a relative image
(PIC00002.jpg). The base image is fixed on the bottom layer, while the relative image is
floating on the upper layer. The relative image can be moved to align with the base image
by dragging the relative image or pressing the arrow keys. Then choose another relative
image (PIC00003.jpg, ¡¤PIC00012.jpg), and align it with the base image. Keep doing this
until all the rest images have been aligned with the base image.
Also take the buckle as an example:
Move Alignment Mode
First, click the
button on the right side of Base Image in the upper part of the window
above, and click the image file in the image list to select a base image or click the
button
on the right side of Relative Image in the upper part of the window above, and click the
image file in the image list to change the relative image.
- 35 -
Second, align the relative image with the base image by dragging the relative image or
using the arrow keys (CTRL+ Arrow keys) to move 10 pixels each time.
Third, repeat the first steps above until all images have been aligned.
Users can also click on
button to select the images in the folder (press Shift or CTRL +
clicks to select multiple files), and click OK to insert the images your have selected. After
adding the images to the list, you can also click
to remove an image or more (press
Shift or CTRL + clicks to select multiple files), or
to move an image upward,
to
move an image downward. To totally reverse the order of the images in the image list, just
click
button.
Object Movie Preview
When the aligning process is finished, click Export-> Preview Object Movie menu or click
to preview the Modelweaver 3.00 Movie. Modelweaver 3.00 has set the default
dimension of the preview window at width 250 and height 200, and a custom dimension can
be set in the Preview Object Movie Argument.
After pressing the OK button, a preview applet will appear as shown below:
Object movie previewing arguments
- 36 -
Please go back to refer to Frame Editing if you are not satisfied with the aligned result.
Object Movie Building and Export
Object Movie Building
Common Points
Once you have been satisfied with the object movie result in the preview window, it is time
to build the 3D Object Movie. To build the object movie, click Export>Export Object Movie
menu or
button, and the dialogue will appear as shown below. The user can choose
the export file type, the directory, the viewer size, the image quality and whether to show
the toolbar in the object movie viewer. This will be explained further in Object Movie Export.
If you plan to create your own viewer, please click on Cancel in the dialog box as shown in
figure below and go directly to Using Your Own Adjuster and Toolbars in the Browser part of
this manual to design your own toolbars to be shown in your final object movie. If you plan
to use the default toolbars Modelweaver 3.00 has provided (as you have seen in the preview
window), you can go directly to Object Movie Export to export the result.
- 37 -
Using Your Own Adjuster and Toolbars in the Browser
Click Adjust>Customize Viewer menu or click
button, and the adjuster and toolbar
image selecting window will show. Please do as follows step by step:
1. Select resource images
- 38 -
Choose the Select Image tab, and click on the Toolbar Image button
needed toolbar image. Click on the Adjuster Image button
adjuster image. Likewise, click on the Wait Image button
to choose your
to choose the speed
to choose your own wait
image.
Customize viewer
To display your own logo, you can use your own toolbar and your own wait image to replace
the original ones.
2. Select button function on the toolbar
Select the Button tab, and there is a toolbar image (which was selected in step 1) will
appear in the right panel (see Figure below). There are 8 buttons to set the position of the
hotspots in the toolbar and 1 button to set the corresponding URL of the toolbar.
- 39 -
Customize the button in the movie viewer
Six buttons: Auto Left
Homepage
, Auto Right
, and Adjuster
, Zoom In
, Zoom Out
,
are set as default in the toolbar. The hotspots have
been added to these six buttons respectively.
You can move the six hotspots with your mouse or by using the arrow keys on the keyboard.
Also you can resize the six hotspots with your mouse. To learn the function of a hotspot, just
move your mouse to the hotspot, and wait for 1 or 2 seconds. To set a hotspot on a position,
just click the corresponding hotspot square, and drag it to the corresponding position above
the graphics icon on the toolbar. To set the URL of the Homepage, click
dialog will appear as shown in Figure below:
- 40 -
, and then a
Enter the URL of your homepage, and click OK to end.
3. Define the shortcut key of the viewer
To define the keyboard shortcut of the viewer, choose the "Key" tab (see Figure below).
Customize the key in the viewer
Click your mouse on one of the function buttons, and click the Redefine button, a dialog will
appear as shown below.
- 41 -
Define the shortcut key for the movie viewer
Press the key you want to use in the viewer, and click OK to end. If don't want to change the
setting this time, just click Cancel to skip out. If want to delete the key, just click Clear to
make it undefined.
4. Define the Adjuster speed
Select the Adjuster tab, and you can set the minimum, maximum and initial speed by
changing the default numbers (see Figure below).
As shown below, this interface is divided into 3 parts: Minimum speed, Maximum speed and
Initial speed. Minimum speed and Maximum speed represent the minimum and the
maximum speed the slide bar can adjust, and the user can click the
buttons beside them
to change the default parameter. Initial speed means the initial speed of the object rotation
when the viewer is just opened, this parameter can be set by dragging the slide bar
in this part.
- 42 -
Customize the adjuster in the viewer.
Besides the functions above, Modelweaver 3.00 has provided users the functions of saving
the settings in their libraries. After a new setting, the user can click the Add to library button
to save it (see Figure below to name the library). And users can click the Select from library
to choose an appropriate toolbar setting for their special objects later (see Figure below).
Name the new library.
Select from an old library.
- 43 -
After the settings above, click OK to end.
Object Movie Export
After building the 3D Object Movie, the user should save the result. Modelweaver 3.00 has
provided three file formats to export the user's 3D Object Movies- Modelweaver Flash
format, Applet format and QTVR format. Choose Export>Export Object Movie or click on
button to publish 3D Object Movies.
Basic Steps:
1. Select publishing format.
2. Enter file name.
3. Select output destination.
4. Set general publishing parameters in general.
5. Click Publish.
Publishing Format
Type:
You may publish as Flash VR, Easypano Virtual Tour Player (Java Applet) or QuickTime VR,
or all of them at the same time.
File Name:
- 44 -
Name the published file folder, for example result (Please don't use space in the file name).
Output Destination:
Specify output destination or destination for the file you want to publish, for example,
C:\Program Files\Easypano\Modelweaver 3.00\output\; System will establish a folder with
the
same
name
as
the
file,
so
output
destination
becomes:
C:\Program
Files\Easypano\Modelweaver 3.00\output\result\. System for your convenience will
establish sub folders "_flash", "_applet" and "_qtvr" under this folder, so files will be saved
separately in the sub folders.
General Properties
Options:
Generate files for autorun CD: If this option is selected, Modelweaver will generate an
autorun.inf file for autorun CD.
Viewer Size: Set the size of viewer.
Recommended: Modelweaver will calculate a recommended size of viewer. Please refer to
the following table:
Purpose
Recommended Size of Viewer
Web Dialup
400x300
Web Broadband 800x600
CD
1024x768
Print
1024x768
Custom
Modelweaver calculates the size of viewer
according to the size defined by users.
- 45 -
Customized: User defines the size of viewer by himself.
Compression:
Adjust image compression quality and display compressed size of file (recommended value
is 75). Click
to preview the compression effect.
Note: Figures above show screen shots of the Export object movie arguments window.
This window will appear whenever you want to save the file and will allow you to define the
certain parameters of the 3D Object Movie that you export. If you do not change any of the
settings in the window, the software will export the movie with the default settings.
Posting Object Movie Files to a website
There are steps to upload Object Movie to website:
Use website editing tools like Dreamweaver to establish a local website with the same
structure of your website server (if you already have site, please skip this step).
Publish Object Movie into a specified local folder of this site.
Upload the published files to the relative destination on your server.
If your website is maintained by others, you have to send the files to them to upload
instead.
1. Modelweaver Applet
After you publish Object movie as Java Applet format, you will find the following files in the
published folder:
- 46 -
How to embed 3D Object Movie into webpage:
Use webpage editing software (for example, Dreamweaver) to open the webpage
which you want to embed the object movie, for example, home.html.
Double click to open the published html file index.html. In this html file you will see the
steps.
Copy the codes generated in the text area of index.html (see image below), paste them
to webpage home.html, and save it to the same folder with all published files.
Finally, use FTP tool (for example, CuteFTP) to upload all files to website server.
2. QuickTime VR
Same as Java Applet format, after you publish object movie as QuickTime VR format, you
will find the following files in the published folder:
Steps to embed the QTVR object movie into webpage
- 47 -
3. Modelweaver Flash
Modelweaver 3.00 enables you to publish panorama as Flash VR, you will find the following
files in the published folder:
Steps to embed the Flash object movie into webpage
Tips and Techniques
Common Points
Users should spend enough time to be familiar with the lighting, digital video camera,
turntable and Modelweaver 3.00 software. The time spent on learning how everything
works together will save you a lot of time on photography which in return will give you high
quality object movies.
Read the manual to your camera thoroughly.
Use the monitor of your computer, not the viewfinder or LCD of your camera to judge
the video feedback.
How to Achieve "Floating" Effect
To achieve a better "floating" effect, a turntable cover with obviously different color from
the object is often used. In practice, turntable covers with white or black background can be
selected according to the color of the object.
- 48 -
White background:
Use a white background, and use a turntable cover (which is available at
http://www.kaidan.com) to cover the turntable.
Adjust your lighting to minimize the shadows.
Once your lighting is adjusted, please set the white balance function of your digital
video camera according to the "White Balance" section of this manual.
When you have set the white balance of your digital video camera, look through the
viewfinder to correct the other settings of your digital video camera.
Maybe you will have to increase the exposure to minimize the shadows. Please avoid
overexposure or underexposure. You will find the white background pure white when you
have increased the exposure. Remember: Our purpose here is to create a VR image in
which an object is floating before a pure white background.
When you feel satisfied with the video in the preview window, click the "Start" button.
If necessary, adjust the settings of the Digital video camera if you are not satisfied with
the results and shoot the object again.
Black background:
As the Kaidan Motorized PiXi™-M Turntable is black, there is no need to cover the turntable
since the background is black.
Adjust the lighting on your object, and reduce the lighting on the background and
turntable. You should also make the room dark enough, so that you can control the lighting
and make the black area darker.
Once your lighting is set, set the white balance function of your Digital video camera
according to the "White Balance" section of this manual.
When you have set the white balance of your Digital video camera, look through the
viewfinder to correctly set the other settings of your Digital video camera.
Maybe you will have to increase or decrease the exposure to ensure that the object has
the right brightness when the background and the turntable are in the darkness. Please
avoid overexposure or underexposure. You will find the black background or the turntable
will be too bright and a pure black when you have prolonged the exposure. Our purpose
here is to produce images in which nothing but the object appears on a pure black
background.
When you feel satisfied with the video in the capture window, click the "Start" button.
If necessary, adjust your setting of the Digital video camera and shoot the object again.
If necessary, you can use a photo editing software to adjust all the pictures (if you have
saved the object movie as a Modelweaver Applet file, and have used .jpeg pictures).
Lighting Technique
Using the simple lighting equipments if without professional equipments
If you do not have professional lighting equipments available as mentioned in lighting
requirements, Acceptable results can also sometimes be achieved with even the simplest of
setups. For example: using nothing more than the overhead light in your room, one desk
- 49 -
lamp, a plain white wall, and a piece of paper on the turntable, you can produce images
which may not be the best, but are good enough for some purposes.
Using diffusers
Using diffusers can produce diffused light and make the light evener and softer. Diffused
light is light that is spread out and coming from many sources. The material that diffuses
the light is called a diffuser. Some lights have attachments to which diffuser can be attached,
but you can diffuse most light simply by positioning diffuser between your light and subject.
In most cases, you can clip a piece of vellum paper to the light with clothespins.
Note: DO NOT attach diffusing material to unapproved lights as it may cause a fire
hazard and be extremely dangerous.
Using bounce Card
Bounce card is a reflective material to help produce better lighting. The light coming from a
normal light source hits the bounce card and is bounced off so that the light is diffused and
scattered then ultimately landing on the subject. Scattering the light in such a manner
produces even, soft lighting--far softer than can be attained with most diffusers.
Photography stores sell specially designed bounce cards in variety of materials, textures,
and colors. However, a piece of foam core or poster board will also work very well. You also
can use a rigid material for your bounce card because it will be easier to position and direct
the light to your subject and will be more durable. To set up lighting using a bounce card, set
up the light you wish to bounce in a position not pointing directly at the subject. Position
your bounce card in a way that the light hits the card and is reflected back in the direction
of your subject. A good way to think of it might be: if you were to stand where the light is
and throw a ball in the direction the light is pointing to hit the bounce card, would the ball
bounce off of the card and hit your subject? Experiment with the position of the bounce card
then determine what works best for your composition.
Using Special Background
For certain objects, you can use special background to suit the object so as to attract the
attention by placing them in settings that they would naturally appear or be used in. For
example, if you are shooting a hiking boot, you might add elements like rocks or tree bark
to the setup to show how and where the boot will be used.
Shooting Metal and Reflective Objects
Generally speaking, because metals and reflective objects reflect the color and brightness
of their surroundings, either a black or white background is recommended to use. Naturally,
because of the reflective nature of metals and like objects, there will be extreme white and
black points in the object. Since the goal is to have a natural-looking object as your final
product, it is acceptable and sometimes a nice presentation method to show some glare or
washed out areas in these kinds of objects.
- 50 -
Centering the Objects on the turntable
Some principles when centering objects on the turntable
Centering objects on the turntable can be tricky. For a symmetrical object like a box or
cylinder, try to make sure that there is equal space around the object from the edge of the
object to the outside edge of the turntable to avoid wobbling.
For asymmetric objects, centering is trickier. In some cases, placing the highest point of the
object directly over the center of the turntable will produce the most appealing results.
Other objects look best when their center of mass (as much weight is on one side as the
other) is directly over the center. For example, if you were shooting a cowboy boot, your
first inclination may be to place the boot's geometric center (which falls somewhere
between the toe and arch of the foot) on the center of the turntable. In doing this, you may
notice it produces a kind of strange effect that is not consistent with ergonomics of the
human leg and foot. By centering the boot based upon its most massive area (near the front
of the heel) you will find that as the boot rotates, it appears more centered and correct.
Using the turntable template
Because of the difficulty of centering some objects on the turntable, we have included a
printable turntable template in the installation package to help center the object, which is a
PDF file that you can open and print on your computer.
The turntable template is a circle that you cut off with scissors from the printed file and then
adhere to the top of your turntable. It has crosshair aligning marks as well as concentric
rings that will help you to visually align any object you are shooting to the center of the
turntable. Simply follow the directions on the printed template sheet.
To ensure that the centering template is itself centered, you may want to punch a small hole
in the center of the template. Then, when you place the template on the turntable, you can
put a pencil or other narrow cylindrical object through the hole, so that the template is
centered with the threaded hole at the center of the turntable. Once this is done, you should
tape down the edges of the template, so that it does not slide when you reposition your
object.
Using a removable marking device and ruler
Another method of creating centering guides on your turntable is to use a removable
marking device and ruler to mark specific measurements directly on the turntable. Be sure
that whatever you are using to mark the turntable with is not permanent and will be easy to
clean off when you are finished. Some recommended marking devices include: small pieces
of easily removed tape, a wax pencil, or a dry-erase marker. If you do place marks on the
surface of the turntable, be sure to measure each mark from the exact center of the
turntable. The center of the turntable is designated by a threaded hole in the exact center
of the Kaidan Motorized PiXi™-M turntable.
You may use the threaded hole as a reference point, since it is located at the center of the
surface of the turntable.
- 51 -
FAQ
Error Message
Related to Digital Video Camera
"No video capture device was detected on your system. This program requires a
functional video capture device, such as a digital video camera."
The Digital video camera may not be plugged in properly, or may have shut itself off. Quit
the software, and check all the FireWire™ cable connections from the camera to the
computer. Make sure the camera is "ON", has power (battery or AC adapter), and is not
"asleep." Run the application again.
Note: some cameras default to a power-saving mode when there is a tape in the
camera.
It is also possible that the Fire Wire™ cable and connectors are damaged. Check to make
sure that the connectors and the cable are intact. Note that damage is often difficult to
detect visually. Quit the software, insert a different FireWire™ cable into your camera and
computer, and run the application again.
Related to Registration
"You can try all the features with this trial version. But the object movie
created with trial version will be watermarked with an Easypano logo. To
remove the logo, you should purchase Modelweaver online and activate it
with the serial number you get from Easypano."
If you are using the trial version of Modelweaver 3.00, you will get this message. Please
launch Modelweaver 3.00 and click Help>Easypano Product Activation to type in the Serial
Number. To obtain an activation pair, please order Modelweaver at
http://www.easypano.com/buynow.htm.
"Activation Failed"
When the activation failed, this message will show up. The reasons will be mainly due to: (1)
the input serial number is wrong; (2) the computer in which you activated Easypano
product for use may not comply with the authorized license number.
- 52 -
Video Report Errors
"File "D:\Program Files\Panorama Technologies\Modelweaver 3.00
\samples\samples'' was not found!"
Please check where the file is located, or whether the filename is correct, and type in the
new path and file name again.
Video Capture Errors
"No video capture device was detected on your system. This program requires a
functional video capture device, such as a digital video camera."
The Digital video camera may have automatically shut itself off. Turn the camera off and on
again and restart the capture.
Note: some cameras default to a power-saving mode when there is a DV tape in the
camera.
Modelweaver3.00 Launching Errors
"Out of memory, the loaded picture is too large; please scale all the pictures down
to the same dimension."
Please check whether too many images have been imported, some of them are too big than
the others or the zone in the define the zone of the image window is too small. Try to find
and get rid of the abnormal images and redefine the zone of the frame of the images if
possible or drag the yellow cropping bars so that the desired sections of the image are
visible. Then import them again. If dialogue above is still on, try to close the software and
launch it again.
Output Errors
"The publishing size must be lower than 640*480. The image would be
scaled down, would you like to continue?"
An error occurred when the numbers that have been entered in the Width and Height
fields of the Object movie setup in the Publish Dialog are too big. If you click the "OK"
button, the movie will be automatically exported into a window that has the width
less than 640 and the height less than 480. Or you can click the "Cancel" and fill in
the blanks again with a width less than 640 pixels, and a height less than 480 pixels.
- 53 -
"The following files exist.....If you continue, they will be overwritten! Do
you wish to continue?"
A message occurred when exporting the 3D Object Movie to a path where there are files
with the same names. Click OK to overwrite, or click Cancel to change the export name.
"Generating the object movie fails!"
An error occurred when exporting the 3D Object Movie. Please check the name of the result
to make sure it is valid. If need to export the file into a new directory, please create the
directory first.
Related to Digital Video Camera
Video is not Played Back in the Window
Is the camera on?
Has the lens cap been removed?
Is the camera in "Stand By" Mode?
Is the FireWire™ cable connected to the camera and the computer?
The Digital video camera may be not properly plugged in, or have powered itself down. Quit
the software, and check all the connections from the camera to the computer. In order to
make sure that the computer has recognized a connected camera, you can:
1. Double-click on "My Computer"
2. Double-click on "Control Panel"
3. Double-click on "System"
4. Select the "Device Manager" tab. Your FireWire™ cable card should be listed under "1394
Bus Controller" and the camera should be listed under "Imaging Device." Once your camera
is working properly, make sure it is in the "ON" position, and launch Modelweaver 3.00
again.
Video is Delayed
There will be a slight delay with the digital video camera feeding to the computer monitor.
This is the normal operating condition of the camera/computer connection and you should
take this factor into account when shooting your object images. However, too long a delay
(more than five seconds) may be the sign of a more serious issue with your computer.
In some cases, you may find that rebooting your computer will eliminate an excessive
delay.
- 54 -
The Video form the Digital Video Camera is Shaky, Blurring or
Irregular
Is there more than one camera plugged into the computer's FireWire™ cable ports?
Disconnect or turn off the camera you are not using.
Is the camera in proper working condition?
Check that your camera and/or FireWire™ cable port are not damaged. Refer to your
camera user manual for further assistance.
Other Troubleshooting
1. The Monitor of the Computer is Blank
Is the computer monitor on or the computer monitor's power cord plugged into an
electrical outlet?
Is the video cable from the monitor secured firmly to the computer's video port?
Refer to the user's guide for your monitor if you still have problems.
2. The Computer has Crashed or has no Response
This is most likely due to low memory or system resources in your computer. Quit all
running applications and launch Modelweaver 3.00 again.
Technical Support
Before you contact technical support, have you:
Read your turntable and camera's manuals and referred to the information of this
Modelweaver 3.00 user manual at: http://www.easypano.com/product-documents.html
Visited the support column in http://www.easypano.com for updated troubleshooting
information
Read the FAQ section of this manual
If
you
still
have
problems
after
the
above
[email protected] or contact us via other ways.
- 55 -
steps,
you
could
email
to
us:
Appendix A: Compatible Devices
List of compatible cameras
Camcorders
Still Digital Cams (movie mode)
Canon Elura
Nikon
Canon Elura2
Coolpix 990
Canon GL1
Coolpix 880
Canon Mini DV MV3i
Olympus
Canon MV1
C-2020 Zoom
Canon MV10
C-2040 Zoom
Canon MV100
C-2100 Ultra Zoom
Canon MV20i
C-3000 Zoom
Canon MV30i
C-3030 Zoom
Canon MV200i
C-3040 Zoom
Canon MV300i
D-490 Zoom
Canon Optura
Fuji
Canon Optura Pi
FinePix 6800 Zoom
Canon Ultura
FinePix 4900 Zoom
Canon Vistura
FinePix 4800 Zoom
Canon XL1
FinePix 4700 Zoom
Canon XM1
FinePix 40i Zoom
Canon XL1
Canon
Canon ZR
Power Shot G1
Canon ZR10
Pro 90 IS
Panasonic AG-EZ20
Kodak
Panasonic PV-DV100
EZ200
Panasonic PV-DV200
SONY
Panasonic PV-DV400
DSC-S50
Panasonic PV-DV600
DSC-S70
Panasonic PV-DV710
MVC-FD85
Panasonic PV-DV800
MVC-FD90
Panasonic NV-C5 (J)
MVC-FD92
Panasonic NV-DJ100(J)
MVC-FD97
Panasonic NV-MG3 (J)
Toshiba
Sony DCR-PC1
PDR-M5
Sony DCR-PC10
PDR-M70
Sony DCR-PC100
Sony DCR-PC2E
Sony DCR-PC3
Sony DCR-TRV-5E
Sony DCR-TRV-8E
- 56 -
Sony DCR-TRV7
Sony DCR-TRV8
Sony DCR-TRV9
Sony DCR-TRV11
Sony DCR-TRV120
Sony DCR-TRV310
Sony DCR-TRV320
Sony DCR-TRV510
Sony DCR-TRV520
Sony DCR-TRV720
Sony DCR-TRV900
Sony DCR-TRV900E
Sony DCR-TR7000
Sony DCR-VX1000
Sony PD100A
JVC GR-DVl300
JVC GR-DVM90
JVC GR-DVL805
JVC GR-DVL300
List of Turntable
PiXi™ Motorized Turntable
Turntable Cover for PiXi™ Motorized
Turntable
PiXi™ Manual Turntable
http://www.kaidan.com/Detail.bok?no=4
http://www.kaidan.com/Detail.bok?no=14
http://www.kaidan.com/Detail.bok?no=2
- 57 -