1
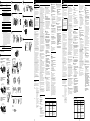
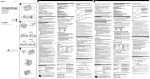
3-862-537-24(1)
Models to be used with the mounting
shoe A
Modèles à utiliser avec le support de
montage A
Mounting shoe C
Support de montage C
Usable at a depth as low as 2 meters
(6.5feet) under water.
To replace the rubber sheet
(Models to be used with the mounting
shoe A-3 only)
3
Pour remplacer la feuille de
caoutchouc
(Modèles devant être utilisés avec le
support de montage A-3 seulement).
4
1
Notice
2
2
L
5
Models to be used with the mounting
shoe B
Modèles à utiliser avec le support de
montage B
K
OC
TA
ND BY
Precautions
1
Mounting shoe C
Support de montage C
7
2
3
To disassemble after using
Démontage après
utilisation
Mounting shoe B
Support de montage B
4
1
8
Models to be used with the mounting
shoe D
Modèles à utiliser avec le support de
montage D
SPK-TRC
G
Mounting shoe C
Support de montage C
1
START/STOP
STBY
2
Sony Corporation © 2002 Printed in Japan
Zooming
Réglage de la longueur focale
Mounting shoe D
Support de montage D
A
mounting
shoe
Support de
montage
A
B
Wide-angle
Grand-angle
arrow
number
Numéro de
flèche
model
Modèle
C
W
T
Telephoto
Téléphoto
H
1
CCD- TRV31/TRV41/TRV51/TRV81/TRV91/TRV31E/TRV41E/TRV51E/TRV61E/
TRV81E/TRV91E
2
CCD- TR710/TR910/TR2300/TR3300/TR3400/TR610E/TR710E/TR760E/TR810E/
TR910E/TR2200E/TR2300E/TR3100E/TR3300E/TR3400E
3
CCD- TRV95/TRV99/TRV89E/TRV95E/TRV99E
1
CCD- TRV30/TRV40/TRV30E/TRV40E/TRV60E
2
CCD- TR44/TR54/TR64/TR66/TR74/TR78/TR84/TR86/TR88/TR94/TR96/TR98/
TR99/TR330/TR403/TR420/TR440/TR490/TR506/TR507/TR514/TR590/
TR614/TR714/TR814/TR916/TR330E/TR340E/TR401E/TR402E/TR410E/
TR420E/TR440E/TR490E/TR501E/TR502E/TR503E/TR506E/TR510E/
TR520E/TR590E/TR620E/TR720E/TR740E/TRV10/TRV11/TRV12/TRV21/
TRV22/TRV33/TRV112/TRV212/TRV11E/TRV12E/TRV21E
3
CCD- TR1/TR3/TR8/TR200/TR300/TR500/TR1E/TR3E/TR8E/TR18E/TRV32/
TRV34/TRV44/TRV52/TRV53/TRV312/TRV515/TRV44E
4
CCD- TR555/TR555E
POWER
5
CCD- TRV101/TRV101E
CAMERA
6
CCD- TRV14E/TRV24E
OFF
7
DCR-TR7000/TR7000E/TR7100E/TRV110*/TRV210*/TRV310*/TRV315/TRV410/
TRV510/TRV110E*/TRV210E*/TRV310E*/TR410E/TRV510E
3
2
8
1
D
2
DCR-TRV720*/TRV720E*/
CCD- TRV62/TRV72/TRV82/TRV94/TRV54E/TRV56E/TRV94E
For future models.
Modèles futurs.
* The viewfinder adaptor is not available.
* L’adaptateur de viseur n’est pas disponible.
START/STOP
REC
• Do not use the sports pack where the wave is
high.
• Do not subject the front glass to strong shock,
as it may crack.
• Do not leave the sports pack under direct
sunlight for a long period of time, as extreme
temperatures may cause damage to the
equipment.
• If you cannot avoid leaving the sports pack
under direct sunlight, be sure to cover the pack
with a towel or other protection.
• Avoid opening the sports pack in the sea or at
the beach. Preparations such as installing and
changing a cassette tape should be made in a
place with low humidity and no salty air.
• If the sports pack is taken to a cold place after
being opened in heat or humidity, moisture
condensation may occur, causing the glass to
fog up and perhaps damaging the equipment.
• The water-proof integrity of the sports pack is
maintained by the water-proof gasket and the
grooved surface it touches. Be especially
careful not to damage or deform those areas.
• Do not expose the microphone to strong waves.
• Do not throw the sports pack into the water.
• Use the pack for no longer than one hour at a
time in temperatures over 40°C (104°F). You
can use the pack normally at temperatures
lower than 35°C (95°F).
• When using the sports pack in cold places,
keep the unit in a bag, etc., except when
recording pictures, this prevents the unit from
getting extremely cold.
• Using the sports pack when the air temperature
is freezing point or below is not recommended.
But, in unavoidable situations, wrap the unit in
something to insulate it.
• On some models of the camcorders, you may
feel uncomfortable watching the complete wide
picture in the viewfinder when you set up your
camcorder in the sports pack. This is because
there is a gap between the sports pack and the
viewfinder.
Before You Begin
PLAY
To make sure that you do not miss good shooting
opportunities, go over the following checklist
before attaching your camcorder to the sports
pack.
START/STOP
sBattery pack
sCassette tape
D
1
2
5
I
4
3
sWater-proof
gasket
CCD-TR950E/TRV66*/TRV64E/TRV66E*/TRV77E*/TRV913E*
DCR-TR8000E*/TRV120*/TRV320*/TRV520*/TRV525/TRV120E*/TRV125E*/
TRV320E*/TRV420E*/TRV520E*/TRV620E/
CCD- TR57/TR67/TR87/TR311*/TR315*/TR317*/TR413/TR414/TR416/TR516/
TR517*/TR716/TR917/TR930/TR940/TR311E*/TR315E*/TR317E*/TR411E*/
TR412E*/TR415E*/TR417E*/TR425E*/TR427E*/TR511E*/TR512E/TR515E*/
TR516E/TR617E*/TR640E*/TR713E*/TR717E*/TR730E/TR820E/TR825E/
TR840E*/TR845E*/TR918E*/TR920E/TR1100E/TR3200E/TRV15*/TRV16*/
TRV17*/TRV25*/TRV35*/TRV36*/TRV37*/TRV46*/TRV47*/TRV57*/
TRV65*/TRV67*/TRV75*/TRV85*/TRV87*/TRV93*/TRV215*/TRV240/
TRV340/TRV615*/TRV715*/TRV740/TRV815*/TRV840/TRV3E*/TRV13E*/
TRV15E*/TRV16E*/TRV23E*/TRV26E*/TRV27E*/TRV35E*/TRV36E*/
TRV37E*/TRV45E*/TRV46E*/TRV47E*/TRV48E*/TRV55E*/TRV57E*/
TRV65E*/TRV67E*/TRV69E*/TRV87E*/TRV238E/TRV239E/TRV240E/
TRV300E/TRV340E/TRV738E/TRV740E
• Before you start recording, ensure that the
video camera recorder is working correctly
and there is no water leakage.
• Sony does not accept liability for damage to
the camcorder, battery, etc. in the sports
pack or for the cost of recording if water
leakage occurs as a result of an incorrect
operation.
S
Operating Instructions
Mode d’emploi
Bedienunganleitung
Istruzioni per l’uso
6
2
Mounting shoe A
Support de montage A
When recording under water use the Sony
marine pack.
For using your video camera recorder with this
pack, refer to the operating instructions of the
recorder.
The water-proof sports pack SPK-TRC has some
resistance to water and moisture, making it
possible to use the Sony 8mm video camera
recorders in the rain or on the beach.
2
Camera mounting shoe
Support de montage
Body
Guide
Caisson
Guide
Rubber sheet
Feuille de caoutchouc
Sports Pack
6
E
1
2
3
1
2
Français
English
F
B
• Fully charged.
• The tape length will cover
the planned recording
time.
• The tape is wound to the
point where you want to
start recording.
• The safety tab on the
cassette is in the correct
position. (The window is
not red.)
• No scratches or cracks.
No dust, sand or hair
around them.
• Correctly set in the
groove. (See “Notes on the
Water-proof gasket” in
detail. )
Maintenance and
Precautions
Water Leakage
If water happens to leak in, remove the sports
pack from the place exposed to water as soon as
possible.
If the camcorder gets wet, take it to the nearest
Sony service facility immediately.
Notes on the Water-proof Gasket
B Preparing the camera
Checking for the water leakage after
replacing the water-proof gasket
3 Install the battery pack.
Check for the water leakage before installing the
camcorder.
Close the sports pack without installing the
camcorder, and keep the sports pack submerged
under water at a depth of about 15 cm (6 inches)
for about 3 minutes and then check the water
leakage.
5 Set the POWER switch to CAMERA.
After recording
After recording at a location subjects to sea
breezes, wash the sports pack with fresh water
with the buckles fastened thoroughly, then wipe
with a soft dry cloth. If water remains on the
sports pack, the metal parts may rust.
Clean the inside of the pack with a soft dry cloth.
Do not wash the inside of the pack. Do not use
any type of solvent such as alcohol, benzine or
shinner for cleaning, as this might damage the
finish.
Preventing the surface of the glass
from fogging up
Grease the surface of the glass with the supplied
anti-fogging lens solution. This is effective in
preventing from fogging.
Apply a few drops of anti-fogging lends solution
on the inner glass of the sports pack, then wipe
with a soft dry cloth so that the solution spreads
on the surface of the glass evenly.
When storing the sports pack
• Close the pack without fastening the buckles to
prevent wear of the water-proof gasket.
• Avoid the dust not to touch the water-proof
gasket.
• Avoid storing the sports pack in a cold, very
hot or humid space, or together with
naphthalene or camphor, otherwise this
might damage the unit.
Tapering side up
Côté effilé vers le
haut
Groove
Rainure
F Installing the Camcorder
1 Turn the viewfinder down until it clicks.
2 Connect the microphone plug to MIC
jack.
3 Connect the remote control plug to
REMOTE (LANC) control jack.
4 Install the camcorder.
1 Align the camera mounting shoe with the
guide on the front body.
2 Insert the camcorder by pushing the rear
of the camera mounting shoe until it
clicks.
Check the knobs on both sides of the
camera mounting shoe to ensure that the
camera mounting shoe is locked properly.
(See illustration F4.)
mounting shoe
Align the mounting shoe C to the notch
of mounting shoe A, B or D
Replacing the rubber sheet
If you use the camcorder CCD-TRV89/TRV95/
TRV99/TRV95E/TRV99E, replace the rubber
sheet stuck on the mounting shoe A with the
supplied rubber sheet.
5 Set the STANDBY switch of the
camcorder to STANDBY.
6 Close the rear body.
Before closing the sports pack body, check
there is no sand, dust or cracks on the waterproof gasket or the surface where it touches,
and grease them slightly.
1 Secure the rear body.
2 Fasten the buckles until it clicks.
1 Remove the rubber sheet stuck on the knob
side.
2 Stick the supplied rubber sheet.
C Attaching the camera
7 Adjust the grip strap.
mounting shoe
Holding the sports pack so that the tips of
your fingers can easily touch the POWER
switch, START/STOP button and ZOOM
button, pull the strap to adjust its length.
Use metal parts of shoulder belt as
shown in the illustration.
D Preparing the Camcorder
8 Attach the shoulder strap.
Attach the supplied shoulder strap to the
hooks for the shoulder strap.
The Sony mark should be on the outside.
1 Remove the shoulder strap, lens cap,
filter or conversion lens from the
camcorder.
2 Install the viewfinder adaptor.
1 Widen a rubber.
2 Install the viewfinder adaptor on the
viewfinder.
If the viewfinder adaptor is loose when it
is attached, bend the eyecup of the
camcorder and attach it again.
Note
When you use a camcorder with the built-in
light, set the switch of the light to OFF before
installing the camcorder.
Using the Sports Pack
G Recording
4 Insert the cassette tape.
1 Turn the POWER switch to CAMERA.
2 Press START/STOP to start recording.
6 When you use a camcorder with the
LCD screen, close the LCD panel.
7 Set to AUTO LOCK mode for automatic
adjustment.
The recording lamp lights in the viewfinder,
and recording starts.
3 To stop recording, press START/STOP.
Press again to resume recording.
To finish recording
Press START/STOP to stop recording.
Then turn the POWER switch to OFF.
8 Set the START/STOP MODE switch to
or 5 SEC, if available.
9 When you use a camcorder with finder
power save function, set the switch to
OFF.
10 Set the STANDBY switch of the
camcorder to LOCK.
Note
When the viewfinder adaptor is attached to the
viewfinder of your camcorder, you get a wide
view of what appears in the viewfinder screen.
However, when viewed from an angle, the screen
may appear distorted.
E Preparing the Sports Pack
1 Release the buckles.
1
2
3
4
While pressing up the unlock button,
Release the buckles.
Open the rear body.
When using the camcorder CCD-TRV30/
TRV30E/TRV40/TRV40E/TRV60E, stick
the black cushion on the inner wall of the
sports pack and when using the
camcorder CCD-TR610E/TR710E/
TR760E/TR810E/TR910/TR910E/
TR2200E/TR2300E/TR3300/TR3300E/
TR3400E/TR3100E, use the gray cushion.
Zooming
• Keep the W side pressed for wide-angle.
• Keep the T side pressed for telephoto.
Press the button firmly for high-speed zoom.
Press it softly for a relatively slow zoom.
(Depending on the models of your camcorder,
whether the function works or not.)
• When the focus is set to the water drop on the
front glass, adjust the focus with using the
zoom button.
Note on recording
If you leave the camcorder for 5 minutes or more
with cassette inserted in Standby mode, the
camcorder goes off automatically. This prevents
battery and tape wear. To resume Standby mode,
turn the POWER switch to OFF and then turn it
to CAMERA again. To start recording, press the
START/STOP button.
Specifications
Water-proof
Water-proof gasket, buckles
Built-in microphone
Stereo
Supplied accessories
Shoulder strap (1),
Camera mounting shoe A(1)/B(1)/C(1)/
D(1), Grease (1), Viewfinder adaptor (1),
Anti-fogging lens solution (1),
Rubber sheet (1), Cushions (2) and
Operating Instructions (1)
Design and specifications subject to change
without notice.
H Checking the Recorded
Picture
You can check the recorded picture in the
viewfinder using the Remote Commander
supplied with your camcorder.
You cannot hear the sound.
1 Set the POWER switch to PLAYER.
2 Press N PLAY on the remote.
Use the Remote Commander for all other
functions including STOP, REW and FF.
Note
Depending on the models of your camcorder, the
PLAYER function will not work even if the
POWER switch is set to PLAYER. The camcorder
may change to camera mode.
I Removing the Camcorder
1 Release the buckles, and open the rear
body. (See illustration E )
Before opening the sports pack, wipe
moisture off the sports pack and yourself. Do
not allow water on the camcorder.
2 Set the STANDBY switch of the
camcorder to LOCK.
3 Holding the camera mounting shoe by
the knobs on both sides of it, press the
knobs and extract the camcorder.
While extracting the camcorder, stop
extracting at the point that the remote
control plug is come out from the sports
pack to disconnect the REMOTE
(LANC) control jack.
4 Disconnect the MIC plug from the MIC
jack.
5 Detach the viewfinder adaptor.
6 Detach the camera mounting shoe.
Le caisson ne peut être utilisé jusqúà 2
mètres sous l’eau.
Pour enregistrer sous l’eau, utilisez le caisson
marin Sony.
En ce qui concerne le fonctionnement du
camescope avec le caisson, consultez le mode
d’emploi du camescope.
Le caisson sport SPK-TRC a une certaine
résistance à l’eau et à l’humidité, ce qui permet
d’utiliser les camescopes 8 mm Sony sous la pluie
ou à la plage.
Remarques
• Avant de commencer à enregistrer, vérifiez
que le camescope fonctionne correctement.
• Sony ne peut pas être tenu responsable pour
tout dommage du camescope, de la batterie
ou autre pièce dans le caisson, ou tout
enregistrement manqué, résultant d’une
infiltration d’eau consécutive à une
utilisation incorrecte.
Précautions
• N’utilisez pas le caisson si les vagues sont
fortes.
• Ne pas exposer la vitre avant à des chocs car
elle pourrait se briser.
• Ne laissez pas le caisson en plein soleil pendant
longtemps car la chaleur pourrait
l’endommager.
• Si vous ne pouvez pas ranger le caisson à l’abri
du soleil, recouvrez-le d’une serviette ou autre
matériau protecteur.
• Evitez d’ouvrir le caisson au bord de la mer ou
à la plage. Effectuez toute opération telle que
l’installation ou le remplacement de cassette
dans un endroit qui n’est pas exposé à
l’humidité ni à l’air marin.
• Si le caisson est porté dans un endroit froid ou
immergé dans l’eau après avoir été ouvert dans
un endroit chaud ou humide, de l’humidité
risque de se condenser et d’embuer la vitre et
éventuellement d’endommager l’appareil.
• L’étanchéité du caisson est garantie par le joint
d’étanchéité et les surfaces de contact. Faites
particulièrement attention de ne pas
endommager ni déformer ces parties.
• Ne pas exposer le microphone à des vagues fortes.
• Ne pas jeter le caisson dans l’eau.
• Evitez d’utiliser le caisson pendant plus d’une
heure à la fois à des températures supérieures à
40°C. Vous pouvez utiliser le caisson normalement
à des températures inférieures à 35°C.
• Si vous utilisez le caisson dans un endroit froid,
rangez-le dans un sac ou autre quand vous
n’enregistrez pas afin d’éviter qu’il ne
refroidisse trop.
• Il est déconseillé d’utiliser le caisson quand la
température est de zéro degré ou inférieure.
Cependant, si vous ne pouvez pas faire
autrement, enveloppez l’appareil dans un
matériau isolant.
• Avec certains modèles de camescope, vous
aurez du mal à voir entièrement l’image dans le
viseur quand vous utilisez le caisson à cause de
l’espace entre le viseur et le caisson.
Avant de commencer
Pour être sûr de ne pas manquer des prises de
vues, vérifiez les points suivants avant d’installer
le camescope dans le caisson.
sBatterie
rechargeable
sVidéocassette
sJoint
d’étanchéité
Material
Plastic (PC, ABS), glass
Mass
Approx. 800 g (1 lb 12 oz) (only sports
pack)
J
mounting shoe
Depending on the location of the screw hole for
attaching the camera mounting shoe of your
camcorder, you have a choice of three types of
camera mounting shoe.
Check list A to identify the appropriate
mounting shoe and arrow number.
• Check that there are no scratches or cracks on
the water-proof gasket. Scratches or cracks on
the water-proof gasket may cause water to leak
in. If there are any, replace the damaged waterproof gasket with a new one.
Do not remove the water-proof gasket from the
groove with a metal tool or a tool with a
sharp point.
• Remove foreign materials such as dust, sand or
hair from the water-proof gasket, the groove
and from any surface it touches.
If the body is closed with such materials
present, these areas may be damaged and
water may leak in.
• Put the water-proof gasket in the grooves
evenly, with the tapering side up. Never twist
them. (See illustration J )
• After checking that there are no cracks or dust
on the water-proof gasket, grease it over
slightly with the supplied grease using a finger.
It prevents wearing.
During greasing, recheck for cracks or dust.
Never use cloth or paper for greasing as the
fibers may cling.
Do not use any type of grease other than that
supplied, as it may damage the water-proof
gasket.
• The useful life of the water-proof gasket
depends upon the maintenance and the
frequency of use, but we recommend changing
it once a year. To replace the water-proof
gasket, please consult the nearest Sony dealer.
Be sure to check the water leakage after
replacing the water-proof gasket.
Dimensions
Approx. 177 x 173 x 274 mm (w/h/d)
(7 x 6 7/8 x 10 7/8 inches)
4
Installing the Camcorder
A Selecting the camera
Trouble Check
Symptom
Cause
Corrective Actions
The sound is not recorded.
The microphone plug is not
connected.
Connect it to the MIC jack on the
camcorder.
• The buckle is not fastened.
• The water-proof gasket is not
in correct.
• There are scratches or cracks
on the water-proof gasket.
• Fasten the buckle until it clicks.
• Put it in the groove evenly.
• The battery pack is run out.
• The tape has run out.
• The safety tab on the
cassette is out.
• Charge the battery pack fully.
• Rewind the tape or use a new one.
• Slide the safety tab or install a new
cassette tape.
There are drops of water
inside of the sports pack.
The recording and playing
back function does not work.
• Replace it with a new one.
• Complètement chargée.
• La longueur de bande est
suffisante pour le temps
d’enregistrement prévu.
• La bande est rebobinée à
l'endroit où l'enregistrement
doit commencer.
• Le taquet de protection de
la cassette est sur la
position qui permet
l’enregistrement. (La
fenêtre n’est pas rouge.)
• Pas d’égratignures ni de
fissures. Pas de poussière,
sable ni cheveux sur le joint.
• Le joint est bien inséré dans
la rainure. (Voir
“Remarques sur le joint
d'étanchéité” pour les
détails.)
Entretien et précautions
Infiltration d’eau
Si de l’eau s’infiltre dans le caisson, changez
immédiatement de place.
Si le camescope est mouillé, apportez-le
immédiatement à un centre de service après-vente
Sony.
Remarques sur le joint d’étanchéité
• Vérifiez qu’il n’y a pas d’égratignures ni
fissures sur le joint d’étanchéité car de l’eau
pourrait s’infiltrer. Si le joint est endommagé,
remplacez-le par un neuf. N’utilisez pas d’outil
en métal ni autre objet pointu pour enlever le
joint d’étanchéité de la rainure.
• Enlevez toute trace de poussière, sable ou
cheveu du joint d’étanchéité, de la rainure et
autres surfaces en contact. Sinon, si vous fermez
le caisson ainsi, ces surfaces risquent d’être
endommagées et de l’eau pourrait s’infiltrer.
• Insérez le joint de façon régulière dans la
rainure avec le côté effilé vers le haut. Ne
jamais tordre le joint (Voir l’illustration J.)
• Une fois que vous avez vérifié qu’il n’y a pas de
fissures ni poussière sur le joint d’étanchéité,
appliquez un peu de graisse fournie avec le
doigt. Cette graisse protège le joint de l’usure.
Pendant le graissage, vérifiez de nouveau qu’il
n’y a pas de fissures ni poussière. Ne jamais
utiliser de chiffon ou de papier pour le graissage
car des fibres pourraient rester collées.
N’utilisez pas un type de graisse autre que
celui fourni car cela pourrait endommager le
joint d’étanchéité.
• La durée de vie du joint d’étanchéité dépend de
l’entretien et des conditions d’utilisation,
cependant, nous recommandons de le changer
une fois par an. En ce qui concerne le
remplacement du joint d’étanchéité, consultez
un revendeur Sony.
Vérification des fuites après le
remplacement du joint d’étanchéité
Vérifiez s’il n’y a pas de fuite avant de monter le
camescope.
Refermez le caisson sans y mettre le camescope,
laissez-le dans l’eau à une profondeur d’environ
15 cm pendant environ 3 minutes, et vérifiez s’il
y a des fuites.
Après l’enregistrement
Installation du camescope
A Sélection du support de
montage
Il existe trois types de support de montage, en
fonction de l’endroit où se trouve l’orifice de la vis
pour la fixation du support de montage de
camescope.
Consultez la liste A pour connaître le support de
montage et le numéro de flèche appropriés.
Matériau
Plastique (PC, ABS), verre
Etanchéité
Joint d’étanchéité, boucles
Microphone intégré
Stéréo
Dimensions
Env. 177 x 173 x 274 mm (l/h/p)
Poids
Env. 800g (caisson uniquement)
Accessoires fournis
Bandoulière (1)
Support de montage A(1)/B(1)/C(1)/D(1),
graisse (1), Adaptateur de viseur (1),
Solution antibuée (1), Feuille de caoutchouc
(1), Tampons (2) et Mode d’emploi (1)
4 Installez le camescope.
1 Alignez le support de montage sur le
guide à l’avant du caisson.
2 Insérez le camescope en poussant l’arrière
du support de montage jusqu’au déclic.
Vérifiez la position des taquets de chaque
côté du support de montage pour
contrôler si le support est correctement
installé. (Voir l'illustration F4.)
5 Réglez le commutateur STANDBY du
camescope sur STANDBY.
Si vous voulez utiliser le camescope CCDTRV89/TRV95/TRV99/TRV95E/TRV99E,
remplacez la feuille de caoutchouc sur le support
de montage A par la feuille de caoutchouc
fournie.
6 Fermez l’arrière du caisson.
1 Enlevez la feuille de caoutchouc collée du côté
du bouton.
2 Collez la feuille de caoutchouc fournie.
Avant de fermer le caisson, vérifiez qu’il n’y a
pas de sable, poussière ou fissures sur le joint
d’étanchéité ou la surface en contact et
graissez-les légèrement.
1 Fermez bien l’arrière du caisson,
2 Poussez les boucles jusqu’au déclic.
7 Réglez la courroie de la poignée.
Tenez le caisson de sorte que vos doigts
puissent atteindre facilement le commutateur
POWER, la touche START/STOP et la touche
ZOOM, puis tirez sur la courroie pour ajuster
la longueur.
C Installation du support de
montage
Utilisez les parties métalliques de la
bandoulière comme indiqué sur
l’illustration.
8 Fixez la bandoulière.
Fixez la bandoulière fournie sur les crochets
prévus à cet effet.
La marque Sony doit se trouver à l’extérieur.
D Préparation du camescope
1 Enlevez la bandoulière, le capuchon, le
filtre ou la lentille de conversion du
camescope.
2 Installez l’adaptateur de viseur sur le
viseur.
1 Ouvrez le caoutchouc.
2 Montez l’adaptateur de viseur sur le
viseur.
Si l’adaptateur de viseur bouge quand il
est fixé, rabattez l’oeilleton du camescope
et insérez à nouveau l’adaptateur.
8 Réglez le sélecteur START/STOP MODE
sur ou 5 SEC, si présent.
Spécifications
3 Branchez la fiche de télécommande sur
la prise REMOTE (LANC).
Remplacement de la feuille de
caoutchouc
Pour éviter que de la buée ne se
forme sur la vitre
• Rangez le caisson sans fermer les boucles pour
éviter d’user le joint d’étanchéité.
• Evitez que de la poussière ne se dépose sur le
joint d’étanchéité.
• Evitez de ranger le caisson dans un endroit
froid, très chaud ou très humide ou avec des
boules de naphtaline ou de camphre car cela
pourrait l'endommager.
2 Branchez la fiche de microphone sur la
prise MIC.
Alignez le support de montage C sur
l’encoche du support de montage A, B
ou D.
Après un enregistrement au bord de la mer,
rincez le caisson à l’eau douce en gardant les
boucles verrouillées, puis essuyez-le avec un
chiffon doux et sec. Si les parties métalliques sont
mouillées, elles risquent de rouiller.
Nettoyez l’intérieur du caisson avec un chiffon
doux et sec. Ne lavez pas l’intérieur du caisson.
N’utilisez aucun type de solvant comme de
l’alcool, de la benzine ou du diluant car ils
pourraient endommager la finition.
Rangement du caisson
1 Tournez le viseur vers le bas jusqu’au
déclic.
B Préparation du support de
montage
3 Installez la batterie rechargeable.
Appliquez un peu de solution anti-buée fournie
sur la vitre. Cette solution est efficace pour éviter
la formation de buée.
Appliquez quelques gouttes de solution antibuée
sur le verre intérieur du caisson sport, puis
essuyez-le avec un chiffon doux et sec de
manière à bien répartir la solution sur la surface
du verre.
F Installation du camescope
4 Insérer une cassette.
Remarque
Quand vous utilisez un camescope avec torche
intégrée, réglez l’interrupteur de la torche sur
OFF avant d’installer le camescope.
Utilisation du caisson
G Enregistrement
1 Mettez l’interrupteur POWER sur
CAMERA.
2 Appuyez sur START/STOP pour
démarrer l’enregistrement.
5 Réglez l’interrupteur POWER sur
CAMERA.
L’indicateur d’enregistrement s’allume dans
le viseur et l’enregistrement commence.
6 Quand vous utilisez un camescope avec
écran LCD, fermez l’écran LCD.
3 Pour arrêter l’enregistrement, appuyez
sur START/STOP.
7 Réglez le mode AUTO LOCK pour passer
en mode de réglage automatique.
Appuyez à nouveau pour reprendre
l’enregistrement.
Pour cesser d’enregistrer
Appuyez sur START/STOP pour arrêter
l’enregistrement.
Puis, mettez l’interrupteur POWER sur OFF.
9 Quand vous utilisez un camescope avec
fonction d’économie d’énergie, réglez le
commutateur sur OFF.
10 Réglez le commutateur STANDBY du
camescope sur LOCK.
Remarque
Quand l’adaptateur de viseur est installé sur le
viseur du camescope, l’image qui apparaît dans
le viseur est grossie, mais vue de côté, elle peut
apparaître déformée.
E Préparation du caisson
1 Déverrouillez les boucles.
1 Tout en appuyant sur la touche de
déverrouillage,
2 Déverrouillez les boucles.
3 Ouvrez la partie arrière.
4 Quand vous utilisez les CCD-TRV30/
TRV30E/TRV40/TRV40E/TRV60E, collez le
tampon noir sur la paroi interne du caisson, et
quand vous utilisez les CCD-TR610E/
TR710E/TR760E/TR810E/TR910/TR910E/
TR2200E/TR2300E/TR3300/TR3300E/
TR3400E/TR3100E, collez le tampon gris.
Réglage de la longueur focale
• Tenez enfoncé le côté W pour filmer en grandangle.
• Tenez enfoncé le côté T pour filmer en
téléphoto.
Appuyez fermement sur la touche pour
changer plus rapidement la focale. Appuyez
légèrement pour changer lentement la focale.
(Varie selon le modèle de camescope et s'il est
équipé de cette fonction.)
• Si la mise au point est effectuée avec la goutte
d’eau sur le verre avant, ajustez la mise au
piont à l’aide du bouton de zoom.
Remarque sur l’enregistrement
Si vous laissez le camescope en mode d’attente
pendant 5 minutes ou plus avec une cassette
insérée, il s’éteint automatiquement afin d’éviter
une usure inutile de la batterie et de la bande.
Pour revenir en mode d’attente, mettez
l’interrupteur POWER sur OFF, puis de nouveau
sur CAMERA. Pour commencer l’enregistrement,
appuyez sur la touche START/STOP.
Guide de dépannage
Problème
Cause
Le son n'est pas enregistré.
La fiche de microphone n'est pas Branchez-la sur la prise MIC du
camescope.
branchée.
Présence de gouttes d'eau à
l'intérieur du caisson.
• Les boucles ne sont pas
verrouillées.
• Le joint d'étanchéité est mal
inséré.
• Egratignures ou fissures sur le
joint d'étanchéité.
• Verrouillez les boucles jusqu'au
déclic.
• Insérez le joint régulièrement dans la
rainure.
• Remplacez le joint par un neuf.
L'enregistrement et la lecture
ne fonctionnent pas.
• La batterie est épuisée.
• La bande est finie.
• Rechargez complètement la batterie.
• Rebobinez la bande ou utilisez une
autre cassette.
• Rentrez le taquet ou utilisez une
autre cassette.
La conception et les spécifications sont
modifiables sans préavis.
• Le taquet de la cassette est
sonti.
Solution
H Contrôle de l’image
enregistrée
Vous pouvez contrôler l’image enregistrée dans
le viseur en utilisant la télécommande fournie
avec le camescope.
Vous ne pouvez pas entendre le son.
1 Mettez l’interrupteur POWER sur PLAYER.
2 Appuyez sur N PLAY de la
télécommande.
Utilisez la télécommande pour toutes les
autres fonctions, y compris l’arrêt, le
rembobinage et l’avance rapide.
Remarque
Selon les modèles de camescope, la touche
PLAYER ne fonctionnera pas même si
l’interrupteur POWER est réglé sur PLAYER. Le
camescope peut se mettre en mode
d’enregistrement.
I Retrait du camescope
1 Déverrouillez les boucles et ouvrez la
partie arrière. (Voir l’illustration E )
Avant d’ouvrir le caisson, essuyez toute trace
d’eau sur le caisson et sur vous. Ne laissez
pas d’eau entrer en contact avec le
camescope.
2 Réglez le commutateur STANDBY du
camescope sur LOCK.
3 Tout en tenant le support de montage par
les taquets de chaque côté, appuyez sur les
taquets et sortez le camescope.
Arrêtez-vous au moment où la fiche de
télécommande sort du caisson pour la
débrancher de la prise REMOTE (LANC).
4 Débranchez la fiche de microphone de
la prise MIC.
5 Retirez l’adaptateur de viseur.
6 Enlevez le support de montage.
C
A
Montageschuh Pfeil-Nr.
Attacco di Numero
montaggio freccia
A
B
START/STOP
2
CCD- TR710/TR910/TR2300/TR3300/TR3400/TR610E/TR710E/TR760E/TR810E/
TR910E/TR2200E/TR2300E/TR3100E/TR3300E/TR3400E
3
CCD- TRV95/TRV99/TRV89E/TRV95E/TRV99E
CCD- TRV30/TRV40/TRV30E/TRV40E/TRV60E
2
CCD- TR44/TR54/TR64/TR66/TR74/TR78/TR84/TR86/TR88/TR94/TR96/TR98/
TR99/TR330/TR403/TR420/TR440/TR490/TR506/TR507/TR514/TR590/
TR614/TR714/TR814/TR916/TR330E/TR340E/TR401E/TR402E/TR410E/
TR420E/TR440E/TR490E/TR501E/TR502E/TR503E/TR506E/TR510E/
TR520E/TR590E/TR620E/TR720E/TR740E/TRV10/TRV11/TRV12/TRV21/
TRV22/TRV33/TRV112/TRV212/TRV11E/TRV12E/TRV21E
3
CCD- TR1/TR3/TR8/TR200/TR300/TR500/TR1E/TR3E/TR8E/TR18E/TRV32/
TRV34/TRV44/TRV52/TRV53/TRV312/TRV515/TRV44E
4
CCD- TR555/TR555E
5
CCD- TRV101/TRV101E
6
CCD- TRV14E/TRV24E
7
DCR-TR7000/TR7000E/TR7100E/TRV110*/TRV210*/TRV310*/TRV315/TRV410/
TRV510/TRV110E*/TRV210E*/TRV310E*/TR410E/TRV510E
2
DCR-TR8000E*/TRV120*/TRV320*/TRV520*/TRV525/TRV120E*/TRV125E*/
TRV320E*/TRV420E*/TRV520E*/TRV620E/
CCD- TR57/TR67/TR87/TR311*/TR315*/TR317*/TR413/TR414/TR416/TR516/
TR517*/TR716/TR917/TR930/TR940/TR311E*/TR315E*/TR317E*/TR411E*/
TR412E*/TR415E*/TR417E*/TR425E*/TR427E*/TR511E*/TR512E/TR515E*/
TR516E/TR617E*/TR640E*/TR713E*/TR717E*/TR730E/TR820E/TR825E/
TR840E*/TR845E*/TR918E*/TR920E/TR1100E/TR3200E/TRV15*/TRV16*/
TRV17*/TRV25*/TRV35*/TRV36*/TRV37*/TRV46*/TRV47*/TRV57*/
TRV65*/TRV67*/TRV75*/TRV85*/TRV87*/TRV93*/TRV215*/TRV240/
TRV340/TRV615*/TRV715*/TRV740/TRV815*/TRV840/TRV3E*/TRV13E*/
TRV15E*/TRV16E*/TRV23E*/TRV26E*/TRV27E*/TRV35E*/TRV36E*/
TRV37E*/TRV45E*/TRV46E*/TRV47E*/TRV48E*/TRV55E*/TRV57E*/
TRV65E*/TRV67E*/TRV69E*/TRV87E*/TRV238E/TRV239E/TRV240E/
TRV300E/TRV340E/TRV738E/TRV740E
DCR-TRV720*/TRV720E*/
CCD- TRV62/TRV72/TRV82/TRV94/TRV54E/TRV56E/TRV94E
1
5
2
I
OFF
6
E
1
3
2
2
J
Spitz zulaufende
Seite nach oben
Lato appuntito
verso l’alto
Rille
Scanalatura
B
4
(Nur für Modelle mit Montageschuh A)
Per sostituire il tappetino di
gomma
2
Montageschuh
Attaco di montaggio videocamera
Gehäuse
Führung
Corpo
Guida
6
1
2
(Solo modelli da usare con l’attacco di
montaggio A-3)
2
5
L
Gummiunterlage
Tappetino di gomma
2
K
OC
S
TA
Montageschuh A
Attacco di montaggio A
ND BY
7
Bei Modellen, die mit Montageschuh B
verwendet werden
Modelli da usare con l’attacco di
montaggio B
2
1
Zum Auseinanderbauen
nach dem Betrieb
Per smontare dopo l’uso
4
1
• Verwenden Sie das Sports Pack nicht bei
hohem Wellengang.
• Stoßen Sie nicht gegen das Glasfenster an der
Vorderseite, da es sonst zerbricht.
• Legen Sie das Sports Pack nicht längere Zeit in
die pralle Sonne, da es sich sonst zu stark
erwärmen kann und das Gerät im Inneren
beschädigt werden kann.
• Wenn kein schattiger Platz gefunden werden
kann, schützen Sie das Sports Pack durch ein
Handtuch o.ä. vor prallem Sonnenlicht.
• Öffnen Sie das Sports Pack nicht im Meer und
nicht am Strand. Alle Vorbereitungen, wie
Einlegen und Wechseln der Cassette, sollten an
einem Ort, der keiner Feuchtigkeit und keiner
Salzluft ausgesetzt ist, erfolgen.
• Wenn das Sports Pack an einen kalten Ort
gebracht wird, nachdem es zuvor an einem
warmen oder feuchten Ort geöffnet war, kann
sich Feuchtigkeit im Inneren ansammeln. Das
Frontglas kann dann beschlagen, und eventuell
kann auch das Gerät im Inneren beschädigt
werden.
• Die Wasserabdichtung des Sports Pack wird
durch eine Gummidichtung und den Rand, auf
dem die Dichtung aufliegt, gewährleistet.
Achten Sie darauf, daß diese Teile nicht
beschädigt oder deformiert sind.
• Achten Sie darauf, daß das Mikrofon keinen
starken Wellen ausgesetzt wird.
• Werfen Sie das Sports Pack nicht ins Wasser.
• Verwenden Sie das Sports Pack nicht länger als
eine Stunde bei Umgebungstemperaturen um
oder über 40 °C. Wenn die Temperaturen unter
35 °C liegen, kann das Sports Pack
uneingeschränkt verwendet werden.
• Bei kalten Umgebungstemperaturen sollte die
Einheit in einer Tasche o.ä. aufbewahrt werden,
damit sie nicht zu stark abkühlt, und erst vor
dem Aufnehmen herausgenommen werden.
• Auch bei Umgebungstemperaturen um oder
unter dem Gefrierpunkt sollte das Sports Pack
möglichst nicht verwendet werden. Falls ein
Betrieb bei solchen Temperaturen
unumgänglich ist, wickeln Sie die Einheit zur
Isolation ein.
• Bei einigen Camcordertypen ist der
Randbereich des Sucherbildes nicht gut zu
sehen, da der Abstand zwischen dem Fenster
des Sports Pack und dem Sucherokular relativ
groß ist.
Überprüfungen vor dem
Aufnehmen
3
Montageschuh C
Attacco di montaggio C
• Bevor Sie mit der Aufnahme beginnen,
vergewissern Sie sich, daß der Camcorder
einwandfrei arbeitet und kein Wasser
eindringt.
• Sony übernimmt keine Verantwortung für
den im Sports Pack eingesetzten Camcorder,
Akku usw. und ersetzt auch keine
Aufnahmekosten, wenn aufgrund von
falscher Bedienung Wasser in das Gehäuse
eingedrungen ist.
Zur besonderen Beachtung
4
1
3
Montageschuh C
Attacco di montaggio C
4
CAMERA
* Der Sucheradapter ist nicht erhältlich.
* L’adattatore mirino non è disponibile.
Zum Austauschen der
Gummiunterlage
Hinweise
3
POWER
F
Für zukünftige Modelle.
Per modelli futuri.
Bei Modellen, die mit Montageschuh A
verwendet werden
Modelli da usare con l’attacco di
montaggio A
Für Unterwasseraufnahmen verwenden Sie
das Sony Marine Pack.
Lesen Sie auch die Anleitung des Camcorders
durch.
Das wasserfeste Sports Pack SPK-TRC weist
einen gewissen Widerstandsgrad gegen Wasser
und Feuchtigkeit und erlaubt es, Sony Video-8Camcorder im Regen oder am Strand
einzusetzen.
D
1
CCD-TR950E/TRV66*/TRV64E/TRV66E*/TRV77E*/TRV913E*
D
Vor dem Einsetzen des Camcorders in das Sports
Pack gehen Sie die folgende Liste durch, um
sicherzustellen, daß alle Funktionen einwandfrei
arbeiten.
8
sAkku
sVideocassette
Montageschuh B
Attacco di montaggio B
Bei Modellen, die mit Montageschuh D
verwendet werden
Modelli da usare con l’attacco di
montaggio D
Montageschuh C
Attacco di montaggio C
G
1
START/STOP
STBY
Zoomen
Zoomata
Weitwinkel
Grandangolo
Montageschuh D
Attacco di montaggio D
Italiano
Bis zu einer Tiefe von 2 m unter Wasser
verwendbar.
PLAY
Modello
CCD- TRV31/TRV41/TRV51/TRV81/TRV91/TRV31E/TRV41E/TRV51E/TRV61E/
TRV81E/TRV91E
1
3
2
Modell
1
8
Deutsch
H
W
T
Tele
Teleobiettivo
2
START/STOP
REC
sDichtung
• Voll laden.
• Die Bandlänge muß für
die geplante
Aufnahmezeit ausreichen.
• Das Band muß sich an der
Stelle befinden, an der die
Aufnahme beginnen soll.
• Der Löschschutz der
Cassette darf nicht
aktiviert sein (rote
Markierung nicht
sichtbar).
• Die Dichtung darf keine
Kratzer oder Risse
aufweisen. Auf oder an
der Dichtung dürfen kein
Staub, kein Sand und
keine Haare vorhanden
sein.
• Die Dichtung muß richtig
in der Rille sitzen (siehe
„Hinweise zur
Dichtung“).
Zur besonderen Beachtung
Bei einem Wasserleck
Wenn Wasser eingedrungen ist, bringen Sie das
Sports Pack umgehend an einen Ort, der keinem
Wasser ausgesetzt ist. Wenn der Camcorder naß
geworden ist, bringen Sie ihn so schnell wie
möglich zur nächsten Sony Kundendienststelle.
Hinweise zur Dichtung
• Überprüfen Sie die Dichtung auf Kratzer und
Risse. Kratzer und Risse können den
wasserdichten Abschluß beeinträchtigen.
Wechseln Sie die Dichtung in einem solchen
Fall aus. Zum Herausnehmen der Dichtung aus
der Rille verwenden Sie keinen
Metallgegenstand und keinen anderen
Gegenstand mit scharfen Kanten.
• Entfernen Sie Fremdkörper wie Staub, Sand
oder Haare von der Dichtung, der Rille und der
Gehäuseoberfläche, die die Dichtung berührt.
Wenn Fremdkörper vorhanden sind, können
die Kontaktflächen beim Schließen des
Gehäuses beschädigt werden und es besteht die
Gefahr, daß Wasser eindringt.
• Setzen Sie die Dichtung mit der spitz
zulaufenden Seite nach oben hin weisend ein.
Achten Sie darauf, daß die Dichtung
gleichförmig in der Rille sitzt und nicht
verdreht ist (siehe Abb. J).
• Nachdem Sie überprüft haben, daß keine Risse
und kein Staub auf der Dichtung vorhanden
sind, fetten Sie die Dichtung leicht mit Ihrem
Finger mit dem mitgelieferten Fett ein. Das Fett
verhindert eine vorzeitige Abnutzung.
Überprüfen Sie beim Einfetten noch einmal die
Dichtung auf Risse und Staub. Zum Einfetten
darf auf keinen Fall ein Tuch oder Papier
verwendet werden, da sonst Fasern auf der
Dichtung hängenbleiben können. Verwenden
Sie stets nur das mitgelieferte Fett; durch
andere Fettarten kann die Dichtung beschädigt
werden.
• Die Lebensdauer der Dichtung hängt von der
Pflege und der Häufigkeit der Verwendung ab.
Im allgemeinen wird empfohlen, die Dichtung
jährlich auszuwechseln. Zum Auswechseln
wenden Sie sich an Ihren Sony Händler.
Nach einem Auswechseln der Dichtung
überprüfen Sie stets das Gehäuse auf
wasserdichten Abschluß.
Überprüfen des wasserdichten
Abschlusses nach dem Auswechseln
der Dichtung
Schließen Sie das Sports Pack ohne eingesetzten
Camcorder, tauchen Sie es 3 Minuten lang ca. 15
cm ins Wasser ein, und überprüfen Sie, ob
Wasser eindringt.
Nach der Aufnahme
Nach dem Einsatz in Meeresluft waschen Sie das
Sports Pack bei geschlossenen Schnallen mit
Süßwasser sorgfältig ab, und trocknen Sie es
dann mit einem weichen Tuch ab. Durch
Wasserrückstände auf dem Sports Pack können
die Metallteile rosten.
Reinigen Sie das Innere des Sports Pack ebenfalls
mit einem weichen, trockenen Tuch. Verwenden
Sie jedoch kein Wasser. Lösungsmittel wie
Alkohol und Benzin dürfen nicht verwendet
werden, da sie das Gehäuse angreifen.
Um ein Beschlagen des Frontglases
zu verhindern
Behandeln Sie das Frontglas mit dem
mitgelieferten Antibeschlagmittel.
Bringen Sie einige Tropfen des
Antibeschlagmittels auf das Innenglas des Sports
Pack auf und wischen dann mit einem weichen,
trockenen Lappen ab, so daß die Lösung
gleichmäßig über die Glasoberfläche verteilt
wird.
Zur Aufbewahrung des Sports Pack
• Klappen Sie das Sports Pack zu. Lassen Sie
jedoch die Schnallen offen, um die Dichtung zu
schonen.
• Sorgen Sie dafür, daß die Dichtung nicht
verstaubt ist.
• Bewahren Sie das Sports Pack nicht an einem
sehr kalten, sehr warmen oder feuchten Ort
und auch nicht an einem Ort auf, der
Naphtalen- oder Camphor-Dämpfen ausgesetzt
ist, da es sonst zu Beschädigungen kommen
kann.
Einsetzen des Camcorders
A Auswählen des KameraMontageschuhs
Wählen Sie je nach der Position der
Schraubenbohrung an Ihrem Camcorder einen
geeigneten Montageschuh aus. Drei verschiedene
Montageschuhe stehen zur Auswahl.
Zum Montageschuh und zur Pfeil-Nr. siehe Liste
A.
B Vorbereiten des
Montageschuhs
Richten Sie den Montageschuh C auf die
Kerbe am Montageschuh A, B oder D aus.
Austauschen der Gummiunterlage
Wenn Sie den Camcorder CCD-TRV89/TRV95/
TRV99/TRV95E/TRV99E verwenden, tauschen
Sie die Gummiunterlage am Montageschuh A
mit der mitgelieferten Gummiunterlage aus.
1 Nehmen Sie die an der Knopfseite
angebrachte Gummiunterlage ab.
2 Setzen Sie die mitgelieferte Gummiunterlage
an.
C Anbringen des
Montageschuhs am
Camcorder
Befestigen Sie den Montageschuh, wie
in der Abbildung gezeigt, mit der
Metallzunge des Schulterriemens.
D Vorbereiten des Camcorders
1 Nehmen Sie den Schulterriemen und die
Objektivkappe, das Filter bzw. den
Konverter vom Camcorder ab.
2 Bringen Sie den Sucheradapter an.
1 Weiten Sie die Gummimuschel.
2 Bringen Sie den Adapter am Sucher an.
Wenn der Sucheradapter nicht richtig fest
sitzt, verbiegen Sie die Okularmuschel
und bringen Sie den Adapter erneut an.
3 Setzen Sie den Akku ein.
Wasserdichter Abschluß
Dichtung, Schnallen
Eingebautes Mikrofon
Stereo
Abmessungen
ca. 177 x 173 x 274 mm (B/H/T)
Gewicht
ca. 800 g (nur Sports Pack)
Mitgeliefertes Zubehör
Schulterriemen (1),
Montageschuh A(1)/B(1)/C(1)/D(1),
Fett (1), Sucheradapter (1),
Antibeschlagmittel (1), Gummiunterlage
(1), Kissen (2), Bedienungsanleitung (1)
Änderungen, die dem technischen Fortschritt
dienen, bleiben vorbehalten.
H Prüfen des Aufnahmebildes
1 Klappen Sie den Sucher bis zum
Klickpunkt nach unten.
Sie können das aufgenommene Bild mit Hilfe der
mitgelieferten Fernbedienung im Sucher prüfen.
Der Ton ist jedoch nicht zu hören.
2 Stecken Sie den Mikrofonstecker in die
MIC-Buchse.
3 Stecken Sie den Stecker des
Steuerkabels in die REMOTE l (LANC)Buchse.
4 Schieben Sie den Camcorder in das
Gehäuse.
1 Richten Sie den Montageschuh auf die
Führung am vorderen Gehäuseteil aus.
2 Schieben Sie den Camcorder hinein, so
daß er mit einem Klicken einrastet.
Drücken Sie hierzu an der Rückseite des
Montageschuhs.
Vergewissern Sie sich anhand der Laschen
an beiden Seiten des Montageschuhs, daß
dieser richtig eingerastet ist (siehe Abb.
F4).
5 Stellen Sie den STANDBY-Schalter des
Camcorders auf STANDBY.
6 Bringen Sie das hintere Gehäuseteil an.
Überprüfen Sie zuvor, daß auf der Dichtung
und der Auflagefläche kein Sand, kein Staub
und keine Risse vorhanden sind und fetten
Sie die Teile leicht ein.
1 Drücken Sie das hintere Gehäuseteil leicht
an.
2 Schließen Sie die Schnallen.
7 Bringen Sie das Griffband an.
Stellen Sie die Länge des Bandes so ein, daß
Sie den POWER-Schalter, die START/STOPTaste und die ZOOM-Taste bequem mit Ihren
Fingern bedienen können.
8 Bringen Sie den Schulterriemen an.
Stecken Sie den Riemen wie in der Abbildung
gezeigt durch die Ösen, und achten Sie
darauf, daß das Sony-Zeichen nach außen
weist.
5 Stellen Sie den POWER-Schalter auf
CAMERA.
6 Wenn Sie einen Camcorder mit LCDisplay verwenden, schließen Sie das
LC-Display.
7 Falls ein AUTO LOCK-Schalter
vorhanden ist, stellen Sie ihn auf
Automatikbetrieb.
8 Falls ein START/STOP MODE-Schalter
vorhanden ist, stellen Sie ihn auf oder
5 SEC.
9 Wenn der Camcorder eine
Sucherabschaltautomatik besitzt,
stellen Sie den Schalter auf OFF.
10 Stellen Sie den STANDBY-Schalter des
Camcorders auf LOCK.
Hinweis
Bei am Sucher angebrachtem Sucheradapter
kann das Sucherbild aus einem breiterem
Blickwinkel betrachtet werden. Beim Betrachten
von der Seite ist das Bild jedoch möglicherweise
verzerrt.
E Vorbereiten des Sports Pack
1 Lösen Sie die Schnallen.
1 Während Sie die Lösetaste gedrückt
halten, ...
2 ... lösen Sie die Schnallen.
3 Nehmen Sie das hintere Gehäuseteil ab.
4 Bei Verwendung des Camcorders CCDTRV30/TRV30E/TRV40/TRV40E/
TRV60E kleben Sie dasschwarze Polster
und bei Verwendung des Camcorders
CCD-TR610E/TR710E/TR760E/TR810E/
TR910/TR910E/TR2200E/TR2300E/
TR3300/TR3300E/TR3400E/TR3100E
kleben Sie das graue Polster an die innere
Wand des Sports Pack.
1 Stellen Sie den POWER-Schalter auf
PLAYER.
2 Drücken Sie N PLAY an der
Fernbedienung.
Zur Steuerung des Bandlaufs verwenden Sie
die Fernbedienungstasten STOP, REW und
FF.
Hinweis
Je nach verwendetem Camcordermodell arbeitet
die PLAYER-Funktion nicht, auch wenn der
POWER-Schatler auf PLAYER gestellt ist. Der
Camcorder schaltete möglicherweise auf
Kameramodus um.
I Herausnehmen des
Camcorders
1 Lösen Sie die Schnallen, und nehmen Sie
das hintere Gehäuseteil ab (siehe Abb.
E.)
Bevor Sie das Sports Pack öffnen, trocknen Sie
das Sport Pack und sich selbst ab. Achten Sie
sorgfältig darauf, daß der Camcorder nicht
naß wird.
2 Stellen Sie den STANDBY-Schalter am
Camcorder auf LOCK.
3 Fassen Sie den Montageschuh an den
beiden seitlichen Laschen an, drücken
Sie die Laschen dann zusammen, und
ziehen Sie den Camcorder soweit
heraus, daß das Fernsteuerkabel von
der REMOTE (LANC)-Buchse
abgetrennt werden kann. Trennen Sie
das Kabel dann ab.
4 Trennen Sie das Mikrofonkabel von der
MIC-Buchse ab.
Hinweis
5 Nehmen Sie den Sucheradapter ab.
Wenn Sie einen Camcorder mit eingebauter
Leuchte verwenden, stellen Sie den
Leuchtenschalter auf OFF, bevor Sie den
Camcorder anbringen.
6 Nehmen Sie den Montageschuh ab.
4 Setzen Sie die Cassette ein.
Technische Daten
Material
Plastik (PC, ABS), Glas
F Einsetzen des Camcorders
Verwendung des Sports
Pack
G Aufnahme
1 Drehen Sie den POWER-Schalter auf
CAMERA.
2 Drücken Sie START/STOP zum Starten
der Aufnahme.
Die Aufnahmelampe leuchtet im Sucher, und
die Aufnahme beginnt.
3 Zum Stoppen der Aufnahme drücken Sie
START/STOP.
Durch erneutes Drücken kann die Aufnahme
wieder fortgesetzt werden.
Am Ende der Aufnahme
Drücken Sie START/STOP, um die
Aufnahme zu stoppen, und drehen Sie dann
den POWER-Schalter auf OFF.
Zoomen
• Durch Drücken der W-Seite wird in den
Weitwinkelbereich gefahren.
• Durch Drücken der T-Seite wird in den
Telebereich gefahren.
Durch festes Drücken erfolgt das Zoomen mit
hoher und durch leichtes Drücken mit
langsamer Geschwindigkeit (abhängig vom
Camcorder-Modell ist möglicherweise jedoch
nur ein Zoomen mit fester Geschwindigkeit
möglich).
• Wenn die Kamera auf Wassertropfen auf dem
Frontglas scharfgestellt het, betätigen Sie die
Zoomtaste, bis das Motiv scharf ist.
Hinweis zur Aufnahme
Wenn der Camcorder länger als 5 Minuten mit
eingelegter Cassette auf Bereitschaft geschaltet
bleibt, schaltet er sich automatisch aus (um den
Akku nicht unnötig zu belasten und das Band zu
schonen). Zum Zurückschalten auf Bereitschaft
drehen Sie den POWER-Schalter einmal auf OFF
und dann wieder auf CAMERA. Anschließend
können Sie die Aufnahme wie gewohnt durch
Drücken der START/STOP-Taste unmittelbar
starten.
Störungsüberprüfungen
Symptom
Ursache
Abhilfe
Der Ton wird nicht
aufgezeichnet.
Der Mikrofonstecker ist nicht
angeschlossen.
Den Stecker an die MIC-Buchse des
Camcorders anschließen.
Im Sports Pack befinden sich
Wassertropfen.
• Die Schnallen sind nicht
richtig geschlossen.
• Die Dichtung ist nicht richtig
eingesetzt.
• Die Dichtung ist verkratzt
oder gerissen.
• Die Schnallen richtig schließen, so
daß sie einrasten.
• Die Dichtung richtig in die Rille
einsetzen.
• Die Dichtung auswechseln.
Aufnahme- und
Wiedergabefunktion arbeiten
nicht.
• Der Akku ist leer.
• Das Band ist am Ende
angelangt.
• Der Löschschutz der Cassette
ist aktiviert.
• Den Akku laden.
• Das Band zurückspulen oder eine
andere Cassette einsetzen.
• Den Löschschutz desaktivieren oder
eine andere Cassette einsetzen.
Utilizzabile sott’acqua ad una profondità di
2 metri massimo.
Per registrare sott’acqua, usare la custodia
subacquea Sony.
Per usare la videocamera registratore con questa
custodia, fare riferimento alle istruzioni per l’uso
della videocamera.
La custodia sportiva impermeabile SPK-TRC è
parzialmente resistente all’acqua e all’umidità,
rendendo possible l’uso di una videocamera
registratore Sony a 8mm sotto la pioggia o su una
spoaggia.
Avvertenza
• Prima di iniziare la registrazione, assicurarsi
che la videocamera registratore funzioni
correttamente e che non ci siano infiltrazioni
d’acqua.
• La Sony non si assume alcuna responsabilità
per danni alla videocamera, al blocco
batteria, ecc. nella custodia sportiva o per il
costo della registrazione se si verificano
infiltrazioni d’acqua dovute a operazioni
scorrette.
Precauzioni
• Non usare la custodia sportiva dove le onde
sono alte.
• Non sottoporre il vetro anteriore a forti urti,
perché potrebbe rompersi.
• Non lasciare la custodia sportiva esposta alla
luce solare diretta per un periodo prolungato,
perché una temperatura molto alta potrebbe
danneggiare la videocamera.
• Se non è possibile evitare di lasciare la custodia
sportiva al sole, coprirla con un asciugamano o
simili.
• Evitare di aprire la custodia sportiva in acqua o
sulla spiaggia. Operazioni preliminari come
l’inserimento e l’estrazione della cassetta
devono essere eseguite in luoghi con poca
umidità e senza brezze salmastre.
• Se si porta la custodia sportiva in un luogo
freddo dopo averla aperta in un luogo caldo o
molto umido, può verificarsi condensazione di
umidità, che fa appannare il vetro e a volte può
danneggiare l’apparecchio.
• L’impermeabilità della custodia sportiva è
mantenuta dalla guarnizione a tenuta d’acqua e
dalla superficie scanalata della custodia a
contatto con la guarnizione. Fare particolare
attenzione a non danneggiare o deformare
queste parti.
• Non esporre il microfono a onde forti.
• Non gettare la custodia sportiva nell’acqua.
• Usare la custodia per non più di un’ora alla
volta quando la temperatura è di 40°C. È
possibile usare normalmente la custodia a
temperature inferiori ai 35°C.
• Se si usa la custodia sportiva in luoghi freddi,
tenerla in una borsa, ecc. tranne quando si
registra, per evitare che si raffreddi
eccessivamente.
• Si sconsiglia di usare la custodia sportiva
quando la temperatura dell’aria è al punto di
congelamento o inferiore. Tuttavia, quando non
si può evitare di usare la custodia in situazioni
simili, avvolgere la custodia in qualcosa per
isolarla.
• Con alcuni modelli di videocamere, si può
avvertire un certo disagio nel guardare
l’immagine in tutta la sua larghezza nel mirino
quando la videocamera è inserita nella custodia
sportiva. Questo è dovuto allo spazio fra la
custodia sportiva e il mirino.
Prima dell’uso
Per essere sicuri di non perdere qualche
eccezionale occasione di ripresa, eseguire i
seguenti controlli prima di inserire la
videocamera nella custodia sportiva.
sBlocco batteria
sVideocassetta
sGuarnizione a
tenuta d’acqua
• Completamente carico.
• Durata sufficiente per il
tempo di registrazione
previsto.
• Nastro riavvolto fino al
punto in cui si desidera
iniziare la registrazione.
• Linguetta di protezione
della cassetta nella
posizione corretta.
(Finestrella non rossa.)
• Assenza di graffi o
incrinature.
Assenza di polvere, sabbia
o capelli intorno ad essi.
• Correttamente inserita
nella scanalatura. (Fare
riferimento a “Note sulla
guarnizione a tenuta
d’acqua” per i dettagli.)
Manutenzione e precauzioni
Caratteristiche tecniche
Infiltrazioni d’acqua
Materiale
Plastica (PC, ABS), vetro
Se l’acqua penetra all’interno, portare via la
custodia dal luogo esposto all’acqua il più presto
possibile. Se la videocamera si bagna, portarla
immediatamente al più vicino centro di
assistenza Sony.
Note sulla guarnizione a tenuta
d’acqua
• Controllare che non ci siano graffi o incrinature
sulla guarnizione a tenuta d’acqua. Graffi o
incrinature possono causare infiltrazioni
d’acqua. In caso fossero presenti, sostituire la
guarnizione danneggiata con un’altra nuova.
Non usare oggetti metallici o strumenti
appuntiti per estrarre la guarnizione dalla
scanalatura.
• Eliminare i materiali estranei come polvere,
sabbia o capelli dalla guarnizione, dalla
scanalatura e dalle superfici della custodia a
contatto con la guarnizione. Se si chiude la
custodia quando tali materiali sono presenti,
queste aree possono essere danneggiate dando
luogo a infiltrazioni d’acqua.
• Inserire la guarnizione nella scanalatura
uniformemente, con il lato appuntito rivolto
verso l’alto. Non torcere mai la guarnizione.
(Vedere l’illustrazione J.)
• Dopo aver controllato che non ci siano
incrinature o polvere sulla guarnizione,
lubrificare leggermente la guarnizione con il
grasso in dotazione con un dito. Il grasso
protegge la guarnizione dall’usura.
Mentre si lubrifica la guarnizione, controllare
di nuovo che non ci siano incrinature o polvere.
Non usare mai stoffa o carta per l’operazione
perché delle fibre possono rimanere attaccate
alla guarnizione. Non usare un grasso diverso
da quello in dotazione, perché potrebbe
danneggiare la guarnizione.
• La durata utile della guarnizione dipende dalla
manutenzione e dalla frequenza d’impiego, ma
consigliamo di cambiarla una volta all’anno.
Per la sostituzione della guarnizione a tenuta
d’acqua, rivolgersi ad un rivenditore Sony.
Assicurarsi di controllare che non si verifichino
infiltrazioni d’acqua dopo aver sostituito la
guarnizione a tenuta d’acqua.
Controllo di infiltrazioni d’acqua
dopo la sostituzione della
guarnizione a tenuta d’acqua
Controllare che non si verifichino infiltrazioni
d’acqua prima di inserire la videocamera nella
custodia.
Chiudere la custodia sportiva senza inserirvi la
videocamera, e tenere la custodia immersa
nell’acqua ad una profondità di circa 15 cm per
circa 3 minuti, e quindi controllare che non vi
siano infiltrazioni d’acqua.
Dopo la registrazione
Dopo la registrazione in luoghi esposti a brezze
salmastre, lavare con acqua dolce la custodia
sportiva lasciando le fibbie saldamente chiuse, e
quindi asciugarla con un panno morbido
asciutto. Se rimangono goccie d’acqua sulla
custodia, le parti di metallo possono arrugginirsi.
Pulire l’interno della custodia con un panno
morbido asciutto. Non lavare l’interno della
custodia. Non usare alcun tipo di solvente come
alcool, benzina o diluente per la pulizia, perché
potrebbero danneggiare la finitura.
Tenuta d’acqua
Guarnizione a tenuta d’acqua, fibbie
Microfono incorporato
Stereo
Nota
Quando l’adattatore mirino è applicato al mirino
della videocamera, è possibile ottenere una vista
ampia di ciò che appare nello schermo del
mirino. Tuttavia, se visto obliquamente, lo
schermo può apparire distorto.
E Preparazione della custodia
sportiva
Dimensioni
Circa 177 x 173 x 274 mm (l/a/p)
1 Sganciare le fibbie.
1
2
3
4
Massa
Circa 800 g (solo custodia sportiva)
Accessori in dotazione
Tracolla (1), Attacco di montaggio
videocamera A(1)/B(1)/C(1)/D(1),
Grasso (1), Adattatore mirino (1), Soluzione
antiappannante (1), Tappetino di gomma
(1), Cuscinetti (2) e Istruzioni per l’uso (1)
Disegno e caratteristiche tecniche soggetti a
modifiche senza preavviso.
Inserimento della
videocamera
A Selezione dell’attacco di
montaggio videocamera
A seconda della posizione del foro per la vite per
l’applicazione dell’attacco di montaggio
videocamera sulla videocamera impiegata, si ha
la possibilità di scegliere fra tre tipi di attacco di
montaggio videocamera.
Controllare la lista A per identificare l’attacco di
montaggio e il numero freccia.
F Inserimento della
videocamera
1 Girare il mirino verso il basso fino a che
scatta.
2 Collegare la spina del microfono alla
presa MIC.
3 Collegare la spina di comando a
distanza alla presa di controllo REMOTE
(LANC).
4 Inserire la videocamera.
1 Allineare l’attacco di montaggio
videocamera con la guida sulla parte
anteriore.
2 Inserire la videocamera spingendo il retro
dell’attacco di montaggio videocamera
fino a che scatta.
Controllare i pomelli su entrambi i lati
dell’attacco di montaggio videocamera per
assicurarsi che l’attacco di montaggio
videocamera sia fissato correttamente.
(Vedere l’illustrazione F4.)
B Preparazione dell’attacco di
montaggio videocamera
Allineare l’attacco di montaggio C con la
tacca dell’attacco di montaggio A, B o D.
Sostituzione del tappetino di
gomma
Se si usa la videocamera CCD-TRV89/TRV95/
TRV99/TRV95E/TRV99E, sostituire il tappetino
di gomma applicato all’attacco di montaggio A
con il tappetino di gomma in dotazione.
5 Regolare l’interruttore STANDBY della
videocamera su STANDBY.
6 Chiudere la parte posteriore.
Prima di chiudere la parte posteriore della
custodia sportiva, controllare che non ci siano
sabbia, polvere o incrinature sulla
guarnizione a tenuta d’acqua o sulla
superficie della custodia con cui la
guarnizione è a contatto, e lubrificare
leggermente entrambe queste parti.
1 Fissare la parte posteriore.
2 Allacciare le fibbie fino a che scattano.
1 Rimuovere il tappetino di gomma applicato
sul lato del pomello.
2 Applicare il tappetino di gomma in dotazione.
C Applicazione dell’attacco di
montaggio videocamera
Usare le parti di metallo della tracolla
come mostrato nell’illustrazione.
7 Regolare la cinghia dell’impugnatura.
Tenendo la custodia sportiva in modo che la
punta delle dita possa facilmente raggiungere
l’interruttore POWER, il tasto START/STOP
e il tasto ZOOM, tirare la cinghia per
regolarne la lunghezza.
D Preparazione della
videocamera
1 Rimuovere la tracolla, il copriobiettivo,
il filtro o l’obiettivo di conversione dalla
videocamera.
8 Applicare la tracolla.
Applicare la tracolla in dotazione ai ganci per
la tracolla.
Il marchio Sony deve trovarsi all’esterno.
2 Installare l’adattatore mirino.
1 Allargare i‘elastico.
2 Installare l’adattatore sul mirino.
Se l’adattatore mirino rimane allentato
quando è applicato, piegare l’oculare della
videocamera e riapplicare.
Premendo verso l’alto il tasto di sblocco,
sganciare le fibbie.
Aprire la parte posteriore.
Quando si usa la videocamera CCDTRV30/TRV30E/TRV40/TRV40E/
TRV60E, applicare il cuscinetto nero alla
parete interna della custodia e quando si
usa la videocamera CCD-TR610E/
TR710E/ TR760E/TR810E/TR910/
TR910E/TR2200E/TR2300E/TR3300/
TR3300E/TR3400E/TR3100E usare il
cuscinetto grigio.
Nota
Quando si usa una videocamera dotata di
lampada video incorporata, regolare su OFF
l’interruttore della lampada prima di inserire la
videocamera nella custodia.
Impiego della custodia
sportiva
G Registrazione
1 Regolare l’interruttore POWER su
CAMERA.
2 Premere START/STOP per avviare la
registrazione.
La spia di registrazione si illumina nel mirino
e la registrazione inizia.
3 Per sospendere temporaneamente la
registrazione, premere START/STOP.
Premere di nuovo il tasto per riprendere la
registrazione.
Per interrompere definitivamente la
registrazione
Premere START/STOP per interrompere
definitivamente la registrazione. Quindi,
regolare l’interruttore POWER su OFF.
Zoom
• Tenere premuto il lato W per grandangolo.
• Tenere premuto il lato T per teleobiettivo.
Premere a fondo il tasto per zoomare ad alta
velocità. Premerlo leggermente per zoomare ad
una velocità relativamente ridotta. (Questa
funzione è attivabile o meno a seconda del
modello di videocamera impiegata.)
• Quando viene messa a fuoco una goccia
d’acqua sul vertro anteriora la messa a fuoco
senza usare il tasto di zoom.
Nota sulla registrazione
Se si lascia la videocamera per 5 minuti o più con
una cassetta inserita e regolata nel modo di
attesa, la videocamera si spegne
automaticamente. Questo consente di evitare il
consumo del blocco batteria e l’usura del nastro.
Per ripristinare il modo di attesa, regolare
l’interruttore POWER su OFF e quindi riportarlo
su CAMERA. Per avviare la
registrazione, premere il tasto START/STOP.
HControllo dell’immagine
registrata
Si può controllare nel mirino l’immagine
registrata usando il telecomando in dotazione
alla videocamera.
Non è possibile udire il suono.
1 Regolare l’interruttore POWER su
PLAYER.
2 Premere N PLAY sul telecomando.
Usare il telecomando per tutte le altre
funzioni, inclusi STOP, REW e FF.
Nota
A seconda del modello di videocamera, la
funzione PLAYER non si attiva anche se
l’interruttore POWER è regolato su PLAYER. La
videocamera può passare al modo videocamera.
I Estrazione della videocamera
1 Sganciare le fibbie e aprire la parte
posteriore della custodia. (Vedere
l’illustrazione E.)
Prima di aprire la custodia sportiva,
asciugare bene la custodia e sé stessi.
Fare attenzione a non far bagnare la
videocamera.
2 Regolare l’interruttore STANDBY della
videocamera su LOCK.
Per evitare l’appannamento della
superficie del vetro
3 Installare il blocco batteria.
Lubrificare la superficie del vetro con la soluzione
antiappannante in dotazione. Questa è efficace per
la prevenzione dell’appannamento del vetro.
Applicare qualche goccia di soluzione
antiappannante al vetro interno della custodia
sportiva e quindi passare con un panno morbido
asciutto in modo da spandere in modo uniforme
la soluzione sulla superficie del vetro.
5 Regolare l’interruttore POWER su
CAMERA.
7 Selezionare il modo AUTO LOCK per la
regolazione automatica.
3 Tenendo l’attacco di montaggio
videocamera per i pomelli situati su
entrambi i lati di esso, premere i pomelli
ed estrarre la videocamera.
Quando si estrae la videocamera,
smettere di estrarla nel momento in cui
la spina di comando a distanza
fuoriesce dalla custodia per scollegarla
dalla presa di controllo REMOTE
(LANC).
Quando si ripone la custodia
sportiva
8 Regolare l’interruttore START/STOP
MODE su o 5 SEC se disponibile.
4 Scollegare la spina del microfono dalla
presa MIC.
• Chiudere la custodia senza agganciare le fibbie, per
evitare l’usura della guarnizione a tenuta d’acqua.
• Evitare che la guarnizione a tenuta d’acqua sia
esposta alla polvere.
• Evitare di riporre la custodia in luoghi freddi,
molto caldi o umidi, o insieme a naftalina o
canfora, perché ciò potrebbe danneggiare la
custodia.
9 Quando si usa una videocamera con
funzione di salvaenergia del mirino,
regolare il relativo interruttore su OFF.
5 Staccare l’adattatore mirino.
4 Inserire la videocassetta.
6 Quando si usa una videocamera dotata
di schermo LCD, chiudere il pannello
LCD.
6 Staccare l’attacco di montaggio
videocamera.
10 Regolare l’interruttore STANDBY della
videocamera su LOCK.
Soluzione di problemi
sintomo
Causa
Rimedio
Il suono non viene registrato.
La spina del microfono non è
collegata.
Collegare la spina alla presa MIC sulla
videocamera.
Gocce d’acqua sono presenti
all’interno della custodia
sportiva.
• Le fibbie non sono agganciate.
• Agganciare le fibbie fino a che
scattano.
• Inserire la guarnizione nella
scanalatura uniformemente.
• La guarnizione a tenuta
d’acqua non è installata
correttamente.
• Sostituire la guarnizione con un’altra
• Sono presenti graffi o
nuova.
incrinature sulla guarnizione a
tenuta d’acqua.
La funzione di registrazione e • Il blocco batteria è scarico.
di riproduzione non si attiva.
• Il nastro è giunto alla fine.
• La linguetta di protezione
della cassetta è estratta.
• Caricare completamente il blocco
batteria.
• Riavvolgere il nastro o usarne uno
nuovo.
• Reinserire la linguetta di protezione o
inserire un’altra cassetta.