1
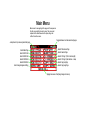
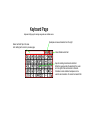
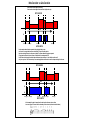
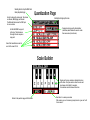
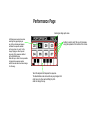
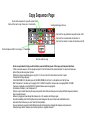
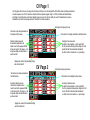
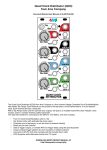
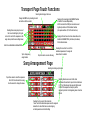
Transport Page Touch Functions
Selecting here brings up the menu
Change the BMP here by touching to select
and inc/dec with the encoder
Touching these areas jumps to one of
the 4 rows for editing of pitch, gate,
note etc. for each of the sequences in the
song chain. (unlike the solo editing below)
Tapping in this area toggles the RANDOM function
for each of the rows independently.
In INT clock mode the SYNC jack can also be used
to globally switch on/off the Random function
(if on pulse switches off, If off it switches it on).
Tapping in the last box of each row allows the user to
disable the RANDOM SYNC jack feature (See above)
for the individual rows.
Switch to enable/disable individual ROWs
Tap to change song
using Encoder
Tap in this area to re-name the song
Touching this row “solos” each of the
individual sequences in the song and
allows them to be edited.
Song Arrangement Page
Selecting here brings up the menu
Tap in these areas to select the sequences
from 0-99 to be chained into a song.
Use the encoder to change the values.
Selecting these boxes in each of the chain
slots allows the number of repeats to be set between
0-31. Tap it then change the value with the Encoder.
If set to 0 the sequence will not play and the
song will cycle back to the beginning when it reaches
the slot.
Touching the Xs in each of the chain slots
“solos” each of the individual sequences in the song and
allows them to be edited. Same as when tapping
on the Sequence bar on the Main Page
Main Menu
Main menu for navigating to the pages of the sequencer.
Tap the screen lightly to select areas. The screen will
respond to the selection when the stylus,finger etc
is lifted from the screen.
Jumps back to previously selected page
Selects Main Page
Selects ROW 1 Edit
Selects ROW 2 Edit
Selects ROW 3 Edit
Selects ROW 4 Edit
Selects Song Arrangement Page
Toggle between last two selected pages
Selects Performance Page
Selects Quantize Page
Selects CV Page 1 (Pitch + Note Length)
Selects CV Page 2 (Gate Duration + Slew)
Selects Copy Seq Page
Selects Copy Song Page
Tapping here saves all Seq/Song changes to memory
Keyboard Page
Keyboard utility page for naming songs and user defined scales
Name text field. Tap in this area
after editing text to return to previous page
Backspace removes characters from the right
Clears the Name text field
Keys for entering characters into text field.
When the page launches the position of the cursor
is to the right of the last character in the field.
Characters can be added or backspace can be
used to clear characters. To clear all text select CLR.
Row Viewer Page
Selecting here calls up the main menu
and also indicates which sequence is active
Select this area to edit Pitch Sliders
Select this area to edit Note Length
Selecting these buttons
switches between
the ROWs for editing
Select this area to edit Gate Duration
Select this area to edit Slew Amount
Selecting here calls up the main menu
and also indicates which sequence is active
Selecting in this area returns to
the Row Viewer page (see above)
Indicates active Row
Slider Editors
Draw slider values in this area of the screen.
Also tapping on a slider will put it into focus and
then the Encoder can be used to enter values.
This is especially useful with Quantization “OFF”
to set micro values as sliders have only 48 steps of resolution.
Indicates the value for
each slider (notes for pitch)
Note Duration vs Gate Duration
Note duration is the length of each step
Gate duration is the length of time the Gate is high for the step
NOTE LENGTH
TIME
5V
0V
Gate Trigger
Gate Trigger
Gate Trigger
Gate Trigger
Gate Trigger
GATE LENGTH
In the example above the blue represents the gate length and you can
see there is a new gate with each new note length. The gate is usually shorter
than the note length but can be the same or longer. The spaces between the gates represent
0V gate and would result in short silences if connected to an envelope and VCA.
In the External clock mode the shortest note duration and gate duration is 1 clock division so there will
only be a very short “off” between steps. Your envelope generator will have to be used to shape note length in this case.
NOTE LENGTH
TIME
5V
0V
Gate Trigger
Gate Trigger
No Trigger
Gate Trigger No Trigger
Gate Trigger
GATE LENGTH
In this example the gate is longer than the note duration for some steps so there
is no new trigger if it crosses over the boundary of the next note (see music notation below)
Selecting here to call up the Midi Clock
latency adjustment page
Select to change the clock mode. The choices
are Internal, Midi(24ppq) and External.
The Midi and External use the SYNC jack
to receive clocks.
Quantization Page
Selecting here brings up the menu
Tapping here brings up the Scale Builder
(see below) which allows the user to create
there own scales (User Scales)
Set the BAR SYNC Loop point
in this box. This determines
the length of each sequence
loop point.
Select the Quantization scale for
each of the rows R1-R4
Scale Builder
Tapping on the keys enables or disables the notes
in the scale. If only one note is active the scale will
be octaves on that pitch for example.
For semitone scale all notes will be active
Return to the quantizer page with this button
Touch here to re-name your scales
If the scale is a pre-set in memory (major,minor etc.) you can’t edit
it or re-name it.
Performance Page
Selecting here brings up the menu
In Performance mode (active when
selecting this page) tapping on
any of the virtual keypad squares
activates the sequence number
on the key. Here it is seq 01 in the
image. Tapping on other keys will
play each of the sequences defined
on the SONG ARR. page.
When the key is active it is also possible
to change the sequence number
with the encoder which will also change
it in the song.
Buttons to switch on/off the row for transpose
using the keyboard at the bottom of the screen
Touch the keyboard to transpose the sequence.
The Quantization scale will override any key changes that
might occur. In other words shifting the pitch
does not change the key.
Copy Sequence Page
Tap to set the sequence to copy with encoder 0-99
Tap to set the row to copy. Choices are 1-4 and ALL(A)
Selecting here brings up the menu
Tap to set the copy destination seq with encoder 0-99
Tap to set the row destination with encoder 1-4
Tap to set the number of copies with encoder (up to 99)
Set the transpose offset for each copy +/-12 semitones
Touch to create the copy
Here’s an experiment to help you to familiarize yourself with the power of the copy and transpose functions.
1/Pick an unused sequence, 10 for example and put it in the first slot with no chained seq after it. Loop it and make up a
pattern that you like using row 1 sliders.
2/Setup the song arrangement page so seq 10,11,12,13 are in the first 4 slots and set each to 1 repeat.
3/Jump back to Copy seq page.
4/ Set SEQ FROM to 10, the pattern you did, Set ROW FROM to A for All or 1 as the pattern is in the first row.
SEQ TO should be 11 because we’re copying 10 to 11, ROW TO should be 1 because we are copying ROW 1 to ROW 1
If we were copying ALL rows the ROW TO is ignored because we are copying ALL.
Set number of copies to 3, set transpose to 0.
5/Tap on copy to create. Now play the song and you will notice that even though we are using 4 different sequence patterns
they all sound the same.
6/Leave it playing and now change the transpose to +3 for example and hit copy again.
You will immediately hear that the patterns have been transposed. Be sure to have scale Quantization set to
scale other than Octaves or you won't hear the transpositions.
You can continue to experiment with different amounts of transpose by changing the transpose entry value and
hitting the copy button. Transpose can be either positive or negative amounts.
Copy Song Page
Tap to set the Song to copy from 0-31
Selecting here brings up the menu
Tap to set the memory location for the song copy
Tap to set the number of copies with encoder (1-31)
Touch to create the copy
When copying a song to a new location the all the song parameters (CLOCK TYPE, Scale assignments,
Bar Loop, BPM and sequence/song arrangement are copied) The sequences are not copied as
all songs can share the same 100 sequences but the chaining or arrangement of the sequences is
copied.
CV Page 1
The CV pages allow the user to assign the front panel CV Input Jack to modulate the Pitch, Note, Gate and Slew parameters
of each sequence row. The CV section is divided into two separate pages. Page 1 is Pitch and Note and Note Duration
and Page 2 is Gate Duration and Slew. Despite having only one CV jack the ability to route CV modulation to so many
destinations can add a surprising amount of variation to a static sequence.
Selecting here brings up the menu
This section is for routing modulation to
the Sequencer Pitch values.
This section is for routing modulation to the Note duration
Selecting in these boxes sets
the amount of modulation to be
routed to each of the sequence ROWS,
in this case for pitch. The range is +/-63.
A negative setting will subtract while a
positive will add.
Tapping here clears all the modulation settings
and sets to default off
This section is for routing modulation to
the Gate Duration.
Selecting in these boxes sets
the amount of modulation to be
routed to each of the sequence ROWS,
in this case for pitch. The range is +/-63.
A negative setting will subtract while a
positive will add.
Tapping here clears all the modulation settings
and sets to default off
Selecting in these boxes sets
the offset for the modulation +/-63 for each ROW
The CV jack works with only positive voltage from 0-5V.
In order that the CV be allowed add and subtract
an offset can be set to simulate a +/- input voltage.
CV Page 2
Selecting here brings up the menu
This section is for modulating the slew amount.
Selecting in these boxes sets
the offset for the modulation +/-63 for each ROW
The CV jack works with only positive voltage from 0-5V.
In order that the CV be allowed add and subtract
an offset can be set to simulate a +/- input voltage.