1
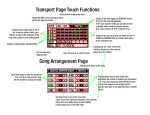
ZOOM PS02 Pattern Editor 3.2
Index
1. Introduction.
2. Overview of the Pattern Editor.
3. Setting up the Pattern Editor.
4. Loading and playing a Rhythm Pattern in the Pattern editor.
5. Creating a new Rhythm Pattern from scratch.
6. Saving a New Pattern.
7. Transferring a pattern from one songfile to another.
8. The Note Menu.
9. Importing midi files into the Pattern Editor.
10. Using the Pattern Editor at increased resolution. *
11. Changing the instrument list. *
12. Midi mapping. *
13. The Bass line.
* For advanced users.
1. Introduction
The Soundside Pattern Editor greatly expands the functionality of the Zoom PS02 allowing
you to:
•
•
•
•
Build new PS02 drum and bass patterns from scratch. No longer are you dependent on
preset patterns supplied by the manufacturer.
Import and alter existing PS02 patterns.
Save new patterns to the PS02.
Import midi files and transform them into equivalent PS02 drum and bass patterns.
2. Overview of the Pattern Editor
The following elements make up the Pattern Editor window:
•
Instrument name midilist - a vertical series of percussion (top half) and bass note
names (bottom half). Shows the instruments used in creating the rhythm pattern.
•
Instrument mute/solo - to the left of each instrument/bass note. Used to mute and
solo a line.
•
Drum/Bass arrange grid - displays the notes of the drum/bass pattern. Across the
top of the grid is a series of numbers and dashes: Numbers coloured red mark the
first beat of a bar, those in black are subsequent beats. The dashes mark a 1/16 note.
•
Menu Bar - Contains “File”, “Pattern”, “Midi device”, “Window” and Help file
menus.
•
Functions bar (just below the Menu bar).
NB: Many of the operations detailed in the manual have keyboard shortcuts - refer
to the Pattern Editor menus for these.
The word "Level" in the text refers to Note Velocity . The PS02 supports note
velocities between 0 and 15.
3. Setting up the Pattern Editor
Before starting to program any rhythm patterns, you will need to ensure that the
instrument name list matches the PS02 Drumset you wish to use. After registration the
Pattern Editor launches with an abbreviated version of the original drumset.
•
To change the displayed instrument list: Open the File menu and select "Open
Instrument Definition File" (these are located in the Pattern Editor folder). Select and
open the full version of the drumset you wish to use (*.ahi).
By having several *.ahi files in the Pattern Editor folder, you can switch easily
between different drum sets during operation. There must be one (and only one) file
named Drums.ahi - this is the default start-up instrument list when you run the
Pattern Editor.
4. Loading and playing a Rhythm pattern in the Pattern Editor
You should back-up your songs.pts file before attempting any alterations.
The Pattern Editor works with rhythm patterns contained in the file songs.pts . The new
user should ensure that the "Fit" checkbox is ticked . The Pattern Editor will then
automatically check to ensure correct import.
The more experienced user will find that pattern import is faster if the "Fit" Box is left
unticked. This is perfectly OK as long as the number of measures currently displayed
matches the number of bars of the imported pattern. Otherwise the user will need to adjust
the current display (using "Build new pattern" in the "Pattern" menu).
•
Open the “File” menu in the Pattern Editor, then select “Open PS02 song file”.
Browse for the Songs.pts file, select and open it. The name of the first pattern appears
in the “Pattern name list” box (top right in the functions bar).
•
Scroll through this list until the pattern that you want appears in the display , then
open the File menu and select “Import PS02 pattern”.
•
To play or stop the pattern click on the Start/Stop button ( next to the tempo
indicator in the functions bar ) or press <spacebar> on the keyboard.
•
To change the tempo select a new tempo from the list in the “tempo” box or type in
any desired tempo in the box from the keyboard.
•
To change the overall volume use the drum/bass volume field in the functions bar (
to the right of the tempo box). Right clicking on the plus or minus signs causes Drum
or Bass volume to toggle between zero (Mute) and full.
To decrease volume in steps, left click on the appropriate minus sign. Conversely, to
increase volume in steps, left click on the appropriate plus sign.
NB: These settings only affect the playback volume on your PC. Bass and drum levels are set
independently on the PS02.
•
Changing the bass sound: The user can scroll through and select the desired
playback bass sound from the Bass selection box in the functions bar.
•
To load a bass pattern only : Ensure that only the Bass check box (in the functions
bar) is ticked before loading a new pattern.
•
To load a drum pattern only: Ensure that only the "Drums" check box (in the
functions bar) is ticked before loading a new pattern.
•
To Delete the displayed Rhythm pattern : Select “Reset events” from the
“pattern” menu (Alternatively if you also want to change the parameters of the
Arrange Grid, select “Build new pattern” from the “Pattern” menu).
•
To delete all bass events only : Select “Reset events (Bass only)” from the
“Pattern” menu.
•
To delete all drum events only : Select “Reset events (Drums only)”.
•
To transfer a drum and/or bass part from one Rhythm Pattern to the current
pattern: Select a "source" pattern from the “pattern name list” (open a new songfile
if necessary), and chose “Add PS02 pattern” from the “File” menu. Use the “Drums”
and “Bass” check boxes to control whether to add the bass or drums component of a
new pattern to the existing one.
This will add the drum and or bass parts of the source pattern to the current pattern
without overwriting the latter. This can also be done through the Auto function (see below).
•
“Auto” function : Checking the "auto" box allows the user to automatically load
patterns by just clicking on the pattern name. The “Bass” and “drums” check boxes
remain active as described above.
If the “Add” box is checked, drum and/or bass parts from the selected pattern are
automatically added to the current pattern, without overwriting the latter.
•
To Zoom the arrange grid : The Zoom button is located on the bottom right of the
window.
To Zoom in : Right click on the + sign.
To Zoom out : Right click on the -- sign.
To make medium adjustments to the Zoom : Use [Shift] and right click.
To make fine adjustments to the Zoom: Use [Ctrl] and right click
To return to the full field: Left click until the Zoom button turns red
•
To make the pattern editor always the top window on your desktop : Open the
window menu and tick “Top”
Note: An instrument can be changed in the midilist by clicking on its name and selecting a
new one from the drop-down menu. Occasionally you might need to use this function for
accurate playback of some PS02 percussion instruments which are not General Midi
standard. If you use this feature remember to return the instrument line to its default value
before saving the pattern.
5. Creating a new Rhythm Pattern from scratch
•
Open the Pattern menu then select “Build new pattern”. From the selection box,
chose the number of M easures you want in the pattern (1, 2, or 4*), the Beat (time
signature - from 1/4 to 8/4) and the Divisions* - 4, 8, 24 or 48 (the latter is for special
cases only - see section 10, "Using the pattern editor at increased resolution"). When
selection is complete click on OK.
*"Divisions" (or quantize ) specify the resolution of the Pattern Editor and correspond to
the more commonly known ppq (parts per quarter note).
The 4 and 8 division options are there for user convenience when creating new
patterns. All patterns default to 24ppq when saved.
*It is possible to create 8 bar patterns by doubling up the number of measures using
the "Double number of measures" command from the "Pattern" menu - the user may
find this useful in special cases. An 8 bar pattern may also be created using the
"Special quantize " feature on certain 4 bar patterns.
•
To enter a note simply left click on the appropriate square in the grid. Notes can
have a level between 0 (silence) and 15 (Max.). The default initially is 12 ( but this can
be changed - see below).
•
To play back/stop the pattern click on the Start/Stop button (or press <spacebar>).
The bass is monophonic (only one note can be sounded at a time), and a note will sound
until it naturally decays or is interrupted by another note.
•
To mute a bass note without playing another, press [Shift] or [Ctrl] or [Alt] and
left click the appropriate grid position where you want the note to end (or use the
middle button on a 3-button mouse at the desired location). A purple/brown rectangle
appears. The currently sounding bass note is cut off at this point (NB: The mute must
be in the same octave as the previous bass note or it may not be saved by the pattern
editor).
NB: If you allow the mouse cursor to hover over a note, a pop-up appears showing
the volume level (L) and, in the case of a bass note, the degree of transpose (T) i.e:
the octave in which the note lies (default is 1)
•
To delete / mute a note : Simply left click on it.
•
To immediately restore a deleted / muted note to its previous level : Press
[Shift] or [Ctrl] or [Alt] and left click the vacant grid square (or click with the middle
button) . You can of course restore a note by just left clicking on the grid square but it
will then assume the default level.
•
To change the level of a single note : Right click over the note to get a menu, then
select “level (single)” and left click on the level desired (0...15).
•
To change the level of all notes on one instrument line : Press [Ctrl] and right
click anywhere on the line. A menu is displayed, select “level (all)” and left click the
volume level desired (0....15).
•
To change the default volume level (the level at which a new note is entered) :
Press [Alt] + left click and while holding both, right click anywhere in the arrange
grid. Select “level (new)” and then release the left click over the desired default
volume (0..15).
•
To solo a line: Left click the "S" to the left of the instrument line. It changes colour
to indicate solo mode. Left click again to return to normal play mode. Several lines can
be soloed at one time. Pressing [shift] + left click, undoes all mutes except the selected
line
•
To mute a line : Left click on the "X" to the left of the instrument line. Left click
again to return to normal play mode. Several mutes can be operative at once. Pressing
[shift] + left click undoes all mutes except the selected line.
•
To transpose a bass note by multiples of an octave* : Right click on the note,
select “transpose” then click on the octave desired.
•
To transpose all bass notes on one line by multiples of an octave* : Press [Ctrl]
then right click anywhere on the line. Select “transpose” and click on the desired
octave.
•
To transpose the whole bassline up/down (by semitones or octaves)* : Open
the Pattern menu and select “Transpose”. Selecting "Transpose up" or "Transpose
down" will transpose all bass notes up or down by a semitone.
•
To change the default bass octave : Position the cursor in the bass section of the
arrange grid, press [Alt] + left click, and while holding both, right click and select
"transpose (new). Release the right click on the desired octave. (All subsequent bass
notes will be entered at this octave. The default at start up is "1").
•
Doubling the number of measures : Open the Pattern menu and select “ Double
number of measures”. The number of bars displayed in the pattern editor will double,
up to a maximum of 8.
•
Halving the number of measures : Open the pattern menu and select “Half number
of measures”.
•
Copying whole sections of the displayed pattern : This feature allows the user to
copy part or all of the existing note events to another location within the pattern. this
saves the user having to program every note event by hand - simply program a few
events and use "Copy" to repeat these throughout the pattern. Also useful when you
have doubled the number of measures and need to copy events from the first bar to
subsequent bars.
Right click on a grid square from which you want copying to start. Then select
"Repeat". You now have 4 options:
Repeat (Instrument) will repeat just the note events of that line (starting the repeat
from the grid square selected) until the end of the pattern is reached.
Repeat (Drums) will repeat all the percussion note events (starting the repeat from
the selected grid square) until the end of the pattern is reached.
Repeat (Bass) will repeat all of the Bass events (starting the repeat from the selected
grid square) until the end of the pattern is reached.
Repeat (All) will repeat all note events (starting the repeat from the selected grid
square) until the end of the pattern is reached.
If you want to copy a selected series of note events from a line, then use the Cut/Copy
and Paste function (see section 7, "The note menu")
•
Quantize : Open the Pattern menu, select " quantize ", then select the desired degree
of quantize (4, 8, 24, or 48*).
*This function changes the resolution of the pattern editor. There are 3 levels of
“quantize” - 4, 8 and 24 - in normal use - quantize 48 is for special cases (see
section 10)
•
Renaming a pattern : Open the Pattern menu and select “Rename Pattern”.
Overwrite the pattern name in the “pattern name list” box with the new name.
When renaming you should use uppercase letters, numbers and a dash only - the PS02
display may not support any other figures.
The PS02 imposes a limit of 255 events in a pattern. The Pattern Editor will generate
a warning if you try to store a pattern exceeding this limit.
6. Saving a new pattern
Important: The "Auto" box should be unchecked first.
•
If you need to open a new ps02 songfile (songs.pts) then select “Open PS02 song file”
from the “File” menu. Browse and open the desired songfile.
•
Select the pattern you wish to overwrite in the “Pattern name list” box.
•
Select “Generate and save PS02 pattern” from the “File menu”.
The rhythm pattern in the pattern editor window has now been stored at the chosen
location.
7. Transferring a pattern from one songfile to another
•
Open the source song file as shown above. Load the selected pattern into the editor.
Then open the destination songfile and transfer the selected pattern as shown in
“Storing a new pattern”.
8. The Note menu
A note menu appears whenever you right click in the Arrange grid. The following
functions are available in addition to those detailed above.
NB: A single note is selected when you right click on it. To select a line of notes
simply left click on the first note and then drag the cursor along the line. The
background to the selected notes will turn white. Right click anywhere over the note
selection to open the note menu.
•
•
•
•
•
•
•
•
•
•
Undo: Undoes the last command.
Cut: Deletes the selected note(s) to the clipboard.
Copy: Copies the selected note(s) to the clipboard.
Paste : Right click over the desired grid square, then select “Paste” to paste the
contents of the clipboard to that line starting from that square.
Clear: Right click on an instrument line (in the grid) and select “clear”. All notes from
the cursor to the end of the line are deleted.
Repeat: Right click at a blank grid square and select “repeat” ( For details see
section 5 "Copying whole sections of the displayed pattern").
Level (single): See section 5, "to change the level of a single note".
Relative level: Right click on an instrument line (in the grid) and select “relative
level”. Set between -5 and +5. This will change the level of every note on the line by
the set amount.
Natural level: Right click on an instrument line, select “natural level” then “low”
“medium” or “high”. This function changes the level of all notes on a line in a
somewhat random way to give a more natural feel. The degree of level variation
increases from low to high.
Transpose (single/all) : see section 5 (Applies to bass notes only).
9. Importing Midifiles into the Pattern Editor
The Pattern Editor imports single-track (Type 0) midifiles. If the midifile has more than
one track, then you will need to convert it to single-track with the appropriate software. A
good midi-converter is Gnmidfmt which interconverts files of midi formats 0,1 and 2
(available from Gunter Nagler’s Midi utilities at http://www2.iicm.edu/Cpub ).
The midi import function works by breaking up the selected midi file into sections equal to
the current number of measures displayed in the Pattern editor. The user saves each
imported section as a PS02 Rhythm Pattern, then chains the patterns together into a song
using the Soundside PS02 Song Editor or the PS02 itself.
•
Set the Pattern editor to display the number of measures which you wish to import
from the midi file. Set quantize to 24 (or 48 if greater resolution is needed - see
section 10).
•
Open the File menu and select “Import midi”. Browse for the midi file required and
open it.
•
A "Midi import Parameters" box opens. "Total offset" is the number of (quarter note
or crotchet) beats after the start of the file. This allows the user to specify where s/he
wants midi import to start. e.g: In 4/4/ time, if Total offset is set to 0, then current midi
import will start from the beginning of the file, if set to 4, then midi import starts from
bar 2 and so on.
Ticking the "auto increase" box allows the user to specify how the "Total offset"
advances after each import. This will allow the Pattern Editor to automatically
advance to the next section of the file for import - if not ticked then the user needs to
do this manually in the "Total offset" box. e.g: In 4/4 time, if auto increase is set to 4,
then the Pattern Editor will advance 1 bar at a time from import to import, if set to 8,
then the advance will be 2 bars and so on.
The Transpose box allows the user to specify a transpose value ( in semitones) for any
incoming non-percussion (ie: Bass) events.
The Midi Channel box: is used to specify which channel of the Midifile is to be
imported as the bass line. If the default setting of "< >10" is retained , then the
Pattern Editor imports and displays all non-percussion notes as a bass line . To limit
bass import to just one channel, the user should select the desired channel in the box.
Checking "Remember midi file " allows the last selected midifile to be remembered
automatically when the user selects the "Import Midi" command.
•
When all parameters have been set, click on "OK". A number of measures of the midi
file equal to the current number of measures in the pattern editor will be imported.
If the midifile is larger than the current number of measures you will get the message
"Pattern too large", but this is just a routine message, not an error.
NB: All notes in the imported midi file will be quantized automatically to the nearest
division
•
Save the imported midi section as a Rhythm pattern.
•
Repeat the operation to import and save further sections of the midi file.
Import problems can arise if there are percussion instruments in the midi file not
available in the current Pattern Editor instrument set. This will generate an error
message "Import Problems" in the bottom left hand corner of the Pattern Editor. By
Clicking on this message the user can view a list of the midi notes that are failing to
import . There are a number of ways of fixing the problem.
1) Import the midifile into a sequencer and edit the drums so that the problem notes
are moved to another line which is available in the Patter Editor.
2) If possible change an instrument midi number in the Pattern Editor to the number
of the "problem" note.
3) Close the Pattern Editor and edit the relevant *.ahi file in the Pattern Editor
folder to allow "Midi mapping" (See below).
4) In a few cases it may be better to use another (different) drums.ahi file which has
a closer match to the incoming instruments.
10. Using the Pattern Editor at increased resolution (Advanced Users)
It is possible to increase the resolution of the Pattern Editor to 48 ppq (divisions) either by
building a Pattern at 48ppq or by increasing the quantize value of an existing pattern. This
feature may be useful for midi import and for programming Patterns which need a higher
level of detail than afforded by 24 ppq.
However, the PS02 only has a max resolution of 24ppq so how does it read these higher
resolution patterns? Well, the short answer is it doesn't! Instead the user applies "Special
quantize " (Open the Pattern Menu, then select " quantize special" ) to the 48 division
Pattern before saving. This doubles the number of bars, while simultaneously doubling the
space between notes and shifting the whole pattern down to 24 divisions. The net result is
that if the special-quantized pattern is now played at double the original speed it will sound
exactly the same as the original 48 ppq Pattern!
11. Changing the instrument list
(Advanced users)
•
To make changes to the order and number of instruments in the pattern editor open the
Drums.ahi file in the pattern editor directory (back-up all your *.ahi files!).
•
Under “Instruments” is a list of Midi numbers each followed by a <Tab> and then the
name of a percussion instrument. This is a list of all the possible midi numbers, with
their associated instrument names, that can appear in the Pattern Editor (and which
can be viewed in the Pattern Editor by clicking on an instrument name and scrolling
through the list). You can change this list as required, but ensure that you maintain the
displayed format!
•
Under “Defaults” is a list of midi numbers. The order of instruments in this list
determines the order of instruments in the Pattern editor .
•
After making changes to the “Instrument” and “Defaults” sections, select “Save as”
from the file menu. Enter Drums.ahi as the file name . Overwrite the current
Drums.ahi file.
NB: If you get an error when trying to run the pattern editor after this operation,
DON’T PANIC! Check your work carefully, and make sure you have inserted a
<Tab> field after each number in the “Instrument” section (Even if you are leaving
the name field empty you should still insert a <Tab> and a few blank spaces).
12. Midi Mapping (Advanced users)
This function is used to overcome midi import problems, when an instrument in the midi file
is not available in the Pattern Editor. In this case you can "map" the problem note to a
different note which is available in the Pattern Editor. (Midi mapping also works for
imported PS02 Patterns)
•
Open the drums.ahi file in the Pattern Editor. Under " Defaults" chose a note number
(XX) to act as the destination, then after it type:
=YY ( where YY is the number of the note in the midi file that needs to be moved).
•
Save the new Drums.ahi file, then run the Pattern Editor and import the midi file
again. All the notes formerly of midi number YY have now been moved to XX in the
Pattern Editor.
•
Close the Pattern editor and undo the midimap at the end of the session.
13. The Bass line
The PS02 bass machine has a range from E0 (the lowest note of a bass guitar) to B5 ( 5
½ octaves). The Pattern Editor does allow the user to enter notes from C0 to D#0 as
well, but these will be transposed up an octave by the PS02, so are best avoided. When
you play back the bass line on the PS02, the chord input display should be set to C NON
throughout . This will ensure playback in the same key.
To transpose the bass line simply alter the Chord Input Display. This may result in some
notes jumping up or down an octave however which may not be the effect you want.
As long as your original bass line is in a major key - with no accidentals - you may also be
able to change the “chord type” on the PS02, which will allow you even more flexibility in
using the pattern.
The PS02 does not allow bass notes to sustain from one Pattern to the next. The user
can work around this by changing the size of the the Pattern so that all bass notes
start and end within the pattern.