1
User Manual
Aktura Technology
Copyright © 2013 Aktura Technology
Contents
Chapter 1:
Welcome And Thank You .......................................................................................... 6
Chapter 2:
How To Use This Manual ........................................................................................... 7
Who Should Read This Manual? .......................................................................................................................................................7
How Is This Manual Organized? .......................................................................................................................................................7
Document Conventions ......................................................................................................................................................................8
Chapter 3:
Getting Help ............................................................................................................... 9
Online Help ..............................................................................................................................................................................................9
Inline Application Assistance ......................................................................................................................................................... 10
Ticketing ................................................................................................................................................................................................ 10
Forum...................................................................................................................................................................................................... 12
Official Website.................................................................................................................................................................................... 12
Chapter 4:
Chimp Rewriter Features ........................................................................................ 13
Feature Summary ............................................................................................................................................................................... 13
Feature Comparison Matrix ............................................................................................................................................................ 14
Feature Requests ................................................................................................................................................................................ 21
Chapter 5:
Installing Chimp Rewriter ....................................................................................... 22
Installing Chimp Rewriter on Your Computer .......................................................................................................................... 22
Activating Chimp Rewriter .............................................................................................................................................................. 23
Upgrading From Free to Paid ......................................................................................................................................................... 25
Downgrading From Paid to Free................................................................................................................................................... 25
Application Updates .......................................................................................................................................................................... 26
Chapter 6:
Getting Started With The User Interface ............................................................... 27
First Steps .............................................................................................................................................................................................. 27
Default Layout ..................................................................................................................................................................................... 28
Ribbon Menu ........................................................................................................................................................................................ 29
Quick Access Toolbar ........................................................................................................................................................................ 30
Styles ....................................................................................................................................................................................................... 31
Title Bar ................................................................................................................................................................................................... 32
Status Bar ............................................................................................................................................................................................... 32
Windows Panes ................................................................................................................................................................................... 33
Zooming ................................................................................................................................................................................................ 33
2
Contents
Resizers ................................................................................................................................................................................................... 33
The Editor .............................................................................................................................................................................................. 34
Context Menu ...................................................................................................................................................................................... 34
Tooltips................................................................................................................................................................................................... 35
Toolbars.................................................................................................................................................................................................. 35
System Log............................................................................................................................................................................................ 37
Personalized Settings ........................................................................................................................................................................ 38
Multilingual Support ......................................................................................................................................................................... 39
Chapter 7:
Creating, Opening and Saving Documents ........................................................... 42
Creating a New Document .............................................................................................................................................................. 43
Documents Tabs ................................................................................................................................................................................. 44
Saving Documents ............................................................................................................................................................................. 45
Chapter 8:
Using The Editor ...................................................................................................... 48
The Document Editor ........................................................................................................................................................................ 48
Undo and Redo.................................................................................................................................................................................... 50
Clipboard Functions .......................................................................................................................................................................... 50
Drag and Drop Support .................................................................................................................................................................... 51
Formatting ............................................................................................................................................................................................ 52
Finding and Replacing Text ............................................................................................................................................................ 57
Highlighting.......................................................................................................................................................................................... 59
Grammar Checking ............................................................................................................................................................................ 61
Spell Checking ..................................................................................................................................................................................... 62
Printing ................................................................................................................................................................................................... 63
Chapter 9:
Rewriting .................................................................................................................. 64
What is Spin? ........................................................................................................................................................................................ 64
Terminology ......................................................................................................................................................................................... 64
The Synonym Selector ...................................................................................................................................................................... 65
Document Views ................................................................................................................................................................................. 70
Variation Builder.................................................................................................................................................................................. 74
Rapid Rewrite ....................................................................................................................................................................................... 75
Spin Editor ............................................................................................................................................................................................. 77
Auto Rewriters ..................................................................................................................................................................................... 78
Spin & Preview ..................................................................................................................................................................................... 81
3
Contents
Flat Spin.................................................................................................................................................................................................. 83
Tip Creator............................................................................................................................................................................................. 83
N-Spin ..................................................................................................................................................................................................... 84
Instant Unique ..................................................................................................................................................................................... 86
Anchor Spin .......................................................................................................................................................................................... 87
Auto List Creator ................................................................................................................................................................................. 88
Spin Cleaner.......................................................................................................................................................................................... 89
Ordered Spin ........................................................................................................................................................................................ 89
Re-Ordered Spin .................................................................................................................................................................................. 89
Auto List Import .................................................................................................................................................................................. 90
Word Density........................................................................................................................................................................................ 91
Spin and LSI Percentage................................................................................................................................................................... 92
Chapter 10: Exporting .................................................................................................................. 94
Introduction.......................................................................................................................................................................................... 94
Export Manager ................................................................................................................................................................................... 94
Profiles .................................................................................................................................................................................................... 95
Bulk Rewrite Directory ...................................................................................................................................................................... 99
Submit to Blog Network .................................................................................................................................................................102
Copyscape Check..............................................................................................................................................................................106
Chapter 11: Research Tools ....................................................................................................... 110
Introduction........................................................................................................................................................................................110
Video and Image Finder .................................................................................................................................................................110
Article Finder ......................................................................................................................................................................................112
Chapter 12: Project Center ........................................................................................................ 115
Project Center Panel ........................................................................................................................................................................115
Files ........................................................................................................................................................................................................120
Thesauri ................................................................................................................................................................................................121
Protected Terms ................................................................................................................................................................................123
Links.......................................................................................................................................................................................................123
Sites........................................................................................................................................................................................................124
Images and Videos ...........................................................................................................................................................................125
Articles ..................................................................................................................................................................................................125
Signatures............................................................................................................................................................................................125
4
Contents
Tags........................................................................................................................................................................................................126
Snippets ...............................................................................................................................................................................................128
Chapter 13: Synonym Database................................................................................................ 129
Quality Determination ....................................................................................................................................................................129
Part Of Speech Matching ...............................................................................................................................................................129
Thesaurus Updates...........................................................................................................................................................................130
Local Thesauri ....................................................................................................................................................................................130
Chapter 14: Shortcut Liftout...................................................................................................... 131
5
Contents
CHAPTER 1:
WELCOME AND THANK YOU
Thank you for downloading and installing Chimp Rewriter. You have made an excellent choice. We
hope you will enjoy all of the capabilities of the latest offering from Aktura Technology.
Chimp Rewriter is a professional document editor and rewriter specifically designed for Internet
Marketers. The software is extremely easy to use and has many features allowing Internet
Marketers to create articles and rewrite them in record time.
Chimp Rewriter is great for beginners as well. The document editor works just like Microsoft Word
and incorporates ribbons, tooltip help and other guides to assist Internet Marketers of all
experience levels.
Many training videos have been produced to help you get started as quickly as possible. They can
be found at http://chimprewriter.com/help/videos.
Chimp Rewriter has been designed to allow beginner users to get straight in and develop articles
simply and quickly without undergoing a long and arduous learning curve. For this reason, many of
the features of Chimp Rewriter may not be initially evident. Professional and long term users
should take the time to read this manual as we are sure you will discover many features that will
save you both time and effort.
This document is subject to change without notice. The latest electronic version of this user manual
can be downloaded from the Chimp Rewriter website at
http://chimprewriter.com/downloads/usermanual.pdf.
Once again, thank you for trying Chimp Rewriter.
Mark Beljaars
Director, Aktura Technology
6
Chapter 1:
Welcome And Thank You
CHAPTER 2:
HOW TO USE THIS MANUAL
Who Should Read This Manual?
Chimp Rewriter is very intuitive and as a result most users should be able to use many of the
features without referring to this manual. However, there are many benefits gained from taking the
time to read this manual as detailed below.
Inexperienced Document Writers
Use this manual as a guide to best practices for creating, editing and rewriting documents.
Experienced Rewriters
This manual contains many tips and tricks and details time saving features of Chimp Rewriter that
will literally save you hours.
Potential Purchasers
This guide contains a wealth of features and how tos that may be used to compare Chimp Rewriter
with other rewriters and document spinners.
How Is This Manual Organized?
The chapters within this manual have been ordered to guide you from absolute beginner to a
rewriting master. Based on your current experience levels, feel free to jump it at any chapter as
each chapter is self-contained.
Below is a guide to chapter content based on your current experience level.
All Users
Chapter 3: Getting Help
Chapter 4: Chimp Rewriter Features
Chapter 5: Installing Chimp Rewriter
Chapter 6: Getting Started With The User Interface
Inexperienced Users
Chapter 7: Creating, Opening and Saving Documents
Chapter 8: Using The Editor
7
Chapter 2:
How To Use This Manual
Intermediate Users
Chapter 9: Rewriting
Chapter 10: Exporting
Chapter 11: Research Tools
Advanced Users
Chapter 12: Project Center
Chapter 13: Synonym Database
Chapter 14: Shortcut Liftout
Document Conventions
When reference is made to a specific button, menu or other control within the application, the
label text is shown in italics. For example: to create a new document, select New from the File
ribbon menu.
Specific keyboard keys are represented by upper case text. For example, to copy text hold down
CTRL and press the C key.
The idea box represents an important note, tip or trick. Particular attention should be paid
to the text within this area.
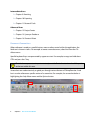
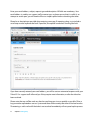
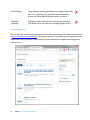
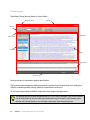
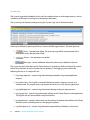
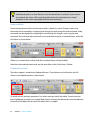
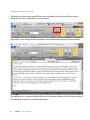
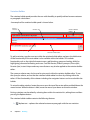
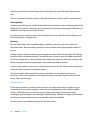
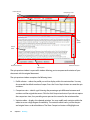
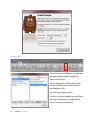
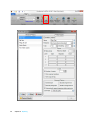
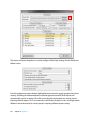
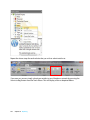
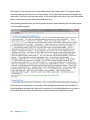
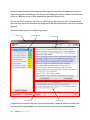
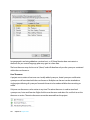
Screenshots are used extensively to guide you through various features of Chimp Rewriter. A red
box is used to reference a specific section of a screenshot. For example, the screenshot below is
highlighting the Help ribbon menu and the Options button.
8
Chapter 2:
How To Use This Manual
CHAPTER 3:
GETTING HELP
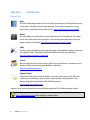
Online Help
Help
The official help page explains how to use the many features of Chimp Rewriter using
screen shots, examples and everyday language. If you require support on using a
feature, this is probably the best place to start. http://chimprewriter.com/support
Videos
We are building our video library to cover all features of Chimp Rewriter. The videos
are all short, descriptive and to the point. They are designed specifically to get you
going as quickly as possible. http://chimprewriter.com/support/videos
FAQs
The ever growing frequently asked question page is developed using forum questions
and support tickets. Hopefully you should find all the answers you seek here.
http://chimprewriter.com/support/faq
Forum
We encourage active use of our forums. Please sign up and leave a comment or ask a
question. All positive and negative feedback is welcome.
http://forum.akturatech.com/
Support Ticket
If all of the above measures fail to address your needs, don’t despair. We offer free
support via our ticketing system. Use this system to report a bug, request a new
feature, give general feedback and for all billing concern.
http://support.akturatech.com/
Support is free, but we do ask that you read the help guide and FAQs before lodging a ticket.
The official website contains the most up to date help, videos and FAQs. Please visit
http://chimprewriter.com before lodging a support ticket.
9
Chapter 3: Getting Help
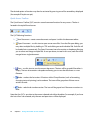
Inline Application Assistance
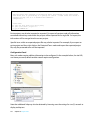
Inline help is available via the help menu within the Chimp Rewriter application. To use, simply
press the Help button and select the help appropriate to your current requirement.
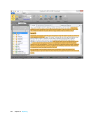
Ticketing
The Aktura Technology ticketing system is very simple to use and allows our support staff to track
the ticket from inception all the way through to resolution. Tickets can be lodged for:
Installation issues – If you can’t download or install Chimp Rewriter, please raise a ticket and
our support staff will make contact to guide you through the installation process.
License issues – If your license key never arrived, or you receive an error on activation,
please let us know and we will rectify the issue as soon as possible.
Support requests – If you can’t work out how to use a feature, please give our support team
a buzz. They love helping out.
Reporting a bug – If we don’t know about it, we won’t fix it. We beta test all major releases
and perform thorough in-house tests before each release. Unfortunately though, bugs do
escape. Please let us know if you find any bugs, no matter how small.
Requesting a new feature – New features are very important to us. It is how we stay ahead
of our competitors. If you have a great idea that you think will save you lots of time, please
let us know and we will implement it. We may even supply you with a life time subscription
if your idea is unique.
Payment issue – Please don’t hesitate to lodge a ticket if you have any payment troubles or
questions.
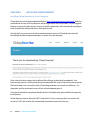
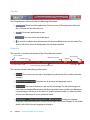
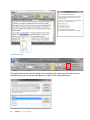
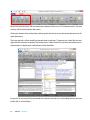
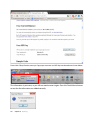
To raise a ticket, go to http://support.akturatech.com/ and click the Submit a ticket button at the top
of the web page.
10
Chapter 3: Getting Help
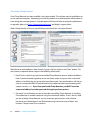
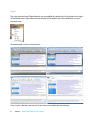
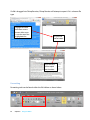
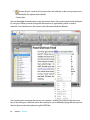
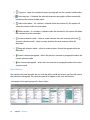
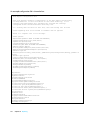
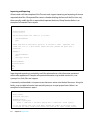
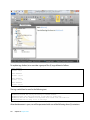
Enter your email address, subject, request type and description. All fields are mandatory. Your
email address is used by our support staff to contact you, so please ensure that it is valid. As an
attempt to avoid spam, you will need to fill out a simple captcha before submitting the ticket.
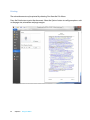
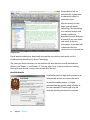
Please be as descriptive as possible when entering a message. If reporting a bug, try to include a
set of steps used to replicate the fault. If possible, also upload screenshots showing the fault.
If you have correctly entered your email address, you will be sent an automated response with your
Ticket ID. Our support staff will email you if they require more information, or after the ticket has
been resolved.
Please note that our staff do work very hard on resolving your issue as quickly as possible. Often a
bug cannot be replicated on our test system and these unfortunately take time to find and resolve.
Threatening us with a refund if the ticket is not resolved immediately will not speed up the process.
11
Chapter 3: Getting Help
Forum
The Aktura Technology forum has been designed as a safe haven for users of all Aktura Technology
products. They forum is used by:
Users to ask questions, provide feedback, request features and get help from other users.
Us to announce new features, updates, offers and products.
Note that the forum is not intended for users to report bugs. Please use the ticketing system for this
purpose. We will publish a list of known bugs on a regular basis on the forum for information
purposes.
The forum can be accessed here http://forum.akturatech.com/. Users of Chimp Rewriter can
register for free. Non-registered users can look, but they cannot actively participate in the forum.
No flaming, racially discriminative or derogatory language will be tolerated at any time. This will
lead to an immediate ban. No warnings. No excuses.
Official Website
The official website for Chimp Rewriter is http://chimprewriter.com. The website has links for
purchasing Chimp Rewriter and includes a blog for detailing the latest announcements. The blog is
also used to list the fixes and feature enhancements of each new version of Chimp Rewriter.
Help and support pages have been created to help you quickly and easily discover the power of
Chimp Rewriter. A large video collection has been developed to show you how to use all the
features of Chimp Rewriter. The videos cover all aspects of Chimp Rewriter, from using the editor to
using the advanced features such as Blog Network Submission and Projects.
12
Chapter 3: Getting Help
CHAPTER 4:
CHIMP REWRITER FEATURES
Feature Summary
Chimp Rewriter has many great features, many of which are not available in any other spinner. The
following list is just a summary of some of the features of Chimp Rewriter...
Our part of speech processing engine is the most powerful engine ever introduced to an
article rewriter.
Subscribers are rewarded with a multi-lingual thesaurus that is updated weekly directly to
your computer. The synonym database resides locally making Chimp Rewriter extremely
quick.
The rewrite editor allows you to work on multiple documents at the same time using a
tabbed interface.
You get access to the fastest and easiest to use spinner ever made!
The user interface uses a standardized Microsoft Office style look and feel and is therefore
intuitive and very easy to learn.
There are numerous ways you can rewrite your document. We have a quick synonym
selector, a rapid multiword rewrite, a rewrite builder, context menu spin and more. You can
even add or remove spun synonyms from your document using the various spinners.
When a Chimp Rewriter user uses a synonym, adds a new synonym, marks a synonym as
hated, or favorites a synonym, those actions are collated and periodically sent to the Chimp
Rewriter servers. All actions are then processed to maintain an accurate, relevant and ever
growing synonym database.
You will receive a powerful blog submitter.
Chimp Rewriter allows you to scrape articles, videos and images and insert them directly
into your document.
Chimp Rewriter has literally dozens of tools and wizards to help you quickly and easily
rewrite any article.
…and that is just the tip of the iceberg. There are MANY MORE features that we’re sure
you’ll love.
13
Chapter 4:
Chimp Rewriter Features
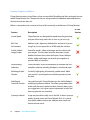
Feature Comparison Matrix
Chimp Rewriter comes in two flavors, a free version called Chimp Rewriter Basic and a paid version
called Chimp Rewriter Pro. The paid version has a large number of additional advanced features
that the free version does not.
Below is a comprehensive summary of most of the commonly used features of Chimp Rewriter:
Feature
Description
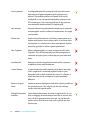
Insane Speed
Chimp Rewriter was designed for speed from the ground up,
and you will instantly notice this as soon as you run it up.
Rich Text
Environment
Add font styles, alignment, bulleted lists and more. If you are
using Pro, you can export this as HTML ready for websites.
Article, Video &
Image Scraper
Search for articles, videos and images and store them with
your project. To insert them into your document, simply
double click them from within the Project Center. Multiple
articles, videos and images can also be spun together to
provide 1000’s of variations.
Powerful Blog
Submitter
Trickle variations of your article directly to multiple XML-RPC
compliant websites including Wordpress, Joomla and more.
Multilingual Spell
Checker
On the fly highlighting of incorrectly spelled words. Make
sure you don’t send unprofessional looking content out on
the web.
Multilingual
Grammar Checker
You read that right. Chimp Rewriter now has a fully-fledged
multilingual grammar checker. This allows you produce your
article with the utmost professionalism. Not only does it give
you suggestions, but it gives you an explanation on why and
how any grammar was incorrect!
Synonym Selector
A pop-out pane that usually sits on the left. It shows synonym
quality, favorite status and Part of Speech (Pro). It is used to
very quickly add or remove spin, add your own words and
favorite or hate words.
14
Chapter 4:
Chimp Rewriter Features
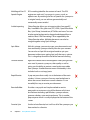
In Free
Version
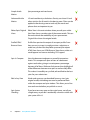
Multilingual Part Of
Speech Engine
POS matching identifies the context of words. The POS
engine can work out if a synonym is a noun, a verb, an
adjective etc. By matching the Part of Speech of a synonym to
its original word, you can achieve grammatically and
contextually correct articles!
Article Importing
Chimp Rewriter allows you to import articles from word97
files, word2003+ files, plain text, RTF, HTML, OpenOffice Write
files, Spin Chimp, Unicode text, UTF8 files and more. Text can
also be copied and pasted or dragged and dropped from a
website. Most HTML formatting is also supported by the
Chimp Rewriter editor. Multiple documents can also be
merged together using Open & Merge.
Spin Editor
With this spinner, you can view your spun document in real
time and modify synonyms directly from the spun content.
You can also set Spin Edit to original mode to spin your
document without ever getting lost in all that messy spintax.
This is a huge leap forward in the field of manual rewriting.
Context Rewrite
Right click context menu which appears when you right click
on a word. It presents synonyms, their quality as well as
giving you the ability to protect a word or phrase or add a
new synonym. Standard context menu functionality is also
included such as cut/copy/paste.
Rapid Rewrite
A pop-out pane that usually sits at the bottom of the main
window. It shows synonyms for every word and phrase in
either the current sentence or current selection. It is an
incredibly fast way to rewrite your document.
Rewrite Builder
Provides a very quick and simple method to rewrite
paragraphs or sentences using all the features of rich text
environment including spell checker, synonym selector,
grammar checker, auto rewrite and more. This is another
pop-out pane which is usually displayed at the bottom of the
screen.
Favorite Spin
Similar to Auto Rewrite, but it will use all of the synonyms you
have marked as a favorite.
15
Chapter 4:
Chimp Rewriter Features
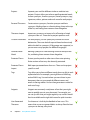
Auto Synonyms
A configurable one click rewrite that will spin the current
document or all open documents with synonyms and
phrases. The qualities and Parts of Speech (Pro) can be
configured, so you can opt for high quality synonyms with
POS matching or if you want lots and lots of spin, you can
turn the quality down and the POS matching off.
Spin Reorder
Powerful iteration and permutation reordering of sentences
and paragraphs result in millions of combinations of a single
source article.
Phrase Spin
Similar to Auto Rewrite, but it will always choose phrases to
replace with phrases (two or more words). If you have a four
word phrase as a synonym for a three word phrase, chances
are pretty good that it will be a good replacement.
Spin Together
Select some paragraphs, or some sentences and hit ‘Spin
Together’. This will automatically put these paragraphs or
sentences into spin syntax, so that they are spun with each
other.
Auto Rewrite
Rewrites an article using one of the best quality synonyms
available for every word and phrase.
Instant Unique
A super sneaky trick which enables you to beat Copyscape
with a single click. It essentially replaces letters in your
document with symbols that look the same. To a human, it
reads the same, but to a computer it reads completely
different!
Remove Original
Word
Option to remove the original word when spinning, and from
the quick spin pane. This will give you the most unique
version from the original article.
Multiple Document
Interface
Open multiple documents at a time, in separate tabs. It is as
easy as dragging an entire folder of text files in at once, and
they will all be opened on their own tab. You can do bulk
actions across all of them at once such as global spin and
favorite spin.
16
Chapter 4:
Chimp Rewriter Features
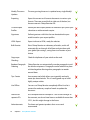
Simple Article
Metrics
Spin percentage and word count.
Advanced Article
Metrics
LSI and word density calculations. Density can show LSI and
other statistics for all words in the density pane. Filters can be
applied to the density pane to track only the words and
phrases that are important to you.
Editor/Spin/Original
Views
Editor View is the main window where you edit your article.
Spin View shows a random spin of the current article. This can
be used to check the readability of your spun content.
Original View shows the original article.
Profile/HTML/
Browser Views
Profile View preview the output of an export profile. From
here you can just copy it straight out into a submitter, or
make sure you have set the profile up correctly for export
HTML View shows raw HTML Browser View shows article as it
would appear in a browser including CSS Support!
Spin & Compare
Spins the document and opens a powerful comparison
matrix. This compares all spun versions of a document
against each other, giving a true uniqueness percentage
between all of them. With one click you can then highlight all
of the differences between two spins to see how they differ.
This makes it incredibly easy to find, edit and finalize the best
spins for your submissions.
Edit In Any View
Words and synonyms can be edited from any view (spin,
original or edit) and editing can even be performed from
within the compare and spin window. This allows you to fine
tune each rewrite before you publish or save it.
Spin Syntax
Checking
If you have too many open or close spin braces, we tell you
straight away so you don’t accidentally submit an article with
spin syntax still in it!
17
Chapter 4:
Chimp Rewriter Features
Projects
Separate your work for different niches or websites into
projects. Projects allow you to have specific protected words,
custom synonyms, favorite synonyms, hated synonyms, tags,
signatures, videos, pictures and much more for each project.
Personal Thesaurus
Create custom synonyms, favorite synonyms and hate
synonyms. Marking them as a favorite brings them to the top
of the list, and hating them removes them altogether.
Thesaurus Import
Import new synonyms or import a list of favorite or hated
synonyms from csv. These can be project specific as well.
Custom Dictionaries
For each project, you can specify any number of custom
dictionaries. These can be built up and shared and massively
add to the built in synonyms. All languages are supported, so
you can even set up projects for different languages!
Favorite/Hated
Words
Marking synonyms as favorite brings them to the top of the
list, and hating them removes them altogether.
Protected Terms
Protect your keywords or other terms from auto spinning.
Entire sections of text may also be easily protected.
Protected Terms
Import
Bulk import protected terms from csv. These can be project
specific as well.
Tags
Tags allow you to have a different word, phrase or link in each
exported article. For example, you might have a NAME tag
and an EMAIL tag. You mark where you want these in your
document, then set up a couple of different names and
emails in the tags editor. You can then generate an article for
each set of tags.
Snippets
Snippets are commonly used pieces of text that you might
want to quickly reuse in your document. For example, you
can set up a link that you might regularly use, and this would
then be available on the right click menu for quick insertion.
User Generated
Thesaurus
Our thesaurus is built by the feedback of our users. This
means that we can use general habits to always float the best
synonyms to the top, every time!
18
Chapter 4:
Chimp Rewriter Features
Weekly Thesaurus
Updates
The ever growing thesaurus is updated every single Weekly!
Exporting
Export the current or all current documents to various spin
formats. There are several built in right out of the box, but
there are more in Chimp Rewriter Pro.
Custom Export
Profiles
Define your own export profiles for whatever spin syntax your
submitter or article network require.
Signatures
Define signatures with links that can be attached to your
article based on your export profiles.
HTML Export
Export rich text to HTML, ready for websites.
Bulk Rewrite
Point Chimp Rewriter at a directory of articles, and it will
automatically run through all of them and spin them with
your global spin settings, saving them to a location of your
choice.
Copyscape
Checking
Check for duplicates of your article on the web.
Random Paragraph
Ordering
Chimp Rewriter can automatically re-order paragraphs to aid
the articles uniqueness. Paragraphs can be locked in to place
or linked together allowing other paragraphs to reorder
around them.
Tips Creator
An awesome tool which allows you to quickly and easily
create tips based articles. This is a really good way to build
highly unique articles.
Use Offline
You can use Chimp Rewriter completely offline! Just let it
contact the web every couple of weeks to update the
thesaurus.
Licenses for
separate PCs
Use Chimp Rewriter on multiple PC’s for no extra charge. At
the moment, we do not have licenses available for more than
2 PC’s, but this might change in the future.
Advertisements
The latest and greatest products that we use and
recommend.
19
Chapter 4:
Chimp Rewriter Features
Super-Fast Support
Our support is second to none. We repeatedly receive
awesome praise for the speed and friendliness of our support
team.
Familiar Ribbon
Interface
Looks just like every major office application, so you will
know your way around as soon as you begin!
Spin Cleaner
Uses powerful part of speech processing and artificial
intelligence to parse and clean a spun article resulting in
smaller, more efficient and more readable articles.
Bulk Directory
Compare
Compare all files in a single directory against one and other.
Individual differences are highlighted and comparison
percentages are calculated.
Undo/Redo
All operations can be undone or redone. You can experiment
to your heart’s content without losing or permanently
modifying you previous article.
Anchor Spin
Spins lists of anchor text and links together to create
hundreds of combinations of anchor links to your site.
WYSIWIG Editing
Chimp Rewriter supports bold, italic and underline character
formatting; heading 1, 2 and 3; paragraph alignment;
indenting and multi-depth bullet and numbering styles. All
formatting can be converted to or from HTML making Chimp
a great editor for creating content for your blog.
Auto List
Chimp’s part of speech engine is able to automatically rewrite
lists within your article. This is a very powerful feature
enabling articles to be written automatically without losing
readability.
N-Spin
This wizard allows you to create hundreds of variations of a
list within seconds.
Learn From Spin
Automatically teach Spin Chimp new words and synonyms to
add to your local synonym database.
20
Chapter 4:
Chimp Rewriter Features
Power Projects
Group together articles, protected terms, images, videos, files,
links, sites, signatures, tags and much more into projects.
Projects can be configured for each niche you work in.
Word Run
Highlights
Highlight unspun word runs of 3 or more words to ensure
your article passes even the most stringent plagiarism tests.
Feature Requests
We use UserVoice to allow users to request for and vote on new features. Our forum can be found
at https://akturatech.uservoice.com/. The current version of Chimp Rewriter was largely driven by
feature and usability requests from actual users of the software, so we highly encourage you to
have your say.
21
Chapter 4:
Chimp Rewriter Features
CHAPTER 5:
INSTALLING CHIMP REWRITER
Installing Chimp Rewriter on Your Computer
Chimp Rewriter can be downloaded directly from http://chimprewriter.com/download/. Both the
paid and free versions of Chimp Rewriter are packaged within the one installer. You can upgrade
the free version to the paid version at any time and the application will automatically reconfigure
itself to enable the advanced features of the paid version.
We take theft very seriously and will not tolerate pirated versions of Chimp Rewriter and will
immediately disable compromised copies as soon as they are detected.
After visiting the above page, the installation file will begin to download immediately. Your
browser may present a warning indicating that executable files may be harmful to your computer.
The file has been virus scanned by Aktura Technology and does not contain any Malware. Our
reputation and the continued success of this software depend upon it!
Once the download has completed, double click the Chimp Rewriter.executable file to begin the
install process.
Chimp Rewriter requires Microsoft .NET Framework 4.0. If your computer does not contain this
version of .NET, the installer will automatically download it and install it for you.
22
Chapter 5:
Installing Chimp Rewriter
Activating Chimp Rewriter
Once Chimp Rewriter has been installed, it must be activated. This software may be installed on up
to two separate computers. Attempting to install this product on a third computer will produce an
error during the activation process. If you do require a third install (due to computer replacement
or upgrade), please visit http://support.akturatech.com/ and lodge a support ticket.
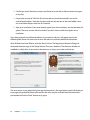
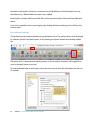
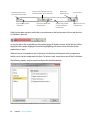
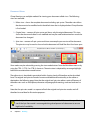
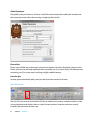
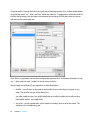
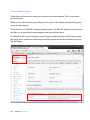
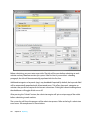
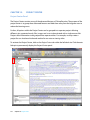
When Chimp Rewriter is first run, you will be presented with the “Activation Wizard”.
Read the terms and conditions, then click the “I agree” tick box and press the “Next” button. The
next screen (as depicted above) requests the following information:
Email: If this is the first time you have installed Chimp Rewriter, enter a valid email address
here. If you have already signed up to our newsletter, make sure you use the same email
address to avoid having to sign up to the newsletter again. Your email address will also be
used as a unique identifier for yourself and may be requested when communicating with
support services. Note: if you have purchased Chimp Rewriter, you MUST enter the
same email address here that you used during the purchase process.
Password: You will require your password when reinstalling Chimp Rewriter, or installing
Chimp Rewriter on another computer using the same email address. If this is the first time
you are installing Chimp Rewriter, you can create any password you wish, however
passwords must be between 5 and 20 characters long and consist only of letters and
numbers. The password IS case sensitive.
23
Chapter 5:
Installing Chimp Rewriter
Confirm password: Re-enter your password here to ensure that it did not contain any typos
or key slips.
Forgot your password? Click this link to have the password automatically sent to the
entered email address. Note that the password can only be sent to the email address that
was used when the password was first created.
Sign up to newsletter: If you have already signed up to our newsletter, you may deselect this
option. The basic version will not activate if you don’t have a valid subscription to our
newsletter.
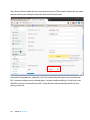
If you have entered in invalid email address or password, a red cross will appear next to the
offending field. Hover the mouse cursor over the red cross to obtain additional information.
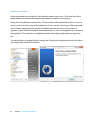
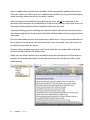
After all fields have been filled in, click the “Next” button. The Registration Wizard will begin to
download the latest copy of the Chimp Rewriter Thesaurus database. The thesaurus database is
modified on a daily basis to ensure that the thesaurus is always up to date and relevant.
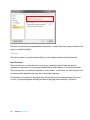
If an error occurs at any point during the registration process, the registration wizard will display an
error page giving detailed information on how the error may be resolved. Read the information
presented and click the “Back” button to try again.
24
Chapter 5:
Installing Chimp Rewriter
Upgrading From Free to Paid
One of the unique features of Chimp Rewriter is that both the free and paid versions are contained
within the one application.
If you had previously registered your copy of Chimp Rewriter free and use the same email address
to purchase a paid license, Chimp Rewriter will automatically upgrade itself to the paid version
after you restart the application. There is no need to enter any serial number or download a new
executable. Reconfiguration is completely automatic and occurs as soon as your payment has been
processed.
It is also possible to use a different email address to purchase Chimp Rewriter than the one you
may have previously used to register the free version. In this case, you must select the Dectivate
License button from the Help menu.
Shutdown and then restart Chimp Rewriter after the application has deactivated. You will be
presented with the activation wizard described in the previous section. Where requested to enter
your email address, enter the exact email address you used to access PayPal to purchase
Chimp Rewriter. We use the email address to link your copy of Chimp Rewriter to your purchase.
If your application does not upgrade as expected, please contact our support department
immediately at http://support.akturatech.com/.
Downgrading From Paid to Free
Chimp Rewriter has a number of different payment models. Some models utilize a subscription
based method where the user is required to make a regular payment to maintain access to paid
functionality.
If you have opted for a subscription model and no longer wish to continue making payments,
Chimp Rewriter will automatically convert back to the free version at the conclusion of the
subscription period. As with upgrading, downgrading is also completely automatic and does not
require any input from you.
25
Chapter 5:
Installing Chimp Rewriter
Application Updates
We are committed to ensuring that Chimp Rewriter remains best in class. To this end, we roll out
regular updates to introduce new feature and to address usability issues and bugs.
During the Chimp Rewriter startup process, Chimp Rewriter will automatically check our servers to
ensure you have the latest copy of the application. If a new version is found, you will be presented
with a window detailing features and fixes included within the new version. If you chose to
upgrade, a patch will automatically be downloaded from our servers and applied to your version of
the application. This operation is completely automatic and will generally require no input from
you.
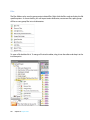
You may also force an update check by running the Chimp Updater application found in the Aktura
technology folder within the Start Menu.
26
Chapter 5:
Installing Chimp Rewriter
CHAPTER 6:
GETTING STARTED WITH THE USER INTERFACE
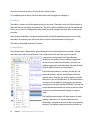
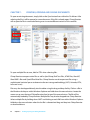
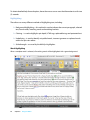
First Steps
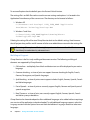
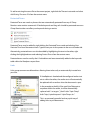
After first loading Chimp Rewriter, you will be presented with the following display:
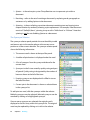
To begin creating a document, either use the File Menu or Quick Access toolbar icons (see below
for more information) to open an existing document or create a blank document.
By default, a blank document will be created as denoted above by New Document 1. To select this
document, simply click on the tab header or click the Create button within the ribbon bar.
As per the example above, red outlines are used throughout this document to highlight
specific areas of the screen. These red outlines are not visible in the actual application.
27
Chapter 6:
Getting Started With The User Interface
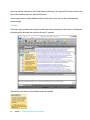
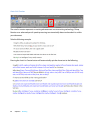
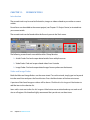
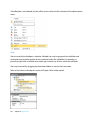
Default Layout
The default Chimp Rewriter layout is shown below:
Quick Access bar
Title bar
Ribbons
Right dock
Tab selector
Left dock
Editor
Bottom dock
Status bar
Each layout item is explained in greater detail below.
The layout may be changed by adding more docks, repositioning the quick access bar, hiding the
ribbons, undocking a dock, moving a dock to a new location and so on.
To restore the layout back to default, simply close then reopen the application.
The default layout may look complicated at first. Don’t worry though as you will not need to
use all of the features or know what each panel does to get started. As you become more
familiar with Chimp Rewriter, you will begin to discover more and more power.
28
Chapter 6:
Getting Started With The User Interface
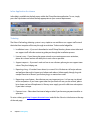
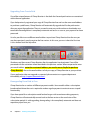
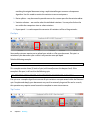
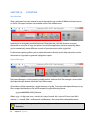
Ribbon Menu
The ribbon menu groups related functions and options into separate ribbon tabs. Ribbon tabs may
be selected by pressing the ribbon heading.
The following ribbons tabs have been configured within Chimp Rewriter:
File – the file ribbon is a special system ribbon for saving, loading and printing documents.
Edit – the edit ribbon is always shown first by default. It is used to create, rewrite and format
documents in the document editor.
Rewrite – the rewrite ribbon contains options and forms used to assist in rewriting an
existing document or adding spin to a new document.
Tools – the tools ribbon contains miscellaneous options for exporting, checking, submitting
and scraping documents.
Help – go here if you want to check your license, obtain help or personalize your copy of
Chimp Rewriter.
The ribbon may be minimized or maximized by clicking the up/down arrow next to the style
selector. In the minimized state, ribbon menus are shown as a drop down when the ribbon header
is clicked.
Ribbons and buttons may be selected using the keyboard by pressing and releasing the ALT key.
This action will display shortcut keys for each ribbon. Pressing the shortcut key (for example R for
Rewrite) will display a second set of shortcut keys specific to the selected ribbon.
29
Chapter 6:
Getting Started With The User Interface
The desired option or function may then be activated by pressing one of the second keys displayed
(for example P for phrase spin).
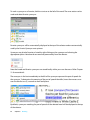
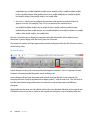
Quick Access Toolbar
The Quick Access Toolbar (QAT) contains several common functions for easy access. The bar is
located in the top left hand corner.
The QAT following functions:
New Document – create a new document and opens it within the document editor.
Open Document – use this icon to open one or more files. From the file open dialog, you
may select multiple files by holding in CTRL and clicking on each individual file. Each file will
be loaded into a separate tab. The Open Document icon also contains a dropdown allowing
you to select and merge multiple files. Use as per above, instead in this case, each file will be
merged into a single document.
Save – use this icon to save the current document. The icon will be grayed if the editor is
empty. The icon also contains a dropdown allowing you to save the document as a new
filename.
Undo – undoes the last action. All actions within Chimp Rewriter (such as formatting,
changing text and spinning) can be undone. The icon will be greyed out if there are no
actions to undo.
Redo – redo the last undone action. The icon will be greyed out if there are no actions to
redo.
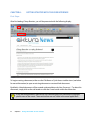
Note that the QAT is sensitive to the current selected tab within the editor. For example, if you have
the Latest News tab selected, only the new and open icons will be displayed.
30
Chapter 6:
Getting Started With The User Interface
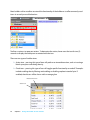
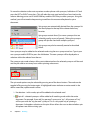
Styles
The style and coloring of Chimp Rewriter can be modified by selecting the Style button to the right
of the ribbon menu. Styles allow the look and feel of Chimp Rewriter to be modified to suit your
personal tastes.
Several example styles are shown below:
Once a style is selected, you can use Custom Scheme to modify the style coloring.
31
Chapter 6:
Getting Started With The User Interface
Title Bar
The Chimp Rewriter title bar contains the following information:
The name of the application. The free version of Chimp Rewriter will end in
Basic. The paid version will end in Pro.
The current application version.
The name of the active document.
An asterisk to indicate that the document has been modified since it was last saved. The
asterisk will not be shown if the document has not been modified.
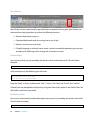
Status Bar
The status bar is located at the bottom of the Chimp Rewriter window.
Cursor Position
Quick View Selectors
Current Spin %
Document Statistics
Current language, thesaurus and project
Resize Handle
Zoom bar
Social media
The status bar contains the following information:
The current cursor position is displayed using the format [line number, character
number].
Document word, sentence and paragraph counts.
32
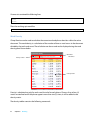
The current document’s spin and LSI percentage. The spin percentage is an
estimated percentage difference between the original document and the spun document.
LSI percentage is also shown in this pane. LSI (latent Symantec Index) is a measure of how
relevant your document is to your protected words.
Displays the selected
language, current base thesaurus and the active project. See section Chapter 10: for further
details. Left click the current language to change it.
Chapter 6:
Getting Started With The User Interface
Quick view selectors can be used to change the current editor view.
Current zoom level and zoom level control.
Like Chimp Rewriter? Click here to share us.
Use the resize handle to change the size of the application window.
Windows Panes
Window panes may be automatically hidden by clicking the
pin icon in the right hand corner of dock title. The window
will automatically retract when not in use. The window will
be represented as a small tab. Click the tab to re-expand the
window.
Zooming
The document zoom level may be modified using the zoom controls in the status bar as shown
below. Use document zoom to increase or reduce the font size.
The zoom level can be modified by the following methods.
Clicking the plus and minus buttons to decrease and increase zoom level respectively.
Clicking and dragging the slider left or right to decrease or increase the zoom level
respectively.
Clicking within the editor, then holding down the CTRL key and using the mouse scroll
wheel.
To return the zoom back to 100%, hold down CTRL and press the 0 (zero) key.
Resizers
Many forms and dockable windows utilize resize handles to allow
sections of the window or form to be rezised by the user.
To resize the section, hold down the left mouse button on the resize
handle. To change the size of the section, move the mouse up or
33
Chapter 6:
Getting Started With The User Interface
down for horizontal resizers or left or right for vertical resizers.
To completely hide a section, left click the handle. Left click again to redisplay it.
The Editor
The editor is where you will be spending most of your time. The editor works just like the editor in
Microsoft Word or any other word processor. The only significant difference is that Chimp Rewriter
allows you to work on multiple documents allowing you to navigate between them using the tab
interface.
Many buttons and editors will automatically enable and disable depending upon the text within
the editor. For example, you will not be able to submit a blank document to a blog site.
The editor is described in detail in Chapter 6.
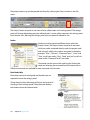
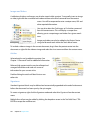
Context Menu
The context menu is displayed by right clicking the mouse within the document editor, builder
and other areas within Chimp Rewriter. The context menu will show the synonym menu if
synonyms are found within the Chimp Rewriter
dictionary, the spelling menu if spelling suggestions
are found, or the edit menu if neither synonyms nor
spelling suggestions were identified. Examples of each
of these types of menus are shown below.
If the selected word has a synonym, the top ten (10)
rated substitutions will also be displayed within the
context menu. Selecting any of these options will add
that item as spin to the document. A substitution that is
not shown can be added as spin by typing in the new
synonym box and pressing the ENTER key. Pressing Tab
within the document editor will move to the next word
or phrase and will automatically display its context
menu.
The spelling context menu will show options for each
spelling corrections. The current selection in the
document is replaced by an item in the list by selecting
the item. The spelling context menu also provides an
34
Chapter 6:
Getting Started With The User Interface
option to add the selection to the Chimp Rewriter dictionary. The “Ignore All” function will remove
the current selection from the spell check process.
Some context menus display additional quick select menu items such as the example on the
previous page.
Tooltips
All buttons are provided with a tooltip that describes the functionality of the button. A tooltip can
be displayed by hovering over a button for two (2) seconds.
Shortcut keys are shown in the tooltip heading if available.
Toolbars
35
Chapter 6:
Getting Started With The User Interface
Most builders utilize a toolbar to extend the functionality of the builder or to offer commonly used
items in an easily accessible location.
Toolbars use icons to represent actions. To determine the action, hover over the icon for two (2)
seconds to display the tooltip text associated with the icon.
There are two types of toolbar icons:
Action icon – pressing this type of icon will perform an immediate action, such as inserting a
blank synonym or calculating density.
Check icon – pressing this type of icon will toggle specific functionality on and off. Examples
include enabling density filtering and enabling or disabling replace instead of spin. If
enabled, check icons will be shown with an orange glow
Enabled check icon
Action icon
36
Chapter 6:
Getting Started With The User Interface
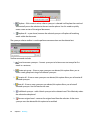
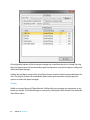
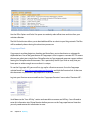
System Log
The System log provides feedback to the user for complex actions or multistep processes, such as
submitting a document to a blog site or exporting a document.
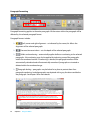
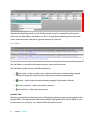
The system log can be accessed by pressing the “System Log” tab in the bottom dock.
Data may be filtered by pressing the Errors, Success and Messages buttons. The data types are:
Errors – the operation failed. The error message will be accompanied with a
description of why the operation failed.
Success – the operation succeeded.
Messages – details additional information that may be helpful to the user.
The system log also writes data to the Chimp Rewriter user directory. Refer to Setting File section
below for instructions on how to locate the user directory. The logging system creates the
following files on an “as-required” basis:
Log-Copyscape.xml – contains log information generated by Copyscape duplication
requests.
Log-License.xml – this log file is created if the license expires, becomes corrupt, or is
compromised. The support team may require this file to assist with licensing questions.
Log-SpinExport.xml – contains log information relating to the spin export process.
Log-System.xml – contains log information relating to the Chimp Rewriter main application.
This log file will only be created if a major fault occurs.
Log-Update.xml – contains information on the number of updates received from the Chimp
Rewriter servers including thesaurus and program updates.
Log-Wordpress.xml – contains log information generated by a Wordpress submission.
37
Chapter 6:
Getting Started With The User Interface
By default, each log file is limited to a maximum size of 100 kilobytes. If the file exceeds this size,
the oldest entry is deleted before the new entry is added.
Each log file is stored in XML format. XML files can be opened natively in Microsoft Excel 2003 and
above.
Lines can be copied from the system log by right clicking the line and selecting Select All from the
context menu.
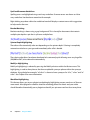
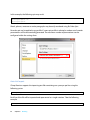
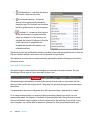
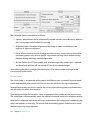
Personalized Settings
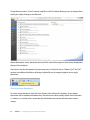
Chimp Rewriter may be personalized by using the options form. The options form can be displayed
by selection Options from the file menu, or by selecting the Options button from the Help ribbon
bar.
The option form is separated into logical partitions as shown below. All options will be applied as
soon as the Apply button is pressed.
To receive detailed help on each option, hover the mouse cursor over the information icon for two
(2) seconds.
38
Chapter 6:
Getting Started With The User Interface
To restore all options back to default, press the Restore Defaults button.
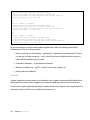
The settings file is an XML file used to store the current settings and options. It is located in the
Application Data directory of the current user. The directory can be located as follows:
Windows XP
C:\Documents and Settings\ YOUR_USER_NAME \Application
Data\Aktura Technology\Settings.XML
Windows 7 and Vista:
C:\Users\YOUR_USER_NAME\AppData\Roaming\Aktura
Technology\Settings.XML
Deleting the settings file will restore Chimp Rewriter back to the default settings. Note however
that all project data, profiles and all manner of other user added data are stored in the settings file.
The settings file may be modified using Notepad or a similar text editor. Modifications
should only be undertaken by advanced users.
Multilingual Support
Chimp Rewriter is the first truly multilingual document rewriter. The following multilingual
elements are supported by Chimp Rewriter:
GUI interface – tooltip help, form labels and button text can all be displayed in your native
language.
Grammar checking – at time of print we support Grammar checking for English, French,
German, Portuguese, and Spanish languages.
Spell checking – at time of print current support includes English, German, Spanish, French
and Italian languages.
Part of Speech – at time of print we currently support English, German and Spanish part of
speech recognition.
Base Thesaurus - at time of print, we currently support English, German, Spanish, French
and Italian synonym databases.
Chimp Rewriter has been developed to allow additional languages to be added without requiring a
new version of the application to be downloaded. To add additional language support, select the
Language section from the Options form and click the Additional Languages button to select new
languages.
39
Chapter 6:
Getting Started With The User Interface
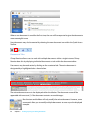
Once downloaded, the new language will become available within the default language or editor
language settings. Note that it may take several minutes to download a new language pack
depending upon your internet speed.
The options form contains two settings for language selection. They are:
40
Chapter 6:
Getting Started With The User Interface
Editor Language – the editor language is the language used for spellchecking and grammar
checking of the current document. If Use default language is selected, the spell and grammar
checkers will use the default language.
Default Language – is used to set the language used for button, tooltip and form text.
Default and editor language selection gives great flexibility to multilingual users. For example, you
may be more comfortable using Spanish as the default language even though you may be
developing English language articles.
Additional languages may be added on an as-requested basis. It may not be possible to
implement Part Of Speech processing for all languages.
41
Chapter 6:
Getting Started With The User Interface
CHAPTER 7:
CREATING, OPENING AND SAVING DOCUMENTS
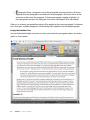
To open an existing document, simply click on the Open button from within the File ribbon. After
selecting the file, it will be opened as a new document. If the file is already open, Chimp Rewriter
will re-open the file in a new tab allowing users to create different versions of the same file.
To open multiple files at once, hold in CTRL when selecting files.
Chimp Rewriter can open native files as well as SpinChimp, Rich Text Files, HTML Files, Word 97,
Word 2007+ files and OpenOffice Write files. Chimp Rewriter can also open text files using a
sophisticated statistical parser to determine the text storage methodology (ASCII, Unicode, UTF8,
Latin and so on).
Files may also be dropped directly into the editor using the drag and drop facility. Click on a file in
the Windows desktop or within Windows Explorer and hold down the mouse button. Locate the
mouse cursor over the top of Chimp Rewriter then let go of the mouse button. The file will be
automatically loaded by Chimp Rewriter. Multiple files may also be dropped into Chimp Rewriter.
Select multiple files by holding down SHIFT and clicking on each file from within Windows Explorer.
Hold down the mouse button when the last file is selected and drag and drop into Chimp Rewriter
as described above.
42
Chapter 7:
Creating, Opening and Saving Documents
Chimp Rewriter retains a list of recently used files in the File ribbon allowing users to re-open them
quickly by simply clicking on the filename.
Recent documents can be pinned to the recent files menu allowing them to be always displayed at
the top of the selection.
Documents may also be opened using the open icon in the Quick Access Toolbar (QAT).The QAT
contains an additional pull down allowing multiple files to be merged together into a single
document.
Creating a New Document
To create a new document, click the “New” button from within the File ribbon. A new empty
document will be created and made active. The document will be initially called “New Document
n”, where n is a number that is automatically calculated to ensure that the document name is
unique.
43
Chapter 7:
Creating, Opening and Saving Documents
When a new document is saved for the first time, the user will be requested to give the document a
more meaningful name.
New documents may also be created by selecting the new document icon within the Quick Access
Toolbar.
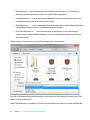
Documents Tabs
Chimp Rewriter allows users to work with multiple documents within a single instance. Chimp
Rewriter does this by displaying individual documents as tabs within the document editor.
Documents may be made active by clicking on the associated tab. The active document is
designated by a highlighted tab as shown below.
The active document name is also displayed within the title bar. The document name will be
appended with an asterix (*) if the document contains unsaved changes.
Most buttons and builders will only modify the active document. However, some
commands allow you to modify multiple documents at once as per the displayed
example.
44
Chapter 7:
Creating, Opening and Saving Documents
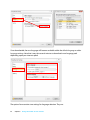
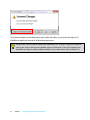
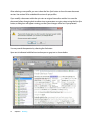
Documents can be closed by selecting the close icon on the right of the tab.
If the document contains unsaved changes, you will be presented with a dialog box asking
whether you would like to save the changes before closing the document.
If you select Cancel the process will be aborted and the document will not be closed.
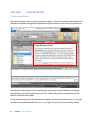
Saving Documents
The active document may be saved by clicking the Save button from within the File ribbon.
Several save options will then be displayed.
45
Chapter 7:
Creating, Opening and Saving Documents
Save document – saves the document overwriting the last version of it. If you have not
previously given the document a name, this option will be greyed out.
Save all documents – saves all open and modified documents. Use this option if you have
multiple documents open that have not been saved.
Save document as… - saves a new copy of the current document under a different filename.
You will be prompted to enter a new filename and save location.
Save Spun document as… - spins the document (removing spin syntax and creating a
unique variant) under a different filename. You will be prompted to enter a new filename
and save location.
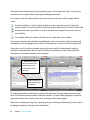
When you first save a document, you will be prompted for a file extension.
Text files will remove all character formatting. Html extensions will convert all formatting to HTML
before saving the document.
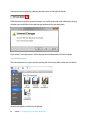
When Chimp Rewriter is shutdown, you will be asked whether you want to save each modified file.
46
Chapter 7:
Creating, Opening and Saving Documents
If you have multiple unsaved documents open within the editor, you may tick the Apply to all
checkbox to apply your answer to all remaining documents.
Saving a file is not the same as spinning or exporting a file. Saving is simply the method of
saving your work so that you can reload it again at a later time. If you wish to export your
document to a blog or create multiple variations of your document, refer to Chapter 10.
47
Chapter 7:
Creating, Opening and Saving Documents
CHAPTER 8:
USING THE EDITOR
The Document Editor
The document editor works just like any other text editor. Text can be manually typed directly into
the editor or copied or dragged and dropped directly from another source such as a web browser.
The editor has many features such as spelling error and grammar check underlines, paragraph
highlighting, word matching and much more. This section will guide you through many of the
features of the document editor.
To get started, simply click within the document editor. You will see a blinking cursor. As you type,
text will be inserted directly after the cursor as you type. The cursor may be moved by clicking
48
Chapter 8:
Using The Editor
elsewhere within the document or by using the up, down, left or right cursor keys. You may also
move the cursor using the home, end, page up and page down keys.
As you type, words will automatically wrap to the next line so that they will not appear off the
screen.
A vertical scroll bar is used to scroll up and down to show text that cannot fit within the
current window. To use the scrollbar, hold the left mouse button down over the scroll handle
and move the mouse up or down to scroll in that direction. Let go of the mouse button to
stop scrolling.
The scrollbar will not be visible if all of the text fits within the current window.
Text may be selected within the editor by holding down the mouse button within the editor and
moving the mouse to highlight more or less text. Selected text is shown with a blue background.
If more than two (2) words are selected, moving the mouse right will automatically snap the
selection to the end of each selected word. To disable snap mode, move the mouse to the left.
From then on, individual characters will be selected.
1. Hold mouse button
down here then with
button held, move
mouse down and to
the right.
2. Move mouse to
here and let go of
the button.
To select whole words, double click anywhere within the word. To select whole sentences, hold
down CTRL and click once anywhere within the sentence. To select whole paragraphs, triple click
(three consecutive clicks in quick succession) anywhere within the paragraph.
When text is selected, pressing a key, copying, pasting or selecting and formatting (such as bold or
paragraph numbering) will apply to all selected text.
49
Chapter 8:
Using The Editor
Most actions will be performed on the selected text only. For example, if you have some text
selected and perform an Auto Rewriter, only the selected text is rewritten. If you have no
text selected, the action will be typically performed on the entire document. Noted
exceptions to this rule are paragraph and character formatting.
Undo and Redo
Each action performed within the document editor is added to a stack. Changes made in the
document can be reverted by navigating back through the stack using the undo command. Undo
commands can be negated by navigating forward through the changes stack using the redo
command. The undo and redo commands can be activated using the associated buttons within the
Edit ribbon as shown below.
If there is no command to undo or redo the associated button will be disabled.
Note that undo and redo commands are also accessible via the Quick Access Toolbar.
Clipboard Functions
The editor supports standard text clipboard features. These features can be found on the Edit
ribbon in the clipboard panel as shown below.
To enable the cut and copy operations, first select some text within the editor. Once the text has
been highlighted, it can be cut or copied. Both actions will copy the selected text into the clipboard
however cut will delete the text from the editor after it is copied.
50
Chapter 8:
Using The Editor
Text may be copied from another application such as a web browser or Microsoft Word and then
pasted into Chimp Rewriter. Most applications allow text to be copied using the CTRL-C keyboard
shortcut.
Chimp Rewriter allows text to be pasted in different formats
by selecting the drop down menu below the Paste button.
Note that the Paste button is called a Split Button. This means
that the top portion of the button performs one action, while
the bottom portion displays a drop down menu of other
related actions.
Below is a list of paste mode operations:
Paste (top part of Paste button) – text and formatting will be retained.
Paste Text – only the text is pasted. All formatting will be lost.
Paste HTML –paste text containing HTML formatting. All formatting is converted to native
formats.
Paste Raw HTML – paste text and HTML tags as plain text.
If in doubt, use the top part of the Paste button rather than the drop down as this operation will
attempt to automatically determine the most appropriate paste method.
Text may also be moved within the editor by cutting the text then pasting it into a different
location.
Drag and Drop Support
Chimp Rewriter supports dragging and dropping of text from most applications. If the source
application contains HTML formatted text, Chimp Rewriter will automatically convert the HTML
formatting into native formatting.
Text may also be directly dragged and dropped from any browser directly into Chimp Rewriter.
To drag and drop text, highlight the text within the source application, hold down your left mouse
button over the text and with the mouse button held down, drag the text over to the Chimp
Rewiter editor and then let go of the mouse button.
51
Chapter 8:
Using The Editor
If a file is dragged into Chimp Rewriter, Chimp Rewriter will attempt to open it if it is a known file
type.
Highlight text then
hold down mouse
button while cursor
is over the top of the
highlighted text
Let go of the
mouse button
Formatted text
will be copied
into the editor
Formatting
Formatting tools can be found within the Edit ribbon as shown below.
52
Chapter 8:
Using The Editor
There are two types formatting within Chimp Rewriter:
Character formatting – modifies individual characters. Examples include bold or italic text.
Paragraph formatting – applies to the entire paragraph. Examples include heading text,
numbering and centered text.
It is possible to apply multiple formats to a single character or paragraph. For example, text may be
both bold and underlined or paragraphs may be both bulleted and center aligned.
As your move the cursor over your document the current formatting will be indicated by
highlighting the related button. As can be seen in the above screenshot, the cursor is located
within bold text within a center aligned, heading 1 style paragraph.
All formatting is automatically converted to HTML when the document is exported to a blog site or
exported as a HTML file. Some formatting, such as bullets and numbering are also retained when
the document is saved as a text file.
Character Formatting
Character formatting comprises bold, italic, underline and case formatting. Character formatting
can be applied in two ways.
The method first is to select one or more characters and then select a character format. The
character formatting will then be applied to the selection only.
The second method is to have no selection and press the bold, italic or underline buttons or any
combined combination and then begin typing. The selected character format will be applied
automatically to the characters as you type.
Case formatting will be applied to the entire current word if no text is selected otherwise it will only
be applied to the selected text.
Shortcuts exist to allow you to apply character formatting as you type. The most common are
CTRL-B to bold text, CTRL-I to italisize it and CTRL-U to underline.
53
Chapter 8:
Using The Editor
Paragraph Formatting
Paragraph formatting applies to the entire paragraph. All characters within the paragraph will be
affected by the selected paragraph format.
Paragraph formats include:
Left, center and right alignment – as indicated by the name, this affects the
alignment of the selected paragraph.
Decrease/increase indent – sets the depth of the selected paragraph.
54
Bullets and numbering – automatically applies bullets or numbering to the selected
paragraphs. Sub-numbering may also be applied by indenting some of the paragraphs
within the numbered section. If numbering is selected, the paragraph number will be
automatically calculated and will automatically renumber if paragraphs are inserted or
deleted within the numbered range.
Paragraph locking – paragraphs may be locked in to place to protect them from
paragraph reordering. Locked paragraphs are depicted with a gray line above and below
the paragraph. See chapter 10 for more details.
Chapter 8:
Using The Editor
Paragraph linking – paragraphs may be linked together ensuring that they will remain
together when the paragraphs are reordered. Linked paragraphs are shown with a section
terminator at the end of the paragraph. To link two paragraphs together, highlight 2 or
more paragraphs and press the Paragraph Link button. See chapter 10 for more details.
If there is no selection, paragraph formatting will be applied to the current paragraph. If a selection
exists that spans multiple paragraphs, the formatting will be applied to all selected paragraphs.
Display/Hide Hidden Text
Use the display/hide hidden text button to show space characters, paragraph markers and indent
guides as shown below.
55
Chapter 8:
Using The Editor
Hidden text can be useful for identifying multiple spaces, indent depth and the end of each
paragraph.
Note that when hidden text is displayed, it is not actual text but is rather a graphical representation
of a special formatting character. Hidden text cannot therefore be selected and will not be
exported.
Right To Left Support
Chimp Rewriter has experimental support for right to left languages such as Arabic. Use the RTL
button to switch between right to left and left to right modes.
Right To Left support can be enabled by selecting the appropriate option within the Language
section of the Settings menu or by pressing CTRL+SHIFT+R.
56
Chapter 8:
Using The Editor
Finding and Replacing Text
The find form can be used to search for text and is displayed via the Find and Replace buttons
within the Edit ribbon. The find form is shown below.
Pressing the Find or Replace button will display a form docked at the top right of the document.
The replace form is a superset of the find form and is therefore used below for illustrative purposes.
The replace form comprises the following elements:
57
Chapter 8:
Using The Editor
Hold down mouse cursor
here to move find window.
Type the text you wish
to find here
Click here to find the text. Each click
will find the next instance of the text.
Click here to display and
set find options.
Replace the
found instance
Type the text you wish
to replace the found
text with here
Close the form
Replace all instances
of the find text
If the find text does not exist within the current document, the find text box will turn red after the
Find button is pressed.
As may be seen in the screenshot on the previous page, all found instances of the find text will be
displayed with a yellow highlight. Found text highlighting will remain active while the find or
replace form is open.
When the cursor is located over the Find button, the find form will become semi-transparent to
enable you to see text underneath the form. To return it back, move the cursor off the Find button.
The following options may be used to configure the find functionality:
58
Chapter 8:
Using The Editor
To obtain detailed help for each option, hover the mouse cursor over the information icon for two
(2) seconds.
Highlighting
The editor uses many different methods of highlighting text, including:
Background highlighting – this method is used to indicate the current paragraph, selected
text, found words, matching words and matching brackets.
Coloring – is used to highlight spin depth, HTML tags, replaceable tags and protected text.
Underlining – is used to identify misspelled words, incorrect grammar or replaced words
within the spin view editor.
Strikethroughs – are used by the MultiSyn highlighter.
Word Highlighting
When a complete word is selected, all matching words will be highlighted with a green background.
59
Chapter 8:
Using The Editor
Spell and Grammar Underlines
Spelling errors are highlighted using a red wavy underline. Grammar errors are shown as a blue
wavy underline. See the above screenshot for example.
Right-clicking anywhere within the underlined word will display a context menu with suggestions
to help resolve the error.
Bracket Matching
Bracket matching is shown using a gray background. This is handy for documents that contain
multiple spin depth or spin that is split over multiple lines.
Spintax Depth Highlighting
The editor will automatically color text depending on the spintax depth. Coloring is completely
automatic and colors as you type and immediately after a file is loaded.
The coloring algorithms have been developed to be extremely quick allowing even very large files
(500,000 word+) to be colored instantaneously.
MultiSyn Highlighting
MultiSyn highlighting is selected by pressing the MultiSyn button within the Review menu. This
highlighting is used to show phrases that have a replicable synonym phrase within the synonym
database. Using the below example, “of a few” is shown to have synonyms for “of a”, “a few” and “of
a few”. See Chapter 9 for more information.
Word Run Highlighting
This feature allows you to pass plagiarism checking by highlighting unspun word runs of three or
more words. Most plagiarism checkers check for matching phrase not words and your article
should therefore theoretically pass a plagiarism check if you spin one word in at least every three.
60
Chapter 8:
Using The Editor
Miscellaneous Highlights
There are many other highlights that are applied as you type. Below are some examples:
Grammar Checking
Grammar checking is performed using the After The Deadline service. To activate grammar
checking, press the Check Grammar button. This will check the current version of the document
only, so this operation may need to be undertaken several times during the development of your
document.
When grammar checking is enabled, all grammatical errors are highlighted using a blue wavy
underline. To receive a detailed explanation and/or suggestions, right click on the highlighted
word. Select Explain to show a detailed explanation of the error.
61
Chapter 8:
Using The Editor
Spell Checking
The spell checker can be used to highlight all misspelled words within your document one at a
time allowing you to correct the word, ignore it or add it to the spelling dictionary.
62
Chapter 8:
Using The Editor
Printing
The active document may be printed by selecting Print from the File ribbon.
Press the Print button to print the document. Select the Options button to configure options such
as the page size, orientation and page margins.
63
Chapter 8:
Using The Editor
CHAPTER 9:
REWRITING
What is Spin?
Spinning refers to replacing an original word or phrase with a random substitution. Spinning is
used to create multiple unique versions of a document from a single source.
A brace { is used to designate the beginning of spin syntax, and a } designates the end. Each
possible substitution is separated by “|”. The following shows an example of spin syntax.
{Text|Substitution1|Substitution2}
When the above is exported the spin engine will choose either “Text”, “Substitution1” or
“Substitution2”. Spin syntax can be nested within other spin syntax. In the above example any of
the components may themselves contain spin syntax which could in turn contain spin syntax and
so on. Any amount of complexity of spin syntax can be used to obtain the desired level of spin. For
example we could have the following:
{The brown dog {jumped|leaped} over the log|The log was jumped by the brown
{dog|puppy}|The dog jumped over the log. The dog was brown}.
In the above example the spin engine would first choose between the outer most spin. As there are
three (3) possibilities for the first level, each would have a 33% chance of being selected. The
engine would then do the same for any remaining spin. The following table shows all possible spun
versions from the above example with the associated probability of selection.
Result
The brown dog jumped over the log
The brown dog leaped over the log
The log was jumped by the brown dog
The log was jumped by the brown puppy
The dog jumped over the log. The dog was brown
Probability
16.66%
16.66%
16.66%
16.66%
33.33%
Terminology
To avoid confusion, we have used the following terminology within this manual and within the
Chimp Rewriter application:
Spin – is a word and one or more substitutions in Spintax format.
64
Chapter 9:
Rewriting
Spintax – is the native spin syntax Chimp Rewriter uses to represent spin within a
document.
Rewriting – refers to the act of rewriting a document by replacing words, paragraphs or
sentences or by adding Spintax to the document.
Spinning – is the act of taking a rewritten document containing text and turning into a
unique variation by randomly selecting a spin replacement. For example, if the document
consist of “{hello|Hi} there”, spinning it may result in “Hello there” or “Hi there”. Note that
spinning is not the act of adding Spintax to a document.
The Synonym Selector
The synonym selector panel provides the user the ability to add
and remove spin to the word or phrase at the current cursor
position or to the current selection. The synonym selector panel
shows the following information.
The current word is shown at the top of the panel.
A toolbar of quick actions is displayed under the word.
A list of synonyms from the synonym database for the
current word.
Synonyms in the list are sorted by quality rating and part
of speech. Quality rating is designated by the number of
bananas shown to the left of the item.
Favorite synonyms are displayed with a filled in star on
the left of the item.
Current spin in the document is shown as selected items
in the synonym list.
To add spin to a word, click the synonym within the selector.
Multiple synonyms may be selected. Selected synonyms can be
removed by clicking on a highlighted synonym.
If one or more synonyms are selected, the original word is
displayed as the first entry within the synonym list. The original
word may be replaced by clicking on it with in the selector.
65
Chapter 9:
Rewriting
To mark a synonym as a favorite, click the star icon to the left of the word. The same action can be
used to deselect favorite synonyms.
Favorite synonyms will be automatically displayed at the top of the selector and are automatically
used by the Favorite Synonyms auto spinner.
Synonyms may also be favorite or hated by right clicking on the synonym and selecting the
appropriate option. Hated words are removed permanently from the selector.
Note that hated and favorite synonyms are stored locally within your user thesaurus. Refer Chapter
11 for more details.
The acronyms in the box immediately to the left of the synonym represent the part of speech for
the synonym. To determine the meaning of the part of speech identifier, hover the mouse cursor
over the box for two (2) seconds to show tooltip text.
By default, synonyms matching the part of speech of the selected word will be displayed at the top
of the selector.
66
Chapter 9:
Rewriting
To move the selection to the next or previous word or phrase with synonyms, hold down ALT and
press the LEFT or RIGHT cursor keys. This will select the next word and will pass focus back to the
selector allowing you to use UP and DOWN keys and the SPACE key to select synonyms. Using this
method, you will not need to keep moving to and from the mouse and keyboard to spin a
document.
Spin groups are automatically derived from the synonym list
and are displayed at the top of the selector below any
favorites.
Spin groups contain three (3) or more synonyms that are
related by quality or part of speech. Clicking the synonym
group will spin the word with multiple synonyms.
Spin groups may also be manually created as described
below.
New synonyms may be added to the selected word using the new synonym text box. Type in your
new synonym and hit ENTER or press the Add button. The new synonym will be displayed as a
selection within the selector from then on.
The synonym spin mode selectors allow you to determine how the selected synonyms will be used
and may be used to save many hours when spinning a document.
The spin mode options may be selected by pressing one of the above buttons. The mode can be
toggled off by pressing the button again. A highlighted button indicates an active mode. In the
above screenshot, replace mode is active.
No selection – in this mode, spin will be added to the selected word.
67
Spin all – selected synonyms will be added to all matching words within the entire
document. For example, if you add “my personal” synonym to “my”, all instances of “my”
will be spun with the “my personal” synonym. This is a very quick way of spinning a
document. A dropdown selection on the spin all icon allows the user to select whether spinall replaces text within existing spin.
Chapter 9:
Rewriting
Replace – if this mode is active, when a synonym is selected it will replace the word and
automatically move the selection to the next word or phrase. Use this mode to quickly
create a new version of the original document.
Replace all – as per above, however the selected synonym will replace all matching
words within the document.
The synonym selector toolbar is used to perform common actions on the selected text.
Toolbar commands include:
68
Force lowercase synonyms – formats synonyms to be lower case text except for first
words in a sentence.
Create spin group – if two or more synonyms are selected, this option allows you to
create a new group consisting of all selected synonyms.
Favorite all – if two or more synonyms are selected, this option allows you to favorite all
selected synonyms.
Hate all – if two or more synonyms are selected, this option allows you to hate all
selected synonyms. Use this feature with care.
Add blank synonym – adds a blank synonym to the selected word. This effectively makes
the selected word optional.
Remove original word – removes the original word from the selection. At least one
synonym must be selected for this option to be enabled.
Chapter 9:
Rewriting
Remove all spin - removes all synonyms from the selection. At least one synonym must
be selected for this option to be enabled.
Context Spin
Spin can be added to the document using the context menu. The context menu can be displayed
by using the TAB key to move through the document or by right clicking within a word or
selection. If no selection exists the current word will automatically be selected.
The context menu will display the top ten (10) synonyms. Selecting a synonym using the cursor
keys or by clicking on it with the mouse. New synonyms can be added by typing the synonym into
the New Synonym text box and pressing the ENTER key.
69
Chapter 9:
Rewriting
Document Views
Chimp Rewriter uses multiple methods for viewing your document called views. The following
views are available:
Editor view – shows the complete document including spin syntax. The editor view allows
the document to be modified and is the default view that is displayed when Chimp Rewriter
is first loaded.
Original view – removes all spin syntax and shows only the original document. This view
shows the document before it was modified and may be used to determine how much the
document has changed.
Spin view – removes all spin syntax and shows an example spun version of the document.
The spin view may be used to show what the document will look like after it has been spun.
View modes may be selected by pressing the view mode buttons from the Edit ribbon menu or by
using the CTRL-1, CTRL-2 or CTRL-3 shortcuts. The active view is depicted by an orange highlight
behind the associated view mode button.
The editor view is described in great detail within Section 8 and will therefore not be described
here. The original and spin view modes however add additional functionality to the editor as
depicted on the following page. Note that the original and spin view editors retain all features of
the editor view such as find/replace, character and paragraph formatting, undo and redo and so
on..
Note that the spin view mode is a superset of both the original and spin view modes and will
therefore be used here for illustrative purposes.
Use the Spin View mode to show what your document will look like once it is spun. Periodic
use of the Spin View mode is encouraged during development of a document to ensure
high level of readability.
70
Chapter 9:
Rewriting
View mode sub view selectors
View mode toolbar
Return to editor view mode
View mode editor
Within the original and spin view modes, you may select one of the sub view modes as described
below:
Text View – views the current document including all formatting.
Raw HTML View – converts all formatting to raw HTML.
Browser View – is a read-only view showing how the document will look inside a browser.
Text may be manually modified within the view mode editor and formatting may also be applied.
The synonym selector may also be used to rewrite the text however it will be locked to replace or
replace all modes as spin should not be added to the document at this level.
71
Chapter 9:
Rewriting
If text is modified within the text view sub mode, it will be automatically updated within the raw
HTML view. Likewise, if HTML tags or text is added to the raw HTML view, they will be converted to
native formatting when the text view sub mode is selected.
Note however that text modified in the original and spin views will not be copied back to the
document within the editor view. Modification at this level is only allowed so that spun version of a
document may be tweaked to enhance readability before they are saved.
Copyscape checking, grammar checking and a number of other tools may be used within the text
view. Note though that not all commands and builders will be available within the original and spin
view modes.
The view mode toolbar contains several commonly used functions. You may save the document to
disk or create a new document from the selected view. In spin view mode, a new spin variant can
be created using the New Spin button.
To return back to the editor mode, press the X button within the view mode toolbar or click the
Editor View button within the Edit ribbon menu.
Within spin view mode a profile may be selected to display how the document will look when it is
exported. The example below depicts how the document may look with the Free Traffic System
profile selected.
72
Chapter 9:
Rewriting
After selecting a new profile, you must select the New Spin button to show the new document
version. See section 10 for a detailed discussion of spin profiles.
If you modify a document within the spin view or original view editor and don’t to save the
document before changing back to editor view or generate a new spin variant using the New Spin
button, a dialog box will appear warning you that your changes will be lost if you proceed.
You may cancel the operation by selecting the No button.
Spun text is indicated with black text and unspun as gray text as shown below:
73
Chapter 9:
Rewriting
Variation Builder
The variation builder panel provides the user with the ability to quickly add and remove sentence
or paragraph substitutions.
An example of the variation builder panel is shown below.
Current
selection
Variation Builder
toolbar
Variation list
Resizer splitter
Variation builder editor
To add a variation, type the new text within the variation builder editor and press the Add button.
All the functionality of the main editor is also available within the builder. This includes
functionality such as the right click context menu, spell checking, grammar checking, MultiSyn
highlighting, character formatting and so on. OneClick Rewrite, Global Synonyms, Phrase Spin,
Favorite Spin, Instant Unique and many more features may also be applied to the variation builder
editor.
The synonym selector may also be used to spin words within the variation builder editor. To use
the synonym selector, ensure that the variation builder editor has focus by clicking within the
editor. All the functionality of the selector including the navigation buttons can be used within the
builder.
To resize the editor window, locate the mouse over the top of the resize splitter and hold down the
mouse button. While the button is held, move the mouse up or down to resize the window.
Existing variations can be edited by selecting them within the variation list, editing them and then
pressing the Replace button.
The variation builder toolbar contains the following features:
74
Replace text – replaces the selected sentence or paragraph with the new variation.
Chapter 9:
Rewriting
Copy text – copies the selected sentence or paragraph into the variation builder editor.
Auto copy text – If checked, the selected sentence or paragraph will be automatically
copied into the variation builder editor.
Select within editor – if a variation is selected within the variation list, this option will
select the variation within the main editor.
Delete variation – if a variation is selected within the variation list, this option will delete
the variation from the main editor.
Sentence selection mode – select to create variations for each sentence within the
Sentence selection mode – select to create variations for each sentence within the
document.
Paragraph selection mode – select to create variations for each paragraph within the
document.
Previous sentence/paragraph – selects the previous sentence or paragraph based on the
current selection mode.
Next sentence/paragraph – selects the next sentence or paragraph based on the current
selection mode.
Rapid Rewrite
The rapid rewrite panel provides the user with the ability to add and remove spin for each word in
the sentence or paragraph. The rapid spin panel also supports multi word substitutions.
An example of the rapid spin panel is shown below.
75
Chapter 9:
Rewriting
Spin can be added to words by selecting synonyms within the individual synonym lists. New
synonyms may be added by typing a synonym into the New Synonym text box and clicking the …
button or pressing the ENTER key.
The spin mode options may be selected by pressing one of the below buttons. The mode can be
toggled off by pressing the button again. A highlighted button indicates an active mode. In the
above screenshot, replace mode is active.
No selection – in this mode, spin will be added to the selected word.
Spin all – selected synonyms will be added to all matching words within the entire
document. For example, if you add “my personal” synonym to “my”, all instances of “my”
will be spun with the “my personal” synonym. This is a very quick way of spinning a
document.
Replace – if this mode is active, when a synonym is selected it will replace the word and
automatically move the selection to the next word or phrase. Use this mode to quickly
create a new version of the original document.
Replace all – as per above, however the selected synonym will replace all matching
words within the document.
The rapid rewrite toolbar also contains the following features:
Sentence selection mode – select to create variations for each sentence within the
document.
Paragraph selection mode – select to create variations for each paragraph within the
document.
Previous sentence/paragraph – selects the previous sentence or paragraph based on the
current selection mode.
Next sentence/paragraph – selects the next sentence or paragraph based on the current
selection mode.
The scroll-bars can be used to scroll the selection up and down to reveal more multi-word spin
options. Scrolling left or right reveals more words within the existing selection. Use the >>> button
(shown below) to navigate to the next word set.
76
Chapter 9:
Rewriting
Note that the Rapid Spin panel (as with all other spinners) may be undocked from the current
document and expanded or retracted in size. This is a handy feature allowing you to show more
words within the current selection or a greater selection of synonyms.
Spin Editor
The Spin Editor is a versatile multi-purpose spinner, viewer and locator tool.
The Spin Editor toolbar contains the following features:
Spin mode – select to create a spun variation of the current sentence and paragraph.
Deselect to display the original version of the current sentence and paragraph.
Respin – click to respin the sentence and paragraph if spin mode is selected.
Previous sentence – selects the previous sentence.
Next sentence – selects the next sentence.
Location Tool
Selecting a word within the document view will display the current sentence and paragraph within
the Spin Editor. The selected word will be automatically highlighted within the Spin Editor. As can
be seen above, the word “pet” was selected within the document view.
77
Chapter 9:
Rewriting
Selecting a word within the Spin Editor will automatically select the word within the document
view.
This is a very powerful tool for locating words and spun phrases within a heavily spun document.
Viewing Modes
Selecting or deselecting spin mode will determine how the current sentence and paragraph will be
displayed. If spin mode is selected, a spun variation of the sentence and paragraph will be shown. If
deselected, the original version will be shown.
This feature can be used to see what a final spun document may look like without tabbing to and
from the Spin View or Original View.
Spinning
The Spin Editor colors each word depending on whether it has been spun or not within the
document editor. Blue color coding indicates that the word has been spun and black indicates it
has not.
Clicking a word in either the sentence or paragraph text boxes within the spin editor will highlight
the word within the document editor. The word can then be spun or new spin added or removed
to or from existing spin. It is best to deselect spin mode when spinning a document using the Spin
Editor to stop the sentence and paragraphs from producing random variations.
Using this spin method, you can spin an entire document from the Spin Editor without getting lost
within the spintax shown in the document editor.
The black and blue coloring can also be used to determine spin coverage of your current
document. Simply turning all black words to blue by click on and spinning each black word will
ensure 100% spin coverage.
Auto Rewriters
Chimp Rewriter contains a number of auto rewriters to rapidly create unique variations of your
source article. Auto rewriters though by nature are not exceptional at creating highly readable
content. Chimp Rewriter uses the latest in part of speech technology to attempt to create
meaningful, grammatically correct and highly readable output, however it is highly recommended
that all auto rewritten documents be reviewed before they are published.
All auto rewriters are available within the Rewrite ribbon menu.
78
Chapter 9:
Rewriting
Each of the auto rewriters will use the current selection if one exists. If no selection exists, the auto
rewriter will rewrite the entire document.
All rewriter buttons have a drop down allowing the rewriter to act on the current document or all
open documents.
The auto rewriters will not modify protected words or phrases. To protect text, select the text and
right click the selection to display the context menu. Select Protect Phrase form the context menu.
Protected text is displayed as colored text within the editor.
Large runs of text may also be protected from the auto rewriters by surrounding the text with two
hashes (##) as shown below
79
Chapter 9:
Rewriting
Double hashes (##) are
automatically stripped from
the document when it is
exported or spun.
All auto rewriters use the
latest in part of speech
technology. This technology
uses statistical analysis and
entropy modeling to
determine the most likely part
of speech of any word within
your article. Using this
information, we are then able
to determine the best
synonym to use to rewrite the
original text.
Part of speech modeling has dramatically changed the way rewriters work and it was first
introduced into the industry by Aktura Technology.
The synonyms the auto rewriters use are read from the base thesaurus and all attached local
thesauri (see Chapter 11 and Chapter 12). You can select (none) in the base thesaurus settings
forcing the auto rewriter to only use the custom local thesauri.
OneClick Rewrite
OneClick Rewrite uses high quality synonyms to
automatically rewrite your source document.
To produce readable output, it is highly
recommended that quality ratings of better or
best be used and POS match type set to full.
Grammar checking should also be enabled.
80
Chapter 9:
Rewriting
Global Synonyms
The global synonyms feature is similar to OnceClick rewrite except that it adds spin variation into
the source document rather than creating a single rewritten article.
Phrase Spin
Phrase spin will add spin to document using the last options set within the global synonyms form.
Phrase spin however will only replace phrases containing two (2) or more words with other phrases
containing two (2) or more words resulting in highly readable output.
Favorite Spin
Favorite spin automatically adds synonyms that have been marked as favorite.
Spin & Preview
The Spin & Preview button found within the Rewrite ribbon menu creates multiple variations of the
current document and displays them in a Spin Preview window. Note that variations are only
created if the document contains spin.
81
Chapter 9:
Rewriting
Profile selector
Comparison view
Resize
splitter
Variant
editor
Document statistics
Export panel
Variation selectors
The spin preview window is a powerful window allowing you to compare each variation of your
document with the original document.
The spin preview window comprises the following items:
Profile selector – selects the profile you wish to display within the variant editor. You may
also override the default number of copes. Press the Create Copies button to create the spin
variations.
Comparison view – details a grid showing the percentage spin difference between each
variation and the original document. Click the Hide Comparison button if you do not require
the comparison view, thus providing more space on the screen for the variation editor.
Variation editor – displays the selected variation. You may modify each variation within the
editor to ensure a high degree of readability. The variation editor works just like the spin
and original views as described above. The Show Comparison button will highlight text
82
Chapter 9:
Rewriting
matching the original document using a sophisticated longest common subsequence
algorithm. Use this mode to rewrite the variation to ensure uniqueness.
Resize splitter – may be moved to provide more or less screen space for the variation editor.
Variation selectors – are used to select the individual variations. You may also click on the
row within the comparison view to select variations.
Export panel – is used to export the current or all variations to files or blog networks.
Flat Spin
Some online spinners require you to upload your article as a flat spun document. Flat spin is a
variation of your document spun so that it only contains one spin depth.
Take the following example:
{{hi|hello} there}|{welcome {to my {home|house}|aboard}}
This example contains three (3) levels of spin (with home|house at the deepest level). If the
example is flat spun, it will result in the following spin:
{hi there|hello there}|{welcome to my home|welcome aboard|welcome to my house}
Flat spin uses a complex algorithm to ensure all spin variations are represented within the flattened
spin. Complex and deeply spun documents may result in extremely large text files and as a result,
this operation may require several seconds to complete in some circumstances.
Tip Creator
83
Chapter 9:
Rewriting
The tip creator is used to create tip articles from multiple paragraphs. Tip articles are a great way of
creating multiple highly unique, highly readable articles from a single source.
To use the tip creator, first create an article where each paragraph represents a single tip. It is good
practice to create at least five (5) tips for each number of tips you require. For example, if you wish
to create a five (5) tip article, you should attempt to create at least 25 tips. Rewrite the paragraphs
as you would for any other document by adding spin as required.
Highlight all tip paragraphs within the editor and select the Tip Creator button within the Rewrite
ribbon tab. Select the number of tips and tip style and press the Create Tips button. This action will
merge your paragraphs together to create your tips article.
Note that if your tip article contains non tip paragraphs such as an introduction or a conclusion
paragraph; do not highlight these paragraphs when using the tip creator.
N-Spin
84
Chapter 9:
Rewriting
N-Spin provides a unique and extremely quick way of creating variation lists. In the example below,
we typed the words “car”, “bike” and “bus” within the word list. To enter values within the word list,
click on the last empty row and type in the required text and press ENTER after which the cursor
will move to the next empty row.
Once the list is populated, we can then configure the separator text. In the above example, we will
use “, “ after each item and “ {and|&}” for the last item in the list.
We can apply one of three (3) spin algorithms as described below:
Shuffle – uses all items in the word list and shuffles them so that they can appear in any
order. The shuffled version of the above list is:
{car, bike {and|&} bus|car, bus {and|&} bike|bike, car {and|&} bus|bike, bus {and|&} car|bus,
bike {and|&} car|bus, car {and|&} bike}
Any of all – use any combination of the word list including some or all of the words. This
would result in the following spin:
85
Chapter 9:
Rewriting
{car|bike|bus|car {and|&} bike|bike {and|&} car|car {and|&} bus|bus {and|&} car|bike {and|&}
bus|bus {and|&} bike|car, bike {and|&} bus|car, bus {and|&} bike|bike, car {and|&} bus|bike,
bus {and|&} car|bus, bike {and|&} car|bus, car {and|&} bike}
Any n of m – allows you to configure the minimum and maximum number of items to
appear in the list. For example, if any 2 of 3 was selected, this would result in:
{car {and|&} bike|bike {and|&} car|car {and|&} bus|bus {and|&} car|bike {and|&} bus|bus
{and|&} bike|car, bike {and|&} bus|car, bus {and|&} bike|bike, car {and|&} bus|bike, bus {and|&}
car|bus, bike {and|&} car|bus, car {and|&} bike}
Use the Calculate button to display an example of how the selected list will be added to your
document. If you are happy with the result, press the Ok button.
The maximum number of N-Spin permutations can be configured within the Miscellaneous section
of the Settings form.
Instant Unique
Instant Unique is a dirty trick used to quickly fool plagiarism checkers, such as Copyscape. Instant
Unique is not recommended for quality article and blog sites.
Instant Unique will spin your document with symbols that look like the source character. For
example, the letter K may be replaced with a kappa symbol, T with tau and so on. This will result in
text that looks like the original document, however the words will be made up of different
characters.
We provide two character sets, Best Match will result in text that looks identical to the original and
Full Match results in text that is similar to the original (for example ‘p’ may be replaced with rho).
86
Chapter 9:
Rewriting
Anchor Spin
The Anchor Spin wizard allows you to quickly
and easily create multiple variations of
anchor text and links.
Type an anchor text in the anchor text box
and press ENTER to enter another anchor
text. Repeat for URLs.
Press OK to spin each variation.
Existing lists may be loaded from a text file by
pressing the Load button. Chimp rewriter
expects one link or text per line.
87
Chapter 9:
Rewriting
Auto List Creator
The auto list creator represents an exciting advancement in auto rewriting technology. Chimp
Rewriter uses advanced part of speech processing to automatically detect and reorder lists within
your document.
Take the following example:
Pressing the Auto List Creator button will automatically spin the above text to the following:
88
Chapter 9:
Rewriting
Spin Cleaner
Spin Cleaner can be used on heavily spun documents to optimize existing spin. Spin Cleaner uses
advanced fuzzy logic algorithms to perform the following activities:
Removes duplicated synonyms
Optimized duplicated words by moving into or out of spin
Removes unnecessary nested spin
If English language is selected, moves words a and an immediately preceding spin into spin
and adjusts for following words starting with a constant or vowel.
Ordered Spin
Spin may be orderly spun by preceding the Spintax with an exclamation mark. Take the below
example:
Hello !{Mark|Steven|David}, how is your !{wife|dog|mother}.
In this example, only the following spin will result:
Hello Mark, how is your wife.
Hello Steven, how is your dog.
Hello David, how is your mother.
Note that “Mark” is always matched with “wife”, “Steven” with “dog” and “David” with “mother”.
Ordered spin may be applied to all spintax by using the Ordered Spin option in the Profile Editor. See
the Profiles section for more details.
Re-Ordered Spin
Spin may be automatically reordered during the spin process by preceding the Spintax with a tilde.
Take the below example:
~{Spin1.|Spin2.|Spin3.}
89
Chapter 9:
Rewriting
In this example, the following spin may result:
Spin3.Spin1.Spin2. OR
Spin2.Spin3.Spin1. OR
Spin1.Spin3.Spin2.
Words, phrases, sentences or entire paragraphs may be easily reordered using Re-Order Spin.
Re-order spin can be applied to any profile. If a non-spin profile is selected, a random set of reorder
permutations will be automatically generated. The maximum number of permutations can be
configured within the settings form.
Auto List Import
Chimp Rewriter supports the importing text files containing one synonym per line using the
following syntax:
@{full_file_path}.
Each line of the file will be imported and represented as a single variation. Take the following
example:
Hello @{d:\lists\names.txt}!
90
Chapter 9:
Rewriting
If names.txt contained the following lines:
Mark
David
Steven
Then the resulting spin would be:
Hello {Mark|David|Steven}!
Word Density
Chimp Rewriter can be used to calculate the current word and phrase densities within the active
document. The word density is a calculation of the number of times a word occurs in the document
divided by the total word count. The calculation can be run and results displayed using the word
density panel shown below.
Density toolbar
Word filter
Word filter
Density matrix
Density is calculated not only for each word, but also for each phrase. Phrases of up to four (4)
words are totalized and if the phrase appears more than two (2) times, it will be added to the
density matrix.
The density toolbar contains the following commands:
91
Chapter 9:
Rewriting
Calculate density – calculates the density
of all words within the document.
Auto calculate density – if checked,
density will be automatically calculated
when you type. This function may introduce
lag for large documents on slow computers.
Calculate LSI – introduces other statistics
to the density matrix using the protected
words to calculate LSI. If this option is not
checked, the No and LSI columns will not be
visible. Note that LSI calculations are
complex and therefore this option is not
enabled by default.
The density matrix may be filtered by checking the filter button and typing the filter text within the
filter text textbox. Multiple search terms can be separated using a comma.
The replace form can be shown and automatically populated by double clicking any word within
the density matrix.
Spin and LSI Percentage
Spin percentage is a measure of how thoroughly your document has been rewritten. The spin
percentage will only register if your document contains spin.
Spin percentage is calculated by comparing the density of each word in a spun article with the
density of each word in the original article. The greater the spin percentage, the more the unique
the article is.
Conventionally, a document with greater than 30% spin percentage is deemed to be unique.
LSI or Latent Semantic Index is a measure of how semantically related your article is to your
protected keywords. See Chapter 11 for details of protected keywords. Chimp Rewriter assumes
that you will protect words and phrases that are important to the meaning of your article. Using
this assumption, we are then able to determine synonyms for all of your protected words and
92
Chapter 9:
Rewriting
summate the density for both the protected words and synonyms of the protected words to
determine the LSI percentage.
LSI percentages from 5 to 15% are desirable. Less than 5% may indicate that your article is not
about your protected keywords. Greater than 15% may indicate a keyword packed article and this
may appear suspicious to search engines when your SEO ranking is calculated.
93
Chapter 9:
Rewriting
CHAPTER 10:
EXPORTING
Introduction
After a document has been created, it can be exported in any number of different formats known
as Profiles. All export functions are available via the Tools ribbon menu.
Exporting is an extremely powerful feature of Chimp Rewriter. You can of course save your
document as a text file, or copy and paste it into another application, however exporting allows
you to automatically create different versions of your document with a single click.
Furthermore, exporting allows you to submit documents directly to your blog network or send a
document to Copyscape to generate a plagiarism report.
Export Manager
The Export Manager is used to export multiple profiles with one click. The manager is accessed via
the Export Manager button within the Tools ribbon menu.
All variations will be exported to a single directory or zip file. To ensure each export directory or zip
file is unique, the directory or file will be named using the following format:
yyyymmddhhMMssNNN_filename
Where: yyyy = 4 digit year, mm = month, dd = day of month, hh = hour in 24 hour time, MM =
minute, ss = second, NNN = milliseconds and filename is the name of the selected document.
Use the Export Manager to quickly and simply save multiple variations of your rewritten
document.
94
Chapter 10: Exporting
All configuration options within the export manager are saved when the form is closed. Pressing
the Quick Export button will automatically export the document using the last options configured
within the Export Manager.
Clicking the pull-down section of the Quick Export button reveals a further button called Export All
Tabs. Pressing this button will automatically export every open document using the previous
options set within the export manager.
Profiles
Profiles are a great feature of Chimp Rewriter. Profiles allow you to export your documents in any
format you require. The Profile Manager is accessed by clicking the Profiles button from within the
Tools ribbon menu.
95
Chapter 10: Exporting
96
Chapter 10: Exporting
The profile manager has many options and may look daunting at first. For this reason, we package
Chimp Rewriter with many commonly used profiles. Beginner users may therefore ignore the
profile editor until they become more familiar with Chimp Rewriter.
Using the profile editor, advanced users can configure the default behavior of an existing profile or
create a new profile for their specific needs.
Examples of options that may be configured using the profile manager include the output file type,
export Spintax, number of copes and advanced spinning options such as ordered spin or reordered
paragraphs.
Chimp Rewriter comes standard with five (5) default profiles. They are:
Plain Text – exports a variation of the source document removing all formatting.
Flat Spin – exports the document with a single depth Jet Spin Syntax
Jet Spin – exports the document with unlimited depth Jet Spin syntax.
Article Ranks – exports the document using Article Ranks spin syntax. Article Ranks spin
syntax is two (2) levels deep only.
Free Traffic System – exports the document using Free Traffic system spin syntax. Free
Traffic system spin syntax is one (1) level deep only.
Profile Details
The profile filename configures the default filename used for documents exported using that
profile. A number of predefined fields may be used as defined below:
[docname] – is replaced by the name of the document being exported.
[profilename] – is replaced by the name of the profile
[copy] – is replaced by the automatically incremented copy counter
[date] – is replaced by the current date
[time] – is replaced by the current time
[ext] – is replaced by the output extension as determined by the file type
If the export type is set to Text, all formatting will be removed from the source document. If set to
HTML, all formatting will be converted to HTML tags before the document is exported.
97
Chapter 10: Exporting
Spintax
This section defines how the Jet Spinner syntax of the source article will be represented within the
export article.
Check the Spin article checkbox to remove all spintax on export. This will create unique variations of
the article. If unchecked, you will be able to set the maximum spin depth and the spin syntax to use
at each spin depth level. The document will be automatically flattened to the maximum spin
depth selected.
Copies
The copies section defines the default number of variations that will be exported.
Advanced Options
The following advanced options may be selected:
Ordered spin – orderly spins the entire document. See Ordered Spin section in Chapter 9 for
further details.
Exclude original word – removes the original word (the first word in the spintax) from the
document before exporting it. This ensures that the variation will be as unique as possible,
but may impact on readability.
Reorder paragraphs – reorders the paragraphs of the source articles. Paragraphs will be
reordered between locked sections. Given the below example, the following paragraph
reordering may result:
Heading 1
Paragraph 1
Paragraph 2
Paragraph 3
Heading 2
Paragraph 4
Paragraph 5
Locked paragraph
Paragraph 6
Paragraph 7
Heading 1
Paragraph 2
Paragraph 2
Paragraph 1
Heading 2
Paragraph 5
Paragraph 4
Locked paragraph
Paragraph 7
Paragraph 6
Note that paragraphs between headings and locked paragraphs remain grouped, thus
increasing readability of the resulting article. Paragraphs may also be linked together so that
they are not separated during the reorder process. See Formatting in chapter 8 for more
details.
Double carriage returns – adds two carriage returns between paragraphs. Some spin
services require a blank line to separate paragraphs.
98
Chapter 10: Exporting
Automatically append signatures before spinning –signature blocks may be configured and
automatically added to the article before they are exported. This is handy for articles that
are going to be submitted to ezine sites. Refer chapter 12 for more details.
Command – the command attribute can be used to execute a program or script after each
profile has finished exporting. Commands may also include the following special syntax:
o [filename] – export file name and path
o [name] – export name only
o [path] – export path only
o [profile] – profile name
Bulk Rewrite Directory
The bulk rewrite directory option found in the Rewrite tab allows you to import, spin and export an
entire directory of articles.
Specify a source path where the original articles are contained and an export path where you
would like the spun articles to be saved.
The Action Before Export specifies the kind of spin to run before the files are exported. None should
be used if you want to import articles with existing spin syntax and export them to flat articles or
different styles of syntax. Similar to the normal export, you can choose which export profiles you
would like to export for each article.
Use Advanced File Options to zip the results or spin each profile into a single file.
99
Chapter 10: Exporting
The Advanced Options dropdown is used to configure Global Spin settings for the Global Spin
Before Action.
Use the configuration export button (highlighted on the previous page) to export the current
settings (including all advanced options) to the designated source file. Bulk Rewrite will
automatically scan for a settings file in the source directory and import any settings prior to
initiating the bulk export. This is an extremely useful feature for power users who might create
different source directories for various projects requiring different export settings.
100
Chapter 10: Exporting
An example configuration file is shown below:
#
# Bulk Export Configuration File
#
# This file enables automatic configuration of the bulk export functionality
# in Chimp Rewriter. If this file exists in the source directory, it all
# settings contained herein will automatically override the settings
# configured within the Bulk Rewriter Directory form.
#
# If a setting does not exist in this file, the form setting will be used.
#
# Lines beginning with # are treated as comments and are ignored.
#
# Below is a complete list of all settings.
#
# #File Options
# ExportPath=[PATH AS TEXT OR BLANK FOR DESKTOP]
# SpinIntoSingleDirectory={True|False}
# ZipResults={True|False}
# SingleFilePerProfile={True|False}
# Delimiter=[ANY TEXT OR BLANK FOR #BREAK#]
# #Action Before Export
# ActionSpinBeforeExport={None|Global|Favorite}
# ApplyInstantUniqueBeforeExport={True|False}
# #Profile Options
# Profile=[Profile Name],{True|False},{NumberOfCopies|PerSignature|PerTag},[Number Of
Copies]
# #Global Spin Options
# Quality={Best|Better|Good|Average|All}
# POSMatch={Full|Loose|Extremely Loose|None}
# GrammarCheck={True|False}
# OnlyReplacePhrasesWithPhrases={True|False}
# AutoReorderLists={True|False}
# MaxSynsPerWord=[number]
# WordReplacementFrequency=[number]
# MaximumSpintaxDepth=[number]
#
ExportPath=
SpinIntoSingleDirectory=False
ZipResults=False
SingleFilePerProfile=False
Delimiter=#BREAK#
ActionSpinBeforeExport=Global
ApplyInstantUniqueBeforeExport=False
Profile=Plain Text,True,NumberOfCopies,10
Profile=Flat Spin,True,NumberOfCopies,1
Profile=Jet Spin,False,NumberOfCopies,1
Profile=Article Ranks,False,NumberOfCopies,1
Profile=Free Traffic System,False,NumberOfCopies,1
Quality=Better
POSMatch=Loose
GrammarCheck=True
OnlyReplacePhrasesWithPhrases=False
AutoReorderLists=False
MaxSynsPerWord=10
WordReplacementFrequency=1
MaximumSpintaxDepth=2
101
Chapter 10: Exporting
Submit to Blog Network
Chimp Rewriter allows you to submit your article to one or more websites. This is an extremely
powerful feature.
Before you are able to submit to your blog network, you must first enable remote publishing and
create an editor account.
Chimp Rewriter uses XML-RPC to remotely publish articles. The XML-RPC interface is very extensive
and allows us to post articles, create categories and tags and much more.
To enable XML-RPC on your Wordpress website, login as an administrator and click Writing under
the Settings pane. Scroll down to the Remote Publishing section and tick the checkbox next to the
XML-RPC option.
102
Chapter 10: Exporting
Next, click on Add new under the Users pane and create a new Editor account. Record the user name
and password as you will need to enter this detail into Chimp Rewriter.
From within Chimp Rewriter, right click on the Sites node within the Project Center and enter the
URL, username and password as defined above. You don’t need to add http:// to the front or the
XML-RPC extension to the end of your URL. Chimp Rewriter will automatically add this for you
during submission.
103
Chapter 10: Exporting
Repeat the above steps for each website that you wish to submit articles to.
From now on, you can simply submit your articles to your Wordpress network by pressing the
Submit to Blog button from the Tools ribbon. This will display a form as depicted below:
104
Chapter 10: Exporting
Before submitting, you must enter a post title. The title will be spun before submitting to each
website and may therefore contain spin syntax. If the first line in your article is a heading
paragraph, the title will be automatically populated with the first line.
Additional categories or keywords (tags) may be added if required. By default, the keywords field
will be automatically populated with all protected terms. Tick off any keywords, categories or
websites that you do not require for the current submission. Clicking the column heading above
the checkboxes will toggle all ticks on or off.
After pressing the “Submit” button, the submission engine will spin a unique copy of the article
before submitting to each website.
The system log will show the progress of the submission process. Refer to the log if a submission
error occurs. An example error is shown below:
105
Chapter 10: Exporting
Use the Offset Options and Select Sites panes to randomly select offset times and sites from your
website collection.
The Bulk Submit button allows you to load additional files to submit to your blog network. The files
will be randomly chosen during the submission process.zzz
Copyscape Check
Copyscape is an online plagiarism checking tool that allows you to check text or a webpage for
duplicated text. One of the great features of Copyscape is that it supports a remote API. This means
that we can submit text straight from Chimp Rewriter to Copyscape and generate a report without
leaving the Chimp Rewriter environment. This is particularly useful if you wish to verify that you
have spun an article enough to ensure that it is unique.
To use the Copyscape API, you must first sign up for a Premium account. Go to the Copyscape
website found here http://www.copyscape.com/login.php and click the Premium link. At the time
this document was published, Copyscape costs US$0.05 per search.
Log into your Premium account and from the “Copyscape Premium” menu select “Premium API”.
Scroll down to the “Your API Key” section and record the username and API key. You will need to
enter this information into Chimp Rewriter before you can use the Copyscape feature. Note that
you only need to enter this information in once.
106
Chapter 10: Exporting
From within Chimp Rewriter, enter you Copyscape username and APU key into the textboxes shown below:
This information is persistent, so you will not need to enter it again. Press the Check Balance button
to test that the information was added correctly.
107
Chapter 10: Exporting
The Plagiarism Check button can now be used from the Tools ribbon menu. This button is editor
sensitive, meaning that if you are in the main editor, it will submit the document contained in the
main editor. If you are in the spin view editor, it will submit the current spin. If you are in the builder
editor, it will submit the text within the builder and so on.
After checking the document, you will be presented with a report detailing the most likely copies
as per the below example:
All matching text returned from Copyscape will be highlighted within the selected editor. To
disable highlights, deselect the Plagiarism Check button. Use the highlighted text as a guide to
show which text still needs to be rewritten to make the document completely unique.
108
Chapter 10: Exporting
109
Chapter 10: Exporting
CHAPTER 11:
RESEARCH TOOLS
Introduction
The research tools may be used to find articles, images or videos related to your niche or current
articles.
Found items can be added to the current project (see Chapter 12: Project Center) or inserted into
your current article.
The research tools can be found within the Research pane in the Tools menu.
The following research tools are available within Chimp Rewriter:
Article Finder: Find and scrape related articles from multiple sources.
Video Finder: Find and scrape related videos from Youtube.
Image Finder: Find and scrape related images from anywhere on the Internet.
Video and Image Finder
Both the Video and Image finders use the same wizard. To use the wizard, simply type in a keyword
into the search box and press the Search button. Press the More button to find more instances.
A preview of the found images or videos will be shown. Click the Use this Image or Video button to
add the item to the selection list.
Items with a start next to the Use this Image or Video button are restricted and may not work on all
sites or all regions. We therefore highly recommend that you do not use these items.
110
Chapter 11: Research Tools
The Advanced Options button displays the following options:
111
Chapter 11: Research Tools
The Advanced Options are explained as follows:
Options: Selected items can be automatically inserted into the current document, added to
the current project or both when OK is pressed.
Alignment: Selects the default alignment of the image or video. Use Random to spin
together all alignment selections.
Resize: Allows advanced control of image and video resizing. Options exist to resize while
maintaining aspect ratio, resize to specific size, maintain existing size or random resizing.
Random resizing will always maintain aspect ratio.
Alt Text: Defines the ALT text to apply to all selected images. May contain spin. Is optional
and therefore if left blank will not include ALT text for the selected images.
After selecting the videos or images you require, press OK to add the videos or images to the
current project and/or article.
Article Finder
The Article Finder is .an advanced article research tool allowing users to research keyword topical
articles and copy and paste some or all of the text from the article into the current document.
Selected found articles can also be saved to the current project allowing them to be loaded into a
new tab within the editor when required.
Type the keyword into the search box. Select an appropriate Source and press the Search button.
The article finder will automatically search the selected source and display a list of relevant articles.
After the list is displayed, each article will begin to download in the background. Downloading has
delays and operates in series only. This ensures that downloading appears to be human in nature,
therefore bypassing scrape detection.
112
Chapter 11: Research Tools
Articles are downloaded in the background allowing you to continue with additional searches or
begin scraping the downloaded articles. Results from additional searches (whether from the same
source or a different source) will be appended to the end of the article list.
It is also possible to search local text files by selecting Local from the source list. The article finder
will recursively search the local directory configured in the Advanced Options pane for the selected
keyword.
The article finder comprises the following sections:
Search panel
Found article list
Feature panel
Source article
Scraped text
Queued articles are articles that have yet to be downloaded. Complete articles are articles that
have successfully downloaded. Error indicates that the article could not be downloaded.
113
Chapter 11: Research Tools
Queued articles can be stopped from downloading by pressing the Cancel button.
Click the article title within the Article List to display the article within the Source Article Text panel.
Selected text, selected paragraph or all text can be copied from the source article to the Scraped
Text panel by pressing the appropriate button below the source article edit box.
Pressing OK will copy all text from the Scraped Text box to the current cursor location in the current
article.
The Advanced Options button displays the following options:
The Advanced Options are explained as follows:
Always find new articles: Each found article is automatically recorded within the
PreviousArticleList.txt file in the ChimpRewriter user directory. Selecting this
option will ensure that only articles not previously found will be displayed.
Add selected articles to current project: If selected, an additional checkbox column is
displayed within the Article List. Checking the checkbox next to the article will add the
article to the current project.
Auto select articles when used: If checked, articles will be automatically selected when text
is copied from them into the Scraped Text pane.
Local Article Path: Source path used to recursively search for local articles when Local is used
as the source.
Maximum number of articles to scrape per search request: Defines the maximum number of
articles retrieved by a single search. Increasing this number may get you banned from the
article sites.
114
Chapter 11: Research Tools
CHAPTER 12:
PROJECT CENTER
Project Center Panel
The Project Center contains many of the advanced features of Chimp Rewriter. The purpose of the
project center is to group these advanced features and hide them away from the beginner user to
reduce the learning curve.
Further, all options within the Project Center can be grouped into separate projects allowing
different sites, protected words, files, images and so on to be activated with a single mouse click.
Projects allow information to be grouped into separate niches. For example, we may create a
project for our skateboard niche and another for our extreme ironing niche.
To activate the Project Center, click on the Project Center tab within the left dock site. Click the autohide pin to permanently display the Project Center panel.
115
Chapter 12: Project Center
The project center may also be opened and closed by selecting the Projects button in the Edit
menu.
The Project Center comprises a tree view of items called nodes and a settings panel. The settings
panel will change depending upon the selected node. A resize splitter separates the settings panel
from the tree view, allowing the settings panel to be increased or reduced in size.
Nodes
Nodes are used to represent different items within the
Project Center. The Project Center comprise of root nodes
which are nodes contained directly under the project node
and sub nodes which exist under a root node. In the below
example, “Files”, “Thesauri”, “Protected Terms”, “Links” and
“Sites” are all root nodes. “Dog”, “food” and “pet” are all sub
nodes of the “Protected Terms” root node.
Commands can be run on each node by right clicking the
node and selecting the command from the context menu.
Different commands are available for each root node and sub node.
Root Node Help
Root nodes cannot be configured and therefore are not
required to show the settings panel.
Chimp Rewriter takes advantage of this fact and instead of
showing a blank settings panel, Chimp Rewriter displays
information about the selected node.
116
Chapter 12: Project Center
Importing and Exporting
All root nodes with the exception of the Thesauri node support importing and exporting of comma
separated value files. All exported files contain a header detailing the format of the file. Users may
then manually modify the file as required and important back into Chimp Rewriter. Below is an
example of a Protected Terms export:
# Monday, 1 October 2012 6:04:44 PM
#
#
#
#
#
#
#
#
#
#
#
#
#
#
#
#
#
#
#
#
Protected Terms
===============
The Protected Terms list format is as follows:
<ProtectedTerms>
Term
...
Where Term must be enclosed in quotes if it contains a comma. Represent line
feeds with "\n". If a quote exists within the term, preceed the quote with a
backslash.
Example:
<ProtectedTerms>
more
well kept secrets
<ProtectedTerms>
protected phrase
dog
food
pet
Importing and exporting is particularly useful for advanced users with information contained
within other applications. Examples of imported information may include website lists, user
synonym lists, links, files and snippets.
A commonly used method is to import custom thesaurus entries into the local thesaurus. Using this
facility, users are able to favorite, hate and add synonyms on a per project bases. Below is an
example of a local thesaurus export
#
#
#
#
#
#
#
#
#
#
#
117
SpinChimp Synonym Export v2.0
Basic Format:
word,syn1,syn2,syn3
Extended Format:
word,syn1**,syn2,syn3!!
where ** indicates a favourite synonym and !! indicated a hated synonym
If you are editing this file in MS Excel exclude the commas in the above format
So instead the first column would contain the word and all other columns contain
Chapter 12: Project Center
# synonyms with favourite and hate options (** and !!)
#
# The line below sets synonyms to reciprocate their relationship to the source word.
# This means that if you had dog as a synonym for canine - canine would also become a
# synonym for dog. Set to 0 to disable this behavior.
@ reciprocal=1
#
#
# Start Here!
for just,for less than**,for only**[4617]
for just a,for that**,to get a**
ﺓﻱﺽﺍﻡﻝﺍ,TO OBTAIN A**
Entire projects may also be imported or exported. On export of a project node, all information
contained within every node within the project will be exported into a single file. On import, the
information will be merged into the current project.
Specific items within an exported project file may also be imported. For example, if you export an
entire project and then right click on the Protected Terms node and import the exported project
file, only the protected terms will be imported.
Configuration Panel
Many sub nodes require addition information to be configured. In the example below, the site URL,
user name password, default enable state all require configuration.
Note that additional help may also be obtained by hovering over the settings for two (2) seconds to
display tooltip text.
118
Chapter 12: Project Center
As depicted in the URL setting on the previous page, some settings contain a drop down button.
The drop down may be used to display a limited list of options or may display a larger text entry
box allowing more text to be viewed without requiring the Project Center panel to be resized.
New Sub Nodes
All root node context menus contain a New command as the first command within the menu. The
new command is used to create a new sub node under the selected root node. The new sub node
will of course be specific to the root node. For example, creating a sub node under the Protected
Terms root node will create a new protected term, creating a sub node under the Sites root node
will create a new site, and so on.
Projects
The Project Center may consist of multiple projects. Each project has a different collection of sub
nodes. By default, only one project called the Default Project exists. Additional projects may be
created by right clicking the Default Project node and selecting New Project from the context menu.
Sub nodes may be copied between projects by dragging from one project to another or by
exporting them from one project and importing them into the other.
Only one project can be active at any time. To activate a project, right click the project node and
click on the Select Project command within the context menu. The selected project is indicated
using a tick icon and a bold font as shown below.
To modify the project name, select it and press F2 or select Rename Project from the context menu.
Projects allow you to configure different sites, protected terms and so on. For example, one day
you may be working on a skateboard niche and as a result you may have protected terms, images,
videos and sites associated with this niche configured under a project called Skateboards. The next
day you may be working on a completely different niche and hence a different project.
This is an extremely powerful feature of Chimp Rewriter and even allows you to store hated and
favorite words on a per niche basis.
If you do not wish to use multiple projects, simply store everything within the default project.
119
Chapter 12: Project Center
Files
The files folder can be used to group project related files. Right click the files node to display the file
specific options. As shown below, you can import entire directories, create new files, open groups
of files or even group files into sub directories.
To open a file double click it. To merge a file into the editor, drag it into the editor and drop it at the
insertion point.
120
Chapter 12: Project Center
Files may be automatically appended after a document is saved if the above setting is enabled. The
option is enabled by default.
Thesauri
The thesauri node is a special node that allows you to configure the base and local thesauri.
Base Thesaurus
The base thesaurus is a large thesaurus of synonyms supplied by Aktura Technology and is
updated on a regular basis using user generated content. Refer Chapter 12 for more information.
The base thesaurus is by default configured to “(Auto Select)”. In this mode, the base thesaurus will
be automatically selected based upon the current editor language.
To download a new thesaurus language, right click the Thesauri root node and select Download
Thesauri. A popup will appear allowing you select a language pack containing a Thesaurus.
121
Chapter 12: Project Center
Language packs are being added on a routine basis, so if Chimp Rewriter does not contain a
thesaurus for you current language, please try again at a later date.
The base thesaurus may also be set to “(None)” and will therefore only use the synonyms contained
within the user thesaurus.
User Thesaurus
A project must contain at least one user. Locally added synonyms, hated synonyms and favorite
synonyms are all contained with the user thesaurus. Multiple user thesauri can be attached to a
single project allowing all synonyms from each thesauri to be made available when rewriting an
article.
Only one user thesaurus can be active at any time. The active thesaurus is used to store local
synonym uses, hates and favorites. Right click the user thesaurus and select Set as default to set the
thesaurus as active. The active thesaurus cannot be removed from the project.
122
Chapter 12: Project Center
To add an existing thesaurus file to the current project, right click the Thesauri root node and select
Add Existing Thesaurus File from the context menu.
Protected Terms
Protected Terms are words or phrases that are automatically protected from any of Chimp
Rewriters auto rewriter commands. All niche keywords and long tails should be protected to ensure
Chimp Rewriter does not affect your keywords during a rewrite.
Protected Terms may be added by right clicking the Protected Terms node and selecting New
Protected Term from the context menu. Type the text you wish to protect in the new sub node title.
Alternatively, protected terms can also be added by highlighting the term in the editor, right
clicking the highlighted term and selecting Protect Phrase from the context menu.
Protected terms are also used by the LSI calculation and are automatically added to the keywords
table within the Wordpress export form.
Links
Links group common reusable anchors allowing them to be easily or automatically inserted into
your text.
If AutoReplace is checked and the configured anchor text
exists within the editor, the anchor text will automatically
be replaced with an anchor when the document is spun.
In the example to the left, if the word SpinChimp exists
anywhere within the article, it will be automatically
replaced with “<a target="_blank" title="Spin Chimp"
href="http://spinchimp.com">SpinChimp</a>”.
This is an extremely powerful and very quick way of
adding links to your documents.
123
Chapter 12: Project Center
If AutoReplace is not selected, the link will be shown within the link submenu of the editor context
menu.
Sites
Sites are used by the Wordpress submitter. Multiple sites may be grouped into subfolders and
commands may be performed on all sites contained within the subfolder. For example, it is
possible to right click a subfolder and submit spin variations to all sites within the sub folder.
Sites may be moved by dragging them between folders or into the Sites root node.
Refer to the Submit to Wordpress section of Chapter 10 for further details.
124
Chapter 12: Project Center
Images and Videos
A collection of videos and images may also be stored within a project. To manually insert an image
or video, right click the associated root node and choose the New command from the context
menu. You will be requested to enter a unique name, URL and
other required information.
You may also select the Find Images or Find videos command
from the context menu. This will display a scraper form
allowing you to scrape images and videos for a given search
term.
Images and videos can also be added to the Project Center
using the Research tools within the Tools ribbon menu.
To include a video or image in the current document, drag it from the protect center into the
document or right click the video or image and select the Insert command from the context menu.
Articles
Selected articles can be added to a project. See
Chapter 11: Research Tools for additional information.
Relevant high content articles may be collected and
arranged into folders and used as a source of
information for your current niche.
Double clicking the article will load it into a new
editor tab.
Signatures
Standard signature blocks may be defined and automatically appended to the end of a document
before the document has been spun by the spin engine.
To create a signature, right click the Signatures node and select New Signature from the context
menu.
Multiple lines of text may be added by clicking the dropdown arrow in the Text field. Press CTRLENTER to accept the multiline text.
125
Chapter 12: Project Center
Signature text may contain spin syntax. The signature will be automatically spun before being
added to the document.
Signatures are very handy for users who submit their articles to multiple ezine sites. The export
manager contains an option allowing one variant to be created per signature allowing a user to
maintain unique signature blocks for each ezine site they submit their articles to.
Tags
Tags allow related information to be grouped together during the spin process. For example, tags
could be used to group names with addresses, people with salutations and so on.
To create a tag, right click the Tags node and select New Tag from the context menu. The tag must
be given a unique name and a comma separated list of values.
The following is an example of two tags:
The tags can then be added to the text editor using the #tagname# nomenclature as per the
example below. Double clicking the tag within the Project Center will also add the tag to the
editor.
126
Chapter 12: Project Center
To explain tags further, let us consider a group of five (5) tags defined as follows:
Name: Number1
Values: 1,A,i
Name: Number2
Values: 2,B,ii
Name: Number3
Values: 3,C,iii
Name: Number4
Values: 4,D,iv
The tags could then be used in the following text:
Here is a
#Number1#
#Number2#
#Number3#
#Number4#
simple tag example:
Include the tag by enclosing it between hashes.
Press the spin view button to see what it looks like.
See how all numbers are replaced with fields from the same row.
And see how easy it is to use tags.
After the document is spun, we will be presented with one of the following three (3) variations:
127
Chapter 12: Project Center
Here is a simple tag example:
1 Include the tag by enclosing it between hashes.
2 Press the spin view button to see what it looks like.
3 See how all numbers are replaced with fields from the same row.
4 And see how easy it is to use tags.
OR
Here is a simple tag example:
A Include the tag by enclosing it between hashes.
B Press the spin view button to see what it looks like.
C See how all numbers are replaced with fields from the same row.
D And see how easy it is to use tags.
OR
Here is a simple tag example:
i Include the tag by enclosing it between hashes.
ii Press the spin view button to see what it looks like.
iii See how all numbers are replaced with fields from the same row.
iv And see how easy it is to use tags.
Tags can therefore be used to create random replacements while still retaining relationships
between data. Other uses of tags include:
Names, professions and workplace – eg #name# is a #position# at #workplace# (Dr Stevens
is a lecturer at Deakin University) – this is useful if you have multiple reference sources to
help establish credibility of your article.
Ordered list identifiers – as per the above example.
Wesbites and addresses – eg Visit <a href=”#url#”>#site_name#</a>
Names and email addresses
Snippets
Snippets represent reusable pieces of miscellaneous text. Snippets are automatically added to the
editor right click context menu. Snippets may contain multiple lines and may also contain spin.
To add a new snippet, right click the Snippets node and select New Snippet. Each snippet requires a
name and some text. The name is used by the context menu.
128
Chapter 12: Project Center
CHAPTER 13:
SYNONYM DATABASE
Quality Determination
The synonym database is continually updated to provide a thesaurus that is always up to date and
is always relevant. This is achieved by tracking synonyms used by each user of Chimp Rewriter and
applying a complex weighting algorithm to determine the quality of each synonym within the
database. The database is therefore referred to as the user generated synonym database.
The following actions are used by the weighting algorithm:
Used synonyms – every time a synonym is used, its quality is slightly increased.
Favorite synonyms – when a synonym is marked as a favorite word, its quality is increased.
Hated synonyms – when a synonym is marked as a hated word, its quality is reduced. If the
quality is reduced by enough users, the synonym will be automatically removed from the
database.
User added words – if the same synonym is added by multiple users, it will be automatically
added to the synonym database.
The quality of a synonym determines whether it will be used by the auto rewriters.
Part Of Speech Matching
The Part of Speech (POS) feature of Chimp Rewriter is a way of determining the part of speech of a
word or phrase based on its context. The surrounding text is analyzed to determine the
relationship a given word has with the rest of the sentence. Simple examples of parts of speech are
nouns, verbs, and adjectives. More advanced POS’s include gerunds, singular nouns and third
person verbs etc.
When determining the best synonyms for a particular word, Chimp Rewriter looks at both the
quality and POS. By analyzing which words are used the most and in which context, both a quality
and a POS can be calculated for every synonym. By displaying the best POS matched words first,
and sub-ordering by quality, the absolute best synonyms will be delivered to you every time.
129
Chapter 13: Synonym Database
As seen in the above example, the closest POS matches are listed first, in order of quality, then
loose POS matches in order of quality, then extremely loose and so on.
Thesaurus Updates
Thesaurus updates are automatically made available to all users of Chimp Rewriter. Updates
download in the background and may include items such as:
New synonyms
Removed synonyms
Changed quality rating of synonyms
Local Thesauri
Each project will contain at least one local thesaurus and only one local thesaurus can be active at
any time. The local thesaurus contains information such as:
User added synonyms
Favorite synonyms
Hates synonyms
Synonym usage counts
Local thesauri may be backed up or restored as required. See Chapter 11 for more details.
130
Chapter 13: Synonym Database
CHAPTER 14:
SHORTCUT LIFTOUT
Double click – select word
Ctrl I – Italic
Right click – select & display context menu
Ctrl K – Create hyperlink
Triple click – select paragraph
Ctrl L – Left Align
Ctrl + click – select sentence
Ctrl + Shft L – Set lower case
Ctrl + mouse zoom – zoom in/out
Ctrl M – Toggle MultiSyn
Ctrl 0 – set zoom to 100%
Ctrl N – New file
Ctrl 1 – Document editor
Ctrl + Shift N – New from existing
Ctrl 2 – Original view
Ctrl O – Open file
Ctrl 3 – Spin view
Ctrl + Shift O – Remove original words
Tab – Move and display context menu
Ctrl P – Print
Ctrl A – Select all
Ctrl + Shft P – Set title case
Ctrl + Shft A – Syn Select Replace All Toggle
Ctrl + Alt Q – Toggle to/from quick spin
Ctrl B – Bold
Ctrl R – Right align
Ctrl C – Copy
Ctrl + Alt R – Toggle to/from rapid spin
Ctrl + Shft C – Spin and compare
Ctrl + Shft R – Syn Select Replace Toggle
Ctrl E – Center Align
Ctrl S- Save file
Ctrl + Shft E – Export
Ctrl + Alt S – Toggle to/from builder
Ctrl F – Find
Ctrl + Shft S – Syn Select Spin All Toggle
Ctrl G – Global spin
Ctrl U – Underline
Ctrl+ Shft G – Toggle grammar check
Ctrl + Shft U – Set upper case
Ctrl H – Replace
Ctrl V – Paste
131
Chapter 14: Synonym Database
Ctrl W – OneClick Rewrite
Ctrl F9 – Spin and save
Ctrl X – Cut
Ctrl Shift F9 – Spin all documents
Ctrl Y – Redo
Ctrl Left – Move to start of previous word
Ctrl Z – Undo
Ctrl Right – Move to start of next word
F1 – Help
Alt Left – Select previous word in selector
F2 – Edit project node text
Alt Right – Select next word in selector
Shft F3 – Change case
Alt + Shift Up – Select prev sentence/para
Alt F4 – Close Chimp Rewriter
Alt + Shift Down – Select next sentence/para
Shft F4 – Toggle hidden text
Ctrl Home – Go to start of document
F9 – Save document as…
Ctrl End – Go to end of document
132
Chapter 14: Synonym Database