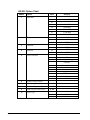
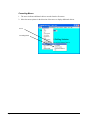
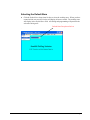
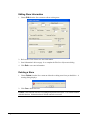
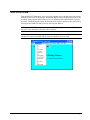
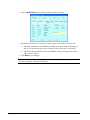
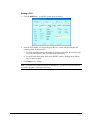
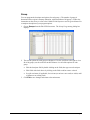
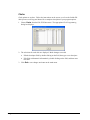
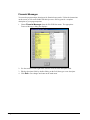
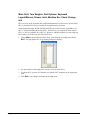
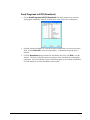
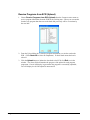
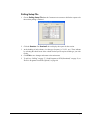
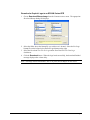
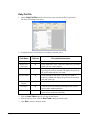
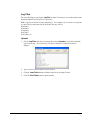
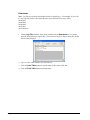
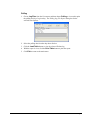
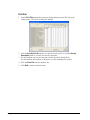
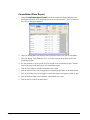
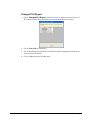
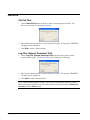
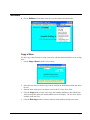
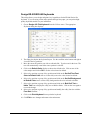
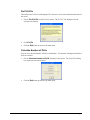
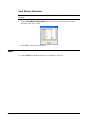
1
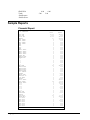
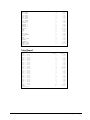
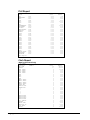
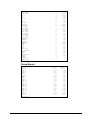
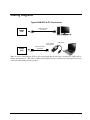
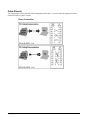
SAM4s ER-900 Series SAM900 User's Manual Version 1.1 All specifications are subject to change without notice. 2012, CRS, Inc. CRS, Inc. Limited Warranty and Disclaimers of Warranty This manual has been developed by CRS, Inc. It is intended for the use of its customers and service personnel and should be read in its entirety before attempting to install, use or program the product(s). Nothing contained in this manual shall be deemed to be, and this manual does not constitute, a warranty of, or representation with respect to, the product or any of the products to which this manual applies. This manual is subject to change without notice and CRS, Inc. has no obligation to provide any updates or corrections to this manual. Further, CRS, Inc. also reserves the right, without prior notice, to make changes in equipment design or components as it deems appropriate. No representation is made that this manual is complete or accurate in all respects and CRS, Inc. shall not be liable for any errors or omissions contained in this manual. In no event shall CRS, Inc. be liable for any incidental or consequential damages relating to or arising out of the use of this manual. This document contains proprietary information that is protected by copyright. All rights are reserved. No part of this document may be photocopied or reproduced without prior written consent of CRS, Inc. NOTICE IF ANY WARRANTY IS EXTENDED TO YOU WITH REGARD TO THE PRODUCT(S) TO WHICH THIS MANUAL APPLIES, IT IS A WARRANTY FROM THE ENTITY OR INDIVIDUAL FROM WHOM YOU DIRECTLY PURCHASED THE PRODUCT(S). SUBJECT TO THE FOREGOING, UNLESS YOU ARE A DIRECT END USER CUSTOMER OF CRS, INC., CRS, INC. DOES NOT EXTEND TO YOU ANY EXPRESS WARRANTY OR ANY IMPLIED WARRANTY AND EXPRESSLY DISCLAIMS ANY IMPLIED WARRANTY OF MERCHANTABILITY, FITNESS FOR USE, OR FITNESS FOR ANY PARTICULAR PURPOSE, OR ANY WARRANTY OF NON-INFRINGEMENT OF INTELLECTUAL PROPERTY RIGHTS IN CONNECTION WITH THE PRODUCT(S) OR ANY SOFTWARE, DRIVERS, OR PROGRAMMING PRODUCT, WHETHER EMBEDDED IN PRODUCT(S) OR PROVIDED AS A SEPARATE PROGRAM, OR USED IN CONJUNCTION WITH THIS/THESE PRODUCT(S). CRS, INC. SPECIFICALLY DOES NOT WARRANT THAT THE OPERATION OF ANY DRIVERS, SOFTWARE, OR PROGRAMMING PRODUCTS LICENSED HEREUNDER, WHETHER EMBEDDED IN PRODUCTS OR PROVIDED AS SEPARATE PROGRAMS, SHALL BE UNINTERRUPTED OR ERROR FREE OR THAT FUNCTIONS CONTAINED IN SUCH DRIVERS, SOFTWARE OR PROGRAMMING PRODUCTS SHALL OPERATE IN COMBINATION(S) WHICH MAY BE SELECTED FOR USE BY YOU OR OTHERWISE MEET YOUR REQUIREMENTS. CRS, Inc. is not responsible for any damages or loss, either direct, indirect, special, incidental or consequential, which you may experience as a result of your purchase or use of the product(s). Your sole remedy in the event that you encounter any difficulties with the product(s) is against the entity or individual from whom you purchased the product(s). Revision 2.0 - April 1, 2005 Contents Introduction 1 Overview ................................................................................................................................... 1 Features ....................................................................................................................... 1 Requirements............................................................................................................... 1 Installing...................................................................................................................... 2 Cash Register Settings................................................................................................. 3 RS-232 Option Chart................................................................................................... 4 Preparing the ER-900 for Communicatons.................................................................. 5 Starting ...................................................................................................................................... 6 Navigating ................................................................................................................................. 7 Mouse and Keyboard .................................................................................................. 7 Viewing Menus and Selecting Menu Items................................................................. 7 Drop-Down List Boxes ............................................................................................... 9 Check Boxes................................................................................................................ 9 Option Buttons ............................................................................................................ 9 Scrolling ...................................................................................................................... 9 Interface Specifications ........................................................................................................... 10 Menu Functions 11 Stores ....................................................................................................................................... 11 Creating a New Store ................................................................................................ 11 Selecting the Default Store........................................................................................ 13 Editing Store Information.......................................................................................... 14 Deleting a Store ......................................................................................................... 14 Edit ECR Data ......................................................................................................................... 15 PLU File .................................................................................................................... 16 Group......................................................................................................................... 21 Tax............................................................................................................................. 22 System Options.......................................................................................................... 23 Print Options ............................................................................................................. 24 Function Keys ........................................................................................................... 25 Clerks ........................................................................................................................ 26 Logo Description....................................................................................................... 27 Financial Messages.................................................................................................... 28 Clerk Messages.......................................................................................................... 29 Misc: NLU; Tare Weights; Port Options; Keyboard Layout/Macros; Drawer Limit; Machine No.; Check Change..................................................................................... 30 Mix and Match .......................................................................................................... 35 Stock.......................................................................................................................... 36 Communications ...................................................................................................................... 37 Polling ....................................................................................................................... 37 Send Programs to ECR (Download) ......................................................................... 39 Receive Programs from ECR (Upload) ..................................................................... 40 SAM900 User's Manual v1.1 Contents i Polling Setup File ......................................................................................................41 Download Bitmap Image...........................................................................................42 Print .........................................................................................................................................45 Daily Poll File............................................................................................................46 Log Files....................................................................................................................47 PLU File ....................................................................................................................50 PLU Range ................................................................................................................51 Consolidated Store Report.........................................................................................52 Changed PLU Report ................................................................................................53 Remove ....................................................................................................................................54 Old Poll Files.............................................................................................................54 Log Files (Upload, Download, Poll) .........................................................................54 Utilities ....................................................................................................................................55 Copy a Store ..............................................................................................................55 Copy PLU File...........................................................................................................56 After Polling ..............................................................................................................57 Set Auto Poll .............................................................................................................59 Length of Polling Time .............................................................................................60 Backup Poll Data Files ..............................................................................................60 Design ER-920/ER-940 Keyboards ..........................................................................61 Design Generic Keyboard .........................................................................................62 Fix PLU File ..............................................................................................................63 Calculate Number of PLUs........................................................................................63 View Memory Allocation..........................................................................................64 Quit ..........................................................................................................................................64 Appendices 65 Structure of Stores ...................................................................................................................65 File Definitions ........................................................................................................................66 SAM900 PLU File Structure ...................................................................................................66 Structure of Polling Files .........................................................................................................68 Sample Reports ........................................................................................................................70 Financial Report ........................................................................................................70 Time Report...............................................................................................................71 PLU Report................................................................................................................72 Clerk Report (Data for One Clerk Only) ..................................................................72 Group Report.............................................................................................................73 Troubleshooting Common Problems .......................................................................................74 Hardware ...................................................................................................................74 Software.....................................................................................................................74 SAM4s ER 900 Series ...............................................................................................74 SAM900 Software......................................................................................................74 Cabling Diagrams ....................................................................................................................75 Cable Pinouts.............................................................................................................76 Manual Revision Record ii Contents 78 SAM900 User's Manual v1.1 Introduction Overview Features SAM900 controls the connection between a SAM4s ER 900 Series (ER-920, ER-925, ER-940 or ER-945) electronic cash register and an IBM compatible PC running in a Windows XP (or later) environment. Using SAM900 at your PC, you can: Connect directly, via telephone modem or by Internet. Upload program files from the register to the PC. Edit cash register programs. Download program files to the register from the PC. Download bitmap images for custom pre/post logos. Poll reports from the register, save, display or print them at the PC. Poll all stores, or individual stores. Poll unattended at a predetermined time. Download preamble/postamble bitmap files. SAM900 converts polled reports to ASCII files, ready to be used by other PC applications. Requirements To use this utility, you must have: Pentium 100 or faster CPU. 32 MB RAM. 150 MB minimum hard disk space available. Dedicated serial port (RS-232C). VGA or SVGA display. Windows XP or above operating system. US Robotics Sportster Modems are recommended for remote connections (for both PC and ECR sites.) SAM900 User's Manual v1.1 Introduction 1 Installing Notes: SAM Polling software requires a USB software key to be installed on the PC running the software to access all of the polling and programming features. Software can be installed on a PC without the key, but it can be used only for program saving/loading. The connection from the ECR to your PC requires a serial port on the PC. See “Cabling Diagrams” on page 75 for more information on cables and connections. 1. Load the SAM900 program CD into your CD drive (or load via SD/USB memory device). 2. From the Windows Desktop, double click the My Computer icon. 3. Select your CD ROM drive (usually drive "D".) 4. Choose Setup. The Welcome dialog displays. 5. Click Next. The Ready to Install dialog displays. 6. Click Next. The Install Directory dialog displays. 7. Click Next. The Select Shortcut Folder dialog displays. 8. Click Next. When all files are copied, the Finished dialog displays. 9. Click Finish. 10. Next, the HSAP SRM loads the driver for the software key. 11. When the driver installation is complete, the Aladdin HASP SRM dialog displays. 12. Click OK. 13. Remove the CD ROM. Your installation is complete. 2 Introduction SAM900 User's Manual v1.1 Cash Register Settings To communicate with your SAM4s ER-900 Series ECR, you must set the RS232C port for the PC function. Setting the RS232C Port Options You must select ‘PC’ as the device that is attached to the RS-232C communications port. You must define the device(s) attached to the RS-232C communications ports, and the options for the device(s). 1. Turn the control lock to the S position. 2. Enter 8 0 (enter 8 1 to program the second port; 8 2 for the optional third port; and 8 3 for the optional fourth port) and press the SUBTL key. 3. Enter 5 and press the X/TIME key. (The complete RS-232C option chart follows for your reference.) 4. Enter 1 (the value for PC) and press the CASH key. 5. Repeat from step 2 for additional options you wish to program. 6. Press CASH to exit the program. Port 1 (standard) 8 0 SUBTL OPTION XTIME VALUE CASH CASH Port 2 (standard) 8 1 SUBTL OPTION XTIME VALUE CASH CASH Port 3 (option) 8 2 SUBTL OPTION XTIME VALUE CASH CASH Port 4 (option) 8 3 SUBTL OPTION XTIME VALUE CASH CASH SAM900 User's Manual v1.1 Introduction 3 RS-232 Option Chart Address 1 2 3 4 5 Option Baud Rate Parity Data Bits Stop Bits Device Function Value Selection 0 9600 BPS 1 1200 BPS 2 2400 BPS 3 4800 BPS 4 19200 BPS 5 38,200 BPS 6 57,600 BPS 7 115,200 BPS 0 NONE 1 ODD 2 EVEN 0 8 BITS 1 7 ITS 0 1 BIT 1 2 BIT NONE PC SCALE Remote Journal (TVS Interface) Remote Printer Liquor Dispenser Scanner COIN EFT Device Pole Display PDC 0 1 2 3 4 5 6 7 8 9 10 6 Initial Feeding Line KP 0 - 20 7 End Feeding Line KP 0 - 20 8 Initial Feeding Line Slip 0 - 20 9 Print Line On Guest Check 0 - 50 10 Scale Type 0 1 2 4 Introduction NCI CAS CAS Ounce SAM900 User's Manual v1.1 Address Option Printer Type 11 Display Type 12 Value Selection 0 1 2 3 4 NONE SAM4s ELLIX10 SAM4s ELLIX20 SRP-270/270, SNBC M280 SRP-350, SNBC R580/2002NP/880NP CITIZEN 3550 CITIZEN 810 CITIZEN 230 EPSON TM T88-2 EPSON U200 EPSON U295 EPSON U300 EPSON U325 EPSON U375 STAR SP-200 STAR SP-298 STAR SP-300 STAR TSP-200 EPSON ICD 5 6 7 8 9 10 11 12 13 14 15 16 17 0 1 Preparing the ER-900 for Communicatons The register must be ready for communications: Connect the register directly to the PC with the appropriate cable. See “Cabling Diagrams” on page 75. The register power must be on. A clerk must be signed on. The register cannot be inside of a transaction. The key lock can be in any position other than OFF. It is not necessary to manually place the register in PC Communications mode. SAM900 will automatically place the register in PC Communications mode when communications are initiated. SAM900 User's Manual v1.1 Introduction 5 Starting 1. Click the Start button, click Programs, click SAM900, and then click SAM900.exe. 2. The SAM900 main menu screen displays. YOU MUST DO THIS FIRST! Before you can attempt communications or editing, you must create at least one store. Refer to "Creating a New Store" on page 11. After creating a store, you must Receive (Upload) information from the ECR. Refer to "Receive Programs from ECR (Upload)" on page 40. 6 Introduction SAM900 User's Manual v1.1 Navigating Mouse and Keyboard You can choose a menu, menu item, or a command by clicking on it with your mouse. Viewing Menus and Selecting Menu Items 1. Point at a menu item with your mouse. 2. Point at your choice on the menu and click the left mouse button. Menu Item Menu Choices SAM900 User's Manual v1.1 Introduction 7 Cascading Menus 1. The arrow indicates additional choices cascade from the first menu. 2. Move the mouse pointer in the direction of the arrow to display additional choices. Arrow Cascading Menu 8 Introduction SAM900 User's Manual v1.1 Drop-Down List Boxes Click on the arrow in the box to open the drop-down list box and display a list of choices. Click on an item to select it. (If all the choices are not in view, scroll bars are provided.) Click here Check Boxes Click on a check box to make a selection. Click the check box again to deselect the item Option Buttons Click on one of the option buttons (also called radio buttons) to make a selection. Your previous selection will pop-up when a new selection is made. Scrolling Move the scroll box to select the item you wish to work with. Drag the scroll box or click the scroll arrows to find your selection. SAM900 User's Manual v1.1 Introduction 9 Interface Specifications Communications Specifications Asynchronous Operation Communication Mode Half Duplex Baud Rate Select: 2400, 4800, 9600 or 19,200 BPS Signal Level RS-232C Character Bits 8 Parity Bits None Stop Bits 1 Error Detection Data sum check 10 Introduction SAM900 User's Manual v1.1 Menu Functions Stores A store must be created before any communications or editing can take place. Creating a New Store 1. Choose Create New from the Store menu to create a store. You can create an unlimited number of stores. The Create New Store dialog displays. 2. Complete the Create New Store dialog according to the Store Information table on the following page. 3. Click Exit to save store information. SAM900 User's Manual v1.1 Menu Functions 11 Store Information Field Name Required /Optional Name R Enter an eight-character store name. Store# O Enter a four digit number store number. Modem Phone# O Enter the Phone number preceded by the letter T or P if you intend to communicate with the register by modem. The T is for TONE and the P is for PULSE. If you communicate direct, leave this field blank. Connection Type R Choose Direct, Dial Out Modem, or Internet Use PC COM Port# (1-32) R Enter the PC serial port (COM1- COM32) that you are using for communications. Baud Rate R Select 9600, 4800, 2400, 1200, or 19,200. Be sure that the rate set on the register (Port Settings) matches the store information rate set here. Down Load PLUs after Polling O Enter Y if you wish to download PLUs in a polling session. When the session is finished polling, the program will download the PLU file. Deactivate This Store O Select the Deactivate This Store check box if you wish the store to be inactive. Modem Time Out Value R Unless otherwise indicated, the default value of 99 will be entered automatically when the store is created Modem Initial String O This field is to allow you to enter any initialization required for your modem for polling or communications. Do not add the command prefix “AT” in this string. If you are using the U.S. Robotics Sportster modem, it would be good to initialize with the string S7=60. This value makes the modem wait for up to 60 seconds to detect a carrier. If no carrier is detected within 60 seconds after you dial, the modem will answer back with No Carrier Detect. Do not put into this string any E, Q or V values. The software automatically handles these values. IP Address or IP Name O If connection is Internet, enter IP address or IP name. Port# That ECR Listens On O If connection is Internet, enter the port the router listens on. (Default is 5000) Keyboard Type R Select 920/940 Flat, 925/945 Raised, or 925/945 Expanded. 12 Menu Functions Description/Instructions SAM900 User's Manual v1.1 Selecting the Default Store Click the Default Store drop-down list box to select the working store. When you have created at least one store, the list box will display all stores created. The working store will display in the Default Store field. All editing and programming will pertain to the selected working store. Default Store Drop-down list box . SAM900 User's Manual v1.1 Menu Functions 13 Editing Store Information 1. Choose Edit from the Stores menu to edit an existing store. 2. Refer to the "Click Exit to save store information. 3. Store Information" table on page 11 to complete the Edit Store Information dialog. 4. Click Exit to save store information. Deleting a Store 1. Choose Delete from the Stores menu to delete the working store from you hard drive. A warning dialog displays. 2. Click Yes to delete the store. Caution: This function will erase everything that pertains to this store. Use extreme caution with this function. Information that is deleted cannot be recovered. 14 Menu Functions SAM900 User's Manual v1.1 Edit ECR Data From the Edit ECR Data menu, select a specific program area to edit that part of an existing SAM4s ER-900 series ECR program. Remember that the options in this program allow you to edit the same program options that you set on a standalone ER-900 through the register's keyboard. Detailed questions about the meaning of the register options are best answered by referring to the SAM4s ER-900 Operators and Program Manual. Note: If you did not Upload programs from the ECR, you will get a message "The file does not exist" if you attempt to select any of these options. Note: If you wish to create a program for a new store, you can use the "Copy a Store" function (see page 55) and then edit the copied program to suit your needs. SAM900 User's Manual v1.1 Menu Functions 15 PLU File The PLU file is maintained here. Follow the instructions on the screen, or refer to the SAM4s ER-900 Operators and Program for a complete description of your program options. Choose PLU File from the Edit ECR Data menu. The appropriate PLU Programming dialog box displays: 16 Menu Functions SAM900 User's Manual v1.1 Editing a PLU 1. Select the PLU you wish to edit: Type a PLU number in the PLU # field and press ENTER, or open the PLU # drop down list box and click on the PLU you wish to edit. If necessary, use the scroll box to view the list of PLUs in the file. Type a PLU descriptor in the Descriptor field and press ENTER, or open the Descriptor drop down list box and click on the PLU you wish to edit. If necessary, use the scroll box to view the list of PLUs in the file. With the list box open, you can type the beginning letter or letters of a PLU descriptor and PLUs beginning with your entry will display in the box. SAM900 User's Manual v1.1 Menu Functions 17 2. Click the Edit PLU button to open the selection fields for editing. 3. Edit fields as necessary by moving your mouse pointer to the field you wish to edit: Edit fields with numeric information by clicking on the field, and then entering new data. If you are entering price data, you must use the decimal key to enter cents. Edit fields with check boxes (such as the PRESET field) by clicking on the field to add or remove a check. 4. Click Save to save changes. Note: For double-wide characters hold down the Ctrl key, type W, then type the character you wish to program. (Descriptor field only). 18 Menu Functions SAM900 User's Manual v1.1 Adding a PLU 1. Click the Add button. A new PLU screen opens for entries: 2. Enter the PLU number you wish to assign in the PLU # field, and then complete the remaining fields for the new PLU. . Fill fields requiring numeric information by clicking on the field, then entering data. If you are entering price data, you must use the decimal key. Fill fields with check boxes (such as the PRESET field) by clicking on the field to add or remove a check. 3. Click Save to save changes. Note: For double-wide characters hold down the Ctrl key, type W, then type the character you wish to program. (Descriptor field only). SAM900 User's Manual v1.1 Menu Functions 19 Deleting a PLU 1. Select the PLU you wish to delete by number or descriptor. 2. Click the Delete PLU button. 3. A warning dialog displays asking if you are sure you wish to delete the PLU. 4. Click Yes to delete the PLU; click No to abort the delete process. Note: PLUs deleted at the PC are not automatically deleted at the ECR. You must run PLU reports at the ECR and then send PLUs from the PC to the ECR. 20 Menu Functions SAM900 User's Manual v1.1 Group You can program the descriptor and options for each group. (The number of groups is determined in the register's memory allocation, with a maximum of 99 groups.) Follow the instructions on the screen, or refer to the SAM4s ER-900 Operators and Program Manual for a complete description of your program options. 1. Choose Groups from the Edit ECR Data menu. The Group Programming dialog box displays: 2. The current options for each group are displayed. Use the scroll box at the right to view all of the groups; use the scroll box at the bottom to view all of the options for each group. Edit the descriptor field by double clicking on the field, then type a new descriptor. Edit fields with check boxes by clicking on the field to add or remove a check. Set gift card status, if applicable, for Activate (to activate a new card) or Add (to add a balance to an existing card.) 3. Click Exit to save changes and return to the main menu. SAM900 User's Manual v1.1 Menu Functions 21 Tax Each of the 4 possible taxes can be set for an add on percentage, tax table or VAT. Follow the instructions on the screen, or refer to the SAM4s ER-900 Operators and Program Manual for a complete description of your program options. 1. Choose Tax from the Edit ECR Data menu. The appropriate Tax Rates dialog box displays: 2. Enter the tax you wish to program in the Tax # field, or open the Tax # list box and select the tax you wish to program. 3. Select the type of tax (% Add On, Table, VAT) from the drop-down list at the Tax Type field. 4. Depending upon the type of tax selected, the appropriate fields will be activated. Enter a percentage for % Add On or VAT taxes. Fill the break point fields for tax tables. 5. Click Exit to save changes and return to the main menu. 22 Menu Functions SAM900 User's Manual v1.1 System Options Each system option can be edited. Refer to the SAM4s ER-900 Operators and Program Manual for a complete description of your program options. 1. Choose System Options from the Edit ECR Data menu. The appropriate System Options dialog box displays: 2. The current setting for each system option is displayed. Use the scroll box at the right to view all of the system options. Edit fields with drop-down list boxes by opening the list box and selecting from the available options. Edit fields with check boxes by clicking on the field to add or remove a check. 3. Click Exit to save changes and return to the main menu. SAM900 User's Manual v1.1 Menu Functions 23 Print Options Each print option can be edited. Refer to the SAM4s ER-900 Operators and Program for a complete description of your program options. 1. Choose Print Options from the Edit ECR Data menu. The appropriate Print Options dialog box displays: 2. The current setting for each print option is displayed. Use the scroll box at the right to view all of the print options. Edit fields with drop-down list boxes by opening the list box and selecting from the available options. Edit fields with check boxes by clicking on the field to add or remove a check. 3. Click Exit to save changes and return to the main menu. 24 Menu Functions SAM900 User's Manual v1.1 Function Keys You can program the different options for each function key. Follow the instructions on the screen, or refer to the SAM4s ER-900 Operators and Program Manual for a complete description of your program options. 1. Choose Function Keys from the Edit ECR Data menu. The appropriate Function Keys dialog box displays: 2. Use the scroll box at the bottom of the screen to select the function key you wish to program or you can select a specific function from the table to go to that function’s options. 3. The options for the specific function key are displayed. Make selections or changes as necessary. Edit the descriptor field by clicking on the field, then type a new descriptor. Edit the Price/Rate field by clicking on the field, then entering a new price or rate, whichever is appropriate. Edit fields with drop-down list boxes by opening the list box and selecting from the available options. Edit fields with check boxes by clicking on the field to add or remove a check. 4. If needed select additional function keys you wish to program. 5. Click Exit to save changes and return to the main menu. SAM900 User's Manual v1.1 Menu Functions 25 Clerks Clerk options are set here. Follow the instructions on the screen, or refer to the SAM4s ER900 Operators and Program Manual for a complete description of your program options. 1. Choose Clerks from the Edit ECR Data menu. The appropriate Clerk Programming dialog box displays: 2. The selections for each clerk are displayed. Make changes as needed. Edit the descriptor field by double clicking on the field, then type a new descriptor. Edit fields with numeric information by double clicking on the field, and then enter new data. 3. Click Exit to save changes and return to the main menu. 26 Menu Functions SAM900 User's Manual v1.1 Logo Description You can program a custom preamble, postamble and check endorsement message. You can also program unique descriptors for financial and clerk report totals. Follow the instructions on the screen, or refer to the SAM4s ER-900 Operators and Program Manual for a complete description of your program options. 1. Choose Logo Descriptor from the Edit ECR Data menu. The appropriate Logo Programming dialog box displays: 2. Use the scroll box at the right of the screen to view all of the logo descriptor fields. 3. Edit the descriptor fields by double clicking on the field, then type a new descriptor. 4. Click Exit to save changes and return to the main menu. SAM900 User's Manual v1.1 Menu Functions 27 Financial Messages You can also program unique descriptors for financial report totals. Follow the instructions on the screen, or refer to the SAM4s ER-900 Operators and Program for a complete description of your program options. 1. Choose Financial Messages from the Edit ECR Data menu. The appropriate Financial Messages dialog box displays: 2. Use the scroll box at the right of the screen to view all of the descriptor fields. 3. Edit the descriptor fields by double clicking on the field, then type a new descriptor. 4. Click Exit to save changes and return to the main menu. 28 Menu Functions SAM900 User's Manual v1.1 Clerk Messages You can also program unique descriptors for clerk report totals. Follow the instructions on the screen, or refer to the SAM4s ER-900 Operators and Program for a complete description of your program options. 1. Choose Clerk Messages from the Edit ECR Data menu. The appropriate Clerk Messages dialog box displays: 2. Use the scroll box at the right of the screen to view all of the descriptor fields. 3. Edit the descriptor fields by double clicking on the field, then type a new descriptor. 4. Click Exit to save changes and return to the main menu. SAM900 User's Manual v1.1 Menu Functions 29 Misc: NLU; Tare Weights; Port Options; Keyboard Layout/Macros; Drawer Limit; Machine No.; Check Change NLU NLUs are keys on the keyboard (like traditional department keys) that access specific PLUs. NLU #1 through NLU 300 are available for assignment to the keyboard. On the default keyboard, the ER-925/ER-945 ECRs has 21 NLUs and is expandable to 63 NLUs. The ER-920/ER-940 has 100 NLUs. Each NLU key is assigned the same number PLU, i.e. NLU key number one is PLU #1. However, with this program, you can assign any PLU number you wish to any one of the NLU keys. 1. Choose Misc from the Edit ECR Data menu. Then from the cascading menu choose NLU. The appropriate NLU Programming dialog box displays: 2. Use the scroll box at the right of the screen to view all of the NLUs. 3. To edit an NLU, type the PLU number you wish the NLU to address in the appropriate field. 4. Click Exit to save changes and return to the main menu. 30 Menu Functions SAM900 User's Manual v1.1 Tare Weights Up to 5 tare weights can be pre-programmed and entered automatically during register operations. Follow the instructions on the screen, or refer to the SAM4s ER-900 Operators and Program Manual for a complete description of your program options. 1. Choose Misc from the Edit ECR Data menu. Then from the cascading menu choose Tare Weights. The appropriate Tare Weight Programming dialog box displays: 2. Enter a weight (up to 9.999 lbs) for each tare. 3. Click Exit to save changes and return to the main menu. SAM900 User's Manual v1.1 Menu Functions 31 COM Port Options Set options for the communications when you are connecting optional hardware to the register. Follow the instructions on the screen, or refer to the SAM4s ER-900 Operators and Program Manual for a complete description of your program options. 1. Choose Misc from the Edit ECR Data menu. Then from the cascading menu choose COM Port 1 Option. The Serial Port Programming dialog box displays: 2. Fill the applicable fields for the device you are using. (Be sure to select the appropriate scale, printer, or pole display type, if necessary.) Edit fields with drop-down list boxes by opening the list box and selecting from the available options. Edit fields with numeric information by double clicking on the field, and then enter new data. 3. Click Exit to save changes and return to the main menu. 32 Menu Functions SAM900 User's Manual v1.1 Keyboard Layout/Macros Each key location on the register can be programmed for any available function. Follow the instructions on the screen, or refer to the SAM4s ER-900 Operators and Program Manual for a complete description of your program options. 1. Choose Misc from the Edit ECR Data menu. Then from the cascading menu choose Keyboard Layout/Macros. The appropriate Keyboard Locations dialog box displays: To Change a Key Function The dialog box depicts the keyboard layout. The current function for each location is displayed. Use the scroll bar at the bottom and right to view all of the key positions. Yellow locations are fixed and cannot be changed. The current function for each programmable location is displayed. 1. To change a programmable location, open the Function Keys drop down list box and find the new function you wish to assign. 2. Highlight the cell that represents the key you wish to assign. 3. Select the “Program Selected KB Cell To:” Function Key button. (If you wish to inactivate a key, select the Blank button.) Note: The PrintGrid button will print out a facsimile of the keyboard, but not a full-size keyboard sheet. If you wish to print out a full-size keyboard, go to Design Keyboard on the Utilities menu. Programming Macros 1. Each Macro can execute a series of key sequences. Select the Macro number (1-10) and the Macro Key Sequence cell, and then select the key on the keyboard the macro is to execute, and then click the Set Macro Cell to Keyboard Cell button. 2. To have the macro change lock postitons for the next keystroke, first select the lock postion option button. Next, select he next Macro Sequence cell, and then click the Set Macro Cell to Keylock Position command button. SAM900 User's Manual v1.1 Menu Functions 33 Misc Here you can set a cash-in-drawer limit, machine number, and a check change limit. Refer to the SAM4s ER-900 Operators and Program Manual for a complete description of your program options. 1. Choose Misc from the Edit ECR Data menu. Then from the cascading menu choose Misc. The appropriate Misc Programming dialog box displays: 2. Double click on the option you wish to edit, and then enter a new value. 3. Click Exit to save changes and return to the main menu. 34 Menu Functions SAM900 User's Manual v1.1 Mix and Match 1. Choose Mix and Match from the Edit ECR Data menu. The appropriate Mix and Match dialog box displays: 2. You can give the discount a specific name/descriptor. Set the trip level to indicate how many items to ring before the discount is applied. Set the discount amount in the price field. (As shown above, a $1 discount will apply after three items are registered.) 3. Click Exit to save changes and return to the main menu. SAM900 User's Manual v1.1 Menu Functions 35 Stock Upload stock from the ECR first. All PLUs will populate this screen. For stock items, edit quantities as needed, and then download to the ECR. 1. Choose Stock from the Edit ECR Data menu. The Stock Programming dialog box displays with a list of all PLU items and current stock levels for stock items. 2. You can edit quantites here and send to the ECR. 3. When complete, click Exit. These quantities can be sent to the register from Communications/Send Programs to ECR (Download). 36 Menu Functions SAM900 User's Manual v1.1 Communications Choose Communications from the Main menu to initiate communications with a SAM4s ER-900 series ECR. Polling 1. Choose Polling from the Communications menu to connect to the store to poll reports. The SAM900 Polling dialog box will display. Note: Polling setup file must be completed first. See “Polling Setup File” on page 41. SAM900 User's Manual v1.1 Menu Functions 37 2. Complete the fields on the Polling Routine window according to the table below: Field Name Required /Optional Poll On Timer O Select the Poll On Timer checkbox to start polling in consecutive order beginning with Poll 1 at the defined time. If not selected, polling is manual and will begin immediately. Poll All Stores O Select the Poll All Stores checkbox to poll all stores. If not selected, enter an individual store to poll in the Listbox of Stores field. List of Stores O Select an individual store to poll if the Poll All Stores check box is not selected. Timer O Enter the military time the polling session is to begin if unattended polling is to be done. Session R Select the polling session, 0 - 2. Polling will proceed in consecutive order by session number. Description/Instructions 3. Click the Start Polling button to begin polling; click Exit to exit the dialog box. Note: The polling setup must be completed before a store can be polled. See “Polling Setup File” on page 41. 38 Menu Functions SAM900 User's Manual v1.1 Send Programs to ECR (Download) 1. Choose Send Programs to ECR (Download) from the Communications menu to send program information from the working store, to the ECR of the working store. 2. From the Download dialog box, select the program components you wish to send to the ECR. (Click Check All to select all components.) A check mark means the item is selected. 3. Click the Download button to initiate the download to the ECR; click Exit to exit the window. The Status field will monitor the progress of the download for each program component. Passed will display in green when the program is successfully downloaded; Fail will display in red if the download is unsuccessful. SAM900 User's Manual v1.1 Menu Functions 39 Receive Programs from ECR (Upload) 1. Choose Receive Programs from ECR (Upload) from the Communications menu to receive program information from the ECR for the working store. When you execute this function, any program data that was on the hard disk previously will be overwritten by the new data. 2. From the Upload dialog box, select the program components you wish to send to the ECR. (Click Check All to select all components.) A check mark means the item is selected. 3. Click the Upload button to initiate the download to the ECR; click Exit to exit the window. The Status field will monitor the progress of the upload for each program component. Passed will display in green when the program is successfully uploaded; Fail will display in red if the upload is unsuccessful. 40 Menu Functions SAM900 User's Manual v1.1 Polling Setup File 1. Choose Polling Setup File from the Communications menu to define the reports to be taken when polling is initiated. 2. Click the Session 1 or Session 2 tabs to display the reports for the session. 3. At the heading of each column, view the type of report (i.e. X1, Z1, etc.) Then, indicate by selecting the check boxes in the column for the specific reports of that type you wish to take. 4. Click Exit to save changes and return to the main menu. 5. To poll, see “Polling” on page 37, “Send Programs to ECR (Download)” on page 39, or "Receive Programs from ECR (Upload)” on page 40. SAM900 User's Manual v1.1 Menu Functions 41 Download Bitmap Image Preparing a Graphic Logo Bitmap for an ER-900 Series ECR The image must be black/white, 384 x 192 pixels, and 10 Kbytes or less in size. 1. Open MS Paint. 2. Open the image file you wish to use. 3. Choose Attributes from the Image menu. The Attributes dialog box displays. 4. The image dimensions must be no larger than 384 pixels wide by 192 pixels high. If the image size in pixels is greater than the maximum, you must resize your image. a. Click OK to exit the Attributes dialog. b. Select your image. (Choose Select All from the Edit menu.) c. Using the handles of the selected image, resize the image. Keep the image in the upper left corner of the screen. d. Choose Attributes from the Image menu. The Attributes dialog box displays again. Enter 384 in the Width field; enter 192 in the Height field; select Pixels as the unit. Click OK to exit the dialog box. e. Your image will be cropped to the 384 x 192 pixel size. If you cropped part of the image you wish to keep, you can undo (Ctrl + Z) and try again. You may have to experiment a bit to resize the image inside the 384 x 192 pixel limit. 5. After the image is sized, select Black and white in the Attributes dialog. 6. Save your image as type “Monochrome Bitmap (*.bmp,*.dib)” and confirm that the size is 10k or less. If you resized your original image, rename it when you save (original size may be retained with the original image.) 42 Menu Functions SAM900 User's Manual v1.1 Download a Graphic Logo to an ER-900 Series ECR 1. Choose Download Bitmap Image from the Communications menu. The appropriate Download Bitmap dialog box displays: 2. Select the folder where the bitmap file you wish to use is located. Select the Pre Logo bitmap file on the left and select the Post Logo bitmap on the right. 3. Select the Download This File Pre Logo and/or Download This File Post Logo checkboxes. 4. Click the Download button. When the logo loads successfully, the download finished message displays after a short delay. Note: The image must be black/white, 384 x 192 pixels, and 10 Kbytes or less in size. SAM900 User's Manual v1.1 Menu Functions 43 Printing the Logo Image – ER-900 Settings Series ECR Two addresses in Print Option Programming affect graphic logo printing: Option #28 – Add the value of 1 to address 28 if you wish to print the pre graphic logo on the receipt. Add the value of 2 to address 28 if you wish to print the post graphic logo on the receipt. Option #29 – Add the value of 1 to address 29 if you wish to print the pre graphic logo on the guest check. Add the value of 2 to address 29 if you wish to print the post graphic logo on the guest check. Print Option Flowchart (P Key Lock Position) Repeat for each Print Option Status 4 0 SBTL X/TIME SBTL CASH Option # 44 Menu Functions SAM900 User's Manual v1.1 Print Choose Print from the Main menu to access the printing utilities described below. SAM900 User's Manual v1.1 Menu Functions 45 Daily Poll File 1. Choose Daily Poll File from the Print menu to print out the poll file of a given day. The Daily Poll dialog box displays. 2. Complete the Daily Poll dialog box according to the table below: Field Name Required /Optional Polling Date R Select the polling date from the drop-down list box. Remove Zero Total Lines O Select the Remove Zero Total Lines check box if you wish totals with zero values skipped. Report Type O Select the report type from the drop-down list box. If no report type is selected, SAM900 will display all reports for the specified date and key lock mode. Keylock Mode O Select the mode of the report. If no key lock mode is selected, SAM900 will display all reports for the specified date and report type. Store to Display R Select the store you wish to display. Grid Lines O Click the Grid Lines button to print/display the selected report with or without grid lines White/Gray O Click the White/Gray button to print/display the selected report with or without shaded fields. Description/Instructions 3. Click the Load Table button to view the selected report. 4. With the report in view, click the Print Table button to print the report. 5. Click Exit to return to the main menu. 46 Menu Functions SAM900 User's Manual v1.1 Log Files For error checking you can choose Log File from the Print menu to view and/or print out the upload, download or poll log file of a given day. Note: Log files are stored in ord by mm/dd/yyyy. For example, if you wish to view logs and you have files from the same day in different years, they will as: 06/06/2007 06/06/2008 06/06/2009 06/07/2007 06/07/2008, etc. Uploads 1. Choose Log Files from the Print menu, then choose Uploads to view and/or print the log of a given day. The Upload Log File Report dialog box for the selected store displays. 2. Type or select a date from the File Date list box. 3. Click the Load Table button to load the table for the selected file date. 4. Click the Print Table button to print the table. SAM900 User's Manual v1.1 Menu Functions 47 Downloads Note: Log files are stored in chronological order by mm/dd/yyyy. For example, if you wish to view logs and you have files from the same day in different years, they will as: 06/06/2007 06/06/2008 06/06/2009 06/07/2007 06/07/2008, etc. 1. Choose Log Files from the Print menu, and then choose Downloads to view and/or print the download log of a given day. The Download Log File Report dialog box for the selected store displays. 2. Type or select a date from the File Date list box. 3. Click the Load Table button to load the table for the selected file date. 4. Click the Print Table button to print the table. 48 Menu Functions SAM900 User's Manual v1.1 Polling 1. Choose Log Files from the Print menu, and then choose Polling to view and/or print the polling activity of a given day. The Polling Log File Report dialog box for the selected store displays. 2. Select the polling date from the drop-down list box. 3. Click the Load Table button to view the selected file date log. 4. With the report in view, click the Print Table button to print the report. 5. Click Exit to return to the main menu. SAM900 User's Manual v1.1 Menu Functions 49 PLU File 1. Choose PLU File from the Print menu to display and print out the PLU file of the working store. The PLU File dialog box displays. 2. Click the Sort by PLU # button to view the file sorted by PLU #; click the Sort by Descriptor button to view the file sorted by descriptor. 3. Use the scroll bar at the right of the grid to scroll up or down the PLUS list. Use the scroll bar at the bottom of the grid to view the remaining PLU options. 4. Click the Print File button to print the file. 5. Click Exit to return to the main menu. 50 Menu Functions SAM900 User's Manual v1.1 PLU Range 1. Choose PLU Range from the Print menu to display and print out a specific range of the PLU file of the working store. The PLU File dialog box displays. 2. Enter or select the From PLU and To PLU numbers. 3. Click the Load Grid button to view the selected PLUs. 4. Click the Print File button to print the file. 5. Click Exit to return to the main menu. SAM900 User's Manual v1.1 Menu Functions 51 Consolidated Store Report 1. Choose Consolidated Store Report from the Print menu to display and print out a consolidated financial, PLU and group reports for the selected stores. The Consolidated Store Report dialog box displays. 2. Chose the Polling Date from the drop down list for the reports you wish to consolidate. 3. Chose the Report Type (Financial, PLU, or Groups) from the drop down list for your consolidated report. 4. Use the scroll bar to select specific stores to include in the consolidated report. Doubleclick on the store to add that store to the consolidated report. 5. Click on Load Table to load the consolidated store report. 6. Click on the Grid Lines icon to toggle between displaying grid lines on the table and not. 7. Click on the White/Gray icon to toggle between showing the descriptors in white or gray. 8. Click on the Print Table icon to print the consolidated store report. 9. Click on Exit to return to the main menu. 52 Menu Functions SAM900 User's Manual v1.1 Changed PLU Report 1. Choose Changed PLU Report from the Print menu to display and print out a list of PLUs that have been changed and may need to be downloaded to the register. 2. Choose Print Grid to print the list. 3. Choose Send Programs to the ECR (Download) from the Communicatons menu if you wish to initiate a download. 4. Click on Exit to return to the main menu. SAM900 User's Manual v1.1 Menu Functions 53 Remove Old Poll Files 1. Choose Old Poll Files from the Remove menu to delete unwanted poll files. The Remove Old Polling Files dialog box displays. 2. Enter the date through which you want old poll files deleted. The message "FINISHED" will display when completed. 3. Click Exit to return to the main menu. Log Files (Upload, Download, Poll) 1. Choose Log Files (Upload, Download, Poll) from the Remove menu to delete unwanted poll log files. The Remove Old Log Files dialog box will display. 2. Enter the date through which you want old log files deleted. The message "FINISHED" will display when completed. 3. Click Quit to return to the main menu. Note: Removing files cannot be undone. Once files are removed, they cannot be restored. Before removing Old Poll Files you may wish to back up the poll data (choose Backup Poll Data Files from the Utilities menu. 54 Menu Functions SAM900 User's Manual v1.1 Utilities Choose Utilities from the Main menu to access the utilities described below. Copy a Store Use the Copy a Store function to create a new store with the identical attributes of an existing store. 1. Choose Copy a Store from the Utilities menu. 2. Select the store that you wish to copy from by clicking the Default Store field drop-down list box. 3. Enter the name of the store you wish to create in the New Copy Store field. 4. Click the Copy button to create a new store with identical attributes as the default store. After selecting this option, the main SAM900 screen will display. The new store will be available in the store list. 5. Click the Exit Copy button to return to the main menu without creating a new store. SAM900 User's Manual v1.1 Menu Functions 55 Copy PLU File Use the Copy a PLU File function to copy a PLU file to an individual store or all stores. 1. Choose Copy a PLU File from the Utilities menu. 2. Select the store that you wish to copy the PLU file from by clicking the Default Store field drop-down list box. 3. Select the name of the store you wish the PLU file copied to in the Copy PLU File to this Store field, or click the Copy To All Stores check box. 4. Click the Copy button to copy the PLU file to the selected store or all stores. The default screen is loaded when the copy is complete. 5. Click the Exit button to return to the main menu without copying the PLU file to any other store. 56 Menu Functions SAM900 User's Manual v1.1 After Polling You can program SAM900 to send your polled files to the printer immediately after polling, or have the polled files sent automatically by e-mail to a preselected e-mail address. Note: Not all ISP’s are compatible with the After Poll feature of SAM900. For example, AOL is not compatible with After Polling; AT&T and Road Runner have been tested. 1. Choose After Polling from the Utilities menu. The After Polling dialog box for the selected store displays. Fill these fields only if the “E-mail the Polled file after Polling to the E-Mail Address below” check box is selected. 2. Click on the check boxes to select Printing or E-mailing the polled file after polling. 3. Select an option form the Your Internet Connection drop down list ONLY IF YOU ARE USING A DIAL-UP CONNECTION. 4. Type in your Outgoing Mail Host Name (SMTP) in the appropriate location. See “Determining the SMTP” on the next page. If you have trouble locating the host name, please contact your e-mail provider. The host names vary greatly depending on the provider. 5. Type in your E-mail Account Logon Name. 6. Type in your E-mail Account Password. 7. Type in your E-mail Address. 8. Type in the address you wish to send the polled reports to in the text box labeled Send File to this E-mail Address. 9. Click on Exit to return to the main menu and save your changes. 10. Start Polling. After polling is completed, the polled file will be emailed to the selected address in the After Polling area. SAM900 User's Manual v1.1 Menu Functions 57 Determining the SMTP SMTP is short for Simple Mail Transfer Protocol. If your computer is on a Network see your System Administrator for the SMTP. The SMTP can be found various ways depending on which Internet Provider and what operating system is used. Example #1: If you are using Windows XP and Outlook/Outlook Express the SMTP can be found by following the steps below: 1. From the PC desktop click Start and then Programs. 2. Click on Outlook Express. 3. Click on Tools. 4. Click on Accounts. 5. Click on Mail. (The Internet Providers name will appear if it is active.) 6. Click on Properties. The incoming and outgoing SMTP’s will be displayed. Log the Out Going SMTP characters exactly as they appear. Enter this set of characters exactly as they appear in the “Outgoing Mail Host Name” field. Example #2: If you are using Windows XP, the SMTP can be found by following the steps below: 1. From the PC desktop click Start and then Programs. 2. Select the Internet Provider Program i.e. AT&T Connection Services, then Customer Care, and then System Information. 3. Click Account Information to display the SMTP. Enter this set of characters exactly as they appear in the “Outgoing Mail Host Name” field. 58 Menu Functions SAM900 User's Manual v1.1 Set Auto Poll You can set SAM900 to automatically go into polling mode when the program is started. You can also set SAM900 to automatically close when polling is completed. 1. Choose Set Autopoll from the Utilities menu. The Set to Automatically Poll dialog box displays. 2. Select the first check box if you wish to automatically poll when SAM900 is executed. Select the second check box if you wish to close SAM900 automatically when polling is completed. 3. Click Exit. 4. Close SAM900 and then restart it for changes to take effect. Note: If you have checked both of these options and wish to turn them off, go to Start/Programs/SAM900/AUTOPOLL.exe, uncheck the boxes and then restart SAM900. SAM900 User's Manual v1.1 Menu Functions 59 Length of Polling Time You can set a time period that SAM900 will wait to successfully poll each report. Leave this value at the default setting of ‘20’ unless you encounter difficulty polling. Backup Poll Data Files Use this utility to backup polled data files to another disk drive. Follow the screen instructons. When finished, the screen displays: A new file is created at c:\<Store Name> Polled Data. 60 Menu Functions SAM900 User's Manual v1.1 Design ER-920/ER-940 Keyboards This utility allows you to design and print a key legend sheet for the ER-900 Series flat keyboard. If you are using a color inkjet printer and legal size paper, you can print a highquality keyboard suitable for your installation. 1. Choose Design 900 Flat Keyboard from the Utilities menu. The appropriate Keyboard dialog box displays: 2. The dialog box depicts the keyboard layout. Use the scroll bar at the bottom and right to view all of the key positions. 3. Move the cursor the position you wish to edit and click. Type the text for the item. The text will automatically center when a new positon is selected. 4. Click on the Default Color display to choose the default color. Click on one of the color samples and click on OK to set the color selected as default. 5. Select a key position or group of key positions and click on the Set Cell Text Font Color to Default Color icon to set the cell(s) text to the color selected as default. 6. Select a key position or group of key positions and click on the Set Cell Background to Default Color icon to set the cell(s) background to the color selected as default. 7. Select a key position or group of key positions and click on the Bold Cell Text or Italize Text icon to display the cell(s) text to Bold or Italics. Click on the icon again to reverse the change. 8. Select a key position or group of key positions and modify the cell(s) font size with the Font Size scroll bar. 9. Click on the Print Keyboard icon to print the keyboard. 10. Click Exit to save changes and return to the main menu. SAM900 User's Manual v1.1 Menu Functions 61 Design Generic Keyboard This utility allows you to design and print keychecks for the ER-925/ER-945. If you are using a color inkjet printer, you can print a high-quality keychecks suitable for your installation. 1. Choose Design Generic Keyboard from the Utilities menu. The appropriate Keyboard dialog box displays: 2. The dialog box displays a matrix of single and double size keychecks. Use the scroll bar at the bottom and right to view the entire matrix. 3. Move the cursor the position you wish to edit and click. Type the text for the item. The text will automatically center when a new positon is selected. 4. Click on the Default Color display to choose the default color. Click on one of the color samples and click on OK to set the color selected as default. 5. Select a key position or group of key positions and click on the Set Cell Text Font Color to Default Color icon to set the cell(s) text to the color selected as default. 6. Select a key position or group of key positions and click on the Set Cell Background to Default Color icon to set the cell(s) background to the color selected as default. 7. Select a key position or group of key positions and click on the Bold Cell Text or Italize Text icon to display the cell(s) text to Bold or Italics. Click on the icon again to reverse the change. 8. Select a key position or group of key positions and modify the cell(s) font size with the Font Size scroll bar. 9. Click on the Print Keyboard icon to print the keychecks. 10. Click Exit to save changes and return to the main menu. 62 Menu Functions SAM900 User's Manual v1.1 Fix PLU File This utility looks for PLUs with improper PLU structure. Review the detailed instructions on the screen 1. Choose Fix PLU File from the Utilities menu. The Fix PLU File dialog box for the selected store displays. 2. Click Fix File. 3. Click the Exit button to return to the main menu. Calculate Number of PLUs You can view the total number of PLUs in the database. The number of changed and deleted PLUs are tracked. 1. Choose Calculate Number of PLUs from the Utilities menu. The Total PLUs dialog box for the selected store displays. 2. Click the Exit button to return to the main menu. SAM900 User's Manual v1.1 Menu Functions 63 View Memory Allocation Note: Memory allocation cannot be edited at SAM900 or downloaded to theECR from SAM900. 1. Choose View Memory Allocation from the Utilities menu to display the memory allocation of the store’s ECR. 2. Click Exit to return to the main menu. Quit Choose Quit from the Main menu to exit SAM900 For Windows. 64 SAM900 User's Manual v1.1 Appendices Structure of Stores When you create a new store, you actually create a new sub-directory under the directory SAM900 for the store. If you create a store named BIGBOYS, the following will be created: 1. A directory named \SAM900\STORES\BIGBOYS This directory holds all the programming files for this store. 2. A directory named \SAM900\STORES\BIGBOYS\POLL This directory holds all the daily polling files for this store. SAM900 User's Manual v1.1 Appendices 65 File Definitions File Extension PLU PLT GRU TAX SYO PRO FKY CLK LGO FIN CKD MRO MSC MM INF MEM STT STK Definition PLU (converted to edit form) PLU (Upload/Download Raw ) GROUP TAX SYSTEM OPTIONS PRINT OPTION FUNCTION KEY CLERK LOGO DESCRIPTION FINANCIAL DESCRIPTORS CLERK LOGO MACRO MISC MIX AND MATCH STORE HISTORY FILE MEMORY ALLOCATION STOCK (Upload/Download Raw) STOCK (Converted to edit ) SAM900 PLU File Structure <Storename>.PLU SAM900 PLU FILE STRUCTURE <Storename>.PLU FIELD STATUS PLU# DESCRIPTION GROUP1 GROUP2 GROUP3 NEGATIVE ITEM FOOD STAMP TAX4 TAX3 TAX2 TAX1 OVERRIDE PRESET PRESET AUTO SCALE SCALABLE DISABLE INVENTORY GALLONAGE 66 Appendices STAR T 1 2 17 35 37 39 41 42 43 44 45 46 47 48 49 50 51 52 53 LENGT H 1 15 18 2 2 2 1 1 1 1 1 1 1 1 1 1 1 1 1 A,C,D SAM900 User's Manual v1.1 NON-ADD# COMP SINGLE ITEM HASH DISABLE PROMO PRINT PRICE/CHECK PRINT PRICE/RECEIPT PRINT ON CHECK Not Used PRINT ON RECEIPT COMP. CONDIMENT CONDIMENT Not Used Disable Void & Return PRESET OVER-MGT RESET COUNTER AUTO TARE (1-5) LINK PLU MIX & MATCH PRICE1 PRICE2 CR/LF TOTAL REC LENGTH 54 55 56 57 58 59 60 61 62 63 64 65 70 71 72 73 74 89 91 98 105 1 1 1 1 1 1 1 1 1 1 1 5 1 1 1 1 15 2 7 7 2 106 STAR T 1 2 17 23 LENGT H 1 15 6 2 24 <Storename>.STK FIELD STATUS PLU# QUANTITY CR/LF TOTAL REC LENGTH SAM900 User's Manual v1.1 A,C,D Appendices 67 Structure of Polling Files When you poll, the session will always create a poll file with the date as the name of the file. For example, if you poll on 09-23-1996, for store BIGBOYS, the session will create a file on the hard disk named \SAM900\STORES\BIGBOYS\POLL\09231996.POL. If you poll this store a second time on the same day, it will append the data to the end of the existing file. The structure of the poll file is as follows: All data is ASCII. A polling session for a store is everything that is done from the moment the PC calls the store, up to the hang-up with the store. The first line saved to disk of any polling session is: BIGBOYS/09-23-1996/20:12:39 The first three characters on the line is ASCII character decimal 16, a right arrow. This designates that this is the start of the polling session. The name of the store follows, a forward slash, the date, a forward slash, and the time in hours, minutes and seconds. The last line of the entire session will be saved as: <END SESSION> The last three characters of the line is ASCII character decimal 17, a left arrow. This designates that this is the end of the polling session. If you do not define any elements in your polling session, you would have a polled file that would look something like this: BIGBOYS/09-23-1996/20:12:39 <END SESSION> When you define your polling session by choosing elements in the store’s session data, the polled data will be save below line 1: BIGBOYS/09-23-1996/20:12:39 and before the last line: <END SESSION> 68 Appendices The time and date on the first line of the session is the time and date that the session started. The second line in the file is the element that was polled. The line ends with a time and date stamp. This stamp is when the ECR was actually pre-polled. This stamp can be different than the header stamp (line 1). If the software finished pre-poll and the session ended abruptly, then next time that you poll (possibly a day later) you sill read the data sitting in the prepoll area. SAM900 User's Manual v1.1 The first line saved for each element is 2 right arrow characters followed by the key lock mode, a forward slash and the report title. For example: X1/FINANCIAL The last line saved for every element is : <END REPORT> This line ends with 2 left arrow characters. All data for the given element will appear between the 2 lines with 2 arrows. Data lines do not start with any arrows. The Clerk report will use a single arrow to designate the data pertaining to the clerk. A clerk report can have up to 99 clerks, so we have to be able to distinguish from clerk from another. See the example that follows. Let’s say our session consisted of the two elements: X1/PLU and X1/Groups. Your file \SAM900\STORES\BIGBOYS\POLL\03172003.POL should look like this: BIGBOYS X1/PLU PLU# PLU1 PLU2 PLU3 PLU4 PLU5 PLU6 PLU7 /03-17-2003/14:26:45 0001 0002 0003 0004 0005 0006 0007 Count Amount 1.00 1.00 1.00 1.00 1.00 1.00 1.00 1.00 1.00 1.00 0.00 0.00 0.00 0.00 .... Totals <End Report> X1/GROUPS Group# GROUP 1 GROUP 2 GROUP 3 GROUP 4 GROUP 5 GROUP 6 GROUP 7 GROUP 8 GROUP 9 GROUP 10 GROUP 11 GROUP 12 GROUP 13 GROUP 14 GROUP 15 GROUP 16 GROUP 17 GROUP 18 GROUP 19 SAM900 User's Manual v1.1 5.00 5.00 Count Amount 5.00 5.00 0.00 0.00 0.00 0.00 0.00 0.00 0.00 0.00 0.00 0.00 0.00 0.00 0.00 0.00 0.00 0.00 0.00 0.00 0.00 0.00 0.00 0.00 0.00 0.00 0.00 0.00 0.00 0.00 0.00 0.00 0.00 0.00 0.00 0.00 0.00 0.00 Appendices 69 GROUP 20 Totals <End Report> <End Session> 0.00 0.00 5.00 5.00 Sample Reports Financial Report CRS /03-20-2003/11:03:07 X1/FINANCIAL +PLU TTL -PLU TTL ADJST TTL NONTAX TAX1 SALES TAX2 SALES TAX3 SALES TAX4 SALES TAX1 TAX2 TAX3 TAX4 XMPT1 SALES XMPT2 SALES XMPT3 SALES XMPT4 SALES EATIN TTL TAKEOUT TTL DRTHRU TTL % 1 % 2 % 3 % 4 % 5 NET SALE CREDIT TAX1 CREDIT TAX2 CREDIT TAX3 CREDIT TAX4 FD/S CREDIT RETURN ERROR CORR PREVIOUS VD VOID MODE CANCEL GROSS SALES CASH SALES CHECK SALES R/A 1 R/A 2 R/A 3 P/O 1 P/O 2 P/O 3 HASH TTL AUDACTION NOSALE CASH-IN-D CHECK-IN-D FD/S-IN-D CHG1-IN-D CHG2-IN-D CHG3-IN-D CHG4-IN-D CHG5-IN-D CHG6-IN-D CHG7-IN-D 70 Appendices Count 47.00 0.00 47.00 37 0 0 0 0 0 0 0 0 0 0 0 0 2 0 0 0 0 0 0 0 20 0 0 0 0 0 2 0 1 0 2 0 14 1 1 0 0 1 0 0 0 2 1 15 2 0 3 2 0 0 0 0 0 Amount 280.15 0.00 280.15 259.19 20.96 0.00 0.00 0.00 0.00 0.00 0.00 0.00 0.00 0.00 0.00 0.00 2.00 0.00 0.00 0.00 0.00 0.00 0.00 0.00 280.15 0.00 0.00 0.00 0.00 0.00 -6.00 0.00 -1.00 0.00 10.00 286.15 56.95 200.00 29.99 0.00 0.00 -5.00 0.00 0.00 0.00 -6.00 0 51.95 229.99 0.00 8.20 15.00 0.00 0.00 0.00 0.00 0.00 SAM900 User's Manual v1.1 CHG8-IN-D CHG1 SALES CHG2 SALES CHG3 SALES CHG4 SALES CHG5 SALES CHG6 SALES CHG7 SALES CHG8 SALES FOREIGN 1 FOREIGN 2 FOREIGN 3 FOREIGN 4 DRWR TTL PROMO WASTE TIP TRAIN TTL BAL FORWARD GUESTS P/BAL CHECKS PAID SERVICE MIX&MATCH PAYMENT TTL GRAND TOTAL <End Report> 0 3 2 0 0 0 0 0 0 0 0 0 0 22 0 0 0 0 0 0 0 0 0 0 0 0 0.00 8.20 15.00 0.00 0.00 0.00 0.00 0.00 0.00 0.00 0.00 0.00 0.00 305.14 0.00 0.00 0.00 0.00 0.00 0.00 0.00 0.00 0.00 0.00 0.00 286.15 Time Report X1/TIME Hour 00:00 - 00:59 01:00 - 01:59 02:00 - 02:59 03:00 - 03:59 04:00 - 04:59 05:00 - 05:59 06:00 - 06:59 07:00 - 07:59 08:00 - 08:59 09:00 - 09:59 10:00 - 10:59 11:00 - 11:59 12:00 - 12:59 13:00 - 13:59 14:00 - 14:59 15:00 - 15:59 16:00 - 16:59 17:00 - 17:59 18:00 - 18:59 19:00 - 19:59 20:00 - 20:59 21:00 - 21:59 22:00 - 22:59 23:00 - 23:59 TOTALS <End Report> SAM900 User's Manual v1.1 Count 0 0 0 0 0 0 0 0 0 0 9 9 0 0 0 2 0 0 0 0 0 0 0 0 20 Amount 0.00 0.00 0.00 0.00 0.00 0.00 0.00 0.00 0.00 0.00 222.20 57.95 0.00 0.00 0.00 0.00 0.00 0.00 0.00 0.00 0.00 0.00 0.00 0.00 280.15 Appendices 71 PLU Report X1/PLU PLU# BLT HAMBURGER PLU3 PLU4 PLU5 PLU6 PLU7 LEINENKUGEL MOOSEHEAD NO MAYO MEDIUM WELL LETTUCE TOMATO PLU14 PLU15 PLU16 PLU17 PLU18 PLU19 PLU20 PLU21 PLU22 PLU23 PLU24 PLU25 PLU26 PLU27 LARGE PIZZA PEPPERONI MUSHROOM <End Report> 0001 0002 0003 0004 0005 0006 0007 0008 0009 0010 0011 0012 0013 0014 0015 0016 0017 0018 0019 0020 0021 0022 0023 0024 0025 0026 0027 0028 0029 0030 Count 6.00 4.00 2.00 3.00 1.00 0.00 3.00 4.00 4.00 0.00 0.00 0.00 0.00 0.00 0.00 0.00 1.00 3.00 0.00 0.00 0.00 0.00 0.00 0.00 0.00 2.00 0.00 0.00 0.00 0.00 Amount 7.99 4.19 3.00 6.00 10.00 0.00 0.00 10.99 0.99 0.00 0.00 0.00 0.00 0.00 0.00 0.00 0.00 5.99 0.00 0.00 0.00 0.00 0.00 0.00 0.00 6.00 0.00 0.00 0.00 0.00 Count 20 37 0 0 0 0 0 0 0 0 0 0 0 0 2 0 0 0 0 0 0 0 0 0 0 0 0 2 0 1 0 2 Amount 280.15 259.19 20.96 0.00 0.00 0.00 0.00 0.00 0.00 0.00 0.00 0.00 0.00 0.00 2.00 0.00 0.00 0.00 0.00 0.00 0.00 0.00 0.00 0.00 0.00 0.00 0.00 -6.00 0.00 -1.00 0.00 10.00 Clerk Report (Data for One Clerk Only) X1/CLERK Clerk# 1 NET SALE NONTAX TAX1 SALES TAX2 SALES TAX3 SALES TAX4 SALES TAX1 TAX2 TAX3 TAX4 XMPT1 SALES XMPT2 SALES XMPT3 SALES XMPT4 SALES EATIN TTL TAKEOUT TTL DRTHRU TTL % 1 % 2 % 3 % 4 % 5 CREDIT TAX1 CREDIT TAX2 CREDIT TAX3 CREDIT TAX4 FD/S CREDIT RETURN ERROR CORR PREVIOUS VD VOID MODE CANCEL 72 Appendices CLERK 1 SAM900 User's Manual v1.1 GROSS SALES CASH SALES CHECK SALES R/A 1 R/A 2 R/A 3 P/O 1 P/O 2 P/O 3 HASH TTL CASH-IN-D CHECK-IN-D FD/S-IN-D CHG1 SALES CHG2 SALES CHG3 SALES CHG4 SALES CHG5 SALES CHG6 SALES CHG7 SALES CHG8 SALES FOREIGN 1 FOREIGN 2 FOREIGN 3 FOREIGN 4 DRWR TTL PROMO WASTE TIP TRAIN TTL BAL FORWARD GUESTS P/BAL CHECKS PAID SERVICE NOSALE MIX&MATCH PAYMENT TTL 0 14 1 1 0 0 1 0 0 0 15 2 0 3 2 0 0 0 0 0 0 0 0 0 0 22 0 0 0 0 0 0 0 0 0 1 0 0 286.15 56.95 200.00 29.99 0.00 0.00 -5.00 0.00 0.00 0.00 51.95 229.99 0.00 8.20 15.00 0.00 0.00 0.00 0.00 0.00 0.00 0.00 0.00 0.00 0.00 305.14 0.00 0.00 0.00 0.00 0.00 0.00 0.00 0.00 0.00 0 0 0 Count 47.00 0.00 0.00 0.00 0.00 0.00 0.00 0.00 0.00 0.00 0.00 0.00 0.00 0.00 0.00 0.00 0.00 0.00 0.00 0.00 47.00 Amount 280.15 0.00 0.00 0.00 0.00 0.00 0.00 0.00 0.00 0.00 0.00 0.00 0.00 0.00 0.00 0.00 0.00 0.00 0.00 0.00 280.15 Group Report X1/GROUPS Group# GROUP 1 GROUP 2 GROUP 3 GROUP 4 GROUP 5 GROUP 6 GROUP 7 GROUP 8 GROUP 9 GROUP 10 GROUP 11 GROUP 12 GROUP 13 GROUP 14 GROUP 15 GROUP 16 GROUP 17 GROUP 18 GROUP 19 GROUP 20 Totals <End Report> SAM900 User's Manual v1.1 Appendices 73 Troubleshooting Common Problems Hardware Refer to “Cabling Diagrams” on page 75 to verify that your direct or modem connection cable is configured properly. Verify that the hardware key is in place. SAM900 will not start if the key is not found. In addition, SAM900 will check for the key at various times during an edit/polling session. If the key is loose, or has been removed, the program will shut down. Note: US Robotics Sportster Modems are recommended for remote connections (for both PC and ECR sites). Software Verify that register software and SAM900 versions are compatible. Due to changes in program structures between various register versions, incompatibility issues may arise. SAM4s ER 900 Series The register port must be set for PC communication. (See Service Mode RS232C port programming.) A clerk must be signed on. Verify that the port settings at the ER-900 are all default (9600 BAUD, NO PARITY, 8 DATA BITS, 1 STOP BIT) and that SAM900 is set the same. SAM900 Software 74 Appendices Create a new store by selecting Create New from the Stores menu. See "Creating a New Store" on page 11. Set the correct Communication Port and BAUD rate. Be sure that the BAUD rate is identical to that set in the register port. Only enter a phone number here if you are using a modem to poll data. If your PC is using any Microsoft Windows operating systems or any software application that has a communications-port configured, (for example a modem, mouse or other device) you may have to check on these settings to make sure there is not a conflict on the same communications port. Enter information in the Modem Initial String field only if you have a modem that needs to be properly configured to communicate. Verify that store files are uploaded in SAM900. You must Receive (Upload) information from the ECR. Refer to "Receive Programs from ECR (Upload)" on page 40. If problems persist, try rebooting the PC. If you have trouble loading a program from SAM900 to a register, be sure the register memory allocation is set large enough for each file. SAM900 User's Manual v1.1 Cabling Diagrams Typical SAM ECR to PC Connections SAM4s ECR Serial Com Cable (see below) DB-9F DB-9F Posio Adaptor CRS #250119 SAM4s ECR USB Cable Serial Com Cable (see below DB-9F DB-9F Note: If you are connecting the ECR to a PC or Laptop that has no serial port, you must use a USB to Serial adaptor as shown above. CRS offers a USB to Serial adaptor from Perle that has been tested and is known to work with SAM polling software products. SAM900 User's Manual v1.1 Appendices 75 Cable Pinouts You can configure cables yourself with the diagram provided here, or you can order the appropriate cables from CRS Parts at 1-800-333-4949. Direct Connection 76 Appendices SAM900 User's Manual v1.1 Modem Connections SAM900 User's Manual v1.1 Appendices 77 Manual Revision Record Edition Date published Revision contents V1.0 12/15/2011 Initial publication V1.1 1/24/2012 Update After Polling instructions 78 Manual Revision Record SAM900 User's Manual v1.1


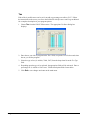
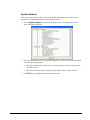
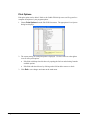
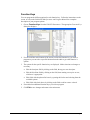

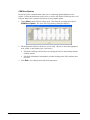
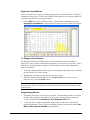
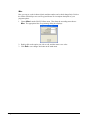


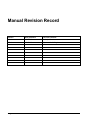


![[SPT-3000] e](http://vs1.manualzilla.com/store/data/005667089_1-a5f3766b3193f6552f250995926a69c5-150x150.png)