1
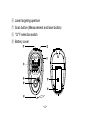
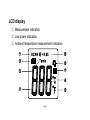
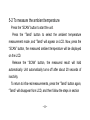
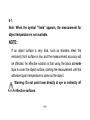
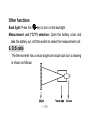
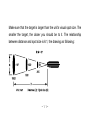
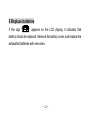
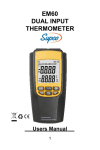
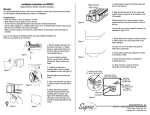
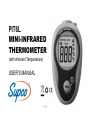
PIT6L
MINI-INFRARED
THERMOMETER
(with Ambient Temperature)
USER’S MANUAL
-1-
1 Introduction
This meter is a convenient non-contact infrared thermometer with
the functions of laser targeting, back light, data hold and auto power
off…
2 Safety Information
▪ Please read the following information carefully before using the
meter.
▪
Do not clean the meter using solvents.
Warning: Do not point laser directly at eye or reflective
surfaces.
-2-
Cautions:
When ambient temperature changes quickly, wait 30 minutes to before
taking measurements.
Avoiding EMF(electro magnetic fields) from arc weld, induction
furnace, etc…
Do not leave the unit on or near high temperature objects.
3. Instrument Description
① Infrared sensor
② LCD display
③ Back light button
④ Ambient temperature measurement button
⑤ Wrist band
-3-
⑥ Laser targeting aperture
⑦ Scan button (Measurement and laser button)
⑧ °C/°F selection switch
⑨ Battery cover
SCAN
= 0.95
Tamb
-4-
LCD display
① Measurement indication
② Low power indication
③ Ambient temperature measurement indication
-5-
④ Measurement Display
⑤ Emissivity display
⑥ Back light indication
⑦ Data hold indication
⑧ °C temperature units
⑨ °F temperature units
4 Specifications
Measurement range: -4°F to 518°F (-20°C to 270°C)
Accuracy at ambient of 72°F (22°C) +/-(2% reading + 6°F(3°C))
Temperature measurement range:32°F to 122°F (0°C to 50°C)
Resolution: 1°F (1°C)
-6-
Emissivity: 0.95
Distance to Spot (D:S) Ratio: 6:1
Laser power: <1mW
Over range indication: “OL” or “-OL”
Auto power off: After 20 sec.
5. Operating Instructions
5-1 Point the infra-red sensor at the object, and press the “SCAN”
button. Release the “SCAN” button and the measured result will hold
automatically.
The meter shuts off after 20 seconds of inactivity.
To get an accurate measurement result, refer to D:S ratio, Emissivity
section.
-7-
5-2 To measure the ambient temperature
Press the “SCAN” button to start the unit.
Press the “Tamb” button to select the ambient temperature
measurement mode, and “Tamb” will appear on LCD. Now, press the
“SCAN” button, the measured ambient temperature will be displayed
on the LCD.
Release the “SCAN” button, the measured result will hold
automatically. Unit automatically turns off after about 20 seconds of
inactivity.
To return to infra-red measurements, press the “Tamb” button again,
“Tamb” will disappear from LCD, and then follow the steps in section
-8-
6-1.
Note: When the symbol “Tamb” appears, the measurement for
object temperature is not available.
NOTE:
If an object surface is very slick, such as stainless steel, the
emissivity from surface is low, and the measurement accuracy will
- 4 be affected. An effective solution is that using the black adhesive
tape to cover the object surface, starting the measurement until the
adhesive tape’s temperature is same as the object.
Warning: Do not point laser directly at eye or indirectly off
reflective surfaces.
-9-
Other functions
Back light: Press the
key to turn on the backlight.
Measurement unit (°C/°F) selection: Open the battery cover and
take the battery out, shift the switch to select the measurement unit.
6. D:S ratio
The thermometer has a visual angle and visual spot size; a drawing
is shown as follows:
-10-
Make sure that the target is larger than the unit’s visual spot size. The
smaller the target, the closer you should be to it. The relationship
between distance and spot size is 6:1, the drawing as following:
-11-
8 Replace batteries
If the sign “
” appears on the LCD display, it indicates that
battery should be replaced. Remove the battery cover, and replace the
exhausted batteries with new ones.
-12-
WARRANTY
Sealed Unit Parts Co., Inc. warrants that it will repair or furnish without
charge a similar product to replace any product which, within the specified
warranty term after the date of sale by the Wholesaler, is proved to the
satisfaction of Sealed Unit Parts Co., Inc. , to have been defective at the
time it was sold. Said warranty is in effect only when said item is used in
accordance with the instructions and recommendations of Sealed Unit
Parts Co., Inc.
-13-
This warranty applies only to products which after shipment from the factory,
have not been altered, changed, repaired, or treated in any manner
whatsoever.
This warranty to repair or replace is the only warranty either expressed,
implied or statutory and is the only warranty being issued herein; Sealed
Unit Parts Co., Inc.'s liability in connection with its products is expressly
limited to the repair or replacement of defective parts. All other damages
and warranties, statutory or otherwise, are being expressly excluded.
-14-
No representative of Sealed Unit Parts Co., Inc. has authority to change
this warranty in any manner whatsoever. No attempt to repair or promise to
repair or improve any part covered by this warranty by any representative of
this company shall be effective unless signed by a properly authorized
officer of Sealed Unit Parts Co., Inc.
-15-
Sealed Unit Parts Co., Inc. (SUPCO)
2230 Landmark Place
Allenwood, NJ 08720 USA
www.supco.com
[email protected]
-16-