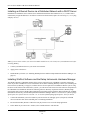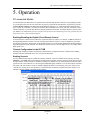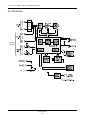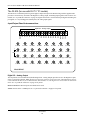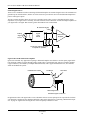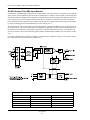
1
The way PC-based instrumentation should be
DI-710 Series
16-Channel USB or Ethernet data logger
DI-715B Series
Ethernet Data Logger with Signal-Conditioned Inputs
User's Manual
Manual
Revision S
Copyright © 2009 by DATAQ Instruments, Inc. The Information contained herein is the exclusive property of
DATAQ Instruments, Inc., except as otherwise indicated and shall not be reproduced, transmitted, transcribed, stored
in a retrieval system, or translated into any human or computer language, in any form or by any means, electronic,
mechanical, magnetic, optical, chemical, manual, or otherwise without expressed written authorization from the company. The distribution of this material outside the company may occur only as authorized by the company in writing.
DATAQ Instruments' hardware and software products are not designed to be used in the diagnosis and treatment of
humans, nor are they to be used as critical components in any life-support systems whose failure to perform can reasonably be expected to cause significant injury to humans.
DATAQ, the DATAQ logo, and WINDAQ are registered trademarks of DATAQ Instruments, Inc. All rights reserved.
Designed and manufactured in the
United States of America
M-100762
Warranty and Service Policy
Product Warranty
DATAQ Instruments, Inc. warrants that this hardware will be free from defects in materials and workmanship under
normal use and service for a period of one year from the date of shipment. DATAQ Instruments' obligations under
this warranty shall not arise until the defective material is shipped freight prepaid to DATAQ Instruments. The only
responsibility of DATAQ Instruments under this warranty is to repair or replace, at its discretion and on a free of
charge basis, the defective material.
This warranty does not extend to products that have been repaired or altered by persons other than DATAQ Instruments employees, or products that have been subjected to misuse, neglect, improper installation, or accident.
DATAQ Instruments shall have no liability for incidental or consequential damages of any kind arising out of the sale,
installation, or use of its products.
Service Policy
1.
All products returned to DATAQ Instruments for service, regardless of warranty status, must be on a freight-prepaid basis.
2.
DATAQ Instruments will repair or replace any defective product within 5 days of its receipt.
3.
For in-warranty repairs, DATAQ Instruments will return repaired items to the buyer freight prepaid. Out of warranty repairs will be returned with freight prepaid and added to the service invoice.
CAUTION
!
!
READ BEFORE CONNECTING INPUT SIGNALS TO YOUR DI-710
The DI-710 data acquisition device you have purchased and are about to use is NOT an ISOLATED product. This
means that it is susceptible to common mode voltages that could cause damage to the device. SUCH DAMAGE IS
NOT COVERED BY THE PRODUCT’S WARRANTY. Please read the following carefully before deploying the
product. Contact DATAQ Instruments Support at 330-668-1444 for all questions. If you have purchased a DI-715B
you do not need to follow these instructions.
This product can tolerate a maximum applied voltage of only ±20V peak without damage. Although you may be certain that the signal you want to measure is lower than this level, a common mode voltage (CMV) with an unknown
value may combine with your signal of interest to exceed this ±20V limit. In such instances, the product will be damaged. Verify a CMV does not exist before connecting signals and acquiring data with your device. Use the following
procedure to check for CMV:
1.
DO NOT connect your data acquisition device to the device under test. If the device under test is connected to
your data acquisition device, disconnect it.
2.
Connect your data acquisition device to the appropriate interface on your PC (USB, Ethernet, RS-232 Serial, or
Parallel Printer Port).
3.
Apply power to your data acquisition device, your PC, and the device under test.
4.
Use a digital voltmeter to make the following measurements:
5.
a.
Measure the voltage (both the AC and DC range) between the ground terminal of your data acquisition
device and Signal+ of the device under test. This measurement should not exceed the Full Scale Range of
your data acquisition device.
b.
Measure the voltage (both the AC and DC range) between the ground terminal of your data acquisition
device and Signal- of the device under test. This measurement should be at or very near 0 Volts.
c.
Measure the voltage (both the AC and DC range) between the ground terminal of your data acquisition
device and Common of the device under test. This measurement should be at or very near 0 Volts.
Should ANY of these measurements exceed their recommendation DO NOT CONNECT SIGNALS to the data
acquisition device. A common mode voltage may exist that could destroy the instrument. You MUST determine
the source of the CMV and eliminate it before taking any measurements.
Digital Voltmeter
Signal +
Device
Under
Test
1
Ground4
Signal - 2
Common3
1Measured
signal is not to exceed the Full Scale Range of your data acquisition device.
Measured signal must be at or very near 0 volts.
3Measured signal must be at or very near 0 volts.
4Connect to AGnd (Analog Ground) port on DI-710 instruments.
2
v
Data
Acquisition
Device
To PC
DI-710 Series and DI-715B Series Hardware Manual
Table of Contents
Warranty and Service Policy ................................................................................................................ iii
CAUTION ........................................................................................................................................... v
1. Introduction ........................................................................................................................................ 1
Features .............................................................................................................................................. 1
Analog Inputs .................................................................................................................................... 2
Digital Input and Output .................................................................................................................... 2
Software ............................................................................................................................................. 3
WinDaq® Recording and Playback Software ............................................................................ 3
The DATAQ Instruments Hardware Manager ............................................................................ 3
Help ............................................................................................................................................. 3
2. Specifications ...................................................................................................................................... 5
Analog Inputs .................................................................................................................................... 5
Digital I/O .......................................................................................................................................... 5
A/D Characteristics ............................................................................................................................ 6
Scanning Characteristics .................................................................................................................... 6
Calibration ......................................................................................................................................... 6
USB Interface .................................................................................................................................... 6
Ethernet Interface .............................................................................................................................. 6
Removable Memory (Stand-alone Models only) .............................................................................. 6
Real Time Clock ................................................................................................................................ 6
Controls (Stand-alone Models only) .................................................................................................. 6
Indicators ........................................................................................................................................... 7
Transfer Rate to PC ........................................................................................................................... 7
General ............................................................................................................................................... 7
3. Installation .......................................................................................................................................... 9
Unpacking .......................................................................................................................................... 9
Installing the Device Drivers (USB Only) ........................................................................................ 9
Installing an Ethernet Device Directly Connected to your PC or Connected via a Hub or Switch Where
ONLY DI-71x Products are Installed ...................................................................................................... 11
Installing an Ethernet Device via a Distributed Network Without a DHCP Server .......................... 14
Installing an Ethernet Device via a Distributed Network with a DHCP Server ................................ 16
Installing WinDaq Software and the Dataq Instruments Hardware Manager ................................... 16
Activation of WinDaq/High Speed Option ....................................................................................... 18
Dataq Instruments Hardware Manager .............................................................................................. 18
4. Instrument Controls, Indicators, and Connections ........................................................................ 21
Connecting the DI-710 to Ground ..................................................................................................... 21
Instrument Front Panel ...................................................................................................................... 22
DI-710 Models ............................................................................................................................ 22
37-pin D sub connector ........................................................................................................ 23
DI-715B Models ......................................................................................................................... 24
Instrument Rear Panel ....................................................................................................................... 25
DI-710 models ............................................................................................................................. 25
DI-715B Models ......................................................................................................................... 26
Connecting Signals ............................................................................................................................ 27
Controls and Indicators ...................................................................................................................... 27
Table of Contents
vii
DI-710 Series and DI-715B Series Hardware Manual
Expansion (DI-715B Models) ..................................................................................................... 27
Power Input Jack ......................................................................................................................... 27
Power Switch (DI-715B Models) ................................................................................................ 27
Ground ......................................................................................................................................... 27
Interface Port ............................................................................................................................... 28
Control Button (Stand-alone Models) ......................................................................................... 28
Start Recording ..................................................................................................................... 28
Stop Recording ..................................................................................................................... 28
Formatting the Memory Card ............................................................................................... 28
Reconfigure Instrument ........................................................................................................ 28
Fix Errors .............................................................................................................................. 28
Mode LED Indicator ................................................................................................................... 29
Removable Storage Slot (MMC) (Stand-alone Models) ............................................................. 29
Installing a Shunt Resistor in DI-715B Models ................................................................................. 29
5. Operation ............................................................................................................................................ 31
PC-connected Models ........................................................................................................................ 31
Enabling/Disabling the Digital I/O and Remote Control ............................................................ 31
Channel Configuration for the DI-715B ..................................................................................... 31
Enabling Channels ................................................................................................................ 31
Calibration and Gain Settings ..................................................................................................... 32
High/Low Calibration ........................................................................................................... 32
Fixed Calibration .................................................................................................................. 32
Gain ...................................................................................................................................... 33
Stand-alone Models ........................................................................................................................... 33
PC-connected operation .............................................................................................................. 34
Networked operation as a data acquisition server (DI-710-ELS, DI-710-EHS, and DI-715B-ES
models) ..................................................................................................................................................... 34
Stand-alone data logger operation ............................................................................................... 34
The Stand-alone Set Up Panel ..................................................................................................... 34
Operation ..................................................................................................................................... 34
Troubleshooting .......................................................................................................................... 35
If power down occurs unexpectedly while recording to MMC/SD ............................................ 36
WinDaq Waveform Browser for MMC ...................................................................................... 37
6. Block Diagram .................................................................................................................................... 39
DI-710 Models ................................................................................................................................... 39
DI-715B Models ................................................................................................................................ 40
7. Accessories .......................................................................................................................................... 41
The DI-705 ......................................................................................................................................... 42
Using the DI-705 with DI-710 “D” Models ................................................................................ 42
Using the DI-705 with DI-715B Instruments .............................................................................. 43
The DI-205 (for use with DI-710 “D” models) ................................................................................. 44
Input/Output Panel Interconnections ........................................................................................... 44
Digital I/O - Analog Output .................................................................................................. 44
Input Signal Configuration .......................................................................................................... 45
Connecting a Single-ended Amplifier .................................................................................. 45
Connecting a Differential Amplifier ..................................................................................... 46
Ground-referenced Signal Sources ................................................................................ 46
Isolated Signal Sources .................................................................................................. 48
Signal Cable and the Differential Amplifier .................................................................. 48
DI-75B Backpack (for use with DI-715B models) ............................................................................ 49
Table of Contents
viii
DI-710 Series and DI-715B Series Hardware Manual
Connecting the DI-75B to the Host Instrument ..........................................................................
Applying Power to the DI-75B ...................................................................................................
Features, Controls, and Indicators ...............................................................................................
DI-75B Front Panel ..............................................................................................................
DI-75B Rear Panel ...............................................................................................................
Removable Screw Terminal Block ................................................................................
POWER switch ..............................................................................................................
POWER input jacks .......................................................................................................
POWER status lamp ......................................................................................................
POWER LOW lamp ......................................................................................................
EXPANSION OUT connector .......................................................................................
EXPANSION IN connector ...........................................................................................
Configuring Channels for the DI-75B ........................................................................................
Calibration ............................................................................................................................
Gain ......................................................................................................................................
Installing Shunt Resistors ............................................................................................................
DI-5B Modules ..................................................................................................................................
DI-5B30/31 Analog Voltage Input Modules, Narrow Bandwidth ..............................................
DI-5B32 Analog Current Input Modules ....................................................................................
DI-5B33 Isolated True RMS Input Modules ..............................................................................
DI-5B34 Linearized 2- or 3-Wire RTD Input Modules ..............................................................
DI-5B35 Linearized 4-Wire RTD Input Modules .......................................................................
DI-5B36 Potentiometer Input Modules .......................................................................................
DI-5B38 Strain Gage Input Modules, Narrow & Wide Bandwidth ...........................................
DI-5B40/41 Analog Voltage Input Modules, Wide Bandwidth .................................................
DI-5B42 2-Wire Transmitter Interface Modules ........................................................................
DI-5B43 Isolated DC Transducer Amplifier Input Module ........................................................
DI-5B45 Frequency Input Modules ............................................................................................
DI-5B47 Linearized Thermocouple Input Modules ....................................................................
DI-5B48 Accelerometer Input Modules .....................................................................................
Table of Contents
ix
49
49
50
50
51
52
52
52
52
52
52
52
52
53
53
53
54
54
55
56
57
59
61
62
64
65
66
68
69
71
DI–710 Series and DI-715B Series Hardware Manual
1. Introduction
Congratulations on your purchase of the DI-710 or DI-715B data logger/data acquisition system. DI-710 and DI715B Instruments feature a variety of options—each explained fully in this manual. Options include a USB or Ethernet Interface, PGL or PGH gain settings, Stand-alone capability, and, for DI-715B instruments, thermocouple temperature measurment capability using DI-5B47 modules. DI-715B models accept DI-5B Industrial Signal Conditioning
Modules. Use the table below to determine the options included with your Instrument.
Options
Ethernet
USB
-H Gain
-L Gain
Stand-alone
Accepts 5B Modules
DI-710-UH*
N
Y
Y
N
N
N
DI-710-UHS*
N
Y
Y
N
Y
N
DI-710-UL*
N
Y
N
Y
N
N
DI-710-ULS*
N
Y
N
Y
Y
N
DI-710-EH*
Y
N
Y
N
N
N
DI-710-EHS*
Y
N
Y
N
Y
N
DI-710-EL*
Y
N
N
Y
N
N
DI-710-ELS*
Y
N
N
Y
Y
N
DI-715B-E
Y
N
Y
N
N
Y
DI-715B-ES
Y
N
Y
N
Y
Y
Model No.
*All DI-710 models available with a 37-pin D sub connector (as opposed to two removable 16-port screw terminal blocks). Add “D” to the model number. See "37-pin D sub connector" on page 23.
Features
The DI-710 has the following features:
•
Multiple Hardware options: USB or Ethernet Interface; PGL or PGH gain settings; and Stand-alone data logger
Operation capabilities. All options available in any configuration.
•
Per channel software-configurable settings: Single-ended or differential input; input gain; and calibration.
•
4,800 samples/second maximum sampling rate—up to 14,400 samples/second when recording to a memory card.
•
0.048 samples/second minimum sampling rate—0.0017 samples/second when recording to a memory card.
•
14-bit A/D converter for high resolution measurement accuracy.
•
16-entry input scan list allows you to scan any sequence of input channels at any available gain.
•
The Stand-alone option allows the user to configure a recording session through their PC then record data in the
field to a memory card (SD or MMC) without being connected to their PC.
The DI-715B has the following features:
•
Accepts up to 8 DI-5B Modules accommodating virtually any industrial signal.
•
Per channel software-configurable settings: input gain settings of 1, 2, 4, 8; calibration.
•
4,800 Hz maximum sampling rate—up to 14,400 Hz when in Stand-alone data logger operating mode.
•
0.048 samples/second minimum sampling rate—0.0017 samples/second when recording to a memory card.
Introduction
1
DI–710 Series and DI-715B Series Hardware Manual
•
14-bit A/D converter for high resolution measurement accuracy.
•
16-entry input scan list allows you to scan any sequence of input channels at any available gain.
•
The Stand-alone option allows the user to configure a recording session through their PC then record data in the
field to an SD card (without being connected to their PC).
Analog Inputs
DI-710 models provide 16 single-ended or 8 differential analog inputs (programmable per channel) that allow your
analog signals to be converted into 14-bit digital data via an on board A/D converter. Two removable 16 position terminal blocks allow you to easily connect and record signals. The DI-710 features the following software-programmable input measurement ranges:
-L Models
-H Models
±10V full scale measurement range at a gain of 1
±10V full scale measurement range at a gain of 1
±1V full scale measurement range at a gain of 10
±5V full scale measurement range at a gain of 2
±100mV full scale measurement range at a gain of 100*
±2.5V full scale measurement range at a gain of 4
±10mV full scale measurement range at a gain of 1000*
±1.25V full scale measurement range at a gain of 8
*Gains of 100 and 1000 are limited to max throughput of 7200 and 900 Hz respectively when acquiring more than
one channel of data.
DI-715B models provide 16 fixed single-ended analog inputs that allow your analog signals to be converted into 14bit digital data via an on board A/D converter. Differential input is not supported. Channels 9-16 are accessible
through use of a DI-705 (see "The DI-705" on page 42). The DI-715B features the following software-programmable
input measurement ranges:
Measurement Range
Gain Setting
±10V full scale
1
±5V full scale
2
±2.5V full scale
4
±1.25V full scale
8
Digital Input and Output
All DI-710 and DI-715B models contain 8 software-programmable digital lines (bits) for input/output operations.
These lines provide an interface for the transfer of data between user memory and a peripheral device connected to
the instrument. Digital inputs can monitor alarms or sensors with TTL outputs, while digital outputs can drive TTL
inputs on control or measurement equipment. Remote control can be utilized with bits 0 and 1 and is easily accessed
using WINDAQ Acquisition software or, for stand-alone models, in the stand-alone setup panel. To avoid using an
analog input channel for Digital I/O, Channel 17 may be enabled as the digital channel. To use the Remote Control
features in WINDAQ Acquisition software either Channel 1 or Channel 17 must be configured as the Digital Input
channel. The digital bits on a DI-715B are only accessible through a DI-705 (see "The DI-705" on page 42).
Introduction
2
DI–710 Series and DI-715B Series Hardware Manual
Software
All software required to record and playback waveforms is included with the purchase of any DI-710 or DI-715B
model including WINDAQ Acquisition and Playback software and the Dataq Instruments Hardware Manager.
WINDAQ® Recording and Playback Software
WINDAQ Acquisition and WINDAQ Waveform Browser allow you to record and playback data acquired through your
instrument. Whether using a Stand-alone model or a PC-connected instrument, WINDAQ is an invaluable resource to
analyzing your data. A special version (see "WinDaq Waveform Browser for MMC" on page 37) of WINDAQ Waveform Browser (free) is required to read waveform data recorded to a Memory Card but is easily transferred to the
standard version for more analytical features.
WINDAQ Acquisition software can be used to record waveforms directly and continuously to disk while monitoring a
real time display of the waveforms on-screen. It operates and displays waveform signals in real time at the full sample
rate of the instrument being used. There are two versions of WINDAQ Acquisition software available for use with DI710 and DI-715B Instruments: WINDAQ/Lite and WINDAQ/High Speed option. WINDAQ/Lite is free but is restricted
to recording throughput rates of 1108 Hz with a DI-710 or DI-715B. WINDAQ/High Speed option is an extra-cost
option allowing you to record data at the speed of your data acquisition system. When you install the software, a trial
version of WINDAQ/High Speed is automatically installed allowing you to run the software for a limited time. Activation is required for continued use to ensure compliance with the Software License Agreement. This software is
accessed through the Dataq Instruments Hardware Manager which can be found in the Start menu under the WINDAQ
program group called Dataq Instruments Hardware Manager.
WINDAQ Waveform Browser playback software (also known as “WWB”) offers an easy way to review and analyze
acquired waveforms. A built-in data file translator allows the user to display multiple waveforms acquired by
WINDAQ Acquisition software or any of a wide range of data acquisition packages. The software’s disk-streaming
design allows data files of any length to be graphically displayed rapidly, in normal or reverse time directions. Seven
standard cursor-based measurements, frequency domain, and statistical analysis functions help simplify waveform
analysis and interpretation. WINDAQ Waveform Browser is free and installed when installing WINDAQ Software.
The DATAQ Instruments Hardware Manager
The DATAQ Instruments Hardware Manager allows you to effectively manage and run multiple instruments installed
and connected to your PC or your Network—or even over the internet. This software can be found in the Start menu
under the WINDAQ program group called Dataq Instruments Hardware Manager. Access WINDAQ Acquisition
software, Upload data from your memory card, check the Status of your memory card, Format your memory card,
configure a Stand-alone data acquisition session, setup the Digital I/O, and more in this easy-to-use point and click
environment. View the Help files by clicking on View Help in the Help menu or by pressing F1.
Help
All WINDAQ software utilizes context-sensitive help. Help may be accessed through the Help menu or by pressing the
F1 key with any feature selected. This will take you directly to the Help topic most relevant to that particular function
or feature. Help topics discuss in detail each function available in the software.
Introduction
3
DI–710 Series and DI-715B Series Hardware Manual
2. Specifications
Unless otherwise noted, specifications are for all DI-710 and all DI-715B instruments.
Analog Inputs*
Number of Channels:
DI-710: 16
DI-715B: 8 configured for signal conditioned inputs and 8 direct connections
Channel Configuration:
DI-710: 16 single ended, 8 differential, programmable per channel
DI-715B: Fixed single ended
Input Impedance, single-ended:
1MΩ
Input Impedance, differential:
1MΩ each input to common
Input bias current:
10µA for a 10V input, single channel
Input offset voltage:
Auto-zero
Input offset current:
2nA (single channel)
Maximum normal mode voltage (DI-710): 30V DC or peak AC
Maximum common mode voltage:
30V DC or peak AC
Common mode rejection (DI-710):
80db, gain=1, 1KΩ unbalance
Channel-to-Channel crosstalk rejection:
-75db @ 100Ω unbalance
Gain temperature coefficient:
50ppm/°C
Offset temperature coefficient:
0.25µV/°C
Digital Filtering:
PC-connected models: Conditional over-sampling
Stand-alone models: None
Analog measurement range (software selectable per channel), Accuracy, and Resolution:
Gain
1
Range
±10V
10
DI-710-L Models
Accuracy**
DI-710-H and DI-715B Models
Range
Accuracy**
Resolution
±1.22mV
±10V
±.05%FSR ±50µV
±.05%FSR ±50µV
Resolution
±1.22mV
Gain
1
±1V
±.05%FSR ±50µV
±122µV
2
±5V
±.05%FSR ±50µV
±610µV
100
±100mV
±.05%FSR ±50µV
±12.2µV
4
±2.5V
±.05%FSR ±50µV
±305µV
1000
±10mV
±.05%FSR ±50µV
±1.22µV
8
±1.25V
±.05%FSR ±50µV
±153µV
*DI-715B Models: These specifications are for the unit itself (excluding DI-5B module(s))
**Test Condition: Single channel, 100 S/s, averaging mode. For DI-715B this spec doesn’t include 5B or CJC error.
Digital I/O
Channels:
8 bi-directional bits
Configuration:
Each bit is programmable as an input or output
Output voltage levels:
Minimum “1”, 3V @ 2.5mA sourcing; Maximum “0”, 0.4V @ 2.5mA
sinking
Output current:
Maximum source, -2.5mA; Maximum sink, 2.5mA
Input voltage levels:
Minimum required “1”, 2V; Maximum allowed “0”, 0.8V
Specifications
5
DI–710 Series and DI-715B Series Hardware Manual
A/D Characteristics
Type:
Successive Approximation
Resolution:
14-bit
Monotonicity:
±2 LSB
Conversion Time:
69µs
Scanning Characteristics
Maximum sample throughput rate:*
PC-connected: 4,800 Hz
Stand-alone: 14,400 Hz**
*When acquiring more than one channel at a gain of 100 max throughput is 7200 Hz;
When acquiring more than one channel at a gain of 1000 max throughput is 900 Hz.
**Assumes SD memory latencies of 80 milliseconds or less.
Minimum sample throughput rate:
PC-connected: 0.0034 Hz
Maximum scan list size:
17 entries
Sample buffer size:
2kb
Stand-alone: 0.0017 Hz
Calibration
Calibration Cycle:
One year
USB Interface
Connector:
USB
Protocol:
USB 1.1
Ethernet Interface
Type:
10/100Base-T
Connector:
RJ-45
Protocol:
TCP/IP
Server Type:
DHCP
Removable Memory (Stand-alone Models only)
Type:
Secure Digital (SD)
Capacity:
16MB to 2GB
Real Time Clock
Type:
Date, hour, minute, second
Resolution:
1 second
Accuracy:
20 ppm
Controls (Stand-alone Models only)
Single push-button:
Provides manual control over Record and Standby modes.
Specifications
6
DI–710 Series and DI-715B Series Hardware Manual
Indicators
Stand-alone models:
Three color LED indicating Record, Standby, and Error conditions.
PC-connected models:
Power LED
Transfer Rate to PC
Real Time:
up to 4,800 samples per second
From MMC or SD Memory (Ethernet
models only):
up to 2,400 samples per second
General
Panel Indicators:
Mode LED
Panel Controls:
Control push-button (Stand-alone models)
Panel slots:
Accepts MMC/SD-type flash memory
Input connectors:
DI-710: Two, removable sixteen position terminal blocks
DI-715B: One removable 32 port screw terminal block
Operating Environment:
0°C to 70°C
Enclosure:
DI-710: Aluminum base with steel wrap-around. Aluminum end-panels
with plastic bezels.
DI-715B: Aluminum base with steel wrap-around. Clear acrylic front
panel.
Dimensions:
DI-710: 5.4 D x 4.1 W x 1.5 H in. (13.81D x 10.48W x 3.81H cm.)
DI-715B: 9 D x 7.29 W x 2.7 H in. (22.86D x 18.52W x 6.86H cm.)
Weight:
DI-710: 14 oz. (397 grams)
DI-715B: 3 lbs. (1.36 kg)
Power Requirements:
DI-710 USB products: 9 to 36 VDC, 2 watts maximum
DI-710 Ethernet products: 9 to 36 VDC, 2.5 watts maximum
DI-715B USB products: 9 to 36 VDC, 2 watts + 5B modules
DI-715B Ethernet products: 9 to 36 VDC, 2.5 watts + 5B modules
Specifications
7
DI–710 Series and DI-715B Series Hardware Manual
3. Installation
Unpacking
The following items are included with each instrument. Verify that you have the following:
•
DI-710 Series or DI-715B Series Instrument.
•
Communications cable (USB ONLY - Ethernet models do not come with an Ethernet cable).
•
Power cable (except DI-710-UL and DI-710-UH).
•
The WINDAQ Resource CD-ROM.
•
DATAQ screwdriver for connecting signal leads to the screw terminal(s).
•
Installation Guide pamphlet (included in CD case).
If an item is missing or damaged, call DATAQ Instruments at 330-668-1444. We will guide you through the appropriate steps for replacing missing or damaged items. Save the original packing material in the unlikely event that your
unit must, for any reason, be sent back to DATAQ Instruments.
Installing the Device Drivers (USB Only)
These USB devices require two drivers to be installed (a Serial Port and a USB driver). Ethernet models do not
require any drivers to be installed (See “Installing WinDaq Software and the Dataq Instruments Hardware Manager”
on page 16. to install Ethernet products).
1.
If provided, plug the appropriate end of the power cable into the instrument (jack labeled Power) and the other
end into a standard outlet. DI-710-UL and DI-710-UH models do not require an external power source. Power is
derived from the PC through the USB interface. For DI-715B models turn on the power using the Power Switch.
The Mode LED will be on when power is applied.
2.
With your computer powered, Windows running, and all other applications closed, plug the appropriate end of
the supplied USB communications cable into the USB port (labeled Interface) on the rear panel of the instrument. Connect the other end of this cable to one of your computer's USB ports.
Note: If using a USB hub with a DI-710-UH or DI-710-UL use a powered USB hub—non-powered USB hubs
may not have sufficient power to run the instrument.
3.
The addition of this new piece of hardware will be “sensed” by Windows and the “Found New Hardware Wizard” will automatically be launched, anticipating the installation of a device driver for the new hardware. If the
Wizard asks “Can Windows connect to Windows Update to search for software?” select “No, not this time” and
click on the Next button.
4.
Insert The WINDAQ Resource CD-ROM into your CD-ROM drive. It contains the device drivers for the DI-710
and DI-715B. If your Windows auto play feature is enabled, the WINDAQ Software Installation will start. Click
on the Exit button to leave the installation.
5.
Click through the defaults. When completed, the “Found New Hardware Wizard” will run again - and again you
should click through the defaults until you exit the Wizard. The DI-710 and DI-715B USB models require two
drivers to be installed, a Serial Port and a USB driver. This will look like two instruments are installed when
there is only one.
Installation
9
DI–710 Series and DI-715B Series Hardware Manual
Note: If you receive the Microsoft-issued warning that the software “has not passed Windows Logo testing” click
“Continue Anyway” to continue with installation. You will see this warning twice - once for each driver (USB
and Serial Port).
XP warning
Vista Warning
6.
After the Drivers are installed, click Finish to close the Found New Hardware Wizard. Windows should prompt
you that the device has been installed properly.
7.
Repeat this process for each instrument. After all device drivers have been installed, install WINDAQ software
(see “Installing WinDaq Software and the Dataq Instruments Hardware Manager” on page 16).
Installation
10
DI–710 Series and DI-715B Series Hardware Manual
Installing an Ethernet Device Directly Connected to your PC or Connected
via a Hub or Switch Where ONLY DI-71x Products are Installed
Installation of an Ethernet device directly connected to the network card on your computer requires you to change the
IP address of your network card.
Note: When installing an Ethernet device directly connected to your PC you MUST use a crossover cable (provided).
Installation of an Ethernet device via an Ethernet hub/switch containing ONLY DI-71x products also requires you to
change the IP address of your network card.
Note: For hubs that do not have an auto-switching sensor (usually older hubs) you must not use a crossover cable.
1.
Find the Network Connections on your computer (usually in the Control Panel).
2.
Double-click on the Local Area Connection icon.
3.
Click on the Properties button.
Installation
11
DI–710 Series and DI-715B Series Hardware Manual
4.
Select Internet Protocol (TCP/IP) in the “This connection uses the following items” window and click on the
Properties button.
5.
Click on the General tab.
6.
Select the radio button Use the following IP address.
7.
Enter 169.254.0.1 in the space provided for the IP address.
Installation
12
DI–710 Series and DI-715B Series Hardware Manual
8.
Enter 255.255.0.0 in the space provided for the Subnet mask.
9.
Click on the OK button to close the Internet Protocol (TCP/IP) Properties dialog box then click on the OK button in the Local Area Connection Properties dialog box for the changes to take effect.
10. Install WINDAQ software (see “Installing WinDaq Software and the Dataq Instruments Hardware Manager” on
page 16).
Installation
13
DI–710 Series and DI-715B Series Hardware Manual
Installing an Ethernet Device via a Distributed Network Without a DHCP
Server
Installation of an Ethernet device connected to a distributed network that does not have a DHCP server or where the
DHCP server is turned off requires you to obtain an IP address from your system administrator.
Note: In the illustration above, the Hubs could instead be routers with DHCP turned off (i.e., a static IP assigned network). Contact your system administrator for details about your network.
1.
Have the system administrator designate an IP address for your device.
2.
Plug the device into your network and apply power.
3.
Install WinDaq software (see “Installing WinDaq Software and the Dataq Instruments Hardware Manager” on
page 16) up to Step 13.
4.
At Step 13, the installation software will not see your device. If it is the first Dataq Instruments device installed
to your network, you will see the No Devices Found dialog box.
Installation
14
DI–710 Series and DI-715B Series Hardware Manual
5.
Click on the Add IP button (either in the No Devices Found dialog box or in the main Dataq Instruments Installation dialog box). This will display the Manage IP Addresses dialog box.
6.
Click on the MAC address of your device in the list of displayed MAC addresses (the MAC address of your
device can be found on the silver sticker located on the bottom of your device).
7.
Enter the IP address your system administrator assigned to you in the New IP Address text boxes.
8.
Click on the Set Static button. Your device will appear in the list of devices to install allowing you to continue
your WINDAQ installation at Step 14. It may take more than 15 seconds for your device to appear in the list. If
you get a “No Devices Found” error after following the above instructions, click the Retry button until the
device appears in the list.
Note: These instructions change the settings inside the device. If you move the device to a DHCP-enabled network
(i.e., where IP addresses are assigned automatically by a DHCP server or router) you will need to change the device
settings using the Dataq Instruments Hardware Manager. See the Dataq Instruments Hardware Manager help file for
complete details.
Installation
15
DI–710 Series and DI-715B Series Hardware Manual
Installing an Ethernet Device via a Distributed Network with a DHCP Server
Installation of an Ethernet device connected to a distributed network that has a DHCP server (i.e., a DHCP router
automatically assigns IP addresses to each device connected to the network) requires no extra setup (i.e., it is a “plug
and play” device).
Note: If you are unsure whether your network is DHCP-enabled or not, check with your system administrator before
installing WINDAQ.
1.
Connect your Ethernet device to your Local Area Network.
2.
Apply power to the device.
3.
Install WINDAQ software (see “Installing WinDaq Software and the Dataq Instruments Hardware Manager” on
page 16).
Installing WINDAQ Software and the Dataq Instruments Hardware Manager
The WINDAQ Resource CD-ROM contains all the software required for use with all DI-710 and DI-715B instruments. If you have a USB device be sure to install the drivers before installing WINDAQ software (See “Installing the
Device Drivers (USB Only)” on page 9.). Ethernet devices do not require driver installation. Whether you are using
the device in the field or while connected to your PC, you will need to run at least one of the software components on
the CD-ROM. This installation includes the following software: WINDAQ Acquisition software (WINDAQ/High
Speed option Trial version), WINDAQ Waveform Browser playback software, WINDAQ Waveform Browser for MMC
(Stand-alone models only), and the Dataq Instruments Hardware Manager. Note: For continued use of WINDAQ/High
Speed option, the software must be activated—see “Activation of WinDaq/High Speed Option” below for details.
1.
Connect all instruments you wish to install to your Network or PC and apply power (if required). All USB
devices must have their drivers installed prior to continuing installation.
2.
Re-insert the WINDAQ Resource CD for the auto play feature to run or run the Setup application.
3.
In the “What do you want to do?” window, select “Install Software” and click OK.
Installation
16
DI–710 Series and DI-715B Series Hardware Manual
4.
In the “Installing Software” window, select “Install Software for DI-148, DI-158, DI-710, and DI-715B instruments” and click OK.
5.
Select the “Install Software” option and click OK to continue. If you wish to view the hardware documentation
you may do so now
6.
In the Welcome! box, click OK to continue.
7.
Read the License Agreement. If you accept the terms, click “Accept and Continue.” If you choose not to accept,
this will end the installation.
8.
When prompted, enter your registration information (name and company) in the appropriate text boxes and click
OK. Confirm your registration information before continuing.
9.
When prompted, specify the directory where you want to install your WINDAQ software. It is recommended that
you accept the default. If you have already successfully installed a DI-148, DI-158, DI-710, or DI-715B instrument be sure to install to the same folder.
10. Make sure each instrument is connected to your PC or Network and all device drivers are installed. You
must install two device drivers for each USB instrument. Click OK to continue.
11. The DATAQ Installation Manager runs. A Windows Security Alert may pop up asking if you would like to Block
the software from installation.
Click the Unblock button to continue with installation.
12. The DATAQ Installation Manager shows all DI-148, DI-158, DI-710, and DI-715B devices currently connected
via USB or Ethernet to your PC. Remote Ethernet models (not connected to your PC or Network) may require a
Installation
17
DI–710 Series and DI-715B Series Hardware Manual
further step for installation (Add IP). Click on the Help button for a description of all the functions in the installation software.
13. When all desired devices are showing up in the list click on the OK button to continue installation. Click Cancel
to exit without installing.
14. When prompted to Select a Program Manager Group specify a destination (or group window) in the Start Menu
for WINDAQ software icons. It is recommended that you accept the default.
15. In the “Installation Option” Dialog box specify whether you want all users to have access to WinDaq software or
just the current User. Click Yes to allow all users to have access, click No to allow just the current user to have
access.
16. After WINDAQ Software installs, you will prompted to install WINDAQ/XL Trial Version and Advanced CODAS
Analysis software. If you wish to install either software click on Yes in the appropriate dialog box. Follow the on
screen prompts to complete installation.
17. Installation is complete - you will now see a Successful Installation box - click on OK to exit WINDAQ Installation. If you purchase more devices at a later date you must run the installation again with all devices (old and
new) plugged in.
18. To run WINDAQ Data Acquisition software or the Stand-alone Set Up software go to the appropriate program
group (specified above—default is Start > Programs > WINDAQ) and click on Dataq Instruments Hardware
Manager. All DATAQ Instruments software is located in the same program group.
Activation of WINDAQ/High Speed Option
Activation is required for continued use of WINDAQ/HS (High Speed option) to ensure compliance with the Software
License Agreement. The Software License Agreement can be found in the WINDAQ Software manual or in the
WINDAQ program group (License.txt). The WINDAQ/HS may be activated through the Help menu by clicking on
Unlock WINDAQ/HS or by waiting for the trial version to expire. Trial versions are good for 40 High Speed (over
1108 Hz throughput) recording sessions. The High Speed version may be purchased after the trial period expires
through our online store or by phone. For help or for questions regarding Activation and/or the Software License
Agreement, contact DATAQ Instruments Customer Support.
Dataq Instruments Hardware Manager
The Dataq Instruments Hardware Manager is installed when installing any DI-710 or DI-715B instrument. This software allows you to effectively manage and run multiple instruments installed and connected to your PC or your NetInstallation
18
DI–710 Series and DI-715B Series Hardware Manual
work—or even over the internet. WINDAQ Data Acquisition Software and the Stand-alone Set Up program are both
accessed through the Dataq Instruments Hardware Manager. The Dataq Instruments Hardware Manager may be
accessed through the Windows Program Manager Group as specified during installation (default is Start > Programs
> WINDAQ > Dataq Instruments Hardware Manager). All available devices will automatically appear in the list box
when you run the software. For help with the Dataq Instruments Hardware Manager access the Help Files using either
the Help menu item or by pressing the F1 key to access context-sensitive help.
Installation
19
DI–710 Series and DI-715B Series Hardware Manual
4. Instrument Controls,
Indicators, and Connections
Connecting the DI-710 to Ground
! IMPORTANT !
The ground connection on the I/O terminal strip should always be connected to a signal ground, if one is not inherently made through analog or digital signal connections. Without this connection, the front end of the DI-710 does not
have a return path which could lead to inaccurate measurements. Under no circumstances should the DI-710 be used
in a measurement situation where it will experience common mode voltages in excess of ±30 VDC or peak AC (the
device’s full-scale range without damage).
The ground lug at the rear of the DI-710 should always be connected to a solid chassis or earth ground. This connection is mandatory for the unit to meet CE guidelines.
DATA
Analog Inputs
DI-710
Front End
POWER
Digital I/O
I
S
O
L
A
T
I
O
N
DATA
Interface
USB/Ethernet
POWER
Rear Panel
Ground Lug
Analog Ground
Connection
To signal ground
(if not inherently
made through
analog or digital
connections).
SD Memory
Card
Two Critical DI-710 Ground Connections
Instrument Controls, Indicators, and Connections
21
Solid Chassis or
Earth Ground
Connection
DI–710 Series and DI-715B Series Hardware Manual
Instrument Front Panel
DI-710 Models
The 32 port screw terminal access connector is used to interface analog input channels 1 through 16 and the eight digital bits. Use the sticker located on the top of your instrument for quick reference to terminal access port designations.
Designations are explained in full detail here.
These two ports
are designated
Digital Grounds
These two ports
are Reserved
Digital Input/Output DGnd +5V
2
0
1
3
R
AGnd
1
Analog Channels
3
4
5
6
2
7
8
+
Diff
-
4
6
5
7
9
The 8 digital bits may be accessed
through these ports. Each port is
programmable as Digital In or Digital
Out. Use Digital port 0 for Remote
Start/Stop and Digital port 1 for
Remote Event Markers.
These two
ports are
designated
Analog
Grounds
These two ports
are designated
+5V Power
Max Current =
100mA
11
10
12
13
15
14
16
16 Analog Channel ports (8 differential) for analog input.
The top row of channels (1-8) are designated positive
differential and the bottom row of channels (9-16) are their
negative counterparts.
DI-710 Series instruments can accept 16 analog inputs in single-ended configuration or 8 analog inputs in differential
configuration. Single-ended inputs are configured by connecting one signal lead to the desired channel and the other
signal lead to analog ground (AG). Be sure to read “CAUTION” on page v before connecting input signals.
Signal Ground
Signal +
Digital Input/Output DGnd +5V
2
0
1
3
4
5
6
7
R
AGnd
1
2
Analog Channels
3
4
5
6
7
8
9
10
11
15
16
12
Channel 1 configured for single-ended input
Instrument Controls, Indicators, and Connections
22
13
14
DI–710 Series and DI-715B Series Hardware Manual
Differential inputs occupy two channels with the lowest numbered channel in the pair assuming the positive (+) input
and the channel number. Refer to the following for differential pairs.
differential pairs
positive differential channels
1
2
3
4
5
6
7
8
9
10
11
12
13
14
15
16 negative differential channels
For example, to configure Channel 1 as a differential input: Connect Channel 1 as the positive (+) input and channel
9 as the negative (-) input—the pair is referred to as “channel 1 differential.” The following illustration shows channels 1 and 9 configured as channel 1 differential.
Signal +
Optional Ground (shield)
Digital Input/Output
2
0
1
3
4
5
6
7
DG
+5V
R
Signal -
AG
1
2
Analog Channels
3
4
5
6
7
8
9
10
11
15
16
12
13
14
Channel 1 configured for differential input
37-pin D sub connector
The two removable 16-port screw terminal blocks may be replaced by a 37-pin D Sub Connector for all DATAQ
Instruments DI-710 Series products (add a “D” to the model number). Refer to the following diagram for pin out.
Note: Digital I/O connections cannot be used concurrently. DI0 and DO0 are directly connected inside the DI-710
(as are DI1 and DO1, DI2 and DO2, etc.).
Refer to “7. Accessories” for accessories that can be used with the 37 pin D sub connector.
Instrument Controls, Indicators, and Connections
23
DI–710 Series and DI-715B Series Hardware Manual
DI-715B Models
The clear acrylic front panel allows easy identification of all installed DI-5B modules. To access the 5B backplane
remove the front panel and bezel by removing the two outside screws. When reattaching the front panel be sure not to
overtighten the screws.
1. Remove front panel and bezel by removing the two screws.
2. DI-5B Modules are installed to the 5B backplane using the set screw.
5B backplane
1
2
1
DI-5B modules are installed on (or removed from) the socketed 5B backplane and are secured with a non-removable
mounting screw. Each channel position is labeled “CHANNEL 1,” “CHANNEL 2,” etc. on the socketed backplane.
The DI-5B modules can be mixed or matched in any combination suitable for the application and are identical in
pinout and size, so it doesn't matter which module gets plugged into which channel position.
Instrument Controls, Indicators, and Connections
24
DI–710 Series and DI-715B Series Hardware Manual
Instrument Rear Panel
DI-710 models
The Rear panel of your DI-710 Model can vary depending on your model. Stand-alone models add a removable storage slot, the LED Mode table, and a Control Button.
See “Controls and Indicators” on page 27 for a full explanation of each component.
Instrument Controls, Indicators, and Connections
25
DI–710 Series and DI-715B Series Hardware Manual
DI-715B Models
The Rear panel of your instrument can vary depending on your DI-715B model. DI-715B stand-alone models add a
removable storage slot, the LED Mode table, and a Control Button.
Rear Panel PC-connected
Rear Panel Stand-alone
Channels 1-8 and corresponding Excitation connections can be made directly to the removable screw terminal block
located on the rear panel of the instrument. All connections are clearly labelled for easy reference. Connect each signal lead to the appropriate screw terminal.
signal leads
channel 1 channel 1 +
+1-
+2-
+3-
+4-
+5-
+6-
+7-
+8-
+1-
+2-
+3-
+4-
+5-
+6-
+7-
+8-
CHANNELS
EXCITATION
excitation channel 1 excitation channel 1 +
signal leads
Instrument Controls, Indicators, and Connections
26
DI–710 Series and DI-715B Series Hardware Manual
Connecting Signals
Use the removable screw terminal blocks to connect your signals.
1.
Insert the stripped end of a signal lead into the desired terminal directly under the screw.
2.
Tighten the pressure flap by rotating the screw clockwise with a small screwdriver. Make sure that the pressure
flap tightens only against the signal wire and not the wire insulation. Do not over-tighten.
3.
Tug gently on the signal lead to ensure that it is firmly secured.
When an input signal is connected and WINDAQ Acquisition software is run, WINDAQ’s real time display immediately reveals the input waveform on your computer’s monitor.
Controls and Indicators
Expansion (DI-715B Models)
The Expansion connector may be used to access channels 9-16 by connecting either a DI-705 (adds up to 8 direct
inputs) or a DI-75B (adds up to 8 5B signal conditioned inputs). The Digital I/O may also be accessed through the
Expansion connector using a DI-705. See “The DI-705” on page 42 for more information.
Power Input Jack
For Ethernet models and Stand-alone models. Power must be applied with the included power adapter or with an
alternate appropriate source (9-36 VDC, 2 watts max). External power is not required for DI-710-UH and DI-710-UL
models—Power is derived through one of your PC’s USB ports or through a powered USB hub. If using an alternate
power source with the DI-715B refer to the following for pin out.
Power Switch (DI-715B Models)
Switches power on/off. If power is on the Mode LED will be on.
Ground
This ground lug should always be connected to a solid chassis or earth ground. This connection is mandatory for the
unit to meet CE guidelines.
Instrument Controls, Indicators, and Connections
27
DI–710 Series and DI-715B Series Hardware Manual
Interface Port
The Interface port allows you to connect the instrument to your PC via USB or Ethernet cable.
Control Button (Stand-alone Models)
The Control Button can be used to stop or start recording data to your memory card (MMC or SD) when using the
instrument as a stand-alone data logger. The Control Button can also be used to reconfigure the instrument to factory
default settings and to re-format memory card files left open due to power failure or other circumstance. The Control
Button is inoperable while running WINDAQ Acquisition software.
Start Recording
To Start recording data to your memory card the Instrument must be in Standby Mode (Mode LED is Green). Press
and hold the Control Button until the Mode LED turns off (about 1 second). Release the Control Button. The Mode
LED will rapidly blink green to indicate the instrument is creating a new file. When the Mode LED slowly blinks red,
data is being recorded. Each subsequent recording session creates a new file (numbered sequentially).
Stop Recording
To Stop recording data to your memory card the Instrument must be in Record mode (Mode LED is flashing red @ 1
Hz). Press and hold the Control Button until the Mode LED turns off (about 1 second). Release the Control Button.
Mode LED will rapidly blink red to indicate the instrument is closing the data file for use with playback and/or analysis software. Do not remove the memory card before the instrument completely closes the file. When Mode LED
turns green the memory card may be removed. Removing the card before completion will cause Error Mode (Mode
LED is orange).
Note: SD cards should be locked before inserting into a card reader. Your PC may try to change the flash card format
whenever it reads the data on your MMC (or SD card if not locked), causing it to lose the unique formatting required
for DI-710 and DI-715B use. If the unique format used by the DI-710 or DI-715B is modified, the data logger may
require you to reformat the memory card.
Formatting the Memory Card
Formatting the card completely removes all data. To format your memory card the instrument must be in Standby
Mode (Mode LED is Green). Press and hold the Control Button until the Mode LED turns red (about 5 seconds).
Release the Control Button. The Mode LED will blink red to indicate the Instrument is formatting the card. When the
Mode LED changes back to green, formatting is complete. Mode LED should be green to indicate successful completion. Formatting is for use with the instrument used to format the card. To use a memory card with a different instrument you will have to reformat the card.
Reconfigure Instrument
To configure your instrument to the default factory data acquisition session settings press and hold the Control Button
during power up (i.e., while plugging the instrument in). Mode LED will flash bright green then dim to indicate that
the instrument is configured. Release the Control Button. The default settings are: 16 channels enabled as singleended inputs; 300 samples per second per channel sample rate; gain setting of 1 for each channel.
Fix Errors
The Control Button can also be used to fix some common operating errors. When the instrument is in Error mode,
some action must be taken to fix the error before you can use it. Generally, the Control Button can be used to make
the instrument operational. See the Error mode in “Mode LED Indicator” on page 29 for more information.
Instrument Controls, Indicators, and Connections
28
DI–710 Series and DI-715B Series Hardware Manual
Mode LED Indicator
Indicates what mode the instrument is currently in. Use the chart on the rear panel of the instrument for quick reference. Use the table provided below for a more detailed description of each available state.
State
Mode
Description
Stand-alone data logger operation
Static Green
Standby
Instrument is powered and available for data acquisition operations. Memory card
may be safely removed.
Flashing Green
Busy
Indicates the instrument is busy. Do Not Remove Memory Card.
Orange
Error
Possible errors include, but are not limited to:
MMC/SD removed prematurely: Memory card removed before the instrument had
a chance to close the data file. Reinsert the card and Press the Control button to close
the file. When steady green, memory card is closed and can be removed safely.
MMC/SD Lock: After initially pressing the Control button to begin recording data,
two series of blinking Orange before reverting back to Green indicates that the memory card is locked. Use another card or unlock the current one. One series of blinking
Orange before reverting back to Green indicates that the memory card is incompatible
for use with the instrument. Use the recommended memory card available through
DATAQ Instruments, Inc.
See also “Troubleshooting” on page 35.
Slow Flashing
Red (@ 1Hz)
Record
Indicates the instrument is acquiring and recording data to your memory card. Do Not
Remove Memory Card.
Fast Flashing
Red
Close
Indicates the instrument is closing the recording session. Do Not Remove Memory
Card. Each recording session must be completed before removing the card.
PC-connected operation
Slow Flashing
Red (@ 1Hz)
Record
Indicates the instrument is running and acquiring data for display and/or recording to
disk. Occurs when WINDAQ Acquisition is running.
Green
Standby
Indicates WINDAQ has been deactivated and the instrument is in Standby Mode. The
Mode LED Indicator will also flash green just before recording to disk to indicate initialization.
Removable Storage Slot (MMC) (Stand-alone Models)
Use any MultiMedia Card (MMC) or Secure Digital Card (SD) from 16MB to 2GB. Push card completely into slot.
Press to release (eject) memory card when recording is complete. Recommended Flash Card: Lexar Professional
133X 2 Gigabyte Secure Digital Flash Memory (model 101014-2G) tested and configured specifically for DI-710 and
DI-715B use by DATAQ Instruments, Inc. Some memory cards may not be fast enough for the instrument. Lexar
memory cards are available through the DATAQ web site (www.dataq.com) as are SD card readers (manufacturer
varies).
Installing a Shunt Resistor in DI-715B Models
To use the Current Input Modules (DI-5B32 and DI-5B42) you must install a shunt resistor (provided with purchase
of 5B module) for accurate readings. To install a shunt resistor:
1.
Remove the clear front panel and bezel by removing the two screws.
Instrument Controls, Indicators, and Connections
29
DI–710 Series and DI-715B Series Hardware Manual
2.
Pull the casing apart from the rear panel until the shunt resistor receptacles are exposed.
3.
Insert the shunt resistor to its receptacle by lining up the pegs and pressing it onto the circuit board firmly. The
shunt resistor receptacle for each channel is directly behind the slot on the 5B backplane for that channel.
4.
Reassemble the DI-715B. Do not overtighten the front panel screws.
Insert pins into the holes provided. Press resistor firmly
onto the circuit board.
DI-5B
Backplane
Install Shunt Resistor
for Channel 1 Here
Rear Panel
Instrument Controls, Indicators, and Connections
30
Casing
DI–710 Series and DI-715B Series Hardware Manual
5. Operation
PC-connected Models
PC-based models (non-Stand-alone) are operated and controlled using WINDAQ Software. To begin displaying data
on your monitor, make sure all wires and cables are properly connected and start WINDAQ Acquisition by pressing
the Start WINDAQ button in the Dataq Instruments Hardware Manager (see “Dataq Instruments Hardware Manager” on page 18). After data is recorded, use WINDAQ Waveform Browser to review your data. Consult the contextsensitive help files or your Fast Start WINDAQ Software Manual for directions on using the WINDAQ software package. Note: If your USB module experiences frequent lock ups connect the Ground Lug to your PC ground. If the problem persists please contact Technical Support.
Enabling/Disabling the Digital I/O and Remote Control
To use the Remote Control features in WINDAQ Acquisition Software Channel 1 or Channel 17 must be enabled as
the Digital Input channel. In order to use all 16 analog input channels, Channel 17 may be enabled for general purpose digital I/O functions. The direction of the digital bits must be set in the DATAQ Instruments Hardware Manager
using the Digital I/O Setup command. The default state from the factory is that all digital bits are set as Inputs with a
High signal (+5V).
Channel Configuration for the DI-715B
Enabling and configuring channels with the DI-715B in WINDAQ Acquisition software is different than enabling
channels with other instruments and is not covered in the Help Files.
Enabling Channels
Use the Channel Selection grid to enable and configure channels. Access the channel selection grid by selecting
Channels… in the Edit menu (in the SET-UP operating mode of WINDAQ software). Each box in this grid represents
an input channel. An input channel is enabled by clicking in its channel box. The following channel selection grid is
typical for a DI-715B. Channels 1 to 8 are the signal conditioned inputs. Channels 9 to 16 are direct inputs accessible
only using a DI-705. Channel 17 may be enabled as Digital but must be accessed using a DI-705 as well (see also
“The DI-705” on page 42). To use the Remote Control Functions of WINDAQ Acquisition software Channel 17 or
Channel 1 must be enabled as the Digital Input Channel.
Operation
31
DI–710 Series and DI-715B Series Hardware Manual
Calibration and Gain Settings
Each DI-5B module has a sticker on it with information regarding Input (Units) and Output (Volts). This information
should be used for calibration. For example, if using a DI-5B47K-13, the Input is -100ºC to +1350ºC and the Output
is 0V to +5V.
High/Low Calibration
Use the following diagram as a guideline for the High/Low calibration method.
Gain should be set to 2, 4, or 8 for better resolution depending on your actual input range. Note that the Low Calibration information is included in the High Calibration dialog box for easy reference. If the High Calibration is entered
first, that information would appear in the Low Calibration dialog box.
Fixed Calibration
Use the following diagram as a guideline for the Fixed calibration method.
Operation
32
DI–710 Series and DI-715B Series Hardware Manual
Since the Lowest end of the input range is 0 Volts, select the Baseline option for the Low Calibrator. Gain should be
set to 2, 4, or 8 for better resolution depending on your actual input range.
Gain
DI-5B Modules generally output between -5 and +5 Volts. The DI-715B is designed to accept ±10 Volt signals. A
Gain of at least 2 should be set to each signal conditioned input to get the most accurate readings. To change the Gain
click on Channel Settings... in the Edit menu.
Stand-alone Models
Stand-alone Models can record data directly to a MultiMedia Memory Card (MMC) or a Secure Digital Card (SD) as
well as record data to a PC. When connected to a PC, data recording sessions may be configured and data may be
acquired using WINDAQ Acquisition software (just the same as if the model were a PC-based instrument). This makes
all the features of WINDAQ Acquisition software available including triggering, user annotation, user commented
event markers, appending, and stop/pause data recording (stand-alone data logger operation does not support these
features).
When taking your stand-alone model out into the field to use as a stand-alone data logger, you can record data to an
MMC or SD without the use of a PC. Data sessions can be configured for a specific job using the included configuration software (installed when WINDAQ is installed). All data recorded to the memory card is fully WINDAQ compatible and can be converted then reviewed and analyzed with WINDAQ Playback software.
Operation
33
DI–710 Series and DI-715B Series Hardware Manual
PC-connected operation
The DI-710 or DI-715B Instrument enters PC Operation Mode when the instrument is connected to the PC and the
user initiates WINDAQ Acquisition software. As soon as PC Operation Mode is entered, the Control button is deactivated and all the features of WINDAQ Acquisition Software are accessible. Consult the context-sensitive help files or
your Fast Start WINDAQ Software Manual for directions on using the WINDAQ software package.
Note: When running WINDAQ Acquisition software over the internet, unpredictable latencies may occur, especially at
higher sample rates. The unit generally will continue to acquire data after a latency - but there will be gaps in your
data.
Networked operation as a data acquisition server
The Ethernet option allows data access from anywhere on a local area network (LAN) or DHCP server. A DI-710 or
DI-715B configured for Stand-alone operation and an Ethernet interface transparently becomes like any other computer on the network, able to share data whenever and wherever it is needed. This can be over the LAN to a PC on the
other side of the facility, or over the Internet to a PC on the other side of the world. Furthermore, Stand-alone instruments can be easily added to existing networks. Its server functionality means that it does not require a dedicated network to operate efficiently. Data is locally stored to MMC/SD memory, where it is available for upload (using the
Uploader software) only on demand and as network bandwidth permits. In this manner, Stand-alone instruments with
Ethernet interfaces are fully compatible with the intrinsic non-preemptive nature of Ethernet networks.
Stand-alone data logger operation
Use your Stand-alone model as a stand-alone data logger to record a WINDAQ-compatible waveform file onto a MultiMedia Card (MMC) or Secure Digital Card (SD). After recording, insert the memory card into your card reader to
access the data file. The data file can then be opened with WINDAQ Waveform Browser Software for MMC allowing
analysis and review features. See “WinDaq Waveform Browser for MMC” on page 37 for more information regarding WINDAQ Waveform Browser for MMC software.
Data may be recorded using a circular FIFO memory configuration allowing you to record data nearly indefinitely or
in a non-circular configuration allowing you to stop recording when your memory card is full. Select the desired
memory configuration using the Stand-alone Set Up software inside the Dataq Instruments Hardware Manager.
Note: SanDisk MMC/SD memory cards have a lifetime expectancy of about 100,000 write actions. Each time data
wraps you will use one write action; each singular data file uses two write actions (start and stop). If used properly a
memory card will last years. See your memory card’s specifications to determine lifetime expectancy.
The Stand-alone Set Up Panel
The Stand-alone Set Up software (installed with WINDAQ—accessible in the WINDAQ program group through the
Dataq Instruments Hardware Manager) allows you to customize each data recording session before taking the instrument out into the field. The default settings (i.e., if you do not configure the instrument) are 16 single-ended channels
enabled at 300Hz sample rate and a gain of 1. The default configuration can be reset at any time on the instrument by
holding the Control button in when applying power. Context-sensitive Help is provided within the configuration software. Press F1 to access Help topics related to the currently displayed feature. You must run the software with the
device properly installed and connected to your PC.
Operation
To use your instrument as a stand-alone data logger follow these steps:
1.
Configure the Instrument using the Set Up software or by re-setting to the default (See “The Stand-alone Set Up
Panel” above).
2.
Connect signal leads (See “4. Instrument Controls, Indicators, and Connections” on page 21.).
3.
Apply Power to the instrument using the supplied Power Cable.
Operation
34
DI–710 Series and DI-715B Series Hardware Manual
4.
Insert the MultiMedia Card (MMC) or Secure Digital Card (SD) into the Removable Storage Slot.
5.
If the memory card has not been used with your instrument, format the memory card to begin recording data. See
“Formatting the Memory Card” on page 28.
6.
To Record Data to memory card: Press and hold the Control Button until the LED light turns off; release the Control button to initiate the recording session—initialization could last up to 30 seconds depending on memory card
used. For Ethernet models you may also use the Start Recording to SD Memory command in the DATAQ Instruments Hardware Manager. This creates a new file numbered sequentially on the memory card. See also “Start
Recording” on page 28.
7.
To Stop Recording Data to memory card: Press and hold the Control Button until the LED light turns off; release
the Control button to end the recording session and close the data file. It could take up to 30 seconds to close the
file depending on the memory card used. For Ethernet models you may also use the Stop Recording to SD Memory command in the DATAQ Instruments Hardware Manager. See also “Stop Recording” on page 28.
8.
Access MMC/SD data using the uploader software provided in installation (Ethernet models) or by removing the
memory card and using a card reader. Data files open in WINDAQ Waveform Browser for MMC (see “WinDaq
Waveform Browser for MMC” on page 37).
Note: To read the data files, SDs should be locked before inserting into a card reader. If the SD is not locked,
Windows may modify the file system and the SD will be unreadable to your instrument requiring you to reformat
the card. MMCs may require you to reformat every time you review the data.
Troubleshooting
Use the following chart for errors and resolution.
Problem
Possible Cause(s)
Resolution
When attempting to initiate a
recording session the LED blinks
green for about 5-10 seconds then
quickly blinks orange then back to
green.
Memory card not inserted.
Press memory card firmly into the
slot until you hear a slight “click”
to indicate proper insertion.
When attempting to initiate a
recording session, LED blinks
orange, then turns green.
SD is locked (write protected).
Unlock the SD Card
Memory card is full.
Reformat the memory card.
Memory card is unusable or damaged.
You need a new memory card
Recording is initiated but only
runs for a short time when LED
blinks orange and stays orange.
Memory card read/write speed in SPI
mode is too slow to record data as
specified.
Try lowering the sample rate first.
Recording is initiated in Circular
Memory configuration, but when
the file attempts to wrap, the LED
blinks orange and stays orange.
Memory card read/write speed in SPI
mode is too slow to record data in circular memory configuration.
Operation
35
If problem persists purchase a new
card (recommended: Lexar Professional 133X 2 Gigabyte Secure
Digital Flash Memory).
DI–710 Series and DI-715B Series Hardware Manual
LED is green but I cannot format a
memory card.
The instrument is looking for a file
that has not been closed (possible due
to power failure).
Reinsert the correct memory card
and press the control button for
about 1 second (until LED turns
off) and release. The instrument
gives you three chances to find the
correct file, if it does not you must
format whatever card is there to
begin a new recording session.
Mode LED will not change from
error state (orange).
This can be caused by switching
memory cards during a power failure
without giving the instrument a
chance to close the data file.
Remove the memory card and
unplug the device. Restore power
to the device (LED should turn
green). Press and hold the control
button for about 1 second (until
LED turns off) and release. If LED
is orange, press it again. When
LED turns green reformat your
memory card.
When memory card is inserted
into a reader a “not formatted”
error is seen.
Dependent upon the reader being
used.
Sometimes the driver for an SD
card reader appears “dead.”
Reboot your PC.
When attempting to read the memory card using a card reader, the
PC takes an interminably long
time to open the data.
Dependent upon the memory card,
card reader, and the PC you are using.
The amount of time it takes to open
the card will vary.
Using the Lock feature on an SD
could speed up the process. Be
sure to try that before purchasing
new equipment.
After viewing data files through a
card reader, upon initiating a
recording session, the LED blinks
orange then turns green.
The instrument has a unique file system. When the data on the memory
card opens in Windows, sometimes
Windows will modify the file system.
You must reformat the card. To
prevent further instances of this
error, use the Lock provided on
your SD card. If you have an
MMC you will have to reformat
the card with each subsequent use.
When attempting to read the memory card using a card reader, the
data file is huge (completely fills
up the memory card) and the
actual waveform data is difficult
to find.
The instrument did not have a chance
to properly close the file.
If you have not started using the
instrument with a different memory card, reinsert the card and
press the LED for about 1 second
(until LED turns off) and release.
The LED should be green indicating the file is closed and can be
read.
If you have already configured and
used the instrument again, the file
can no longer be closed and you
will have to search for it and cut/
paste the data into a new file.
If power down occurs unexpectedly while recording to MMC/SD
The Stand-alone models have a built-in file protection feature. If power is lost while recording, all data—prior to up
to 255 samples from the power failure—is available. If power is lost for any reason, the data file will be closed and
saved and a new data file will be started when power is restored (Mode LED will flash red @ 1 Hz) if that option is
selected in the Hardware Manager Stand-alone setup.
Operation
36
DI–710 Series and DI-715B Series Hardware Manual
If the memory card is full, the Mode LED will quickly flash orange and then green and will not record new data until
reformatted. Circular memory configuration may still be used if the memory card has not started to wrap the data (i.e.,
as long as the card is not full) and will only wrap data in the available space.
When recording at low sample rates be aware that the memory card must acquire 256 samples before it actually commits them to memory. For example, if you are recording one channel at 1 sample per second and power down occurs
unexpectedly, you could lose up to 255 seconds (4 minutes and 15 seconds) of data (255 samples). Use the following
formula to determine the maximum amount of data loss at power failure.
255
---------------------------------------= Seconds of data that COULD be lost
Throughput Rate
Note: Switching memory cards before power is restored is not suggested because the data logger will automatically
attempt to close the file. Leave the memory card in until power is restored, then allow the instrument to close the data
file. After a new file has begun, stop recording. The memory card may now be removed and read for analysis.
WINDAQ Waveform Browser for MMC
All files recorded in Stand-alone data logger operating mode (data saved to MMC or SD—.wdc files) must be
reviewed in WINDAQ Waveform Browser for MMC. Data files recorded using WINDAQ Acquisition software (PC
operation—.wdq files) must be reviewed in the standard WINDAQ Waveform Browser. Even if connected to a PC,
WINDAQ Waveform Browser cannot eavesdrop on the data being recorded to your memory card. Recording must be
stopped and the file must be closed to review the data.
DI-710 and DI-715B stand-alone data loggers place 256 equally-spaced event markers into all data files when recording to MMC or SD. This allows easier navigation through larger files. Click on Event Markers in the View menu to
access and “jump to” each of these event markers.
The Calculate command in the File menu is unavailable in WINDAQ Waveform Browser for MMC. Use the Save
As... command in the File menu to save data to another format in order to perform Advanced CODAS calculations
(File > Save As... > option 8) CALC is still available). Converting data from a .wdc format to a .wdq format is also
possible with File > Save As.... Choose option 2) Binary (with CODAS header) and enter a file name with .wdq as
the extension. For more information regarding the Save As... function, consult your WINDAQ Waveform Browser
Help File.
A stand-alone data file acquired with remote events or storage enabled displays an hourglass when opening while it
scans for event marks and timestamps in order to construct an Event Marker table. Use File Save or the "Save All"
button when changing files or exiting to write the Event Marker table to the file and avoid a delay when the file is
opened again.
Operation
37
DI–710 Series and DI-715B Series Hardware Manual
6. Block Diagram
DI-710 Models
Block Diagram
39
DI–710 Series and DI-715B Series Hardware Manual
DI-715B Models
5B
Backplane
Expansion
Connector
Block Diagram
40
DI–710 Series and DI-715B Series Hardware Manual
7. Accessories
The DI-705 ........................................................................................................................................
The DI-205 (for use with DI-710 “D” models) .................................................................................
DI-75B Backpack (for use with DI-715B models) ............................................................................
DI-5B Modules ..................................................................................................................................
DI-5B30/31 Analog Voltage Input Modules, Narrow Bandwidth ..............................................
DI-5B32 Analog Current Input Modules ....................................................................................
DI-5B33 Isolated True RMS Input Modules ..............................................................................
DI-5B34 Linearized 2- or 3-Wire RTD Input Modules ..............................................................
DI-5B35 Linearized 4-Wire RTD Input Modules .......................................................................
DI-5B36 Potentiometer Input Modules .......................................................................................
DI-5B38 Strain Gage Input Modules, Narrow & Wide Bandwidth ...........................................
DI-5B40/41 Analog Voltage Input Modules, Wide Bandwidth .................................................
DI-5B42 2-Wire Transmitter Interface Modules ........................................................................
DI-5B43 Isolated DC Transducer Amplifier Input Module ........................................................
DI-5B45 Frequency Input Modules ............................................................................................
DI-5B47 Linearized Thermocouple Input Modules ....................................................................
DI-5B48 Accelerometer Input Modules .....................................................................................
Accessories
41
42
44
49
54
54
55
56
57
59
61
62
64
65
66
68
69
71
DI–710 Series and DI-715B Series Hardware Manual
The DI-705
The DI-705 can be used with DI-710 “D” models (see “37-pin D sub connector” on page 23) and with DI-715B
instruments.
Using the DI-705 with DI-710 “D” Models
The DI-705 plugs into the 37-pin D sub connector of the front panel of DI-710 “D” models and provides convenient
screw terminal access to analog inputs, analog outputs, and the Digital I/O. Note: The digital I/O is not available in
stand-alone mode. The screw terminals accept 16-22 gauge wire and each is silk-screened with the corresponding
“D” connector pin number (see “37-pin D sub connector” on page 23). The DI-705 also features a 37-pin male “passthrough” connector, which allows you to connect our BNC cable (model number CABL-4), or our 5B back plane
cable (model number CABLE-1), or any 37-pin DAS-16 compatible cable to the DI-710 while still allowing screw
terminal access.
Any combination of single-ended or differential channels may be connected to the DI-705, but keep in mind a differential channel uses two analog inputs. Configure single-ended and differential channels on the DI-705 the same way
as on the DI-710. See “Instrument Front Panel” on page 22 for more information.
Accessories
42
DI–710 Series and DI-715B Series Hardware Manual
Using the DI-705 with DI-715B Instruments
Plug the DI-705 into CABL-7 and connect CABL-7 to the EXPANSION port on the rear panel of the DI-715B to
access the Digital I/O and analog channels 9-16. Digital I/O may also be accessed through a DI-75B channel
expander using the EXPANSION OUT port on the rear panel of the DI-75B-7. The screw terminals accept 16-22
gauge wire and each is silk-screened with a pin number (below).
Signal connections are made
to the screw terminals.
Connect to EXPANSION on
DI-715B or EXPANSION
OUT on DI-75B.
The DI-715B accepts single-ended inputs only. The Digital I/O may be enabled as Channel 17. Note: The Digital I/O
is not available in stand-alone mode. Pinout for the DI-705 is as follows (screw terminal in bold).
1 N.C.
11 CH8
21 DI6
31 CH15
2 DI5
12 CH7
22 DO2
32 CH14
3 DO3
13 CH6
23 DO0
33 CH13
4 DO1
14 CH5
24 DI2
34 CH12
5 DI3
15 CH4
25 DI0
35 CH11
6 DI1
16 CH3
26 DO4
36 CH10
7 Power GND
17 CH2
27 DO7
37 CH9
8 DO6
18 CH1
28 AGD
9 N.C.
19 AGD
29 DI7
20 DI4
30 CH16
10 DO5
Note: Digital I/O connections cannot be used concurrently. DI0 and DO0 are
directly connected inside the DI-715B (as are DI1 and DO1, DI2 and DO2, etc.).
Accessories
43
DI–710 Series and DI-715B Series Hardware Manual
The DI-205 (for use with DI-710 “D” models)
The DI-205 is a termination panel for general purpose input and output. The DI-205 along with the supplied cable
provides a convenient way to interface the Digital I/O, analog output, and analog input signals to DI-710 Series “D”
models (see “37-pin D sub connector” on page 23). Signal connection is via terminal strip for digital and analog output signals, or 5-way binding posts (banana jacks) for analog input signals.
Input/Output Panel Interconnections
VOUT
DAC2
DAC1
DO7
DO6
DO5
DO4
DO3
DO2
DO1
DO0
DI7
DI6
DI5
DI4
DI3
DI2
DI1
DI0
DGND
Digital I/O - Analog Output
S. GND
S. GND
S. GND
S. GND
S. GND
S. GND
S. GND
S. GND
CHAN. 1
CHAN. 2
CHAN. 3
CHAN. 4
CHAN. 5
CHAN. 6
CHAN. 7
CHAN. 8
+
Dif.
CHAN.9(1) CHAN.10(2) CHAN.11(3) CHAN.12(4) CHAN.13(5) CHAN.14(6) CHAN.15(7) CHAN.16(8)
S. GND
S. GND
S. GND
S. GND
S. GND
S. GND
S. GND
S. GND
-ODEL$)
Digital I/O - Analog Output
The 20 position screw terminal block (labelled Digital I/O - Analog Output) provides access to the Digital I/O ports
of the 37-pin D sub connector. Note: Digital I/O connections cannot be used concurrently. DI0 and DO0 are directly
connected inside the DI-710 (as are DI1 and DO1, DI2 and DO2, etc.) The Digital I/O is not available in stand-alone
mode. See “37-pin D sub connector” on page 23 for pinout.
DAC1 and DAC2 are Reserved ports and should not be used.
VOUT connects to the +5VPWR pin. See “37-pin D sub connector” on page 23 for pinout.
Accessories
44
DI–710 Series and DI-715B Series Hardware Manual
Input Signal Configuration
Each DI-205 may be configured to connect to 16 single-ended or 8 differential channels. In addition, any combination
of single-ended or differential channels may be applied. A differential channel is configured by using two singleended inputs. Use the following illustration for input connections.
S. GND
S. GND
+ input
CHAN. 1
CHAN. 1
- input
Signal Leads
Signal Leads
CHAN.9(1)
CHAN.9(1)
S. GND
S. GND
Channel 1 configured
for single-ended input
Channel 1 configured
for differential input
Note that when an input channel is configured for differential operation, the binding post associated with that channel's high (+) input assumes the channel number.
Connecting a Single-ended Amplifier
A single-ended amplifier is the most straightforward approach to connecting signals to the DI-205. However, to
derive adequate performance, the use of a single-ended amplifier requires that the signal to be measured is relatively
high level (greater than or equal to 1V full scale), and the distance from the signal source to the DI-205 is relatively
short (less than 15 feet). Assuming these conditions exist, a single-ended amplifier may be connected according to the
diagram below.
DI-205
Terminal Strip
1 of 16 analog inputs
(+)
Signal
Source
(-)
1 of 16 analog grounds
Accessories
45
DI–710 Series and DI-715B Series Hardware Manual
Connecting a Differential Amplifier
A differential channel configuration is a special case approach to signal measurement that should be used with all
low-level measurements (less than 1v) or when the signal to be measured is located far away from the DI-205 (greater
than 15 feet). When in a differential operating mode, the instrument sees the difference in voltage between the high
(+) and low (-) inputs. Differential amplifiers have the advantage of reducing common mode voltages (those appearing simultaneously and in phase on both inputs). This capability may be leveraged to greatly reduce noise riding on a
signal of interest.
Two signal measurement conditions govern the configuration of a differential channel input: The signal to be measured is ground-referenced; or the signal to be measured is isolated from ground.
Ground-referenced Signal Sources
A ground-referenced signal source is one with a local ground that may not be (and probably is not) at the same potential as the computer's ground. This potential difference between signal ground and computer ground is referred to as a
common mode voltage and is caused by a number of different factors.
Computer
Ground
Signal
Source
V
Ground Potential Difference
(Common Mode Voltage)
The most common of these is different physical locations of the computer and signal ground points. Since wire is not
a perfect conductor (exhibiting zero resistance regardless of length) a voltage drop, however small, will always be
Accessories
46
DI–710 Series and DI-715B Series Hardware Manual
present. The differential amplifier is unique in its ability to measure signals originating from sources with different
ground potentials relative to the computer provided it is connected properly.
WRONG APPROACH
Circulating currents in signal shield
induce noise on signal of interest.
DI-205 terminal strip
Signal
Source
Signal
Lead
Shield
+
Differential
Amplifier
-
gnd
Ground loop caused by circulating currents.
The most common error made in connecting differential amplifiers is the tendency to ground both ends of a signal
shield. This causes current to flow through the shield and induces noise on the signal to be measured. Ensuring that
only one ground exists on the signal circuit eliminates this problem.
RIGHT APPROACH
One ground on the signal circuit eliminates
noise-inducing ground loops.
DI-205 terminal strip
Signal
Source
Signal
Lead
Shield
+
Differential
Amplifier
-
gnd
Potential difference
(no path for current to circulate)
Accessories
47
DI–710 Series and DI-715B Series Hardware Manual
Isolated Signal Sources
There are two considerations when connecting a differential amplifier to an isolated signal source: The elimination of
ground loops as described above, and the use of bias resistors to provide bias current for the differential amplifier's
positive and negative inputs.
The bias resistors should be chosen to be as low as possible, but the value you use is dependent upon the output
impedance of your signal source. Generally, the value of the bias resistor should be 10 times the output impedance of
your signal source or higher. Bias resistors greater than 1MΩ are not recommended.
DI-205 terminal strip
Floating
Signal
Source
+
Signal
Lead
Shield
Differential
Amplifier
-
gnd
Locate bias resistors as close
to amplifier as possible
Signal Cable and the Differential Amplifier
Quick rule-of-thumb: Any application requiring a differential amplifier also defines a need for quality signal cable.
Four elements combine to ensure adequate quality signal cable: a twisted signal pair with low resistance stranded
copper conductors; surrounded by a multiple-folded foil shield; with a copper stranded drain wire; all contained
within an insulated outer jacket.
Insulated Outer Jacket
Foil Shield
Drain Wire
Twisted Signal Pair
Stranded Copper Conductors
In applications where such signal cable is used, a dramatic decrease in noise pickup will be experienced. The drain
wire should be considered as the shield and should be connected as described in “Connecting a Differential Amplifier” on page 46. Signal cable meeting all four criteria for quality is Belden No. 8641.
Accessories
48
DI–710 Series and DI-715B Series Hardware Manual
DI-75B Backpack (for use with DI-715B models)
The DI-75B is an eight-channel, 5B-module expansion device for DI-715B, DI-720, and DI-730 instruments. Each
DI-75B accepts up to eight high performance, plug-in signal conditioning modules expanding the measurement capability of its host instrument. Each DI-75B is provided with the appropriate cable to connect it to its host instrument.
Power is obtained from the host instrument through the supplied, dual-ended power cable.
Each DI-75B channel consumes one channel from its host instrument in return for the isolated, signal-conditioned
input it provides. A maximum of one DI-75B instrument may be connected to any DI-715B instrument to get a total
of 16, 5B-conditioned input channels. Signal connections are made to the DI-75B through a removable screw terminal block located on the back panel of the instrument.
Connecting the DI-75B to the Host Instrument
NOTE: The dual-ended power cable is sized to fit when the DI-75B is stacked on top of the host instrument. If these
instruments are not in a stacked configuration, do so before proceeding.
1.
Connect the appropriate end of the included expansion signal cable to EXPANSION on the rear panel of the host
instrument.
2.
Connect the other end of the expansion cable to EXPANSION IN on the rear panel of the DI-75B.
Applying Power to the DI-75B
A separate power supply is not required. Power is obtained from the host instrument through the dual-ended power
cable supplied with the DI-75B. Apply power using the following procedure:
1.
Unplug the five-pin DIN end of the power adapter cable that is currently supplying power to your host instrument and plug it into one of the DI-75B's power input jacks.
2.
Now plug one end of the dual-ended power cable into the remaining power jack on the DI-75B and plug the other
end into the host instrument power input jack.
Accessories
49
DI–710 Series and DI-715B Series Hardware Manual
Features, Controls, and Indicators
DI-75B Front Panel
The clear acrylic front panel allows easy identification of all installed DI-5B modules. To access the 5B backplane
remove the front panel and bezel by removing the two outside screws.
1. Remove front panel and bezel by removing the two screws.
2. DI-5B Modules are installed to the 5B backplane using the set screw.
5B backplane
1
2
1
DI-5B modules are installed on (or removed from) the socketed 5B backplane and are secured with a non-removable
mounting screw. Each channel position is labeled “CHANNEL 1,” “CHANNEL 2,” etc. on the socketed backplane.
The DI-5B modules can be mixed or matched in any combination suitable for the application and are identical in
pinout and size, so it doesn't matter which module gets plugged into which channel position. Channels 1 through 8 of
the DI-75B are designated Channels 9 through 16 consecutively on the DI-715B.
Note: When reattaching the front panel be sure not to overtighten the screws.
Accessories
50
DI–710 Series and DI-715B Series Hardware Manual
DI-75B Rear Panel
EXPANSION OUT can be used to access the Digital I/O
of the DI-715B using a DI-705 and CABL-7.
Connect the appropriate end of the expansion cable
to the host instrument, then connect the other end of
the cable to EXPANSION IN.
Accessories
51
DI–710 Series and DI-715B Series Hardware Manual
Removable Screw Terminal Block
Allows signal connections to be made to the DI-75B. The input signal connections are made along the top row while
the excitation connections (for those DI-5B modules that require excitation) are made along the bottom row. Note that
this screw terminal block can be removed from the DI-75B, thus making signal connections to the screw terminals
easy. Note also that the screw terminal block is “keyed,” thus difficult to improperly re-insert. Each channel (labeled
“CHANNEL 1,” “CHANNEL 2,” etc. on the socketed backplane) has four corresponding screw terminals for your
signal connections: channel +, channel -, excitation +, and excitation -. These terminals satisfy all transducer inputs
and provide sensor excitation when necessary.
POWER switch
Controls power to the DI-75B. 1 is on, 0 is off.
POWER input jacks
The DI-75B-7 can be powered by its host instrument through the supplied dual-ended power cable. Simply unplug
the five-pin DIN end of the power adapter cable that is currently supplying power to your host instrument and plug it
into one of the DI-75B's power input jacks. Now plug one end of the dual-ended power cable into the remaining
power jack on the DI-75B and plug the other end into the host instrument power input jack.
POWER status lamp
Glows green when the POWER switch is in the 1 position, indicating power is applied to the DI-75B.
POWER LOW lamp
Glows red when the DI-75B cannot derive adequate power from its host instrument. In this case, an alternate power
source is required. Any suitable power source (+9 to +36 volts DC at 3A maximum) may be connected to either
power input jack to provide the necessary power.
EXPANSION OUT connector
Used to connect to a DI-705 in order to access the Digital I/O of the DI-715B. Connect the appropriate end of a
CABL-7 to this connector and connect the other end of the cable to the DI-705. See “The DI-705” on page 42 for
more information.
EXPANSION IN connector
Connects the DI-75B to its host instrument.
Configuring Channels for the DI-75B
In WINDAQ Acquisition software, channels are enabled or configured for acquisition with the channel selection grid.
The channel selection grid is accessed by selecting Edit > Channels… (in the SET-UP operating mode of WINDAQ
software).
Each box in this grid potentially represents an input channel. An input channel is enabled by clicking the desired box.
Which box you click, which mouse button you click with, and how many times you click the mouse button determines whether the input channel is enabled for single-ended operation, or operation defined by the DI-5B module.
Accessories
52
DI–710 Series and DI-715B Series Hardware Manual
The following channel selection grid is typical when a DI-75B is used with a DI-715B. A total of sixteen signal conditioned inputs are available for data acquisition. Channel 17 may be enabled as Digital but must be accessed using a
DI-705 (with CABL-7) through the EXPANSION OUT port.
See the Dataq Instruments Hardware Manager Help files to configure channels for DI-75Bs connected to stand-alone
models.
Calibration
Each 5B module has an Input and Output equivalent printed on it for calibration purposes. Each channel should be
calibrated for its specific 5B module. Calibration for the DI-75B modules is completed exactly the same as for DI715B modules. See “Calibration and Gain Settings” on page 32 for more information.
Gain
The signal conditioned (or DI-5B module) channels on the DI-75B output ±5 volts to the host instrument. Since the
DI-715B is a ±10 volt input device, each DI-75B signal conditioned channel in use should be set to at least a gain of
2 so they have a full scale measurement range of at least ±5 volts. Use the same method described at “Gain” on
page 33 to set the gain of the DI-75B signal conditioned inputs.
Installing Shunt Resistors
To use the Current Input Modules (DI-5B32 and DI-5B42) you must install a shunt resistor (provided with purchase
of 5B module) for accurate readings. Instructions for the DI-75B are the same as instructions for the DI-715B. See
“Installing a Shunt Resistor in DI-715B Models” on page 29 for instructions on installation of shunt resistors.
Accessories
53
DI–710 Series and DI-715B Series Hardware Manual
DI-5B Modules
DI-5B30/31 Analog Voltage Input Modules, Narrow Bandwidth
Each DI-5B30 and DI-5B31 voltage input module provides a single channel of analog input which is filtered, isolated, amplified, and converted to a high level analog voltage output (see block diagram). This voltage output is logicswitch controlled, allowing these modules to share a common analog bus without the requirement of external multiplexers.
The DI-5B modules are designed with a completely isolated computer side circuit which can be floated to ±50V from
Power Common, pin 16. This complete isolation means that no connection is required between I/O Common and
Power Common for proper operation of the output switch. If desired, the output switch can be turned on continuously
by simply connecting pin 22, the Read-Enable pin to I/O Common, pin 19.
Signal filtering is accomplished with a six-pole filter which provides 95dB of normal-mode-rejection at 60Hz and
90dB at 50Hz. Two poles of this filter are on the field side of the isolation barrier, and the other four are on the computer side.
After the initial field-side filtering, the input signal is chopped by a proprietary chopper circuit. Isolation is provided
by transformer coupling, again using a proprietary technique to suppress transmission of common mode spikes or
surges. The module is powered from +5VDC, ±5%.
A special input circuit on the DI-5B30 and DI-5B31 modules provides protection against accidental connection of
power-line voltages up to 240VAC.:
Ordering Information
MODEL
DI-5B30-01
DI-5B30-02
DI-5B30-03
DI-5B31-01
DI-5B31-02
DI-5B31-03
DI-5B31-07*
DI-5B31-09*
INPUT RANGE
-10mV to +10mV
-50mV to +50mV
-100mV to +100mV
-1V to +1V
-5V to +5V
-10V to +10V
-20V to +20V
-40V to +40V
Accessories
54
OUTPUT RANGE
-5V to +5V
-5V to +5V
-5V to +5V
-5V to +5V
-5V to +5V
-5V to +5V
-5V to +5V
-5V to +5V
*CSA certification pending.
DI–710 Series and DI-715B Series Hardware Manual
DI-5B32 Analog Current Input Modules
Each DI-5B32 current input module provides a single channel of analog input which is filtered, isolated, amplified,
and converted to a high level analog voltage output (see block diagram). This voltage output is logic switch controlled, which allows these modules to share a common analog bus without the requirement of external multiplexers.
The DI-5B modules are designed with a completely isolated computer side circuit which can be floated to ±50V from
Power Common, pin 16. This complete isolation means that no connection is required between I/O Common and
Power Common for proper operation of the output switch. If desired, the output switch can be turned on continuously
by simply connecting pin 22, the Read-Enable pin to I/O Common, pin 19.
A precision 20Ω current conversion resistor is supplied with the DI-5B32 module (see block diagram for installation
details).
Signal filtering is accomplished with a six-pole filter which provides 95dB of normal-mode rejection at 60Hz and
90dB at 50Hz. Two poles of this filter are on the field side of the isolation barrier, and the other four are on the computer side.
After the initial field-side filtering, the input signal is chopped by a proprietary chopper circuit. Isolation is provided
by transformer coupling, again using a proprietary technique to suppress transmission of common mode spikes or
surges. The module is powered from +5VDC, ±5%.
A special input circuit on the DI-5B32 modules provides protection against accidental connection of power-line voltages up to 240VAC.
Ordering Information
MODEL
DI-5B32-01
DI-5B32-02
INPUT RANGE
4mA to 20mA
0mA to 20mA
Accessories
55
OUTPUT RANGE
0V to +5V
0V to +5V
DI–710 Series and DI-715B Series Hardware Manual
DI-5B33 Isolated True RMS Input Modules
Each DI-5B33 True RMS input module provides a single channel of AC input which is converted to its True RMS dc
value, filtered, isolated, amplified, and converted to a standard process voltage or current output (see block diagram).
The DI-5B modules are designed with a completely isolated computer side circuit which can be floated to ±50V from
Power Common, pin 16. This complete isolation means that no connection is required between I/O Common and
Power Common for proper operation of the output switch. If desired, the output switch can be turned on continuously
by simply connecting pin 22, the Read-Enable pin to I/O Common, pin 19.
The field voltage or current input signal is processed through a pre-amplifier and RMS converter on the field side of
the isolation barrier. The converted dc signal is then chopped by a proprietary chopper circuit and transferred across
the transformer isolation barrier, suppressing transmission of common mode spikes and surges. The computer side
circuitry reconstructs, filters and converts the signal to industry standard outputs. Modules are powered from +5VDC,
±5%.
For current output models an external loop supply is required having a compliance voltage of 14 to 48VDC. Connection, with series load, is between Pin 20 (+) and Pin 19 (-).
Ordering Information
MODEL
DI-5B33-01
DI-5B33-02
DI-5B33-03
DI-5B33-04
DI-5B33-05
INPUT RANGE
100mV
1V
10V
150V
300V
Accessories
56
OUTPUT RANGE
0V to +5V
0V to +5V
0V to +5V
0V to +5V
0V to +5V
DI–710 Series and DI-715B Series Hardware Manual
DI-5B34 Linearized 2- or 3-Wire RTD Input Modules
Each DI-5B34 RTD input module provides a single channel of RTD input which is filtered, isolated, amplified, linearized, and converted to a high level analog voltage output (see block diagram). This voltage output is logic switch
controlled, which allows these modules to share a common analog bus without the requirement of external multiplexers.
The DI-5B modules are designed with a completely isolated computer side circuit which can be floated to ±50V from
Power Common, pin 16. This complete isolation means that no connection is required between I/O Common and
Power Common for proper operation of the output switch. If desired, the output switch can be turned on continuously
by simply connecting pin 22, the Read-Enable pin to I/O Common, pin 19.
RTD excitation is provided from the module by two matched current sources. When using a three-wire RTD, this
method allows an equal current to flow in each RTD lead, which cancels the effects of lead resistances. The excitation
currents are very small (0.25mA for 100Ω Pt and 120Ω Ni, and 1.0mA for 10Ω Cu) which minimizes self-heating of
the RTD.
Signal filtering is accomplished with a six-pole filter which provides 95dB of normal-mode-rejection at 60Hz and
90dB at 50Hz. Two poles of this filter are on the field side of the isolation barrier, and the other four are on the computer side. After the initial field-side filtering, the input signal is chopped by a proprietary chopper circuit. Isolation is
provided by transformer coupling, again using a proprietary technique to suppress transmission of common mode
spikes or surges. The module is powered from +5VDC, ±5%.
A special input circuit on the DI-5B34 modules provides protection against accidental connection of power-line voltages up to 240VAC.
Accessories
57
DI–710 Series and DI-715B Series Hardware Manual
Ordering Information
MODEL
INPUT RANGE
OUTPUT RANGE ACCURACY*
100Ω Pt, α = 0.00385
±0.46°C
0V to +5V
-100°C (-148°F) to +100°C (+212°F)
DI-5B34-01
±0.36°C
0V to +5V
0°C (32°F) to +100°C (+212°F)
DI-5B34-02
±0.46°C
0V to +5V
0°C (32°F) to +200°C (+392°F)
DI-5B34-03
±0.88°C
0V to +5V
0°C (32°F) to +600°C (+1112°F)
DI-5B34-04
10Ω Cu, α = 0.004274
DI-5B34C-01
0°C (32°F) to +120°C (+248°F) (10Ω at 0°C)
0V to +5V
±0.23°C
DI-5B34C-02
0°C (32°F) to +120°C (+248°F) (10Ω at 25°C)
0V to +5V
±0.23°C
DI-5B34C-03**
0°C (32°F) to +160°C (+320°F) (10Ω at 0°C)
0V to +5V
±0.32°C
120Ω Ni, α = 0.00672
DI-5B34N-01
0°C (32°F) to +300°C (+572°F)
0V to +5V
±0.40°C
* Includes conformity, hysteresis and repeatability.
**CSA certification pending.
Accessories
58
DI–710 Series and DI-715B Series Hardware Manual
DI-5B35 Linearized 4-Wire RTD Input Modules
In RTD temperature measurement applications requiring a very high level of accuracy, the DI-5B35 4-Wire RTD
input module offers a significant advantage over 3-wire measurement techniques (see block diagram). The DI-5B35
measures only the voltage dropped across the RTD and almost completely ignores the resistance or length of the RTD
lead wires. The DI-5B34 3-Wire RTD module provides lead resistance compensation, but requires equal lead resistances, while the DI-5B35 does not require matched lead resistances.
Each DI-5B35 RTD input module provides a single channel of RTD input which is filtered, isolated, amplified, linearized, and converted to a high level analog voltage output. This voltage output is logic switch controlled, which
allows these modules to share a common analog bus without the requirement of external multiplexers.
The DI-5B modules are designed with a completely isolated computer side circuit which can be floated to ±50V from
Power Common, pin 16. This complete isolation means that no connection is required between I/O Common and
Power Common for proper operation of the output switch. If desired, the output switch can be turned on continuously
by simply connecting pin 22, the Read-Enable pin to I/O Common, pin 19.
RTD excitation is provided from the module by a precision current source. The excitation current is available on two
leads which are separate from the two input signal measuring leads. The excitation current does not flow in the input
signal leads, which allows RTD measurement to be totally independent of lead resistance. The excitation current is
very small (0.25mA for 100Ω Pt and 120Ω Ni, and 1.0mA for 10Ω Cu) which minimizes self-heating of the RTD.
Signal filtering is accomplished with a six-pole filter which provides 95dB of normal-mode-rejection at 60Hz and
90dB at 50Hz. Two poles of this filter are on the field side of the isolation barrier, and the other four are on the computer side. After the initial field-side filtering, the input signal is chopped by a proprietary chopper circuit. Isolation is
provided by transformer coupling, again using a proprietary technique to suppress transmission of common mode
spikes or surges. The module is powered from +5VDC, ±5%.
A special input circuit on the DI-5B35 modules provides protection against accidental connection of power-line voltages up to 240VAC.
Accessories
59
DI–710 Series and DI-715B Series Hardware Manual
Ordering Information
MODEL
INPUT RANGE
OUTPUT RANGE ACCURACY*
100Ω Pt, α = 0.00385
±0.46°C
0V to +5V
-100°C (-148°F) to +100°C (+212°F)
DI-5B35-01
±0.36°C
0V to +5V
0°C (32°F) to +100°C (+212°F)
DI-5B35-02
±0.46°C
0V to +5V
0°C (32°F) to +200°C (+392°F)
DI-5B35-03
±0.88°C
0V to +5V
0°C (32°F) to +600°C (+1112°F)
DI-5B35-04
10Ω Cu, α = 0.004274
DI-5B35C-01
0°C (32°F) to +120°C (+248°F) (10Ω at 0°C)
0V to +5V
±0.23°C
DI-5B35C-02DI0°C (32°F) to +120°C (+248°F) (10Ω at 25°C)
0V to +5V
±0.23°C
5B35C-03**
0°C (32°F) to +160°C (+320°F) (10Ω at 0°C)
0V to +5V
±0.32°C
120Ω Ni, α = 0.00672
DI-5B35N-01
0°C (32°F) to +300°C (+572°F)
0V to +5V
±0.40°C
* Includes conformity, hysteresis and repeatability.
**CSA certification pending.
Accessories
60
DI–710 Series and DI-715B Series Hardware Manual
DI-5B36 Potentiometer Input Modules
Each DI-5B36 Potentiometer input module provides a single channel of Potentiometer input which is filtered, isolated, amplified, and converted to a high level analog voltage output (see block diagram). This voltage output is logic
switch controlled, which allows these modules to share a common analog bus without the requirement of external
multiplexers.
The DI-5B modules are designed with a completely isolated computer side circuit which can be floated to ± 50V from
Power Common, pin 16. This complete isolation means that no connection is required between I/O Common and
Power Common for proper operation of the output switch. If desired, the output switch can be turned on continuously
by simply connecting pin 22, the Read-Enable pin to I/O Common, pin 19.
Excitation for the potentiometer is provided from the module by two matched current sources. When using a threewire potentiometer, this method allows cancellation of the effects of lead resistances. The excitation currents are very
small (less than 1.0mA) which minimizes self-heating of the potentiometer.
Signal filtering is accomplished with a six-pole filter which provides 95dB of normal-mode-rejection at 60Hz and
90dB at 50Hz. Two poles of this filter are on the field side of the isolation barrier, and the other four are in the output
stage. After the initial field-side filtering, the input signal is chopped by a proprietary chopper circuit. Isolation is provided by transformer coupling, again using a proprietary technique to suppress transmission of common mode spikes
or surges. The module is powered from +5VDC, ±5%.
A special input circuit on the DI-5B36 module provides protection against accidental connection of power-line voltages up to 240VAC.
Ordering Information
MODEL
DI-5B36-01
DI-5B36-02
DI-5B36-03
DI-5B36-04
INPUT RANGE
0 to 100Ω
0 to 500Ω
0 to 1kΩ
0 to 10kΩ
Accessories
61
OUTPUT RANGE
0V to +5V
0V to +5V
0V to +5V
0V to +5V
DI–710 Series and DI-715B Series Hardware Manual
DI-5B38 Strain Gage Input Modules, Narrow & Wide Bandwidth
Each DI-5B38 Strain Gage input module provides a single channel of Strain Gage input which is filtered, isolated,
amplified, and converted to a high level analog voltage output (see block diagram). This voltage output is logic
switch controlled, which allows these modules to share a common analog bus without the requirement of external
multiplexers.
The DI-5B modules are designed with a completely isolated computer side circuit which can be floated to ±50V from
Power Common, pin 16. This complete isolation means that no connection is required between I/O Common and
Power Common for proper operation of the output switch. If desired, the output switch can be turned on continuously
by simply connecting pin 22, the Read-Enable pin to I/O Common, pin 19.
The DI-5B38 can interface to full- or half-bridge transducers with a nominal resistance of 100Ω to 10kΩ. A matched
pair of bridge-completion resistors (to ±1mV at +10V excitation) allows use of low cost half- or quarter-bridge transducers. On wide bandwidth modules, the 10kHz bandwidth allows measurement of high speed processes such as
vibration analysis.
Strain Gage excitation is provided from the module by a very stable 10V or 3.333V source. The excitation supply is
fully isolated, allowing the amplifier inputs to operate over the full range of the excitation voltage. Full scale sensitivities of 2mV/V, 3mV/V or 10mV/V are offered. With 10V excitation, this results in a ±20mV, ±30mV or ±100mV full
scale input range.
On wide bandwidth modules, the input signal is processed through a preamplifier on the field side of the isolation
barrier. This preamplifier has a gain-bandwidth product of 5MHz and is bandwidth limited to 10kHz. On all modules,
after initial field side filtering, the input signal is chopped by a proprietary chopper circuit. Isolation is provided by
transformer coupling, again using a proprietary technique to suppress transmission of common mode spikes or
surges. The module is powered from +5VDC, ±5%.
Special input circuits on the DI-5B38 module provide protection of the signal inputs and the isolated excitation supply up to 240VAC.
Accessories
62
DI–710 Series and DI-715B Series Hardware Manual
Ordering Information
MODEL
DI-5B38-31 or DI-5B38-01
DI-5B38-32 or DI-5B38-02
DI-5B38-33 or DI-5B38-03
DI-5B38-34 or DI-5B38-04
DI-5B38-35 or DI-5B38-05
DI-5B38-36 or DI-5B38-06
DI-5B38-37 or DI-5B38-07
INPUT
INPUT RANGE
BRIDGE TYPE
Full Bridge
100Ω to 10kΩ
Full Bridge
300Ω to 10kΩ
Half Bridge
100Ω to 10kΩ
Half Bridge
300Ω to 10kΩ
Full Bridge
300Ω to 10kΩ
Full Bridge
100Ω to 10kΩ
Full Bridge
300Ω to 10kΩ
Accessories
63
EXCITATION
OUTPUT RANGE
3.333V at 3mV/V Sensitivity
10.0V at 3mV/V Sensitivity
3.333V at 3mV/V Sensitivity
10.0V at 3mV/V Sensitivity
10.0V at 2mV/V Sensitivity
3.333V at 10mV/V Sensitivity
10.0V at 10mV/V Sensitivity
-5V to +5V
-5V to +5V
-5V to +5V
-5V to +5V
-5V to +5V
-5V to +5V
-5V to +5V
DI–710 Series and DI-715B Series Hardware Manual
DI-5B40/41 Analog Voltage Input Modules, Wide Bandwidth
Each DI-5B40 and DI-5B41 wide bandwidth voltage input module provides a single channel of analog input which is
amplified, isolated, and converted to a high level analog voltage output (see block diagram). This voltage output is
logic-switch controlled, allowing these modules to share a common analog bus without the requirement of external
multiplexers.
The DI-5B modules are designed with a completely isolated computer side circuit which can be floated to ±50V from
Power Common, pin 16. This complete isolation means that no connection is required between I/O Common and
Power Common for proper operation of the output switch. If desired, the output switch can be turned on continuously
by simply connecting pin 22, the Read-Enable pin to I/O Common, pin 19.
The input signal is processed through a preamplifier on the field side of the isolation barrier. This preamplifier has a
gain-bandwidth product of 5MHz and is bandwidth limited to 10kHz. After amplification, the input signal is chopped
by a proprietary chopper circuit. Isolation is provided by transformer coupling, again using a proprietary technique to
suppress transmission of common mode spikes or surges. The module is powered from +5VDC, ±5%.
A special input circuit on the DI-5B40 and DI-5B41 modules provides protection against accidental connection of
power-line voltages up to 240VAC.
Ordering Information
MODEL
DI-5B40-01
DI-5B40-02
DI-5B40-03
DI-5B41-01
DI-5B41-02
DI-5B41-03
DI-5B41-07**
DI-5B41-09**
INPUT RANGE
OUTPUT RANGE
-10mV to +10mV
0V to +5V
-50mV to +50mV
0V to +5V
-100mV to +100mV
0V to +5V
-1V to +1V
0V to +5V
-5V to +5V
0V to +5V
-10V to +10V
0V to +5V
-20V to +20V
0V to +5V
-40V to +40V
0V to +5V
*Required for DI-500-HV high voltage option.
**CSA certification pending.
Accessories
64
DI–710 Series and DI-715B Series Hardware Manual
DI-5B42 2-Wire Transmitter Interface Modules
Each DI-5B42 2-wire transmitter interface module provides a single channel which accepts a 4 to 20 mA process current input and provides a standard +1 to +5V output signal (see block diagram). An isolated +20VDC regulated
power supply is provided to power the current transmitter. This allows a 2-wire loop powered transmitter to be
directly connected to the DI-5B42 without requiring an external power supply. The regulated supply will provide a
nominal +20VDC at a loop current of 4mA to 20mA.
The DI-5B42 will provide a 1500V isolation barrier for non-isolated 2-wire field transmitters. It can also be used
when additional isolation is required between an isolated 2-wire transmitter and the input stage of the control room
computer.
The voltage output is logic switch controlled, which allows these modules to share a common analog bus without the
requirement of external multiplexers.
The DI-5B modules are designed with a completely isolated computer side circuit which can be floated to ±50V from
Power Common, pin 16. This complete isolation means that no connection is required between I/O Common and
Power Common for proper operation of the output switch. If desired, the output switch can be turned on continuously
by simply connecting pin 22, the Read-Enable pin to I/O Common, pin 19.
A precision 20Ω current conversion resistor is supplied with the module. All field inputs are fully protected from
accidental connection of power-line voltages up to 240VAC. The module has a 3dB bandwidth of 100Hz. Signal filtering is accomplished with a six-pole filter, with two poles on the field side of the isolation barrier, and the other four
on the computer side.
Ordering Information
MODEL
DI-5B42-01
INPUT RANGE
4mA to 20mA
Accessories
65
OUTPUT RANGE
+1V to +5V
DI–710 Series and DI-715B Series Hardware Manual
DI-5B43 Isolated DC Transducer Amplifier Input Module
Each DI-5B43 displacement transducer module provides a single channel of displacement transducer input which is
filtered, isolated, scaled, and converted to a high level analog voltage output (see block diagram). This voltage output
is logic switch controlled, which allows these modules to share a common analog bus without the requirement of
external multiplexers.
The DI-5B modules are designed with a completely isolated computer side circuit which can be floated to ±50V from
Power Common, pin 16. This complete isolation means that no connection is required between I/O Common and
Power Common for proper operation of the output switch. If desired, the output switch can be turned on continuously
by simply connecting pin 22, the Read-Enable pin to I/O Common, pin 19.
The DI-5B43 can interface to DC displacement transducers and other devices which require a precision 10VDC supply and produce a high level output. The 1kHz bandwidth significantly reduces ripple and noise inherent in these
devices.
Transducer excitation is provided from the module by a very stable 10V source. The excitation supply is fully isolated, allowing the amplifier inputs to operate over the full range of the excitation voltage. This feature offers significant flexibility in real world applications. Ten full scale input ranges are provided, from ±1V to ±10V, producing ±5V
full scale output.
The input signal is processed through a preamplifier on the field side of the isolation barrier. This preamplifier has a
gain-bandwidth product of 5MHz and is bandwidth limited to 1kHz. After amplification, the input signal is chopped
by a proprietary chopper circuit. Isolation is provided by transformer coupling, again using a proprietary technique to
suppress transmission of common mode spikes or surges. The module is powered from +5VDC, ±5%. Special input
circuits on the DI-5B43 module provide protection of the signal inputs and the isolated excitation supply up to
240VAC.
Accessories
66
DI–710 Series and DI-715B Series Hardware Manual
Ordering Information
MODEL*
DI-5B43-01
DI-5B43-02A
DI-5B43-03
DI-5B43-04A
DI-5B43-05
DI-5B43-06
DI-5B43-07A
DI-5B43-08A
DI-5B43-09
DI-5B43-10
MAXIMUM INPUT
±1V
±2V
±3V
±4V
±5V
±6V
±7V
±8V
±9V
±10V
Accessories
67
EXCITATION
+10.0Vdc @ 40mA
+10.0Vdc @ 40mA
+10.0Vdc @ 40mA
+10.0Vdc @ 40mA
+10.0Vdc @ 40mA
+10.0Vdc @ 40mA
+10.0Vdc @ 40mA
+10.0Vdc @ 40mA
+10.0Vdc @ 40mA
+10.0Vdc @ 40mA
*CSA certification pending.
DI–710 Series and DI-715B Series Hardware Manual
DI-5B45 Frequency Input Modules
Each DI-5B45 frequency input module provides a single channel of frequency input which is isolated and converted
to a high level analog voltage output. This voltage output is logic switch controlled, which allows these modules to
share a common analog bus without the requirement of external multiplexers (see block diagram).
The frequency input signal can be a TTL level signal or a zero-crossing signal. Terminal 3 (+In) on the field-side terminal block is the “common” or ground connection for input signals. A TTL signal is connected from terminal 2 (-In)
to terminal 3 (+In), while a zero-crossing signal is connected from terminal 4 (+EXC) to terminal 3 (+In). Input circuitry for each of the signal types has hysteresis built in. An input signal must cross entirely through the hysteresis
region in order to trigger the threshold comparator.
A 5.1V excitation is available for use with magnetic pickup or contact-closure type sensors. The excitation is available on pin 1 (-EXC) and the excitation common is pin 3 (+In).
The DI-5B modules are designed with a completely isolated computer side circuit which can be floated to ±50V from
Power Common, pin 16. This complete isolation means that no connection is required between I/O Common and
Power Common for proper operation of the output switch. If desired, the output switch can be turned on continuously
by simply connecting pin 22, the Read-Enable pin to I/O Common, pin 19.
A special circuit in the input stage of the module provides protection against accidental connection of power-line
voltages up to 240VAC.
Ordering Information
MODEL
DI-5B45-01
DI-5B45-02
DI-5B45-03
DI-5B45-04
DI-5B45-05
DI-5B45-06
DI-5B45-07
DI-5B45-08
INPUT RANGE
0 to 500Hz
0 to 1kHz
0 to 3kHz
0 to 5kHz
0 to 10kHz
0 to 25kHz
0 to 50kHz
0 to 100kHz
OUTPUT RANGE
0 to +5V
0 to +5V
0 to +5V
0 to +5V
0 to +5V
0 to +5V
0 to +5V
0 to +5V
Accessories
68
EXCITATION
+5.1Vdc @ 8mA
+5.1Vdc @ 8mA
+5.1Vdc @ 8mA
+5.1Vdc @ 8mA
+5.1Vdc @ 8mA
+5.1Vdc @ 8mA
+5.1Vdc @ 8mA
+5.1Vdc @ 8mA
DI–710 Series and DI-715B Series Hardware Manual
DI-5B47 Linearized Thermocouple Input Modules
Each DI-5B47 thermocouple input module provides a single channel of thermocouple input which is filtered, isolated, amplified, linearized and converted to a high level analog voltage output (see block diagram). This voltage output is logic switch controlled, which allows these modules to share a common analog bus without the requirement of
external multiplexers.
The DI-5B modules are designed with a completely isolated computer side circuit which can be floated to ±50V from
Power Common, pin 16. This complete isolation means that no connection is required between I/O Common and
Power Common for proper operation of the output switch. If desired, the output switch can be turned on continuously
by simply connecting pin 22, the Read-Enable pin to I/O Common, pin 19.
The DI-5B47 can interface to eight industry standard thermocouple types: J, K, T, E, R, S, N, and B. Its corresponding output signal operates over a 0 to +5V range. Each module is cold-junction compensated to correct for parasitic
thermocouples formed by the thermocouple wire and screw terminals on the mounting hardware. Upscale open thermocouple detect is provided by an internal pull-up resistor. Downscale indication can be implemented by installing
an external 47MΩ resistor, ±20% tolerance, between screw terminals 1 and 3.
Signal filtering is accomplished with a six-pole filter which provides 95dB of normal-mode-rejection at 60Hz and
90dB at 50Hz. Two poles of this filter are on the field side of the isolation barrier, and the other four are on the computer side.
After the initial field-side filtering, the input signal is chopped by a proprietary chopper circuit. Isolation is provided
by transformer coupling, again using a proprietary technique to suppress transmission of common mode spikes or
surges. The module is powered from +5VDC, ±5%.
A special circuit in the input stage of the module provides protection against accidental connection of power-line
voltages up to 240VAC.
Accessories
69
DI–710 Series and DI-715B Series Hardware Manual
Ordering Information
MODEL
DI-5B47J-01
DI-5B47J-02
DI-5B47J-03
DI-5B47J-12**
DI-5B47K-04
DI-5B47K-05
DI-5B47K-13**
DI-5B47K-14**
TYPE
INPUT RANGE
ACCURACY*
Type J
0°C to +760°C (+32°F to +1400°F)
±0.61°C
Type J
-100°C to +300°C (-148°F to +572°F)
±0.32°C
Type J
0°C to +500°C (+32°F to +932°F)
±0.36°C
Type J
-100°C to +760°C (-148°F to +1400°F)
±0.70°C
Type K
0°C to +1000°C (+32°F to +1832°F)
±0.80°C
Type K
0°C to +500°C (+32°F to +932°F)
±0.38°C
Type K
-100°C to +1350°C (-148°F to +2462°F)
±1.20°C
Type K
0°C to +1200°C (+32°F to +2192°F)
±0.96°C
*Includes conformity, hysteresis and repeatability. Does not include CJC accuracy.
**CSA certification pending.
Accessories
70
DI–710 Series and DI-715B Series Hardware Manual
DI-5B48 Accelerometer Input Modules
The DI-5B48 provides excitation to piezoelectric sensors with built-in microelectronic amplifiers, commonly known
as ICP®* or IEPE or LIVM sensors. The module provides a constant current excitation to the sensor, then isolates,
filters, and amplifies the sensor output, yielding a high-level analog voltage output. The excitation current, signal
gain, and filter high-pass and low-pass cutoff frequencies are field-configurable through a set of slide switches.
Six poles of signal filtering in the DI-5B48 module result in greater than 100dB of normal-mode rejection for signal
frequencies above the cutoff frequency. One pole of filtering is on the field side of the isolation barrier for anti-aliasing purposes and the remaining five-pole programmable Bessel filter is located on the system side. High-pass filtering is achieved through a second order passive filter, located on the field side. If desired, the output switch can be
turned on continuously by simply connecting pin 22, the Read-Enable pin, to I/O Common, pin 19.
The DI-5B48 offers the option of setting the constant current source for sensor excitation to common values of 4mA
or 9mA with a compliance voltage of 24VDC. Programmable gains of 1, 10 and 100 are selectable and the module
offers a ±10V output. The required supply level is +5VDC, ±5%.
To ensure protection of expensive data acquisition equipment, the DI-5B48 module signal inputs and sensor excitation outputs are protected against accidental connection of voltages up to 240Vrms.
Ordering Information
MODEL
DI-5B48-01
INPUT RANGE
±10V max
OUTPUT RANGE
±10V
Accessories
71
BANDWIDTH
2.5kHz to 20kHz
ISOLATION VOLTAGE
1500
DATAQ Instruments, Inc.
241 Springside Drive
Akron, Ohio 44333
Telephone: 330-668-1444
Fax: 330-666-5434
E-mail: [email protected]
Vertrieb: / Distributed by:
ALTHEN GmbH Mess- und Sensortechnik
Frankfurter Str. 150-152 Tel.: +49 (0)6195 7006-0 http://www.althen.de
65779 Kelkheim / Deutschland Fax: +49 (0)6195 700666 E-Mail: [email protected]