1
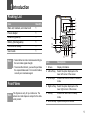
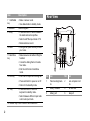
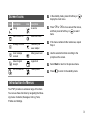
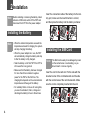
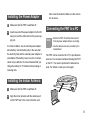
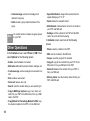
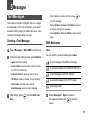
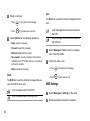
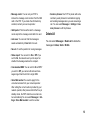
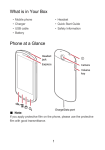
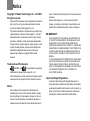
Notice
Copyright © Huawei Technologies Co., Ltd. 2009.
All rights reserved.
1
2
No part of this document may be reproduced or transmitted in any form or by any means without prior written
consent of Huawei Technologies Co., Ltd.
The product described in this manual may include copyrighted software of Huawei Technologies Co., Ltd and
possible licensors. Customers shall not in any manner
reproduce, distribute, modify, decompile, disassemble,
decrypt, extract, reverse engineer, lease, assign, or sublicense the said software, unless such restrictions are
prohibited by applicable laws or such actions are
approved by respective copyright holders under
licenses.
3
8
9
NO WARRANTY
10
11
Trademarks and Permissions
4
HUAWEI, and
are trademarks or registered
trademarks of Huawei Technologies Co., Ltd.
5
Other trademarks, product, service and company names
mentioned are the property of their respective owners.
6
Notice
7
Some features of the product and its accessories
described herein rely on the software installed, capacities and settings of local network, and may not be activated or may be limited by local network operators or
network service providers, thus the descriptions herein
may not exactly match the product or its accessories you
purchase.
Huawei Technologies Co., Ltd reserves the right to
change or modify any information or specifications contained in this manual without prior notice or obligation.
THE CONTENTS OF THIS MANUAL ARE PROVIDED “AS
IS". EXCEPT AS REQUIRED BY APPLICABLE LAWS, NO
WARRANTIES OF ANY KIND, EITHER EXPRESS OR
IMPLIED, INCLUDING BUT NOT LIMITED TO, THE IMPLIED
WARRANTIES OF MERCHANTABILITY AND FITNESS FOR
A PARTICULAR PURPOSE, ARE MADE IN RELATION TO
THE ACCURACY, RELIABILITY OR CONTENTS OF THIS
MANUAL.
TO THE MAXIMUM EXTENT PERMITTED BY APPLICABLE
LAW, IN NO CASE SHALL HUAWEI TECHNOLOGIES CO.,
LTD BE LIABLE FOR ANY SPECIAL, INCIDENTAL, INDIRECT, OR CONSEQUENTIAL DAMAGES, OR LOST PROFITS, BUSINESS, REVENUE, DATA, GOODWILL OR
ANTICIPATED SAVINGS.
Import and Export Regulations
12
Customers shall comply with all applicable export or
import laws and regulations and will obtain all necessary
governmental permits and licenses in order to export, reexport or import the product mentioned in this manual
including the software and technical data therein.
1 Table of Contents
Table of Contents 1
Introduction 1
Packing List ................................................1
Front View ..................................................1
Rear View...................................................2
Screen Icons ..............................................3
Introduction to Menus.................................3
Installation 4
Installing the Battery...................................4
Installing the SIM Card ...............................4
Installing the Power Adapter ......................5
Installing the Indoor Antenna......................5
Connecting the FWT to a PC .....................5
Mounting the FWT......................................6
Validating....................................................6
Basic Operations 7
Making or Answering Calls.........................7
Operations During a Voice Call ..................7
Text Input ...................................................7
Contacts 9
Making Calls from Contacts .......................9
Searching for a Contact..............................9
Groups........................................................9
Other Operations......................................10
Messages 11
Text Messages .........................................11
Voice Mail Number ...................................13
Common Phrases .................................... 13
Delete All.................................................. 13
Call Log 14
Making Calls from Call Log ...................... 14
Other Operations ..................................... 14
Tools 15
Alarms...................................................... 15
Calendar .................................................. 15
Calculator................................................. 15
World Time............................................... 15
Profiles 16
Selecting a Profile .................................... 16
Editing a Profile........................................ 16
Settings 17
Phone settings ......................................... 17
Display Settings ....................................... 17
Call Settings............................................. 17
Network.................................................... 18
Security .................................................... 19
Wireless Data Service 20
Installing Management Program ............. 20
Applying the Data Service........................ 21
Warnings and Precautions 22
1 Introduction
Packing List
Item
Quantity
Main unit, handset, and coiled cord
1
Power adapter
1
Antenna (Optional)
1
Battery (Rechargeable)
1
Certificate of Quality
1
User Guide
1
1
2
3
4
5
14
6
13
12
7
8
11 10 9
Note • Select either an indoor antenna according to
the local radio signal strength.
• To access the Internet, you need to purchase
the required data suite. For more information,
consult your local sales agent.
Front View
figures are only for your reference. The
Note The
actual color and shape are subject to the delivered product.
Item
Description
1 Screen
Display information.
2 Left soft key
Select the option displayed on the
lower left corner of the screen.
3 Scroll keys
Access the shortcut screen in standby
mode.
4 Right soft key Select the option displayed on the
lower right corner of the screen.
5 OK key
Access the main menu in standy
mode.
6 Shortcut keys Speed dial a phone number.
1
Item
Description
7 Call/Redial
key
• Make or answer a call.
8 Antenna
Receive signals.
9 # key
• Press and hold it to switch between
the silent and normal profiles.
• Switch on/off the input mode of T9.
• Mark/unmark a record.
10 Mute
• During a call, press this key to mute
your voice.
11 Handsfree
key
• Make/answer a call without lifting the
handset.
Rear View
• View dialed calls in standby mode.
1
6
2
• Cancel the dialing that is in handsfree mode.
• End the call that is in handsfree
mode.
12 End key
5
No. Item
NO. Item
• Press and hold it to power on or off.
1
Wall-mounting brackets
2
Main unit spiral cord
jack
3
Battery container
4
SIM card slot
5
Battery port
6
Data port
• Press and hold it to lock the
keyboard in standby mode.
• Switch between different input methods in text input mode.
14 Number keys Enter numbers and characters.
2
3
• End a call or reject an incoming call.
• Return to the standby mode.
13 * key
4
Screen Icons
Icon Description
Icon Description
Calling
No service
Alarm clock is on
Hands-free mode
Message received
Powered by the
power adapter
Voice message
received
Battery power level
Network signal
strength
Keypad lock
Line 2 is selected
In silent profile.
1
In the standby mode, press left soft key or
display the main menu.
2
Press
or
to move around the menus,
and then press left soft key or
to select
items.
3
If the menu contains further submenus, repeat
Step 2.
4
Use the selected function according to the
prompts on the screen.
5
Select Back to return to the previous menu.
6
Press
to
to return to the standby mode.
Introduction to Menus
Your FWT provides an extensive range of functions.
You can use these functions by navigating the following menus: Contacts, Messages, Call log, Tools,
Profiles and Settings.
3
2 Installation
Before installing or removing the battery, indoor
Note antenna
or SIM card, switch off the FWT and
disconnect the FWT from the power adapter.
Insert the connection cable of the battery into the battery port, make sure the insert direction is correct,
and then place the battery into the battery container.
Installing the Battery
the ambient temperature exceeds the
Note • When
temparature allowed for charging, the system
will stop charging the battery.
• When the power adapter is in use, the FWT
will automatically charge the battery and stop
it after the battery is fully charged.
• Take the battery out of the FWT if the FWT is
left unused for a long period.
• Make sure that the battery has been charged
for more than 8 hours before it supplies
power for the FWT at the first time. The
charging time depends on the environmental
temperature and the age of the battery.
• For a battery that is not in use for a long time,
you need to activate it, that is, charge and
discharge the battery for two to three times.
4
Installing the SIM Card
SIM card is easily to be damaged by scars
Note The
on the contact area or overbending, so you
should insert or remove it gently.
Insert the card to the card slot. Put the side with the
bevelled corner of the card backwards and the side
with the contact area of the card downwards. Make
sure the card is completely inserted into the slot.
Installing the Power Adapter
1
Make sure that the FWT is switched off.
2
Insert one end of the power adapter into the DC
input port, and the other end into the power supply jack.
In normal condition, use an external power adapter
and a battery. Use the battery only in the case that
the electricity fails and the external power adapter is
unavailable. If the battery level is low, the communication may be affected. It is recommended that you
charge the battery for 15 minutes before making or
receiving calls.
then screw the antenna. Make sure the connection is secure.
Connecting the FWT to a PC
the FWT off and then disconnect it
Note • Switch
from the power adapter before connecting.
• Use the data service suite provided by the
manufacturer.
The FWT can be connected to a PC to provide data
services. You can also maintain and debug the FWT
on the PC. You need to purchase the data service
suite. For details, consult your local agent.
Installing the Indoor Antenna
1
Make sure that the FWT is switched off.
2
Align the indoor antenna with the antenna port
on the FWT host in the correct direction, and
5
Mounting the FWT
3
Snap the hooks to the nails.
7.7cm
Horizontal Mounting
Place the FWT on a flat surface. Select a cool and
ventilated site for the FWT to dissipate the heat.
Vertical Mounting
1
Pull out the handset retaining clip from the slot
and turn it around. Then push it back so that the
handset will not fall down when FWT is placed
vertically.
Validating
2
6
According to the distance between the two
hooks (about 7.7cm), hammer two nails into the
wall and leave a 3-mm space at the end of nails.
1
Press and hold
2
The power icon
appears normally. The
signal strength icon
appears normally.
3
If you can make a call, it indicates that the FWT
is installed correctly.
to power on your FWT.
3 Basic Operations
Making or Answering Calls
Making a Voice Call
1
Operations During a Voice Call
During a voice call, you can select Options to perform the operations.
Enter or edit a number in one of the following
ways:
• Enter a phone number through the keypad.
• Select a number from Call Log.
• Select a number from Contacts.
Text Input
Note • Press * key to switch between input methods.
• Press # key to enable or disable T9 method.
2
Press
to dial.
• Press 1 key to display the list of symbol.
3
Press
to end the call.
• Press right soft key to delete the letter in front
of the cursor.
Answering or Rejecting a Call
• In standby mode, press
to answer a call. Press
• In handsfree mode, press
answer a call. Press
,
or lift the handset
to end the call.
T9 Input Method
Press each key carrying the desired letter once, and
then the predictive text scheme will present the available words composed by the letters you have entered
in the drop-down list.
, or lift the handset to
to end the call.
7
Traditional Input Method
Inputting Different Languages
When T9 input method is off, you can use the traditional input method. Repeatedly press the key that
carries the letter to be entered when it appears on the
screen.
In a text editing screen, select Options>Input language to set the language for the text.
"123" Numeric Input Method
In a text editing screen, press and hold the character/
number keys to enter corresponding numeric characters.
You can also press successively the * key to switch to
the "123" numeric input method, and enter corresponding numeric characters by pressing the character/number keys.
Symbol Input Method
Your FWT provides an independent symbol input
method.
For example, to enter ":" with the symbol input
method, you can just press the scroll keys to select
":" from the symbol list and then press
8
.
4 Contacts
Making Calls from Contacts
1
In the Contacts screen, select Phone or SIM.
2
Select a contact and select Options > Voice
call. Alternatively, you can select Edit before
call to edit the number before making the call.
Groups
Adding/Deleting Group Members
1
In the Contacts screen, select Groups.
2
Select a group and press
3
Select Options > Add. Select a contact and
. The member you add will be dispress
played in the group member list.
Searching for a Contact
1
In the Contacts screen, select Phone or SIM.
2
Select Options > Search.
3
Select Options > Search, and then enter the
contact name. The contact will be displayed.
In the Phone or SIM screen, enter a string contained
in the contact name. Then the contacts whose names
contain this string are displayed.
to view the details.
To delete a group member, select a member from the
group member list, and then select Options >
Delete.
Managing a Group
1
In the Contacts screen, select Groups.
2
Select a group and select Options for the following options.
• Details: view the details of a group
• Rename: change the name of a group
9
• Create message: send a text message to all
members of a group
• Speed Dial Number: assign often-used numbers to
speed dialing keys "2" to "9"
• Delete: delete a group and all members of the
group
• Delete: delete the selected contact
cannot rename or delete any group preset
Note You
in your FWT.
Other Operations
• Settings: sort the contacts in the FWT and the SIM
card or to set an alert before saving
In Contacts screen, select one of the following
options.
• Phone: view the contacts in the FWT
In the Contacts screen, select Phone or SIM . Then
select Options for the following options.
• SIM: view the contacts in the SIM card
• Details: view the details of a contact
• Copy all: copy all the contacts from your FWT to the
SIM card or from your SIM card to the FWT
• Edit before call: edit the number before making a call
• Create message: send a message to the selected contact
• New: create a new contact
• Voice call: make a voice call
• Search: enter the contact name you are searching for
• Copy to SIM/Copy to phone: copy one or more contacts from your FWT to the SIM card or from your SIM
card to the FWT
• Copy Marked To Phone/Copy Marked To SIM: copy
the marked contacts to the FWT or to the SIM card
10
• Mark/Unmark: mark/unmark a record or all records in
your FWT and SIM card
• Groups: view the groups of the contacts
• Delete all: delete all the contacts from your FWT or
from your SIM card
• Memory status: view the memory status of both your
FWT and SIM card
5 Messages
• Enter the phone number, and then press
Text Messages
The maximum number of English letters in a single
text message is 160. If the characters you entered
exceed this limit, the text is divided into two or more
continuous messages when it is sent.
Creating a Text Message
1
Select Messages > Write SMS from the menu .
2
In the message editing screen, select Options:
• Select Options > Groups or Contacts to choose
a number and send the message.
• Select Options > Save to drafts to save the message.
SMS Mailboxes
Inbox
You can save the received messages in Inbox.
• Send: send the message
a read message in the SIM card memory
• Insert number: insert a phone number saved in
the FWT or the SIM card
an unread message in the SIM card memory
• Common phrases: speed up the text entry
a read message in the FWT memory
• T9 Switch: enable or disable T9 input method
an unread message in the FWT memory
• Input mode: select the input method
a message report
• Input language: select an input language
3
to
send the message.
After editing, press
bers.
to access Edit num-
1
Select Messages > Inbox to view the
messages and then press
to view the
details.
11
2
3
Reply or call back.
• Press
to reply with a text message.
• Press
to call back by a voice call.
Sent
The Sent box is used to store the messages that are
sent.
a text message that are sent and saved to
the FWT.
select Options for the following operations.
a text message that are sent and saved to
the SIM card.
• Reply: reply the message
• Forward: forward the message
• Edit before call: edit the number
• Save number: save the numbers retrieved from
an SMS to the FWT or SIM memory or an existing
entry in the contacts
1
Select Messages > Sent to select a message
and to view the details.
2
Forward or make a call.
• Delete: delete the message
Drafts
The Draft box is used to store the messages that you
save and that fail to be sent.
a text message saved to the FWT.
• Press
to forward a text message.
• Press
to make a voice call.
SMS Settings
1
Select Messages > Settings on the menu.
2
Set the parameters related to messages:
a text message saved to the SIM card.
12
• Message center: You can set your FWT to
retrieve the message center number from the SIM
card or the FWT. If you delete the information by
accident, contact your service provider.
• Valid period: The time within which a message
can be kept in the message center after it is sent.
• Auto save: You can set that the message is
saved automatically to Sent after it is sent.
• Common phrases:Your FWT is preset with some
commonly used phrases for automatical replying
and sending messages when you are answering a
call. You can select Messages > Settings> Common phrases to edit the phrases.
Delete All
You can select Messages > Delete all to delete the
messages in Inbox, Sent or Drafts.
• Save to: To set the position for saving messages.
• Status report: You can set it to On or Off. If you
set it to On, the network send you the report on
whether the message reaches the recipient.
• Concatenated SMS: You can set it to On or Off. If
you set it to Off, you cannot edit and send messages longer than the limit of a single SMS.
• Voice Mail number:You need to apply for the
voice mail services from your network operator.
After setting the correct number provided by your
network operator, after press and hold the 1 key in
standby mode, the FWT dials the voice mail number automatically.You can select Messages > Settings> Voice Mail number to set the number.
13
6 Call Log
The last dialed calls, received calls and missed calls
are saved automatically.
Making Calls from Call Log
1
Select Call Log and then press the up/down
scroll key to switch between Missed, Recived
and Dialed.
2
Select a record. Press
3
Select Options for the following options.
to make a voice call.
• Edit before call: edit the number before making a
call
• Create Message: send a SMS
• Save number: save the number of the selected
record to the FWT, the SIM card, or an existing
contact
• Voice Call: make a voice call
• Details: view the details of the selected record
• Delete: delete the selected record
14
• Mark/Unmark: mark/unmark a record or all
records
Other Operations
Calls Status
Select Call Log > Calls status to display the information about voice calls, and data services. In the
voice call, and data screen, you can select Reset to
clear all records.
Delete All
Select Call Log > Delete all to delete the records of
All calls, Missed, Received, or Dialed.
7 Tools
Alarms
Calculator
Setting Alarm Clocks
Select an alarm. Press
, and then you can set it.
Select Tools > Calculator on the main menu.
• Press the numeric keys to enter the figures.
• Press the scroll key to enter the operators.
Prompt Interface for an Alarm
• Press the left soft key to clear.
When it is time for an alarm clock to ring, the tone
sounds and a prompt is displayed. Press any key to
stop it, or select snooze or stop the prompt.
• Press the # key to enter a radix point.
If your FWT is powered off, the alarm can still ring.
When it rings, you can choose to power on the FWT.
• Press the right soft key to exit Calculator.
• Press
to enter an equal mark.
World Time
Stopping the Alarm Clock
Select Tools > World Time on the main menu.
Select an alarm clock from the list, and press the left
soft key to deactivate it.
You can view the time of important cities around the
world. To switch among the time zones, press the left/
right scroll key.
Calendar
Select Tools > Calendar and select Options. You
can perform the Go to... operation to go to a certain
date directly from the month view screen.
If the daylight saving time (DST) is used in your city,
you need to set the FWT to DST. Then, you can get
the right local time. To set the FWT to DST, switch to
the desired time zone and then select Options > Set
Time Zone.
15
8 Profiles
Selecting a Profile
• Prompt tone volume: Adjust the volume of
prompts.
1
In the Profiles screen, select a profile.
• On-off tone: Activate or deactivate the power-on
and power-off tones.
2
Activate the selected profile.
• Press
to activate it.
• Select Options and select On to activate it.
Editing a Profile
1
In the Profiles screen, select a profile.
2
Select Options and select Edit to set it.
• Voice call tone: Select a ring tone for incoming
calls.
• Message tone: Select a message tone.
• Tone volume: Adjust the volume of rings.
• Key tone volume: Adjust the volume of keys.
16
You can select a profile, and then select
Note • Options
and select Rename to change the
name of the profile.
• You cannot rename any profile preset in your
FWT.
9 Settings
Note Please use an external power adapter and a
battery together when you set the FWT.
In the Settings screen, select Display Settings.
• Contrast: Set the contrast level of the display.
Phone settings
• Backlight time: Set the delay time of backlight.
In the Settings screen, select Phone settings.
• Phone Language: Select a language. You can also
select Auto to set it to be the same as the language
that is used in your SIM card.
• Input Language: Set the language used to enter text.
• Date and Time: Change the system time for the FWT.
• Date Format: Change the display format of the date.
• Shortcuts: Assign the frequently used functions to the
keys as shortcut keys.
• Keypad lock period: After enabling the auto keypad
lock function, you can set the keypad lock period. If
there is no operation on the FWT within a preset period
of time, the keypad is locked automatically. You can
press the * key, then press
Display Settings
to unlock the keypad.
the FWT is not used for a long time with no
Note Ifadapter
or battery, you may need to set the time
after switching the FWT on.
• Greeting message: Enter a greeting message that
appears on the screen when you power on your FWT.
Call Settings
Minute Alert
If the function is activated, your FWT notifies you of
the call duration by giving an alert several seconds
before the end of each minute.
Auto Dial
If the function is activated, the number you key in is
dialed automatically at the time you set.
Call Forwarding
When you can not to answer the phone or you want
to forward a call, you can use this function.
17
Call Barring
My Number
You can restrict and allow all outgoing calls by activating this function.
With this function, you can save your own numbers
on the SIM card. You can select Options to edit or
delete the records.
Call Waiting
When you are in a conversation, you can answer a
third call by activating this function.
The function is network-dependent. For more information, consult your service provider.
Calling ID
This function allows you to select whether to display
your number on the phone of the party who calls you.
The function is network-dependent. For more information, consult your service provider.
Select Line
It is used to set the call line for your FWT. Two
options are available: Line 1 and Line 2.
18
Call Barring Password
This function is used to change the password for call
barring. Select Call barring password from the Call
settings screen. Now you can change the call barring password.
old call barring password is provided by
Note The
your network operator if it is the first time for
you to change the password.
Network
You can change the settings for the network. Select
Settings > Network for following options: Mode,
Select network.
Security
You can change settings related to the FWT security.
Select Security from Settings, and select the following security setting items:
Reset
This option is used to reset user configurations of the
FWT settings to the factory settings.
Password lock
This option is used to enable or disable Phone lock
and PIN lock.
Change password
1
Select Security > Change password.
2
Select one item.
3
Enter the old password (The initial phone password is 0000.)
4
Enter a new password.
5
Enter the new password again to confirm.
modify the PIN code, you must set PIN
Note • To
lock to On first.
• If you enter the wrong PIN or PIN2 for three
times, the SIM card is locked. You need the
PUK or PUK2 code to unlock the SIM card. If
you enter the wrong PUK or PUK2 code for
10 times in total, the SIM card is locked permanently.
• The PUK or PUK2 code is delivered with the
SIM card. If you do not receive the code or
forget it, contact your service provider.
Fixed Dialer Number
If your SIM card supports the Fixed Dialer Number
(FDN) function, you can select Security > Fixed
dialer number to set the limit for phone numbers.
19
10 Wireless Data Service
Installing Management
Program
the above interface doesn’t appear,
Note • Ifrestart
the FWT.
• Still if the setup program doesn’t run
automatically then double click the"FWT
connect" CD ROM appear in My Computer.
This section introduces how to install the management program and the hardware driver. The procedures are for your reference only.
This takes the Windows XP operating system (OS)
as an example to describe how to configure your
computer. For other OSs, the configurations may be
different and you need to configure them as required.
operating system configuration requireNote The
ment of a PC: Windows 2000, Windows XP,
4
According to the instructions, click Next to proceed.
5
Read License Agreement carefully. Then select I
Agree and click "Next".
6
Select an installation path and click Next.
Vista (32-bit or 64 bit).
20
you do not select a path, the default
Note • Ifpath
is used. You can click Browse… to
1
Use the USB cable to connect the FWT and a
PC.
2
The system finds the new hardware and installs
the modem driver automatically.
7
In the Folder text box, enter the name. Then click
Next.
3
The setup program automatically starts. Then,
the installation interface appears.
8
If a prompt indicating that the software has not
passed Windows Logo testing is displayed, click
Continue Anyway to proceed.
change the path.
9
Click Close to complete.
4
Click Connect to dial up. After the login completes, you can access the Internet.
10 A short-cut icon appears on the PC desktop and
then the FWT restarted.
Applying the Data Service
You can apply and enjoy such data services as Web
browse. For details, consult your service provider.
The procedures are for your reference only.
Note
• The profile information varies with networks. For details, consult your service
provider.
• The connection rate shown after the
dial-up is connected may be the connection rate of the data port. For details,
consult your service provider.
Dialing Up
1
Double click the newly created "FWT Connect"
icon.
2
Click "Yes" and continue to "FWT Wireless Connection Setting" window and Select "New" to create a new profile.
3
Enter Profile Name, Username & Password and
"Save" the profile and click "OK".
21
11 Warnings and Precautions
To use the FWT correctly and safely, read the following cautions and let
your children know these before using the FWT.
Basic Cautions
• According to the packing list, check items in the package box to make
sure that they are complete and undamaged.
• Before installing and using the FWT, read this user guide carefully
Electronic Device
Power off your FWT when it is close to high-precision electronic devices.
The FWT may affect the performance of these devices.
Such devices include hearing aids, pacemakers, fire alarm systems, automatic gates, and other automatic-control devices. If you are using an electronic medical device, consult the device manufacturer and confirm
whether the radio waves affect the operation of the electronic device.
Hospital
Pay attention to the following points in hospitals or health care facilities:
• Do not take your FWT into the operating room (OR), intensive care unit
(ICU), or coronary care unit (CCU).
• Power off your FWT when it is close to medial devices.
• Observe any instructions wherever the use of wireless device is prohibited.
Traffic Safety
• Do not use your FWT while driving. Secure the FWT on its holder. Do
not place the FWT on the seat or other places where it can get loose in a
sudden stop or collision.
• Observe the rules and regulations of airline companies. Power off your
FWT before boarding an aircraft.
Operating Environment
• Do not place magnetic storage media such as magnetic cards and
floppy disks near the FWT. Radiation from the FWT may erase the information stored on them.
22
• Do not put your FWT, battery, or other accessories in containers with
strong magnetic field, such as the induction cooker and microwave
oven. Otherwise, circuit failure, fire, or explosion may result.
• Do not place or use the FWT, the battery or the power adapter near any
heat sources such as fire or a heater; or places with flammable gases;
or areas with electrical appliances that give out heat. Otherwise, it will
cause fire, explosion and breakdown of the FWT.
• Because the FWT needs to eliminate heat during working, put the FWT
and the power supply in a ventilated and shadowy place. Never airproof
the FWT or put something on it or place it near water, fire as well as
inflammable and explosive materials.
• Because the FWT contains precision devices, you should put it in a dry
place and away from moist materials.
• Before cleaning the FWT, please power off the FWT, and then disconnect the power supply and take out the battery. Before moving the FWT,
please disconnect the external power supply.
• Do not subject your FWT, battery, and power adapter to serious collision
or shock. Otherwise, battery leakage, FWT malfunction, overheating,
fire, or explosion may result.
• Do not place sharp metal objects such as pins near the earpiece. The
earpiece may attract these objects and hurt you when you are using the
FWT.
• Do not place the FWT in the area over the air bag or in the air bag
deployment area. Otherwise, the FWT may hurt you owing to the strong
force when the air bag inflates.
• In raining and lightning, disconnect the power adapter from external
power supply and power off the FWT, In this case, if the outdoor antenna
is used, do not touch the FWT and antenna.
• Put your FWT, battery, and power adapter in places beyond the reach of
children. Do not allow children to use the FWT, battery, or power adapter
without guidance.
• Do not touch the antenna when a call is going on. Touching the antenna
may affect call quality and cause the FWT to operate at a power level
higher than needed.
• The network signal condition will directly affect the quality and stability of
the call. Consequently, you should place the FWT in a place where it can
receive network signal well. Do not put FWT in a building with an iron or
metal roof. The distance between FWT and other metal materials (such
as metal brackets or metal doors and windows) should be greater than
25 cm and the distance between FWTs should be greater than 30 cm.
• Do not open the chassis in any case and the device should be maintained by a qualified maintenance department.
• Without permission, you are not allowed to modify the architecture and
security design of FWT. You must bear any consequence resulted from
the operation without permission.
• Your FWT is designed to conform to the authoritative international radio
frequency (RF) specifications. Use FWT accessories approved by Huawei only.
• The antenna(s) used for this transmitter must be installed to provide a
separation distance of at least 20cm from all persons.
• Please observe the national local regulations in the location where product is to be used. This product may be restricted for use in some or all
countries of European Union.
Emergency Call
You can use your FWT for emergency calls. However, connections in all
conditions cannot be guaranteed. You should never rely solely on the FWT
for essential communications.
Battery
• If the battery fluid gets into eyes, do not rub them. Wash with clean water
and seek medical assistance immediately.
• If the battery fluid contacts skin or cloth, wash with clean water immediately to avoid irritation to the skin.
• Do not dispose of the battery in fire. Otherwise, the battery may ignite or
explode.
• When installing the battery on your FWT, do not push the battery by
force lest battery fluid leak out or the battery crack.
• Do not connect two poles of the battery with metallic materials such as
cables.
• Do not disassemble the battery or solder the battery poles. Otherwise,
fluid leakage, overheating, fire, or explosion may result.
• If there is battery leakage, smoke, or strange smell, stop using the battery and keep it away from open flame to avoid fire or explosion.
• Disconnect the power adapter and take out the battery when the FWT is
not used for a long time.
• Do select its self-contained complete battery and power adapter; otherwise, the FWT may be spoiled. Huawei Technologies Co., Ltd is not
responsible for any consequences caused by using non-standard batteries or power supplies. Dispose of used batteries according to the
instructions.
• Dispose of the battery according to local laws or regulations.
Power Adapter
• Use AC power as specified for the power adapter. Any violation of this
rule may result in fire or malfunction of the power adapter.
• Do not short-circuit the power adapter. Short-circuiting the power
adapter may cause fire or malfunction of the power adapter.
• Remove the dust on the power plug regularly.
• Do not use worn-out power cords. Otherwise, electric shock, shortcircuiting of the power adapter, or fire may result.
• Do not put the power adapter near the container filled with liquid such as
water. If the liquid comes into the power adapter, electrical leakage or
other faults may result.
• If the liquid such as water comes into the power adapter accidentally,
remove the plug of the power adapter from the socket immediately.
• Disconnect the power adapter from the socket before cleaning or maintaining it. Otherwise, electric shock or short-circuiting of the battery or
power adapter may result.
• Ensure the plug of the power adapter is properly inserted into the power
socket when charging the battery. Improper insertion may result in electric shock, fire, or explosion.
• Do not place any heavy object on the power cord of the power adapter.
Do not damage, change, or pluck the power cord.
Using the USB Cable
When using the USB cable, observe the following requirements. Otherwise, the FWT or PC may fail.
23
• When the USB cable is used to connect the FWT to a PC, connect the
USB cable with the FWT first.
• When the FWT communicates with a PC, do not disconnect the USB
cable with the FWT, or the PC may fail.
• When disconnecting the USB cable, disconnect it from the PC first.
Environmental Protection
Please abide by the local laws in disposing of the package materials of
your FWT, consumed batteries and used FWT, and try to recycle them.
Regulatory information
The following approvals and notices apply in specific regions as noted.
0168
EU regulatory conformance
Hereby, Huawei Technologies Co., Ltd., declares that this ETS6630 is in
compliance with the essential requirements and other relevant provisions
of Directive 1999/5/EC.
The declaration of conformity may be consulted at
www.huaweidevice.com/certification.
Version: V100R001_02 Part Number:31019860
24