1
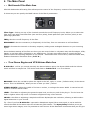
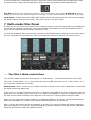
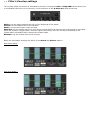
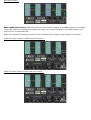
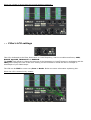
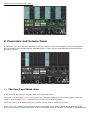
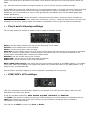
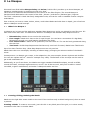
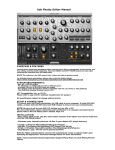
R.A.M.S.E.S. Rhythm and Motion Stereo Engine System User Manual www.xils-lab.com Table of contents 1 INTRODUCTION................................................................................................................................................4 2 FEATURES.......................................................................................................................................................... 5 3 INSTALLATION................................................................................................................................................. 6 3.1 SERIAL NUMBER.................................................................................................................................................. 6 3.2 WINDOWS (XP, VISTA, WINDOWS 7)................................................................................................................. 6 3.3 MAC (OSX 10.5.0 AND LATER)........................................................................................................................... 6 4 WELCOME TO R.A.M.S.E.S.............................................................................................................................7 4.1 R.A.M.S.E.S. AUDIO PATH................................................................................................................................. 7 4.2 TRY THE PRESETS.................................................................................................................................................7 4.3 TOOLBAR........................................................................................................................................................... 7 4.4 R.I.T.A. OR REAL-TIME CONTROLLING R.A.M.S.E.S.............................................................................................8 4.5 STILL NOT ENOUGH ? TRY THE MIDI LEARN FUNCTION............................................................................................ 8 4.6 OTHER RESOURCES...............................................................................................................................................8 5 PRESET MANAGEMENT................................................................................................................................. 9 5.1 MAIN TOOLBAR.................................................................................................................................................. 9 5.2 PRESET MENU..................................................................................................................................................... 9 5.3 SORT MENUS..................................................................................................................................................... 11 5.4 SORTING MENU: ADDITIONAL FUNCTIONS ............................................................................................................ 11 5.5 A/B COMPARISON.............................................................................................................................................. 12 5.6 ADJUSTING THE PARAMETERS (KNOBS)................................................................................................................. 12 6 THE MAIN PANEL........................................................................................................................................... 13 6.1 MULTI-MODE FILTER MAIN AREA........................................................................................................................13 6.2 TRUE STEREO ENGINE AND VCA/VOLUME MAIN AREA........................................................................................ 13 7 MULTI-MODE FILTER PANEL..................................................................................................................... 14 7.1 THE FILTER'S MASK CONTROL AREA.................................................................................................................... 14 7.2 FILTER'S ENVELOP SETTINGS................................................................................................................................ 15 7.3 FILTER'S LFO SETTINGS..................................................................................................................................... 17 8 PANORAMIC AND VOLUME PANEL.......................................................................................................... 18 8.1 THE PAN/LEVEL MASK AREA.............................................................................................................................18 8.2 PAN/LEVEL'S ENVELOP SETTINGS......................................................................................................................... 19 8.3 PAN/LEV'S LFO SETTINGS.............................................................................................................................. 19 9 LE MASQUE...................................................................................................................................................... 20 9.1 WHAT IS LE MASQUE ?..................................................................................................................................... 20 9.2 CREATING, EDITING, DELETING THE MASKS.......................................................................................................... 20 9.3 COPY, PAST, RANDOM....................................................................................................................................... 21 9.4 PLAY/STOP, SELECT TEMPO................................................................................................................................. 22 9.5 MASK CONTROLS............................................................................................................................................... 22 10 THE SPRAY DELAY....................................................................................................................................... 22 11 R.I.T.A SECTION............................................................................................................................................ 23 11.1 INTRODUCTION TO R.I.T.A............................................................................................................................... 23 11.2 R.I.T.A MODULATION MATRIX......................................................................................................................... 24 11.3 R.I.T.A YY PAD, MODULATION WHEEL AND PITCH BEND CONTROLLERS.............................................................. 24 11.4 LIVE SCENES - R.I.T.A PRESETS -.................................................................................................................... 24 12 CONFIGURING YOUR DAW TO CONTROL R.A.M.S.E.S. WITH MIDI DATA.................................25 13 OPTION MENU...............................................................................................................................................26 13.1 MAIN............................................................................................................................................................ 26 13.2 DISPLAY......................................................................................................................................................... 28 13.3 MISC............................................................................................................................................................. 28 14 CREDITS......................................................................................................................................................... 29 1 Introduction Thank you for choosing R.A.M.S.E.S. ! Imagine a multi effect that could ........ • • • • • Give Rhythm and Motion to any signal. Add, or restrain, Space and Depth in a true True Stereo Scene, bigger than 'pan', larger than life. Re-Shape, Re-filter, Re-envelope, and sculpt all that comes in. Create hypnotic, robotic sequences, but also being able to adapt to the most complex, subtle, Human rhythms. Make your Digital Synthesizer sounds analog. But also able to offer the gift of velocity to your vintage old hardware true analog synth. That's R.A.M.S.E.S. ! Three Grids to control rhythm of the Filter, the Panoramic and level, and any of other sources, from your Midi keyboard to two dedicated envelopes of LFOs. Filter Pan & Level Advanced -4- 2 Features R.A.M.S.E.S. offers: • True stereo path, independent Right and Left filtering • One multimode Analog like self-oscillating filter • An Advanced true stereo engine • Crunch • Delay with easy advanced settings • Three Grids based on masks : Multi and freely positionable steps. • All parameters are MIDI controllable R.A.M.S.E.S. is available in the following formats: • Mac OSX 10.5 and later: 64 and 32 bits, VST, Audio Unit, RTAS (Pro Tools 7.0 and later), AAX (32 & 64 bits) • Windows 7, XP and Vista: 64 and 32 bits, VST, RTAS (Pro Tools 7.0 and later), AAX (32 & 64 bits) Minimum system requirements: 1 Gigabyte of RAM and a 1 GHz processor. R.A.M.S.E.S. is a plug-in and is not available as a standalone application -5- 3 Installation 3.1 Serial number R.A.M.S.E.S. uses a simple proprietary serial number based protection. When launching R.A.M.S.E.S. for the first time, it will ask for this number. After submitting, you must close and re-launch it once to complete the registration. This serial number will never be asked for again, even when installing updates. Tip: It is always a good idea to back up this serial number, or to print it, in case you should have to reinstall R.A.M.S.E.S. (i.e. if you encountered a HD crash for example, or have to reinstall your OS). 3.2 Windows (XP, VISTA, Windows 7) To install R.A.M.S.E.S. on Windows XP, Vista or Windows 7, launch the installer file RAMSES_full_win_setup_xxx.exe. Please download the latest version from the XILS-lab website. Once you have accepted the license agreement, you will be asked to select the installation directory and provided with a default one. Presets and various files, like this manual, used by R.A.M.S.E.S. will be stored in this directory. Please note that this location is different from the VST install directory, which you will need to specify in the next step of the installer. Once the installation directory is specified, you will be asked to select the VST plug-in directory, with a suggested default location. Keep this default directory if you do not use the VST version. Important notice for Vista or Windows 7: be sure to use a folder owned by the user (do not use “c:/program files” for instance). Otherwise you will have to run your music application with “administrator rights”. The RTAS plug-in and its table control management ProTools are directly copied into the following directory: C:\Program Files\Common Files\Digidesign\DAE\Plug-Ins 3.3 Mac (OSX 10.5.0 and later) To install R.A.M.S.E.S. on a computer equipped with Mac OSX 10.5.0 or later, double-click the file RAMSES_full_osx_setup_xxx.dmg. Please download the latest version from the XILS-lab website. Then launch the install program, RAMSES.pkg, and follow the instructions. Warning: the install program will ask you for your system password. The various files of R.A.M.S.E.S. will be copied into the following directories: Library/Application Support/Digidesign/Plug-Ins Library/Application Support/Avid/Audio/Plug-Ins Library/Audio/Plug-Ins/Components Library/Audio/Plug-Ins/VST/ Library/Application Support/Documentation/XILS-lab/RAMSES Library/Application Support/XILS-lab/RAMSES users/username/Library/Preferences/XILS-lab/RAMSES -6- 4 Welcome to R.A.M.S.E.S R.A.M.S.E.S. Audio path 4.1 R.A.M.S.E.S. is a multi-mode analog like filter followed by a Stereo Engine, a Volume/Crush effect and simple but easy and powerful delay as described by the next schematics Every modules are fully modulated by Envelopes, LFOs, Masques based sequencers, MIDI real time messages (Pitch-Bend, Modulation Wheel, Velocity, Note ON, After Touch, ….). The modules are mono or stereo, depending on your input and output channel number : • Input Mono and Output Mono : Filter, Volume, Crush and delay are monophonic (No Stereo module) • Input Mono and Output Stereo : Filter is mono, Stereo, Volume, Crush, Dealy are stereo • Input and Output Stereo : all modules are stereo Try the presets 4.2 R.A.M.S.E.S. comes loaded with a lot of useful presets, that you can consider as starting blocks, or use as it. As R.A.M.S.E.S. is a MULTIEFFECT, presets are spread in different categories : • • • • • Hybrid : Ramses will control Filter, Pan, Volume, Crusher, Spray Delay simultaneously, including added Real Time modulation, the solution for very complex modulations Filter Only : Ramses will only control the filter ( Sweeps, Wah Wah, AutoWah, ReFilter, StepSequences etc ) Level Only : R.A.M.S.E.S. will only control the volume ( FadeIn-Out, Tremoloe, TranceGate, etc ) Pan Only : R.A.M.S.E.S. will only control the Balance/Pan ( Autopan, Pan Sequences, Narrow to Large Stereo) Real Time Only : You can use R.A.M.S.E.S. Rita engine to control it with any keyboard or Midi Device: The key for live fun and organic performances. Tip : To display presets by category, go to the Menu Bar, top left, and ensure that « TYPE » is selected as the main criteria, then click in the « Criteria field » to open the drop down menu. Presets will be displayed according to their type category. Thanks to the “Lock” feature (advanced mode Only), you can browse presets, keeping the dry/wet in the full wet position. 4.3 Toolbar Note: The toolbar at the top of the interface allows you to load or save presets, make a comparison between settings A and B, or modify the options. These functions are described in detail later in this manual. Click on the PRESET name field to show the available presets in the current sorted group. Please note that selecting a new preset without saving your current settings will erase any changes you have made to those settings. Click on the sort arrow button to display the current sorted group and to choose the preset within it. You can sort presets by: Author, Feeling, Type, Style, Bank or Projects. Click on the sorting label over the sorted group name, to sort your preset according to your preferences Please note that R.A.M.S.E.S. powerful Preset management is described in full details in chapter 5 of this manual. 4.4 R.I.T.A. or Real-time controlling R.A.M.S.E.S R.A.M.S.E.S. real time R.I.T.A Module let you control your multi-effect via your Midi Keyboard : You can for example simultaneously control Filter CutOff with velocity, trig the filter envelope with Key Strokes ( Note ON), Control Balance with Keyboard Scaling ( Number of note played) Cutoff again AND Delay Level with the Mod Wheel while still being able to increase Resonance with Aftertouch, and Crunch with the Expression Pedal. In R.I.T.A. all these controls represent a LIVE SCENE, and the good news is that R.I.T.A. has its own presets, so can can load new SCENES, as well as save your own Live Scenes, completely adapted to gear, way of playing, desires and needs ! Note : You can see the list of R.I.T.A. Factory Scenes Presets in appendix xx at the end of this manual. 4.5 Still Not enough ? Try the Midi Learn function Almost any R.A.M.S.E.S. parameter can be controlled by MIDI. In order to make it work, or use R.I.T.A. module ( Realtime Interactive Transformation Area ) you’ll first need a MIDI controller, like a keyboard or any other device than can send midi notes and/or Midi Controller DATA, and then to assign a MIDI track to Ramses ( The process can be different according to the host you use ) Once this is done ( you can check that it works by moving the Mod Wheel or play a note and you should see the mod wheel move on Ramses GUI, and the note played be reflected with its velocity in the XY pad at the bottom of Ramses ) To assign a Midi Cc to any R.A.M.S.E.S. Parameter, first go to option, and choose « Open Midi Settings Panel ». In this Panel Click on Parameter to display the list of all the parameters and choose the one you want to automate. Then just click the learn button, and move any slider/knob on your Midi Device, and it will be automatically assigned to this parameter. The assignation list is permanent, and will work with all presets. Note : Ctrl+Alt+cmd+click on a Midi assignable control, allows to directly open the Midi CC panel with the correct parameter selected, ready for learning. 4.6 Other resources You can also watch the Tutorial Videos on XILS-lab and Le Lotus Bleu Youtube channels. Sometimes things are much easier to understand watching a video than reading the manual. At R.A.M.S.E.S. release time, there is already a lot of video material. There will be much more as time goes by. Then, Once you’ll have experimented with all the above we nevertheless recommend that you …. Carry on and read the manual. We’ve made the most to make R.A.M.S.E.S. useful, fun, efficient and usable at once. Then, R.A.M.S.E.S. is a VERY complex and subtle piece of software. If you want to take the step from fun utility to mastering it thoroughly, you’ll be fully rewarded, and you’ll soon find out that R.A.M.S.E.S. has a big depth in programming and tweaking. Its indeed only limited by your imagination, and can do things that even we, as the authors of the program, are not able to imagine. Each button, knob, concept, is explained in depth in the manual, and you can combine them in many various ways ! 5 Preset Management 5.1 Main Toolbar At the left of the toolbar you can find one, displaying the category name (Bank, Author, Type, Style, Feeling or Project), which open the sort management menus. The first text fields show the current sorting group and the second one shows the current preset. Clicking on the name field of the category or preset names opens the corresponding menus. Note: When a parameter is modified, the name of the preset is followed by a *, indicating that the current settings of R.A.M.S.E.S. no longer match the stored preset. When you want to save a modified preset, click on the Save or Save As button. In order to prevent you from erasing them, the Factory presets cannot be modified. When you edit a Factory preset, the Save button will be grayed out, and you will have to use the Save As function to save it in another bank. If you edit any other preset than a Factory one, the Save and Save As function will both be available. The main difference is that the Save function will save the preset under its current name, and with its current tags, overwriting the previous incarnation of the preset, while the Save as function opens a dialog box where you can modify the name of the preset, the bank in which it will be stored, and all its tags The settings of R.A.M.S.E.S. are then saved in the currently displayed preset, and the * disappears. Clicking on the Save As button to duplicate and save this preset with an other name and/or to other sorting groups, clicking on the Move To will change its name and/or other sorting groups. 5.2 Preset menu Factory Presets: R.A.M.S.E.S. contains many Factory Presets, including standard well-known Bucket-Brigade Delay based chorus. Hint: We’d recommend to Choose TYPE as first criteria in the sorting menu when you begin to play with R.A.M.S.E.S, and use the preset type corresponding to the situation. Click the Preset name field to open the preset menu. Here you can choose and load another preset from the current sort groups into R.A.M.S.E.S You can also use the Up (next preset) /Down (previous) arrows located at the right of the preset name to browse presets In this menu, other actions are also available: Delete Preset: use this to delete the current preset (a popup confirmation window appears). This option is only available if the current preset is not a factory one. Export Preset: Use this function to export the current preset in an external file (.mskd format). This file can be imported later as a new bank. It always makes sense to back up your presets on external support like CD ROMs etc. Open preset Information (or click on SAVE AS): opens the following preset information window where the name and all other information related to the current preset can be displayed or changed. In this window you can modify the Name of the preset, specify the Bank in which the preset will be saved, and also enter information in the other fields: • • • • • Author (Your name, otherwise used by Sound Designers for factory presets), Type (Category of the instrument like Keys, Leads, Basses, etc.) Style (Musical Genre), Feeling (Cold, warm, soft) Project ( My_Song, My_Live_Project ). Note: You can also see its creation date and the last update date. To modify a preset name, click in the preset field and enter the new preset name this will also save all the current settings. To change preset information, click on the display, this will open a menu when you can select one of the existing items. Note: You can add a new item in any category, and therefore create custom banks, custom styles, Projects, categories of instruments etc. To add a new item in any filed, select “New….”at the bottom of the list. Note: You may have to browse until the end of the list in order to select “new” depending on its length. A Pop Up window opens when you can enter the new name. The current preset will then be associated to this new item. Note: Please be aware that creating too many categories can also have its drawbacks and make browsing become from difficult and painful to nearly impossible. Should you create around 200 different custom instrument categories, it would become very difficult to browse the library using the Style sorting. Once you have filled all the desired/required fields: SAVE AS: Will save the current preset in the chosen Bank, with its new (or unchanged) Name, tags in all the fields you filled in. MOVE TO: Allows saving the current preset in another location. This is handy to gather a lot of preset into a single location, or User Bank, which you can export in a single file containing all the presets you created or edited for a given project. CANCEL: Will just cancel all operations and return to the standard R.A.M.S.E.S. GUI. Sort menus 5.3 The sorting menus are a powerful and unique tool. Allowing you to perform sophisticated tasks like displaying the preset list with one of the following selections: • • 5.4 All the Chorus tagged with a given musical genre All the presets you have made for one tack, one live project etc. Sorting Menu: Additional Functions In this menu, other actions are also available: Delete: deletes all of the presets of the current group that are not factory ones. IMPORTANT: Use this function with care: If the bank does not contain any factory presets, ALL PRESETS IN THIS BANK WILL BE PERMANENTLY DELETED. Rename: modifies the current group name. Selecting this choice will open a window where the new name will be entered. Use Factory: enables or disables the display of factory presets. Sort By: sorts the presets according the bank, author, project, or shows all presets (Bank Name, Author Name, Project Name, All Presets). The preset menu will show presets of the same category (same author, same project or same bank). Export Bank: exports a bank in R.A.M.S.E.S. proprietary cross platform format, (Mac and PC). The selected bank (i.e. the bank which contains the currently active preset) will be exported to a user specified location on your hard drive. Import Bank: allows you to browse your hard drives to select a file and imports a Masque bank. A/B comparison 5.5 You can store two different settings at the same time and instantly switch from one to the other to compare their settings. These two settings are stored in the A and B memories. When you launch R.A.M.S.E.S, the default-activated memory is A. When you load or modify a preset, this memory –A- is also modified in real time according to your edits. You can switch to B memory by clicking on the B button. To copy the current active memory content to the other memory slot, just press the button labeled -> or <-, according to the current active memory. With this A/B comparison system, you can easily have two settings and compare them in a convenient way. Adjusting the parameters (Knobs) 5.6 On R.A.M.S.E.S, most sound parameters, like the delay time and feedback, or the filter’s Cut Off frequency are controlled using Knobs. To adjust the parameters of R.A.M.S.E.S. with the mouse, you have two axes: horizontal and vertical, which will give the same results. To increase a parameters value, click and drag the knob to the right or to the top. To decrease a parameter value, click and drag the knob to the left or to the bottom. If you right-click on a parameter, or if you hold shift while clicking, you can adjust the parameter with fine precision (the ? button of the toolbar displays a panel summarizing these shortcuts). Adjusting and modifying locators and masks within the grids are explained below. Keyboard shortcuts In addition we have provided some soft keys combination to perform several very useful tasks: Windows: • • • CTRL+left click: reset parameter to its default value. CTRL+right click or CTRL+Shift+left click: initialize the default value of the parameter. Win+Alt+CTRL + click: open the MIDI Control panel, with the parameter already selected. OSX: • Apple+left click: reset parameter to its default value. • Apple+Shift+left click: initialise the default value of the parameter Apple+Alt+CTRL + click: open the MIDI Control panel, with the parameter already selected. 6 The Main Panel 6.1 Multi-mode Filter Main Area XILS-lab Multimode 0df Analog filter allows precise control of the frequency content of the incoming signal. In this area you can specify the BASE values of the filter’s parameters. Filter Type : Clicking on any of the 6 switch around the cut-off frequency knob, allows you to select the filter type, two poles Low-Pass filter (two and four poles), Band-pass filter (two and four poles) or two poles high-pass filter FREQ : Set the cut-off frequency of the filter RESONANCE : Set the resonance (or Emphasis) of the filter, from no resonance to self-oscillation DRIVE : Increase the internal no-linearity response, adding some analogish distortion to your incoming signal. Once the base settings of the filter are done you can control them in a dynamic way with Envelopes, LFOs, Masks, in real time with a keyboard or any MIDI device. To learn more about how to control the filter please consult the following chapters of our manual : Multimode Filter Control Area, Advanced Mask Area, Realtime Interactive Transform Area ( R.I.T.A. ) 6.2 True Stereo Engine and VCA/Volume Main Area R.A.M.S.E.S. will let you control precisely the Stereo Balance point, the Stereo Width and the Volume which will feed its output bus. The whole Audio Path in R.A.M.S.E.S. is in True Stereo. BALANCE : Move the red ball to place the signal in the left, right, or center ( Default value) of the Stereo Scene. This is a WYSIWYH ( What you see is what you hear ) control STEREO WIDTH : Adjust the width of the bar to reduce, or enlarge the stereo Width. A narrow bar will result in a narrow stereo width. LEVEL : This fader is adjusting the general output level, at the very end of the plug-in. The led over the fader is lighten when clip occurs. It remains enlighten during a few seconds. CRUSH : this fader is adjusting a simple but efficient bit/sample rate reduction, allowing to add modern digital distortion to your sounds. Tip : Even if you feed R.A.M.S.E.S. input with a Monophonic signal, like a mono synth, it can be useful to control the width of the stereo scene for at least two good reasons : The Spray Delay will allow you to get some huge stereo images, even if it processes a mono source. All the Panoramic movements that you can give to a mono signal when using Masks, EV, LFO, or Real Time control will be subdued by the global stereo width you have set here, unless you have opted for a dynamic control of the Stereo Width simultaneously.. Dry/Wet : Control the Mix between the incoming ( DRY) and processed ( Wet) signal in R.A.M.S.E.S.. Though usually you will only use the 100% WET position ( Full right ), it can be useful sometimes to add a bit of DRY signal. Lock Switch : Please note that the DRY/WET signal is saved with each preset but if you want to browse the preset without modifying this control, lock it by clicking on the lock switch. 7 Multi-mode Filter Panel In this area, you will learn how to control the Frequency content of the incoming signal by modulating the cut-off and the resonance of the filter, using the dedicated Filter Mask Grid, the Filter dedicated LFO ( FLFO), and the dedicated Filter Envelope generator ( F-EV) To enter the MultiMode Filter Control Area, just click on the FILTER button located at the top center left of the unit. Versailles will now display the Filter Grid-Mask area, and the F-LFO and F-EV area under it. 7.1 The Filter's Mask control Area The two Filter Masks Levels have fixed targets ( or destinations) : Cut Off and Resonance of the filter. The Level 1 of each Mask ( White ) will control the Filter’s CutOff, while the Level 2 of each mask ( Blue ) will control the Resonance of the Filter. Neutral point : When a Level 1/2 is vertically centered, no action occurs, and no difference is heard while the signal crosses the Mask area. If the Level 1 of a mask is set below the center of the Mask, the CutOff of the Filter will be lower when the signal goes thru the Mask. Resp. If the level 1 of a Mask is set ABOVE the center, the CutOff Frequency of the filter will be raised according to how high the Level when the incoming signal crosses the Mask. Note : To know more about Masks handling ( Create/Delete Masks, L-R Locators, Lenght, Snap/Quantize, MultiSelect, MultiEdit etc ) please consult chapter Mask Management in this manual. Note : You can also control the Drive parameter of the Filter. To know more about this please consult the following chapters of our manual : Advanced Mask Area, Realtime Interactive Transform Area ( R.I.T.A. ) Using the grid and the masks are explained below 7.2 Filter's Envelop settings The envelop within this section is dedicated to the Filter. Turning the RES or FREQ AMNT knobs allows you to modulated either the cut-of frequency or the resonance of the R.A.M.S.E.S. Multi-mode filter. DELAY : set the delay between the trig and the beginning of the attack. ATTACK : set the attack time of the envelop. DECAY : set the decay time of the envelop. SUSTAIN : set the sustain level, the level of the envelop during all the time the control signal in activated. When the envelop is trigged with a one shot signal (see below), then the envelop is siwthcing to the release state immediately after reaching the sustain state. RELEASE : set the release time of the envelop. Below are schematics showing the effect of the Attack and Release feature : With short attack : With long attack : With long Release : BEAT/MASK/MIDI switch : this switch set how the envelop is trigged. In the BEAT position, it is trigged every beat. When set to MASK, it is trigged and gated every masks and finally in the MIDI position, it is trigged every received Note ON. Below are schematics showing the effect of the envelopes when trigging by the masques or the Beat When the decay+attack is smaller than the masque : When the decay+attack is larger than the masque : When the release is larger than the interval between masques : 7.3 Filter's LFO settings This LFO, dedicated to the Filter, Resonance or Cutoff frequency, has five mixable waveforms, SAW, RAMPE, SQUARE, TRIANGLE and RANDOM. The AMNT knob allows to change the amount of the Resonance or Cutoff frequency modulation and the FREQ knob change the rate of the LFO. Clicking on the led allow to tweak the rate in multiple or submultiple of your DAW tempo. The LFO can be FREE or reset every Beat or Masks. Below are some schematics explaining this. When the LFO is reseted every masks : When the LFO is reseted every Beat : 8 Panoramic and Volume Panel In this area, you can control the Panoramic and the Volume of the incoming signal, using the dedicated Pan-Level Mask Grid, the Pan-Volume dedicated LFO ( P-LFO), and the dedicated Pan-Volume Envelope generator ( P-EV) 8.1 The Pan/Level Mask Area It has a similar structure to the Filter Mask area explained above. The Level 1 of each Mask ( White ) will control the Panoramic Position of the incoming Signal, while the Level 2 of each mask ( Blue ) will control the Volume of the incoming signal. When the Level 1 is vertically centered, no action occurs, and no difference is heard. If the Level 1 of a mask is set below the center of the Mask, the incoming signal will be directed to the LEFT of the stereo field when the signal goes thru the Mask. Resp. If the level 1 of a Mask is set ABOVE the center, the signal will be directed to the RIGHT of the Stereo Field when the incoming signal crosses the Mask. Tip : Smooth Volume transitions using the Masks to control Volume using the Masks envelops. If the Masks are continuous, and that there’s no room between them, you might encounter some clicks and abrupt volume falls and rises which are a typical StepSequencer effect consequence. To get smoother transitions, you must introduce a more or less gap between the Masks, then use the Masks Attack and release parameters. To do this very quickly : Select all Masks ( Using the select all button), Point the mouse towards the right locator of any of the selected masks until it becomes « green ». Drag the right locator to the left until all Masks are narrower. Adjust attack and release 1 parameters until you get the desired smoothness. 8.2 Pan/Level's Envelop settings The envelop within this section is similar to the envelop in the Filter section. DELAY : set the delay between the trig and the beginning of the attack. ATTACK : set the attack time of the envelop. DECAY : set the decay time of the envelop. SUSTAIN : set the sustain level, the level of the envelop during all the time the control signal in activated. When the envelop is trigged with a one shot signal (see below), then the envelop is siwthcing to the release state immediately after reaching the sustain state. RELEASE : set the release time of the envelop. AMNT PAN : set the amount of the Panoramic modulation AMNT LEV : set the amount of the Level modulation BEAT/MASK/MIDI switch : this switch set how the envelop is trigged. In the BEAT position, it is trigged every beat. When set to MASK, it is trigged and gated every masks and finally in the MIDI position, it is trigged every received Note ON. See the Filter's envelope chapter for more explanation regarding the envelop trig 8.3 PAN/LEV's LFO settings This LFO, dedicated to the Panoramic (Balance) and Output Level has the same feature than the LFO dedicated to the filter (see above) It has five mixable waveforms, SAW, RAMPE, SQUARE, TRIANGLE and RANDOM. The AMNT knob allows to change the amount of the Resonance or Cutoff frequency modulation and the FREQ knob change the rate of the LFO. Clicking on the led allow to tweak the rate in multiple or submultiple of your DAW tempo. The LFO can be FREE or reset every Beat or Masks. 9 Le Masque Inherited from XILS-lab Le Masque:Delay and Oxium, R.A.M.S.E.S. provides up to three Masques, all operating simultaneously in perfect sync with your host. The first one is hardwired and dedicated to the control of the Filter Engine. The second Masque is hardwired and dedicated to the control of the VCA ( Volume ) and Stereo ( Balance/pan ) Engines. The Third « Advanced » Mask has freely assignable levels, and can be used to establish custom complex modulations. Prior to show you how to create, delete, select, multi select Masks and edit them in depth, just a few lines about Le Masque overall concept. What is Le Masque ? 9.1 Le Masque can be seen as first sight as a standard Step Sequencer, and it can indeed be used like one. It’s also much more than that. The differences between Le Masque and standard Step Sequencers are : • • • • Discontinuity : Masks do not need to be continuous. Free Length : Mask don't have to be of equal length. You can have a succession of a big Mask, followed by several very small masks. Possibilities are huge. Free Time Position : mask can be quantized, but don't have to. The can be freely positioned along the time line. Two levels : Unlike Step Sequencers that have only one level of control, Masks have TWO levels. Up to four bars Timeline loop ; Most Step Sequencers use only one bar. Masks have their own envelopes, including a release stage, prolonging its actions outside of the Mask’s zones. Consequences ! Le Masque can create, or be adapted to, the most complex human rhythms and shuffles. You can mix triplets with 16 th notes for example very easily. The Release of the envelope can be used to get a soft modulation tail. Additionally, as you’ll see above, the Masks can trigger standard DADSR Envelopes, as well as LFOS, control LFO rates, envelope segments times, etc etc. Put all this at work, and you’ll be able to create incredible, organic modulations, and make Le Masque breathe and live. 9.2 Creating, Editing, Deleting the Masks Masks are the light blue zones visible on the Grid. If the Grid has only its black background, then no mask is present. Creating a Mask: To create a new mask, just Left click in any black part of the grid, or in other words, somewhere else than in another Mask. If you only left click in the grid a new mask with a standard length will be created. You can always change the length of the mask later. If you want to specify the length of a mask at once while creating it, you’ll have to click and drag: Just left click to define the place of the left locator, and while keeping the left click on, drag the mouse until you reach the desired end of the Mask. Moving the mouse over a mask select it : the color changes, as well its left or right locators when the mouse is ready to catch them. You can create up to 16 different Masks. Deleting a Mask: Just Right Click in a Mask area, i.e. between its two locators, to delete it. Editing Mask’s Locators: Just click and drag the left or right locator of a Mask to change their position in the Grid. The Locators can also be quantized. (See Below) Editing Multiple Masks : Clicking on the ALL, 1-3 or 2-4 buttons, allows you to select all masks, only the odd or only the even masks. Using CTRL+ Click on a masks selects it. You can then edit several masks very easily. The Mask Levels Parameter: Within in each Mask you can see two little white and red horizontal bars (A freshly created Mask will inherit two default one located at mid height) this are the Levels Parameter. This is not a standard level parameter, but a modulation source, which can be used to further modulate R.A.M.S.E.S. Parameters. To increase, or decrease, the levels of each Mask by click-Drag the white or red bar. Tip : When the white and yellow bars have the same value, only the white level is visible ( the yellow bar is under the white one ) Moving the white bar will allow you to see the yellow one. Using ALT modifier will allow you to move the yellow bar instead of the white one, regardless if it’s visible or hidden. 9.3 Copy, Past, Random In the overview panel, when the three grids can be see in a glance, you can easily copy past a grid from one to an other. Just click on the COPY button of the grid you want to be copied from, and then to the PAST button of the grid you want to be put (this will overwrite the current masks). The RANDOM button allows you to create masks in a random, which may help you to discover new possibilities. 9.4 Play/Stop, select tempo The TEMPO knob allows you to select which multiple or submultiple of your DAW tempo, the grids will run. From :4 to x2, the range allows you to choose the right speed and then with the 16 beat of each grids, getting up to 64 beat loops. Hitting the Play or the stop button allows you to control the grid, independently of your DAW. Of course, these buttons are MIDI controllable. 9.5 Mask controls Under the grid, you can find various parameters ATTACK/RELEASE 1 and 2 : two pairs of attack/release parameters, one for each of the internal locator parameter, are available. Le Masque, as a source of modulation, offers either the fix level of its internal value, either the output of an attack/release envelope, fed with these levels. When the current cursor is inside a locator, Le Masque output the level. When it is outside, it outputs a zero (no modulation). Grid display : The grid can be off 4, 8 16 or 32 bars, each bar divided in 1/3 (for triplets), ¼ (for quarter notes) 1/8 or 1/16. You can easily place a locator on the grid thanks to the horizontal and vertical “SNAP” switches. Lock Function : Locking the grid by clicking on the “Lock” label avoid to change your settings by error. Only the Levels can be changed, not the mask position. Number of bars: Specifies the length of the Grid loop in bars. The choices are 1/2/3/4 bars. Please note that the existing Masks will be preserved if you change the number of bars on the fly. Use the Snap Mode to quantize locators and align them according to the GRID PRECISION settings. Grid Precision: Displays green vertical bars based on a musical division of the bar and beat. These vertical bars are just indicators, which help you, define, create and edit the Masks with the best possible precision. However, please note that, when the SNAP function is enabled, the quantized locators will be positioned according to the Grid Precision settings. ZOOM : Le Masque provides two zoom level. By clicking on this label, you can get the full masque, zoom1 (x4) or zoom2 (x8). When zooming move the view by moving the slider just above the Grid. GRID INIT : opens a menu to save the current settings of Le Masque as a template, or load a factory or previously saved template. 10 The Spray Delay The Spray Delay : Was invented to fill the gap between Quantized Robotic Delays, and Human Friendly Delays with a beating between the Delay Lines. The Spray Delay delay can easily do both, but it adds a third type : Quantized Delays with a human beating between the lines. With ONE knob.. DELAY TIME and Midi sync LED: set the main time of the delay. If the Midi Sync Diode is lit, the Main Delay Time will be synced to your host. Click on the Diode to enable /disable Midi Sync. Note : When Midi Sync is engaged, Delay Time will be displayed in musical values. Otherwise its value will be displayed in mS. DELAY LEVEL : set the feedback of the delay. Turn it full left for no delay effect and full right for a very long echo. OFFSET L/R and Midi Sync Diode 2: Set the value of the beating between the delay lines, when the Midi Sync Diode 2 is not engaged. Otherwise, set an independent value for the second Delay line, to mimic the behavior of conventional midi synced stereo delays ST.SPRAY : set how the left and the right channel are mixed in the stereo field. Tip : You can also modulate the delay parameters with the Advanced Mask Sequencer, or Live by using RITA Module Examples : Quantized delay with Beating between lines : Set the main delay time ( 16th notes, dotted 8th etc) Turn the Offset Knob to find the good beating. Done. ( Adjust Stereo Width if desired ). Quantized Delay with different settings for the 2 Delay Lines : Ensure that the two Midi Sync Diodes are lit. Use the Delay Time and Offset Knobs to set the values of the two Delay lines. Human 'tuned by ear' Delay : Set the main delay value, and adjust Offset to get the second delay value ( Ensure that the 2 Midi Sync diodes are not lit ) 11 R.I.T.A section 11.1 Introduction to R.I.T.A With R.I.T.A. ( Realtime Interactive Transformation Area ), you can operate R.A.M.S.E.S with a simple Midi keyboard, or any Midi device, and control any Ramses parameters with Velocity, Modulation Wheel, Aftertouch, Pitch Bend, and active keyboard scaling, or in other words, the number of the note played ( Very nice also with drumpads that can send Midi note data and velocity ) Here’s a short list of the things you can do with Rita : Spectacular Dj-ing effects like Start/Stop (Volume) or heavy filter drops and rises, Dub effects on Drumloops ( Delay + Filter on wheel), Analogize any digital synth while playing it, give velocity to a vintage analog keyboard while playing it and controlling its pan position. Drastic combined Filter/Pan/Volume effects on drumloops or recorded material. Wah-Wah effects while playing guitar, Wobble/Dubsteps effects by controlling LFO rates and filters. Its only limited by your imagination, and its only by using RITA alone. You can of course use R.I.T.A. in conjunction with all other R.A.M.S.E.S modules ( Lfos, Envelopes, Masks, StepSequencers ) And finally, R.I.T.A. has its own presets, independent from R.A.M.S.E.S general presets, which means that you can mix-match R.I.T.A. presets on the fly with a complex general R.A.M.S.E.S scene. And that you can also save and load your own R.I.T.A. templates, or Live Scenes, fully adapted to your gear, and way of playing live ! IMPORTANT : Please note that to use R.I.T.A., you MUST be able to send midi data directly to R.A.M.S.E.S. And eventually simultaneously to the Synth you’re playing, or track receiving the audio data of an external analog synthesizer you’re playing etc etc. If you don't know how to send MIDI data to a VST effect in your host, please consult the following chapter of this manual : Configuring your host to Send Midi Data to R.A.M.S.E.S ( How to ) 11.2 R.I.T.A Modulation Matrix You can assign up to TWO modulation targets to each of the 6 following sources : Modulation Wheel, Velocity, Pitch of note played ( KB Scaling), Aftertouch, Pitch Bender, and finally an assignable Midi Controller in the 6 th slot ( Cc4 expression pedal for example ) Setting a connection : To assign a modulation target to a source, just click in one of the two destination slots. This will open a drop-down menu where you can select the desired target. There are 91 possible target parameters ( see the list of targets parameters at the end of the manual ). Canceling a connection : To cancel any Source/Target modulation, repeat the operation above, and just choose “NONE” at the top of the drop-down menu. Activating a modulation : After you have established a connection between a source and a target you must specify the amount of modulation, positive or negative, that will affect the target parameter. This is done by turning the AMOUNT knob clock wise or anti clock wise. Turning the AMOUNT Knob clockwise will result in Positive modulations, and anti-clockwise in negative modulations. In the central neutral position, no modulation occurs, and therefore no change is heard. Example : ModWheel CutOff positive : Moving the mod wheel will increase the cut off value ModWheel -> CutOff Negative : Moving the ModWheel will decrease the cut off value ModWheel -> CutOff Centered ! No modulation occurs. Neutral point 11.3 R.I.T.A YY Pad, Modulation Wheel and Pitch Bend controllers These three modules can perform like a simple display, reflecting in real time the actions you perform on an external keyboard or Midi device, or they can be active : You can actually play the ModWheel, the Pitch Bend or the XY pad ( Just grab the red ball and move it ) with your mouse. XY Pad : The vertical axis represents Velocity, and the horizontal axis the pitch of the note played. Tip : It can be handy to use the XY pad if you only have a 3 octaves physical keuboard to address the whole range of the modulations assigned to keyboard scaling. Tip : You can also use these items as a monitor to verify that RAMES is receiving correct midi DATA from your hardware controllers, and that you DAW is well configured. 11.4 Live Scenes - R.I.T.A Presets You can experiment with R.I.T.A. factory presets to get a feel of what it can do. You can also save your own RITA presets. To save a preset : Click on the R.I.T.A. INITIALISATION button under the XY Pad, then choose “New Rita Preset”. In the pop up box, choose “Create New with Current Settings” To load a preset : Click on the RITA INITIALISATION button under the XY Pad. Select a preset in the dropdown list. The selected preset will be loaded in R.I.T.A.. 12 Configuring your DAW to control R.A.M.S.E.S. with MIDI Data. In this chapter we’ll see how to configure various hosts so that you can control it’s R.I.T.A. module, and benefit of the implementation of direct midi CC automation possibilities. As we cant cover in this chapter every possible host, here are the general guide lines : To control R.I.T.A. or use direct Midi Cc automation, your host must be configured so that R.A.M.S.E.S. receives Midi Data. There are several ways to do that. 1. Insert R.A.M.S.E.S. in your Virtual Instrument track. When you’re doing this, the Virtual instrument this track is assigned to and R.A.M.S.E.S. will both receive the same Midi Data from your Midi Keyboard or Hardware controller. 2. Method 1 won’t work if R.A.M.S.E.S. is due to process an Audio Track, like a drum-loop or a recorded Guitar track. In this case you should usually insert R.A.M.S.E.S. in this Audio Track, THEN, create another MIDI Track, and finally this MIDI Track to Ramses. The same method is often required if R.A.M.S.E.S. is inserted in a BUS. Example 1 : Control RAMSES in Cubase step by step tutorial 1. Insert RAMSES in an instrument track or Audio Track ( Variant : Insert Ramses on a bus track ) 2. Add a MIDI Track ( in Project Menu, select “Add Track” , then “Midi”) This is the track wich will be used to control RAMSES in Midi 3. Assign RAMSES to this track : Choose RAMSES in the drop down menu of the MIDI output of the Track 4. “All MIDI inputs” being the default value you can now control RAMSES with any Midi Device connected, using all the RITA features including control by Mod Wheel, Pitch Bend, Aftertouch, Midi Note On, Midi Note Pitch, Velocity, and all Midi Cc that your device can send. ( Note : Please see the Midi Cc assignation chapter of this manual to learn more about assigning Midi Ccs to control any of the 91 Ramses automatable parameters ) 5. If you want to record SIMULTANEOUSLY the performance of a synthesizer AND RAMSES control data, you’ll have to select BOTH tracks : The instrument track, and the RAMSES midi track previously created, as shown in the picture above : Figure 1 : Both tracks ( Oxium and Ramses ) are enabled ( lit ) You can see the Mod Wheel data recorded on Ramses channel, while recording the Keyboard part with Oxium 13 Option menu This menu allows choosing the global settings. These settings are defined for all the instances of R.A.M.S.E.S. Each time an option is changed, the related option file is saved. 13.1 Main In the toolbar, the Options button opens a menu for selecting various options for R.A.M.S.E.S. This menu shows the following options settings: R.A.M.S.E.S. About: displays information about R.A.M.S.E.S. (version, build date and credits). Assignation of MIDI Ccs to control RAMSES parameters You can control any of the 91 Ramses automatable parameters by assigning an unique MIDI controller to it. These links are permanent and are stored in a special file. Its therefore very easy to build a special Ramses template to control it with a Midi Control Device like a Novation Keyboard for example. Using this feature you’ll be able to automate in your DAW that are NOT available in the different modulation Matrixes of Ramses UI, pushing one step forward the level of control you can gain over RAMSES. Two simple examples : You’ll be able to sitch On/Off waveforms of the cumulative Lfos, and also to switch Filter types. Not only does it open new sound design possibilities, but it also mean that, if you have a controller with enough knobs/sliders etc, you can program Ramses without ever touching the mouse. ( except for saving patches or a few tasks like this ) To assign a Midi Controller Number to a RAMSES parameter : 1/ Click on Open MIDI settings panel: a popup window appears where you can assign MIDI controllers for each of R.A.M.S.E.S’s parameters. 2/ Click on the “Parameters” label to select the parameter you want assign in the drop down list . Then 1. enter manually the MIDI controller number (from 0 to 127) with the computer keyboard or Click on the LEARNING switch and send a MIDI command with the correct MIDI controller number by moving any knob, slider or button of your MIDI device. R.A.M.S.E.S. will memorize the first Midi Command received. If you made a mistake and moved the wrong knob or slider, just click on LEARNING switch again. 3. Press OK to finish the assignation process, or choose another parameter in the list to assign it another controller number, and press OK when all parameters have been assigned. 2. Figure 2 The LEARNIG Diode is on and a slider sending Midi CC25 data has been moved, then automatically assigned by RAMSES to the Decay of the Filter envelope Note : This setting popup can also be opened by CTRL+ALT+Apple+Left-click (Mac) or CTRL+Win+ALT+Leftclick (Win) on the desired R.A.M.S.E.S. parameter. The Midi assign popup window will open with the correct parameter already assigned and ready to be assigned ( But you’ll still have to write the cc number or initiate the auto assignation process by enabling the Learning function ) 13.2 Display Display low frequency as BPM: Allows displaying the low frequency in BPM instead of Hz. Output level follows presets: When checked, this option allows the output level to follow the presets. That means that the output level is programmed with the value saved in the preset. Otherwise it keeps its value. Popup On: shows a popup window while modifying the value of a knob. Popup Over On: shows a popup window when the mouse is over a switch. Popup Name On: the name of the current modified parameter is displayed. GUI update: low: slow refresh rate for the GUI. Useful when it is necessary to save CPU power. GUI update: middle: standard refresh rate for GUI. GUI update: fast: fast refresh rate for GUI. Useful when it is necessary to precisely follow the sequencer's led for instance. 13.3 Misc Init settings from current settings: initializes the default values of R.A.M.S.E.S. from the current settings. All the new presets will be created from these settings, when the init settings choice is selected. These parameters will also be used when setting a control to its default value. (Win: CTRL+Click, OSX: ALT+Apple+Click). Hiss gated: This setting allows the internal noise be mute when no audio signal is incoming . Wheel Incr: 0.01: parameter increment of 0.01 when using of the mouse wheel. Wheel Incr: 0.05: parameter increment of 0.05 when using of the mouse wheel. Wheel Incr: 0.1: parameter increment of 0.1 when using of the mouse wheel. 14 Credits Concept of R.A.M.S.E.S. and original UI design was done by: Laurent Bourgeon Additional designs were done by Xavier Oudin and Laurent Bourgeon Filters, Stereo processing concept and coding were done by: Xavier Oudin Digital Signal Processing and plug-in coding was done by: Xavier Oudin The graphical user interface was created by: Laurent Bourgeon helped by Xavier Oudin The graphics created by: Xavier Oudin and Yannick Bonnefoy This manual was written by Laurent Bourgeon and Xavier Oudin And proofread and corrected by: Michael Logue The presets were done by: Lotuzia, Tzadi.