1
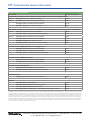
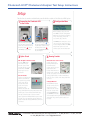
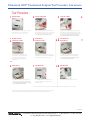
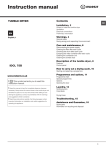
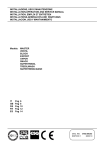
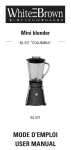
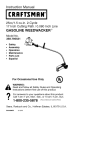
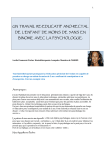
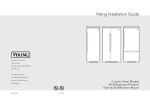
Cholestech LDX Cholesterol Analyzer Test ® Distributed by The Cholestech LDX® Cholesterol Analyzer Test combines enzymatic methodology and solid-phase technology to measure total cholesterol, HDL cholesterol, triglycerides, and glucose. Samples used for testing can be whole blood from a finger stick (collected in a lithium heparin-coated capillary tube) or venipuncture.The sample is applied to a Cholestech LDX cassette. (For professional in vitro diagnostic use only.) BENEFITS: Easy to use; fast & reliable results Results in 5 minutes Single-use disposable cassettes Room temperature storage for 30 days FDA-Cleared / CLIA Waived * *Note: The High Sensitivity C-Reactive Protein Tests are Moderately Complex and are not CLIA Waived. Ordering Information: Product Description Cholestech LDX Analyzer System (1 system) Cholestech Total Cholesterol Cassette (10 cassettes) Cholestech TC HDL Tests (10 cassettes) Cholestech TC GLU Tests (10 cassettes) Cholestech TC HDL GLU Tests (10 cassettes) Cholestech Lipid Profile GLU (10 cassettes) Cholestech Lipid Profile Tests (10 cassettes) Cholestech Thermal Label Printer (1 printer) Cholestech Thermal Printer Labels (1 roll) Cholestech LDX ALT/AST Tests (10 cassettes) High Sensitivity C-Reactive Protein Tests* (10 tests) *Moderately Complex Cholestech ROM Upgrade Kit (1 kit) Catalog # CTH-10-959 CTH-10-986 CTH-10-987 CTH-10-988 CTH-10-990 CTH-10-991 CTH-10-989 CTH-11-781 CTH-11-785 CTH-12-788 CTH-12-807 CTH-13-184 11578 Sorrento Valley Road, Suite 25/26, San Diego, CA 92121 tel (858) 481-5031 toll free (888) 882-7739 e-mail: [email protected] fax (801) 720-7568 CPT Code Reimbursement Information Reimbursement Information: CPT Code # National Limit Amount Lipid Profile, waived procedure (Total Cholesterol, HDL Cholesterol and Triglycerides) Option A: 80061QW (Lipid Panel, waived procedure) $18.72 Option B: 82465QW (Total Cholesterol, waived method) $6.08 83718QW (HDL Cholesterol, waived method) $11.44 84478QW (Triglycerides, waived method) $8.04 Lipid Profile and Glucose, waived procedure (Total Cholesterol, HDL Cholesterol,Triglycerides and Glucose) Option A: 80061QW (Lipid Panel, waived procedure) $18.72 82947QW (Glucose, quantitative, waived procedure) 82465QW (Total Cholesterol, waived method) 83718QW (HDL Cholesterol, waived method) 84478QW (Triglycerides, waived method) 82947QW (Glucose, quantitative waived procedure) $5.48 $6.08 $11.44 $8.04 $5.48 Total Cholesterol, HDL Cholesterol and Triglycerides 82465QW (Total Cholesterol, waived method) 83718QW (HDL Cholesterol, waived method) 82947QW (Glucose, quantitative, waived procedure) $6.64 $11.44 $5.48 Total Cholesterol, HDL Cholesterol 82465QW (Total Cholesterol, waived method) 83718QW (HDL Cholesterol, waived method) $6.08 $11.44 Total Cholesterol and Glucose 82465QW (Total Cholesterol, waived method) 82947QW (Glucose, quantitative, waived procedure) $6.08 $5.48 Total Cholesterol 82465QW (Total Cholesterol, waived method) $6.08 Option B: Glucose 82947QW (Glucose, quantitative) 82950QW (Glucose Post Dose, includes glucose) 82951QW (Glucose Tolerance Test (3 tests) 82952QW (Glucose Tolerance Test - each additional test beyond 3 tests) $5.48 $6.64 $17.99 $3.50 DISCLAIMER – The CPT information contained in this document is provided as representative examples of reimbursement in this category. It is intended to assist providers in accurately obtaining reimbursement for health care services. It is not intended to increase or maximize reimbursement by any payor. Providers should consult their payor organizations with regard to local reimbursement policies. The information provided in this document is for information purposes only and represents no statement, promise or guarantee by CLIAwaivedTM Inc. All CPT codes are supplied for information purposes only and represent no statement; promise or guarantee by CLIAwaivedTM Inc. that these codes will be appropriate or that reimbursement will be made. CPT codes and descriptions are copyrights of the American Medical Associations. CPT does not include fee schedules, relative values or related ratings. The source for this information is the Center for Medicare and Medicaid Services. The content provided by the Center for Medicare and Medicaid Services is updated frequently. It is the responsibility of the service provider to confirm the appropriate coding required by their local Medicare carriers, fiscal intermediaries and commercial payors. All product information and prices are subject to change without notice at any time. Please call our office before ordering to verify current prices. 11578 Sorrento Valley Road, Suite 25/26, San Diego, CA 92121 tel (858) 481-5031 toll free (888) 882-7739 e-mail: [email protected] fax (801) 720-7568 CHO-04-046 LDXQRG_1 12/21/04 3:52 PM Page 2 Cholestech LDX Cholesterol Analyzer Test Setup Instructions ® Setup Test Pr 1 Take the time to examine and familiarize yourself with the contents of the Cholestech LDX System. the Cholestech LDX 1 Connecting to the Printer A Before starting to test, press and hold STOP to enter the Configuration Menu and select options for language, units, sample type, printer, risk assessment, date, and time. A B B Plug the printer power supply A into the printer and the wall or power strip. Connect the end of the printer cable B , labeled “To Printer” , to the printer. 2 Configuration Menu Plug the power supply A into the Cholestech LDX and the wall or power strip. Insert the end of the white printer cable B , labeled “To Cholestech LDX”, into the Analyzer. 4 Running Controls Run the Optics Check Cassette Cholestech Level 1 and 2 Controls Press the RUN button. The drawer will open. Place the Optics Check Cassette into the cassette drawer. Press the RUN button again to close the drawer. Controls must be run following manufacturer’s recommendations. Controls must be at room temperature before testing. Verify that the lot number on the control vial and the assay sheet are the same. Mix each vial by gently inverting 7–8 times immediately before use. Store controls in the refrigerator when not in use. Record Results Check to see that the four Optics Check Results numbers are within the acceptable range printed on the Optics Check Cassette. Record the results on the Optics Check Log. If the numbers are outside the range, the Analyzer will be temporarily disabled until another optics check is run that falls within range. The Optics Check Cassette is used to check the optical system of the Analyzer. Run the Optics Check Cassette: once each day before patient samples are tested and after the Cholestech LDX has been moved or serviced. Press the RUN but drawer will open, a Load cassette The DATA button allows you to select choices for each of the menu items in the Configuration Menu. The RUN button enters your choices and advances you to the next menu item. 3 Optics Check Open the Draw 5 Insert the Cas Immediately place drawer with the bla and the brown mag Testing QC Material FAQ Use the MiniPet™ Pipette and tips to measure and dispense the control sample into the cassette. Place the cassette in the drawer immediately and press RUN. Record results on the Quality Control Log. Results must be within established ranges before patient samples can be tested. Frequently How do I get a Even though the Ch must have a CLIA department of hea Technical Service c application. Remember: The Ch 11578 Sorrento Valley Road, Suite 25/26, San Diego, CA 92121 tel (858) 481-5031 toll free (888) 882-7739 e-mail: [email protected] fax (801) 720-7568 Cholestech LDX® Cholesterol Analyzer Test Procedure Instructions 4:523:52 PM PM PagePage 2 2 Test Procedure the Drawer 1theOpen miliarize d familiarize yourself yourself with with the contents contents of theof Cholestech the Cholestech LDX LDX System. System. X System. Menu olestech tech LDXLDX Menu Menu 2 Configuration 2 Configuration ess and nfiguration r language, r, risk me.A A BeforeBefore starting starting to test, to press test, press and and hold STOP hold STOP to enter to enter the Configuration the Configuration Press the RUN button on the Analyzer. The cassette MenuMenu and select and select options options for language, for language, drawer will open, and the screen will display: units,units, sample sample type, type, printer, printer, risk risk Load cassette and press RUN. assessment, assessment, date, date, and time. and time. B B ou to select enu items The DATA The DATA buttonbutton allowsallows you toyou select to select Thethe RUN Plug Plug power the power supplysupply Au. A into A into choices choices for each for each of theofmenu the menu itemsitems stheand Cholestech the Cholestech LDX and LDXthe andwall the wall Insert the Cassette in the inConfiguration the Configuration Menu.Menu. The RUN The RUN menu item. or or power strip. strip. InsertInsert the end theofend of f power buttonbutton enters enters your choices your choices and and Dispense the Sample B, B, the white the white printer printer cablecable advances advances you toyou thetonext the menu next menu item. item. labeled labeled “To Cholestech “To Cholestech LDX”, LDX”, into the intoAnalyzer. the Analyzer. Perform Perform Perform a Fingerstick aaFingerstick Fingerstick edure ure dure Test TestProcedure Procedure Perform a Fingerstick 2 Open the the Drawer Drawer 1 1 Open 5 4 2 22 ck Collect the Sample Controls Controls 4 Running 4 3Running esette Cholestech Cholestech LevelLevel 1 and12and Controls 2 Controls After cleaning the selected site with alcohol and drying it thoroughly, firmly prick the site with a lancet. PressPress the RUN the button RUN button on theonAnalyzer. the Analyzer. The cassette The cassette Gently squeeze the finger to obtain a large drop of drawer drawer will open, will open, and the andscreen the screen will display: will display: blood. Wipe off the first large drop of blood. LoadLoad cassette cassette and and press press RUN.RUN. 6 Begin the Test the the Cassette Cassette 5 5InsertInsert Collect Collect thethe Sample theSample Sample 3 33Collect 4 Dispense the Sample Controls Controls must must be runbe place run the cassette into the Analyzer Immediately following following manufacturer’s manufacturer’s drawer with the black toward n until a large drop of blood Place the end of the reaction capillarybar tube into the Analyzer recommendations. recommendations. and the brownwell magnetic stripe on the right. horizontally by the end withControls the sample and dispense the sample Controls must must be atbe room at room op of blood without touchingtemperature by pushing down on the plunger. Keep temperature beforebefore zer. nalyzer. Analyzer. The cassette The The cassette AfterAfter cleaning Aftercassette cleaning cleaning the level selected the theselected selected site with sitewith alcohol with alcohol alcohol and and and ube within 10cassette seconds. testing. the after the site sample has testing. Verify Verify that the thatlotthe lot en ill een display: will will display: display: drying drying drying it thoroughly, ititthoroughly, thoroughly, firmlyfirmly firmly prickprick the pricksite the thewith site sitewith awith lancet. aalancet. lancet. each nter the capillary tube. number applied. number onbeen theoncontrol the control vial vial ress ess RUN. RUN. RUN. Gently Gently Gently squeeze squeeze squeeze the finger the thefinger finger to obtain totoobtain obtain a large aalarge drop largedrop ofdropofof diately and the and assay the assay sheet sheet are the are same. the same. Mix each Mix each site when with alcohol and Squeeze the gently again a large drop of blood blood. blood. blood. WipeWipe off Wipe the off offfirst the thefinger first large firstlarge large dropdrop of drop blood. ofofuntil blood. blood. ator Print the Results gently by gently inverting inverting 7–8 times 7–8capillary times immediately immediately rick the site with a lancet.vial byvial forms. Hold the tube horizontally by the end with before before use. Store use. Store controls controls in the in refrigerator the refrigerator when when obtain a large drop of the plunger. Touch it to the drop of blood without touching ptics heck Check ResultsResults not innot use. in use. the skin. Fill the capillary tube within 10 seconds. ge drop of blood. Begin Begin Begin thethe Test theTest Test not allow any bubbles to enter the capillary tube. Testing Testing QC Material QC Do Material 8 6 66 Collect the Sample 3Perform a Fingerstick a Fingerstick 2 2 Perform the 4 Dispense Collect Collect the th S 33 Squeeze the finger gently again until a large drop of blood forms. Hold the capillary tube horizontally by the end with After After cleaning cleaning the selected the selected site with site alcohol with alcohol and and the plunger. Touch it to the drop of blood without touching dryingdrying it thoroughly, it thoroughly, firmlyfirmly prick prick the site thewith site awith lancet. a lancet. the skin. Fill the capillary tube within 10 seconds. GentlyGently squeeze squeeze the finger the finger to obtain to obtain a large a large drop of drop of Do not allow any bubbles to enter the capillary tube. blood.blood. Wipe Wipe off the offfirst the large first large drop drop of blood. of blood. 7 View the Results the the TestTest 6 6BeginBegin Dispense Dispense thethe Sample theSample Sample 4 44Dispense Press RUN. The drawer will close. When the test is finished, the Analyzer will beep and the drawer will Immediately Immediately placeplace the cassette the cassette into the intoAnalyzer the Analyzer open. Put everything that touched the blood sample drawer drawer with the withblack the black reaction reaction bar toward bar toward the Analyzer the Analyzer into a biohazardous waste container. and the andbrown the brown magnetic magnetic stripestripe on theonright. the right. Squeeze Squeeze Squeeze the finger the thefinger finger gentlygently gently againagain again untiluntil auntil large aalarge drop largedrop ofdrop blood ofofblood blood forms. forms. forms. Hold Hold the Hold capillary the thecapillary capillary tube tube horizontally tubehorizontally horizontally by thebyby end the thewith end endwith with the plunger. the theplunger. plunger. TouchTouch Touch it to itthe ittoto drop the thedrop ofdrop blood ofofblood blood without without without touching touching touching Place the end ofcapillary the capillary tube the skin. the the skin. Fill skin. the Fill Fill capillary the the capillary tubetube within tube within within 10into seconds. 1010seconds. seconds. the sample well and sample Do not DoDo allow not not allow allow any bubbles any anybubbles bubbles to dispense enter totoenter enter thethe capillary the the capillary capillary tube.tube. tube. by pushing down on the plunger. Keep the level after the sample has ViewView View thecassette the Results theResults Results been applied. Place the end of th the sample well an Squeeze Squeeze the finger the f by pushing down o forms.forms. Hold the Holdcath the cassette level the plunger. the plunger. TouchT been applied. the skin. the skin. Fill the Fill Do notDoallow not allow any b 8 Print the Resu the the Res 7 7ViewView Press the DATA button on the Analyzer once or The results will pri twice (depending on the test cassette) to view PressPress RUN. RUN. The drawer The drawer will close. will close. WhenWhen the test theistest is PressPress the DATA the DA bu remaining results. finished, finished, the Analyzer the Analyzer will beep will beep and the anddrawer the drawer will will twicetwice (depending (depen open.open. Put everything Put everything that touched that touched the blood the blood sample sample remaining remaining results. re Place Place the end the of end end theofofcapillary the thecapillary capillary tube tube into tubeinto into intoPlace ainto biohazardous athe biohazardous waste waste container. container. the reference sample the thesample sample well well and well and dispense anddispense dispense the thesample sampleof the testing procedure. For more informa This guide provides a the briefsample summary by pushing bybyinserts, pushing pushing down down down onCholestech the ononplunger. the theplunger. plunger. Keep KeepUser Manual, or the Cholestech LDX System T product the LDXKeep System This reference This reference guideguid pro the cassette the thecassette cassette levellevel after levelafter the aftersample the thesample sample has has has product product inserts, inserts, the Cho the beenbeen applied. beenapplied. applied. Print thethe Results the 7 77 8 8How 8PrintPrint often do Results IResults have to run the controls? If you are testing under CLIA-waived status, you must follow the manufacturer’s recomme HowHow often often do Ido ha Use the UseMiniPet the MiniPet Pipette Pipette controls. Cholestech recommends that you run controls: View the Results Print the Results FAQ FAQ If you If are you testing are testing underu 7 8 and tips andFrequently totips measure to measure and andasked questions about the use of the Cholestech LDX • With each new shipment of cassettes (even if cassettes are from the same lot previous controls. controls. Cholestech Cholestec reco FAQ ™ ™ Frequently Frequently asked asked questions questions about about thethe useuse of the of the Cholestech Cholestech LDXLDX dispense dispense the control the control • With each new lot of cassettes. • With• each With each new shipme new sh sample sample into the intocassette. the cassette. • As otherwise required by your laboratory’s standard quality control procedures. • With• each With each new lot newofloc PlacePlace the cassette the cassette in thein the porarily y disabled disabled until until • If you are not running the Cholestech LDX under CLIA-waived status, or if your local or stat How do Iand getand a CLIA Certificate of Waiver? • As •otherwise As otherwise required requ drawer drawer immediately immediately within falls within range.range. frequent testing of quality control material, then quality control must be performed in com t be within Even though the Cholestech LDX is a “CLIA-waived” test system, each laboratory or testing site using the Cholestech LDX • If you • Ifare younot arerunning not runn t How How do Ido get I get a CLIA a CLIA Certificate Certificate of Waiver? of Waiver? presspress RUN.The RUN. Record Record results Analyzer once or results willresults print when the test is finished. must have a CLIA Certificate of Waiver before starting testing. To obtain a Certificate of Waiver, call your state frequent frequent testing testing of quao les can sed check to check theto the on theonQuality the Quality Control Control Log. Results Log.orResults must must be within be withinService (1.800 733.0404) Even Even though though the Cholestech the Cholestech LDX HCFA-116). isLDX a “CLIA-waived” is a “CLIA-waived” test system, test system, each each laboratory laboratory orItesting or testing site using site using the Cholestech the Cholestech LDX LDX cassette) view How should store my cassettes? department of health Cholestech Technical for an application (form Cholestech Run he Optics the Optics CheckCheck must must haveofhave a health CLIAa Certificate CLIA Waiver of before before starting testing. testing. ToWhen obtain Tostored obtain a Certificate a Certificate of Waiver, Waiver, call your call state yourthe state established established ranges ranges beforebefore patient patient samples refrigerated atof36–46˚F (2–8˚C), cassettes are stable until the expiration Technical Service can give you samples the can phonecan number of your state department andCertificate assistofyou in Waiver filling out the starting How should should I stor Is patient samples samples are are eont te into the intoAnalyzer the the Analyzer Analyzer Press Press Press RUN.RUN. The RUN.drawer The Thedrawer drawer will close. will willclose. close. WhenWhen When the test the theis test testisis PressPress Press the DATA the the button DATA button button the ononCholestech Analyzer the theAnalyzer Analyzer once once oronce ororService The results The The results will print will will print when printcan when when thebe(form test the thetest istest finished. isisroom finished. finished. department department of DATA health of health oronCholestech or Technical Technical Service (1.800(1.800 733.0404) 733.0404) forresults an forapplication an application (form HCFA-116). HCFA-116). Cholestech Cholestech for How be tested. be tested. pouch and box. Cassettes stored at temperature 30 days. Do not use a c application. has LDX been has been moved moved When When stored stored refrigerated ar ward bar toward toward the Analyzer the theAnalyzer Analyzer finished, finished, finished, the Analyzer the theAnalyzer Analyzer will beep will willbeep and beepthe and and drawer the thedrawer drawer will will will twicetwice twice (depending (depending (depending on the on ontest the the test cassette) test cassette) cassette) view totoview view Technical Technical Service Service can give can you give the you phone thetophone number number of your of state your state department department of health of health and assist and assist you in you filling in filling out the out the date. Do not return cassettes to the refrigerator once they have been stored at roomrefrige temp pouchpouch and box. and Cassette box. Cas application. application. he eononright. the theright. right. open.open. open. Put everything Put Puteverything everything that touched thattouched touched theSystem blood the theblood blood sample sample sample remaining remaining remaining results. results. results. Remember: The that Cholestech LDX is only waived for fingerstick or venous whole blood. f summary Foraamore information, seecontainer. the date.date. Do notDoreturn not return cass close. When of thethe testtesting is procedure. Press thewaste DATA button ontest the cassette Analyzer once or The results will print when the test is finished. into ainto into biohazardous biohazardous biohazardous waste waste container. container. Remember: Remember: The Cholestech The Cholestech LDX System LDX System is onlyis waived only waived for fingerstick for fingerstick or venous or venous wholewhole blood.blood. User Manual, System TrainingonVideo. epSystem and the drawer will or the Cholestech LDX twice (depending the test cassette) to view uched the blood sample remaining results. This This reference Thisreference reference guideguide guide provides provides provides a brief aabrief summary briefsummary summary of theofoftesting the thetesting testing procedure. procedure. procedure. For more For Formore information, moreinformation, information, see the see seetest the thetest cassette testcassette cassette ontainer. product product product inserts, inserts, inserts, the Cholestech the theCholestech Cholestech LDX LDX System LDXSystem System UserUser Manual, UserManual, Manual, or theororCholestech the theCholestech Cholestech LDX LDX System LDXSystem System Training Training Training Video. Video. Video. n the controls? This reference guide provides a brief summary of the testing procedure. For more information, see the test cassette product inserts, the Cholestech LDX System User Manual, or the Cholestech LDX System Training Video. d status, you must follow the manufacturer’s recommendations for running hat you run controls: HowHow How often often often do Ido do have I Ihave have to run totorun the runthe controls? thecontrols? controls? ttes (even if cassettes are from the same lot previously received). If youIfIfare you youtesting are aretesting testing underunder under CLIA-waived CLIA-waived CLIA-waived status, status, status, you must you youmust follow mustfollow follow the manufacturer’s the themanufacturer’s manufacturer’s recommendations recommendations recommendations for running forforrunning running controls. controls. controls. Cholestech Cholestech Cholestech recommends recommends recommends that that you thatrun you youcontrols: run runcontrols: controls: oratory’s standard quality control procedures. How often do I have to run the controls? • With ••With each Witheach new eachnew shipment newshipment shipment of cassettes ofofcassettes cassettes (even(even (even if cassettes ififcassettes cassettes are from are arefrom the fromsame the thesame same lot previously lotlotpreviously previously received). received). received). ch LDX under CLIA-waived status, or if your local or state regulations require more you are testing under CLIA-waived status, you must follow the manufacturer’s recommendations • With ••With each Witheach new eachnew lotnew oflot lot cassettes. ofofcassettes. cassettes. for running material, then quality control must beIfperformed in compliance with those regulations. controls. Cholestech recommends that you run controls: • As•otherwise •AsAsotherwise otherwise required required required by your bybyyour laboratory’s yourlaboratory’s laboratory’s standard standard standard quality quality quality control control control procedures. procedures. procedures. • With each new shipment of cassettes (even if cassettes•are the same previously received). If you •from •IfIfare you you not are are running not notlot running running the Cholestech the theCholestech Cholestech LDX under LDX LDXunder under CLIA-waived CLIA-waived CLIA-waived status, status, status, or if or your orififyour local yourlocal orlocal state ororstate regulations stateregulations regulations require require require moremore more ssettes? ertificate ertificate icate of Waiver? ofofWaiver? Waiver? • With each new lot of cassettes. frequent frequent frequent testing testing testing of quality ofofquality quality control control control material, material, material, then then quality thenquality quality control control control mustmust be must performed bebeperformed performed in compliance inincompliance compliance with with those withthose those regulations. regulations. regulations. F“CLIA-waived” the cassettes are stable until theorexpiration date printed on cassette DX is(2–8˚C), isaa“CLIA-waived” “CLIA-waived” test system, test testsystem, system, each each laboratory each laboratory laboratory testing orortesting testing site using site site using using the Cholestech the thethe Cholestech Cholestech LDX LDX LDX • As otherwise required by your laboratory’s standard quality control procedures. ored at room temperature forTo30 use aofcassette pastyour theyour expiration fof ver Waiver Waiver before before before starting starting starting testing. testing. testing. obtain Todays. Toobtain obtain a Do Certificate anot aCertificate Certificate Waiver, ofofWaiver, Waiver, call call call state your state state •for If you are running the Cholestech LDXCholestech under CLIA-waived status, or if your local ormy state regulations require more How How How should should should I store I Istore store my cassettes? my cassettes? cassettes? refrigerator once they have been stored at room temperature. estech tech Technical Technical Technical Service Service Service (1.800 (1.800 (1.800 733.0404) 733.0404) 733.0404) an forfor application anannot application application (form (form (form HCFA-116). HCFA-116). HCFA-116). Cholestech Cholestech frequent testing of quality control material, then quality control must be performed inatcompliance with those WhenWhen When stored stored stored refrigerated refrigerated refrigerated 36–46˚F atat36–46˚F 36–46˚F (2–8˚C), (2–8˚C), (2–8˚C), the regulations. cassettes the thecassettes cassettes are stable are arestable stable untiluntil the untilexpiration the theexpiration expiration datedate printed dateprinted printed on the ononcassette the thecassette cassette uphone the thephone phone number number number of your ofof your state yourstate department statedepartment department of health ofofhealth health and and assist andassist assist you in you you filling ininfilling filling out the out out the the using the Cholestech LDX pouch pouch pouch and and box. andbox. Cassettes box.Cassettes Cassettes can be can can stored bebestored stored at room atatroom temperature roomtemperature temperature for 30 forfor days. 3030days. days. Do not DoDouse not notause use cassette aacassette cassette pastpast the pastexpiration the theexpiration expiration er, call your state How should I store my cassettes? date.date. date. Do not DoDoreturn not notreturn return cassettes cassettes cassettes to thetotorefrigerator the therefrigerator refrigerator onceonce they oncethey have theyhave been havebeen stored beenstored stored at room atatroom temperature. roomtemperature. temperature. rm HCFA-116). Cholestech Rev. 03.18.10 stem DX XstSystem System isinonly isisonly waived only waived waived for fingerstick forforfingerstick fingerstick orWhen venous ororvenous venous whole whole whole blood. blood. blood. stored refrigerated at 36–46˚F (2–8˚C), the cassettes are stable until the expiration date printed on the cassette you filling out the pouch and box. Cassettes can be stored at room temperature for 30 days. Do not use a cassette past the expiration date. Do not return cassettes to the refrigerator once they have been stored at room temperature. duestions dquestions questions about about about thethe the useuse use of of the ofthe the Cholestech Cholestech Cholestech LDXLDX LDX holestech LDX 11578 Sorrento Valley Road, Suite 25/26, San Diego, CA 92121 tel (858) 481-5031 toll free (888) 882-7739 e-mail: [email protected] fax (801) 720-7568