1
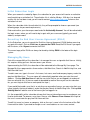
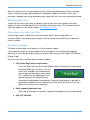
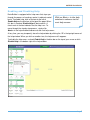
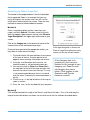
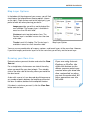
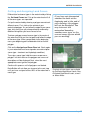
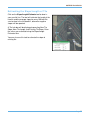
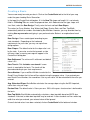
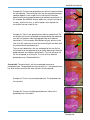
BasinBuilder
User Manual
AGREN® BasinBuilder
Agren Disclaimer
The content and products associated with Agren’s BasinBuilder are provided to you on an “as-is” and
“as available” basis. Agren makes no representations or warranties of any kind, expressed or implied,
as to the operation of BasinBuilder or the information, estimates, content, materials, products or
services included on or associated with BasinBuilder. You expressly agree that your use of
BasinBuilder and all products and services included on or associated with BasinBuilder are at your sole
risk.
Agren does not make any representations, warranties or guarantees, expressed or implied, regarding
the accuracy, correctness, or completeness of the content of BasinBuilder, nor the safety, reliability,
title, timeliness, completeness, merchantability, conformity, or fitness for a particular purpose of the
content of BasinBuilder. It is your sole responsibility to independently evaluate the accuracy,
correctness, or completeness of the content of BasinBuilder.
Agren makes no representation, warranty, or guarantee that the content is free of infection from any
viruses, worms, or other code or computer programming routines that are intended to damage or
detrimentally interfere with any system data.
BasinBuilder Introduction
BasinBuilder will step you through the simple process of drawing a dam, watershed, and
calculating a runoff curve number. If you choose not to calculate a runoff curve number, you will
have the ability to enter your own.
Based on your design criteria, BasinBuilder creates a dynamic spreadsheet that offers a range of
basin options. At a glance, you can see options that have a variety of tile sizes, dam heights,
percent of stored runoff, drain time, size of temporarily flooded areas, and costs for each basin.
Options can then be sorted various ways.
Every report contains a complete cost estimate using county derived costs with an aerial photo
showing dam location and the size of the temporary pool.
BasinBuilder allows you to design basins that are in a series, one upstream from another.
With BasinBuilder, all options are developed using high-resolution digital elevation models derived
from LiDAR data.
Page 1
AGREN® BasinBuilder
Initial Subscriber Login
When your account is created by Agren, the subscriber for your account will receive an activation
email containing an activation link. The activation link is valid for 30 days. If 30 days has elapsed
and the link has not been used, you will need to contact [email protected] to have a new
activation link sent.
When the subscriber clicks the activation link, they will be prompted to choose a password (see
following pages for password requirements).
Enter and confirm your chosen password and click Activate My Account. You will be redirected to
the login screen, where you will need to log in again with your username (typically your email
address) and password.
Executing the End User License Agreement (EULA)
As the Subscriber, you must execute the End User License Agreement (EULA) before accessing
any part of the tools. Click on Click here to execute the EULA. Read the EULA and if you agree
with the terms, click I Agree to execute the EULA.
The current copy of the EULA can always be found by clicking EULA in the footer of the login
system.
Managing M y Users
Part of the responsibility of the subscriber is to manage the users assigned to their license. Initially,
this requires setting up users that can access your license.
Upon executing the EULA, the subscriber will be redirected to the Manage My Users page. The
Manage My Users page contains three sections, Add New User, Search & Add Existing User, and
Edit Licensed Users.
To add a new user, type in the user’s first name, last name, email and company/agency under the
grey bar Add New User. The user name will automatically populate when you enter the email
address. Clicking Add New User will add the user to the license you are logged in to and email
them an activation link. (If the user needs to be added to another license you are the subscriber
for, you must log into that license and repeat the steps.)
If you would like to add a user that is an existing user on another license, you may enter their user
name (typically their email address) under the grey bar Search & Add Existing User. Clicking Add
Existing User will add the user to the license you are logged in to.
It is the responsibility of the subscriber to keep their license information current as employees are
hired or terminated. To remove a user from a license, click Remove From License to the right of
the user’s name under the grey bar Edit Licensed User.
To edit first name, last name, or company, click on the user’s name in the first column of the Edit
Licensed User table. If you need to change a user’s email address or user name, contact
Page 2
AGREN® BasinBuilder
[email protected]. If a user’s activation link has expired, you can also send another
activation link by clicking Resend activation email from the Manage Individual User page.
A link to Manage My Users can be found in the footer of the login screens.
Initial User Login
When your subscriber accepts the EULA and sets up the users for a license, activation emails will
be sent to each user. The email contains an activation link that is valid for 30 days. If 30 days has
elapsed and the link has not been used, you will need to contact your subscriber to have a new
activation link sent.
When you click on the activation link, you will be prompted to choose a new password (see below
for password requirements).
Enter and confirm your chosen password and click Activate My Account. You will be redirected to
the login screen, where you will need to login again with your username (typically your email
address) and password.
For subsequent logins, go to www.agrentools.com. Click on LICENSED USER LOGON in the top
right corner of your screen.
Password Requirements
Passwords must be at least 12 characters in length and may only be repeated once every 24
passwords. In addition, passwords must contain characters from three of the following four
categories.
•
•
•
•
English uppercase characters (A - Z)
English lowercase characters (a - z)
Base 10 digits (0 - 9)
Non-alphabetic characters (e.g., !, $, #, %)
Passwords must be changed every 180 days. Seven days before the expiration of your password,
you will receive an email notifying you that your password will expire and provide you with
instructions on how to change your password. On the day your password expires, you will receive
an email notice that your password has expired with a link to the initial login screen to reset your
password.
Resetting Your Password
After three incorrect login attempts, your account will be locked for 15 minutes. After 15 minutes,
you may retry your account, or reset your password.
To reset your password, click Forgot your password? on the login screen. A Forgot Password
screen will come up. Enter your user name (typically your email) and click Submit to send an email
with a link to reset your password.
Page 3
AGREN® BasinBuilder
When you click the link in the password reset email, you will be redirected to a Reset Password
screen. Choose a new password following the requirements above, and confirm. Once your
password is updated, you will be prompted to log in again with your user name and new password.
Managing M y Info
To edit your first name, last name, or company, click on your user name (typically your email
address) and then click Manage My Info in the footer of the login screens. If you need to change
your email address or user name, contact [email protected].
Choosing a License and Tool
From the login screen, choose the license you want to access from the drop down list.
To access Agren’s conservation planning tools, click on the tool you would like to use below the
license selection.
Customer Support
The footer of every login screen contains a link to customer support.
If you experience even the smallest problem while using Agren’s conservation planning tools,
please let us know! We do our best to get you answers within the hour, 8am to 5pm CST Monday
through Friday.
There are three ways to contact Agren customer support:
1. Click Find a Bug? when using the tools
The Find a Bug? icon (just to the left of Enable Help on the top of your map) records
information about your session, as well as a
screen shot, and pops up a window where
you can type your question or report a bug.
This is the best way to report bugs or ask
questions because we receive the most
information to help diagnose your problem. Please be as descriptive as possible in
explaining the problem you are experiencing. Occasionally, we might also ask for a
copy of the session you are working on.
2. Email [email protected]
Please be as descriptive as possible in explaining the problem you are experiencing.
3. Call (712) 792-6248
Page 4
AGREN® BasinBuilder
Enabling and Disabling Help
BasinBuilder is equipped with a help menu that steps you
through the process of creating a water & sediment control
Click on Next>> in the help
basin. To enable help, click on the box to the left of
window to advance to the
Enable Help on the blue bar at the top of the page. When
next help screen.
this box is checked, Enable Help will be turned on. A
check mark in the box indicates that the help is on. To
move through the step-by-step process, simply click
Next>> in the help window to advance to the next help screen.
At any time, you may temporarily close the help window by clicking the “X” in the top right corner of
the help window. When you click on another icon, the help menu will reappear.
To disable the help menu, uncheck Enable Help in the blue bar on the top of your screen or click
Disable Help in the bottom right of the help window.
Page 5
AGREN® BasinBuilder
Zooming to Basin Location
The location of the proposed basin is the first information
that is requested. Zoom in far enough that you can
easily distinguish the contour lines, but still see the
entire basin watershed on the screen. There are two
methods to zoom to the desired basin location.
Method A
Enter a legal description (section, township, and
range) and click Search. If the box shown at the left
does not appear upon program startup, click Zoom to
Legal Description in the upper right hand corner of your
screen.
Click on the Imagery box in the bottom left corner of the
screen to turn on the aerial photo map layer.
Once you have zoomed to the appropriate section, you
may zoom in further one of five ways.
1. Click and hold the left mouse button on one corner
of the area of interest. Drag the pointer to the
opposite corner drawing a rectangle and release.
2. Using the scroll bar/wheel on the mouse, roll
forward to zoom in, roll backward to zoom out.
3. You may also click on Zoom In or Zoom Out in
the map tools to the left of the map and then click
once on the area of interest on the map. This way
is not recommended because there is no control
over the zoom. Frequently this command zooms in
too far.
4. Click the + or – in the top left corner of the map to
zoom in and out.
5. Press the + or – on the key board of your computer.
If the legal description is known, the
Zoom to Legal Description box easily
zooms you into the correct location
If the Imagery box is in
grayed out, you have not
zoomed in far enough to use
Imagery yet. Zoom in until
the Imagery box turns
black. (This applies to the
Contours and Terrain
buttons as well.)
Method B
Click on Pan (located to the right of the Zoom In and Zoom Out tools). Then, click and drag the
map to the desired location and zoom in or out with one of the five methods described above.
Page 6
AGREN® BasinBuilder
Map Layer Options
In the bottom left hand corner of your screen, you will find
check boxes that allow different viewing options (shown
on the right). Check the box next to the map layer(s) you
prefer to work with when planning your basin.
Imagery provides you with an aerial photo of the
area selected. The Imagery layer is available in
areas less than 25 miles wide.
Contours inserts two-foot contour lines. The
Contour layer is available in areas less than two
miles wide.
Terrain inserts hill shading. The Terrain layer is
available in areas less than two miles wide.
Map Layer Options
You may use any combination of imagery, contours, and terrain layers at the same time. However,
if you have imagery and terrain layers on at the same time you will only see the terrain layer.
Drawing your Dam Line
Determine where you want the dam and select the Draw
Dam tool.
For a straight dam, click once on one side of the valley
where you would like your dam to begin. Then, doubleclick on the other side of the valley where you would like
the dam to end.
A dam with a curve in it can be made by clicking once on
any number of points between the beginning and end of
the dam. As above, double-click to complete the dam.
If you are using Internet
Explorer or FireFox, the
right click button on the
mouse removes points you
created when you drew the
dam, watershed, or when
you cut the watershed. All
other operations use the
left click.
If the dam is not where you want it, click the Clear Dam
button and start over.
Page 7
AGREN® BasinBuilder
Drawing your Watershed
It is easiest to show the entire watershed in the viewing
frame before you begin to draw the watershed. While
drawing the watershed, you can use the + or – in the view,
arrow keys on your keyboard, or the scroll bar on your
mouse to zoom. While drawing the watershed, the Zoom
In and Zoom Out map tools are disabled.
If you make a mistake
drawing the dam or
watershed, simply click the
Clear Dam or Clear
Watershed to erase the
drawing.
Click the Draw Watershed tool. Begin drawing the outline
of the watershed. The stretchy polygon line for the
watershed boundary is attached to both ends of the dam
line so the first and last click point must be upslope from
the dam line. As you follow the boundary of the watershed, click every time you change direction.
You must start on the same side you ended the dam or your polygon will twist over itself and give
you an incorrect watershed.
When you have a polygon drawn around your watershed, double click near where you began the
dam to end the watershed drawing process.
Entering the Runoff Curve Number (RCN)
BasinBuilder can calculate a runoff curve number
automatically, or you may enter it manually.
Click on RCN and follow the prompts. If you already
know your runoff curve number, you may enter it at the
prompt and then skip to Create Basin.
To allow BasinBuilder to calculate your runoff curve
number, click NO in the RCN Number pop-up box and
follow the instructions below to assign hydrologic soil
groups, cut land use, and assign land cover.
The Runoff Curve Number Help Box
allows you to skip ahead if you already
know your RCN value.
Page 8
AGREN® BasinBuilder
Assigning Soil Hydrologic Group
To speed up processing, you can turn off the contour
and terrain layers. You will need only the imagery layer
during the remaining steps. Soil polygons can be
assigned dual hydrologic groups. Soil polygons that are
white on the map are assigned dual hydrologic groups
(A/D, B/D, or C/D). The first letter in a dual hydrologic
group represents drained areas and the second letter
represents undrained areas. Only the soils that in their
natural condition are in group D are assigned to dual
classes. Existing water bodies at the time of soil
hydrologic group assignment could have letters A, B, C,
or D. The choice of which of these four letters is used is
up to the user.
Left click to assign soil hydrologic
groups to all white polygons. If your
watershed does not contain any white
Left click on each of these polygons and choose the
hydrologic group that best represents that polygon. In the areas, you may skip this step.
case of existing basins, you will have a choice of all four
letters. Choose the letter that best represents the basin.
All the white polygons within the watershed must be assigned a letter before a runoff curve number
can be calculated.
Page 9
AGREN® BasinBuilder
Cutting and Assigning Land Covers
Differentiate land cover types in the watershed by clicking
the Cut Land Covers tool. Cut up the watershed until all
of the cover types are separated.
Cut up the watershed by drawing a polygon around each
different cover. First, click on the outside of your
watershed polygon. As you follow the edge of your cover
type, click every time you change direction and end by
double clicking after you have crossed a line.
To draw a polygon around a cover type in the center of
the watershed, click on the start point and follow the edge
of the cover type. When you get back to the beginning,
cross your beginning point and double click to end the
polygon.
If you have not intersected
another line both at the
beginning and at the end of
your drawing, the polygon
will not be developed. You
may intersect the
watershed boundary,
another cover type, or the
current cover type on which
you are working.
Click on the Assign Land Cover Desc tool. Each region
in your watershed must be assigned a cover description
(cover type – treatment and hydrologic condition).
To assign a cover type, hold the mouse arrow over a
polygon. Left click once on the polygon and a menu of
descriptions will be displayed. Next, select the most
appropriate cover type for that polygon.
Continue this process until all polygons are labeled.
BasinBuilder will not allow you to move to the next step
until you have assigned at least 95% of the watershed a
cover type.
A variety of cover types are available
for Cultivated Agricultural Lands, NonCultivated Agricultural Lands, as well
as Urban Areas.
Page 10
AGREN® BasinBuilder
Estimating the Slope/Length of Tile
Click on the Slope/Length Estimator tool to draw in
your new tile line. The tool will estimate the length of the
new tile and the average slope for every 100 feet. Be
sure to draw in the tile downhill, otherwise negative
slopes will be reported.
A Tile Info box will be displayed requesting New Tile
Slope, New Tile Length, and Existing Tile Slope. Enter
the values you estimated using the Slope/Length
Estimator here.
You can also use this tool to estimate the slope of
existing tile.
Page 11
AGREN® BasinBuilder
Cutting and Assigning Protected Areas
Determine if the watershed has any areas that are
protected by a structure such as terraces, basins, or
water and sediment control basins. If a protected area
does exist in the watershed, click on the Cut Protected
tool. First, left click on the outside of your watershed
polygon. As you follow the edge of your protected area,
click every time you change direction and end by double
clicking after you have crossed a line. Then, left click on
the Assign Protected tool and assign the areas
Unprotected, Protected with tile (graded terrace), or
Protected without tile (level terrace).
The red area above designates an
If the entire watershed is unprotected, it will automatically
unprotected area. The purple area
be assigned unprotected. If you choose to assign
designates an area protected with a
protected areas of the watershed, BasinBuilder will not
graded terraced tile.
allow you to move to the next step until you have assigned
at least 95% of the watershed a protected or unprotected status.
Watershed Definitions for Water and Sediment Control Basins
Unprotected Area: The area of the watershed, upstream from the proposed water and sediment
control basin that does not have any basins, terraces, or ponds that retain a portion of the water.
Or, an area with basins, terraces, or ponds that does not meet engineering design standards (10year – 24-hour frequency storm without overtopping).
Maximum acres for an unprotected area within a watershed vary, and are determined by your state
requirements.
Protected Area: The area of the watershed, upstream from the proposed water and sediment
control basin that has basins, terraces, or ponds that retains a portion of the water. And, an area
that meets engineering design standards (10-year – 24-hour frequency storm without overtopping).
*Please refer to Appendix A for a description of different basin scenarios that will work in
BasinBuilder.
Page 12
AGREN® BasinBuilder
Creating a Basin
You are now ready to create your basin. Click on the Create Basin tool to the left of your map
under the green heading Basin Generation.
In the top of the Create Basin dialog box, fill in the New Tile slope and length if it is not already
filled in. If Existing Tile runs under the proposed dam, click Yes and enter the type, slope, and
size. Next, select the Dam Design. Finally, enter the front and back Dam Slopes.
The values for Curve Number, Avg. Watershed Slope, Erosion Rate, and Dam Top Width
automatically default to numbers calculated by BasinBuilder. However, you may override them by
clicking Use my own value and typing in your preferred value. Below is an explanation of each
value.
Dam Design: Dams are designed according to your
state standards. Depending on the freeboard
requirements for your state, you may see up to three
design options.
Dam Slopes: The default value for the slope ratio is set
by the state. If you enter a value that exceeds a state
minimum slope, a warning message will appear in the
Create Basin dialog box.
Dam Settlement: The minimum fill settlement and default
value is 5%.
Core Trench: Click Include a core trench if a core
trench is required for the basin. The trench will be
planned according to your state requirements.
Curve Number: If you used BasinBuilder to calculate the
Runoff Curve Number the first box will be selected using the program value. If you entered your
own Runoff Curve Number, the second box “Use my own value” will be selected with the value you
entered.
Avg. Watershed Slope: BasinBuilder calculates the average slope using the ArcGIS slope tool,
rather than using soil maps.
Erosion Rate: The default value is 5 tons per acre. 100% of the gross sheet erosion is delivered to
the basin.
Dam Top Width: BasinBuilder automatically calculates a dam top width based on NRCS dam
standards. If desired, a wider dam top width may be entered. If state standards call for a wider top
width than what you entered, your entered value will be ignored.
Once all desired values have been selected, click on Create Basin! at the bottom of window.
Page 13
AGREN® BasinBuilder
Using the Basin Selection Table
After a few moments the Basin Selection Table will appear as shown below. This table will list all
possible scenarios of basins for this dam site. The table will give you the New Tile Size, Existing
Tile Size, Pool Size, Dam Height, Runoff Stored, Drain Time, and Base Cost for each option.
Average base costs for dam fill and tiling have been provided by your county. These costs may be
overridden if necessary at the bottom of the Basin Selection Table. Simply click Change located to
the right of Costs: to enter your own values.
Page 14
AGREN® BasinBuilder
Sorting and Narrowing your Results
Each column of the Basin Selection Table can be sorted from least to greatest, or greatest to least, by
clicking on the heading of each column.
Viewing a Basin
Once the desired basin is selected, you can display an
aerial view of that basin. To create an aerial view of the
basin, click on View 638 in the right hand column of the
table. A view of the basin will be displayed.
You can select another basin to view by returning to the
Basin Selection Table. To return to the table, place the
cursor on the green bar at the top of the basin view. When
the curser is placed on the green bar, a down arrow will
appear. Click on the down arrow and you will return to the
Basin Selection Table.
The image you see on the
screen will be the image
printed in all the reports.
Zoom to the desired level
and turn on/off desired
map layers before you click
Create Report.
Printing and Saving Reports
Several versions of reports are available to print and/or save.
There are separate reports for both the landowner and the
planner. The Planner’s Report offers more comprehensive
information than the Landowner’s Report.
Saving a report is the best
way to document what was
provided to the landowner.
To create a report, click on the Create Report button.
Enter data into the Create Report dialog box (see left). Then,
check the boxes of the reports you want to save and/or print
and click on Create Report! at the bottom of the dialog box.
Choose whether you would like to open or save the file. (If
the report is opened, it may still be saved after the report has
been opened or printed.)
An Adobe Acrobat (PDF) report will be created. If both the
Landowner Report and the Planner Report are selected,
they will appear in one continuous PDF File. The Landowner
Report will be on pages 1-4 and the Planner Report will be
on pages 5-11. To print only one report, you will need to
choose File, Print and indicate the page numbers you would
like to print.
Page 15
AGREN® BasinBuilder
The Landowner’s Report can include:
Disclaimer Statements
Aerial View of Water and Sediment Control Basin
Basic Basin Information and Estimated Cost
The Planner’s Report can include:
Disclaimer Statements
Aerial View of Water and Sediment Control Basin
Detailed Basin Information and Estimated Cost
Water and Sediment Control Basin Planning Details
Earthwork Dimensions
Estimated Runoff Curve Number Worksheet
Technical Calculations
Saving and Loading a Session
To save a session so you can return to it at a future point in time, choose the Save Session tool
under Session Management menu option on the left hand side of the screen. Give the file a
descriptive name and choose a location to save it. The session will be saved as a .sdt file.
All information will be saved except the final basin that
you choose for your report. The Basin Selection Table will
still be available. However, it is important that you save a
copy of the basin report so you will be able to identify
which basin you chose.
To load a previous session, simply choose the Load
Saving and Loading a session
Session tool under Session Management menu option on
the left hand side of the screen and navigate to the .sdt file
you would like to load.
Loading a previous session allows you access to other basins from the Basin Selection table and
allows you to alter values from the previous basin.
Page 16
AGREN® BasinBuilder
Using the GIS Data Function
The GIS Data function allows information to be saved as an ArcGIS layer and a Microsoft Access
file.
To save the GIS Data, click the GIS Data function under
638 Generation from the menu options on the left hand
side of the screen. A zip file containing an ArcGIS layer
file (.lyr) and a personal geodatabase file (.mdb) will be
saved. The layer file and the personal geodatabase file
Get GIS Data
can be added directly into ArcGIS. From ArcGIS, these
layers can be downloaded an AutoCAD program or a GPS
unit.
Page 17
AGREN® BasinBuilder
Appendix A
Basin Scenarios
Scenario #1: The entire watershed above the proposed water and sediment
control basin is unprotected (i.e. there are no other basins, terraces or ponds
that retain part of the flow in the watershed above the proposed water and
sediment control basin.)
Example 1a: There is no existing tile line in the watershed. In this
example, BasinBuilder will give options for a new tile line.
Example 1a
Example 1b: There is an existing tile line in the watershed, but the
existing tile line outlets downstream from the proposed water and
sediment control basin. In this example, BasinBuilder will give options
using the existing tile line and options for using the existing tile line, a
new tile line, or a combination of new and existing tile lines.
Example 1b
Example
1b
Scenario #2: The watershed is divided into a protected area(s) with tile and an
unprotected area.
Example 2a: There is one protected area within the watershed. The
existing tile line from the protected area outlets downstream from the
proposed water and sediment control basin. In this example,
BasinBuilder will give options for using the existing tile line only, new tile
line only, as well as options for using both the existing tile line and a new
tile line.
Example 2a
Page 18
AGREN® BasinBuilder
Example 2b: There are two protected areas within the watershed that
are not adjoining. The existing tile lines from the two protected areas
combine together in one single tile line, and that tile line outlets
downstream from the proposed water and sediment control basin. In
this example, BasinBuilder will give options for using the existing tile
line only, new tile line only, as well as options for using both the
existing tile line and a new tile line.
Example 2b
Example 2c: There is one protected area within the watershed. The
existing tile line from this protected area outlets below the protected
area, but still upstream from the proposed water and sediment
control basin. In this example, BasinBuilder will give options on the
size of tile line necessary to hook into the existing tile and drain both
the protected and unprotected area.
The user must determine a tile size and grade for the new tile line
that extends from the protected area to a point downstream from the
proposed water and sediment control basin. The user will enter this
tile size and grade as existing tile. The user will then label the
protected area as “Protected with tile.”
Example 2c
Scenario #3: The watershed is split into a protected area and an
unprotected area. The protected area has no outlet. (i.e., the protected area
has level terraces and all of the water infiltrates into the ground).
Example 3a: There is only one protected area. This protected area
has no outlet.
Example 3a
Example 3b: There are multiple protected areas. None of the
protected areas have outlets.
Page 19
Example 3b
AGREN® BasinBuilder
Notes:_______________________________________________________________________
____________________________________________________________________________
____________________________________________________________________________
____________________________________________________________________________
____________________________________________________________________________
____________________________________________________________________________
____________________________________________________________________________
____________________________________________________________________________
____________________________________________________________________________
____________________________________________________________________________
____________________________________________________________________________
____________________________________________________________________________
____________________________________________________________________________
____________________________________________________________________________
____________________________________________________________________________
____________________________________________________________________________
____________________________________________________________________________
____________________________________________________________________________
____________________________________________________________________________
____________________________________________________________________________
____________________________________________________________________________
____________________________________________________________________________
____________________________________________________________________________
____________________________________________________________________________
____________________________________________________________________________
____________________________________________________________________________
Page 20
AGREN® BasinBuilder
1238 Heires Ave. • Carroll, IA 51401
P: 712.792.6248 • E: [email protected]
W: www.agreninc.com • www.agrentools.com
Page 21