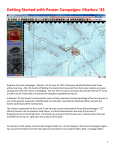
1
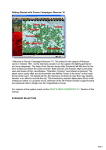
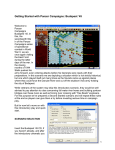
Getting Started Welcome to Panzer Campaigns France ‘40. With the storm clouds of war rising after the spectacular victory in Poland, Germany has set their sites on the West with a daring plan to press masses of highly mobile panzer formations through the Ardennes in an effort to end the war by defeating France and England. This guide is designed to get you playing immediately. For veterans of the system check out the "What's New in France `40 " section of this manual. SCENARIO SELECTION Insert the France ‘40 CD if you haven’t already and after the introductory cinematic you’ll be taken to the File Selection Dialog. Click the scenario #00_Started and then ok. Page 1 This takes you to the AI Selection Dialog where you choose the side you wish to play. For the purposes of this tutorial select Axis AI "Manual" for yourself and "Automatic With Fog of War" for the Allied. Click ok to get the game underway and you are now the German commander. Your first Command Report will appear with information relevant to the first turn. Note its contents and click ok to close it. OBJECTIVE OF THE GAME Page 2 Click Info and then Victory on the Menu Bar. As you can see to obtain a major victory in this battle you must earn 500 Victory Points by the scenario’s end. Click ok to close it. If you look at the map, you’ll see some oval shapes with numbers inside them. These are your objectives. To win a major victory you will need to hold objectives and inflict enemy casualties equal to 500 points. As you incur losses points are taken away from you. Page 3 If you look on the east corner and near the southeast corner of the map, you will also see some objectives with a "?" and a "0" in them. These are Exit Objectives. The Axis Exit Objective is colored blue. You can earn Victory Points by moving your unit onto the Exit Objective and removing them using the Command menu. (Tip: To scroll the map use the scroll bars or click Settings and Auto Scroll in the Menu Bar). TURN 1 In this scenario the Germans move first. Click on the unit indicated. It is a motorcycle recon unit and its information is now displayed in its Unit Box in the Hex Info Area. Let’s send this unit west to scout the road leading to the left of the map. Double click the recon unit on the map or click its Unit Box so that the Unit Box lights up. It is now "selected" and ready for orders. Page 4 Let’s move it one hex at a time. To do so right click an adjacent hex. If able to move it will obey. The Status Bar will tell you why if not. Now select another unit – the Motorized Infantry unit on the main road following the motorcycle recon unit as shown. Let’s move it several hexes at once. To do so, with the left mouse button down drag it to the indicated hex. The system will determine the path it follows so it’s wise to drag smallish distances to keep control because with fog of war active movement cannot be taken back. Also note in this instance the unit moved across the stream even though the bridge is shown as being destroyed. In this case the units merely forded the stream and paid a movement penalty. However, you won’t be able to ford the darker blue river hexsides without further engineer support but you can check that out later in the User manual. (Tip: Clicking the Divisional Markings Button on the Toolbar will add color to your forces based on the organizations they belong too). Page 5 Let’s now send a third unit, the Heavy or Machine Gun Infantry unit next to the grey Obstacle (Wire) marker toward the 50 point objective immediately in front of the German advance. Select it and right click adjacent hexes until it reaches the position as shown. Doing so will reveal an enemy unit. Did it fire at you? The system handles enemy defensive fire during your turn and will likewise fire your units during its turn. Your unit is strong and will survive the fire (if any) against it and possesses sufficient movement points so you may return fire. To do so select your unit exactly as you did for movement. Now with the Control Button pressed, place the mouse over the adjacent enemy unit. A crosshairs will appear. Right click to fire. The results of your fire will be shown on screen – either there will be no effect, you’ll cause a loss or possibly disrupt the enemy (the results will be yellow) or cause it to be broken (the results will be red). Most direct fire occurs against adjacent hexes. Page 6 Now that you’ve spotted an enemy unit, let’s fire some artillery. Artillery can fire at any unit in its range so long as an eligible spotter can see it. Select the artillery unit as shown. To check any unit’s range right click its Unit Box. In this case you will see your artillery unit ’s range is 10 hexes. You can also see the hard and soft attack values in this display but you can read ore about these details in the User Manual. To fire artillery do exactly as you did with direct fire – place your mouse over the enemy unit and with the Control Button pressed right click the enemy’s hex. (Tip: Enemy unit information with fog of war active will be hidden from you and summarized as X = less than 10 men, XX= 10 to 99 men and XXX = 100 to 999 men. With both direct and indirect fire if more than one enemy unit exists in a hex you are given the option to select a target should your weapons be appropriate). We may be able to soften the enemy up further with airpower too. The Command Report at the beginning of your turn advised that you have airpower available. Click the enemy’s hex again and now click the Call Air Mission Button on the Toolbar. Page 7 A dialog will appear showing any air units available. You will see the 3/StG.2 – an air unit made up of Stuka Dive Bombers ready for orders. Click the air unit line in the dialog and then ok. An air mission will be conducted against the selected hex and if successful its combat results will be displayed on screen, first possibly Anti-Aircraft fire against your unit and then the result of the bombing. As you look around your remaining units you will find most of them to be "Fixed". This is a state of readiness suggesting that at some stage in the scenario, the system may release them to you. However there are a few you can move. For example, move your Panzer unit forward to assist you next turn in capturing the Objective hex as shown here Page 8 See if you can maneuver your forces and end Turn 1 as indicated. If unable to do so, it’s only because no scenario plays the same way twice – the enemy, weather and fate etc., will all play a part. Note: Ignore the units in the lower right corner of the map. These units are outside the play area (behind impassible hexes) and are for use in demonstrating additional features in a later part of this help file. When you’ve finished your actions click the Next Turn Button on the Toolbar and click ok if prompted. The enemy will move and fire its forces. Your units may fire automatically in reply. Some enemy movement may be spotted. Your next turn will be announced once the Axis Command Report appears. TURN 2 Page 9 It is still daytime and most German forces remain Fixed. Let’s see if you can capture the objective you fired at during Turn 1. First we’ll order some more artillery fire against the enemy’s hex. As before, select an eligible artillery unit, place your mouse over the target hex and press Control plus right click. If you hadn’t previously you may very well now have disrupted the enemy or broken it. It is always a good idea to use up any available artillery in order to weaken the enemy in preparation for the next stage of your attack. Let’s now order an advance into the objective itself. To enter an enemy occupied hex, you must assault it. Move your panzer unit adjacent to the objective if not already there. If you have sufficient movement points remaining (they’ll be colored white or green), select this panzer unit and right click the enemy’s hex. A dialog will appear announcing the initiating of an assault. In fact, you can add other units to the assault as this type of an attack, designed to capture the hex, is not restricted to a single unit nor even a single attacking hex. Add the Machine Gun unit next to the Panzer to support the attack. (Tip: when vehicles assault into non-Clear hexes, they may suffer a penalty for lacking infantry support so for best results use a combined arms approach when assaulting). To resolve your assault, click the Resolve Assault Button on the Toolbar. Page 10 Results will appear showing both sides’ losses. If you’ve won and any remaining enemy retreat you will capture its hex. If you win and the enemy is unable to retreat you will capture some of its forces instead but not enter its hex. (Remember do not worry if your outcome does not match the one illustrated as play will differ). (Tip: If you capture an objective hex you will earn its Victory Points but objectives can be recaptured an endless number of times in a game. Only the side owning it at a scenario’s end receives its points. To take an objective hex simply enter it. You do not need to remain there). Let’s now continue to move available units. Click on the Engineer units shown here in this image in preparation to move it forward. Notice this unit is not FIXED any longer as it was released to you at the start of this turn. Click the Reachable Hexes Button on the Toolbar will highlight the extent a unit may still potentially move in a turn. Page 11 Not very far really. This is because the unit is in its Deployed Mode as opposed to the other units with the white bar at the bottom of the icon. These units with the white bar are in travel mode to take advantage of fast movement such as along the roads but at the expense of being more vulnerable to enemy fire. With the Engineer unit still selected click the Change Travel Mode Button on the Toolbar. You’ll see a white line appear at the bottom of the unit and a "T" next to its movement points in its Unit Box. It is now in Travel Mode, which gives units a larger movement allowance particularly when using roads. You may also notice that the unit can now use the bridge to cross over the rivier extending the movement to the west in the direction of the objectives and the enemy. You may want to turn the Reachable hexes off again and only use it when you want to see how far a unit can travel. Page 12 FINISH THE GAME You now know how to move, fire and assault with your forces. With the victory conditions in mind keep maneuvering your forces in the manner you see fit. The end of the game will be announced at the conclusion of the enemy’s final turn at which time final Victory Points will be shown. To restart the scenario click File and Selection in the Menu Bar. A list of scenarios will appear and you may select any by double clicking on its entry. FURTHER INFORMATION This Guide is designed to make you feel comfortable with what’s going on in Panzer Campaigns but it is no substitute for the User Manual, which is the series’ rulebook. You can see this whilst playing by pressing F2 or click User Manual here. The Main Program Manual discusses the various elements of the interface in helpful detail. You can see this whilst playing by pressing F1 or click Main Program Help File here. If you wish to delve inside the game designer’s head, Press F3 whilst running the game and Designer’s Notes will be yours or click Notes Help File here. Pressing F4 invokes a feature called the Parameter Data Table. It provides a host of information including movement costs, terrain benefits and stacking limits amongst other things. Lastly, documentation for the game’s editors may be found in the following help files: Scenario Editor Help File Order of Battle Editor Help File Finally, be sure to check out the "What's New in France `40 " section of this manual. Page 13 WHAT’S NEW IN FRANCE ‘40? In this section we thought it would be useful to highlight some changes, some new features and some old features that are often overlooked AI Orders A/I Orders have been a part of the series since the first title but it was largely ignored by players and we feel a large part of the reason for this is because the A/I not only moved the units you asked it to move, but it also moved other units that you didn’t move and may not have wanted to move. With this game however, we have changed the program so the use of AI Orders does not invoke additional AI actions and this will be important in the campaign scenarios that involve moving large numbers of units by division around the map. To initiate A/I Orders, select any unit – and then right click on the destination hex while holding down the Alt Key. Unlike Divisional Movement Orders discussed below, the unit must be selected and highlighted in order to invoke A/I Orders. Upon issuance of an A/I Order, an arrow(s) will appear to indicate the general movement of the units of the Division (or Higher) to the selected destination hex. Units under an A/I Order will enter travel mode and automatically move to the extent of their movement allowance toward the selected destination hex. Movement will automatically continue until all units are in or near (if hex stacking limits are reached) the selected destination hex. A/I Orders are executed once the player selects Next Turn Button on the Toolbar. After A/I Order movements are completed, it is necessary for the player to complete their Turn by again selecting the Next Turn Button on the Toolbar. Page 14 There are two methods to review the current A/I Orders in effect: On screen review and A/I Order Dialog. On-screen review provides a visual depiction of the general direction of movement and units under an A/I Order. To invoke the On-screen review, select View on the Menu Bar and from the drop down menu select AI Orders. To review from the A/I Order Dialog, select A/I on the Menu Bar and from the drop down menu select View/Delete A/I Orders – the A/I Order Dialog window will appear. From the A/I Order Dialog window, you can review units selected for A/I Orders and destination hexes by map coordinates. To Cancel an A/I Order, highlight the unit formation in the A/I Order Dialog window and select Delete. It is important to note if an A/I Order was originally initiated at the Corps level, it is necessary to delete each of the subordinate units of the Corps in the A/I Order Dialog window to cancel their movement as well. Divisional Movement Orders Divisional Movement Order is a one-click type of immediate group movement. These Orders are executed immediately during the player’s turn and not during the A/I Movement Phase. Divisional Movement Orders are issued to units from the same Division located in the same or contiguous hexes for the purpose of moving by transport mode toward a designated location. Page 15 To initiate a Divisional Movement Order, select any hex containing a unit of the Division, but do not select any actual units in the hex - and then right click on the destination hex while holding down the Alt key. For illustration purposes, use the units in the lower right corner of the #00_Started.scn. Place your cursor on the lead unit as seen in the upper map image and while holding the Alt key, right click on the hex with the red dot. The units will immediately go into Travel Mode and advance toward the selected hex as seen in the image at the left. These Movement Orders can be issued one hex at a time when you wish to control the exact path taken or to a destination hex several hexes away letting the A/I select the path. Note: Unlike other methods for movement, no unit is to be selected for a Divisional Movement Order and in fact if any unit in the hex is selected, an A/I Movement Order will be issued. See AI Movement Orders in the reference manual. When a Divisional Movement Order is issued, units in contiguous hexes that contain units of the same Division will automatically move towards the destination hex changing into travel mode and following one another in a column to the extent of their movement allowance. If two or more divisions become mixed or should there be some ambiguity about which unit within a single Division should move next, then a gap will appear in the Page 16 column. Gaps can be corrected using another Divisional Movement Order on the trailing portion or units of the same Division can be moved using standard movements until they are in the same or contiguous hexes not containing units of other Divisions at which time the Divisional Movement Order can be re-initiated. Wired Bridges A Wired bridge contains a probability of automatic damage once a unit moves adjacent to it. Wiring solely impacts either the Allies or Axis during a scenario as determined by the Parameter Data file. In this game, Wired Bridges are triggered by the Axis. If the Parameter Data file is configured for Wired Bridges, the ability to intentionally demolish bridges using friendly engineer units is disabled. Scheduled Dialog A unit listed with a 0% arrival probability in the Scheduled Dialog shares the first non-zero arrival probability as a unit above it. This new convention serves to allow for entire divisions to arrive together but using a variable arrival percentage. Broken Terrain Although Broken terrain has existed in other Panzer Campaigns titles, be aware of new Page 17 art used to represent dike terrain found extensively in Coastal regions of the battlefield. Otherwise the impact of Broken terrain remains unchanged and its effects are listed in the Parameter Data Table. Optional Rules In many cases, Optional Rules are just that – Optional. However, with this series there are two very different models of combat rules – the normal combat rule and the Alternative Resolution. In this title we are recommending you use the Alternative Resolution rules for combat and highly recommend that these not be changed as the game victory was tested with them on. Page 18