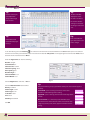
1
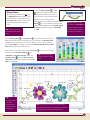
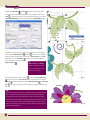
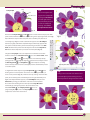
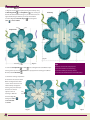
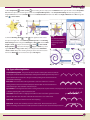
Fancyworks Flower Tutorial
This tutorial was designed to help you
learn the Fancyworks Studio program.
Practicing these steps will give you
knowledge of the product and show
you how easy it is to use Fancyworks
Studio. Fancyworks Studio offers one
of the best lettering programs with 10
fonts included and the option to add
75 embroidery fonts with the purchase
of Embroidery Type Library 1.
Besides this tutorial, Fancyworks Studio comes with a complete user manual in a .pdf format on the software CD that explains all the different
features in the software. This tutorial shows a few of the features giving you a basic understanding of the program.
Let’s Get Started
One of the features that makes Fancyworks
Studio easy to use are the toolbars that contain
the majority of tools you will need while
Main Tools
Selection Tools
creating and editing designs. The images on
each icon indicate what they are used for or
you can simply place your mouse cursor
over the icon (don’t click) and a tool tip
window will appear with a name of the
Digitizing Tools
Line Type Tools
Lettering Tool
icon. To use any of the tools, simply click
on the desired icon to open a window or
Editing Tools
change to the selected tool.
To Display and Select Hidden Tools
Some of the tools are hidden. A small arrow
Display Tools
to the right of the tool icon indicates hidden
Thread Color Tool
tools. Select a hidden tool by clicking on
the small arrow and then the tool
you want.
1
1. Set the Units of Measurement to millimeters by clicking on the Units of Measurement button located in the
top left-hand corner of the work area. As you click on the button, you will rotate through the available types of
units of measurement (inches, millimeter, centimeter, points). (Fig. 1)
2. Under the Settings Menu (Fig. 2) , select Running Stitch. A Running Stitch Settings window opens (Fig. 3) .
Change the settings as follows:
Fig. 1
Tip: The Settings menu is
where you change the default
settings of the Stitch Types.
Fig. 2
Fig. 3
Also change the settings for the Satin
Tip: Automatic underlay is
Stitch (Settings Menu > Satin Stitch)
available for the Satin Stitch
(Fig. 4) and Complex Fill (Settings Menu
choose from center walk,
> Complex Fill) (Fig. 5) as shown.
edge walk or narrow zigzag.
Tip: Use Split Satin for stitches wider than
Fig. 4
.4 inches (12mm). This divides the stitch
Fig. 5
Tip: There are 11 Special
width into thirds.
Fill Patterns available for the
complex fill.
3. From the Image Menu select Import Image to Digitize (Fig.
6) . The Import Image to Digitize window opens. Locate the
flower border.jpeg file on your computer from the Fancyworks Tutorial CD and select it. Click Open. The image will
appear in the work area (Fig 7).
Tip:
Imports 18 graphic
file formats.
Fig. 6
2
Fig. 7
4. Select the Running Stitch
Please Note:
and Arc
tools (it takes 3 points to form an arc).
When digitizing you must select two tools
Starting in the lower left corner, left click
— a Digitizing tool (Running Stitch, Satin
points on the vine using the picture below
Stitch, Complex Fill or Appliqué Stitch) and
(Fig. 10) as a guide, ending at the first
a Line Type tool (Straight, Arced or Pre-set
flower. Right click to end the object. With the Select
Shape) before beginning to digitize an
Object
object.
click for submenu (Fig. 8) . Select the Running Stitch
object with the Select Object
Properties. Change the settings to a Bean Stitch.
tool gives you the option of
Click OK.
selecting its stitch properties
Tip: Always right click to
icon, click on the object and then right
Fig. 8
Tip: Right clicking on any
and make any changes to it.
finish digitizing an object or
shape.
With the Running Stitch
and Straight Line
tools, left click two points across the
flower to travel to the next vine area. Right click to end. Change to the Running Stitch
and Arc tools and click points on vine as shown. Right click to end. Select the object
with the Select Object icon. Right click and change Running Stitch Properties to Bean
Stitch. Repeat this process to finish the vine.
5. Zoom out to see the entire design using the Zoom Out
by clicking on the Select Entire Design
icon
or Edit Menu > Select Entire Design. Click on the
Select New Color
icon. The Select Color From
Threadchart window opens (Fig. 9) . Choose Isacord
icon. Select all the objects
Tip: The number of color
changes allowed in a design
is 124.
6133 and click Select.
Fig. 9
Bean Stitch
Bean Stitch
Running Stitch
Running Stitch
Bean Stitch
Tip:
To view the thread
color name;
mouse over the
2
3
1
Start
color in the Color
Sequence Bar.
Tip: Color Sequence Bar displays the colors used in
the design. To select objects of a specific color hold the
Color Sequence Bar
SHIFT key and click on the numbered color box.
Fig. 10
3
6. With the Satin Stitch
and Arc
tools place alternating points
3
around the leaf as shown (Fig.11). Right click to end object. Click on the
1
2
icon to add a lock stitch. Select the object and right click. Select
Lock
Satin Stitch Properties and change the underlay to Edgewalk (Fig. 12) .
5
4
7
6
8
9
10
12
14
11
13
Fig. 11
Fig. 12
7. Repeat process for other leaves. Inside each leaf place a running (bean)
stitch using the Running Stitch
and Arc
tools. Select each object,
right click and change the stitch properties to a Bean Stitch with a 2 mm
stitch length. Insert a Lockstitch
at the end of each object (Fig. 13) .
To see the design in stitches select
Display Stitches
.
Tip: To see a lock stitch, turn
Stitches off (F6) and Points
on (F7). A red X with a black
box around it indicates a lock
stitch has been added.
8. Turn wireframe back on by selecting
Fig. 13
. Click on the Select New Color
icon change color to Isacord 3541, make sure no objects are selected.
Zoom in
Line
on the purple flower. Take the Running Stitch
and Straight
tools and place points in the top heart shape petal for the underlay
(Fig. 14) .
End
Underlay
Tip:
Manually placing the underlay in a complex fill gives you greater control
over sewing direction of the design. Always place underlay stitches in
the opposite direction of the embroidery stitches. It acts like a bridge
and lifts the stitches up while making the material more stable. The force
of the machine while stitching and the flexibility of the material is what
makes the embroidery distort if not enough underlay is used along with
proper stabilizing material.
4
Start
Points placed
for underlay.
Outline shape
first then
zigzag up.
Fig. 14
Start
Complex Fill
3
2
Tip:
1
End
You can change the starting point of a complex fill
Slope Direction
by using the Select Point
icon and right click on
the point where you want
to start the complex fill
stitching. Select Set as
Complex Fill Start Point.
Exit Point
Next use the Complex Fill
Fig. 15
and Arc
tools to create the heart shape petal. Click
points counterclockwise around the object starting in the upper right-hand corner (Fig.
Fig. 16
15) . To finish the shape click the last point close to the first point, but not on
or overlapping it. Right click and a submenu will appear. Select End Object.
Click once, slightly outside the complex fill object and directly opposite the
1
start point to indicate where you want the stitching to end. This is the Exit
2
3
4
Point. Click two more points inside the object to indicate the Slope Direction of the stitches. Repeat this process for all of the petals (Fig. 16) .
5
6
9. Right click #2 purple in the color sequence bar to hide the color in the
work area. Click on the Select New Color
the Satin Stitch
and Arc
icon. Select Isacord 2113. With
tools digitize the oval inside the petal by
Running
Stitch
placing points as shown (Fig. 17) . Right click at the end of each object. Select
the Running Stitch
and Straight Line
tools and place a traveling
stitch to the top of the next oval to avoid jump stitches. Continue the process
Color Sequence Bar - Right click to hide a color.
on all of the petals.
10. Digitize the center object using the Complex Fill
and Arc
tools.
Fig. 17
Tip:
Starting at the 12 o’clock position click on the circle. Click again at the 3, 6
Hiding colors in the work area makes it easier
and 9 o’clock positions (Fig. 19) . Finish the circle by clicking close to the first
to see the object you are working on. This is
point, do not overlap points it should be just to the right of the first point.
especially useful on designs with lots of detail.
Right click. A flyout window appears, select End Object. Next place the
Exit Point by clicking just outside the circle at the 6 o’clock position.
This is where the stitching will end. Then place the Slope Direction
horizontally by clicking two points in the center of the circle.
Add a Lock Stitch
. Turn Display Stitches
on to see
Start
progress (Fig. 18) . Right click on the #2 purple in the color
End
sequence bar to turn the color back on.
9
Slope
Direction
Exit Point
Fig. 18
3
6
Fig. 19
5
End
11. Digitize the other flower by first placing the underlay using
and Straight Line
the Running Stitch
tools. Starting on
Underlay
the left side of the flower working in a parallel direction to the
color
47
96
55
56
44
right side finishing the underlay to the top of the flower
as shown (Fig. 20) . Select the object
48 51 52
32
and change the
to Isacord 4643.
31
28 27
63 66 67
35
38
39
42 43
34
59
71
58
72
33
End
73
30
Start
Complex Fill
29
3 6 7 10
2
70
62
69
68
76 77
80 81
84
11
85
87
1
4
86
78 79 82
5
95
8 9
12
13
24
14
15 20 23
16 19
Start
25
18 21 22
89
88
92
40
17
83
26
93
41
94
60
37
36
61
64
91
65 74
75
90
45
49
Fig. 20
Exit Point
Fig. 21
and Arc
12. Take the Complex Fill
50 53 54
57
Tip:
tools and digitize the outer flower shape
starting at the top. Place the Exit Point directly opposite the starting point. When
finished, add a Lock Stitch
58
46
Slope
Direction
Underlay serves three main purposes.
1. Attaches the fabric to the backing.
2. Provides stability for the top stitches.
.
3. Provides loft and dimension to the embroidery.
13. Continue creating complex fills
for the other two sections of the
flower ending with the center
section. These sections do not
Exit Point
need underlay. Change the
starting, exit point and slope
direction on all these
objects so the are
stitching in different
directions (Fig. 22) .
End
Start
Slope
Slope Direction
Direction
1
2
Exit
Point
3
Change the colors
3
to Isacord 3652
1
2
Start
and 3770.
End
Fig. 22
6
Fig. 23
14. With Complex Fill
and Pre-set Star
click and drag the star shape, place the Exit Point on the right side with a vertical Slope Direc-
tion. With the object still selected right click and select Complex Fill Properties. In the Complex Fill Settings window change the stitch
length to 2mm. Then click on the Rotate
color
icon. In the Rotate Selection window enter -20 for the Angle of Rotation. Click OK. Change the
to Isacord 0310.
Slope
Direction
Exit Point
Fig. 25
Fig. 24
15. With the Running Stitch
and Arc
tools digitize the swirl. Select
Tip:
The Rotate tool makes it
the object and right click. Select Running Stitch Properties. In the Running
easy to rotate an object
Stitch Settings window change the Stitch Type to Stem Stitch and the Stitch
by entering a precise
Length to 3mm. With object selected change the color
Display Stitches
. Select the swirl object
to Isacord 3541.
degree.
Fig. 26
. Copy and Paste it by select-
ing the Edit Menu > Copy or Ctrl + C keys on the keyboard and Edit Menu
�
> Paste or Ctrl + V keys. Click and drag the object to the other swirl location.
Click on the Rotate
�
�
�
�
�
�
�
icon and rotate the object 180 degrees.
�
�
�
�
Fig. 27
�
�
�
�
�
Tip: Types of Running Stitches
�
�
�
�
Standard Running Stitch - A single line of stitches used for underlay, fine details and outlines.
�
�
�
They appear as stitches that are produced by a sewing machine. Running stitches may also be
�
�
�
�
�
�
�
�
�
��
�
�
�
�
�
�
�
�
�
�
used to move from one section of a design to another by hiding under stitches that will be
Fig.
28
�
�
�
�
�
�
�
created later in the design.
Bean Stitch - A variation of the running stitch that is used as an outline. It is a “heavier”
�
�
�
� �
� �
�
�
�
�
looking stitch because for each stitch forward, the software adds one stitch backward and
�
�
�
�
�
�
�
�
�
��
� ��
� �
�
��
��
�
�
then forward again. This constitutes a three times pass.
Special Stitch - A running stitch that creates a running stitch pattern at preset intervals. The program has 11 special stitch patterns that are
scalable by adjusting the scale bar to the desire size.
�
�
�
�
�
��
�
� �
�
Back Stitch - A stitch most commonly used as an outline stitch. These stitches take up two
stitches and then go back to the first needle penetration and then back to the third needle penetration.
�
�
�
�
�
�
�
�
�
�
�
�
�
�
�
�
�
�
�
�
�
�
�
�
�
�
�
�
��
�
�
�
�
��
�
��
��
��
�
�
�
��
��
��
�
�
��
��
�
�
�
�
�
�
�
�
�
�
�
�
�
�
�
�
�
�
�
�
�
�
�
�
�
��
�
�
�
�
�
���
�
�
�
�
�
�
�
�
�
�
�
�
�
�
��
�
�
�
distance of the first stitch. This stitch is ideal for decorative use or as an outline stitch.
�
��
�
Stem Stitch - A stitch similar to a zigzag but slanted more. The second stitch goes back half the
Quilt Stitch - A stitch that simulates the look of hand quilting.
�
�
�
7
Tip:
Tip:
Use the arrow key on
The Character Map
your keyboard to
displays the charac-
easily scroll through
ters that are available
font selection.
for that font. Double
clicking on a character
will bring it to the work
area.
Tip:
Tip:
Add 75 more fonts
Click on the different
with Embroidery Type
types of baseline to see
Library 1.
how it changes.
Fig. 29
16. To add Lettering select the Lettering
icon and then click in the work area above the flowers. The Text window opens. In the text box
enter the word or words you would like to add. In this exercise we entered “Fancyworks”. In the upper right hand corner under Fonts click on
the down arrow and select the font - Writer.
Under the Appearance tab enter the following:
Baseline: Straight
Follow Baseline: ✓
Character Size: 12.9mm
Character Spacing: 1mm
Word Spacing: 55%
Baseline Angle: 0
Character Width: 100%
Column Width: 100%
Fig. 30
Click the Alignment tab and enter: Kern: ✓
Click the Stitch Generation tab and enter:
Density: 2.347mm
Stitch Length: 2.5mm
Column Type: Satin
Lock Stitch: Letter
Trim: Letter
Underlay: Center Walk
Click OK.
Tip:
Get perfect lettering on any type of material with your choice of three types of
underlay.
Center Walk - places a running stitch in the center of the
column. For small lettering use this setting.
Edge Walk - places a running stitch on both inside edges of the
column.
Narrow Column - is a satin stitch placed down first that is
narrower then the column stitch for letters. For materials with
a high nap, like terry cloth, velour, pique knit or fleece use this
setting.
8
17. Repeat the same steps for “STUDIO” with the text set as follows:
Font: Block
Under the Appearance tab set the type to the following:
Under the Alignment tab:
Baseline: Straight
Kern: ✓
Follow Baseline: ✓
Character Size: 10mm
Under the Stitch Generation tab:
Character Spacing: 1mm
Density: 2.38mm
Word Spacing: 55%
Stitch Length: 2.5mm
Baseline Angle: 0
Column Type: Satin
Character Width: 100%
Lock Stitch: Letter
Column Width: 100%
Trim: Letter
Underlay: Center Walk
Click OK.
18. To reposition the text, select the text using the Select
Object icon. A Text Object window appears asking if you
want to Select Just This Character (Fig. 31) . Click No to select
the whole word. Click and drag to move the text to where you
want it.
Fig. 31
19. To save the design go to File > Save Design. The Save
Design File As window will open. Choose the folder and drive
to which you wish to save the design to. Select the type of file
format under Save as type. Click on Save.
General Density Guidelines for Standard Lettering
Inches(mm)
Rows/Inch (mm)
Stitch Length - In. (mm)
=/>1 (25.4)
62-67 (2.44-2.63)
.1575 (4)
3/4 (19.05)
60 (2.38)
.1378 (3.5)
1/2 (12.7)
60 (2.38)
.0984 - .118 (2.5-3)
1/4 (6.35)
55-60 (2.17-2.38)
.039 - .0787 (1-2)
1/8-1/4 (3.175-6.35)
55-57 (2.17-2.22)
.039 (1)
Rows/Inch (mm)
Stitch Length - Inch (mm)
60 (2.38)
.1575 (4)
3/4 (19.05)
50 (2)
.118 - .1378 (3-3.5)
1/2 (12.7)
45- 50 (1.8-2)
.0787 (2)
1/4 (6.35)
40 (1.56)
.039 (1)
1 (25.4)
Use this chart as a
guideline for setting
the density and stitch
length for lettering.
General Density Guidelines for Script Lettering
Inches(mm)
Tip:
9