1
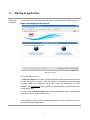
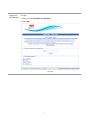
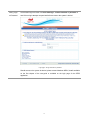
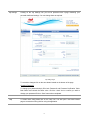
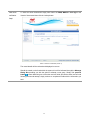
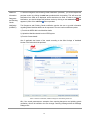
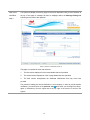
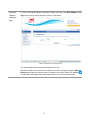
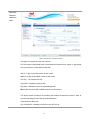
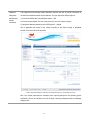
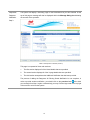
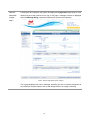
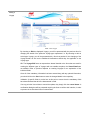
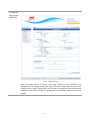
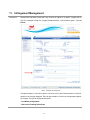
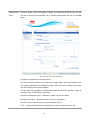
CERS PORT
USER MANUAL
Edition Number:
0
Revision Number:
3
Revision Date:
17 December 2007
Prepared For:
Prepared By:
Engineering Ingegneria Informatica S.p.A.
Defense & Aerospace Division
Via San Martino Della Battaglia, 56
00185 - Rome
ITALY
1
Table of Contents
1.
INTRODUCTION .......................................................................................................................3
2.
STARTING OF APPLICATION ...................................................................................................4
3.
ENTERING A NEW ARRIVAL NOTIFICATION ......................................................................12
4.
ENTERING A NEW REPORTABLE DEPARTURE NOTIFICATION ..........................................19
5.
REPORTING OF INFRINGEMENTS (FOR NON-REPORTABLE VOYAGES) ...............................26
6.
CANCEL OR EDIT VOYAGE NOTIFICATIONS .........................................................................31
7.
PORT WASTE INFRINGEMENT REPORTING ..........................................................................34
8.
BULK CARRIER INFRINGEMENT REPORTING ......................................................................36
9.
VOYAGE MANAGEMENT.......................................................................................................38
10.
VOYAGE DETAIL PAGE (VOYAGE DASHBOARD) ..................................................................42
11.
INFRINGEMENT MANAGEMENT ...........................................................................................47
12.
LOGOUT AND TIME OUT PROCEDURES .................................................................................53
APPENDIX I – COMMON ICONS AND GRAPHICS ...........................................................................54
APPENDIX II – GENERAL PRINCIPALS .........................................................................................55
APPENDIX III – FLOW CHART DIAGRAMS ...................................................................................58
2
1.
Introduction
The European Union (EU), through a variety of EU Directives, has placed a requirement on Member States
to work with the European Commission and co-operate on data exchange by implementing a system to
capture data on vessel movements, dangerous cargoes, vessel safety, security information and the
disposal of waste within European waters.
The EU-wide system that will be used to satisfy the above requirements is called SafeSeaNet and MCA as
the responsible National Competent Authority, is tasked with developing and implementing a UK system
that will report to SafeSeaNet and the European Commission.
The UK system that MCA is developing and implementing is called the CONSOLIDATED EUROPEAN
REPORTING SYSTEM (CERS).
This document acts as a guide for working with the CERS/SVD system. Each single operation available to
the user is described on the next chapters. The Web application also possesses a help-online system to
provide the user with further detail.
Contact details
Should you have any problems accessing the system or require further information please
contact:
- Aberdeen MRCC on Telephone 01224 597987: Fax Number: 01224 212862
- Email [email protected]
3
2.
Starting of application
Starting the
Application
To begin with, you should open an internet browser and navigate to the CERS start page:
https://cers.mcga.gov.uk/cerssvd/
Application start page
This screen offers 2 options:
1. Full-Screen Option. When clicked a new customised window is opened through which
the User can login to the system. This new window is customised so that the standard
menu-bar, toolbar and address-bar that are part of the web browser are no longer
displayed. This recommended option provides the application with a cleaner interface and
a larger display area.
2. A direct link to the Standard Login page. When clicked the User will be redirected to the
Login page within the same browser window.
Click on either the ‘viewing modes’ (represented as monitor icons) to proceed to the Login
page of the CERS/SVD application.
4
Logging-in to
the Application
To Login:
1. Enter your login Username and Password.
2. Click Login.
Login page
5
Wrong Login
or Password
Unsuccessful login will result in an Error Message – Invalid username or password. A
total of three login attempts are permitted before access to the system is denied.
Login page – wrong username or password
Should access to the system be denied, please contact Aberdeen MRCC, details available
on the first chapter of the user-guide or available on the login page of the CERS
application.
6
Organisation
of the Home
Page
Following a successful login, you will be presented with the CERS Home page.
CERS Home Page
This page consists of 4 parts:
1. The upper part, the Header, contains useful control links to the My Settings section, a
link to the Help system and an option to Logout of the application. It also displays some
pertinent information including the current date and time and the name and IP of the
logged-in User.
2. The left part contains a collapsible categorised Navigation Menu that is used for
navigating to any section of the application.
3. The right section displays the MCA Security Policy message and a record of your last
five login accesses as well as Cers System support contact details.
4. The lower part, the Footer, contains links to the Accessibility, Legal and the Feedback
of use for the CERS system.
7
Hide
Navigation
Menu
To obtain more space you can hide the left navigation menu by clicking on the ‘Hide Menu’
button located on top of the navigation menu.
Hide Navigation Menu button
To un hide the navigation menu click on the button with the ‘Menu’ label on your top left
corner of the screen.
8
My Settings
Clicking on the ‘My Settings’ link you will be presented with a page containing your
personal details and settings. You can change them as required.
My Settings Page
To record the changes click on the save button located on the bottom of the page.
Changing Password
To change your password simply fill-in both ‘Password’ and ‘Password Verification’ fields.
Both fields must contain the same value. Click the ‘check’ box to confirm you wish to
change your password.Click on ‘Save’ button when completed.
Help
To obtain online help please click on the ‘Help’ link. This will open a new web browser
page to access the online guide for using the application.
9
Logout
Click on the ‘Logout’ link when you want to exit from the system. This will redirect you back
to the login page.
Message
Dialog
Below the Header on each and every page there is a section devoted to providing
continuous feedback to the User. This Message Dialog displays information including Error,
Warning and Information messages to the User to provide them with feedback concerning
their last action.
CERS – Message dialog box
Error Messages – Displayed using a red background, indicate that the last action failed and
the User should read the message to understand what went wrong.
Warning Messages – Displayed using an amber background, indicate that there is
information that the User should be aware of before proceeding.
Information Messages – Displayed using a green background, indicate that the last action
performed by the User was completed successfully.
10
Connection
Status
The Connection Status of the application is displayed within the upper right corner of the
page to indicate to the User whether the application is maintaining a successful connection
with the server. This continuously monitors the connection to ensure that the server is
running and that a viable network connection is present.
States
Communicating with server – when the User performs some action requiring interaction
with the server this status message will be displayed until the interaction completes.
Connection Lost – should the internet connection fail for any reason, the status message
below will be displayed. Should this happen, the User should attempt to refresh the page or
alternatively to return to the Home Page and Login in order to reestablish the connection.
11
3.
Entering a NEW Arrival Notification
Introduction
Arrival Port Notifications must be entered onto CERS for: 1) Every sea-going merchant vessel (equal to or greater than 300 GT) arriving at a UK port.
2) Any sea-going merchant vessel (irrespective of size) arriving at a UK port from outside the
EU and carrying dangerous or polluting goods
The operator, agent or master of such a ship must provide the required port arrival
notification to the port authority at least 24 hours in advance of ship arrival or at the latest at
the time the ship leaves the previous port, if the voyage time is less than twenty-four hours;
or if the port of arrival is not known or it is changed during the voyage, as soon as this
information is available.
The port authority shall, upon receipt, input the port arrival notification received from the
operator, agent or master onto CERS.
New arrival
notification.
In order to add a new Arrival Notification to the system, you should first open the Notifications
section of the collapsible Navigation Menu and then choose New Arrival.
12
New arrival
notification.
To insert an arrival notifications simply enter either the IMO#, MMSI# or Call Sign of the
Vessel of interest and then click the Lookup button.
Step1
CERS – New Arrival notification (STEP 1)
The vessel details will be retrieved and displayed on screen.
Should the vessel not be found within the system, this will be indicated through the Message
Dialog Box providing you with the option to attempt a new query. Simply click previous
button
re-enter data using one of the other two box fields. Should the vessel not be found
following the second attempt, simply continue to complete all fields with the information you
hold.
13
New Arrival
notification.
Step 2
CERS – New Arrival notification (STEP 2)
This page is composed of three main sections.
VESSEL IDENTIFICATION
The first section initially displays the Vessel details as retrieved by the system.
ARRIVAL INFORMATION
The second section provides a form defining the details that should be entered in order to
record a new Arrival Notification. These fields are defined as:
Port of Arrival – Mandatory choice from the UK Port List
Port Berth – Optional Berth at which Vessel berths
Persons on Board – Mandatory number of people of board
E.T.A. – Mandatory date and time for Estimated Time of Arrival
E.T.D. – Optional date and time for Estimated Time of Departure
Last Port of Call – Optional choice from the Worldwide Port List
A.T.D. – Optional date and time for Actual Time of Departure from the Last Port of Call
The third section encapsulates Dangerous and Polluting Goods (DPG) notification which can
be added to the notification if the vessel is arring at a UK port from a departure port outside
14
the EU. To add the DPG Notification, you should expand the section by clicking the add icon
shown on the left hand side of the Dangerous and Polluting Goods heading. This will
cause the DPG Notification form fields to be displayed, which should then be completed as
detailed below. In order to collapse the Notification, clicking on the remove icon
that
appears in place of the add icon when expanded.
Once all of the mandatory information has been entered along with any optional information,
you should click on the Save button to store the details to the system.
Validation of specific fields is carried out at this point to ensure that the mandatory fields
have been filled and that all of the data entered is valid.
If at any point the User wishes to cancel the update, they simply click the previous arrow
icon
at the top left of the screen. A confirmation dialog box will be presented requiring
the User to confirm their intention, in order to prevent the un-intentional loss of unsaved data.
15
Additional
Information
Dangerous
and Polluting
Goods
Notification
(HAZMAT).
To add the Dangerous and Polluting Goods Notification (HAZMAT), you should expand the
pertinent section by clicking the add icon provided within the heading. This will cause the
Notification form fields to be displayed, which should then be filled. In order to remove the
Notification, you should collapse the pertinent section by clicking on the remove icon
that
appears in place of the add icon
when expanded.
The Dangerous and Polluting Goods notification requires the user to provide information
regarding where Manifest details can be requested. The user has three different options:
1) Provide the WEB LINK to the Manifest details
2) Upload the Manifest details into the CERS system
3) Provide Contact details
Also if applicable the license of the vessel according to the Safe Carriage of Irradiated
Nuclear Fuel Code should be provided.
CERS – New Arrival notification, Additional Dangerous And Polluting Goods info
NB: If the vessel possesses an exemption from reporting dangerous and polluting goods
notification, this will be notified to the user through a warning message within the Message
Dialogue Box.
16
CERS – New Arrival notification with Hazmat exemption
If such a message appears on screen there is no requirement to complete the dangerous
and polluting goods notification, only the arrival notification.
17
New Arrival
notification.
Step 3
The system will display a Summary page for the Arrival Notification that you have entered. At
the top of this page a message will also be displayed within the Message Dialog box
indicating the success of the operation.
CERS – New Arrival notification (STEP 3)
This page is composed of three main sections:
1.
The first section displays all of the Vessel details that were provided.
2.
The second section displays all of the Voyage details that were provided.
3. The third section encapsulates the Additional Notifications that may have been
provided.
The process of adding the Arrival Notification is now complete, in order to provide another
notification, you should click on the previous icon
after which you can begin from Step 1
again or alternatively Click the logout tab at the top right of the screen to exit from the
system.
18
4.
Entering a NEW Reportable Departure Notification
Introduction
A Reportable Departure Notification (Hazmat) must be entered onto CERS for: Any sea-going merchant vessel (irrespective of size) departing a UK port and carrying
dangerous or polluting goods.
The operator, agent or master of such a ship must provide the required departure hazmat
notification to the port authority* prior to departure of the vessel from the loading port or, if
the destination is unknown at departure then as soon as this information becomes available.
The port authority is the UK departure port if departing UK and is the UK arrival port if
departing from a non-EU port.)
The port authority shall, upon receipt, input the departure hazmat notification received from
the operator, agent or master onto CERS.
Reportable
Departure
Notification
In order to enter a departure notification of Dangerous or Polluting Goods (HAZMAT) to the
system, you should first open the Notifications section of the collapsible Navigation Menu
and then choose Reportable Departure Notification.
19
Reportable
Departure
Notification.
To insert a reportable departure notifications simply enter either the IMO#, MMSI# or Call
Sign of the Vessel of interest and then click the Lookup button.
Step1
CERS – New Departure notification (STEP 1)
The vessel details will be retrieved and displayed on screen.
Should the vessel not be found within the system, this will be indicated through the Message
Dialog Box providing you with the option to attempt a new query. Simply click previous
re-enter data or alternately enter Vessel data relevant to one of the other two boxes.
20
Reportable
Departure
Notification.
Step 2
CERS – New Departure notification (STEP 2)
This page is composed of three main sections.
The first section initially displays the Vessel details as retrieved by the system. If appropriate
you may amend the vessel details at this point.
IMO # – 7 digit unique IMO number for the Vessel
MMSI # – 9 digit unique MMSI number for the Vessel
Call Sign – The Vessels Call Sign
Ship Name – Mandatory Vessel name
Flag State – Mandatory choice of registered flag state
NB At least one of the IMO or MMSI numbers must be entered.
The second section provides a form defining the details that should be entered in order to
record a new Dangerous & Polluting Goods Notification.
These fields are defined as:
Port of Departure – Mandatory choice from the UK Port List
21
A.T.D. – Optional date and time for Actual Time of Departure from the Last Port of Call
Next Port of Call – Mandatory choice from the Worldwide Port List
Persons on Board – Mandatory number of people of board
E.T.A. – Mandatory date and time for Estimated Time of Arrival
E.T.D. – Optional date and time for Estimated Time of Departure
The third section encapsulates the Dangerous & Polluting Goods Notification. information. To
add the Notification, you should expand the the section by clicking the add icon
to the left
of the heading . This will cause the Notification form fields to be displayed, which should then
be completed. In order to remove the Notification, you should collapse the pertinent section
by clicking on the remove icon
that appears in place of the add icon when expanded.
Once all of the mandatory information has been entered along with any optional information,
you should click on the Save button to store the details to the system.
22
Additional
Dangerous
and Polluting
Goods
notification.
The Dangerous and Polluting Goods notification requires the user to provide information of
the where the Manifest details can be obtained. The user has three different options:
1) Provide the WEB LINK to the Manifest details – URL
2) Provide Contact details The user must select only one of the above options.
3) Upload the Manifest details into the CERS system – Upload
Also if applicable the license of the vessel according to the Safe Carriage of Irradiated
Nuclear Fuel Code should be provided.
CERS – Reportable Departure notification with additional Dangerous and Polluting Goods Info
NB: If the vessel possesses an exemption from reporting dangerous and polluting goods
notification, this will be notified to the user through a warning message within the Message
Dialogue Box.
23
CERS – Reportable Departure notification with Hazmat exemption
Validation of specific fields is carried out at this point to ensure that the mandatory fields
have been filled and that all of the data entered is valid.
If at any point the User wishes to cancel the update, they simply click the previous icon .
A confirmation dialog box will be presented requiring the User to confirm their intention, in
order to prevent the un-intentional loss of unsaved data.
24
Reportable
Departure
Notificaion.
The system will display a Summary page for the Notification that you have entered. At the
top of this page a message will also be displayed within the Message Dialog box indicating
the success of the operation.
Step 3
CERS – New Departure notification (STEP 3)
This page is composed of three main sections:
1.
The first section displays all of the Vessel details that were provided.
2.
The second section displays all of the Voyage details that were provided.
3.
The third section encapsulates the Additional Notification that has been provided .
The process of adding the Dangerous & Polluting Goods Notification is now complete, in
order to provide another notification, you should click on the previous icon
after which
you can begin from Step 1 again or alternatively you may Click the logout tab at the top right
of the screen to exit from the system.
25
5.
Reporting of Infringements (for Non-reportable voyages)
Introduction
The VTM Directive requires that fishing vessels, traditional ships and recreational craft (≥45
m in length) and merchant vessels (≥ 300 GT) must provide an arrival notification prior to
entry into ports of the Member States .
Smaller Vessels have no such arrival notification requirement but there remains a need for
Users to be capable of adding Infringements against them.
Reporting
Infringements
In order to Report an Infringement you first have to add a new Non Reportable Voyage to the
system.
First open the Notifications section of the collapsible Navigation Menu and then choose
Reporting of Infringements.
26
Step1
To insert a non-reportable voyage simply enter the Name of the Vessel and then click the
Lookup button.
CERS – New Non Reportable Voyage (STEP 1)
Any Vessels matching the Ship Name or partial Ship Name that you provided will then be
listed in a tabular format providing summary details that can be used for distinguishing and
identifying the Vessel of interest.
To enter partial ship names use the ‘%’ character along with the ship name.
Example:
- Writing in the ship name box ‘Quee%’ will return all the ships with name starting with the
letters ‘Quee’. (see Appendix II for further details)
To proceed with recording an infringement against a non-reportable voyage for any given
vessel in the list, you should then click on the select icon
that is provided in the first
column of each row. (see Appendix II for further details on how to use the tabular data)
NB Should the appropriate vessel not be returned after clicking ‘lookup’ then simply click the
next icon
that is provided in the top section of the page. This will allow for recording a
new vessel within the system but caution should be used in these situations and this
functionality should only be used if it has been determined that the Vessel is not already
recorded within the repository.
27
New Non
Reportable
Voyage.
Step 2
CERS – New Non Reportable Voyage (STEP 2)
This page is composed of two main sections.
The first section initially displays the Vessel details as retrieved by the system or if you had
chosen to enter a new voyage, the fields of this section will initially be blank. To proceed, you
should either confirm these details or in the case of a new voyage simply enter the details
requested within the data fields.
Call Sign – The Vessels Call Sign
Ship Name – Mandatory Vessel name
Flag State – Mandatory choice of registered flag state
The second section provides a form defining the details that should be entered in order to
record a new Non Reportable Voyage. These fields are defined as:
Port of Arrival – Mandatory choice from the UK Port List
Port Berth – Optional Berth at which Vessel berths
Persons on Board – Optional number of people of board
E.T.A. – Mandatory date and time for Estimated Time of Arrival
E.T.D. – Mandatory date and time for Estimated Time of Departure
Last Port of Call – Optional choice from the Worldwide Port List
28
A.T.D. – Optional date and time for Actual Time of Departure from the Last Port of Call
Once all of the mandatory information has been entered along with any optional information,
you should click on the Save button to store the details in the system.
Validation of specific fields is carried out at this point to ensure that the mandatory fields
have been filled and that all of the data entered is valid.
If at any point the User wishes to cancel the update, they simply click the previous icon.
A confirmation dialog box will be presented requiring the User to confirm their intention, in
order to prevent the un-intentional loss of unsaved data.
29
New Non
Reportable
Voyage.
Following the save operation, the system will display the Voyage Detail page listing all of the
details that have been entered. At the top of this page a message will also be displayed
within the Message Dialog component indicating the success of the operation.
Step 3
CERS – New Non Reportable Voyage (STEP 3)
The Voyage displayed can now be managed, permitting the User to add the infringement to
the Vessel (see chapter related to how to add Infringements to the voyage of interest).
30
6.
Cancel or edit Voyage notifications
Introduction
To cancel or edit an Arrival/Departure Notification you should first select the voyage of
interest through the search functionality available and then perform the changes required
(See chapter 9 on how to search and select the voyage of interest).
31
Editing a
Voyage
CERS – Edit a Voyage
By choosing to Edit the displayed Voyage, you will be presented with the pertinent form for
changing the details of the particular Voyage type represented. i.e. By choosing to edit an
Arrival-type Voyage, you will be presented with a form that permits for the changing of the
Voyage details as well as the Additional Notifications should they be applicable to the
Voyage type.
NB: The Voyage Edit forms as expected are almost identical to the forms that are used for
creating the different types of Voyages with one notable exception; the Vessel Details are
not editable. Refer to previous chapters on creating Voyages for an explanation of the
individual fields.
Once all of the mandatory information has been entered along with any optional information,
you should click on the Save button to store the changed details in the repository.
Validation of specific fields is carried out at this point to ensure that the mandatory fields
have been filled and that all of the data entered is valid.
If at any point the User wishes to cancel the update, they simply click the cancel button. A
confirmation dialog box will be presented requiring the User to confirm their intention, in order
to prevent the un-intentional loss of unsaved data.
32
Cancel a
Voyage
In order to cancel a Voyage, it must first be identified within system. Once identified, the Voyage
Detail page provides Users, who possess the required capability, with the ability to delete the
displayed Voyage.
CERS – Cancel a Voyage
By clicking on the Cancel Voyage button, you will first be asked to confirm that you want to
delete the displayed Voyage through the use of a confirmation dialog box.
Only after you confirm your intention will the displayed Voyage be cancelled from the system. The
reason for this confirmation dialog is to prevent the unintentional loss of data.
33
7.
Port Waste Infringement reporting
Introduction
The requisite requirements for reporting are contained with The Merchant Shipping and
Fishing Vessels (Port Waste Reception Facilities) Regulations 2003 [SI 2003 No 1809]. In
essence the requirements specify that Port & Harbour Authorities and Terminal Operators
(i.e. Port Waste Management Plan holders) must immediately report vessels suspected of
the following port waste infringements to the Maritime and Coastguard Agency : -
(a) Failure of Master to provide Port Waste Notification information in specified timescales
(Regulations 11(2) and 11(3) plus Schedule 2 of SI 2003 No 1809 refer) to the relevant
Harbour Authority/Terminal Operator, prior to vessel arrival [Regulation 17 of SI 2003 No
1809 refers]
(b) Failure of Vessel to deliver waste and/or cargo residues ashore prior to departure - if
vessel not exempt or if vessel does not have sufficient spare waste storage capacity on
board to be able to store waste likely to be accumulated on next voyage for delivery ashore
at next port [Regulations 12(1), 16(1) and Regulation 17 of SI 2003 No 1809 refer]
FAILURE TO DELIVER
PORT WASTE
WASTE/RESIDUE
NOTIFICATION PRIOR
ASHORE PRIOR TO
SHIP TYPE / SIZE
TO ARRIVAL
DEPARTURE
INFRINGEMENT
INFRINGEMENT
All sea-going UK and Non-UK ships
Yes
Yes
Warship, naval auxiliary or other ship
owned or operated by a State and used, for
the time being, only on government noncommercial service
No
No
UK and Non-UK Fishing Vessels
No
Yes
UK and Non-UK Recreational Craft
authorised to carry, or designed to carry, no
more than 12 passengers
No
Yes
(See exceptions immediately below)
"ship" means a sea-going vessel of any type whatsoever (including hydrofoils, hovercraft,
submersibles and floating craft) operating in the marine environment beyond the limits of
waters of categories A and B as categorised in Merchant Shipping Notice No. MSN 1776(M)
"recreational craft" means a ship of any type, regardless of the means of propulsion, which is
34
intended for sports or leisure purposes.
Also, Exemptions from the above requirements may also be given to specific “ships” if:
(a) the ship is engaged in scheduled traffic with frequent and regular port calls; and
(b) there is sufficient evidence of an arrangement ensuring the delivery of ship-generated
port and payment of charges in a port along the ship's route.
Adding Port
Waste
Infringements
Infringements represent events that have occurred in relation to a specific Voyage and as
such are managed through the Voyages Menu within a self-contained panel – List of
Events. (See Infringement management chapter 10 for more details on how to add the
infringement)
35
8.
Bulk Carrier Infringement reporting
Introduction
The Merchant Shipping (Safe Loading and Unloading of Bulk Carriers) Regulations 2003 [SI
2003 No 2002] implements in the United Kingdom Directive 2001/96/EC of the European
Parliament and of the Council of 4 December 2001 (establishing the harmonised
requirements and procedures for the safe loading and unloading of bulk carriers). They also
implement Directive 2002/84/EC of the European Parliament and of the Council of 5
November 2002 (amending the Directives on maritime safety and the prevention of pollution
from ships), in so far as that Directive relates to the 2001 Directive.
Article 7(c) of the Directive requires terminal representative to notify the Master and also the
Port State Control Authority (i.e. Maritime and Coastguard Agency in the United Kingdom) of
apparent deficiencies noted on board a bulk carrier which could endanger the safe loading or
unloading of solid bulk cargoes.
Article 10 of the Directive requires terminal representative to notify the Port State Control
Authority (i.e. Maritime and Coastguard Agency in the United Kingdom) of damage noted on
board a bulk carrier that could impair the structural capability or watertight integrity of the hull,
or the ship's essential engineering systems.
BULK CARRIER
STRUCTURAL
BULK CARRIER SAFE
LOADING OR
SHIP TYPE / SIZE
UNLOADING
INFRINGEMENT
CAPABILITY OR
WATERTIGHT
INTEGRITY OR
ESSENTIAL
ENGINEERING
SYSTEM DAMAGE
INFRINGEMENT
All UK and Non-UK Bulk Carriers
(as defined - see below) that call at
Terminals within the United Kingdom
or United Kingdom waters for loading
or unloading of solid bulk cargoes
Yes
Yes
Note: Does not apply to Terminals which only in exceptional circumstances are
used for loading or unloading dry cargo in bulk into or from bulk carriers, or in
cases where the loading or unloading is carried out solely with the equipment of
the bulk carrier concerned.
36
"bulk carrier" bears the meaning given to it in Regulation IX/1.6 of the 1974 SOLAS
Convention and interpreted by Resolution 6 of the 1997 SOLAS Conference, namely:
- a ship constructed with single deck, top-side tanks and hopper-side tanks in cargo paces
and intended primarily to carry dry cargo in bulk, or
- an ore carrier, meaning a sea-going single deck ship having two longitudinal bulkheads and
a double bottom throughout the cargo region and intended for the carriage of ore cargoes in
the centre holds only, or
- a combination carrier as defined in Regulation II-2/3.27 of the 1974 SOLAS Convention.
"dry cargo in bulk" or "solid bulk cargo" shall mean solid bulk cargo as defined in
Regulation XII/1.4 of the 1974 SOLAS Convention, excluding grain.
Adding Bulk
Carrier
Infringements
Infringements represent events that have occurred in relation to a specific Voyage and as
such are managed through the Voyage Dashboard within a self-contained panel – List of
Events (See Infringement management chapter 10 for more details on how to add the
infringement).
37
9.
Voyage Management
Introduction
Arrival and Departure Notifications along with Non-Reportable Voyages define the central
entities of the CERS system. In fact, almost all functions within the system are carried out by
manipulating the Voyage information and associating them with the other details including
Infringements and Exemptions etc.
The first step in managing any particular Voyage recorded by the system is to retrieve the
Voyage of interest and to achieve this two separate search interfaces have been provided:
Search by Date and Search by Vessel.
The chapter will explain you:
1) How to search for your Voyage of interest by date
2) How to search for your Voyage of interest by first searching for the vessel
38
Search by
Date
In order to search the system for a Voyage based on the Voyage Date, you should first open
the Voyages section of the collapsible Navigation Menu and then choose Search by Date.
You will then be presented with a screen that can be used for searching the system for the
recorded Voyages. To perform this query, you should enter Ports of Call and the Voyage
Dates to which you would like to limit the search and then click the Search button.
CERS – Search Voyage By-Date
The resulting tabular list will present summary details of any Voyages that have been entered
into the system that match your search criteria. To proceed, you should then choose the
Voyage from the list by clicking on the select icon
provided, after which you will be
directed the Voyage Detail page.
Search by
Vessel
In order to search the system for a Voyage based on the Vessel, you should first open the
Voyages section of the collapsible Navigation Menu and then choose Search by Vessel.
39
Search by
Vessel
Step 1
You will then be presented with a screen that can be used for searching the system for the
recorded Vessels. To perform this query, you should enter IMO number or the Ship Name
to which you would like to limit the search and then click the Search button.
NB These fields are Wildcard-enabled and as such you may specify all or part of either if
these fields in conjunction with the use of the wildcard character.
CERS – Search Voyage By-Vessel (STEP 1)
The resulting tabular list will present summary details of any Vessels that are recorded by the
system that match your search criteria. To proceed, you should then choose the Vessel from
the list by clicking on the select icon
provided.
40
Search by
Vessel
Step 2
CERS – Search Voyage By-Vessel (STEP 2)
This page is composed of two main sections.
The first section displays the Vessel Details of the Vessel you have chosen. The second
section provides a search panel that can be used for searching the system for any Voyages
that are recorded against the specific Vessel. To perform this query, you should enter
Voyage Dates to which you would like to limit the search and then click the Search button.
The resulting tabular list will present summary details of any Voyages that have been entered
into the system that match your search criteria. To proceed, you should then choose the
Voyage from the list by clicking on the select icon
provided, after which you will be
directed the Voyage Detail page.
41
10. Voyage detail page (Voyage dashboard)
Introduction
The Voyage Detail page represents a central point of the system through which most
management functions relating to Voyages can be carried out, as such it is also referred to
as the Voyage Dashboard. This page is composed of five main sections.
The first two sections pertain to the Vessel and Voyage details respectively.
The remaining three sections pertain to Maritime Incidents recorded against the Vessel and
Infringements and Exemptions recorded against the Voyage.
42
Voyage Detail
Page (Voyage
Dashboard).
CERS – Voyage Detail Page
Within the toolbar section at the top of the page, buttons are also provided for the
management of the Voyage including the ability to Edit the Voyage details and Cancel the
Voyage from the system. Please also note that expired Voyages that have already been
completed can be neither edited nor canceled and in this situation, these buttons will be
disabled.
43
Vessel details
The Vessel Detail panel displays the details of the Vessel under consideration. These
details include:
IMO # – the unique IMO number of the Vessel
Ship Name – the Vessels registered name
MMSI number – the unique MMSI number of the Vessel
Call Sign – the radio call sign of the Vessel
Year Built – the year of build
Flag – the Flag State under which the Vessel is registered
G.T. – the Gross Tonnage or weight of the Vessel
Ship Type – the classified type of the Vessel
44
Voyage details
The Voyage Detail panel displays the details of the Voyage under consideration and the
specific details displayed here will depend on the type of Voyage being displayed. For all
Voyage types, the following details are provided:
Voyage Type – indicating whether the Voyage is recorded as an Arrival, Departure or NonReportable.
Persons on board – the number of persons recorded on board for the Voyage
For Arrivals, the details include:
Port of Arrival – the end point of the Voyage
Port Berth – the berth at which the Vessel is docked
E.T.A. – estimated time of arrival to the Arrival Port
E.T.D. – estimated time of departure from the Arrival Port
Last Port of Call – the start point of the Voyage
A.T.D. – actual time of departure from the last port
Additionally, Dangerous and polluting goods notification will be displayed, should they have
been provided.
For Departures, the details include:
Port of Departure – the start point of the Voyage
A.T.D. – actual time of departure from the Departure Port
Next Port of Call – the end point of the Voyage
E.T.A. – estimated time of arrival to the Next Port
E.T.D. – estimated time of departure from the Next Port
Additionally, Dangerous and polluting goods notification will be displayed, should they have
been provided.
For Non Reportable Voyages, the details include:
Port of Arrival – the end point of the Voyage
Port Berth – the berth at which the Vessel is docked
E.T.A. – estimated time of arrival to the Arrival Port
E.T.D. – estimated time of departure from the Arrival Port
Last Port of Call – the start point of the Voyage
A.T.D. – actual time of departure from the last port
45
Infringement
section
From the infringement panel, the User is be able to view a list of all of the infringements
recorded in relation to the Voyage displayed. They will also be able to record new
Infringements against the Voyage (see infringement management for more detail on how to
record a new infringement).
CERS – List of Events Panel (PW Infringements and BCL Deficiencies)
Maritime
incident
section
The Maritime incidents panel displays any maritime incident related to the vessel. The user if
present on the
required can view details of the incident by clicking on the detail icon
tabular data.
CERS – List of Maritime Incidents Panel
Exemption
section
The exemption panel displays the list of exemptions which are applicable to the voyage
under consideration. The user if required can download the exemption form by clicking on
the PDF
icon present on the tabular data.
CERS – List of Exemptions
46
11. Infringement Management
Introduction
Infringements represent events that have occurred in relation to a specific Voyage and as
such are managed through the Voyage Dashboard within a self-contained panel – List of
Events.
CERS – Infringements Management
Through this panel, a User will be able to view a list of all of the Events that have occurred in
relation to the Voyage displayed. They will also be able to record new Infringements against
the Voyage. The type of infringements include:
- Port Waste Infringements
- Bulk Carrier Loading Deficiencies
47
The infringements are recorded in a similar fashion, the Port Waste Infringement types will
be used here as an example but the following discussion is equally applicable to the other
Bulk Carrier Loading Deficiencies.
48
Adding a New
Event
In order to record a new Event against a Voyage, you should first choose the type of Event
you wish to add from the Dropdown List of available infringements and click on the Add
button.
CERS – Adding a new Event (Infringement)
This page is composed of three main sections.
The first two sections pertain to the Vessel and Voyage details. They are unchanged from
the Voyage Dashboard and are displayed simply to allow the User to identify what Voyage
they are recording the infringement against.
The third section encapsulates the Infringement Details that should be provided in order to
record the event. These fields are defined as:
Checklist of Infringement Types – Mandatory, at least one must be chosen
Deficiency Description – Optional descriptive text of the Infringement
Next Port of Call – Optional choice from the Worldwide Port List
E.T.A. – Optional date and time for Estimated Time of Arrival at the Next Port of Call
49
First Name – Mandatory first name for the point of contact
Surname – Mandatory surname for the point of contact
Phone # - Mandatory phone number for the point of contact
Mobile # - Optional mobile number for the point of contact
Email – Optional email address for the point of contact
Once all of the mandatory information has been entered along with any optional information,
you should click on the Save button to store the details in the system.
Validation of specific fields is carried out at this point to ensure that the mandatory fields
have been filled and that all of the data entered is valid.
If at any point the User wishes to cancel the update, they simply click the cancel icon . A
confirmation dialog box will be presented requiring the User to confirm their intention, in order
to prevent the un-intentional loss of unsaved data.
50
Editing an
Event
In order to edit an event already recorded against a Voyage, it should first be identified
through the List of Events panel and selected. This will provide you with a detailed Event
View and by clicking on the Edit button included within the toolbar section of the page you
will be directed to Edit Infringement form for the specific event.
CERS – List of Events from the Voyage detail page
CERS – Editing an Event (Infringement)
Note: The Infringement Edit forms as expected are almost identical to the forms that are
used for creating the different types of Infringements with one exception; the User that
created and the User that last edited the event are displayed along with the respective dates.
51
Refer to Add New Event functionality for an explanation of the individual fields.
Once all of the mandatory information has been entered along with any optional information,
you should click on the Save button to store the changed details in the repository.
Validation of specific fields is carried out at this point to ensure that the mandatory fields
have been filled and that all of the data entered is valid.
If at any point the User wishes to cancel the update, they simply click the cancel icon . A
confirmation dialog box will be presented requiring the User to confirm their intention, in order
to prevent the un-intentional loss of unsaved data.
52
12. Logout and time out procedures
Logout
To logout from the application you can click on the ‘Logout’ tap situate on the top left corner
of the page. This will redirect you back to the login page. You can now close safely your
internet web browser.
Time-out
If you don’t use the web application for more than 20 minutes, the system will automatically
log you out. To login again simply click on the login link that will bring you to the login page of
the application.
53
APPENDIX I – Common Icons and Graphics
Icon
Meaning
Wildcard icon – indicates that the field is wildcard enabled
Mandatory icon – indicates that the field is required in order to proceed
Previous/Cancel icon – clickable button that returns the User to the previous page
Next icon – clickable button that allows the User to skip the current step
Print icon – clickable button that opens the Print Dialog box for printing the current page
Add icon – clickable button that opens expandable sections permitting for the addition of Additional
Notifications
Remove icon – clickable button that closes expandable sections permitting the removal of
Additional Notifications
Select icon – clickable button that redirects the User to view additional details of an entity
represented as a row within a DataGrid (Tabular data).
Edit icon – clickable button that redirects the User to edit the entity represented as a row within a
DataGrid (Tabular data).
Indicates that the Datagrid (Tabula data) has the paging feature enabled
Indicates that the Datagrid (Tabula data) has the paging feature is not enabled
Arrow Up icon – indicates that the DataGrid (Tabular data) is sorted in ascending order by the
column possessing the icon
Arrow Down icon – indicates that the DataGrid (Tabular data) is sorted in descending order by the
column possessing the icon
Calendar button.
Indicates that infringements are recorded against the voyage.
54
APPENDIX II – General Principals
Introduction
Throughout the CERS/SVD system, there is a consistent model used for permitting the User
to carry out common functionality. This section of the document will provide you details for
the following functionalities:
- Searching and use of wildcards
- Tabular-data paging and sorting of information
Searching
* Wildcard *
The CERS system provides multiple interfaces for searching different types of entities. These
search functions follow a similar process in order for the User to gain familiarity with the
system. The process involves the User specifying certain search criteria that are used for
narrowing the search results and once these criteria have been specified the User clicks on
the Search button.
A useful function that is provided in certain search forms where it is deemed appropriate is
the use of Wildcard-enabled fields. These fields permit the User to specify a part of the
search term that they wish to use and to precede or follow this term with the Wildcard
character. By doing so, the system will return results that contain the partial term that was
entered. NB The Wildcard character that is used by the system is the % character and
Wildcard-enabled fields are indicated by the Wildcard icon .
Validation of specific fields is carried out at this point to ensure that the mandatory fields
have been filled and that all of the data entered is valid.
The results of the search operation will then be displayed in the familiar tabular format,
providing the User with summarised data for each entity returned that can be used for
distinguishing and identifying the pertinent record.
CERS – Search operation pages (Wildcard usage example)
55
Tabular data
Tables are used throughout the application to display sets of information in an easily
comprehensible fashion and these tables share similar functionality for the most part.
CERS – Search tabular data (Sorting and Paging)
* Sorting *
* Paging *
The column headings of the tables contain a title for each column. In most situations these
titles are clickable, such that when the User clicks on the title of a particular column the
information displayed in the table will be Sorted based on that column. The data in this
column could be text, numerical or date values and the table will be sorted alphabetically,
numerically or chronologically based on the type of data. Should the User click on the title a
second time, the order of the Sorting will be reversed.
In some situations the number of entities, represented by rows, is too great to be displayed in
a single page. As such, the number of entities to display in a table is limited to a configurable
maximum, initially set to 20 per page. In situations where the dataset exceeds this number,
the dataset is split into as many subsets as is required. These subsets are then displayed in
separate pages that are accessible to the User though the Paging control that is provided
56
above these tables. The Paging control will list the number of pages that are available and
the User simply clicks on the relevant number to view the subset of data that is presented on
that page. The User also has the option of scrolling through the available pages using the
indicator arrows provided.
CERS – Search tabula data paging component
Additionally the User is presented with a control to disable/enable this Paging functionality by
simply clicking the icon displayed
.
For most situations the rows of a table represent a list of records that are displayed in a
tabular fashion with summary information to identify and distinguish each of the records. In
order to view the complete set of data associated with these records, they each possess an
icon within the first column of the table. By clicking this icon
, the particular record data
will be retrieved and displayed to the User.
The functionality of tables varies throughout the application, some permit the associated
entities (represented by rows) to be viewed while others may provide the ability to manipulate
the displayed data in some fashion. Any functionality that is available to the User will be
represented through the use of icons or checkboxes paired with action buttons. The icons
are usually self-descriptive and to provide extra information to the User, when the mouse
pointer is positioned over an icon, a tooltip is displayed beside the pointer to indicate the
functionality associated with clicking that particular icon.
57
APPENDIX III – Flow Chart diagrams
Introduction
The following chapter includes a set of flowcharts representing the different use cases of the
system. This includes:
- Port Users CERS/SVD Start Application
- New Arrival notification
- New Departure notification
- Reporting of infringements (for non-reportable voyages)
- Search Voyages (By-Date and By-Vessel)
- Edit or Cancel Voyage details
- Adding or editing Events (PW Infringements and BCL Deficiencies)
Port User – Overview
58
Port User – New Arrival Notification
59
Port User – New Reportable Departure Notification
60
Port User – Reporting Of Infringements
61
Port User – Search Voyages
62
Port User – Edit or Cancel Voyages
Port User – Add or Edit Infringements
63