1
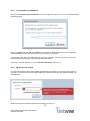
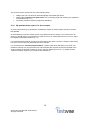
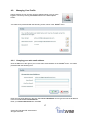
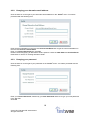
The Testwise Online Assessment Service Testwise User Guide 1 © 2015 GL Education/GL Assessment. All rights reserved. Contents 1. Using Testwise for the first time ................................................................................................. 4 2. Logging In ..................................................................................................................................... 5 2.1. Logging in to Testwise ........................................................................................................... 5 2.2. I’ve forgotten my Customer ID ............................................................................................... 6 2.2.1. I’ve forgotten my Email. ................................................................................................ 7 3. The Student ................................................................................................................................... 8 3.1. How do students log in to take a test? ................................................................................... 9 3.2. How do students take a test? .............................................................................................. 10 4. The Administrator....................................................................................................................... 12 4.1. Logging in ............................................................................................................................ 13 4.1.1. How do I log in as Administrator? ............................................................................... 13 4.1.2. Where do I get my password? .................................................................................... 13 4.1.3. How do I complete the ‘Set Your Password’ form? .................................................... 13 4.1.4. I’ve forgotten my password. ........................................................................................ 15 4.1.5. My account is locked. .................................................................................................. 15 4.1.6. My password has expired / is due to expire. ............................................................... 16 4.2. Managing Your Profile ......................................................................................................... 17 4.2.1. Changing your main email address. ........................................................................... 17 4.2.2. Changing your alternative email address. .................................................................. 18 4.2.3. Changing your password. ........................................................................................... 18 4.3. Subscriptions ....................................................................................................................... 19 4.3.1. How do I change my security settings? ...................................................................... 20 4.3.2. How do I change the order assessments are displayed and taken? .......................... 21 4.4. The Register ........................................................................................................................ 22 4.4.1. How do I add students to a register? .......................................................................... 22 4.4.1.1. Adding Students Individually ....................................................................................... 22 4.4.1.2. Copying Students ........................................................................................................ 23 4.4.1.3. Importing Students ...................................................................................................... 24 4.4.2. How can I demonstrate the assessment? ................................................................... 26 4.4.3. How can I check students’ progress? ......................................................................... 27 4.4.4. How can I check how many assessments have been taken? .................................... 28 4.4.5. How do I view student details? ................................................................................... 29 4.4.6. How do I reset a test to be taken again? .................................................................... 30 4.4.7. How do I delete a student from the register? .............................................................. 31 4.4.8. How do I export students? .......................................................................................... 32 4.4.9. How can I print the register? ....................................................................................... 32 4.5. Reporting ............................................................................................................................. 33 4.5.1. What kind of reports can I generate? .......................................................................... 33 4.5.2. Generating a report. .................................................................................................... 34 4.5.3. How do I view/save reports? ....................................................................................... 39 4.5.4. How do I delete reports? ............................................................................................. 39 4.5.5. How do I create Year on Year reports? ...................................................................... 40 5. Surveys ........................................................................................................................................ 43 5.1. Survey Administration .......................................................................................................... 44 5.1.1. What are Surveys?...................................................................................................... 44 5.1.2. How do I get username and passwords?.................................................................... 44 5.1.3. Getting the Register ID ............................................................................................... 44 5.1.4. How do I check the status of surveys? ....................................................................... 45 5.1.5. How do I preview / approve a survey? ........................................................................ 45 5.1.6. What do I do when a survey is completed? ................................................................ 46 5.2. Taking a Survey ................................................................................................................... 48 5.2.1. How do I log in to take a survey? ................................................................................ 48 5.2.2. How do I take a survey? ............................................................................................. 48 2 © 2015 GL Education/GL Assessment. All rights reserved. 6. Technical Information ................................................................................................................ 49 6.1. How can I make sure my PCs are compatible with Testwise? ............................................ 50 6.2. Memory, Processor, Screen Resolution & Colour Quality – XP .......................................... 50 6.3. Memory, Processor, Screen Resolution & Colour Quality – Vista/W7 ................................ 52 6.4. Using the Setup Checker ..................................................................................................... 54 7. More Help .................................................................................................................................... 55 8. Feedback ..................................................................................................................................... 56 3 © 2015 GL Education/GL Assessment. All rights reserved. 1. Using Testwise for the first time Testwise is an on-line testing service designed to make testing easy. Our guide will take you step by step through our site. This manual will guide you through everything from registering students for assessments, to how the students log in, to generating your reports. This manual has been designed for the Administrator and is not to be given to students. Before you start testing we strongly advise you to pass the system requirements, which you will find at the end of our guide, to your IT department to ensure you have no problems when testing. Our guide will use the following terminology: Administrator is used to describe the role of the teacher or the member of staff who will be handling the administration of the tests. Student refers to the user who will be taking the test. Assessments are the tests which you have purchased (CAT4, NGRT, SRS, PTE, PTM, etc.) Subscriptions refer to what you have purchased, i.e. Assessments, Year on Year reports and Surveys. Register is the assessment’s class list featuring student details and the status of tests. Survey Taker refers to a pupil, parent or staff member taking a survey. Surveys are stakeholder surveys purchased. Before you start, ensure you have your Customer ID; this should have been provided to you in your Welcome email in the form of a weblink with the Customer ID already defined (such as www.testingforschools.com/#/<Customer ID>). Our Technical Support Department are available to help if you need guidance using Testwise and they can be contacted using the details below: T: +44 (0)330 123 5375 (IVR Menu Option 2) [GL Education Overseas Customers: +44 1793 516349 - (IVR Menu Option 2)] E: [email protected] Let’s get started………….. 4 © 2015 GL Education/GL Assessment. All rights reserved. 2. Logging In 2.1. Logging in to Testwise The main Testwise website is www.testingforschools.com. Customers usually log in using a weblink with their Customer ID already defined (such as www.testingforschools.com/#/<Customer ID>) which will be included in the Welcome email sent to them by our Testwise Setup Department). (Alternatively, if the Customer ID is known, enter it into the field and click the Enter Testwise button). A successful login will take you to the following screen which gives you the choice between logging in as an Administrator or a Candidate (Take a test or complete a survey). 5 © 2015 GL Education/GL Assessment. All rights reserved. 2.2. I’ve forgotten my Customer ID Candidates should be supplied the Customer ID by the account Administrator. Administrators unsure of the Customer ID can be reminded via email by clicking the ‘Forgotten your Customer ID?’ link. Enter the main email address for the account or the optional ‘alternative’ email address if one has been added to the account. We will then send a reminder of any associated Customer IDs to that email account. 6 © 2015 GL Education/GL Assessment. All rights reserved. 2.2.1. I’ve forgotten my Email. The email address required in (2.2) is the main email address for the account or the optional ‘alternative’ email address if one has been added to the account. If you cannot find this email address you will need to contact Testwise customer support for assistance. Click on the ‘Forgotten your email?’ link for a list of the support centres and their telephone numbers. Please note that because we do not know your Customer ID at this point we cannot assist with determining exactly which support centre you require. 7 © 2015 GL Education/GL Assessment. All rights reserved. 3. The Student 8 © 2015 GL Education/GL Assessment. All rights reserved. 3.1. How do students log in to take a test? For a student to access a test the left button on the opening screen is used – it is labelled Take a test or Complete a survey. The student will need to enter the Register ID (another way of saying the ‘Name of the Test’) eg. ‘cat4d1516’. (Note: the Register ID field is not case-sensitive so, in this example, ‘CAT4D1516’ will also work). Administrators can verify the correct Register ID by clicking on the appropriate test in their Subscription screen (4.3). Once they have entered the Register ID of their test and clicked OK, a list of all the students that are registered for the test will appear. Students will select their name from the list and click the View tests button. Depending on the security settings, this is when they would be asked to enter their password. 9 © 2015 GL Education/GL Assessment. All rights reserved. 3.2. How do students take a test? The next screen takes students to their assessment. The students will then select the section of the assessment they have been advised to do, and click on Take Now. Some assessments require the tests to be taken in order; in these cases a Not Yet icon will be displayed. Any completed tests will show the Finished icon. Once the Take Now icon has been clicked, the test will begin downloading. Note: Nothing is being installed on your computer; the application is delivered over the Internet and held in the temporary memory of your PC. 10 © 2015 GL Education/GL Assessment. All rights reserved. Note: Students must not end their tests prematurely, they must wait until the timer has run out and the screen tells the student that the results are being stored. Closing the browser window in which the test is running will cause the results to be lost. Note: The use of the F5 button during a test will cause the test to restart and any previously answered questions will be lost. Once the results have been stored, the student is returned to the test selection screen and the computer can either be turned off or another test be taken. 11 © 2015 GL Education/GL Assessment. All rights reserved. 4. The Administrator 12 © 2015 GL Education/GL Assessment. All rights reserved. 4.1. Logging in 4.1.1. How do I log in as Administrator? Enter your Password and click OK. 4.1.2. Where do I get my password? When your account is set up we will send you an email containing a link. Following the link will take you to a web page which will allow you to set a password for your account as described in (4.1.3). This link can only be used once and will expire after a period of days as specified in the email. In order to guarantee unimpeded delivery of emails such as this one from Testwise, it is advised that you add the email address ‘[email protected]’ to the list of trusted addresses in your email client. Instructions on how to do this will be specific to your particular email client and is outside the scope of this document. Please contact Testwise customer support if you have not received such an email or have accidentally deleted it. 4.1.3. How do I complete the ‘Set Your Password’ form? The ‘Set Your Password’ form is only accessible by following valid links from emails sent to your registered account inviting you to set or reset your password. These may be sent by Testwise customer support when your account is first set up (4.1.2), or if you have requested a password reset. They may also be sent in response to you issuing a ‘Forgotten Password’ request (4.1.4). 13 © 2015 GL Education/GL Assessment. All rights reserved. Enter your new password into the field labelled Password and retype the same password into the field labelled Confirm Password, then click OK. As well as letters and numbers you are allowed to use characters from the following set in your password: ! " $ % ^ & * ( ) - _ = + [ ] { } ; : ' @ # ~ , < . > / ? |. All other characters are disallowed. Please note that, in order to encourage the use of ‘strong’ passwords that are less likely to be breached, your password must adhere to certain constraints as specified on the form; i.e. your new password must contain: At least 8 characters. No more than 20 characters. No spaces. At least two numbers. Both upper and lower case letters. The system will not let you submit the form until the password satisfies the above conditions. We also recommend: Passwords must not contain all or part of the user's name or job function, or any term (like a birthday, a partner's name or a street address) that could be easily guessed or researched. Simple substitutions (such as 1 for i, 0 for O, 5 for s etc.) in recognisable words - i.e. words found in a dictionary - afford no real protection and must not be relied on. Similarly, commonly used or easy to guess combinations or series such as 1234abcd, A5DFghJK, $taRwaRr$, 1passw*d etc. must not be used. Once you have successfully submitted the form containing your new password, you may log in to the system using your new password as described in (4.1.1). 14 © 2015 GL Education/GL Assessment. All rights reserved. 4.1.4. I’ve forgotten my password. Click on the ‘Forgotten your password?’ link on the login form shown in (4.1.1). The following dialog will be displayed. Enter your Email and click OK. If the Email is recognised, an email will be sent to your registered email addresses containing instructions on how to reset your password. It will contain a link which you must follow to reset your password. This link can only be used once and will expire after a period of days as specified in the email. Following a valid link will take you to the ‘Set Your Password’ form (4.1.3). 4.1.5. My account is locked. As a security measure, three unsuccessful login attempts will cause your account to be ‘locked’ for one hour. On the third unsuccessful login attempt you will notice that the login failed message now reads like this While the account is locked the system will not allow you to log in. 15 © 2015 GL Education/GL Assessment. All rights reserved. The account can be unlocked in one of the following ways. Waiting one hour; the account will automatically unlock after this period. Clicking the ‘Forgotten your password?’ link on the login page and resetting your password as described in (4.1.4). Contacting Testwise customer support for assistance. 4.1.6. My password has expired / is due to expire. As a security measure your password is scheduled to expire six months after it has been created / last updated. An email warning is issued 14 days before your password is due to expire. If you receive such an email you should change your password in order to ensure an uninterrupted service (4.2.3) or follow the forgotten password procedure (4.1.4). If your password has expired you will receive an email to this effect. You will no longer be able to log in to your account until your password has been changed. For convenience the ‘Password Expired Email’ contains a link which will allow you to reset your password. This link can only be used once and will expire after a period of days as specified in the email. Following a valid link will take you to the ‘Set Your Password’ form (4.1.3). Please contact Testwise customer support if you require further assistance. 16 © 2015 GL Education/GL Assessment. All rights reserved. 4.2. Managing Your Profile Various aspects of your account can be managed online once you have logged in. Do this by clicking the Profile button on the Subscriptions screen. You will then be presented with the following screen, which is the ‘Profile’ menu. 4.2.1. Changing your main email address. Click the edit icon to the right of your current main email address on the ‘Profile’ menu. You will be presented with the following form. Enter the new email address in the form field labelled New Email and re-type the new email address in the form field labelled Confirm Email. Enter your Current Password then click OK. 17 © 2015 GL Education/GL Assessment. All rights reserved. 4.2.2. Changing your alternative email address. Click the edit icon to the right of your alternative email address on the ‘Profile’ menu. You will be presented with the following form. Enter the alt email address in the form field labelled New Email and re-type the new email address in the form field labelled Confirm Email. Enter your Current Password then click OK. Please note that supplying an alternative email is optional. Leave the New Email and Confirm Email fields blank to remove an existing alternative email. 4.2.3. Changing your password. Click the edit icon to the right of your password on the ‘Profile’ menu. You will be presented with the following form. Enter your Current Password, followed by your New Password and then re-type your new password in the last field. Click OK. 18 © 2015 GL Education/GL Assessment. All rights reserved. 4.3. Subscriptions Once you’ve entered the administration side, you will see on the left-hand side of the screen a list of the subscriptions you have purchased (1). Select the subscription that you are going to be administrating first. Details of the subscription will appear on the right hand side. 8 7 2 6 3 1 5 1 2 Subscription List Time & Type Filters 3 4 Register ID Settings 5 Test Order 6 7 8 Register Profile Feedback 4 Shows a list of all the assessments, surveys and reports you have purchased. Testwise will default to showing current subscriptions. Time filter allows you to filter the subscription list by time; Current - default shows all current subscriptions. Future - subscriptions with a future release date. Recent - subscriptions that have expired in the last year. Old - subscriptions more than a year old. Type filter allows you to filter the subscription list by type. Defaults to show All, but can also filter to show only Assessments, Cross-assessment reports or Stakeholder Surveys. IMPORTANT - the students will need this to log onto their test. Where you can change the Register ID, make tests unavailable for students and change whether they have a common, individual or no password. (See 4.3.1) Allows you to change the order that certain assessments are displayed and taken. (See 4.3.2) This takes you to the screen where you manage the students. Allows the updating of email addresses and your Testwise password. This option will be seen on most screens, and allows you to provide us with any information you feel we should know. 19 © 2015 GL Education/GL Assessment. All rights reserved. 4.3.1. How do I change my security settings? You are able to edit the security settings of the assessment by clicking either Settings or the Register ID name at the top left of the screen (4 & 3 in 4.3). This allows you to control whether students are able to access the assessments, and whether passwords are required by the students. Once you have clicked Settings, you will be presented with the Register security settings dialog. Register ID – this must be unique, Testwise will not accept any previous register IDs. Note that each academic year, there will be a new default Register ID for each test. Tests available to students – selecting No will not allow any user to log into the student side of the account. Student password – This will automatically be set to Individual; when adding students to the register you will be required to enter a password, which will be their individual password. Selecting Common will allow you to enter one password that all students can use. If you chose None, no password will need to be entered by the students. Generally we would recommend using individual passwords to prevent candidates mistakenly logging in to another student’s account by clicking on the wrong name. 20 © 2015 GL Education/GL Assessment. All rights reserved. 4.3.2. How do I change the order assessments are displayed and taken? If the Test Order button (5) is enabled on the subscription screen (see 4.3) you are allowed to alter the order in which the subscription’s assessments are displayed and/or taken. Clicking the button will display the Test Order dialog. You may change the test order by clicking and dragging a test to its desired location, or by clicking the arrow buttons to move that test up or down in the list. Your changes will not be saved until you click OK. The students will subsequently see the tests in this order when they log in. If you wish to force the student to take the tests in this order then check the box labelled ‘Force the order in which these tests are taken’, and click OK. 21 © 2015 GL Education/GL Assessment. All rights reserved. 4.4. The Register The register is where you add, view and edit student details. Your register allows you to track the progress of the student’s test status. It is also where you generate reports (we’ll look at that later). 4.4.1. How do I add students to a register? The first thing to do in the register is to add your students to it; there are three ways you can do this. 1. Use the Add button which allows you to add them individually. 2. Copy students to this register from an existing register. 3. Import students using a .csv file. 4.4.1.1. Adding Students Individually Clicking the Add button at the top left of the register will display the ‘Add Student’ dialog. All parameters you can see above must be entered; however any information in the Additional tab is not mandatory. Once you’ve added your student details, click OK. You will then see them appear in the register. 22 © 2015 GL Education/GL Assessment. All rights reserved. 4.4.1.2. Copying Students Clicking the Copy button at the top left of the register will launch the dialog shown below. From here you will be able to copy candidates from another register into this one. First, select the subscription which contains the students you would like to copy to this register. The drop down list above the subscriptions allows you to filter this list. Options are: Future, Current, Recent and Old. Selecting a subscription will allow you to view the list of students in that register. This list can be filtered on group and year. Select the students you wish to copy to the current register and click OK. The process will fail if any of the selected students already exist on the current register. 23 © 2015 GL Education/GL Assessment. All rights reserved. 4.4.1.3. Importing Students Clicking the Import button at the top left of the register will launch a new browser window that will allow you to upload .csv files containing student details. Click the Upload files button and browse for your .csv file to upload the students. See below for details of how to create a .csv file in a suitable format. If you are importing any students who already exist on previous registers with date of birth or gender details different from the new import file, please check the Use these details to update the corresponding students on their other registers box. This will cause the Gender and Date of birth details you are providing in this import file to be replicated across your registers wherever a candidate has the same UPN as the imported one. Once your file has successfully been imported, after a short delay, the register will refresh to display the students’ names. If any errors occur the import will terminate, no students will be imported and a list of errors will be given like the one below. Correct your .csv file and try again. Care should be taken when viewing or editing .csv files in Microsoft Excel as this can make it difficult to spot missing or extra columns. If in doubt, view the .csv file in a text editor. Creating a .csv Import File To import students using a .csv file, it is important that you follow our template exactly as shown in the Student Import CSV Template http://www.testingforschools.com/help/csv-template.csv (this can also be found in our Guidance Documents). You can save a copy of this file by right clicking on the mouse and selecting Save As, from there you can open it and enter student details. 24 © 2015 GL Education/GL Assessment. All rights reserved. Information on the .csv file columns follows : Field Name UPN Forename Surname Grouping Password Gender Date of Birth External Reference Free School Meals Ethnic Group Special Educational Needs Custom 1 Custom 2 Year EAL Description There is no required format, simply a unique number for each student. Testwise regards candidates with matching UPNs on different registers as being the same person and requires them to have matching Gender and Date of Birth too. Maximum of 30 characters Maximum of 30 characters You can use this field to group students in classes. This is the password that the students will enter to log into their assessments. You can make the password individual or common. Please note that only letters, numbers and the underscore character can be used in passwords. This can be either Male or Female or M & F This should be formatted dd/mm/yyyy Any text up to 255 characters in length. Useful for storing a student reference number from another system. Any text up to 255 characters in length. Any text up to 255 characters in length. Any text up to 255 characters in length. Can be used for students who have SEN requirements Example A012345678900 Any text up to 255 characters in length. Can be used to record any school specific information about the student. Any text up to 255 characters in length. Can be used to record any school specific information about the student. Students Year Group, maximum of 30 characters A field used to indicating "English as a Foreign Language" users. EE1 1EE 25 © 2015 GL Education/GL Assessment. All rights reserved. John Smith Class 7A john85 Male or M 21/01/1997 ABC123 YES Asian NO Allergies Year 11 Yes The mandatory fields are UPN, Forename, Surname, Grouping, Password, Gender and Date of Birth. Also note that all headers MUST be spelt the same way as shown (e.g. Date of Birth cannot be shortened to DOB). All other fields are optional. Once you have entered your students’ details in to the file, simply go to File > Save As > Save As Type > CSV (Comma Delimited) > Save 4.4.2. How can I demonstrate the assessment? Some assessments come with a demonstration that can be launched from the register. If a demonstration exists for your assessment it will be available under the ‘Usage’ tab on the register as below (circled in orange). Clicking the hyperlink ‘Launch’ will allow you to view a demonstration of the assessment in a new browser tab. Close the browser tab or window containing the demo when you are finished. 26 © 2015 GL Education/GL Assessment. All rights reserved. 4.4.3. How can I check students’ progress? We recommend you have the register open on a separate computer while students are taking their assessment so that you can monitor their progress. An icon will appear under each test to show you their status. If no icon is displayed then no tests have been started yet. This icon indicates that the test is being downloaded to the student’s computer. This icon indicates that the student has started the test. This icon indicates that the student has completed the test. This icon indicates that the student has abandoned the test. This icon indicates that the test is available for resit. This icon indicates that the test has been completed but there may be errors in the results file. If this icon is shown please contact Testwise customer support. 27 © 2015 GL Education/GL Assessment. All rights reserved. 4.4.4. How can I check how many assessments have been taken? When you first enter a test register you will see a panel on the right, this will display information about your assessment usage. It shows the release and expiry dates of the assessment the maximum register size the remaining allocation the number of students who have completed all the tests the number of students who have taken some of the tests the number of students who have not yet taken any tests 28 © 2015 GL Education/GL Assessment. All rights reserved. 4.4.5. How do I view student details? The main register screen only shows the basic details of students. To view the full details, check the box to the left of a student’s name, then click on the View Details tab on the right of the screen. A new panel view will open on the right showing all the student’s details. You can view all the students’ details by using the Select All function on the register’s main screen then use the arrows at the bottom of the View Details tab to navigate through the students. At any time you can edit a student’s information by clicking the Edit button. If you edit the date of birth or the gender and the student exists on other registers, you will be prompted and asked if you’d like to change the details or keep the original details that are on other registers; select These of the details you’d like kept. 29 © 2015 GL Education/GL Assessment. All rights reserved. The Log function in the View details tab will show you the history of the selected student for the current assessment. You can see when they have downloaded, started, completed or abandoned a test or are available for resit. 4.4.6. How do I reset a test to be taken again? When you click on the View Details tab, you will see the status of the assessment tests. If a test has the Completed status and you would like your student to retake the test, click the Resit button; this will allow the student to retake the test. You will be prompted with a dialog box with confirmation that you want to set the test to resit. Please note that by clicking on Resit the existing test result will be deleted. 30 © 2015 GL Education/GL Assessment. All rights reserved. 4.4.7. How do I delete a student from the register? To delete students from the register, tick the box of the desired student(s) on the left-hand side of the register then go to the Delete tab on the right. Students that cannot be deleted from the register will be displayed in the upper section of the tab. Students cannot be deleted if they are logged in, have started or completed a test. The lower section of the tab will display all students that can be deleted. 31 © 2015 GL Education/GL Assessment. All rights reserved. 4.4.8. How do I export students? To export students from your register to a .csv file, click the Export button. Once you have clicked the Export button, you will be presented with a dialog asking whether you would like to open or save the file. Select Save and save the file to your local computer or network. Because the format of the exported .csv file is exactly the same used to import students into a test register, you can use the combination of export and import functions to copy students from one register to another. 4.4.9. How can I print the register? The Print button allows you to print a list of students’ details, including forename, surname, date of birth, group and password and the status of their test. The password is dependent on the test register security settings. If this setting is set to Individual each individual student’s password will be shown in the printed report. If this setting is set to Common the current common password will be shown in the printed report. If this setting is set to None the text (no password) will be shown in the printed report. By selecting the print option, you will be presented with the print dialog box asking you to select your print settings. Select these and the print job will be sent to your designated printer. 32 © 2015 GL Education/GL Assessment. All rights reserved. 4.5. Reporting 4.5.1. What kind of reports can I generate? Once a student has completed the assessment, you can generate a report. The reports vary depending on which assessment the students took, you will usually be given a choice of .xls or .pdf format. PDF Format This is the Adobe Acrobat format, which can contain images, graphs, and formatted text. These reports can be printed out and provided to staff or, in some cases, to students. Sample: XLS Format This is a raw data format and generally used if you would like to manipulate any data. For example, you may wish to import the data into your school management system. This format is generally not printer friendly in its raw state. Sample: 33 © 2015 GL Education/GL Assessment. All rights reserved. 4.5.2. Generating a report. To generate a report, log in to the administrator page and go to the assessment’s register. Select all the students that you wish to include in the report. Do this by checking the boxes down the left-hand side of the students’ names or by using the Select All function. Once you have selected your students click on the Report tab on the right. Any selected students who cannot be reported will be shown in the top section of the tab under Nonreportable students. Students that can be included in the report will be shown in the bottom section of the tab under Reportable students. 34 © 2015 GL Education/GL Assessment. All rights reserved. Click on Report at the bottom of the tab to view the list of reports available. Select the type of report you wish to create by selecting it and clicking Next. If none of the students that you have selected can be included in the report, a warning will be displayed making you aware of this. Click on the Back button to return to the previous screen or Cancel to return to the register. 35 © 2015 GL Education/GL Assessment. All rights reserved. Alternatively, if only some of the students cannot be displayed, you will see this warning message. If this appears, click Next to carry on, noting that the listed students will not appear in the report. The following prompt will ask you to enter the report parameters. A Report Name must be entered, other parameters are not mandatory but if entered, they will be included in the report. 36 © 2015 GL Education/GL Assessment. All rights reserved. Once the parameters have been entered click Generate report; Testwise will confirm your report has been successfully submitted. Click OK to take you back to the register screen, then click the Subscriptions button on the top left. This will take you back to the administrator screen; in the bottom half of the page you will see your report. The length of time it takes for the report to be generated depends upon how many students you include in your report, but it shouldn’t take any longer than a few minutes. 37 © 2015 GL Education/GL Assessment. All rights reserved. The status of the report job can be: This icon indicates that the report job has been submitted. This icon indicates that Testwise is working on the report. This icon indicates that the report has completed and is available to view or download. This icon indicates that there has been a problem generating the report. If this icon is shown please contact Testwise customer support. 38 © 2015 GL Education/GL Assessment. All rights reserved. 4.5.3. How do I view/save reports? Once a report job shows the completed status, you can either view it directly from Testwise by clicking View or you can save it to your machine. By clicking Save you will be prompted with a dialog box, click Save and chose the location where you would like to save it. 4.5.4. How do I delete reports? Reports can be deleted by checking the tick box to the left of the report name then clicking Delete. Multiple reports can be selected for deletion. Any deleted reports will be deleted permanently. 39 © 2015 GL Education/GL Assessment. All rights reserved. 4.5.5. How do I create Year on Year reports? Year on Year reports are displayed in Subscription panel, on the administrator page. Select the Year on Year report you would like and click the Report button in the top right. You will be presented with a list of report types that you can generate. Select the report type you require and click Next. 40 © 2015 GL Education/GL Assessment. All rights reserved. This next screen, if appropriate for it to appear, will allow you to select from a list of year groups to filter candidates by. Selection is based on the year groups of the candidates in the registers with the most recent academic year. There is also a check box option labelled ‘Include candidates not in latest year groups’ which allows you to select whether to display candidates who have not been subscribed to any of the registers with the most recent academic year. The columns to the right of the ‘No Of Pupils’ column indicate the percentage of the tests completed for that year group, for each of the years. Select the year groups that are to be included in the report using the checkboxes in the first column of the year group list, then click Next. 41 © 2015 GL Education/GL Assessment. All rights reserved. The Cross-register reporting table allows you to select the students to be included in the report. The green ticks indicate whether or not a student has completed the test. The list of students can be filtered to show only those who have completed that test using the checkbox in the test column heading. Select the students you would like to be included in the report using the check boxes in the first column on the left, then click Next to enter report parameters. A Report Name must be entered. Once you have completed all the required parameters, click Generate report. Once completed, the reports will be displayed on the Subscription page. 42 © 2015 GL Education/GL Assessment. All rights reserved. 5. Surveys 43 © 2015 GL Education/GL Assessment. All rights reserved. 5.1. Survey Administration 5.1.1. What are Surveys? Surveys enable your school to monitor the changing perceptions of pupils, parents and staff with minimum fuss, providing a wealth of evidence for an effective evaluation. Once you have purchased your Stakeholder Survey subscription you will be given usernames and passwords which you can supply to those you wish to be able to log in and take the survey. 5.1.2. How do I get username and passwords? Usernames and passwords are sent to you via email, they come in excel or PDF format. PDF example Excel example Username Password staff0001 MRU6R staff0002 A8FM8 staff0003 L2JXQ staff0004 787ZM staff0005 KYGYL staff0006 9H3JG 5.1.3. Getting the Register ID As well as a username and password for the survey, survey takers also need the Register ID. As with any subscription, this can be found in the administration side of your Testwise account (see 4.3). To recap; on the subscription lists select the survey you would like, the screen to the right will fill and you will see the Register ID. 44 © 2015 GL Education/GL Assessment. All rights reserved. 5.1.4. How do I check the status of surveys? To see how many surveys have been completed, log in to the administrator side of your Testwise account, select Stakeholder Survey from the Type drop-down and then select the required survey. You will now see pie charts showing you how many surveys the pupils, parents and staff have completed and how many are left to be taken. The number of charts will vary depending on your subscription. Note in the above example that Parent surveys are subscribed (or the Parent Survey Statistics panel would be missing) but there is no pie chart. This is because the parent survey is in preview mode – note the Preview button at the bottom. 5.1.5. How do I preview / approve a survey? If one of your survey types is in preview mode you will see a Survey Statistics panel with no pie chart and a Preview button at the bottom (see above). Clicking the button will open the Survey Preview dialog. Clicking the Launch button will open a new browser tab and launch the survey preview. Simply close the browser tab when you are finished previewing the survey. If you have any feedback on the survey preview then you should enter it into the text area supplied and click the Submit Feedback button so that it can be dealt with it. 45 © 2015 GL Education/GL Assessment. All rights reserved. If you are happy with the survey preview and are ready for the real survey to be made available, click the Approve button. Please be patient while the survey is uploaded and made available. Once the real survey has been made available you will be sent the usernames and passwords for this survey and the pie chart will appear in the Survey Statistics panel. 5.1.6. What do I do when a survey is completed? When you are happy that enough survey takers have completed one of your survey types you can request the report by clicking on the Request Report button of the Subscription page (see 5.1.4). This will open the Request Report(s) dialog. 46 © 2015 GL Education/GL Assessment. All rights reserved. Choose the survey type(s) which you wish to request a report for and click Process. Note that this will effectively close that survey and prevent any further surveys of that type being taken. We will be informed that your report is ready to be compiled. 47 © 2015 GL Education/GL Assessment. All rights reserved. 5.2. Taking a Survey 5.2.1. How do I log in to take a survey? Survey takers log in to Testwise in the usual fashion (see 2), and then choosing the Take a test or Complete a survey option will prompt them to enter the Register ID. The next screen will ask the survey taker to enter their Username and Password. A drop down of survey types will be displayed; after choosing the appropriate option click Login. The next screen will take the survey taker to the traffic lights screen; they will need to click Take Now on the traffic light to begin the download of the survey. 5.2.2. How do I take a survey? The survey consists mainly of multiple choice questions. The last part of the survey is free hand for any comments or suggestions the survey taker would like to make. When the survey takers have completed their surveys they will be taken back to the traffic light screen where the traffic light will show as Finished; they can now log out of Testwise. 48 © 2015 GL Education/GL Assessment. All rights reserved. 6. Technical Information 49 © 2015 GL Education/GL Assessment. All rights reserved. 6.1. How can I make sure my PCs are compatible with Testwise? Minimum Machine Specification In order for pupils to take tests using Testwise, the minimum technical specification for the machines should be: Processor: Memory: Browser Application: Browser pop-ups: Browser plug-ins Screen Resolution: Colour Quality: Internet Connectivity: 6.2. 1.0 GHz Pentium or equivalent 256 MB RAM Microsoft Internet Explorer 7 (or later) Mozilla Firefox 2.0 or greater Safari 3.0 or greater Enabled Latest version of Adobe Flash Available free of charge from http://www.adobe.com/. Please take care to untick the Yahoo search bar option when downloading, as this includes, by default, a pop-up blocker. 800 x 600 (usable with scrolling), optimised for 1024 x 768 or higher High/Highest/65536 colours Variable depending on number of pupils taking tests simultaneously, but for an average school should be 10 MB (or faster) if you have a slower connection speed you could stagger the download of the tests. Memory, Processor, Screen Resolution & Colour Quality – XP 1. Right click on the Start menu. 2. Click on Explore from the options available. 3. Right click My Computer in the left pane. 4. Click on Properties to open the System Properties window. This will indicate memory and processor, as highlighted below. Check that the processor is a minimum of Pentium 1.0 GHz and that the memory is a minimum of 256 MB RAM. 5. Click on Cancel, when you have finished checking the memory and processor settings. 6. Close down the My Computer window. 7. Close down the Start menu window. 50 © 2015 GL Education/GL Assessment. All rights reserved. To check screen resolution and colour quality XP: Right click anywhere on a clear desktop. Click on Properties to open the Display Properties window Click on the Settings tab. This will indicate screen resolution and colour quality as highlighted below. Check the screen resolution is 800 x 600 pixels minimum (preferably 1024 x 768 or higher) and that colour quality is either: High/Highest 16 bit or higher 65536 colours or higher. 51 © 2015 GL Education/GL Assessment. All rights reserved. 6.3. Memory, Processor, Screen Resolution & Colour Quality – Vista/W7 1 2 3 4 Click on the Windows icon. Click on Control Panel from the options available. Select System and Security Click on System; this will tell you your memory and CPU size. 52 © 2015 GL Education/GL Assessment. All rights reserved. To check screen resolution and colour quality Vista/Windows 7: 1 2 Right click on any blank area of the desktop. Select the screen resolution and left click, this will indicate screen resolution and colour quality as highlighted below. Check the screen resolution is 800 x 600 pixels minimum (preferably 1024 x 768 or higher) and that colour quality is either: High/Highest 16 bit or higher 65536 colours or higher. 53 © 2015 GL Education/GL Assessment. All rights reserved. 6.4. Using the Setup Checker The Setup Check button checks whether your browser is of the required level to run Testwise; whether its current configuration is suitable for running Testwise; that the various plugins, such as Flash, are installed and are the correct version; and that pop-ups are enabled. Additionally, it allows you to make sure that student results can be posted correctly to the Testwise main results server, and also our backup results server. We recommend you use this check on PCs being used for Testwise, and also after any changes to your school network or communication software. The Asset Download Tests are sample files provided to let you check that the file types required by Testwise can be accessed on your network. If the result of running this check shows any of the options as Fail or there are issues downloading any of the sample files, either take the appropriate actions to resolve these issues or contact Testwise Technical support for advice. 54 © 2015 GL Education/GL Assessment. All rights reserved. 7. More Help In the top right-hand corner of most Testwise screens is a Help button. Selecting this option displays a page containing links to a number of online documents (including this help manual) covering the use of Testwise and the most common Testwise Assessments. In the Guidance Documents you will find information on: The overall use of GL Assessment tests Cognitive Abilities tests Progress in English tests Progress in Maths tests Single Word Spelling tests Group Reading tests Technical documentation MIS Support documentation Click on the required link to show any of these documents in PDF format. 55 © 2015 GL Education/GL Assessment. All rights reserved. 8. Feedback In the top right-hand corner of most Testwise screens is a Feedback button. Selecting this option opens a dialog containing a Customer feedback form. Select the type of feedback you would like to give us from the drop-down list, enter your feedback in the text box and click Send. 56 © 2015 GL Education/GL Assessment. All rights reserved.