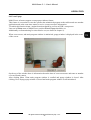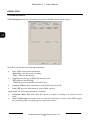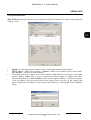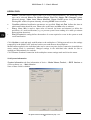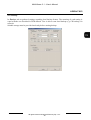
1
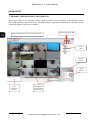
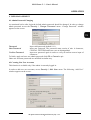
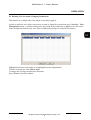
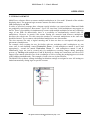
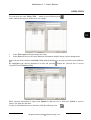
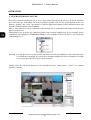
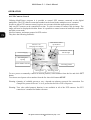
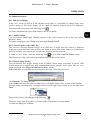
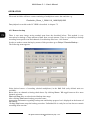
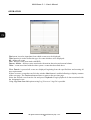
u s e r ’s m a n u a l
MultiViewer
Network Software
For NV-DVR900 / NV-DVR1600
Novus Digital Multiplexers series
Instrukcja obsługi oprogramowania
sieciowego
Multi-Viewer
MultiViewer 3.1
- User’s
Manual 2.54 . Wersja 1.0.
TABLE OF CONTENTS
1. FOREWORD ...........................................................................................................................3
1.1 Main characteristics ...........................................................................................................3
1.2 PC Hardware & Software Requirements ...........................................................................4
1.3 Software Installation ..........................................................................................................4
2. OPERATION ...........................................................................................................................5
3. GRAPHIC USER INTERFACE DESCRIPTION................................................................6
4. USER MANAGEMENT .........................................................................................................7
4.1 Admin Password Changing................................................................................................7
4.2 Creating New User Accounts.............................................................................................7
4.3 Deleting User Account, Changing Permissions .................................................................9
5. SITE MANAGEMENT .........................................................................................................10
6. LIVE MONITORING FEATURE .......................................................................................13
6.1 PTZ Cameras Control ......................................................................................................15
6.2 Additional features...........................................................................................................16
6.2.1 Full Screen Display .................................................................................................16
6.2.2 Audible Alarm.........................................................................................................16
6.2.3 Screen Capture to the JPEG file ..............................................................................16
6.2.4 Remote Image Saving .............................................................................................16
6.2.5 Printing....................................................................................................................17
6.3 Log View .........................................................................................................................17
6.4 Event Popup.....................................................................................................................19
6.5 Connection termination....................................................................................................19
7. PLAYBACK MODE .............................................................................................................24
7.1 Multiplexer Recording Playback ....................................................................................24
7.2 Playback of Remotely Saved Recordings ........................................................................25
7.3 CD Backup Playback .......................................................................................................26
7.4 HDD Backup Playback ....................................................................................................26
8. BACKUP FILES CONVERTING .......................................................................................29
9. EVENT MONITORING FEATURE (WATCH) ................................................................30
10. REMOTE SETUP FEATURE..............................................................................................31
10.1 Audio settings ................................................................................................................31
10.2 Alarm and motion detection settings..............................................................................33
10.3 Camera settings..............................................................................................................35
10.4 HDD information ...........................................................................................................36
10.5 Email notification...........................................................................................................37
10.6 System Information........................................................................................................38
10.7 Backup ...........................................................................................................................39
All rights reserved © NOVUS Security Sp. z o.o.
2
Instrukcja obsługi oprogramowania
sieciowego
Multi-Viewer
MultiViewer 3.1
- User’s
Manual 2.54 . Wersja 1.0.
FOREWORD
1.
FOREWORD
MultiViewer program is designed to work with NV-DVR900 and NV-DVR1600 Novus digital
multiplexers (also in CD versions). This tool allows to connect with digital multiplexers via computer
network (TCP/IP protocol) and it also provides effective search function of backup data (HDD and
CD). MultiViewer allows to connect multiple digital multiplexers simultaneously. Live view as well
as data searching is possible. The software allows you to change multiplexer settings (remote
configuration).
Password system on the software and multiplexer limits unauthorized access.
1.1 Main characteristics
User friendly interface
Multiple user account and password settings
Ability to simultaneously connect up to 255 multiplexers
Ability to connect up to 15 users to one multiplexer at the same time (only one user in data
playback mode)
Multiplexer remote settings function
Ability to save images displayed on the screen
Image printing function without use of additional applications
Ability to remote control PTZ cameras
Alarm popup window feature
Data search and conversion from backup HDD created on the multiplexer
User interface language selection
All rights reserved © NOVUS Security Sp. z o.o.
3
Instrukcja obsługi oprogramowania
sieciowego
Multi-Viewer
MultiViewer 3.1
- User’s
Manual 2.54 . Wersja 1.0.
FOREWORD
1.2. PC Hardware & Software Requirements
CPU
Intel® Pentium® 1GHz (or faster)
RAM memory
256MB
HDD
4MB capacity to install software and additional capacity to for video
data backup
Additional requirements
VGA card, AGP x 4, 16MB
OS
Microsoft® Windows® 98 / ME / 2000 / XP™
1.3. Software Installation
MultiViewer software does not require installing.
Notice:
MultiViewer100v2.xx.exe file should be copied to desired location before operation
(the software can not be run from CD).
Notice:
MultiViewer ver. 2.67 (or above) supports only DVR's with firmware ver.1.46 (or
above)
All rights reserved © NOVUS Security Sp. z o.o.
4
Instrukcja obsługi oprogramowania
sieciowego
Multi-Viewer
MultiViewer 3.1
- User’s
Manual 2.54 . Wersja 1.0.
OPERATION
2. RUNNIG THE PROGRAM
MultiViewer software is run with the use of MultiViewer100 vX.XX.exe shortcut icon.
If the software is started up for the first time language selecting menu appears.
During the first run the following language selection dilaog-box is displayed.
User interface language selection takes effect after next software start.
After short period MultiViewer login window appears on the screen.
When running the software for the first time use specified data:
User Name: admin
Password: 1111
admin is the user with system administrator privileges. Only admin can create new user accounts.
After first login admin should change password settings in order to limit unauthorized access.
Along with the following logins user should input login and password provided by admin.
After login the specific user selected software settings are automatically loaded.
To log out enter menu File / Log Out.
All rights reserved © NOVUS Security Sp. z o.o.
5
Instrukcja obsługi oprogramowania
sieciowego
Multi-Viewer
MultiViewer 3.1
- User’s
Manual 2.54 . Wersja 1.0.
OPERATION
3. GRAPHIC USER INTERFACE DESCRIPTION
After login ready to use software interface appears on the screen. Interface is divided into several
areas with functions described below. Detailed software operation instructions are included in the
following chapters of this user’s manual.
Menu bar and shortcut icons to specific functions
Changing operation mode
Root
menu
Display
modes
PTZ
functions
Event
notification
window
Data Playback
control buttons
and slide bars
All rights reserved © NOVUS Security Sp. z o.o.
6
Instrukcja obsługi oprogramowania
sieciowego
Multi-Viewer
MultiViewer 3.1
- User’s
Manual 2.54 . Wersja 1.0.
OPERATION
4. USER MANAGEMENT
4.1 Admin Password Changing
As mentioned before after login the default admin password should be changed. In order to change
admin password access the Security / Change Password menu. “Change Password” window
appears on the screen.
Password
New Password
input valid password (default 1111).
input new password. The password must consist of min. 4 characters,
CAPITAL LETTERS and lower case are distinguished.
Confirm Password
input new password again in order to verify & confirm correct input of
characters.
To finish, apply and save new admin password click OK or Cancel to quit .
Other user accounts passwords are modified in similar way.
4.2 Creating New User Accounts
This function is available only if the admin is currently logged in.
In order to add new user accounts, access Security / Add User menu. The following “Add User”
window appears on the screen .
All rights reserved © NOVUS Security Sp. z o.o.
7
Instrukcja obsługi oprogramowania
sieciowego
Multi-Viewer
MultiViewer 3.1
- User’s
Manual 2.54 . Wersja 1.0.
OPERATION
•
•
•
•
In the Admin Password field input administrator password. Only the administrator can add
a new user account.
In the User Name field input user name. The user name must consist of min. 4 characters.
In the Password field user password must be input. Password must consist of min.4 characters.
In the Confirm Password field input new password again in order to verify & confirm input of
correct characters.
Next set specific user permissions.
Permissions applying to software operation are grouped in the Client Operation field.
•
•
•
•
•
If All of Client Operation is marked, the user will have access to all system settings except for
user accounts settings.
Marking Print, Save, Convert Image, Make AVI File allows user to print images, save
images, files format conversion, create AVI sequences.
Marking Open 601, 602, 603 files allows user to playback recorded backup files
Marking Analyze, Play HDD allows user to playback backup- HDD moved from the
multiplexer
Marking Remote Download allows user to save data on PC HDD during network connections
Permissions applying to multiplexer operation are grouped in the DVR Unit Operation field.
•
•
Marking Pan, Tilt, Zoom, Focus, Iris, Preset allows user to control Speed Dome cameras
utilizing MultiViewer software interface
Marking Log View allows user to remotely access multiplexer system registry event.
To finish, apply and save new user account settings, click OK or Cancel to quit .
All rights reserved © NOVUS Security Sp. z o.o.
8
Instrukcja obsługi oprogramowania
sieciowego
Multi-Viewer
MultiViewer 3.1
- User’s
Manual 2.54 . Wersja 1.0.
OPERATION
4.3 Deleting User Accounts, Changing Permissions
This function is available only if the admin is currently logged in.
In order to add new user, delete current user account or change his permissions go to Security / User
Management menu. A window listing users along with their permissions is displayed on the screen.
In the example shown below the user name is user with privileges to control PTZ cameras.
Highlight desired user (selected user is highlighted by blue background).
To delete selected user click Delete User
To change his privileges mark desired functions.
Press Close to close this window.
All rights reserved © NOVUS Security Sp. z o.o.
9
Instrukcja obsługi oprogramowania
sieciowego
Multi-Viewer
MultiViewer 3.1
- User’s
Manual 2.54 . Wersja 1.0.
OPERATION
Apart from authorization settings multiplexer and camera assignment is also needed.
Once it's done user can see only allowed units and is able to review only allowed cameras.
In order to assign units and cameras for particular user go into User Permission… menu in Security
section.
On the left there is a list of all defined multiplexers. On the right there are defined user accounts.
After selecting any multiplexer name (blue highlighted) you can permit each user to view particular
cameras. In order to allow user to view cameras from selected unit mark Permission option next to
desired user name. Now selecting and deselecting cameras is possible. All cameras are available for
each user by default.
In order to save settings click OK. In order to leave the menu without saving any changes click
Cancel.
All rights reserved © NOVUS Security Sp. z o.o.
10
Instrukcja obsługi oprogramowania
sieciowego
Multi-Viewer
MultiViewer 3.1
- User’s
Manual 2.54 . Wersja 1.0.
OPERATION
5. SITE MANAGEMENT
MultiViewer software allows to connect multiple multiplexers in “live mode” (Live tab of the window
displaying sites). The program logic structure assumes two basic elements:
Unit (multiplexer) and Site.
In order to effectively manage these elements special window was created where Sites and Units
are graphically represented as „Root menu”. Up to 255 sites from 32 000 multiplexers may appear on
the list. There is a possibility to simultaneously connect with multiple multiplexers but only within the
range of one Site. So theoretically, there is a possibility to simultaneously connect with 255
multiplexers. However in practice this means sharing the network band between multiplexers
decreases the refresh rate. For this reason the number of connected multiplexers at the same time
should be limited. Try to connect with individual multiplexers one after another.
The sites structure has only a logical meaning and it does not have to correspond with physical
placement of multiplexers.
For example, when creating site tree for facility with two workshops with 2 multiplexers we can
create sites in each building: named Production Room 1 with multiplexers named 1 and 2 and
appropriately second site named Production Room 2 with multiplexers named 3 and 4.
Additionally, logic site can be created only for multiplexers recording images during packaging
process e.g. Packing with multiplexers 2 and 4. By doing so, during one connection, user can receive
images from cameras placed in one of the workshops or select viewing the packaging process in both
of the building simultaneously. The example of such a site tree is placed below.
The MultiViewer software settings including localization settings are assigned to user. All setting are
loaded automatically during login to specific account.
All rights reserved © NOVUS Security Sp. z o.o.
11
Instrukcja obsługi oprogramowania
sieciowego
Multi-Viewer
MultiViewer 3.1
- User’s
Manual 2.54 . Wersja 1.0.
OPERATION
In order to create new site the multiplexers must be defined first. To do so, enter Setup / Unit ...
menu or press following icon
In the window that appears new multiplexers settings have to be input.
•
•
•
In the Unit description field input unique multiplexer name.
In the Domain/IP field Address input multiplexer IP address confirming with its settings in the
network menu.
In the Port field input network port address confirming with multiplexers settings in the network
menu.
If there is a web password feature enabled in multiplexer settings the following information has to be
input:
•
•
In the Unit ID field input user ID conforming with menu settings Web Password of
multiplexer
In the Unit Password field input user password conforming with menu settings Web
Password of multiplexer
The rest of the fields is not obligatory and is used to provide additional information helpful during
system management.
When all required information is input click Update in order to add new unit to data base. Delete
is used to remove unit from the data base.
To add additional unit to the data base click the following icon:
All rights reserved © NOVUS Security Sp. z o.o.
12
Instrukcja obsługi oprogramowania
sieciowego
Multi-Viewer
MultiViewer 3.1
- User’s
Manual 2.54 . Wersja 1.0.
OPERATION
To create new site enter Setup / Site … menu or press following icon
In the window that appears define new site settings.
•
•
In the Site name field input unique site name
In the Notes field user can input additional information helpful during system management.
In the left part of the window (Available Unit) defined multiplexers are placed, which can be added to
site.
By highlighting the desired multiplexer in blue and pressing button the selected unit is moved
to specified site (Selected Unit).
When required information is input click Update to add new site to data base. Delete is used to
remove site from the data base.
In order to add additional site to data base click the following icon:
All rights reserved © NOVUS Security Sp. z o.o.
13
Instrukcja obsługi oprogramowania
sieciowego
Multi-Viewer
MultiViewer 3.1
- User’s
Manual 2.54 . Wersja 1.0.
OPERATION
6. LIVE MONITORING FEATURE
In order to connect with desired site in „live” mode select Live tab on the site tree. From the available
sites select the one with which you wish to connect (double click the left mouse button on the site
name to „display” and „close” its contents). Click the right mouse button on the localization name and
from the displayed menu select Connect.
After a short period of time a connection with selected site is established and images from cameras
appear on the screen.
Appropriate icons describe the connection status with selected multiplexers. In the example below
connection with multiplexer Production Room 1 was established. However, there is no connection
with multiplexer 2.
Warning: If in the given site it is not possible to connect at least one multiplexer, the connection time
is considerably expanded. It is advised to eliminate multiplexers from localization to which
access is not provided for a longer period of time.
Double click the left mouse button on the multiplexer name „drops down” „closes” its contents
(specific cameras).
All rights reserved © NOVUS Security Sp. z o.o.
14
Instrukcja obsługi oprogramowania
sieciowego
Multi-Viewer
MultiViewer 3.1
- User’s
Manual 2.54 . Wersja 1.0.
OPERATION
Buttons grouped in the CHANNEL section allow to select display mode (split screen).
Within specific display mode, it is possible to arrange camera layout. Select desired camera and press
the left mouse button and while holding pressed „drag ” the icon to the desired window. Within one
split screen mode specific camera can be displayed only once.
It is possible to hide image from specific camera. In order to do so click the right mouse button on
desired camera icon and tick off unmark View position.
Hidden camera is marked on the tree with the following symbol
In the image background of each camera (in the left upper corner), camera name ( if it is set in the
digital multiplexer menu ) or its number (K1, K2 and so on.) is displayed.
Additionally, recording mode information is displayed:
Rec - continuous recording,
Motion - recording in motion detection mode,
Alarm - alarm recording
VLoss - Video Signal Loss, no recording or the camera is in hidden mode in multiplexer menu
All rights reserved © NOVUS Security Sp. z o.o.
15
Instrukcja obsługi oprogramowania
sieciowego
Multi-Viewer
MultiViewer 3.1
- User’s
Manual 2.54 . Wersja 1.0.
OPERATION
6.1 PTZ Cameras Control
Utilizing MultiViewer program it is possible to control PTZ cameras connected to the digital
multiplexer. The PTZ camera connection method can be found in the multiplexer user’s manual.
In order to allow PTZ cameras control ,login to user account which has appropriate permission.
Only one PTZ camera can be controlled at a time. To select a camera to control click its image. The
image will now be displayed with blue frame. It is possible to control camera in both full screen mode
and split screen mode.
Next use buttons and menu grouped in PTZ section.
They have the following functions:
Zoom in / out
(changing focal length )
PTZ camera control
up and down
PTZ camera control
left and right
Focus changing
Iris closing and
opening
Preset number selection
Activating pattern
Saving preset
Activating preset
To save preset set manually camera in desired position, select number from the list and click SET
button.
To activate saved preset select number from the list then click button MOVE.
Warning: Quantity of available presets to save depends on telemetry protocol for connection. For
example for protocol Novus-C it is 63 presets but for Pelco-D it is 20 presets.
Warning: Tour (also called pattern) function is not available in all of the PTZ cameras. See PTZ
camera user’s manual for further reference.
All rights reserved © NOVUS Security Sp. z o.o.
16
Instrukcja obsługi oprogramowania
sieciowego
Multi-Viewer
MultiViewer 3.1
- User’s
Manual 2.54 . Wersja 1.0.
OPERATION
6.2 Additional features
6.2.1 Full Screen Display
In the „live” mode (as well as in the playback mode) there is a possibility to enlarge image from
specific camera to full screen display. In this mode all interface buttons will not be displayed.
To activate full screen mode click following icon:
To restore standard display press Esc button on the PC keyboard.
6.2.2. Audible Alarm
User can activate sound signal alarming operator if the event occurred in the system (e.g. motion
detection, alarm).
To enable sound signal enter Setup menu and mark Sound On/Off.
6.2.3. Screen Capture to the JPEG file
User can save currently displayed image as an JPEG file. If image from one camera is displayed
in full screen mode then the system will save the image in exactly that format. However, if split screen
option is currently active then in the file will store image in split screen mode.
In order to save image click the following icon
or go to File / Capture Screen.. menu.
Then input desired file name and its localization where the file is to be saved.
6.2.4 Remote Image Saving
User can remotely save images directly to the PC HDD. Camera image is recorded in special .603
format which can be played back only utilizing MultiViewer software. Place where files are to be
saved is selected in the Setup tab Backup Location...menu.
In the Path field user can find current root path to the folder where files are saved.
Click Browse.. To change the path.
In the Folder field user can input new name to new sub-folder which will be created in this location.
To begin image recording from a selected camera click the right mouse button on its icon and select
Save.
The recorded camera icon changes to the following:
From now image from this camera is recorded in the folder pointed in menu Setup.
To finish recording tick off Save.
All rights reserved © NOVUS Security Sp. z o.o.
17
Instrukcja obsługi oprogramowania
sieciowego
Multi-Viewer
MultiViewer 3.1
- User’s
Manual 2.54 . Wersja 1.0.
OPERATION
File saved in folder will have a name consisting of multiplexer name, date and time e.g.
Production_Room_1_20041119_140859(00).603
Data playback recorded on the PC HDD is described in chapter 7.2
6.2.5 Remote backup
There is one more image saving method apart form the described before. This method is very
convenient for backup of large amount of data from several cameras. There is a possibility to backup
recording from specific time and channels. Saved backup files have *.603 format.
In order to make a remote backup by means of this procedure go to Setup / Remote Backup ...
The following menu appears.
Select desired source of recording (desired multiplexer) in the Unit field (only defined units are
available).
Below there are channels selecting check-boxes. By clicking None / All toggle between all or none
channels selection.
Start and Stop allow to select desired backup time range.
After clicking Start button backup procedure starts.
Appropriate information regarding backup state and backup progress bar is displayed on the bottom of
the window.
Clicking Stop button stops the backup procedure. Unfinished file is ready for use but does not contain
recordings from set time.
All rights reserved © NOVUS Security Sp. z o.o.
18
Instrukcja obsługi oprogramowania
sieciowego
Multi-Viewer
MultiViewer 3.1
- User’s
Manual 2.54 . Wersja 1.0.
OPERATION
6.2.6 Printing
User can print out screen view. Press this icon
or go to the File / Print Image... menu.
On the screen default system printer configuration window is displayed. In Setup / Printer Setup
menu user can define default quantity of prints (Copies) as well as print size: Width and Height
6.3 Log View
User can remotely view multiplexer Log View (of course only if a logged user has required
authorization level). Remote view of multiplexer Log View is irrespective of playback and for this
reason it is possible to view Log View of multiplexers currently connected as well as disconnected.
To acquire content of the Log View, select desired multiplexer from the list, right click on its icon and
select Log View from menu.
All rights reserved © NOVUS Security Sp. z o.o.
19
Instrukcja obsługi oprogramowania
sieciowego
Multi-Viewer
MultiViewer 3.1
- User’s
Manual 2.54 . Wersja 1.0.
OPERATION
Start menu is used to input date from which events are to be displayed.
Filter function is used to define the type of events which are to be displayed:
All - defines all events
Disk - defines events associated with HDD
Sensor, Motion - defines events associated with motion detection and external alarms.
Other - events associated with the other system events then described above
When Search is pressed all events are displayed beginning from the specified date and meeting all
user requirements.
If there are more events then can fit in the window Next button is enabled allowing to display contents
of the next page. The Previous button allows to return to the previous page .
Select the desired event from the list and press Playback to begin playback of data associated with
the designated event.
Using Log Save from List option saving Log View as a *.log file is possible.
All rights reserved © NOVUS Security Sp. z o.o.
20
Instrukcja obsługi oprogramowania
sieciowego
Multi-Viewer
MultiViewer 3.1
- User’s
Manual 2.54 . Wersja 1.0.
OPERATION
6.4 Event Popup
MultiViewer software supports event popup windows feature.
This feature is convenient in case the operator has minimized program to the taskbar and uses another
application and at the same time wants to receive event occurrence information.
To enable this function alarm / motion detection should be set first at DVR’s setup menu.
Later on in Setup menu of MultiViewer position Event Popup should be set.
Additionally event monitoring for sites must be set (see details in chapter 9).
When event occurs, and main program window is minimized, popup window is displayed in the centre
of the screen.
On the top of the window there is information about the time of event occurrence and name or number
of event related camera.
After clicking Show Client main program window is recalled and popup window is closed. After
clicking Close Popup popup window is closed and main program window is still minimized.
All rights reserved © NOVUS Security Sp. z o.o.
21
Instrukcja obsługi oprogramowania
sieciowego
Multi-Viewer
MultiViewer 3.1
- User’s
Manual 2.54 . Wersja 1.0.
OPERATION
6.5 Watermark verifying
MultiViewer software allows to "mark" remotely saved pictures. This watermark feature allows to
prove that file has not been modified after saving.
Notice: Watermark feature is enabled only for files created by Save feature (described in chapter
6.2.4). Files saved by means of Remote backup cannot be watermarked.
In order to mark file while saving Watermark option in the Setup menu must be checked.
In order to prove authenticity of the file go into File / Watermark proofer… menu.
Then click Load… and select verified file. After the while verifying result is displayed.
All rights reserved © NOVUS Security Sp. z o.o.
22
Instrukcja obsługi oprogramowania
sieciowego
Multi-Viewer
MultiViewer 3.1
- User’s
Manual 2.54 . Wersja 1.0.
OPERATION
If the following information is displayed file might be modified or corrupted.
The following information means that watermark checking is not enabled for this file.
6.5 Connection termination
During connection with Site it is possible to disconnect with the whole Site (and all multiplexers
within its range) as well as with an individual multiplexer.
To disconnect with a given Site select it from the list, right click on its icon and select Disconnect
from the menu.
To disconnect with multiplexer, select it from the list, right click on its icon and select Disconnect
from the menu.
All rights reserved © NOVUS Security Sp. z o.o.
23
Instrukcja obsługi oprogramowania
sieciowego
Multi-Viewer
MultiViewer 3.1
- User’s
Manual 2.54 . Wersja 1.0.
OPERATION
7. PLAYBACK MODE
7.1 Multiplexer Recording Playback
Utilizing computer network it is possible to view recordings stored on multiplexer’s HDD.
Only one multiplexer can be connected at a time (different then live view) .
Only one user can playback recordings from a specific multiplexer at a time.
If another user is currently connected to the specific multiplexer in playback mode, then during the
launch of data playback following message is displayed:
In order to connect with desired multiplexer in the data playback mode user should select tab
Playback tab on the Site tree.
In the upper part of the list calendar and date & time menu can be found. Before establishing
connection select desired date & time, from which data playback should begin.
From currently available multiplexers select the one you want to establish connection with ,right click
on its name and from a drop-down menu select Connect.
Connection is established in a short period of time and images from the cameras are displayed on the
screen.
The data is played back with the nominal speed for camera which recorded the highest speed that
means if camera 1 recorded with the speed of 5 images per second and the camera 2 with the speed of
1 image per second, the recordings will be played back with the speed of 5 images per second.
Double click left mouse button on the multiplexer name to „drop down” and „close” its contents
(individual cameras).
Similarly like with live view, it is possible to change the split screen and arrange camera layout.
Identicaly like during live view, camera names and modes in which data was recorded are displayed.
During data playback user can also save individual images and sequences.
During playback the full screen display mode is also available.
Printing option works in similar way as during live view.
All rights reserved © NOVUS Security Sp. z o.o.
24
Instrukcja obsługi oprogramowania
sieciowego
Multi-Viewer
MultiViewer 3.1
- User’s
Manual 2.54 . Wersja 1.0.
OPERATION
During playback, control buttons are active. Those are situated on the bottom of the screen next to the
buttons controlling PTZ functions.
Their functions are as follows:
Playback speed
adjustment bar,
slow down playback
(ranging -1...-5) in this
mode disabled
Playback forward
Reverse playback
Pause
Stop playback
(disable connection)
In order to select different recording press “stop” button or select Disconnect option after clicking
right mouse button on the digital multiplexer icon. Next select new time and/or date and again connect
with multiplexer.
Activate Live tab and select connection to automatically finish playback mode session.
7.2 Playback of Remotely Saved Recordings
In order to playback recordings saved over the network on the PC HDD in .603 files format using
Multi-Viewer software select Media tab next click
icon (or access File / Open...menu and find
previously saved file).
The playback starts in a short period of time and camera images from selected recording appears on
the screen.
Double click left mouse button on the file name to „drop down” and „close” its contents (individual
cameras).
Similar, like during live view, it is possible to adjust split screen layout display.
During data playback user can also save individual images.
Full screen display option is also available during playback.
Printing option works in similar way as during live view.
Activate Live or Playback tab and select connection to automatically finish playback mode session
(Media).
Setup menu features Auto Repeat option, if this option is marked the playback of the file will repeat
until user will stop the playback manually.
All files in given folder will be displayed on the list. Using „drag & drop” technique of the files names
directly to the screen to display images provides user friendly method of activating individual files.
All rights reserved © NOVUS Security Sp. z o.o.
25
Instrukcja obsługi oprogramowania
sieciowego
Multi-Viewer
MultiViewer 3.1
- User’s
Manual 2.54 . Wersja 1.0.
OPERATION
During playback control buttons are active. Those are situated on the bottom of the screen next to the
buttons controlling PTZ functions.
Their functions are as follows:
Playback speed
adjustment bar,
slow down playback
(ranging -1...-5) in this
mode enabled
Playback forward
Reverse playback
Pause
Stop playback
(disable connection)
Additionaly in this mode the playback position bar is active. This provides fast access to various
playback points.
7.3 CD Backup Playback
In order to playback recordings copied from multiplexer on a CD user can use a special player
attached automatically to each CD burned on the multiplexer or use MultiViewer software. In order to
playback recordings from CD user should follow playback from PC HDD procedures (page 20 in this
user's manual) selecting this time path to the CD-ROM.
Available playback options are similar to the one described in the previous chapter.
7.4 HDD Backup Playback
MultiViewer software allows to view backup HDDs with files created using HDD Backup function
available in the multiplexer. User can view backup done with HDDs connected via USB/FireWire port
or HDD’s placed in the removable bay .
Warning: Power off PC before inserting or removing the swappable bay.
When the swappable bay with HDD is inserted and connected properly to the PC, turn the PC on,
activate MultiViewer software and run HDD content analysis. To do so, access File / Analyze
HDD... menu (connections with multiplexers should be disabled at this time).
A list of backup-HDDs connected to the PC along with files capacity information and percentage
HDD usage is displayed on the screen.
All rights reserved © NOVUS Security Sp. z o.o.
26
Instrukcja obsługi oprogramowania
sieciowego
Multi-Viewer
MultiViewer 3.1
- User’s
Manual 2.54 . Wersja 1.0.
OPERATION
Press Analyze button to initiate HDD content analysis.
To view the results of analysis, access View / Backup HDD menu.
HDD analysis window similar to the one shown below appears on the screen.
Press Done button closes window.
Click right mouse button on the green bar associated with the backup file and select Play to begin
data playback.
All rights reserved © NOVUS Security Sp. z o.o.
27
Instrukcja obsługi oprogramowania
sieciowego
Multi-Viewer
MultiViewer 3.1
- User’s
Manual 2.54 . Wersja 1.0.
OPERATION
In the Media tab, HDD and camera icon will appear.
In this playback mode the same functions are available as during the data playback from PC HDD or
CD.
In order to copy HDD content onto PC HDD, right click on LOG… name and select Save.
Click View Analysis button to view detailed HDD content analysis
.
Color graph shows percentage rate of individual recording modes: red-continuous, white-video loss
detection, blue-no recording, green-motion detection recording, azure-alarm recording.
All rights reserved © NOVUS Security Sp. z o.o.
28
Instrukcja obsługi oprogramowania
sieciowego
Multi-Viewer
MultiViewer 3.1
- User’s
Manual 2.54 . Wersja 1.0.
OPERATION
8. BACKUP FILES CONVERTING
Using MultiViewer software it is possible to convert .603 files to .AVI format. This format can be
played back in most of today's standard players of video files e.g. Media Player.
Simultaneously, only image from one channel can be converted.
To convert file to the .AVI format access File / Make Video Clip… menu, select file to convert and
click Open.
A window appears on the screen, allowing to define file settings that will be applied during
conversion.
In the Channel menu select channel which is to be converted (make sure that this channel was
included during creation of .603 file ).
Video Resolution menu is used to select desired resolution, to which the .603 file will be converted
(the higher the resolution settings the bigger the file volume).
Video Size menu is used to define maximum size that created file can have. When the limit is
reached, the conversion process is finished and the rest of the .603 file data is skipped.
Click OK and a video codec window displays that will be used to create the file.
It is possible to create an uncompressed file, however, the volume of such file is usually large.
All rights reserved © NOVUS Security Sp. z o.o.
29
Instrukcja obsługi oprogramowania
sieciowego
Multi-Viewer
MultiViewer 3.1
- User’s
Manual 2.54 . Wersja 1.0.
OPERATION
9. EVENT MONITORING FEATURE (WATCH)
MultiViewer software allows to monitor events occurring in the multiplexer systems even if
connection is not established. This function provides event information, such us multiplexer menu
modification or motion detection. The event monitoring function (Watch) can be activated for an
unlimited number of multiplexers.
To enable event monitoring function right click on Site icon and select Watch.
Red letter W is placed on localization icon indicating current event monitoring status.
From now on, system events notification information is displayed
in the lower left corner
.
The first column (Unit) informs with which multiplexer the event notification information
is associated .
Second column (Event) indicates the type of the event occurred:
video signal loss on - Ch...
video signal on - Ch...
menu modified
sensor signal on - Ch…
motion detect - Ch…
The third column (Date) indicates the exact date and time of event occurrence.
Select and right click the desired event (selected event is highlighted in blue) to activate menu
applying to the events displayed in the window.
Select Playback to connect with given multiplexer and playback recording associated with specific
event.
Select Remove to delete event from the list, select Remove All to delete all event records from the
list.
Select Save List to save a specific list to text file in folder in which Multi-Viewer software is located.
To disable event monitoring function right click on the localization icon and select Watch Off
All rights reserved © NOVUS Security Sp. z o.o.
30
Instrukcja obsługi oprogramowania
sieciowego
Multi-Viewer
MultiViewer 3.1
- User’s
Manual 2.54 . Wersja 1.0.
OPERATION
10. REMOTE SETUP
MultiViewer software allows to remotely change multiplexer menu settings via network. Only some
menu settings are available over the network. In the following sub-chapters multiplexer menu settings
accessible via network will be described. To obtain detailed information applying to specific
multiplexer functions please see digital multiplexer user’s manual.
To connect with multiplexer in settings mode select desired device from localization tree and click
Remote Setup.
Settings menu with 7 tabs appears..
All rights reserved © NOVUS Security Sp. z o.o.
31
Instrukcja obsługi oprogramowania
sieciowego
Multi-Viewer
MultiViewer 3.1
- User’s
Manual 2.54 . Wersja 1.0.
OPERATION
10.1 Audio settings
Audio recording settings are placed in the Audio Setup tab .
•
•
•
Auto Gain bar adjusts the signal level depending on microphone provided.
Bypass - mark this option to play the „live” sound (signal on Audio Out) during recording.
Associated Video Channel - this parameter indicates channel number with which the sound is
associated.
Click Update to send and apply modifications to the multiplexer. Clicking next tab saves the settings
temporarily in the MultiViewer software but does not send them to the multiplexer.
Modifications applied in the individual tabs can be sent at any time before connection in multiplexer
menu settings mode is terminated. Changed settings in the individual tabs should be sent to
multiplexer independently for each tab.
Click Close to terminate connection in the multiplexer menu settings mode and close the menu.
All rights reserved © NOVUS Security Sp. z o.o.
32
Instrukcja obsługi oprogramowania
sieciowego
Multi-Viewer
MultiViewer 3.1
- User’s
Manual 2.54 . Wersja 1.0.
OPERATION
10.2 Alarm and motion detection
Alarm Setup tab provides settings associated with alarm functions and motion detection.
•
•
•
•
•
Pre-Recording Time - user can select one of three pre-alarm types: Long, Middle and Short
Post-Recording Time - user can select time ranging from 1 to 99 seconds
In the Motion Detect field adjust settings associated with motion detection function. Settings
are adjusted for individual channels. Channel is selected by clicking on squares indicated
Ch1..Ch16. In the window on the right hand side image form selected channel is displayed.
Activity net grid is seen on the image. To edit the grid check Area option. Individual fields are
activated / deactivated by clicking left mouse button on them. Mark Full option to enable
motion detection in all frames instantly. Sensitivity adjustment bar is used to set sensitivity
level of motion detection..
Alarm Name - select desired alarm input number from the drop down menu and assign
individual name for quicker and simpler identification.
Alarm Outputs is used to define various system actions on alarm relays for different alarm
events. Settings are applied for individual relays separately. Relay is selected by clicking on
Alarm Output 1 to 4 buttons. Alarm menu is used to select alarm inputs whose activation
causes the change of given alarm relay status. Click All to mark all inputs, click None to remove
all marks.
All rights reserved © NOVUS Security Sp. z o.o.
33
Instrukcja obsługi oprogramowania
sieciowego
Multi-Viewer
MultiViewer 3.1
- User’s
Manual 2.54 . Wersja 1.0.
OPERATION
Alarm Off field is used to defined how the alarms detected by the device should be confirmed .
Manual alarms are confirmed manually,
Auto - alarms are terminated automatically when desired preset time expires(s).
Buzzer On activates sound signal for a required period of time.
Events field is used to select which alarm events should activate required alarm relay.
Following event types are available:
Disk Full; Video Loss, Motion (Motion detection on specified inputs); Admin PW Change
(Administrator password modification).
Click Update to send and apply modifications to the multiplexer. Clicking next tab saves the settings
temporarily in the MultiViewer software but does not send them to the multiplexer.
Modifications applied in the individual tabs can be sent at any time before connection in multiplexer
menu settings mode is terminated. Changed settings in the individual tabs should be sent to
multiplexer independently for each tab.
Click Close to terminate connection in the multiplexer menu settings mode and close the menu.
All rights reserved © NOVUS Security Sp. z o.o.
34
Instrukcja obsługi oprogramowania
sieciowego
Multi-Viewer
MultiViewer 3.1
- User’s
Manual 2.54 . Wersja 1.0.
OPERATION
10.3 Camera setting
Camera Setup tab features individual channel display settings .
•
•
•
Channel - option used to select channel number whose settings should be modified .
Name - option used to input name assigned to specific channel
Bars allowing to preset desired image parameters settings:
Brightness; Contrast; Saturation; Hue;
Click Update to send and apply modifications to the multiplexer. Clicking next tab saves the settings
temporarily in the MultiViewer software but does not send them to the multiplexer.
Modifications applied in the individual tabs can be sent at any time before connection in multiplexer
menu settings mode is terminated. Changed settings in the individual tabs should be sent to
multiplexer independently for each tab.
Click Close to terminate connection in the multiplexer menu settings mode and close the menu.
All rights reserved © NOVUS Security Sp. z o.o.
35
Instrukcja obsługi oprogramowania
sieciowego
Multi-Viewer
MultiViewer 3.1
- User’s
Manual 2.54 . Wersja 1.0.
OPERATION
10.4 HDD information
HDD Management tab lists information associated with HDD installed in the system.
Individual columns lists the following information:
•
Use - HDD system status information
Main Disk - used for current recording
Copy - HDD for data backup.
•
Type indicates the type of HDD IDE interface used.
IDE indicates internal HDD,
1394 indicates external HDD on FireWire port .
•
Capacity (GB) provides information of total HDD capacity in GB.
•
Free (GB) provides information of unused HDD capacity.
Additionally, the following information is available:
•
Overwrite When Disk Full. Mark this option to continue recording in so called overwrite
order..
•
Disk Full Message percentage value set in this function defines volume of total HDD capacity
after reaching which a message appears on the main monitor.
All rights reserved © NOVUS Security Sp. z o.o.
36
Instrukcja obsługi oprogramowania
sieciowego
Multi-Viewer
MultiViewer 3.1
- User’s
Manual 2.54 . Wersja 1.0.
OPERATION
10.5 E-mail notificaion
Mail Notification tab provides access to settings associated with function of alarm event notification
send by e-mail.
•
•
•
Enable - activate this option to enable e-mail’s notification under provided address.
SMTP Server - SMTP server settings. Address - SMTP server address used to send e-mails.
Port Number - port used to send messages.
The middle part of the window lists e-mail recipients. Use indicates if messages is sent under
specific address. Name field is used to input desired name helpful for quicker and easier
recipient identification. E-Mail Address used to input recipients address. To add new recipient
to the list double click left mouse button in the empty field on the list. In the window that
appears input name and address of the recipient and confirm by clicking OK. Click Cancel to
resign.
All rights reserved © NOVUS Security Sp. z o.o.
37
Instrukcja obsługi oprogramowania
sieciowego
Multi-Viewer
MultiViewer 3.1
- User’s
Manual 2.54 . Wersja 1.0.
OPERATION
•
•
•
•
Events - selection field of alarm events set to send e-mail notifications. The following events
type can be selected: Alarm On, Motion Detect, Disk Full, Admin PW Changed (Admin
password change), Video Loss, Menu Modified, Power On/Off (power loss), No Event.
Slecting ALL marks all options instantly, selecting NONE clears selection.
Condition additional notification parameters are specified. Start and End defines the time in
which notification should be sent. Hour refers to the hours and Min refers to minutes.
Every, Hour, Min is used to input value of interval (in hours and minutes) to define the
periodicity of e-mail notifications (e.g. to prevent system from sending 60 e-mails per minute
during motion detection).
Every Events this setting defines the number of events required to occur in the system to send
e-mail notification.
Click Update to send and apply modifications to the multiplexer. Clicking next tab saves the settings
temporarily in the MultiViewer software but does not send them to the multiplexer.
Modifications applied in the individual tabs can be sent at any time before connection in multiplexer
menu settings mode is terminated. Changed settings in the individual tabs should be sent to
multiplexer independently for each tab.
Click Close to terminate connection in the multiplexer menu settings mode and close the menu.
10.6 System information
System Information tab lists information of device - Model Name, Product; - BIOS Version as
well as software ver. - Main Version.
None of these fields is editable.
All rights reserved © NOVUS Security Sp. z o.o.
38
Instrukcja obsługi oprogramowania
sieciowego
Multi-Viewer
MultiViewer 3.1
- User’s
Manual 2.54 . Wersja 1.0.
OPERATION
10.7 Backup
In Backup tab are gathered settings regarding local backup feature. The meaning of each setting is
equal with the one described in DVR manual. User is able to start local backup (e.g. CD backup) via
network.
Suitable storage must be provided and ready before starting backup.
All rights reserved © NOVUS Security Sp. z o.o.
39
NOVUS Security Sp. z o.o.
ul. Puławska 431, 02-801 Warszawa
tel.: (22) 546 0 700, fax: (22) 546 0 719
www.novuscctv.com
2006-07-21