1
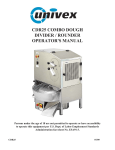
8713S Premium Slicer
Operators Manual
Persons under the age of 18 are not permitted to operate or have
accessibility to operate this equipment per U.S. Dept. Of Labor
employment standards administration fact sheet No. ESA91-3.
05-2012-ED1
ATTENTION:
TO INSURE BOTH SAFE AND TROUBLE-FREE
PERFORMANCE, WE STRESS THAT ALL PERSONNEL
THAT WILL BE INVLOVED WITH YOUR NEW UNIVEX
SLICER MUST READ AND UNDERSTAND THESE
INSTRUCTIONS BEFORE ATTEMPTING TO
OPERATE THIS SLICER.
WE APPRECIATE YOUR COOPERATION AND YOUR
BUSINESS. SHOULD THERE BE A QUESTION OR IF
WE CAN BE OF FURTHER ASSISTANCE,
PLEASE CALL US.
1-(800)-258-6358
Page 1
Table of Contents
1. Notice to owner/operators of the slicer. . . . . . . . . . . . . . . . . . . . . . . . . . . . . . . . . . . . . . . . . . . . . . . . . . . . . . . . p.1
2. Table of Contents. . . . . . . . . . . . . . . . . . . . . . . . . . . . . . . . . . . . . . . . . . . . . . . . . . . . . . . . . . . . . . . . . . . . . . . . . . . . . p.2
3. Overview of the Slicer. . . . . . . . . . . . . . . . . . . . . . . . . . . . . . . . . . . . . . . . . . . . . . . . . . . . . . . . . . . . . . . . . . . . . . . . .p.3
4. Introduction . . . . . . . . . . . . . . . . . . . . . . . . . . . . . . . . . . . . . . . . . . . . . . . . . . . . . . . . . . . . . . . . . . . . . . . . . . . . . . . . . p.4
a. Inspection
b. Installation
c. Important Safety Warnings
5. Operator Instructions. . . . . . . . . . . . . . . . . . . . . . . . . . . . . . . . . . . . . . . . . . . . . . . . . . . . . . . . . . . . . . . . . . . . . . . . . p.5
a. Start/ Stop Switch
b. Automatic Mode
c. Slice Adjustment
d. Positive Hold Carriage
e. Protective Guard
6. Cleaning Instructions. . . . . . . . . . . . . . . . . . . . . . . . . . . . . . . . . . . . . . . . . . . . . . . . . . . . . . . . . . . . . . . . . . . . . . . . . p.6 - 7
7. Sanitizing Instructions. . . . . . . . . . . . . . . . . . . . . . . . . . . . . . . . . . . . . . . . . . . . . . . . . . . . . . . . . . . . . . . . . . . . . . . . p.8
8. Sharpening Instructions . . . . . . . . . . . . . . . . . . . . . . . . . . . . . . . . . . . . . . . . . . . . . . . . . . . . . . . . . . . . . . . . . . . . . . p.9
9. Lubrication Instructions . . . . . . . . . . . . . . . . . . . . . . . . . . . . . . . . . . . . . . . . . . . . . . . . . . . . . . . . . . . . . . . . . . . . . . p.10
10. Inspection of Seals . . . . . . . . . . . . . . . . . . . . . . . . . . . . . . . . . . . . . . . . . . . . . . . . . . . . . . . . . . . . . . . . . . . . . . . . . . . p.11
11. Slicer Wiring Diagram . . . . . . . . . . . . . . . . . . . . . . . . . . . . . . . . . . . . . . . . . . . . . . . . . . . . . . . . . . . . . . . . . . . . . . . . p.12
12. Warranty Information . . . . . . . . . . . . . . . . . . . . . . . . . . . . . . . . . . . . . . . . . . . . . . . . . . . . . . . . . . . . . . . . . . . . . . . . p.13
Page 2
Overview of the 8713S Premium Slicer
5
4
7
6
3
8
2
9
10
1
11
14
12
13
Overview
1. On/ Off Switch and Indicator Light
8. Carriage
2. Fence
9. Carriage Arm
3. Last Slice Device
10. Carriage Arm Knob
4. Sharpener Assembly
11. Carriage Arm Handle
5. Protective Guard
12. Slice Adjustment Knob
6. Knife Guard
13. Automatic/ Manual Selector Knob
7. Adjustment Spacer
14. Variable Speed Knob
Page 3
Introduction
This manual contains instructions for the installation, operation, care, and sharpening
of the 8713S premium slicer. It is recommended that all operators familiarize
themselves with this manual prior to operating the slicer.
Inspection:
All UNIVEX slicers are inspected and tested at the factory; however, they should be
inspected carefully by the person making the installation for loose, damaged or broken parts. Any
damages, imperfections or shortages should be reported to the dealer or UNIVEX and shipping
carrier.
Warning: After slicer has been inspected, wash slicer completely with warm water and
mild soap. For safety, follow the cleaning instructions on Page 6.
Installation:
The most efficient installation of your slicer will depend upon the layout of your kitchen. Locate
your slicer where it will save steps for the operator and be sure to provide sufficient clearance
around it for ease of maintenance and cleaning, as well as for efficient and safe use. Ensure the
surface is level and flat before installation. Slicer should be operated on a sturdy bench or table
with the height determined to suit the operator. It is most important that the forearm of the operator
be at the proper level for ease and safety of operation, as well as for maximum production. This
height is considered optimum when the carriage handle (Overview [11]) of the slicer is at
approximately the height of the operator's elbow when standing.
Important:
Warning/Caution: Before making electrical connections, CHECK the specifications on the
nameplate to make sure that they agree with those on your electrical service. A grounding type
three-terminal plug is provided for safety. If you do not have a mating receptacle, have a qualified
electrician provide one with grounding provisions in accordance with local safety codes.
IMPORTANT SAFETY WARNINGS:
It is a violation of United States Department of Labor regulations to permit operation of the slicer
by any person under the age of 18 years.
Warning:
The slicer knife is extremely sharp! Never touch the knife, always keep hands and fingers clear of
the knife. Never run slicer without the guard and all other parts in place and securely fastened.
Take extra care to avoid accidents by keeping the knife guard and sharpening assembly cover ON
at all times. When the machine is not in use, the slice adjustment knob should be turned fully back
to the closed position (beyond "0") so that the knife edge is not exposed
Observe the cleaning instructions on Page 6 for best results and for safety. Also remember to
always turn off the slicer and disconnect the electrical supply cord before cleaning. When slicing,
always work the carriage using only the carriage arm handle (Overview [11]). Do not hold or push
the carriage from any other place.
Page 4
OPERATION INSTRUCTIONS
The UNIVEX slicer is designed to meet the cook's demand for an efficient, sturdy slicer. The
UNIVEX slicer will give unfailing performance over a period of years, when operated and
maintained according to instructions contained herein.
START/STOP SWITCH
The slicer is started by pushing the ON/OFF switch (Overview [1]). A indicator light (Overview [1]) is
provided to indicate when the slicer is turned on.
AUTOMATIC MODE:
Be sure to set your slice thickness by turning the Slice Adjust Knob (Overview [12]) first before
setting the slicer to automatic. To switch the slicer to automatic mode, simply turn the Automatic
Selector Knob (Overview [13]) from Manual to Auto then press the Start Switch. The slicer will turn
on and the carriage will begin moving back and forth. The desired speed of the motion can be set
by adjusting the Variable Speed Knob (Overview [14]). Simply turn the Automatic Selector Knob
back to Manual to end the automatic feature or shut the slicer off.
SLICE ADJUSTMENT
Warning: Dial-type knob adjustment (Overview [12]) allows for slice thickness ranging
from paper thin up to .875". Dial graduations allow you to precisely set up specific slice thickness
for various needs. Please note that the numbers labeled on the slice adjustment knob are for
reference only and do not indicate any specific unit of measure. When not in use, always return
knob back to its fully closed position (beyond "0") so that the knife edge is not exposed.
POSITIVE HOLD CARRIAGE
Caution: A last slice gravity feed grip Overview [3]) is provided which can be locked out
of the way when not required. Do not use this last slice device to work the carriage back and forth.
Use only the carriage arm handle (Overview [11]). Always make sure the carriage is
positively secured to the slicer by checking to see that the carriage arm knob (Overview [10])
is fully tightened.
PROTECTIVE GUARD
Warning: The protective guard (Overview [5]) covers the knife edge completely except at
the forward edge where slicing will be performed. This forward edge is covered by the edge of the
fence, but only when the slice adjustment is completely closed.The knife guard
(Overview [6]) can be removed for cleaning by unscrewing the knife guard knob
( Refer to p.6 Figure 2 [2]). For safety, keep the knife guard on at all times except when cleaning.
Never operate the slicer with the knife guard removed.
Page 5
Cleaning Instructions
WARNING: Never touch the knife edge. Always keep hands, fingers and arms clear of knife
edge during the cleaning procedure. It is recommended to wear cut-proof gloves.
WARNING: Turn off slicer and disconnect electrical cord before cleaning. Never place slicer in
a dish washing machine or hose rinse the slicer as damage may occur.
1.
2.
Turn slice adjustment knob (overview [12]) to the fully closed position (beyond “0”)
so that the knife edge is not exposed.
Remove the following items to disassemble the slicer (Figure 1 & 2):
a. Last Slice Device Shaft: Unscrew knob and shaft (Figure 1 [5])
counter-clockwise from carriage and through Last Slice Device
(Figure 1 [1]) to remove and set aside.
3
2
4
1
5
6
7
b. Adjustment Spacer Shaft: First loosen Adjustment Spacer Knob
(Figure 1 [4]). Now unscrew the Adjustment Spacer Shaft
(Figure 1 [6]) counter-clockwise to remove and set aside.
Adjustment Spacer (Figure 1 [3]) can now be removed and set aside.
c. Carriage Arm Handle: Loosen and remove the black handle
(Figure 1 [9]) and set aside.
d. Carriage Arm: Loosen the Carriage Arm Knob (Figure 1 [8]) and set
aside for cleaning. Pull straight upwards on the Carriage and Arm
(Figure 1 [7]) and set the Carriage Assembly aside.
8
9
11 10
Figure 1
1
e. Slice Adjustment Knob and Automatic Knob: Remove screws located
2
on front of Slice Adjustment Knob (Figure 1 [10]) and Automatic Knob
(Figure 1 [11]) and set aside. Pull knobs forward to remove and set aside
(Note the shafts are keyed to ensure correct alignment).
f. Sharpener Assembly: Unscrew sharpener locking pin (Figure 2 [1])
and remove sharpener by pulling upwards. Use caution around blade edge.
Figure 2
g. Blade Guard: Loosen the Blade Guard Knob and shaft (Figure 2 [2]) and remove.
Set aside for cleaning. Use the handle on the Blade Guard (Figure 1 [2])
and remove. Be careful when working around the blade edge.
h. Last Slice Device: Unscrew the knob (Figure 3 [1]) and detach the support (Figure 3 [2])
and gaskets (Figure 3 [3]) from the Last Slice Device (Figure 3 [4]). Set items aside for cleaning.
3
1
4
2
Figure 3
Figure 4 shows the removed
components ready to be
cleaned.
Figure 4
Page 6
Cleaning Instructions (continued)
Figure 5
Figure 5 shows the slicer
ready to be cleaned with
the components removed.
3.
4.
5.
The removed items should be hand washed in a sink using warm water, a mild detergent
and a soft cloth. Never place these items in a dish washing machine as it will ruin the
anodized finish. Dry the removable washed items with a clean soft cloth and set aside for
sanitizing.
2
Wash the Adjustable Fence (Figure 6 [1]) on all sides
with warm water and a mild detergent.
1
Wash the front and rear of the Knife (Figure 6 [2]) and
Knife Scraper Figure 7 with warm water and a mild
detergent using extreme CAUTION around the blade.
Carefully remove the Knife Scraper as seen in Figure 8
and clean around the Knife’s edge as shown in Figure 9
with warm water and a mild detergent applied to a soft cloth.
Figure 7
6.
Figure 8
3
3
Figure 6
Figure 9
Wash the Slicer Body (Figure 6 [3]) with warm water and a mild detergent. Pay special
attention to food contact areas and all splash zones on your slicer.
Remove all excess water and liquid and dry all areas previously washed with a clean
dry cloth. Unit is now ready for sanitization.
(Please see next page for the Sanitizing Procedure)
Page 7
Sanitizing Instructions
WARNING: Never touch the knife edge. Always keep hands, fingers and arms clear of knife
edge during the sanitizing procedure. It is recommended to wear cut-proof gloves.
WARNING: Turn off slicer and disconnect electrical cord before sanitizing.
Your Univex Slicer is designed to meet and exceed the newest and safest NSF / ANSI 8 standards.
These standards are in place to prevent the growth of disease causing bacteria by ensuring your can
be easily cleaned and sanitized. Following the cleaning and sanitizing procedures in this manual will
keep your equipment clean and in well functioning condition.
Many sanitizer solutions are available and below is just an example of one type. If a chemical
sanitizer other than chlorine, iodine or quaternary ammonium is used, it shall be applied in
accordance with the EPA-registered label use and instructions.
The sanitizer shall comply with Section 4-501.114, Manual and Mechanical Warewashing Equipment,
Chemical Sanitation – Temperature, pH, Concentration and Hardness of the FDA Food Code.
Chlorine Sanitizer Solution:
A chlorine sanitizer solution shall have a minimum temperature based on the concentration and pH of
the solution listed in the following chart (taken from section 4-501.114 of the FDA Food Code);
Minimum Concentration
mg/L
25
50
100
Minimum Temperature
pH 10 or less
pH 8 or less
°C (°F)
49 (120)
38 (100)
13 (55)
°C (°F)
49 (120)
24 (75)
13 (55)
This machine shall be cleaned and sanitized at intervals to comply with national, state and/or local
health codes. Cleaning and sanitizing shall be performed under the guidelines of this manual at least
once every 4 hours after each use to prevent the growth of harmful bacteria.
Apply the sanitizer solution to all previously washed locations and surfaces. Pay special attention to
food contact zones and splash zones. Sanitize the parts that were previously removed for washing
and reassemble back on to the slicer in the reverse order they were removed in Section 2 of the
Cleaning Instructions.
Page 8
Sharpening Instructions
This slicer is equipped with a knife having a concave or hollowed surface for superior slicing. Of course
any knife, however superior, must be sharpened regularly and properly in order to produce the highest
quality slices and also to allow it to maintain it’s productivity. The knife sharpener for this machine is a top
mounted design. Since the sharpener is not exposed during the slicing operation the stones remain free
of food contamination and in the best possible condition for sharpening.
WARNING: The following sharpening procedure will provide high quality sharpening results and should
be followed for safety considerations.
1
2
3
4
5
6
7
8
9
10
The blade should be clean and free from all grease and food remnants. Food particles and oils
will clog and impair the sharpening stones.
Turn the slicer OFF.
Adjust the Thickness Control Dial (Figure 1 [12]) to beyond “0”. This will ensure that the blade edge
is not exposed to the operator.
Move the carriage all the way to the start position (closest to the operator).
Loosen the sharpener locking pin (Figure 10 [1]) then lift and rotate the sharpener 180°. Lower the
sharpener so that the blade is between the 2 stones and resecure with the sharpener locking pin.
Turn the slicer on and push the sharpening stone button (Figure 11 [1]) for 20 - 30 seconds.
It is normal to see sparks during the sharpening process.
After sharpening the back side of the blade push the honing stone button (Figure 11 [2]) for 3 seconds
and release. It is important to not over-use the honing stone or it will affect performance of the blade.
You may now turn the slicer off.
Remove the sharpener from the blade and place back into the ready position.
Clean the blade and remove any dust or debris left from the sharpening beforesanitizing the slicer.
Refer to the cleaning section of this manual. Remember clean, sharpen, clean, sanitize.
1
2
1
Figure 10
Figure 11
Page 9
LUBRICATION & FUNCTION CHECK
Warning: Turn off slicer and DISCONNECT ELECTRICAL CORD before lubricating and
close fence all the way.
General lubrication should be performed in accordance with the lubrication instructions below.
During this lubrication sequence, be sure to check for free operation and movement of related
parts as well as for excessive wear and looseness of various parts. Be sure to check all handles
and knobs for tightness. Never use any type of vegatable cooking spray or oil as lubrication as
this will cause damage to your slicer.
A
A
Figure 12
Remove the 4 bottom cover screws to gain access
to the slice adjustment and carriage slide rod.
B
A
A
Figure 13
B
Figure 14
Lubrication Instructions:
A = Clean and apply mineral oil weekly.
B = Apply Petro-Gel (4400408) as often as required to maintain a light film.
Page 10
Inspection of Seals
It is important to regularly inspect the seals of the slicer to ensure that your equipment is in compliance
with section 5.34.9.3 of the NSF/ Ansi 8 standards. Damaged or cracked seals can contain harmful bacteria
that can cause a number of illnesses. If the seals of your slicer are found to be compromised or missing, it is
necessary to remove the slicer from service and contact an authorized service agency or Univex.
Full thorough inspections should be conducted not exceeding 6 month periods and is recommended to
be performed by an authorized service agency. However as the regular operator of the machine seals
should be reviewed during normal daily cleaning and reported upon if found to be worn.
Refer to the below figure 14 for seal locations. Inspect seals for degradation, cracks, tears or missing parts.
Figure 14
3
4
5
1
2
6
(Behind the slice thickness control knob there is an O-ring)
Page 11
8713S Wiring Diagram
Start/stop switch
Power In
IC
L1 L2 GRND
Blade motor
Carriage
motor
Wire color is
for ease of
following and
does not
denote actual
wire color
Power
Switch
Variable speed control
switch
11
10
9
F F A C M L L
circut
board
L1
L2
7
U
6
V
5
4
Motor
3
Transformer
U V W
Relay
2
1
Control Box
1
2
L1
N
Page 12
Warranty
The Univex line of Premium and Value slicers carry a one year on-site parts
and labor warranty against any defects in materials or workmanship. The
one-year period begins on the date of purchase by the end user and
remains in full effect provided the unit is used properly in accordance
with our instructions.
Any work to be performed under this warranty must be performed
between the hours of 8:00 a.m. and 5:00 p.m. local
time, Monday through Friday. Univex will not cover overtime charges
of any kind.
Please call the Univex Warranty Service Department at
(800) 258-6358 to report any warranty claims before arranging repair
or attempting to return the unit to Univex Corporation.
Damages incurred in transit or incurred because of installation error,
accident, alteration or misuse are not covered. Transit damages should
be reported to the carrier immediately.
Univex will not be liable for any consequential, compensatory,
incidental or special damages.
Page 13