1
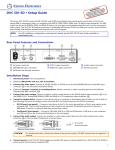
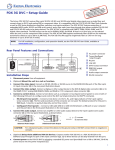
Product – ADC v12 Topic: Miranda CR Compact Router This router driver supports compact routers such as the Miranda/Nvision CR-3232 router and the Miranda CQX Compact Router (CR-1602). These are small, very basic routers which support a single layer and basic switching. Release Date: 9-December-2014 Revision History Revision Protocol Date Author Company Description 1.1 02/17/2012 D. Kron 1.2 4/20/2012 Cleanup With ADC v12.18: Expanded Backup config to add Input/Output mapping. 1.3 2/8/2013 Added note on support of Miranda CQX Compact Router (CR-1602). Initial Release Version Used Boot - SV0770-01A0 Version 1.2.0.0 App - SV0773-05A Version 5.0.1.6 FPGA - SV0630-02A0 Version 2.0.0.0 Protocol Manual: Nvision Serial Protocol NP0010-02. Rev 5 Router Sample Serial Take and Tally User Manual: CRSC User’s Guide Revision: 2.0 Software V 1.6.0 Part Number: UG0032-03 2010 © 2014 Imagine Communications Corp. Proprietary and Confidential 9-December-2014| Page 1 of 19 Driver Overview Robust, slim-line and affordably priced, the NVISION Compact routers are ideally suited to utility routing applications. They are available in a comprehensive array of formats, including 3Gbps, HD, SD, AES, analog video, analog audio and machine control, in sizes from 8 x 8 to 32 x 32. Rich configuration software simplifies key tasks like salvos and partitioning, as well as integration with other NVISION and third party routing systems. Today, the Compact Router protocol will be the same for a CR3232, CR3204, CR1616, CR1604, CR0808, or CR-CQX. So this driver should be able to control any and all of these products. Multiple control capabilities Ethernet and serial control Local button panel Remote control panel Graphical User Interface (GUI) panels The NVISION Compact CQX is a 16 x 8 router which offers 'Clean and Quiet' outputs for performing seamless video and audio transitions. The CQX provides two Clean and Quiet outputs for 3Gbps/HD/SD signals, and six auxiliary outputs are available for preview or monitoring. It also offers support for up to 16 channels of embedded audio. The CQX's unique design supports ±3 line buffer, which reduces the need for costly timing equipment. The line buffer allows the router to realign sources which are grossly out of time, and switch them with minimal delay. This switching is performed without any video artifacts or audio pops that are typically associated with a transition of this nature. Robust, compact and affordable, the NVISION Compact CQX is ideal for disaster recovery backup and bypass master control applications. It can also be used as a low-cost alternative to a master control system. Several transition types are available, including V-fade, cut-fade, fade-cut, and crossbar. The CQX features two separate emergency bypass inputs with relays to ensure critical signal passage, even in the event of a power outage. The NVISION Compact CQX is based on the same durable and scalable design as the rest of the NVISION Compact router range. It can operate as a standalone unit, and can also be driven by an external control system. The Compact Router driver by ADC was introduced with Device Server v12.18. Please contact Technical Support if you need this driver in a v11.XX Device Server build. Note: Miranda states that the CQX (CR-1602) router does not support any legacy router protocols. This router supports both serial and IP control. This device is controlled using the Miranda/Vision Compact router series driver Driver Limitations The CQX doesn't support partitioning at this time. Extended Software Version Command Clean/Quiet Transition Types Clean/QuietTransition Rates © 2014 Imagine Communications Corp. Proprietary and Confidential 9-December-2014| Page 2 of 19 Cable Requirements Miranda CR3232 Router to Automation Pin Outs cabling is straight through RS422 9 pin (DB9). Miranda CR3232 Router DB9 (male) DB9 (male) Device Server RX- (2) TX- (2) TX+ (3) RX+ (3) RX+ (7) TX+ (7) TX- (8) RX- (8) Connections Connect one end of the cable to the 9-pin Automation Control port (USB) upon the Miranda CR3232 Router MC switcher. Connect the other end of the cable to a port on the serial card in the ADC-100 Device Server. Make note of the physical port number upon the ADC Device Server, as you will need it when configuring the Miranda CR3232 Router driver. When viewing the serial cards on the back of the Device Server you will start counting ports from the upper left and count downwards. Start counting ports on the top of the next serial port card. Device Software Setting The Miranda CR3232 Router should be configured Automation Baud Rate: 38.4K Automation Data Bits: 8 Automation Stop bits: 1 Automation Parity: None All other settings should be left to their factory default values. The CQX needs to be locked to the same house reference as all the video sources are that are input to the CQX. The sources should be timed to within plus minus 3 lines of that reference and be of the same video format. The CQX also has a switch on the front which needs to be properly set to match the video format you want to be performing clean switching with. With this the unit will perform glitch free transitions. © 2014 Imagine Communications Corp. Proprietary and Confidential 9-December-2014| Page 3 of 19 Communications Parameters The communications parameters used by automation for the Miranda CR3232 Router MC switcher driver object are: Baud Rate: 38,400 Parity: None Data Bits: 8 Stop Bits: 1 These communication parameters are hard coded into the Miranda CR3232 Router driver and are not changeable by the user upon the ADC system. Device Server Set-Up Configuration Information IMPORTANT Configuration Note: When you have finished making changes on a configuration screen, press Apply and all changes made upon the current configuration window will be applied to the driver. Press OK, and any configuration changes made upon the various tabs will be applied, however, the configuration window will close. Press Cancel and none of the configuration changes will be applied to the driver and the configuration window will close. 1. From Configuration utility, right-click on your Device Server icon and select the Configured Devices item to display “Configured Devices” window. © 2014 Imagine Communications Corp. Proprietary and Confidential 9-December-2014| Page 4 of 19 2. From the list in the right hand pane select “Miranda Compact Router” from the “Router/Switchers” category. If you do not see this driver in your ADC Device Server build then please contact Techncial Support. Use the mouse pointer to drag this item over the top of one of the icons in the left hand pane that has the caption “NO DEVICE”. 3. Select the “CompactRTR” icon you’ve just created and press the right mouse button to bring up a menu. Select “Properties” from this menu (or double-click on the icon instead). 4. Select the General tab to configure the name for the device in the Device name window. The Device Name entered will appear in the Device Status and Configuration Window on the client applications. The default name may be used but it is recommended to use unique names for easy device identification. © 2014 Imagine Communications Corp. Proprietary and Confidential 9-December-2014| Page 5 of 19 Value for Input/OutputCrosspoints can be increased depending on the capability of the Miranda CR3232 Router. The Switcher Latency setting may be changed as required. Switcher Latency values will vary at different broadcast facilities and should be verified during the commissioning process. The Switcher Latency window supports settings between +/- 10 frames. Press Apply and all changes made upon the current configuration window will be applied to the driver. Press OK, and any configuration changes made upon the various tabs will be applied, however, the configuration window will close. Press Cancel and none of the configuration changes will be applied to the driver and the configuration window will close. 5. Select the “Serial Port” tab to configure the physical serial port number. Choose “Serial Port” in drop-down list. This port selected is physical port which the IconMaster is connected to. When viewing the serial port cards on the back of the ADC Device Server, the upper left serial port is Port 1. The port numbers increase as you count down the ADC serial board. The top serial port of the next serial card will be the following port number. © 2014 Imagine Communications Corp. Proprietary and Confidential 9-December-2014| Page 6 of 19 6. Select the Sources tab. Use this tab to create a table of source names (mnemonics) associated with router or switcher inputs that the automation may use for record events. The source names table accepts multiple names for the same input number, but does not accept duplicate names for different inputs. If a record event is placed on a record list, the source name may be entered in the title field. The automation compares this source name to the source names table and switches the designated input to the record device that has registered the event. © 2014 Imagine Communications Corp. Proprietary and Confidential 9-December-2014| Page 7 of 19 Configure the following parameters as required: • • • • Add button: Click the Add button to enter a source crosspoint name and number. Crosspoint Name: Enter a mnemonic to help the operator identify the crosspoint. Number: Enter the physical connection number of the crosspoint. Edit button: To edit an existing entry, select an entry from the crosspoint list display and then click Edit. An edit dialog is displayed populated with the parameters currently specified for the selected entry. Make changes as required, and then click OK. Delete button: To delete an existing entry, select an entry from the crosspoint list display and then click Delete. 7. Select the Destinations tab. Use this tab to create a table of destination names that the 8. automation primarily uses for secondary crosspoint switch events. The destination names table accepts multiple names for the same output number, but does not accept duplicate names for different outputs. If a secondary crosspoint switch event is placed on the playlist, the source and destination names may be entered in the title field using the format: source name:destination name (the colon is required) The automation system compares these names to the source and destination names tables, and switches the designated input to the designated output at the appropriate time. © 2014 Imagine Communications Corp. Proprietary and Confidential 9-December-2014| Page 8 of 19 Configure the following parameters as required: • • • • • Add button: Launches the Add Destination Data dialog. Specify the CrossPoint Name, Number, and then click OK Crosspoint Name: The Crosspoint Name is a mnemonic to help the operator identify the crosspoint. Number: The physical connection number of the crosspoint. Edit Button: To edit an existing entry, select an entry from the crosspoint list display and then click Edit. An edit dialog is displayed populated with the parameters currently specified for the selected entry. Make changes as required, and then click OK. Delete button: To delete an existing entry, select an entry from the crosspoint list display and then click Delete. 9. Select the System Inputs tab. Use this tab to specify the switcher inputs for common sources such as Black, Colorbars, Station ID, and Initial Input. All four inputs designated here may be switched manually from the diagnostic switch panel (see Switching Tab below). In addition, the Black and Station ID inputs are used by the automation if the corresponding list settings, Switch to Black and Station ID on Skip, are enabled on the List Configuration / Properties / Options tab. © 2014 Imagine Communications Corp. Proprietary and Confidential 9-December-2014| Page 9 of 19 Configure the following parameters as required: • • • • • • System Inputs: For each parameter specify a number from 0 to 32768 to indicate which crosspoints carry the black, colorbars, station ID and initial input signals. Default is 0. These options are not used by the automation system unless the corresponding list settings are enabled for Black Input and StationID. Black Input: When the Transmission List Option “Switch to Black” is selected, and the most recent event on the list was running on a device configured to use this router, then the crosspoint listed here (if non-zero) will be switched to the output crosspoint used by that event if the list stops because of an error, if the event ends and there is a Hard-Start delay until the next event begins, or if it ends normally and there are no more events on the list. If it is set to 0 then nothing will happen. Colorbars: This crosspoint is used only when the Colorbars button is pressed on the diagnostics control panel (Configuration Utility or Air Client). If it is set to 0 then the Colorbars button will have no action. Station ID: When the Transmission List Option “Station ID on Skip” is selected, and the most recent event on the list was running on a device configured to use this router, then this crosspoint is switched to the output crosspoint used by that event when an operator invokes Skip on the Air Client’s control panel. When the next event begins to play, the crosspoint is switched to whatever that event requires. Initial Input: This crosspoint will be switched to all outputs of the router when the Device Server application is launched. If it is set to 0 then nothing will happen. In most cases it is recommended to leave this function disabled (0). About Initial Input: The Initial Input source comes into play when communication is first established with the switcher or in the event of a switcher failure. 10. Select the Reporting tab. Use this tab to enable reporting of the condition of the switcher to the error log. © 2014 Imagine Communications Corp. Proprietary and Confidential 9-December-2014| Page 10 of 19 Configure the following parameters as required: These parameters allow the switcher to generate an error whenever the switcher does not respond to a communication request. Place a check mark in each box to enable reporting (default is disabled for all). • Errors: Enables the logging of critical failures, such as the device failing to confirm that a transition command was executed, or when communication is lost with the router. The current IconMaster driver supports the logging of “No Comm” and “No Dev” error codes. • Warnings: Enables the logging of other information reported by the router. The current IconMaster driver supports the logging of NAKs received from the Master Control Switcher. • Crosspoint Changes: Enables the logging of each transition with a timestamp from when it occurred. The current IconMaster driver will log all ACK’d crosspoint change requests sent by ADC Automation to the MCS. IMPORTANT: Normally these are left disabled, but can be enabled for diagnostic purposes. If reporting for Crosspoint Changes is enabled, the error log will quickly fill up with every crosspoint switch command the automation has sent to the switcher. 11. Select the Log tab. Use this tab to configure manual intervention logging parameters with the Miranda CR3232 Router. Any manual action on Program Bus or Keyer of the device will be logged to the ADC As Run file and error/warning depending on the reporting configuration. Note: As Run Logging with the Miranda Compact Router is not frame accurate. ADC-100 Device Server will poll the Miranda Compact Router for status approximately every 3 seconds. © 2014 Imagine Communications Corp. Proprietary and Confidential 9-December-2014| Page 11 of 19 Configure the following parameters as required: • • • • AsRun Log: This group enables As Run Logging of Manual Actions on Program, Keyer and Audio Over Bus with the help of 3 check boxes: Select the type of bus to log: Program Bus and Keyer Bus are supported while Audio Over Bus has not been tested with ADC Manual Intervention. Program Bus: When selected enables the manual change in PGM bus to be reported as an error or as a warning. Keyer Bus: When selected enables the manual change in KEY bus to be reported as an error or as a warning. Contextual Error Message: Check to enable two additional error messages: “Manual Intervention of System” “Return to Automated Control of System” 12. Select the Backup tab. Use this tab to designate another switcher as the backup to the main switcher in case of a failure. The router that is configured here will receive all of the transition commands that are sent to the main device. For this reason the Backup router must be wired identically to the Main. There are other methods for driving a second switcher if this limitation cannot be accommodated. © 2014 Imagine Communications Corp. Proprietary and Confidential 9-December-2014| Page 12 of 19 Configure the following parameters as required: • Backup Switcher: Select from the dropdown list of available backup switchers. Use this parameter when installing a redundant switcher to act as backup if the main switcher fails. In the Configure Backup Switcher window, enter the number of the port that has the backup switcher connected to it (i.e., the device server channel number). The main and backup switchers do not need to be the same model, but the backup should have dimensions large enough to back up all of the main switcher’s crosspoints. Both switchers must receive the same inputs. During playout, the backup switcher switches whenever the main switcher switches The default is None (no backup switcher configured). IMPORTANT: The backup switcher is switched simultaneously with the main switcher. The inputs on the backup switcher must match, in a one-to-one correspondence, the inputs on the main switcher. Once a backup switcher/router has been specified, two additional new configuration tabs are displayed: Input Mapping and Output Mapping, which are used to define the input and output mappings between the designated devices. If a backup switcher/router is not specified, the “Enable backup mapping” check-box is disabled (grayed out), and the additional mapping tabs are hidden (not displayed). • Enable backup mapping: Check this box to enable backup Input and Output mapping. If this parameter is checked, the Input Mapping and Output Mapping tabs are displayed, and enabled for entry. If a backup switcher/router is set, but “Enable backup mapping” is disabled (unchecked), the Input Mapping and Output Mapping tab their but tables are in a disabled state. This allows the user can see what mapping is used if backup mapping is enabled. © 2014 Imagine Communications Corp. Proprietary and Confidential 9-December-2014| Page 13 of 19 13. Input Mapping tab and the Output Mapping tab. When the user specifies backup switcher/router for the first time, the mapping tables are filled with default values, using one-to-one correspondence. Default Mapping: The following default mapping is used only if the backup device is specified for the first time. • • If both Main and Backup switcher/router have the same amount of inputs/outputs, the tables are filled using one-to-one correspondence between Main and Backup inputs. If Backup switcher/router has more inputs/outputs than Main, the same order is used. Main Input (16 inputs) Backup Input (16 or more inputs) 1 1 … … 16 16 If the Main switcher/router has more inputs/outputs than the Backup, all Main inputs/outputs whose numbers are more than the Backup inputs/outputs amount will correspond to Backup input/output 1: Main Input (6 inputs) Backup Input (4 inputs) 1 1 2 2 3 3 4 4 5 1 6 1 Modified Mapping: If the backup switcher/router is already specified and mapping tables are filled by the user, but then the user changes backup device, already adjusted input and output mapping values are retained – as much as possible. © 2014 Imagine Communications Corp. Proprietary and Confidential 9-December-2014| Page 14 of 19 • If the first chosen backup switcher/router has more inputs/outputs than the second, all in-puts/outputs that are not in range are replaced by appropriate ones. For Example: The user first chooses an Evertz router which has 128 inputs and specified mapping, then changes the backup switcher/router to an IconMaster which has 16 inputs. The old input mapping is kept, but values which are not in range are replaced automatically. (Note: This example is for reference only. The configuration dialog of your selected devices may appear different than those shown in this example.) Evertz as backup • IconMaster as backup If the user fills mapping tables and then changes the amount of inputs/outputs on the Main switcher/router, the number of lines in the mapping tables is automatically updated and the new lines populated with default values. For Example: The main switcher Maestro has 6 inputs, but then the user increases the number of inputs on the Maestro to 12 and presses “Apply”. (Note: This example is for reference only. The configuration dialog of your selected devices may appear different than those shown in this example.) Maestro set for 6 Inputs © 2014 Imagine Communications Corp. Proprietary and Confidential Input tab shows 6 lines for input 9-December-2014| Page 15 of 19 Maestro changed to 12 Inputs Input tab now shows 12 lines for input 14. Select the Cascade tab. Use this tab to set up Cascade routing. Cascading (sometimes called “chaining”) allows the user to route audio and video through multiple switchers and routers simultaneously. Example: a customer has ten VTRs, each with a designated output on their router. They have only one input on their master control switcher that must be shared among all ten VTRs. Each VTR output on the router may be cascaded to the single input on the master control switcher to switch it to air. This particular arrangement negates the possibility of using transition effects on the master control switcher between two back-to-back VTR events – the switcher cannot transition between events on the same input. © 2014 Imagine Communications Corp. Proprietary and Confidential 9-December-2014| Page 16 of 19 • • Click the Add button to enter cascade data for the switcher: (See above figure) Configure the following parameters as required, then click OK. (See below figure) Output Active Line: This setting specifies which of the switcher’s crosspoints the cascaded switcher is connected to. The valid range is 0 to 32768. Cascade Device: Select a cascade device from the dropdown list. Cascade Crosspoint In: The crosspoint on the cascaded switcher to which the Output Active Line setting (above) is connected. The valid range is 0 to 32768. Cascade Crosspoint Out: The out crosspoint on the cascaded switcher to which the signal is to be routed. The valid range is 0 to 32768. 15. Select the Switching tab. Use this tab to manually switch inputs and outputs for diagnostic purposes. This utility is not intended as an on-line substitute for the router’s own control panels. The source and destination names tables must be completed before any sources or destinations will appear in the drop-down boxes. © 2014 Imagine Communications Corp. Proprietary and Confidential 9-December-2014| Page 17 of 19 Configure the following parameters as required: • Black, Colorbars, Station ID, Initial Input buttons: These selections refer to the sources designated on the System Inputs tab above. If a source and destination are selected in the drop-down boxes, clicking the “Switch” button will cause the switch to occur. Operation Notes for Miranda CR 3232 Router 1. The Miranda CR3232 Router is a one-based switcher. 2. Audio Over On/Off asset can support file numbers up to 255 within the # field of the ADC Playlist, or the user can place ID=<AssetID> in the title field of the ADC playlist for audio file recall. The number for the audio keyer (either 1 or 2) should be inserted in the sSP field of the Audio Over event. 3. The ADC100 requires automation overhead of 15 frames plus “Max Latency Count” frames latency after each transition. Hence the ADC100 List Preroll time must be 15 plus “Max Latency Count” frames more than the longest effect duration desired. For example, if the slow transition speed is 2 seconds (60 NTSC frames, 50 PAL frames), the ADC100 List Preroll must be at least 2 secs +15 + “Max Latency Count” frames. Test Procedures Test Procedure for Miranda CR3232 Router 1. Bring up the ADC Device Server software. © 2014 Imagine Communications Corp. Proprietary and Confidential 9-December-2014| Page 18 of 19 2. Configure the Miranda CR3232 Router. In the Air Client, select "Resources | Switcher “. Select the Miranda CR3232 Router from the list. This will bring up a dialog box, which will allow you to test the switcher. 3. Select an input and output cross point. Now hit switch button. 4. The switcher should have switched the input to the output. Error Conditions and Recovery 1. Ensure that the cable is attached properly between the device server and the switcher. If you are not using a standard Miranda CR3232 Router product cable then make sure that the cable pin outs are correct. 2. Ensure that the Miranda CR3232 Router switcher is functioning properly. Verify that the installation of the switcher is complete. 3. Verify that signals are being sent and received through the communications cable. To do this, a VOM may be attached to the transmit and receive lines. While issuing a switch command, watch for a change in voltage. Alternatively, attach a data analyzer in-line and watch for a transmission and acknowledgment of commands being sent to the switcher. If a command is being sent and not returned, check to ensure that the cable is connected properly at the switcher. If the command is being returned, check to ensure that the setup in the software is correct. If commands are not being sent at all, check the cable connection to the server and the setup in the software. Internal Document # xxxxx File xxxxx © 2014 Imagine Communications Corp. Proprietary and Confidential 9-December-2014| Page 19 of 19