1
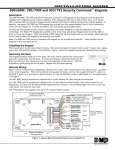
895 Voice Module Users Guide 1 2 3 4 5 6 7 8 9 * 0 # Copyright © 2000 - 2002 Digital Monitoring Products, Inc. Information furnished by DMP is believed to be accurate and reliable. This information is subject to change without notice. 895 Voice Module Users Guide Table of Contents Section Page About Your 895 Voice Module ............................. 1 About this Guide ............................................ 1 Special 895 Voice Module Features ...................... 1 Accessing the Security System ............................ 2 Local House Phone Access ................................. 2 Remote Phone Access ...................................... 2 Using the Security System ................................. 3 System Status ............................................... 3 Zone Status Report ......................................... 3 Armed Status Report ....................................... 3 System Troubles Report .................................... 4 Main Menu ................................................... 5 1Arm System Menu ....................................... 6 Area System Mode ..................................... 6 All/Perimeter Mode ................................... 6 Home/Sleep/Away Mode ............................. 6 Bad or Bypassed Zones at Arming Menu ............ 7 Section Page 2Disarm System Menu .................................... 8 Area Disarm ............................................ 8 All/Perimeter and Home/Sleep/Away Disarm .... 8 3Output Options Menu ................................... 9 Output Status .......................................... 9 Output On ............................................... 9 Output Off .............................................. 10 4Zone Options Menu ..................................... 11 Zone Status ............................................. 11 Zone Bypass Menu ..................................... 11 5User Code Options Menu ............................... 12 Add User ................................................ 12 Delete User ............................................. 12 895 User Access Codes ..................................... 13 This page has been intentionally left blank. This page has been intentionally left blank. LT-0421 (5/02) Introduction About Your 895 Voice Module Special 895 Voice Module Features The 895 Voice module provides you with access to your security system through a voice prompted touch-tone telephone interface. You can use the 895 Voice Module with a telephone at your home or away from your home, giving you complete access to your system. The vocabulary of more than 200 words makes the Voice Module extremely easy to use. The 895 has been designed with you, the user, in mind. The 895 provides you with a simple vocabulary that is very easy to understand allowing you to efficiently control your system. The following items are some of the special features the Voice Module provides to make it extremely user-friendly. The Voice Module works in a similar fashion to a voice mail system. You dial your home phone number, access the system, enter a user code, and then simply follow the prompts the Voice Module gives you. When you use the 895 Voice Module, it is very much like calling anyone or anywhere: You are essentially calling your home security system. About this Guide This 895 Voice Module Users Guide explains the three major steps in using the 895 Voice Module. The first section describes how to access your system using the Voice Module. The second section describes the major prompts you will be given after accessing the system. Finally, a discussion of the Main Menu will guide you through the various menus and prompts available to you on the Voice Module. To make this guide easy to use, keys that you should press when using the 895 are set in bold type. Prompts you will hear are set in quotation marks and SMALL CAPS. Important notes are set in italics. After reading this guide, you will be familiar with how to access and control your security system using the 895 Voice Module. Press the STAR (∗) key at any time to return to the previous menu. Press the POUND (#) key at any time to jump ahead to the next menu or prompt. The Voice Module will hang up (go on-hook) if any of the following three things occur: A period of inactivity for more than 20 seconds has occurred. You enter an invalid user code three times. The Voice Module has repeated a prompt three times without any data input. If the name of the area, zone, or output programmed into the security system is not in the Voice Modules vocabulary, the area name is not reported. When the Voice Module is accessed using a remote telephone (not at your home), the Voice Module will lockout any users who have entered an invalid code three times within a period of ten minutes. This means that you must use a house phone or keypad to enable remote phone access. See the following page for Remote Phone Access information. 1 Accessing the Security System Local House Phone Access Remote Phone Access When controlling your system from inside your home, simply pick up the phone and press the STAR (∗) key twice. You may use any touch-tone telephone to access your security system when away from home. There are three ways to remotely access your system using the Voice module. After you have accessed and connected to the security system using any of the options listed below, you must enter a valid user code when prompted. After the module detects two STAR (∗) key entries, the module asks you to enter your user code. This is the same user code you use with your keypads. After you enter a valid user code, the Voice Module announces any alarms and the armed status of the system. Follow the ensuing prompts to perform a variety of functions on the security system. See the Main Menu section on page 5 for more information about the operations you can perform with the Voice Module. After the STAR (∗) key has been pressed twice, if it is not followed by a valid user code, the Voice Module prompts you to enter your code again. The module will go on-hook after three invalid user codes. Also, the Voice Module will go back on-hook after 20 seconds of inactivity. Summary: 1. While at home, pick up your telephone. 2. Press the STAR (∗) key twice. 3. Enter valid User Code. 4. Follow the Voice Module prompts to perform a variety of functions to your security system. 2 • STAR Option: Call your home phone number. If a person at home answers or an external answering service answers, press the STAR (∗) key twice. This disconnects you from the person who answered the phone and connects with the security system. Be sure to tell the person on the line what you are doing. If the answering machine picks up, press the STAR (∗ ∗) key twice. This disconnects you from the answering machine and connects you to the security system. Enter a valid user code when prompted. Programmed Security System Option: To use this option, the installing technician must program the security system to pick up after a specified number of rings. Call your home phone number. After the specified number of rings has been reached, the security system will pick up. Enter a valid user code when prompted. Note: XR200 and XR2400F panels require you to enter your user code and then press the POUND (#) key. The voice will announce, PLEASE ENTER CODE FOLLOWED BY THE POUND KEY, if your system requires this. • Call Back Option: (XRSuper6, XR20, XR40 only) Call your home, let the phone ring one time, and hang up. Then call your home back within 30 seconds and the security system picks up. Enter a valid user code when prompted. Using the Security System System Status After entering the user code, you will hear the status report. Entering the POUND (#) key at any time during System Status takes you directly to the Main Menu. Pressing the STAR (∗) key at any time during the report repeats the System Status report. The Status Report contains information on the following topics: Zone Status Armed Status System Troubles Zone Status Report This section of the Status Report provides you with information about your systems zones. If any of the zones in your security system are currently in alarm it is announced at this time. Note: If all zones are in normal condition, the Voice Module immediately proceeds to the Armed Status report. The Voice Module lists the zone type, the status of that zone, the zone number, and the zone name (if it is in the Voice Modules vocabulary). An example of a Zone Status report is, BURGLAR ALARM ZONE 1 FRONT DOOR. Note: If you return to System Status at any time after hearing the Main Menu (see page 5), you will hear additional Zone information. The Zone Status Report will contain the status of zones in alarm, zones in a trouble state, zones that are currently bypassed, and wireless zones that are missing and not responding. Also, there may be a short delay for the 895 Voice Module to gather this information from the security system. 3 Armed Status Report System Troubles Report During this report, the Voice Module announces the armed/disarmed status of your system. Because users often have different needs for their security system, their systems can be programmed in one of three waysArea, All/Perimeter, or Home/Sleep/Away. The reports vary for different area modes available to different security systems. After reporting the Armed Status of your system, the Voice Module reports any trouble currently displayed in the keypad status list. If there is no trouble displayed on the keypad, the Voice Module proceeds to the Main Menu. Area Mode: The Voice Module reports which areas are armed/ disarmed. The Voice Module lists the area number, name, and status of the area. An example of an Area Mode Status Report is AREA 1 FOYER ARMED. Note: If the name of the area programmed into the security system is not in the Voice Modules vocabulary, the area name is not reported. All/Perimeter Mode: The Voice Module reports whether the perimeter is armed/disarmed or if the entire system is armed/ disarmed. An example of an All/Perimeter Mode Status Report is PERIMETER ARMED. Home/Sleep/Away Mode: The Voice Module reports the current status of your system. An example of a Home/Sleep/Away Mode Status Report is SLEEP MODE ARMED. Note: The word Instant following an Armed Report means that a part of your system has been armed with no entry delay. After the Voice Module announces the status of the system, it proceeds to the System Troubles report. 4 The Voice Module announces the three types of system trouble: BATTERY TROUBLE, POWER TROUBLE, and PHONE TROUBLE. The Voice Module then proceeds to the Main Menu. Main Menu Main Menu The Main Menu provides you with five options to continue controlling your system with the Voice Module. The table below lists the Options available in the Main Menu. Press... For... Turn to... ∗ (STAR) An updated System Status Page 3 1 (ONE) Arm System Menu Page 6 2 (TWO) Disarm System Menu Page 8 3 (THREE) Output Options Page 9 4 (FOUR) Zone Options Page 11 5 (FIVE) User Code Options Page 12 9 (NINE) To Hang up If you choose to hang up at this time, press 9 (NINE). After you press 9, the Voice Module says GOOD-BYE and hangs up. After listing the Main Menu Options, the Voice Module pauses for four seconds. If you have not pressed a key, the Voice Module repeats the Main Menu. After the Voice Module repeats the Main Menu three times, the Voice Module says GOOD-BYE and hangs up. Note: The XR200 and XR2400F panels require you to press the POUND (#) key after entering data. If your security system requires this you will hear prompts with the additional phrase, FOLLOWED BY THE POUND KEY. You must then press # for your data to be sent to the security system. Note: If you return to System Status at any time after hearing the Main Menu, you will hear additional Zone information. Zone information will also include trouble, bypass, and missing zone information at this time, as well as alarm zone information. Return to System Status at this time to hear a complete Zone Status Report. 5 1Arm System Menu All/Perimeter Mode While in the Arm System Menu, you may arm all or part of your system the same way you arm your system using your keypad. Follow the Voice Module prompts to properly arm your system. To arm the Perimeter, press 2 (TWO). Note: If you arm part of the system with no entry delay, you will hear a response containing the word INSTANT. If bad or bypassed zones are found during the arming process, the Voice Module will proceed to the Bad or Bypassed Zones at Arming Menu. See the following page for information about Bad and Bypassed Zones at Arming. To arm the Perimeter with no entry delay, press 3 (THREE). The Voice Module then announces one of three All/ Perimeter Arming Reports depending on what you armed: ALL SYSTEM ARMED, PERIMETER ARMED, or PERIMETER ARMED INSTANT. After you hear the Arming Report, you will be returned to the Main Menu. Area System Mode Home/Sleep/Away Mode Enter the area numbers that you wish to arm followed by the POUND (#) key. To arm Home, press 2 (TWO). To arm Away, press 1 (ONE). To arm multiple areas, you may enter more than one area number at this time. An example of arming multiple areas would be if you pressed 1, 2, and the (#) POUND key to arm only areas 1 and 2. If you choose areas that are not assigned to your user code, those areas will not be armed. To arm Sleep, press 3 (THREE). To arm all areas, press 9 (NINE). After you hear the Arming Report, you will be returned to the Main Menu. The Voice Module then announces an Area Arming Report containing all of the areas that were armed, in sequential order. After you hear the Arming Report, you will be returned to the Main Menu. 6 To arm All, press 1 (ONE). To arm Home with no entry delay, press 4 (FOUR). To arm Sleep with no entry delay, press 5 (FIVE). After you arm the system, the Voice Module announces a Home/Sleep/Away Report. Bad or Bypassed Zones at Arming Menu The Voice Module lists all bad or bypassed zones on your system when arming. The module announces the zone number (and name if it is found in the vocabulary) and whether the zone is bypassed or bad. If you do not press any keys, the Voice Module repeats the menu. After repeating the menu three times, the module disconnects. After you have either bypassed or force armed the bad zones, the Voice Module announces a Bypassed or Force Armed Report. An example of a bypassed zone announcement is ZONE 1 FOYER BYPASSED. After the module lists the zones, you may press STAR (∗) to repeat the list. Depending upon the action taken, you will either hear ALL BAD ZONES or ALL BAD ZONES FORCE ARMED. The Voice Module then returns you to the appropriate Arming ReportArea Arming Report, All/ Perimeter Arming Report, or Home/Sleep/Away Arming Report. If the list contains bad zones that have not been bypassed, the Voice Module prompts you to bypass or force arm those zones. After announcing the proper Arming Report, the Voice Module then returns to the Main Menu. BYPASSED To bypass all bad zones, press 1 (ONE). To force arm all bad zones, press 2 (TWO). You may press STAR (∗) at this time to stop arming the bypassed zones and return to the Arm System Menu. 7 2Disarm System Menu All/Perimeter and Home/Sleep/Away Disarm The Disarm System Menu allows you to disarm all or part of your system. After following the prompts, you may disarm your entire system by pressing 9 (NINE) or return to the Main Menu by pressing STAR (∗). You may press STAR (∗) at this time to return to the Main Menu. Area Disarm Enter the Area Numbers you wish to disarm followed by the (#) POUND key. To disarm multiple areas, you may enter more than one area number at this time. An example of disarming multiple areas would be if you pressed 1, 2, and the (#) POUND key to disarm only areas 1 and 2. To disarm the entire system, press 9 (NINE). If a user has attempted to disarm all areas, but does not have proper access, the Voice Module only disarms areas that the user has access to disarm. The Voice Module then announces the Area Disarm Report. During the report you will hear the area number, area name (if in vocabulary) and DISARMED . The Voice Module announces all areas in the sequential order that they were disarmed. If you have disarmed the entire system, the Voice Module announces that the entire system is disarmed. An example of part of an Area Disarm Report is AREA 1 FOYER DISARMED. After announcing the Disarm Report, the Voice Module returns to the Main Menu. 8 To disarm the entire system, press 9 (NINE). After disarming, the Voice Module announces a Disarm Report of SYSTEM DISARMED. After successfully disarming the system, you will hear a Disarm Report. The Voice Module then returns to the Main Menu. 3Output Options Menu The Output Options Menu contains three choices to control your outputsOutput Status, Turn Outputs On, and Turn Outputs Off. After you turn an output on or off, the Voice Module gives you a report of the output status. Then the Voice Module returns you to the appropriate menu so you may turn on/off additional outputs. Press... For... 1 (ONE) Output Status 2 (TWO) Turn Output On 3 (THREE) Turn Output Off ∗(STAR) Main Menu Output Status To hear the status of an output, enter the output number followed by the POUND (#) key. If you enter an invalid output number, the Voice Module announces INVALID OUTPUT NUMBER and returns you to the Output Status Menu. After you have entered a valid output number, the Voice Module announces an Output Status Report that lists the current output status. The reports lists the output number, the output name (if it is in the vocabulary), and whether the output is on or off. You will then be returned to the Output Options menu. Output On To turn an output on, enter the output number followed by the POUND (#) key. If you have entered an invalid output number the Voice Module announces INVALID OUTPUT NUMBER. If the output you tried to turn on is a restricted output, the Voice Module announces CANNOT TURN THE OUTPUT ON, OUTPUT RESTRICTED. After you have entered a valid output number, the Voice Module announces an Output On Report. If the output was successfully turned on, you will hear the output number, name (if in the vocabulary) followed by the word ON. After listing the Output On Report, the Voice Module repeats the Output On menu so you may turn additional outputs on. Once back in the Output On menu and you wish to return to the Output Options Menu to complete other operations, press the STAR (∗) key. 9 Output Off To turn an output off, enter the output number followed by the POUND (#) key. If you have entered an invalid output number you will hear INVALID OUTPUT NUMBER. After you have entered a valid output number, the Voice Module announces an Output Off Report. If the output was successfully turned off, you will hear the output number, name (if in the vocabulary) followed by the word OFF. After listing the Output Off Report, the Voice Module repeats the Output Off menu so you may turn off additional outputs. Once back in the Output Off menu and you wish to return to the Output Options Menu to complete other operations, press the STAR (∗) key. 10 4Zone Options Menu Zone Bypass Menu From the Zone Options Menu, you may choose to either listen to the zone status or perform a zone bypass. The Zone Bypass Menu gives you the option of bypassing or resetting zones. Press... For... Press... To... 1 (ONE) Zone Status Menu 1 (ONE) Bypass 2 (TWO) Zone Bypass Menu. 2 (TWO) Reset ∗ (STAR) Main Menu. Zone Status The Zone Status Menu lists several options to hear the status of your systems zones. Press... To hear... 1 (ONE) Armed Zones report of all armed burglar zones sequentially. Bypassed Zonesreport of all bypassed zones sequentially. Zones in Alarmreport of all alarmed zones sequentially. To enter a zone number You will then hear the status of that zone. Zone Options Menu 2 (TWO) 3 (THREE) 4 (FOUR) ∗ (STAR) ∗ (STAR) Return to Zone Options Menu. To bypass or reset a zone, press the appropriate number (1 or 2). Then enter the zone number followed by the POUND (#) key. The Voice Module announces a Report of the Bypassed/ Reset zones, and then repeats the Bypass/Reset menu so you may change additional zones. After you press one of the above keys, the Voice Module announces the appropriate zone status report. Then the Voice Module repeats the Zone Status Menu. 11 5User Code Options Menu From this menu you may add Users and delete Users. Press... To... 1 (ONE) Add User 2 (TWO) Delete User ∗ (STAR) Return to the Main Menu Add User To return to the User Code Options Menu press the STAR (∗) key. 1. Enter a valid user number followed by the POUND (#) key. You will then proceed to the Enter User Code menu if the number is not already in use or invalid. 2. Enter the User Code you would like to add. User Codes and numbers should follow the specifications of your security system. Refer to your security systems User Guide for more information. 3. Enter User Code again. This is for verification purposes. 4. Users with Area Systems will now proceed to the Enter User Area prompt. Enter the areas you wish the user to have access to. (Users who are not in Area Mode will proceed directly to User AuthorityStep 5.) 5. Enter the User Authority level that you wish to assign to the User Code. Follow the prompts to enter the desired authority level for the User Code. 12 6. After successfully entering all necessary Authority information, you will hear that the user has been added. For example, USER 33 ADDED. 7. You will then be returned to the Enter User Number menu so you may add additional users or press the STAR (∗) key to return to the User Code Options Menu. Note: Because systems can be set up in different modesArea, All/ Perimeter, or Home/Sleep/Awayyou may hear additional prompts. Please follow the prompts given to you by the Voice Module to successfully add a user code. Delete User To return to the User Code Options Menu press the STAR (∗) key. To delete a User, enter the User Number followed by the POUND (#) key. If the User Number is invalid, you will hear INVALID USER NUMBER and be returned to the Delete User Number menu. If you successfully deleted the User Number you will hear a confirmation report. For example, this report will sound like USER 33 DELETED. You will then return to the beginning of Delete User to delete additional users. 895 User Access Codes To access the 895 Voice Module, use the same code that you currently use with your keypads. There is no need to change your present User Code to use the 895. The chart below explains the Authority Levels necessary to gain access to your security system and change user codes using the 895. The chart also explains the basic code configuration necessary to use the 895. Your code should already follow the code configuration below, if it does not, you may need to alter you user code to conform to the specifications outlined below. Panel Code Configuration Authority Level XR200 or XR2400F (Area Mode) 3- to 5-digit User Code + # Levels 6 through 9. Must have a Level 9 code to change user code. No custom Codes. XR200 or XR2400F (All/Perimeter and Home/Sleep/Away Modes) 4-digit code + # Levels 6 through 9. Must have a Level 9 code to change user code. No custom Codes. XR40 4-digit user code Standard to access. Must have Master Authority to change codes. XR20 4-digit user code Standard to access. Must have Master Authority to change codes. XRSuper6 4-digit user code Standard to access. Must have Master Authority to change codes. 13