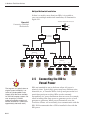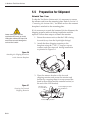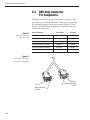
1
KVH Industries, Inc.
A Guide to TracVision Cruiser
®
• Technical Manual
• User’s Guide
• Installation Guidelines
Congratulations!
You have selected one of the most advanced marine satellite
tracking systems available today. KVH® Industries’ TracVision®
Cruiser is designed for use with DIRECTV® and the DISH™
Network on vessels that typically experience low to moderate
motion. This manual provides detailed instructions on the
proper installation, use, and maintenance of your TracVision
Cruiser system.
Throughout this manual, important information is marked for
your attention by these icons:
A helpful tip that either directs you to
a related area within the manual or
offers suggestions on getting the
highest quality out of your system.
An alert to important information
regarding procedures, product
specifications, or product use.
Information about installation,
maintenance, troubleshooting, or
other mechanical issues.
An electrical safety warning to help
identify electrical issues that can be a
hazard to either this KVH product or
a user.
TracVision Cruiser
Serial Number
Direct questions, comments, or suggestions to:
KVH Industries, Inc.
50 Enterprise Center
Middletown, RI 02842 USA
tel: +1 401 847-3327
fax: +1 401 849-0045
e-mail: [email protected]
internet: http://www.kvh.com
This serial number will be required
for all troubleshooting or service
calls made regarding this product.
KVH Part # 54-0144 Rev. C
© 1999, KVH Industries, Inc.
TracVision® and KVH® are registered trademarks of
KVH Industries, Inc.
DIRECTV® is an official trademark of DIRECTV,
a unit of GM Hughes Electronics Corporation.
DISH™ Network is an official trademark of
EchoStar Communications Corporation.
Table of Contents
1
Introduction . . . . . . . . . . . . . . . . . . . . . . . . . . . . . . .1-1
1.1
Digital Satellite Television . . . . . . . . . . . . . . . . . . . . . . . . . . . . . .1-1
1.2
TracVision Cruiser System Overview . . . . . . . . . . . . . . . . . . . . .1-1
1.2.1 TracVision Cruiser Components.............................................1-2
1.2.2 Integrated Receiver Decoder..................................................1-2
1.3
Materials Provided with TracVision Cruiser . . . . . . . . . . . . . . . .1-3
1.3.1 Additional Materials Required for
TracVision Cruiser Use...........................................................1-3
2
Installation . . . . . . . . . . . . . . . . . . . . . . . . . . . . . . . .2-1
2.1
Overview of Installation . . . . . . . . . . . . . . . . . . . . . . . . . . . . . . .2-1
2.1.1 Installation Tools and Materials Required...............................2-1
2.1.2 Kitpack ....................................................................................2-2
2.2
Choosing the Best Location and Getting
the Best Reception . . . . . . . . . . . . . . . . . . . . . . . . . . . . . . . . . . .2-2
2.3
Mounting the Antenna Unit . . . . . . . . . . . . . . . . . . . . . . . . . . . . .2-3
2.4
Connecting the Antenna Unit . . . . . . . . . . . . . . . . . . . . . . . . . . .2-6
2.4.1 Connecting the Antenna Data Cable to the IRD ....................2-8
2.4.2 Connecting the Antenna to Vessel Power ............................2-10
2.4.3 Connecting the Antenna RF Signal Cable to the IRD ..........2-11
2.5
Connecting the IRD to Vessel Power . . . . . . . . . . . . . . . . . . . .2-14
2.6
Checking Out the System . . . . . . . . . . . . . . . . . . . . . . . . . . . . .2-15
2.7
Completing the Installation Process . . . . . . . . . . . . . . . . . . . .2-16
3
Operation . . . . . . . . . . . . . . . . . . . . . . . . . . . . . . . . .3-1
4
Troubleshooting . . . . . . . . . . . . . . . . . . . . . . . . . . . . .4-1
4.1
Causes and Remedies for Common Operational Issues . . . . . .4-1
4.1.1 Satellite Signal Blocked ..........................................................4-2
4.1.2 Outside Satellite Coverage Zone ...........................................4-2
4.1.3 Radar Interference..................................................................4-2
54-0144 Rev. C
i
4.1.4 Vessel Turning During Startup................................................4-2
4.1.5 Incorrect or Loose RF Connectors .........................................4-3
4.1.6 Passive Multiswitch Used .......................................................4-3
4.2
IRD Troubleshooting . . . . . . . . . . . . . . . . . . . . . . . . . . . . . . . . . .4-3
4.2.1 EchoStar IRD Commissioning ................................................4-3
4.2.2 IRD Data Port or Cable/Wiring ...............................................4-3
4.2.3 IRD Faulty...............................................................................4-3
4.2.4 Failed IRD Status Check ........................................................4-4
4.3
Antenna Gyro and LNB Faults . . . . . . . . . . . . . . . . . . . . . . . . . .4-5
4.4
Computer Diagnostics . . . . . . . . . . . . . . . . . . . . . . . . . . . . . . . .4-5
4.5
Maintenance Port Parser Commands . . . . . . . . . . . . . . . . . . . . .4-5
5
Maintenance . . . . . . . . . . . . . . . . . . . . . . . . . . . . . . .5-1
5.1
Warranty/Service Information . . . . . . . . . . . . . . . . . . . . . . . . . . .5-1
5.2
Preventive Maintenance . . . . . . . . . . . . . . . . . . . . . . . . . . . . . . .5-1
5.3
Replaceable Parts . . . . . . . . . . . . . . . . . . . . . . . . . . . . . . . . . . . .5-2
5.4
Field Replaceable Unit Procedures . . . . . . . . . . . . . . . . . . . . . .5-3
5.4.1 PCB Removal and Replacement............................................5-5
5.4.2 RF Detector ............................................................................5-6
5.4.3 Antenna Gyro Assembly .........................................................5-6
5.4.4 Antenna LNB Replacement ....................................................5-8
5.4.5 EchoStar Adapter Replacement .............................................5-9
5.5
Preparation for Shipment . . . . . . . . . . . . . . . . . . . . . . . . . . . . .5-10
Appendix A
System Specifications . . . . . . . . . . . . . . . . . .A-1
Appendix B
Functional Block Diagram . . . . . . . . . . . . . . . .B-1
Appendix C
Data Cable Wiring . . . . . . . . . . . . . . . . . . . . .C-1
C.1
Wiring TracVision Cruiser to a 15-pin Data Connector . . . . . . .C-1
C.2
DB9 Data Connector Pin Assignments . . . . . . . . . . . . . . . . . . .C-2
Appendix D
ii
EchoStar IRD Commissioning Procedure . . . . . .D-1
Appendix E
Startup Data Sequence . . . . . . . . . . . . . . . . . .E-1
Appendix F
Maintenance Port Parser Commands . . . . . . . . .F-1
F.1
System Commands . . . . . . . . . . . . . . . . . . . . . . . . . . . . . . . . . . .F-1
F.2
Manual Positioning Commands . . . . . . . . . . . . . . . . . . . . . . . . .F-2
F.3
Operational Commands . . . . . . . . . . . . . . . . . . . . . . . . . . . . . . .F-3
F.4
Tracking and Conscan Commands . . . . . . . . . . . . . . . . . . . . . .F-4
List of Figures
Figure 1-1
TracVision Cruiser Identifies and Compensates
for Vessel Motion . . . . . . . . . . . . . . . . . . . . . . . . . . . . . . .1-1
Figure 1-2
TracVision Cruiser Single IRD System Configuration . . . .1-1
Figure 1-3
Primary Components of TracVision Cruiser . . . . . . . . . . . .1-2
Figure 2-1
Forward Shipping Restraint and LNB Arm
(Arranged for Shipping) . . . . . . . . . . . . . . . . . . . . . . . . . .2-3
Figure 2-2
TracVision Cruiser Shipping Restraints (Top View) . . . . . .2-3
Figure 2-3
Stiffening Plate Dimensions . . . . . . . . . . . . . . . . . . . . . . .2-4
Figure 2-4
Orientation of the Antenna Unit and Stiffening Plate . . . . .2-4
Figure 2-5
Recommended Drain Hole Locations . . . . . . . . . . . . . . . .2-5
Figure 2-6
Shipping Restraint (Arranged for Storage) . . . . . . . . . . . .2-5
Figure 2-7
Bolting TracVision Cruiser to the Deck (Side View) . . . . . .2-6
Figure 2-8
Proper Wire-to-Terminal Connection . . . . . . . . . . . . . . . . .2-6
Figure 2-9
Moving the Antenna Reflector . . . . . . . . . . . . . . . . . . . . . .2-7
Figure 2-10
Cable Port Assignments (Exterior of Baseplate) . . . . . . . .2-7
Figure 2-11
Cable Overlap within the TracVision
Cruiser Baseplate . . . . . . . . . . . . . . . . . . . . . . . . . . . . . . .2-7
Figure 2-12
Proper Terminal Strip Wiring Arrangement –
Data Cable . . . . . . . . . . . . . . . . . . . . . . . . . . . . . . . . . . . .2-8
Figure 2-13
Examples of DIRECTV IRD Connectors . . . . . . . . . . . . . .2-8
Figure 2-14
EchoStar Adapter Installation . . . . . . . . . . . . . . . . . . . . . .2-9
Figure 2-15
Proper Wire-to-Terminal Connection . . . . . . . . . . . . . . . .2-10
Figure 2-16
Proper Terminal Strip Wiring Arrangement –
Power Cable . . . . . . . . . . . . . . . . . . . . . . . . . . . . . . . . .2-10
54-0144 Rev. C
iii
Figure 2-17
Wiring TracVision Cruiser to Vessel Power . . . . . . . . . . .2-11
Figure 2-18
Connecting the RF Cable to TracVision Cruiser . . . . . . . .2-11
Figure 2-19a-d Attaching the Provided F-connector to an RF Cable . . . .2-12
Figure 2-20
Connecting TracVision Cruiser to Multiple IRDs . . . . . . .2-13
Figure 2-21
Connecting to Multiple Multiswitches . . . . . . . . . . . . . . . .2-14
Figure 5-1
Antenna, PCB, and Rotating Plate . . . . . . . . . . . . . . . . . .5-3
Figure 5-2
Close-up of Linear Actuator, Pivot Bracket, and Pin . . . . .5-3
Figure 5-3
Antenna Assembly . . . . . . . . . . . . . . . . . . . . . . . . . . . . . .5-4
Figure 5-4
Close-up of RF Detector, PCB, and Cover . . . . . . . . . . . .5-4
Figure 5-5
PCB Connector Locations – Rear View (not to scale) . . . .5-5
Figure 5-6
Attaching the Shipping Restraints to
the Antenna Baseplate . . . . . . . . . . . . . . . . . . . . . . . . . .5-10
Figure 5-7
Securing the Forward Shipping Restraint . . . . . . . . . . . .5-10
Figure C-1
DB9 Male and Female Connector Arrangement . . . . . . . .C-2
List of Tables
iv
Table 1-1
TracVision Cruiser Packing List . . . . . . . . . . . . . . . . . . .1-3
Table 2-1
Kitpack Contents . . . . . . . . . . . . . . . . . . . . . . . . . . . . . .2-2
Table 2-2
TracVision Cruiser Operational Messages . . . . . . . . . .2-15
Table 2-3
DSS On-Screen Messages . . . . . . . . . . . . . . . . . . . . .2-16
Table 3-1
TracVision Cruiser Automated Procedures . . . . . . . . . . .3-2
Table 4-1
Troubleshooting Matrix . . . . . . . . . . . . . . . . . . . . . . . . .4-1
Table 5-1
Field Replaceable Units . . . . . . . . . . . . . . . . . . . . . . . .5-2
Table A-1
TracVision Cruiser System Specifications . . . . . . . . . . .A-1
Table C-1
Alternate Wiring Arrangement for TracVision Cruiser
Data Cable to DB15 (15-wire) Connector . . . . . . . . . . .C-1
Table C-2
DB9 Pin Functions and Color Code . . . . . . . . . . . . . . .C-2
Table F-1
System Commands . . . . . . . . . . . . . . . . . . . . . . . . . . . .F-1
Table F-2
Manual Positioning Commands . . . . . . . . . . . . . . . . . . .F-2
Table F-3
Operational Commands . . . . . . . . . . . . . . . . . . . . . . . .F-3
Table F-4
Tracking and Conscan Commands . . . . . . . . . . . . . . . .F-4
Introduction
1
Introduction
1.1
Digital Satellite Television
The DIRECTV® and DISH™ Network systems transmit digital
audio and video data from land-based transmitters to a
satellite “parked” above the equator. Each satellite relays the
signals in spot beams covering the continental United States
and contiguous waters. TracVision Cruiser is designed to
identify, lock on to, and track the appropriate satellite, both
while your vessel is at rest and in motion.
1.2
Figure 1-1
TracVision Cruiser Identifies and
Compensates for Vessel Motion
TracVision
TracVision Cruiser
System Overview
Your KVH TracVision Cruiser employs a state-of-the-art
actively stabilized antenna system designed for use with
Ku Band satellite television reception. This vessel-referenced
stabilization system is enhanced by a conical scan tracking
function to detect and lock on to the strongest signal, resulting
in the clearest reception possible.
A complete satellite TV system includes the TracVision Cruiser
connected to an Integrated Receiver Decoder (IRD), aka a
“satellite receiver,” and a television set. A desktop or laptop
computer is used to conduct diagnostics. The interrelationship
of units is illustrated in Figure 1-2. System specifications and a
functional block diagram are provided in Appendices A and B,
respectively.
Antenna Unit
Figure 1-2
TracVision Cruiser Single IRD
System Configuration
11-16 Volts DC
2.5-3.5 Amps
9-Pin PC
Communications
Port
Low-speed
Data Port
IRD
54-0144 Rev. C
TV
1-1
A Guide to TracVision Cruiser
1.2.1 TracVision Cruiser Components
The Antenna Unit includes the antenna positioning
mechanism, signal front end, power supply and control
elements. These include antenna drive controls and
mechanisms, the cable wrap subassembly, antenna gyro
sensor, power conditioning and regulating circuits, and the RF
detector. The antenna is a parabolic dish mounting a dual port
low noise block (LNB) converter with built-in preamplifier. A
molded ABS radome encloses the baseplate and is secured in
place with standard fasteners. Liquid-tight (watertight) fittings
located on the back of the baseplate join the power, signal, and
control cabling to below-decks units.
Figure 1-3
Primary Components of
TracVision Cruiser
Radome
Always lift the antenna unit by the
gray baseplate and not the radome,
antenna reflector, or internal
mechanical assemblies.
Gyro
Antenna
Reflector
LNB
NEVER pick up the unit by the LNB
or the gyro!
Antenna Unit/
Baseplate
1.2.2 Integrated Receiver Decoder
On-screen messages are not
available with a DISH Network IRD.
For directions on installing a
multiswitch with your TracVision
Cruiser system, refer to Section
2.4.3, “Connecting the Antenna RF
Signal Cable to the IRD.”
1-2
The IRD receives satellite signals from the Antenna Unit for
signal decoding, processing and channel selection, and sends
the signals to the TV set for viewing. Messages are sent from
the IRD to the Antenna Unit and messages are received from
the Antenna Unit for display on the television screen. The IRD
also provides the interface for the user to activate authorization
for reception. Please refer to the User’s Manual provided with
your selected IRD for complete operating instructions.
Multiple IRDs may be connected to the Antenna Unit to
provide satellite signals to a number of TV sets. When two
or more IRDs are connected to the same antenna, an active
multiswitch must be installed between the Antenna Unit and
Introduction
the IRDs. The multiswitch contains relays that select the proper
output from the antenna LNB to send to the IRD. In multiple
IRD installations, all IRDs must be for the same satellite
television service (i.e., DIRECTV or DISH Network).
1.3
Materials Provided with
TracVision Cruiser
Table 1-1 lists the units, cables, and materials packed in the
TracVision Cruiser package by name and KVH part number.
Component
KVH Part No.
Antenna Unit (comprising):
01-0225
Baseplate Assembly
02-0952
Radome Assembly
02-0953
Stiffening Plate
20-0684
RF Cable
32-0589-60
Power Cable
32-0590-60
Data Cable
32-0591-60
Kitpack*
72-0094
Installation and Operation Manual
54-0144
Table 1-1
TracVision Cruiser
Packing List
Cables for the TracVision Cruiser
are stored beneath the antenna unit
during shipping.
* A complete listing of kitpack contents is provided in Section 2.1.2, “Kitpack.”
1.3.1 Additional Materials Required for
TracVision Cruiser Use
To make full use of your new TracVision Cruiser and receive
satellite TV on the water, you will need to provide/purchase
the following:
• Television
• Appropriate IRD for your selected satellite
TV service (if using the DISH Network, a
Series 4000 or 5000 IRD will be required)
• Sealing materials to weatherproof cable holes
and seal mounting plate
• Optional KVH EchoStar Adapter (for use with
the DISH Network service and IRD)
54-0144 Rev. C
Operation of the DISH Network
requires the purchase of an
EchoStar IRD Adapter. The
adapter is not shipped in the main
TracVision Cruiser container. To
purchase an EchoStar Adapter,
contact KVH or your local KVH
dealer and ask for KVH Product
Number 02-0899.
1-3
Installation
2
Installation
2.1
Overview of Installation
TracVision Cruiser is designed for simple installation and
setup. Just follow these easy steps:
1. Choose the antenna location.
2. Mount the antenna unit.
3. Connect the antenna unit cables.
4. Connect the antenna unit to the TV IRD.
Plan the entire installation before
proceeding! Take into account
component placement, running
cable distances between units, and
accessibility to the equipment after
installation.
5. Connect the TV IRD to the TV.
2.1.1 Installation Tools and Materials Required
• Electric drill, assorted drill bits and
1
⁄2˝ hole saw
• Socket wrenches
• Phillips and flat tip screwdrivers
• Installation kitpack containing stainless steel
hardware for mounting the Antenna Unit,
power switch, and switch plate
WHEN INSTALLING TRACVISION
CRUISER, DO NOT BEND OR
FLEX THE BASEPLATE TO
CONFORM WITH THE DECK
SURFACE!
• Augat Snap ‘n Seal Crimp/Strip Tool (Part
Number IT1000) if using the KVH-provided
F-connector
• Silicone sealant or RTV
• Wire strippers
• Terminal crimp tool
• Optional PC with terminal emulation software
such as PROCOMM, Windows Terminal, or
Windows 95 Hyperterminal. Use of a PC during
all installations is highly recommended.
54-0144 Rev. C
While some DIRECTV IRDs offer
on-screen messages, it is
recommended that a PC be
available for all TracVision Cruiser
installations.
2-1
A Guide to TracVision Cruiser
2.1.2 Kitpack
Table 2-1 lists the materials provided in the TracVision Cruiser
kitpack.
Table 2-1
Kitpack Contents
Part
Qty.
Rocker switch
1
12-0048
Switch plate
1
19-0167
RF F-connector
2
23-0170
Terminal crimp (female)
5
23-0188-03
Tie-wrap
5
22-0013
⁄4-20 x 3˝ Hex head Cap Screw
(stainless steel)
6
14-0250-48
⁄4 Flat washer (stainless steel)
6
14-0251
1
1
2.2
The radome exterior is treated with
a special finish selected for
ultraviolet stabilization and
transparency to satellite signals. Do
not apply additional paints or
finishes. Application of any other
coatings voids the warranty.
Always lift the antenna unit by the
gray baseplate and not the radome,
antenna reflector, or internal
mechanical assemblies, pictured
previously in Figure 1-3.
NEVER pick up the unit by the LNB
or the gyro!
2-2
KVH Part No.
Choosing the Best Location and
Getting the Best Reception
•
The ideal antenna site has a clear view of the
horizon/satellite all around.
•
The closer the antenna reference is aligned with
the vessel’s centerline, the smaller the pool of
tracking errors will be.
•
Place the Antenna as close as possible to the
intersection of the vessel’s fore-and-aft centerline
and midships.
•
The Antenna Unit should not be too high off the
water (a height above the waterline no more than
half the vessel length).
•
Keep the antenna out of line with nearby radars,
as their energy levels may overload the antenna
front-end circuits. If necessary, position the
Antenna Unit so it is at least four feet (1.3 meters)
above or below the level of the radar.
•
Make sure that the mounting surface is rigid so
that it cannot flex when the vessel vibrates. If
necessary, add a strength member to the mounting
site to stiffen it.
Installation
2.3
Mounting the Antenna Unit
KVH recommends that TracVision Cruiser be mounted with
the cable ports facing aft. However, the unit can be installed in
whatever orientation is most convenient for the vessel and the
mounting area. Mount the TracVision Cruiser with the
supplied stiffening plate using the following procedure.
1. Remove the eight pan head screws and flat
washers holding the radome onto the baseplate.
Carefully lift the radome straight up until it is
clear of the antenna assembly and set it aside.
Save the screws and flat washers for reinstalling
the radome later.
2. Cut the tie-wraps holding the LNB to the
forward shipping restraint and rotate the LNB
arm clear of the shipping restraint as shown in
Figure 2-1.
LNB
3 tie-wraps used
to secure LNB arm
Forward Shipping Restraint
Nuts and Washers
The aluminum stiffening plate
prevents the fiberglass baseplate
from excessive bending when
installed on a curved surface. Its
use is strongly recommended.
Figure 2-1
Forward Shipping Restraint and
LNB Arm (Arranged for Shipping)
Forward Shipping Restraint
3. Remove the six 1⁄4-20 x 3⁄4" pan head screws, nuts,
lock washers, and flat washers holding the
antenna unit and shipping restraints onto the
stiffening plate. Set aside the shipping restraints
(illustrated in Figure 2-2). Remove the antenna
unit from the stiffening plate. The shipping
restraints, nuts, lock washers, and flat washers
will be used later to complete the installation.
Rotating Plate
Shipping Restraint
The six 1⁄4-20 x 3⁄4" pan head screws
are for shipping only, and are not
used as part of the installation
hardware. Retain them for future
shipping needs.
Figure 2-2
TracVision Cruiser Shipping
Restraints (Top View)
Forward Shipping
Restraint for
LNB Bracket
Rotating Plate
Shipping Restraint
54-0144 Rev. C
2-3
A Guide to TracVision Cruiser
4. Position the stiffening plate in the desired
location on the centerline of the vessel. The
dimensions of the stiffening plate are illustrated
in Figure 2-3.
21.11"
Figure 2-3
Stiffening Plate Dimensions
4.73"
4.0"
19.277"
26"
24.0"
1.565"
1.18"
Figure 2-4
Orientation of the Antenna Unit
and Stiffening Plate
5. Note that the cables exit the antenna unit at the
wide end of the stiffening plate. The proper
orientation is illustrated in Figure 2-4. While the
stiffening plate is in place, mark location(s) on
the deck to permit convenient cable access to the
liquid-tight fittings on the back of the baseplate.
6. Using the stiffening plate as a template, lay
out the locations of the six mounting holes (also
pictured in Figure 2-4). Drill six 3⁄8" (10mm)
mounting holes in the installation surface.
Apply a bead of silicone sealant around each
hole.
7. Drill cable access hole(s) in the vessel as needed.
2-4
Installation
8. There are eight possible drain hole locations in
the baseplate, as illustrated in Figure 2-5. Drill
out ONLY those drain holes that will be facing aft
when the unit is mounted. The drain holes should
be 3⁄16" and angled as shown in Figure 2-5.
Figure 2-5
Recommended Drain
Hole Locations
Recommended
3/16˝ Drain Hole
Positions
You MUST drill out the drain holes
as indicated to ensure that any
moisture that enters the baseplate
is able to drain. Drill ONLY those
drain holes that will be facing aft
when the antenna is installed.
Drain Hole Angle
(relative to baseplate)
9. Position the stiffening plate over the drilled
mounting holes, and place a bead of silicone
sealant around each of the six mounting holes
on the top surface of the stiffening plate.
10. Place the antenna unit on top of the stiffening
plate, making sure all holes are aligned.
11. The forward shipping restraint can be easily
stored in the baseplate. Place the forward
shipping restraint in reversed position over the
two forward holes (Figure 2-6) and secure it to
the baseplate and the stiffening plate with the
hardware described in Steps 12 and 13.
LNB
Installation Bolts and Washers
54-0144 Rev. C
Forward Shipping Restraint
Figure 2-6
Forward Shipping Restraint
(Arranged for Storage)
DO NOT store the rotating plate
shipping restraints in the antenna
baseplate as they will interfere with
the rotating plate’s motion.
2-5
A Guide to TracVision Cruiser
12. For each hole, place a 1⁄4" flat washer on a
3" 1⁄4-20 bolt (from the kit pack) and place it into
the mounting hole from above.
13. Apply a flat washer, lock washer, and nut (the
ones removed in step 3) to each mounting bolt
from below decks and tighten securely. The
correct mounting arrangement is illustrated in
Figure 2-7.
Figure 2-7
Bolting TracVision Cruiser
to the Deck (Side View)
Bolt
TracVision Cruiser
Baseplate
Flat Washer
Silicone
Stiffening Plate
Silicone
Deck
Flat Washer
Lock Washer
Hex Nut
2.4
Connecting the Antenna Unit
The following sections provide instructions for properly wiring
the Antenna Unit to the IRD and to vessel power.
Figure 2-8
Proper Wire-to-Terminal
Connection
Terminal Connector
• After attaching the power and data cables to the
appropriate terminal connector strips, tug gently
to ensure a firm connection.
Insulation
1/4˝
2-6
Tips for Safe and Successful Wiring within
the TracVision Cruiser Baseplate
• When attaching cables to the TracVision Cruiser
terminal connector strips, make sure the
insulation is stripped back approximately 1⁄4˝.
Twist the wires gently to help achieve a good
connection. Do not pinch insulation inside the
connector.
Installation
• After attaching cables within the TracVision
Cruiser baseplate, eliminate any unnecessary
slack in the cables before tightening the liquidtight fittings.
• Run the RF signal cable into the baseplate last. It
will help keep the power and data cables clear
of the antenna and LNB.
• After hooking up all of the wiring and removing
any slack, slowly rotate the antenna reflector
while raising and lowering it to make certain
that the cables are all clear of any moving
elements.
DO NOT leave an extra length of
cable within the baseplate as a
service loop. All service loops
should be stored within the vessel’s
cable access.
Figure 2-9
Moving the Antenna Reflector
• Check to be certain that the elevation axis
actuator motor shaft (pictured in Section 5,
Maintenance, Figure 5-2) clears all cable
connections.
• Completely seal cable access holes on the deck.
TracVision Cruiser Cable Ports
On one side of the baseplate are four liquid-tight fittings,
which serve the dual purpose of relieving strain on the cables
as well as providing a tight seal around the cable access ports.
Figure 2-10
Cable Port Assignments
(Exterior of Baseplate)
RF1
(#1)
RF2
(#2)
Data
(#3)
Power
(#4)
When wiring is done properly, the sets of cables will overlap
each other, with the RF cable(s) on top of the power and data
cables as pictured in Figure 2-11. This will help ensure that all
cables stay clear of moving elements within the antenna unit.
Data
Power
54-0144 Rev. C
RF
Figure 2-11
Cable Overlap within the
TracVision Cruiser Baseplate
2-7
A Guide to TracVision Cruiser
2.4.1 Connecting the Antenna Data Cable
to the IRD
Figure 2-12
Proper Terminal Strip Wiring
Arrangement – Data Cable
Shield
1
Grnd
Red
2
+12v DC
Black
3
Grnd
Brown/White
4
RTN
Orange/White
5
PC_RXD
White/Orange
6
PC_TXD
Green/White
7
RTN
White/Blue
8
IRD_RXD
Blue/White
9
IRD_TXD
Shield
10
Grnd
Figure 2-13
Examples of DIRECTV
IRD Connectors
TracVision Cruiser will not function properly unless you
connect the data cable, the procedures for which vary based on
your selected satellite TV service. The end of the data cable
fitted with two DB9 connectors remains within the vessel. This
will be hooked up to the IRD as discussed later. For your
reference, DB9 pin assignments and wiring identification
information has been provided in Appendix C. The other end
will be attached to the TracVision Cruiser as described in the
following section.
TracVision Cruiser Data Cable Wiring Process
1. Feed the cable up to the deck and through the
third liquid-tight fitting (#3) from the left as
pictured in Figure 2-10.
2. Refer to Figure 2-12 for the proper arrangement
of data cable wires within the terminal strip.
3. After connecting the data cable to the
TracVision Cruiser, hook up the other end to the
IRD as described in the next subsections.
DIRECTV
The data cable for TracVision Cruiser is equipped with a male
DB9 (low-speed data port) connector. Connect the DB9
connector on the data cable to the low-speed data port on the
back of the IRD. Examples of several common DIRECTV IRDs
are provided to illustrate various locations of the female DB9
port and other IRD connectors.
Early RCA IRD
CH3
CH4
In from ANT
Satellite In
Video
Out to TV
R
Audio L
Low-speed Data Port
S Video
New RCA IRD
Out to
TV
Satellite In
In from
ANT
All IRDs are susceptible to AC
power fluctuations that can result in
the IRD locking up and requiring a
reset. Refer to Section 4.2, “IRD
Troubleshooting,” for a solution to
this issue.
2-8
Low-speed Data Port
CH3
CH4
Sony IRD
VHF/UHF
Satellite In
CH3
CH4
Low-speed Data Port
IN
VHF(SAT)/UHF
OUT
Installation
Wiring to an IRD with a DB15 Connector
Should the IRD only be equipped with a DB15 connector,
contact KVH for an adapter or follow the alternate wiring
directions provided in Appendix C.
DISH Network
Unlike the DIRECTV IRDs, the EchoStar IRD used with
the DISH Network is not equipped with a DB9 connector.
As a result, you will need to purchase an EchoStar Adapter
(KVH Part Number 02-0899).
The rear of the DISH Network IRD has a port labeled “High
Speed Data Port.”
This port is static-sensitive, so
observe the proper precautions.
Before starting to install the
adapter, make certain that the IRD
is not plugged into an AC outlet.
1. Remove the protective metal plate to expose the
High Speed Data Port. (Save the screws and
plate in the IRD packing material in case the
unit must be returned for repairs.)
2. Install the KVH EchoStar Adapter as shown in
Figure 2-14. Secure the Adapter to the IRD using
the captive screws in the Adapter.
3. Connect the DB9 connector on the data cable to
the EchoStar Adapter DB9.
Figure 2-14
EchoStar Adapter Installation
h
Hig
rt
Po
ta
Da
ed
e
Sp
®
R
STA
HO ter
ECAdap
Commissioning the IRD
Please refer to the user manual that accompanied your IRD for
instructions on properly commissioning the system.
54-0144 Rev. C
2-9
A Guide to TracVision Cruiser
EchoStar Commissioning Issues
EchoStar IRDs that have not been commissioned within
several months of manufacture require several additional
commissioning steps. Please refer to Appendix D for a detailed
description of the process.
DO NOT leave an extra length of
cable within the baseplate as a
service loop. All service loops
should be kept inside the vessel’s
cable access.
Figure 2-15
Proper Wire-to-Terminal
Connection
Terminal Connector
Tips for Safe and Successful Wiring within
the TracVision Cruiser Baseplate
• When attaching cables to the TracVision Cruiser
terminal connector strips, make sure the
insulation is stripped back approximately 1⁄4˝.
Twist the wires gently to help achieve a good
connection. Do not pinch insulation inside the
connector.
• After attaching the power and data cables to the
appropriate terminal connector strips, tug gently
to ensure a firm connection.
• After attaching cables within the TracVision
Cruiser baseplate, eliminate any unnecessary
slack in the cables before tightening the liquidtight fittings.
Insulation
1/4˝
Figure 2-16
Proper Terminal Strip Wiring
Arrangement – Power Cable
Shield
1
Grnd
Red
2
+12v DC
Black
3
Grnd
Brown/White
4
RTN
Orange/White
5
PC_RXD
White/Orange
6
PC_TXD
Green/White
7
RTN
White/Blue
8
IRD_RXD
Blue/White
9
IRD_TXD
Shield
10
Grnd
2-10
2.4.2 Connecting the Antenna to
Vessel Power
TracVision Cruiser must be connected to a +12 volt DC,
5 amp power supply to operate. The supplied power cable
should be run up to the antenna unit, through the far right
liquid-tight fitting (#4 – refer to Figure 2-10), and wired
to the terminal connector strip as illustrated in Figure 2-16.
TracVision Cruiser comes equipped with a KVH standard
60-foot power cable, a rocker switch, and a switch panel.
Power cables of other lengths are also available through
KVH distributors.
Figure 2-17 on the following page illustrates the internal
wiring arrangement for TracVision Cruiser within the vessel,
including the supplied rocker switch. When wiring the rocker
switch, it is recommended that the shield wire from the
TracVision Cruiser be connected to the shield from vessel
power.
Installation
Figure 2-17
Wiring TracVision Cruiser
to Vessel Power
Rocker
Switch
+12v DC
+12v DC
+12v DC
Ground
Ground
yyyy
;;;;
;;;;
yyyy
;;;;yyyy
yyyy
;;;;
Shield
Splice
Shield
When wiring the rocker switch, it is
recommended that the shield wire
from the TracVision Cruiser be
connected to the shield from vessel
power.
2.4.3 Connecting the Antenna RF Signal
Cable to the IRD
The RF signal cable is fitted with an F-type connector at only
one end and should be attached to TracVision Cruiser and the
IRD as follows:
1. Feed the bare end of the RF signal cable
through the #2 liquid-tight fitting (refer to
Figure 2-10) at the back of the TracVision Cruiser
baseplate and away from the dome, leaving the
F-connector inside the TracVision Cruiser
baseplate (as pictured in Figure 2-18).
To Vessel
Entry Port for
RF2 Connector
Figure 2-18
Connecting the RF Cable to
TracVision Cruiser
RF2
54-0144 Rev. C
2-11
A Guide to TracVision Cruiser
2. For single IRD installation, connect the RF signal
cable’s F-connector to the plug labeled RF2.
3. Feed the bare end of the RF signal cable and
pass through the cable hole drilled earlier and
into the vessel.
4. Attach the provided F-connector to the end of
the RF signal cable inside the vessel as
illustrated in Figure 2-19a-d, using an Augat
Snap ‘n Seal Crimp/Strip tool to lock the
connector on the cable.
Figure 2-19a-d
Attaching the Provided
F-connector to an RF Cable
A. Slide compression fitting onto raw cable
before beginning connector termination.
B. Twist and break off connector body.
Twist
KVH has provided an F-connector
for use with the TracVision Cruiser.
This connector specifically requires
the Augat Snap ‘n Seal Crimp/Strip
Tool, part number IT1000.
If you do not have this tool, you will
need to purchase a silicone-filled,
weatherproof F-connector (Radio
Shack Part Number 278-236 or
equivalent) to use instead.
C. Use Augat tool to strip center conductor to
and trim back overall jacket. Do not cut
through braid.
0.25
0.25
D. Slide connector body onto the prepared
cable. Slide the compression fitting up into
the connector body. Use Augat tool to snap
on the connector.
5. Attach the cable to the IRD connector labeled
SATELLITE IN.
2-12
Installation
Multiswitch Installation
For multiple IRD/TV installations, an active multiswitch
(Channel Master model 6214IFD or equivalent) is placed
between the Antenna Unit and the IRDs. Figures 2-20 and 2-21
illustrate typical wiring arrangements for multiple IRD and
multiple multiswitches, respectively. Mount the multiswitch
unit in accordance with the manufacturer’s instruction sheet.
1. Connect the RF cable tagged “RF2” to the
multiswitch input labeled “LNB LHCP +18V”.
2. Connect a second RF cable to the multiswitch
input labeled “LNB RHCP +13V”.
3. Connect the multiswitch outputs to individual
IRD inputs. Use RG-6 or RG-11 cable terminated
with F-type connectors for all RF connections.
4. Terminate all unused output connectors with
75 ohm DC blocks (Channel Master #7184,
Radio Shack #15-1259 or equivalent).
TracVision Cruiser
Data Cable Connector
TracVision Cruiser RF Connectors
RG-6 or RG-11 (75 ohms) cable
or better is required for RF wiring.
Use of non-RG-6 or non-RG-11
(75 ohms) cables will result in
degraded performance and void
the warranty.
Figure 2-20
Connecting TracVision Cruiser to
Multiple IRDs
RF1
RF2
DC Power
DC In
RHCP
+13v
VHF/UHF
LHCP
+18v
Multiswitch
Out 1
IRD #1
54-0144 Rev. C
Out 2
IRD #2
Out 3
IRD #3
Out 4
IRD #4
The data cable should be attached
to the master IRD. The master IRD
must remain powered for the
secondary IRDs to function
properly.
2-13
A Guide to TracVision Cruiser
Multiple Multiswitch Installation
If there is a need for more than four IRDs, it is possible to
carry out a multiple multiswitch installation, as illustrated in
Figure 2-21.
Figure 2-21
Connecting to Multiple
Multiswitches
TracVision Cruiser RF Connectors
RF1
RF2
RF Splitters/
Power Dividers
DC Power
DC In
RHCP
+13v
Out 1
Out 2
VHF/UHF
LHCP
+18v
Multiswitch
IRD #1
IRD #2
DC Power
Out 3
IRD #3
Out 4
The long-term fix, typically done at
original system installation, is to
install an Uninterruptible Power
Supply (UPS) like those available
for use with computer systems. Be
sure to specify a UPS with
adequate available current for all
devices attached to it. (IRDs draw
approximately 200 watts each.)
2-14
RHCP
+13v
Out 1
Out 2
VHF/UHF
LHCP
+18v
Multiswitch
IRD #1
2.5
DC In
IRD #4
IRD #2
Out 3
IRD #3
Out 4
IRD #4
Connecting the IRD to
Vessel Power
IRDs are intended for use in the home where AC power is
relatively clean. Typical ship’s power may have sufficient noise,
distortion, etc., to cause the IRD to lock up and prevent the lowspeed data port from working. IRDs are also extremely
susceptible to AC power fluctuations that can occur, for example,
when switching from shore power to generator power or from
generator to generator. When power fluctuations occur, the
TracVision Cruiser will occasionally lose communication with the
IRD. KVH recommends that a UPS be installed in line with the
IRD power.
Installation
To Reset the IRD
1. Completely shut down DC power to the antenna.
2. Remove the AC source, either at the breaker or by
unplugging the IRD.
3. Wait at least 10 seconds before restoring power
first to the IRD and then to the antenna.
2.6
Checking Out the System
Power up the TracVision Cruiser system and observe messages
on your TV screen to verify proper operation. Some messages
originate in the IRD, others are generated in the TracVision
Cruiser circuits. Be sure that both the Antenna Unit and the
IRD are turned on. Depending on the satellite TV service and
IRD, the system may display several text messages on the
television screen to aid in monitoring TracVision Cruiser
performance. These messages are not displayed when the IRD
is displaying the Signal Strength Meter on the TV screen. The
messages and their meanings are described in Table 2-2.
Message
Definition
TracVision Cruiser
Displays at startup, alternating with “Software
Version” information
Software Version
Current software version
Alternates with “TracVision Cruiser”
Initializing
System initializing
Search Mode 1
Antenna Unit in Search Mode 1
Search Mode 2
Antenna Unit in Search Mode 2
Search Mode 3
Antenna Unit in Search Mode 3
Reacquisition
System is reacquiring the satellite
RF Signal Error
RF signal detector has no signal at input
AZ Motor Error
Fault detected in azimuth drive subassembly
EL Motor Error
Fault detected in elevation drive subassembly
Ant Gyro Error
Fault detected in Antenna Gyro assembly
or
Antenna Gyro failed to initialize properly
because the vessel was turning during the
60-second startup and initialization period
following power-up
Cable Unwrap
System in process of unwrapping cable
54-0144 Rev. C
The DISH Network and some
newer IRDs (e.g., the Sony A50)
give priority to internal IRD
messages rather than on-screen
messages. KVH recommends that
the maintenance port be used to
read installation-related messages
on a PC.
Table 2-2
TracVision Cruiser Operational
Messages
2-15
A Guide to TracVision Cruiser
Differences among IRD data ports may result in different
message formats, and some messages may not be displayed on
the television screen. DSS messages you may see include:
Table 2-3
DSS On-Screen Messages
Message
Definition
Searching for satellite –
please stand by
The IRD is powered up and
doesn’t detect the satellite signal.
Searching for program guide –
please stand by
The system has found the satellite,
but has been turned off for more
than approximately four hours. This
message appears for about
10 seconds.
Refer to your DSS User’s Manual for specific messages
displayed by your system.
2.7
If a need does arise to paint the
radome, only use non-metallic
paint to avoid degrading the RF
signal strength and the reception
quality.
Completing the Installation
Process
If the system has initialized properly and is functioning,
replace the radome on the baseplate (labels on the sides),
securing it with the 8 pan head screws and flat washers
removed at the start of the installation process.
As noted previously, while DIRECTV offers on-screen
messages, it is recommended that a PC be available for all
installations of both DIRECTV and DISH Network (EchoStar).
This will permit the installer to record the TracVision Cruiser
startup sequence to verify that the unit is functioning within
specified parameters. Baseline startup parameters (with optimal
ranges) have been provided in Appendix E.
2-16
Operation
3
Operation
The TracVision Cruiser system is easy to use. Antenna unit
initialization and satellite acquisition is automatic and does not
require any operator intervention.
To use the TracVision Cruiser system:
1. Turn on the IRD and the television.
2. Apply operating power to the antenna unit.
Refer to your IRD user manual for complete operating
instructions for the IRD.
To allow the TracVision Cruiser antenna gyro to initialize
properly, avoid turning the vehicle for 60 seconds after you
turn on the TracVision Cruiser antenna unit. If you do turn
during the minute following power-up, the antenna could
experience an antenna gyro failure (noted as ANT GYRO
ERROR in an on-screen message) or have trouble tracking the
satellite (noted as REACQUISITION in an on-screen message).
As part of the startup process, the
TracVision Cruiser system will
default to Channel 200, a program
directory. This is the system’s
means of verifying that it has
identified and is tracking the correct
satellite.
Once Channel 200 appears, wait at
least another 30 seconds before
changing the channel to ensure
that the system has completed its
startup routine.
To correct this error, turn off the system for at least 10 seconds
and then restart, making sure not to turn during the 60-second
startup and initialization process.
Tips to get the Best Reception with TracVision Cruiser
• A clear line of sight to the satellite helps ensure
the antenna can acquire and track the satellite.
• The antenna unit is designed to turn a full 720˚
before coming to the end of its cable. Should this
occur, the system conducts an automated cable
unwrap. This involves rotating the dish in the
opposite direction. During this process, your
transmission will be frozen for approximately
10-15 seconds while the cable unwraps and the
antenna reacquires the satellite.
54-0144 Rev. C
3-1
A Guide to TracVision Cruiser
The system carries out a number of automated steps at startup.
For reference, these steps are outlined in Table 3-1 below.
Table 3-1
TracVision Cruiser
Automated Procedures
3-2
Step
Actions
Antenna Unit Initialization
The microprocessor circuitry does a
basic self-test of the hardware and
software associated with the
antenna unit and calibrates the
antenna gyro.
IRD Identification
The microprocessor next queries
the IRD to determine whether it is a
DIRECTV or DISH Network IRD.
Based on the IRD type, the system
will then set various system
variables to ensure that the correct
satellite is found during Search
Mode.
Satellite RF Threshold
The antenna is pointed at the north,
south, east and west horizons to
determine the background noise
level and to calculate the minimum
signal level required for satellite
acquisition.
Satellite Search Modes
The system design includes three
search modes to acquire the
satellite.
Search Mode 1
The antenna makes four complete
revolutions at the saved elevation.
Reacquisition Search
(Search Mode 2)
The antenna will search in a
“window” of 6˚ around the satellite’s
last known elevation.
Search Mode 3
The antenna conducts a complete
sky search, making continuous
revolutions at steadily increasing
elevations (from 20˚ to 70˚).
Fine-tuning/Satellite Verification
When a signal is detected, the
antenna interrupts the search mode
and begins a procedure to fine-tune
the position for maximum signal
strength. When the signal peak is
found, the IRD is queried to
determine if it can decode the
peaked signal. If it is able to
decode and lock onto the signal,
then the system enters tracking.
Operation
Conical Scan Tracking
The antenna control unit generates a conical scanning function
to maintain peak signal strength to the receiver and to update
the satellite’s position. When conical scan tracking is active, the
antenna moves continually with a circular motion to sweep
across the satellite’s peak signal. The signal strength is then fed
back to the control circuits to keep coming back to the direction
of the strongest signal.
If the satellite signal is lost while the system is in conical scan
track mode, the control software imposes a 60-second time-out
delay. If the signal is not regained during that time, the
antenna reverts to the Reacquisition Search to start looking for
the satellite signal.
54-0144 Rev. C
3-3
Troubleshooting
4
Troubleshooting
The troubleshooting matrix shown in Table 4-1 identifies some
trouble symptoms, their possible causes, and references to
troubleshooting solutions.
PO
SSI
BLE
CAU
Sat
ellit
SE
e si
(AN
gna
DS
Out
l
bloc
OLU
side
k
TIO
ed (
sate
N)
S
llite
ecti
Rad
on 4
cov
ar in
e
.1.1
rag
terf
)
e zo
Veh
ere
nce
ne (
icle
Sec
(Se
turn
ctio
tion
ing
Inco
n 4.
dur
4.1.
rrec
1
i
n
2)
.3)
g st
t or
a
r tup
loos
Pas
eR
(Se
sive
F co
ctio
mul
n 4.
n
nec
tisw
Ech
1.4)
tors
itch
oSt
ar I
(
u
S
s
e
e
RD
ctio
d (S
IRD
com
n 4.
ecti
data
1.5)
m
o
n
i
ssio
p
4
o
.
1.6)
rt o
IRD
ning
r
cab
faul
(Se
ty (S
le/w
ctio
iring
n 4.
ecti
Fail
2.1)
on 4
(Se
ed I
ctio
.2.3
RD
n
)
Ant
s
4.2.
tatu
enn
2)
s ch
a gy
e
c
ro f
k
LNB
(
Sec
ault
tion
y (S
ass
emb
ecti
4.2.
on 4
4)
ly fa
.3)
ulty
(Se
ctio
n 4.
3)
SYMPTOM
No IRD status message
X
No picture on TV set
X
Intermittent picture for short intervals
X
System works at rest but not on the move
X
System will not find satellite
X
Snowy television picture
X
X
X
X
X
X
X
X
X
X
X
X
X
X
X
X
X
X
X
X
X
X
X
X
IRD locks up
4.1
Table 4-1
Troubleshooting Matrix
X
X
X
X
X
Causes and Remedies for
Common Operational Issues
There are a number of common issues that can affect the signal
reception quality or the operation of the TracVision Cruiser.
The following sections address these issues and potential
solutions.
54-0144 Rev. C
4-1
A Guide to TracVision Cruiser
4.1.1 Satellite Signal Blocked
Satellite signals can be blocked or degraded by buildings,
other vessels, or equipment on the vessel itself. Refer to
Section 2.2, “Choosing the Best Location and Getting the Best
Reception,” to make certain that the TracVision Cruiser
unit is installed in the optimal location.
4.1.2 Outside Satellite Coverage Zone
TracVision Cruiser will provide outstanding reception
throughout the entire coverage area for your satellite television
service of choice. However, signal quality can be degraded as
you approach the fringe coverage areas (e.g., off the coast of
Northern Maine). Refer to your satellite television service
manual to check the viable coverage area.
4.1.3 Radar Interference
The energy levels radiated by radar units can overload the
antenna front-end circuits. Refer to Section 2.2, “Choosing the Best
Location and Getting the Best Reception,” to make certain that the
TracVision Cruiser unit is in the optimal location with regard to
your radar unit.
4.1.4 Vessel Turning During Startup
At times, an on-screen message may display ANT GYRO
ERROR (antenna gyro error) while the system has trouble
finding the satellite and tracking performance is reduced.
On-screen messages are not
available with DISH Network IRD
and some newer DIRECTV IRDs
(e.g., the Sony A50).
4-2
The most common cause of this error is the vessel turning
during the 60-second startup and initialization sequence that
occurs immediately after turning on the power to the
TracVision Cruiser unit. If the vessel is turning, the antenna
gyro records that variable motion as “standing still” which
causes the antenna to track improperly. To solve this problem,
turn TracVision Cruiser off for at least 10 seconds. Turn the
system back on, making certain that the vessel is either
motionless or travelling in a straight line for the 60 seconds
immediately following power-up.
Troubleshooting
4.1.5 Incorrect or Loose RF Connectors
As part of preventive maintenance (described in Section 5,
“Maintenance,”) KVH recommends checking the Antenna Unit
cable connections. A loose RF connector can reduce the signal
quality. Refer to Section 2.4.3, “Connecting the Antenna RF Signal
Cable to the IRD” for directions on proper Antenna Unit to
RF cabling.
4.1.6 Passive Multiswitch Used
An active multiswitch must always be used to connect
the TracVision Cruiser system to multiple IRDs. Refer to
Section 2.4.3, “Connecting the Antenna RF Signal Cable to the
IRD” for directions on proper multiswitch/multiple IRD
cabling.
4.2
Baseline RF levels are included as
part of the startup sequence
provided in Appendix E.
IRD Troubleshooting
The IRD that was provided with your satellite television
service may also be the cause of less-than-ideal operation.
4.2.1 EchoStar IRD Commissioning
If you have purchased a DISH Network system, there is a
chance that your EchoStar IRD will fail to acquire the satellite
when you first activate it. This has been known to happen in
IRDs that have not been commissioned within several months
of their manufacture. Appendix D provides the manual satellite
acquisition and commissioning procedure.
4.2.2 IRD Data Port or Cable/Wiring
Refer to Section 2.4.1, “Connecting the Antenna Data Cable to the
IRD” and your IRD user manual to confirm that the IRD is
properly connected to the Antenna Unit and the television.
4.2.3 IRD Faulty
In the case of a faulty IRD, refer to your IRD user manual for
service, replacement, and warranty information.
54-0144 Rev. C
4-3
KVH TracVision Cruiser
4.2.4 Failed IRD Status Check
As detailed in Appendix E, TracVision Cruiser completes a
detailed startup routine whenever it is turned on. One of
the first checks is the IRD status test. As noted in the typical
startup cycles, the expectation is that the IRD and its
communications link to TracVision Cruiser will pass this test.
There are, however, two alternate results, each indicating a
slightly different problem.
Test Result: NONE
If the system tests achieves a result of NONE, there is no
communication at all between the antenna unit and the IRD.
Solution
Check to be certain the IRD and TracVision Cruiser are
both connected properly at the low-speed data port. Refer to
Section 2.4, “Connecting the Antenna Unit,” for correct Antenna
Unit to IRD wiring procedures and diagrams. After verifying
the connection, cycle the power on and off and review the
startup test results.
This may also be caused if the high-speed data port on an
EchoStar IRD is not enabled. See Appendix D for instructions on
enabling the EchoStar high-speed data port.
Test Result: UNKNOWN
In the instance of a result of UNKNOWN, a communications
link exists, but the data received by the antenna unit is garbled
and unrecognizable.
Solution
As with a result of NONE, first check to be certain the IRD and
TracVision Cruiser are connected properly at the low-speed
data port. Refer to Section 2.4, “Connecting the Antenna Unit,”
for correct Antenna Unit to IRD wiring procedures and
diagrams. After verifying the connection, cycle the power on
and off and review the startup test results. If this does not
initially succeed, refer to Section 2.5, “Connecting the IRD to
Vessel Power” and follow the IRD reset procedure.
4-4
Troubleshooting
4.3
Antenna Gyro and LNB Faults
Section 5, “Maintenance,” provides detailed instructions for
authorized service personnel who may be required to replace
the TracVision Cruiser antenna gyro or the LNB.
4.4
Computer Diagnostics
TracVision Cruiser has been designed to provide diagnostic
readouts viewed on the TV screen (DSS only) or on a personal
computer having an RS-232 serial communication port. If you
are unable to isolate a system problem with the foregoing
troubleshooting tools, set up for computer diagnostics as
described below. System problems will most likely be found
somewhere through the diagnostic readouts.
The diagnostics procedure requires terminal emulation
software such as PROCOMM, Windows Terminal, or
Windows 95 Hyperterminal. Use the settings appropriate to
your application.
1. Connect one end of the PC cable to the female
DB9 connector on the end of the data cable.
Connect the other end to the serial port on the
PC (a 9-pin/25-pin connector adapter may be
needed for some PCs.)
2. Open the terminal emulation software and
establish the following settings: 9600 baud; no
parity; 8 data bits; 1 start bit; 1 stop bit; no flow
control.
Most terminal emulation programs
have a parameter for local
character echo. Select this
parameter to see what is being
typed without any system delay.
3. Apply power to the TracVision Cruiser system
and allow the system to complete full
initialization. Data should be scrolling on the PC
display to identify any system problems
detected. If no data is seen, recheck your
connections and the terminal software setup.
4.5
Maintenance Port Parser
Commands
TracVision Cruiser system parser commands are detailed in
Appendix F.
54-0144 Rev. C
4-5
Maintenance
5
Maintenance
5.1
Warranty/Service Information
KVH Industries, Inc. warrants the KVH product purchased
against defects in materials for a period of TWO (2) years and
against labor costs for a period of ONE (1) year from the date
of original retail purchase by the original purchaser. It is the
customer’s responsibility to verify the date of purchase by
returning the warranty card included with the product to KVH
within 30 days of purchase, or by providing a copy of a dated
sales receipt for the KVH product under warranty with the
warranty claim. If this date cannot be verified, the warranty
period will begin 30 days after the date of manufacture of the
original product purchased.
The serial number of your
TracVision Cruiser will be required
during any troubleshooting or
service calls. You will find the
serial number on the inside front
cover of this manual as well as in
front of the antenna reflector on
the rotating plate.
For additional information on KVH warranty, repair, and
liability policies, please refer to the complete warranty
statement provided at the conclusion of this manual.
5.2
Preventive Maintenance
TracVision Cruiser requires minimal preventive maintenance.
The following tasks are sufficient to maintain peak
performance.
Monthly
• Wash the exterior of the radome and baseplate
assembly with fresh water; a mild detergent
may be added to remove grime and salt. Do not
spray the radome directly with high-pressure
water.
• Do not apply abrasive cleaners or volatile
solvents such as acetone to the ABS radome.
54-0144 Rev. C
5-1
A Guide to TracVision Cruiser
Annually
• Remove the radome and examine the interior of
the Antenna Unit for signs of corrosion, loose
connections, or frayed or broken wires.
• Clean and wax the radome.
• Visually inspect the elevation drive shaft
(pictured in Figure 5-2) to be certain that it
moves easily and is clear of grit and debris.
Clean and lubricate as required.
5.3
Replaceable Parts
TracVision Cruiser has been designed with durability and low
maintenance in mind. If you experience an operating problem
or otherwise require technical assistance, contact your local
authorized TracVision Cruiser dealer/installer first. Have the
Antenna Unit serial number ready with a list of the trouble
symptoms. If an authorized dealer/installer is not located
nearby, contact the factory directly at the telephone, facsimile,
or e-mail listings inside the front cover.
Replacement part numbers for units that can be serviced in the
field are listed in Table 5-1.
Table 5-1
Field Replaceable Units
Should the fuse ever need to be
replaced, TracVision Cruiser uses
a 5x20mm, 4-amp, 250-volt fastblow fuse.
FRU
Part Number
Baseplate Assembly
02-0952
Radome Assembly
02-0953
Power Cable
32-0590-60
Data Cable
32-0591-60
EchoStar Adapter Unit *
02-0899
CPU PCB
02-0954
RF PCB
02-0826
Antenna Gyro
02-0978
System Fuse
16-0017-4000
LNB
19-0056
* Optional, purchased separately
5-2
Maintenance
5.4
Field Replaceable Unit
Procedures
The following subsections provide detailed procedures for
repairing or swapping out field replaceable units. The
procedures refer to labeled items presented on the following
isometric diagrams, which are based on KVH assembly
drawings.
Figure 5-1
Antenna, PCB, and Rotating Plate
60
21
33
2
1
11
Figure 5-2
Close-up of Linear Actuator,
Pivot Bracket, and Pin
54-0144 Rev. C
5-3
A Guide to TracVision Cruiser
Figure 5-3
Antenna Assembly
52
53
58
57
23
19
16
17
Orient LNB this way
Figure 5-4
Close-up of RF Detector,
PCB, and Cover
11
2
33
21
59
From Antenna Gyro
30
Apply clamp directly behind
ferrite as shown
5-4
1
Maintenance
5.4.1 PCB Removal and Replacement
Estimated Time to Repair: 1⁄2 hour
The microprocessor PCB assembly (Item 1) is protected by
a cover (Item 21) fastened to the rotating plate (Item 11) –
Fig. 5-1. The cover must be removed to gain access to the
main power fuse and the PCB assembly.
1. Remove quick release pin (Item 14) from
actuator pivot bracket (Item 8) – Fig. 5-2.
2. Remove shaft from linear actuator (Item 7) –
Fig. 5-2.
When carrying out maintenance
on the PCB, be sure to not drop
any of the small screws inside the
mechanism. If a screw is lost within
the baseplate, it must be retrieved
to avoid causing any damage when
the unit rotates.
3. Remove 16 pan head screws (Item 60) from the
cover flanges. Remove PCB cover – Fig. 5-1.
4. Remove cable connectors from PCB.
5. The PCB is mounted to the rotating plate with
10 pan head screws. Figure 5-5 illustrates the
PCB arrangement and connector locations.
To
IRD
Figure 5-5
PCB Connector Locations –
Rear View (not to scale)
From
LNB
Pan Head Screws
J3
Fuse
J11 J9
J4
J3
J5
J2
J1
TracVision Cruiser is equipped with
a 5x220 mm, 4-amp, 250 volt fastblow fuse, which is mounted on the
PCB. To access and replace the
fuse, remove the PCB cover.
6. Reverse this process to install the replacement
PCB. Reinstall all cable connectors removed in
Step 4.
7. Carry out all calibration procedures for the
antenna gyro and the LNB (Sections 5.4.3-5.4.4).
54-0144 Rev. C
5-5
A Guide to TracVision Cruiser
5.4.2 RF Detector
Estimated Time to Repair: 1⁄2 hour
The RF Detector PCB (Item 2) receives operating voltages from
both the CPU board and the IRD (via the RF cable) – Fig. 5-1.
Ensure that all power is turned off before proceeding.
1. Remove 2 RF connectors from the coaxial
fittings on the PCB. Tag the cables to ensure that
they are returned to the same connectors.
2. Remove the Molex connector from J3 – Fig. 5-5.
3. Remove 3 pan head screws (Item 33) – Fig. 5-4.
Remove the RF Detector PCB from the rotating
plate.
4. Installation of the replacement RF Detector is the
reverse of this procedure. Be sure that the RF
cables are restored to their original positions. Be
sure that the center conductor pin is centered in
the connector before tightening the collar.
5.4.3 Antenna Gyro Assembly
Estimated Time to Repair: 1 hour
Following the removal and
replacement of the antenna gyro
assembly, it will be necessary to
calibrate the gyro and restart
the system.
The antenna gyro assembly (Item 16) is mounted on the rear of
the antenna reflector bracket (Item 17) with four locking nuts
and washers (Items 52 and 53) – Fig. 5-3. Following the
removal and replacement of the antenna gyro assembly, it will
be necessary to calibrate the gyro and restart the system. A
digital level will be required for the calibration procedure.
Directions for removal, replacement, and calibration follow:
1. Remove quick release pin (Item 14) from
actuator pivot bracket (Item 8) – Fig. 5-2.
2. Remove shaft from linear actuator (Item 7) –
Fig. 5-2.
3. Remove 16 pan head screws (Item 60) from the
cover flanges. Remove PCB cover – Fig. 5-1.
4. Remove the screw and clamp (Items 59 and 30)
holding the cable to the rotating plate; save the
cable clamp for reuse – Fig. 5-4.
5-6
Maintenance
5. Remove the Molex connector from J11 on the
CPU board – Fig. 5-5.
6. Remove the 4 locking nuts and flat washers and
take unit off of the bracket.
7. Replacement is the reverse of this procedure.
Antenna Gyro Calibration
1. Connect a PC to the communications port as
described in Section 4.4, “Computer Diagnostics.”
2. Type HALT<cr> while the system is performing
the limit switch initialization routine. The
system will complete the initialization function
by finding the azimuth and elevation switch
limits and then go to the home position.
3. Type DEBUGON<cr> to enter Debug Mode.
4. Type EL,300<cr>.
5. Place the digital level on the top of the antenna
gyro housing. Measure and record the Antenna
Gyro Angle using the digital level.
6. Type =CALUP,XX.X<cr>, where XX.X is the
digital level reading obtained in Step 5.
7. Type TRKANG<cr> and observe the following
message on the PC screen:
AZ xxx.xx
EL yy.yy
8. Verify that the elevation (yy.yy) is within 0.5˚ of
the value entered in Step 6 + 15˚ (e.g., the digital
level reading was 12˚; the elevation value should
be in the range of 26.5˚-27.5˚).
9. Type =CALAZ<cr>. Verify that the Antenna
Gyro Azimuth scale factor is between -0.00090
and -0.00110.
10. Type =CALEL<cr>. Verify that the Antenna
Gyro Elevation scale factor is between 0.00090
and 0.00110.
11. Type ZAP to restart/reinitialize the system.
54-0144 Rev. C
5-7
A Guide to TracVision Cruiser
5.4.4 Antenna LNB Replacement
Estimated Time to Repair: 1⁄2 hour
The LNB (Item 19) receives preamplifier operating power from
the IRD via the RF Detector PCB – Fig. 5-3. Be certain that the
IRD is disconnected from its power source before removing or
reconnecting the LNB.
1. Disconnect and label both RF coaxial connectors
at the LNB. Remove 4 pan head screws and
washers (Items 57 and 58) – Fig. 5-3.
2. Remove LNB clamp (Item 23) – Fig. 5-3.
3. Remove LNB.
When replacing the LNB, make
certain to restore it to its original
orientation, as shown in Figure 5-3.
4. Replacement is the reverse of this procedure.
Check the rotation to ensure that the LNB is not
striking any wires or the baseplate.
Antenna LNB Normalization and Stability Test
1. Type HALT<cr> to put the system into Idle
Mode.
2. Type DEBUGON<cr> to put the system into
Debug Mode.
3. Use the PC 2, 4, 6, and 8 keys along with the
Signal Strength Display Meter on the TV screen
to peak the RF Signal.
4. Type =CALLNB<cr> to start the LNB
Normalization Function.
Note: The CALLNB Function requires the
antenna to be pointed directly at the satellite
peak before performing this routine.
5. The system must respond with the following
message: CALLNB: PASS. If the system
displays CALLNB: FAIL, return to step 1 and
retry the procedure, making sure to achieve the
highest possible RF signal peak.
6. Record the Cold Sky Average and the RFGAIN
value reported in step 5.
7. Type ZAP<cr>. The system will re-initialize
using the new RFGAIN and RFOFFSET scale
factors displayed following step 5.
5-8
Maintenance
8. Wait for the system to perform the background
noise calculation. Read the Average Noise Level
value from the messages transmitted out the
maintenance port. This value must be greater
than 300 and less than 1300. An example of the
message sequence and format is as follows:
*** Averaging Background Noise ***
Average Noise Level = 750
Noise Threshold = 1450
9. Wait for the system to search for, find the
satellite, enter Tracking Mode and track the
satellite for a minimum of 30 seconds. Record
the average RF signal value reported from the
+POS: AZ, EL, RF messages. An example of the
message sequence and format is as follows:
+POS: 154.5 33.2 2521
10. The RF signal values while tracking shall be
greater than 2000 and less than 3000.
5.4.5 EchoStar Adapter Replacement
Estimated Time to Repair: 1⁄2 hour
Use the following procedure to replace the EchoStar Adapter:
1. Remove power from Antenna and unplug IRD
from AC power.
2. Observe static precautions.
3. Unscrew and remove DB9 cable connector from
the Adapter.
4. Unscrew thumbscrews securing Adapter to IRD.
5. Carefully remove Adapter from IRD card edge.
6. Install new Adapter on the IRD card edge.
Secure the Adapter and reinstall cable.
54-0144 Rev. C
5-9
A Guide to TracVision Cruiser
5.5
Preparation for Shipment
Estimated Time: 1 hour
To ship the TracVision Cruiser unit, it is necessary to remove
the antenna unit from the mounting plate. Refer to Section 2.4,
“Connecting the Antenna Unit,” for details on how the antenna
baseplate is attached to the mounting plate.
When rotating the azimuth
mechanism by hand, go slowly!
Hitting the mechanical stops with
excessive force will damage the
azimuth limit switch.
If it is necessary to repack the Antenna Unit for shipment, the
shipping restraint removed during installation must be
replaced. Follow these steps to reinstall the restraint.
1. Rotate the antenna unit so that the LNB is facing
forward (away from the liquid-tight fittings).
2. Attach the three shipping restraints to the
baseplate using the 1⁄4˝-20 x 3⁄4˝ long hex screws,
washers, and nuts removed during installation
as pictured in Figure 5-6.
Figure 5-6
Attaching the Shipping Restraints
to the Antenna Baseplate
3. Place the antenna bracket on the forward
shipping restraint and secure the restraint and
bracket by wrapping three tie-wraps around the
bend in the restraint and the antenna bracket (at
the end of the LNB bracket).
Figure 5-7
Securing the Forward
Shipping Restraint
3 tie-wraps used
to secure LNB arm
Forward Shipping Restraint
5-10
Forward Shipping Restraint
Nuts and Washers
System Specifications
Appendix A
System Specifications
Physical Characteristics
Power
11-16 volts DC @ 2.5 amps
nominal, 3.5 amps peak
Dimensions/Weight
31˝ wide x 14.5˝ high/ 33 lbs
LNB
Dual Output
Tracking
Better than 30˚/sec
Maintenance Port
9600 bps, 8,N,1,EIA, RS232
Table A-1
TracVision Cruiser System
Specifications
Pointing System
Elevation Range
15˚ to 75˚
Azimuth Range
720˚
Position Repeatability
0.1˚
Environmental
Operating Temperature
-25˚C to +55˚C
Storage Temperature
-40˚C to +85˚C
Humidity
to 100 percent
54-0144 Rev. C
A-1
Functional Block Diagram
Appendix B
Functional Block Diagram
In-vessel Components
TracVision Cruiser Antenna Unit Components/Wiring
Terminal
Connectors
TV
LNB
Antenna
Sensor
Elevation Mechanism
Azimuth Mechanism
RF2
DSS or
EchoStar
IRD
RF1
RF
Detector
IRD
Elevation
Motor
PC
Maint.
CPU/Motor Driver/
Power Supply
Azimuth
Motor
Power
Power
+12v DC
Power
Switch
Elevation
Limit
Switch
Azimuth
Limit
Switch
Cable Assignments
RF2.........................RF Cable (32-0589-60)
RF1.........................Owner-provided RG-6 or RG-11 (75 ohms) cable
IRD/Maint................Data Cable (32-0591-60)
Power......................Power Cable (32-0590-60)
54-0144 Rev. C
B-1
Wiring TracVision Cruiser to a 15-pin Data Connector
Appendix C
Data Cable Wiring
C.1
Wiring TracVision Cruiser to a
15-pin Data Connector
In some instances, the IRD provided with a satellite TV service
may be equipped with a 15-pin connector (DB15 wide-band
data port), rather than a 9-pin connector (DB9 low-speed data
port). There are two methods that will allow a TracVision
Cruiser system to function through a DB15 port.
Splicing a DB15 Connector to the Data Cable
It is possible to splice a DB15 connector to the TracVision
Cruiser data cable after removing the male DB9 connector. The
alternate wiring arrangement is as follows:
DB9 Pin
Wire Color
Function
DB15 Pin
2
Blue/White
TXD
14
3
White/Blue
RXD
6
5
Green/White
GND
7
Table C-1
Alternate Wiring Arrangement for
TracVision Cruiser Data Cable to
DB15 (15-wire) Connector
Creating a DB9-to-DB15 Adapter
It is also possible to construct a DB9-to-DB15 adapter that will
remove the need to cut and splice the data cable. When
constructing such an adapter, follow the DB9-to-DB15 pin
arrangement detailed in Table C-1.
54-0144 Rev. C
C-1
A Guide to TracVision Cruiser
C.2
DB9 Data Connector
Pin Assigments
During the troubleshooting or maintenance process, it may
be necessary to check the DB9 data connectors to ensure that
it is operating properly. With that in mind, Figure C-1 and
Table C-2 detail the pin assignments for both the male and
female DB9 connectors.
Table C-2
DB9 Pin Functions
and Color Code
From Connector
Wire Color
Function
Male Connector Pin 2
Blu/Wht
DSSTXD
Male Connector Pin 3
Wht/Blu
DSSRXD
Male Connector Pin 5
Grn/Wht
DSSGND
Female Connector Socket 2
Org/Wht
PCRXD
Female Connector Socket 3
Wht/Org
PCTXD
Female Connector Socket 5
Brn/Wht
PCGND
Figure C-1
DB9 Male and Female
Connector Arrangement
Socket 1
Pin 1
Male Connector
(to IRD)
C-2
Female Connector
(to PC)
EchoStar IRD Commissioning Procedure
Appendix D
EchoStar IRD Commissioning
Procedure
If you have purchased a DISH Network system, there is a
chance that your EchoStar IRD will fail to acquire the satellite
when you first activate it. This has been known to happen in
IRDs that have not been commissioned within several months
of their manufacture. The following process is a manual
method of acquiring the satellite for the first time so that the
IRD can download the most up-to-date satellite and
programming data, allowing it to automatically acquire the
satellite from then on.
Please refer to your EchoStar IRD user manual for complete
instructions on the IRD, the remote control, and the command
screens.
It will be necessary to have a PC
available to complete the manual
acquisition and commissioning
procedure.
Manual Satellite Acquisition and IRD Commissioning
1. Turn on TV and EchoStar IRD.
2. Using EchoStar remote, press MENU.
- The Main Menu will come up on the Screen.
3. Select #6, System Setup.
4. Select #1, Installation.
5. Select #1, Point Dish/Signal.
- The Signal Strength Screen will appear.
6. Using remote, select the zip code box on the
screen, and input the local zip code.
- The screen will show you the Azimuth and
Elevation to the satellite. Write this down.
7. Connect a PC to the data port.
8. Turn on the TracVision Cruiser.
9. Type HALT <CR> after receiving the message
*** Entering Search Mode 1 ***.
54-0144 Rev. C
D-1
A Guide to TracVision Cruiser
10. Type in the elevation that you obtained in step 6.
- Type EL,xxx<CR>
(e.g., Elevation of 30.2° = EL,302<CR>)
11. Using a compass, take a bearing on an object
that is approximately on the azimuth obtained
in step 6.
12. Type in an azimuth that points the antenna in
the direction of the object selected in step 11.
- Type AZ,xxxx<CR>
(e.g., Azimuth of 233° = AZ,2330<CR>)
- Valid azimuth range is 0-360° (0000-3600)
The Signal Strength Meter is
located on the bottom of the “Point
Dish and Signal Strength” screen.
This Signal Strength Meter is Red
in color, and turns Green when the
proper satellite is located.
13. Check to see if there is signal strength on the
Signal Meter Screen.
14. Move antenna counter-clockwise in 5°
increments, until signal strength is acquired. If
you do not find satellite, point the antenna at
the object selected in step 11 and move antenna
clockwise in 5° increments until signal strength
is acquired.
15. Once satellite is found, fine tune azimuth in 1°
increments for maximum signal strength.
16. Fine tune in elevation in 1° increments for
maximum signal strength.
Turning the IRD off with the remote
puts IRD in standby mode. Turning
the IRD off from the front panel
shuts IRD off.
17. Once the satellite is found, turn the EchoStar
IRD off, using the power button on the infrared
remote. Do not turn off the IRD using the front
panel. Leave IRD in standby mode for
approximately 5 minutes. The IRD will now
download new software from the satellite.
- To verify that the IRD has been updated, put
the IRD into the Signal Strength Screen mode,
and three satellite options will appear on the
left side of the screen: 61.5° West, 119° West,
148° West. Your EchoStar IRD is now updated.
18. Turn the TracVision Cruiser off and then on. The
EchoStar IRD will now communicate with the
TracVision Cruiser system. To verify this,
monitor data port information. The following
message will appear.
*** Initializing IRD ***
IRD STATUS: PASS ECHO
D-2
Startup Data Sequence
Appendix E
Startup Data Sequence
The data on the following pages presents the standard startup
data sequence registered by the TracVision Cruiser when using
DIRECTV or EchoStar IRDs. This sequence can be recorded
using the data port and a PC.
54-0144 Rev. C
E-1
A Guide to TracVision Cruiser
Typical Startup Sequence and Ranges: DSS (DIRECTV)
?PGM
KVH TracVision Cruiser Rev X - Version X.XX - Serial Number XXXXXXXX
Limit Switch Test
Limit Switch Status: PASS --------- Pass is expected.
*** Initializing IRD ***
IRD STATUS: PASS
DSS ------------ Indicates system recognized IRD as DSS. If NONE or UNKNOWN,
refer to Section 4.
Saved Sat Pos: EL = 24.2 --------- Shows last known elevation to satellite
*** Initializing Rate Bias ***
+A/D: 2017 2072 507
+A/D: 2023 2052 510 --------------- Typical values usually between 300-700
+A/D: 2024 2054 509
+A/D: 2039 2041 507
Gyro Bias: Az = 2033, El = 2053
RATE BIAS: PASS
------------------ Indicates Rate Bias results are within range
*** Averaging Background Noise ***
507
525
+POS: 327.7 20.0 507
Average Noise Level = 519
Noise Threshold = 1300 ------------ Typical values are between 1300-2200
+POS:
45.0
21.5
+POS: 151.3
20.0
Saved Sat Pos: EL = 24.2
*** Entering Search Mode 1 ***
+POS:
61.4
24.2
+POS:
89.3
24.2
514
502
+POS: 302.3
24.2
507
Satellite Found: AZ = -210.52, EL =
+POS: 130.0
24.2
24.20, RF = 1601
519
*** Entering Tracking *** ------- Tracking function turned over to Antenna Gyro
+POS: 145.7
24.2 1650
+POS: 145.2
23.6 1280
*** Entering Satellite Check ***
Satellite Located
+POS: 147.2
24.0 2447 ------------ Relative heading of antenna to forward
+POS: 146.9
24.1 2393 ------------ System elevation
+POS: 149.0
24.0 2340
23.7 2350 ------------ Current RF level. Should be minimum of 500 counts higher
IRD Signal Quality = 78
than reported Threshold above
+POS: 148.3
+POS: 148.0
23.3 2407
+POS: 147.8
24.4 2449
+POS: 148.7
23.2 2399
IRD Signal Quality = 82
+POS: 148.5
24.7 2402
+POS: 147.7
23.5 2406
+POS: 147.8
24.1 2352
Gyro Bias Residue: Az = 0 EL = 0 -- Determined at startup. Typical starting value lower than 20.
+POS: 148.9
24.0 2289
+POS: 146.9
24.4 2404
E-2
Startup Data Sequence
Typical Startup Sequence and Ranges: EchoStar (DISH Network)
?PGM
KVH TracVision Cruiser Rev X - Version X.XX - Serial Number XXXXXXXX
Limit Switch Test
Limit Switch Status: PASS ---------- Pass is expected.
*** Initializing IRD ***
IRD STATUS: PASS
ECHO ------------ Indicates system recognized IRD as EchoStar. If NONE or
UNKNOWN, refer to Section 4.
Saved Sat Pos: EL = 24.2 ---------- Shows last known elevation to satellite
*** Initializing Rate Bias ***
+A/D: 2017 2072 507
+A/D: 2023 2052 510 ---------------- Typical values usually between 300-700
+A/D: 2024 2054 509
+A/D: 2039 2041 507
Gyro Bias: Az = 2033, El = 2053
RATE BIAS: PASS
------------------- Indicates Rate Bias results are within range
*** Averaging Background Noise ***
507
525
+POS: 327.7 20.0 507
Average Noise Level = 519
Noise Threshold = 1300 ------------- Typical values are between 1300-2200
+POS:
45.0
21.5
+POS: 151.3
20.0
Saved Sat Pos: EL = 24.2
*** Entering Search Mode 1 ***
+POS:
61.4
24.2
+POS:
89.3
24.2
514
502
+POS: 302.3
24.2
507
Satellite Found: AZ = -210.52, EL =
+POS: 130.0
24.2
24.20, RF = 1601
519
*** Entering Tracking *** --------- Tracking function turned over to Antenna Gyro
+POS: 145.7
24.2 1650
+POS: 145.2
23.6 1280
*** Entering Satellite Check ***
Satellite Located
+POS: 147.2
24.0 2447 ------------- Relative heading of antenna to forward
+POS: 146.9
24.1 2393 ------------- System elevation
+POS: 149.0
24.0 2340
23.7 2350 ------------- Current RF level. Should be minimum of 500 counts higher
IRD Signal Quality = 78
than reported Threshold above
+POS: 148.3
+POS: 148.0
23.3 2407
+POS: 147.8
24.4 2449
+POS: 148.7
23.2 2399
IRD Signal Quality = 82
+POS: 148.5
24.7 2402
+POS: 147.7
23.5 2406
+POS: 147.8
24.1 2352
Gyro Bias Residue: Az = 0 EL = 0 -- Determined at startup. Typical starting value lower than 20.
+POS: 148.9
24.0 2289
+POS: 146.9
24.4 2404
54-0144 Rev. C
E-3
Maintenance Port Parser Commands
Appendix F
Maintenance Port Parser
Commands
TracVision Cruiser system parser commands are parsed when
the system receives an ASCII carriage return (Hex 0D). An
ASCII line feed (Hex 0A) is permitted but is ignored in any
transmitted command. All system responses are terminated
with an ASCII carriage return followed by a line feed and
ending with either an acknowledge character (ASCII > (Hex
3E)) or a not-acknowledge character (ASCII ? (Hex 3F)). The
parser commands are shown below in boldface capital letters
but they are not case-sensitive. In most cases the command is
responded to with an echo; that is, if you type ZAP, for example,
and press “ENTER.” The response will be the command you
have entered. For other commands the response is specific for
each command, such as VERSION, STATUS, or HELP.
F.1
System Commands
Software Version
Function:
reports software version
Command:
VERSION
Argument:
none
Response:
KVH TV Cruiser Version XX.XX
Table F-1
System Commands
System Status Report
Function:
reports general system status
Command:
STATUS
Argument:
none
Response:
system status string,(TBD)
Initialize the System
Function:
initializes the system (perform a soft reset)
Command:
ZAP
Argument:
none
Response:
echoes the command, then reinitializes the system
54-0144 Rev. C
F-1
A Guide to TracVision Cruiser
F.2
Manual Positioning Commands
To execute the following commands, first put the Antenna Unit
in idle mode by typing HALT and pressing “ENTER.”
Positioning commands may be entered after the antenna comes
to rest.
Table F-2
Manual Positioning Commands
Help on Parser Commands
Function:
lists parser commands
Command:
HELP
Argument:
none
Response:
print a list of all parser commands
Azimuth Angle
Function:
commands a manual azimuth angle that the
mechanism moves to
Command:
AZ,xxxx (range is 0000-3599)
Argument:
desired azimuth angle of the mechanism
relative to vessel reference, or baseplate fwd,
000˚-359.9˚(vessel-referenced)
Response:
echoes the command; mechanism moves at a fixed
velocity
Elevation Angle
Function:
commands a manual elevation angle that the
mechanism moves to
Command:
EL,xxx (range is 100-700)
Argument:
desired elevation angle of the mechanism relative
to up, or external sensor attitude reference, 10.0˚70.0˚
Response:
echoes the command; mechanism moves at a fixed
velocity
Azimuth CW Step
F-2
Function:
commands a 0.1 deg CW manual step in azimuth
angle
Command:
6
Argument:
none
Response:
echoes the command
Maintenance Port Parser Commands
Azimuth CCW Step
Function:
commands a 0.1 deg CCW manual step in azimuth
angle
Command:
4
Argument:
none
Response:
echoes the command
Elevation UP Step
Function:
commands a 0.1 deg UP manual step in elevation
angle
Command:
8
Argument:
none
Response:
echoes the command
Elevation DOWN Step
Function:
commands a 0.1 deg DOWN manual step in elevation
angle
Command:
2
Argument:
none
Response:
echoes the command
F.3
Operational Commands
Idle Mode
Function:
halts active tracking and conical scan, then enters
idle mode
Command:
HALT
Argument:
none
Response:
echoes the command
Table F-3
Operational Commands
Current Cable Wrap Angle
Function:
sets or reports current cable wrap angle, defined as
0˚ (CCW limit) to 700˚ (CW limit); the value is
expressed as 0000-7000 with an implied decimal
Command:
WRAPANGLE,xxxx
Argument:
the desired cable wrap angle setting
Response:
Wrap Angle = xxx
54-0144 Rev. C
F-3
A Guide to TracVision Cruiser
F.4
Table F-4
Tracking and Conscan Commands
Tracking and Conscan
Commands
Report Target Location
Function:
reports the target (satellite) location in the Earth frame
and uses the saved satellite position
Command:
TGTLOCATION
Argument:
none
Response:
Target Location = E XXX, A XXXX
Report RF Signal Strength
Function:
reports the modified signal strength from the RF power
detector circuit, and applies the RF gain and offset
computed during LNB calibration
Command:
SIGLEVEL
Argument:
none
Response:
Signal Strength = XXXX
Report IRD Signal Quality
Function:
reports the signal strength from the IRD; it uses the last
received signal quality and initiates a new signal quality
request command from the IRD
Command:
SIGQUALITY
Argument:
none
Response:
Stale Signal Quality = XX
Report IRD Type
F-4
Function:
reports the IRD connection type as DSS, EchoStar,
untested, or none
Command:
IRDTYPE
Argument:
none
Responses:
IRD
IRD
IRD
IRD
type
type
type
type
has not been tested yet.
is Echostar.
is DSS.
cannot be determined.
KVH Industries Limited Warranty
TracVision Cruiser
Limited Warranty on Hardware
KVH Industries, Inc. warrants the KVH product purchased against defects in materials for a period of TWO (2) years
and against labor costs for a period of ONE (1) year from the date of original retail purchase by the original purchaser.
It is the customer’s responsibility to verify the date of purchase by returning the warranty card included with the
product to KVH within 30 days of purchase, or by providing a copy of a dated sales receipt for the KVH product under
warranty with the warranty claim. If this date cannot be verified, the warranty period will begin 30 days after the date of
manufacture of the original product purchased.
If you discover a defect, KVH will, at its option, repair, replace or refund the purchase price of the product at no charge
to you, provided you return it during the warranty period, transportation charges prepaid, to the factory direct. Please
attach your name, address, telephone number, a description of the problem and a copy of the bill of sale or sales
receipt as proof of date of original retail purchase, to each product returned to warranty service. Alternatively, you may
bring the product to an Authorized KVH TracVision Dealer for repair. If the product was installed by an Authorized KVH
TracVision Dealer (identified with the KVH Authorized TracVision dealer list), KVH will cover the dealers’ labor charges
for warranty repairs, provided the dealer contacts KVH for pre-approval of the charges.
This Limited Warranty does not apply if the product has been damaged by accident, abuse, misuse or misapplication
or has been modified without the written permission of KVH; if any KVH serial number has been removed or defaced;
or if any factory-sealed part of the system has been opened without authorization.
Return Authorization
A Return Material Authorization is required prior to returning the product to KVH Industries. Please call our Technical
Support Department at (401) 847-3327 or send an e-mail to [email protected] to obtain the RMA number. Write the
number in large, clear characters on the outside of the box. To avoid confusion and misunderstandings, shipments
without an RMA number clearly visible on the outside box will be refused and returned to you at your expense. If
possible, use the original box and packing material to protect the equipment from damage in shipment. KVH assumes
no responsibility for warranty shipments from the customer to the factory if not shipped in the manner prescribed
above.
THE EXPRESS WARRANTIES SET FORTH ABOVE ARE THE ONLY WARRANTIES GIVEN BY KVH WITH
RESPECT TO ANY PRODUCT FURNISHED HEREUNDER; KVH MAKES NO OTHER WARRANTIES, EXPRESS,
IMPLIED OR ARISING BY CUSTOM OR TRADE USAGE, AND SPECIFICALLY DISCLAIMS ANY WARRANTY OF
MERCHANTABILITY OR OF FITNESS FOR A PARTICULAR PURPOSE. SAID EXPRESS WARRANTIES SHALL
NOT BE ENLARGED OR OTHERWISE AFFECTED BY TECHNICAL OR OTHER ADVICE OR SERVICE PROVIDED
BY KVH IN CONNECTION WITH ANY PRODUCT.
KVH's liability in contract, tort or otherwise arising out of or in connection with any product shall not exceed the price
paid for the product. IN NO EVENT SHALL KVH BE LIABLE FOR SPECIAL, PUNITIVE, INCIDENTAL, TORT OR
CONSEQUENTIAL DAMAGES OR LOST PROFITS OR GOODWILL (INCLUDING ANY DAMAGES RESULTING
FROM LOSS OF USE, DELAY IN DELIVERY OR OTHERWISE) ARISING OUT OF OR IN CONNECTION WITH THE
PERFORMANCE OR USE OR POSSESSION OF ANY PRODUCT, OR ANY OTHER OBLIGATIONS RELATING TO
THE PRODUCT, EVEN IF KVH HAS BEEN ADVISED OF THE POSSIBILITY OF SUCH DAMAGES.
If any implied warranty, including implied warranties of merchantability and fitness for a particular purpose, cannot be
excluded under applicable law, then such implied warranty shall be limited in duration to ONE (1) YEAR from the date
of the original retail purchase of this product by the original purchaser.
Some states do not allow the exclusion or limitation of implied warranties or liability for incidental or consequential
damages, so the above limitations may not apply to you. This warranty gives you specific legal rights, and you may
also have other rights which vary from state to state.
TV Cruiser O/M Cover 5/99
KVH Industries, Inc.
50 Enterprise Center, Middletown, RI 02842 U.S.A.
Tel: (401) 847-3327 Fax: (401) 849-0045
E-mail: [email protected] Internet: http://www.kvh.com
KVH Europe A/S
Ved Klaedebo 12, 2970 Hoersholm, Denmark
Tel: +45 45 160 180 Fax: +45 45 867 077
E-mail: [email protected] Internet: http://www.kvh.com