1
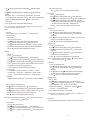
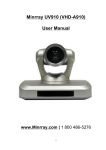
Science & Technology protect your comfort life.
User Manual
Wireless Video Door Phone
OP —D04
www.opizcn.com
OPIZ ELECTRONICS CO.,LTD.
tip
Thank you for your kindly purchasing our product.
Please carefully read this user manual before using the product and follow instructions
exactly on how to install and use the product.
Medical equipment
AT T E N T I O N
.The device may interfere with medical equipment like Cardiac Pacemaker, hearing aid, etc.
1. This user manual is guidance for using and installing Wireless Video Door Phone.
2. Our company reserves the right to change or alert product and system without prior
When answering, please keep the device at least 15cm away from Cardiac Pacemaker. If
you are afraid of interference, please turn off the device immediately, and contact the
manufacturer of the pacemaker for guidance. As to other medical equipment, please
notice.
consult the manufacturers.
3. If there's any distinction between description and real product, please subject to the real product.
4. Please follow the right process to turn off. Do not remove battery when power-on or it is
being charged, avoid any digital information loss. And install the Micro SD in right way,
avoid broken.
For children's safety
.Keep the product and all accessories out of reach of children. Small parts may cause
choking or serious injury if swallowed.
5 .Please visit www.opizcn.com for details.
6. This product with patent.OPIZ take OP-D04 all copyright and registered trademark.
Disposal battery
.Disposal battery cannot be disposed as ordinary waste. Please refer to local
SAFEGUARDS AND USAGE INTRODUCTION
Please carefully read this User Manual (in particular, precautions for safety) before
using the product and follow the instructions to use your product exactly.
On using Door Phone, Power Adapter and other accessories
.Please turn off the device where wireless video door phone using is forbidden (including
airport, gas station, hospital, etc.)
.Keep the indoor monitor and all accessories out of reach of children.
.Keep the indoor monitor away from liquid, do not place the product where is air-wet.
.Keep the indoor monitor away from fire, litten cigarette.
.Do not paint or lacquer the products.
.Do not drop, throw or bend the product.
.Do not place the product together with any magnetic things, such as magnetic disc, credit
card, and travel card. It may affect the information stored in those cards.
.Do not put the product where temperature is above 70 C.
.Do not attempt to repair this product by yourself as opening or removing covers.
.To avoid potential danger, please use the specified battery and power adapter.
.Use wet or anti-static cloth instead of dry and static cloth to clean the product. Don't clean
the product with chemical agent or stonewashed agent for these will damage the outside
part of the product.
.Never crush or squeeze LCD and camera, for they are fragile. Keep the product away from
sharp things.
.If there is any problem, please contact our tech support and customer service.
rules about the dispose of electronic products.
Usage of original accessories
.Power adapter: connect the AC power with specified power adapter. Make sure the
right place of wire. Assure it won' t be damaged. Please unplug it when cleaning the
device. Power adapter cannot be used outside or in wet condition. Do not
change its wire or plug. Please unplug the charging cable after charging, and then
disconnect the charger and AC. Do
not cut off AC during charging, or it may shut off by itself.
.Battery: First time or unused battery long time are recommended to be charged
at least 12 hours, but within 24 hours. Charge the battery under moderate
temperature ( between -5C to +45C ). Disconnect power adapter after charging.
Unused battery can reach its best efficacy after discharging and being charged for
many times. Only specifically designed power
adapter is allowed. Avoid short circuit. Never dispose battery in fire, which may
cause explosion.
According to national standard GB2188-2007, the limiting value for Specific Absorption Rate
(SAR) is 2.0W/kg for 10g random biotic tissues in random 6min. The SAR value of this
product is lower than 2.0 W/kg. SAR value will change for many factors, so it is lower
than the maximum value. Our tested SAR value is below 0.754W/kg.
Inflammable and Explosive Area
.When entering an inflammable and explosive area (gas stations), please turn off the device,
and follow the warning signs or instructions.
- 1 -
- 2 -
BEFORE USING
CONTENTS
Before using … … … … … … … … … … … … … … … … … … … … … … … … …01-02
1. Indoor Monitor
Indoor Monitor… … … … … … … … … … … … … … … … … … … … … … … …04
Outdoor Camera
… … … … … … … … … … … … … … … … … … … … … … …05
Antenna
Left
Basic operations … … … … … … … … … … … … … … … … … … … … … … …05-07
Up
Right
Function
Down
Answer
Unlock
Monitor
Menu functions descriptions… … … … … … … … … … … … … … … … … …08-11
System connecting … … … … … … … … … … … … … … … … … … … … … …12
Installation descriptions… … … … … … … … … … … … … … … … … … … … 12
Simple failure treatment… … … … … … … … … … … … … … … … … … … … 14
3.5inch TFT LCE
Power indicator
Unlock indicator
Appendix I … … … … … … … … … … … … … … … … … … … … … … … … … …14
MI C
MIC
Speaker
Front view
Appendix II… … … … … … … … … … … … … … … … … … … … … … … … … …15
Appendix III… … … … … … … … … … … … … … … … … … … … … … … … … …15
Slot
Mini USB
Speaker
ON/OFF
SD card
Lithium
battery
Bracket
Side view
Rear view
Buttons descriptions:
:In standby status, it use for entering calling other monitors status; at menu status,
it use for choose the last menu; at talking and monitor status, it use for taking video.
:At menu status, it use for choose the next menu, or cancel alarm; at talking and
monitoring status, it use for taking image
:Use for out off the menu (back to last menu) at the menu.
:Use for move to right. In talking or monitoring status ,use for switching IR.
:In standby status, press it enter to menu status. In menu status, it is as a confirm button.
In talking or monitoring status press to take photos.
: Answer the call when the visitors press the call button in outdoor camera or as the
confirmation button when you do ring.
: Unlock for the visitors in talk status, or monitoring.
: Monitor outside in standby status.
- 3 -
- 4 -
4. USB function
2. Outdoor Camera
①
②
③
④
⑤
⑥
①
②
③
Front view
④
⑤
MIC
Infrared light
Camera
Speaker
Call button
Screws
⑥
To
Power Supply
12V GND
To
E-Lock
NC COM NO
Rear view
battery
B A S I C O P E R AT I O N S
1. Power O N /OFF functions
a. When SD card inserts USB line under standby status, it will pop up the dialog box: “ U S B”,
“ POWER”.
b. U sing “
” button to select ‘POWER’, at this time USB only for charge energy, the indoor
monitor works normally.
c. When select “USB”, the indoor monitor can connect with computer. However,
it can't read SD card on the indoor monitor, and maybe the indoor monitor can't
work normally.
5. Monitor function
Step one: Under the standby status,
If only one outdoor camera: Any indoor monitor press “
” button will enter the monitor
status, blue light will on long time.
If two outdoor camera:
a. Any indoor monitor, press “
” button, enter monitor status;
b. Use “
” buttons choosing for the number of outdoor camera, “
” button to confirm, at
this, at this time the blue light will be on long time, press “
” button to return to
standby..
Step two:
If can receive the signal in five seconds, will successfully connected with outdoor camera
(It default the indoor monitor with sound, and outdoor camera without), and then
enter the normal monitor status If doesn't receive the signal in 5 seconds, then it will
exit monitor and calling status of monitor and call automatically, and return the standby.
Step three:
Under monitor status, indoor monitor with sound, but outdoor camera without. Press “
a. Press ON/OF button when the indoor monitor in off status, the screen will show “ O PIZ ”
” button to switch one way or two way talking. (Single and double talking can exchange
and create “ Di ” tones, then release the button. It is mean that the
many times). Max talking time is 90 seconds.
indoor monitor is entering into ON status.
Under the talking status, press the “
b. Press ON/OF button when the indoor monitor is on status, the screen will show
“ Goodbye” and create “ Di ” tones, then release the button. It is mean that the indoor
monitor is entering into OFF status.
” button can release the door. When opening
the door, the screen of indoor monitor will show the opening.
Under the monitor status, press the “
” button can end the monitor and return standby.
After 90 seconds, end the communication, then enter to standby.
c. The outdoor camera have powered, you can judge the outdoor camera according to the
“ Di ” tone. Like one “ Di ” tone mean that this camera is the first camera, two “ Di ”
mean the outdoor camera is the second outdoor camera.
2. ID No. display of the indoor monitor
a. When the indoor monitor is entering into ON status, the screen shows “1”, it is mean
that this is the No.1 indoor monitor.
b. When the indoor monitor is entering into ON status, the screen shows “2”, it is mean
that this is the No.2 indoor monitor.
c. When the indoor monitor is entering into ON status, the screen shows “3”, it is mean
that this is the No.3 indoor monitor.
3. Indoor monitor standby
The indoor monitor is in standby status will showing the “ signal”, “ ID”, “ Power
symbol”,
“ Date”, “ MENU”, “ DEL”. The red light shines one time per four seconds, as the
power enough. If the power is low, the red light shines one time per one second.
As this several seconds later, the screen will enter sleeping power-saving mode.
If there is ringing record, the blue light shines one time per second. The blue light
will be off after records being blue .
- 5 -
Step four:
Under talking status, if there is SD card,
Press the “
” button, the pictures will store into the SD card;
Press the “
” button, it will run the video, press again will end the video. The video
also store in the SD card.
6.Outdoor camera call indoor monitor
Step one:
Under the standby, outdoor camera press “ CALL” button enter the call status. Outdoor
camera will ring. Indoor monitor also ring with pictures.
Step two:
a. If the indoor monitor doesn't answer in 30 seconds, it will exit calling indoor monitor.
b. If the indoor monitor receives signal from outdoor camera, the red light of indoor monitor
will be on long time, and it will have ring and pictures on screen. The nax calling is 30
seconds.
- 6 -
Step three:
a. No one answer indoor monitor in 5 seconds; it will run video function automatically,(If the
video set to manual. As call, it will video by manual.), will until limited time is up.
b. If someone answer call in 30 seconds, it will end ring and enter the talking status.
The red light of the indoor phone will be off, and the blue light will ON. And the
max talking time is 90seconds.
” button, this time is signal talking, indoor monitor with voice,
c. If press the “
but outdoor monitor without.(single voice)
” button , both outdoor camera and indoor monitor have voice.(twod. If press “
ways voice);
Step four:
Press “
” button to unlock. If successful open, screen will show a lock open, and
then enter in standby status
Step five:
when under double talking status .Press “
”button to hang up, and there will be a sound
“ Di ” then all system enter into standby status.
Step six:
when under calling, if no auto video, press “ ” button to take photos and store in the
SD card
Step seven:
When under calling, if no auto video press “
” button to take video, then press “ ”
button to end videoing and store into the SD card.
Attention: If some one call from outdoor camera as the indoor monitor at talking status. The
communication will be break off. And then received the ring from outdoor camera.
7. Indoor monitor call indoor monitor:
Step one:
” button choose to indoor monitor menu.
a. In standby status, press “
” button choose for indoor monitor’ ID which you would like to call. Press “
b. Use “
” button confirm. The red light will on in long time the calling status.
Step two:
a. If no signal received in 4 seconds, will be no music from the main calling monitor and
after a sound “Di” to exit the calling status to standby.
b. If the calling signal are received, the two monitors will ring and the red lights will on long
time.
Step three:
MENU
1. Menu function
1. Press “
” while standby the main menu showing “Video”, “Photo”, “Setting”,
“Code”, “Call History”, “Exit” six branch menu, and “EXIT” is to exit from
the menu.
” for selecting branch menu, press “
” to enter the relevant branch menu.
2. Use “
3. The sub-menu of the branch menu
” button enter
a. Video menu: “Play”, “Delete”, “Delete all” for option, press “
the relevant branch menu.
b. Photo menu: “View”, “Set as background”, “Delete”, “Delete all” for option,
” button to enter the relevant branch menu.
press “
c. Setting menu: “Tong setup”, ”Brightness”, “Own ID number”, “Auto control”,
” button to
“Flash setup”, “Volume setup”, “Date setup” f or options. Press “
enter the relevant branch menu.
”
d. Code menu: “Go to”, 'Send”, ”Receive”, ”Clear” 4 for options, press “
button to enter the relevant branch menu.
e. Call history menu: Would see the call record, you can choose “ Play” “ Delete ”, or “ Back”
Attention: Choose “ Exit ” will back to last menu.
2. Menu summary
1> Video
” button enter main menu .
a. Press “
” button for choosing, press “
” button to enter the relevant branch menu
b. Use “
c. If SD card isn' t plugged in, it will show “No SD Card!” and back to menu. If SD card
is plugged in but no video record, it will show “No File!” and back to menu. If SD
card is plugged in and has video record, turn to next step.
” button for choosing, press “
” button to video operate menu;
d. Use “
” button for choosing “ Play ” “ Delete ”, “ Delete All ” menu, press “
” button for
e. Use “
confirming.
” button to pause or continue. Press “
” or “
”
When you are playing, press “
button to exit. After you finishing the operation, press “
” button or it will return to
video operate menu automatically.
” button gradually to exit, and enter standby。
f. Press “
2> Photo
a. If no answer from the monitor being called, it will back to standby status after 30 seconds
b. If there is an answer from the monitor being called, the two monitors ring will stop,
the red lights off and blue lights on , enter to the two-way talking status. The max talking
time is 90 seconds.
Step four:
” at any one of the monitors which are under talking ,then both of these
If press “
monitors will make a sound”Di” and enter to standby status.
Attention: If some one call from outdoor camera as the indoor monitor at talking status. The
communication will be break off. And then received the ring from outdoor camera.
” button Menu
a. Press “
” buttons for choosing Photo, press “
” button for confirming
b. Use “
c. If SD card isn' t plugged in, it will show “No SD Card!” and back to menu. If SD card
is plugged in but no photo record, it will show “No File!” and back to menu. If SD
card is plugged in and has photo record, turn to next step.
” buttons for choosing Photo, press “
” button photo operate menu
d. Use “
” buttons for choosing “ Play”, “ Set As Background”, “ Delete”, or “ Delete All”
e. Use “
” button to enter.
press “
” button to view the previous photo, and
When you are viewing photos, press “
” button to exit.
press “ ” button to view the next. Press “
” button to exit.
After you finishing the operation, press “
3> Call history
a. Press “
” button primary menu,
b. Use “
” buttons for choosing call history , press“
- 7 -
- 8 -
” button video menu,
c. Use “
” button for choosing video line for operation, press “ ” button call in operation
menu.
d. Use “ ” button for choosing operate orders: ‘PLAY’,‘Delete’, press“ ” button corresponding
operation.
When choose 'PLAY', if no SD card will show 'NO VIDEO FILE!' then turn back
to call in operation menu. During playing, press “
” button to pause or continue playing.
Operation is completed automatically or press the “
” button to return the video
operation menu.
e. Press “
” button exit the menu gradually then enter in standby.
Note: Turn off the power, all the call records will disappear, but the video file of the SD
card will be remained (Video menu to view it)
4> Code
(1) User code:
Details please refer to the “User code function” of “Operation Instruction”.
(2) Clear code function:
Under the standby,
a. Press “
” button primary menu,
b. Use “
” buttons for choosing ‘code’, press“
” button password menu,
c. Use “
” buttons for choosing ‘clear’ ,press“
” button clear code menu,
d. Use “
” buttons for choosing ‘clear’ line (choose ‘back’ is quit), press “ ” button
confirm the success of clearing code, then automatically return to the password menu.
e.Choose “
” button exit the menu gradually then enter in standby.
5> Settings
(1) Tone set up:
a. Press “
” button primary menu,
b. Use “
” buttons for choosing ‘Settings’,press “
” button settings menu;
c. Use “
” buttons for choosing ‘Tong set up’,press“
” button music selections menu;
d. Use “
” buttons for choosing e set list (totally 12songs) “ ” button listening testing state;
e. Press “
” button or press “
” button to confirm the selected music is the current
music ( Ring tones ), turn back to the music selections menu;
f. Press “
” button to exit the menu gradually then enter in standby.
12 music as follows:
<< Love Romance>>、< <Beauty and the Beast>>、< <Memory>>、<<Titanic>>、
<< Love Music Box>>、<<Close to You>>、<<Green Sleeves>>、<<Whisper in utumn>>、
<< To Alice>>、< <Rhythm of the Rain> >、<<Blue Love>>、<<Romeo and Juliet>>
(2) Brightness:
Brightness adjustment is divided into 5 (only in the menu can adjust the brightness) .
a. Use “
b. Use “
c. Use “
d. Use “
confirm
e. Press “
” button for choosing primary menu;
” buttons for choosing ‘Settings’,press“
” button settings menu;
” buttons for choosing ‘brightness’,press“ ” button brightness adjustment menu;
” buttons for choosing the level of the brightness(totally 5 levels) “
” button
the level of the brightness then turn back to the settings menu;
” button to exit the menu gradually then enter in standby.
Attention: Adjust the maximum level and then press “
” button is invalid; adjust the minimum
level and then press “
” button is invalid.
back to the ID settings menu;
e. Press “
” button to exit the menu gradually then enter in standby.
(4) Auto-control
a. Press “
” button primary menu,
b. Use “
” buttons for choosing ‘Settings’, press“
” button settings menu;
c. Use “
” buttons for choosing ‘Auto-control’, press“
” button video settings menu;
d. Use “
” buttons to set up manual/auto video: ‘Manual Video ‘, ‘Auto Video',
then press “MENU” button to confirm and turn back to the video settings menu;
The default is auto video (with SD card)、manual take picture.
e. Press “
” button to exit the menu gradually then enter in standby.
(5) Flash set up
a. Press “
” button primary menu,
b. Use “
” buttons for choosing ‘Settings’, press“
” button settings menu;
c. Use “
” buttons for choosing ‘Flash set up’, press“ ” button standby time
settings menu;
d. Use “
” buttons to change the standby time (10S~60S) “
” button to confirm
and turn back to the standby time settings menu;
e. Press “
” button to exit the menu gradually then enter in standby.
(6) Volume set up
a. Press “
” button primary menu,
b. Use “
” buttons for choosing ‘Settings’, press“
” button settings menu;
c. Use “
” buttons for choosing e ‘Volume Set up’, press“ ” button call volume
settings menu;
d. Use “
” buttons volume level (totally 8 levels) “
” button to confirm and
turn back to the call volume settings menu;
e. Press “
” to exit the menu gradually then enter in standby mode.
Attention: Adjust the maximum volume and then press “
” is invalid; adjust the
minimum volume then press “
” is invalid.
(7) Date Set up
a. Press “
” button primary menu,
b. Use “
” buttons for choosing ‘Settings’, press“
” button settings menu;
c. Use “
” buttons for choosing ‘Date Set up’, press“ ” button date and time
settings menu;
d. Use “
” button date or time “
” buttons increase or decrease the number
“ ” button confirm and turn back to the date and time settings menu;
e. Press “
” button to exit the menu gradually then enter in standby.
(8) Change a passport
a. Press “
”button.
b. Use “
” buttons for choosing “Setting”, press “
” button “Setting” menu.
c. Use “
” buttons for choosing “security password”, press “
” password changing
menu. “Old password” is “0001”, and then input new password.
d. Chose a number by pressing “
”, adjusting its size by pressing “
” buttons.
Then press “
” button to confirm and exit.
e. Press “
” button to exit gradually, and enter standby。
Tips: The password is from manufacturer, so please keep it safe. If you forget it, you
have to return it back to factory to find it.
6> Code function
The code has been set already, so please don't change it until you have special needs.
(3) Own ID Number
a. Press “
” button the primary menu,
b. Use “
” buttons for choosing ‘Settings’,press“
” button settings menu;
c. Use “
” buttons for choosing ‘Own ID Number’,press“
” button e ID settings menu;
d. Use “
” buttons for choosing set up the ID Number “
” button confirm and turn
- 9 -
- 10 -
INSTALLATION DESCRIPTIONS
(2) Installation
1. Open the battery cover and put the battery inside, then cover it.
BATTERY
Step1:
Dig installation
hole
Step2:
Fix rain cover
2. Use the USB to charge when the monitor is lack of power.
AC
Step4:
Tighten screw
Step3: Fix
botton panel
FA I L U R E D I A G N O S I S
3. Outdoor camera connects with E-lock and power introduction.
(1) Diagram
12V+ GND
1
2
3
1. Fail to call. Whether indoor monitor is on
Whether outdoor camera is very far away from the indoor monitor
Whether there is wrong match between outdoor camera and indoor monitor
NC COM NO
4
5
6
2. Bad connection. Whether noise index is higher than 50dB
Whether outdoor camera is very far away from the indoor monitor
12V + GND
NO
COM
NC
3. Low volume in speaking state. Whether protective material is uncovered
Whether the volume is adjusted to be too low
NC
E - Lock
COM
4. Close Alarm.When have alarm from camera and monitor.
First step: Fix the camera screw at the bottom well. At this time, still have alarm.
Second step: Press the unlock button to close the alarm.
power supply
- 11 -
- 12 -
APPENDICES
Packing list
1.Technical data
Numbe r
Items
Number
Items
1
Ou td oor camera
6
USB l ine for Indoo r
2
Ind oor mo nitor
7
Me mo ry ca rd
3
Powe r ad apter for
8
User man ual
9
Gu ara ntee card
10
Inspect certificate
a. Outdoor camera
Working frequency
Transmission power
Camera
Power adapter
Working current
Static current
Quan tity
monito r
2402~2483MHz
16-20dBm
1/4 inch COMS
1/4"Input 100 V ~ 240 V
Output 12 V / 1 A
300mA
≤30mA
Battery capacity
Standby time
Color
Dimension
Installation
N.W.
Qu antity
outdo or camera
4
Powe r ad apter for
indo or moni to r
5
1350mA
48hours
L ithium battery
The packing list is subject to final sale. Please consult distributor for detailed information.
Black
176*108*58mm
surface mounted
313g
Announcement for hazardous elements
Hazardous elements
b. Indoor monitor
Items
Screen
3.5 inch TFT-LCD
Sen si ti vit y
-9 0dBm
Stand by C urren t
20-30mA/3.7V
Working Curre nt
25 0mA
Battery Ca pacity
1350 ma h
Stand by Time
12 0h
Plumbum
(Pb)
Mercury
(Hg)
Cadmium
(Cd)
Chromium
(Cr(VI))
PCB and
Accessories
Plastic
Metal
×
Battery
×
Others
×
:Hazardous element value is below SJ/11363-2006 standard
Dimensio n
10 2.5*66 .5*1 8mm
NW
15 0g( packa ge in clu ded)
× :Hazardous element value is beyond SJ/11363-2006 standard
c. Accessories
Item
Batter y
Power adapter for outdoor camera
Power adapter for indoor monitor
Rechar geable Lithium batter y
Battery Capacity
1100mah
Nominal voltage
3.7V
Input
AC100V-240V
Output
DC12V
Input
AC100V-220V
Output
DC5V
- 13 -
- 14 -
Polybrominated Polybrominated
Biphenyl
diphenyl ether
(Pbb)
(PBDE)