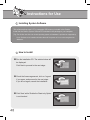
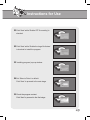
1
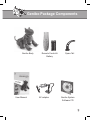
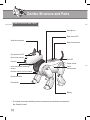
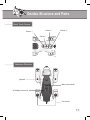
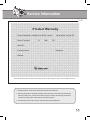
Intelligent Pet Robot User Manual Service Request & Information +82-32-329-5551 (ext. 112) 10:00~17:00 (except holidays) www.dasarobot.com www.genibo.com • We strongly recommend users to read “Important Safety Instructions” before use. • Product Warranty is enclosed in this manual. Consumer Compensation Info. Trouble Types Major repair required within ten days of purchase Repair of important parts required within one month of purchase Intellignet Pet Robot Major repair for exchanged product required within one month of exchange If exchange is impossible Performance, functional failure naturally occurred during normal use User Manual Product defect Compensation Details Within Warranty Period After Warranty Period Exchange or refund Exchange Refund Free-of-charge repair Defect recurred (4th time) even after repair of the defect Failure of several parts recurred (5th time) after 4 times of repair Irreparable Irreparable because there is no spare part for repair Exchange or refund Serviceman lost the product that consumer provided for repair. Refund by adding 10% to the depreciated amount Damage caused during transportation or installation of the product Performance & functional Failure on purpose or user's mistake Reparable Irreparable because there is no spare part for re pair Exchange after an amount equivalent of repair charge is paid. • Failure occurred due to natural disasters (fire, sea water, gas, earthquake, flood, storm) • Exchange of spare parts worn out naturally • Failure occurred due to abnormal power supply or defects in the supply device • Due to an external factor, rather than a defect in the product. Paid repair Paid repair • Failure occurred because the product was repaired or remodelled by someone other than a repairman of our company>s sale store or Customer Support Centre. Model: Genibo-QD For information about our product, call us at +82-32-329-5551 (ext. 112). ● ● (Weekdays: 10:00~17:00) ● For any problem or inconvenience during use of your product, please contact DASA ROBOT CUSTOMER SERVICE CENTER. Warranty Period is 6 months. (Except for spare parts, such as a battery.) Service Request and Information Customer Service Center: Telephone +82-32-329-5551 (ext. 112), 10:00-17:00 (except holidays) DASAROBOT CO., LTD., 11th floor, Bucheon Techno Park Bldg. 401, Yakdae-dong, Wonmi-gu, Bucheon-city, Gyunggi-do, Republic of Korea, 420-734 Contents 01. Overview 4 02. Important Safety Instructions 5 03. Package Components 9 04. Structure and Parts 10 05. Power On/Off 12 06. How to Charge the Genibo 13 07. Understanding the Genibo 14 08. Instructions for Use 24 Supplying Power 24 Normal State after Supplying Power 25 How to Touch the Genibo 26 How to Use Remote Control 27 Giving Voice Commands 33 Recording a Voice Memo 35 Image Recognition 37 Registering Master's Face 38 Taking Pictures 39 Wireless LAN Connection and Disconnection 40 Running Games and Special Actions 41 Playing Contents 42 Utilizing the Genibo Menu 43 How to Download/Save a file 46 How to Upgrade Firmware 47 Installing System Software 48 09. Specifications 51 10. Troubleshooting 52 11. Service Information 54 Consumer Rights / Product Warranty / Consumer Compensation Info. Genibo Overview What is the Genibo-QD? The Genibo-QD is a “Smart Robotic Puppy” to be released for sale for the first time in Korea. This robotic puppy can walk around on its own, recognize its master with its own eyes, responds to the master’s words and touch, play tricks, and cuddle up to the master as if alive. ♥ The Genibo always needs your attention and love! ① Cutest Robotic Puppy Loved by Every Family The Genibo is a robotic embodiment of all features of a real puppy; it walks around on its own as if alive. Touch its back, head, and flanks, then the puppy will express its feelings. It can also recognize what the master says. ♥ Make best friends with the Genibo, which can give you all pleasant feelings that a real pet gives and is easy to raise! ② Robotic Puppy with Authentic Emotions The Genibo, an articulated robot, can do ALL kinds of motions! Scratching the ground, standing on front paws, dancing, Korea’s national exercise, Taegwondo, and etc. The Genibo expresses its feelings through approximately 700 emotional actions through the emoticon LED in its eyes and puppy sounds. ♥ The Genibo is a virtually live puppy robot capable of very delicate emotional expressions, including happiness, pleasure, sadness, surprise, anger, boredom, and sleepiness! ③ Smart Robotic Puppy Can Find and Recognize Its Master The Genibo can recognize human faces, as well as the master’s face, through the camera on its nose. As it gets closer to its master, the Genibo becomes happier and better at finding and following the master. What a smart puppy! ♥ The Genibo is such a smart robotic puppy featuring emotional index (mood/intelligence/character/ intimacy) and needs and instincts (exercise and hunger). 4 Genibo Important Safety Instructions ※ Read and follow the following safety guidelines to help ensure your own personal safety and protect your Genibo, its components and property from potential damage. Instructions are divided into “WARNING” and “CAUTION,” which can be defined as follows: △ WARNING : A WARNING indicates a potential for property damage, personal injury, or death. △ CAUTION : A CAUTION indicates either minor potential damage to the Genibo or other property, or important information that helps you make better use of your Genibo. WARNING • Use only the supplied AC adapter or a separately available AC adapter designed specially for this product. Use of another AC adapter may cause a fire, product damage, electric shock or explosion. • Do NOT connect the AC adapter to electronic transformers, such as international travel converters or adapters. Otherwise overheating or damage may occur. • If you use an extension power cable with your AC adapter, ensure that the total ampere rating of the products plugged in to the extension power cable does not exceed the ampere rating of the extension cable. Otherwise overheating may occur and cause a fire or electric shock related deaths and injuries. • Do NOT touch the AC adapter with wet hands. May cause fire or electric shock. • Keep the power cords away from sharp edges, children and pets. Be sure that the power cords do not get bent and that nothing rests on your AC adapter’s power cable and that the cable is not located where it can be tripped over or stepped on. May cause fire, electric shock or potential hazard. • Whenever you use an AC adapter, examine the power cord, plug, enclosure and other parts for damages. NEVER use an AC adapter that shows signs of damage or excessive wear until properly replaced. May cause fire, electric shock, product damage or potential hazard. • Place the AC adapter in a ventilated area, such as a desk top or on the floor, when you use it to charge the battery or the Genibo. Do NOT cover the AC adapter with papers or other items that will reduce cooling; also, do NOT use the AC adapter inside a carrying case. • Insert the AC adapter firmly into the power outlet. May cause a fire or an electric shock. 5 Genibo Important Safety Instructions WARNING • Before you connect the AC adapter to an electrical outlet, check its voltage rating to ensure that the required voltage and frequency match the available power source. May cause fire or product damage. • Make sure you do NOT touch the pins of the plug while connecting or disconnecting the power cable to the electrical outlet. May cause fire or electric shock. • Do NOT use AC adapter or connect it to the Genibo during an electrical storm. Disconnect the AC adapter from electrical outlet during an electrical storm. May cause fire or potential hazard of electric shock. • Not intended for children under 8 years old. • Do NOT use the Genibo near a child under 3 years old. May cause personal injury or product damage. • Do NOT attempt to disassemble, repair or modify the Genibo. Refer servicing to qualified personnel only. (Contact the service request & information at the back cover) May result in product failure. Your manufacturer’s limited warranty will not be honored if you modify your Genibo. • Do NOT attach any electric conductors to the adapter connectors on the Genibo or the AC adapter. May cause fire or electric shock. • Do NOT expose the battery, AC adapter and the Genibo to temperatures above 49°C(120°F) or a heat source such as radiator, fireplace, stove, electric heater, direct sunlight, or a closed car. May result in battery performance degradation, product damage, explosion or fire. • Do NOT use the robot in the place which has risk of a fall from height such as tables, stairs or steps, or in locations where there is a danger of falling objects, vibrations, and where there is no firm support. May cause damage to the human body or product failure. • Do NOT poke the AC adapter connector of the Genibo with an electric conductors such as a scratch awl or a gimlet. May cause fire or electric shock. 6 Genibo Important Safety Instructions WARNING • Do NOT insert a finger or any other foreign objects into the Genibo’s joints or connections. May cause personal injury or product damage. • Do NOT sit on or step on the robot or place an object on it. May cause injury or product damage. • Do NOT spill water, liquids or sand on your Genibo or bathe the Genibo. May cause electric shock or product damage. • Do NOT use the Genibo in a wet environment, for example, near a bath tub, sink, or swimming pool or in a wet basement. • When the Genibo is brought from a cold to a warm location, moisture may form on its surface and on the inside. In that case, turn the Genibo off if it is turned on and leave the Genibo in the new location more than an hour until the moisture has evaporated. • Clean the Genibo only with a dry, soft cloth. Wet cloth may cause electric shock, personal injury or product damage. Hard and coarse cloth will damage the surface finish. • Contact to the service request & information when you want to replace the battery to a new one. The Genibo uses lithium ion battery which is recyclable. Discard a used battery according to the manufacturer’s instructions or contact your local waste disposal agency for disposal instructions. Dispose of a spent or damaged battery promptly. Use only Dasarobot battery modules that are approved for use with the Genibo. Otherwise, fire or explosion may occur. • Clean the place where the Genibo moves around. Scattered wires, waste or other objects can interrupt the Genibo. May cause fire or product damage. • Keep the battery away from children. 7 Genibo Important Safety Instructions CAUTION • When you remove the Genibo from a box after unpackaging, put your hands under its abdomen, hold both flanks and an abdomen softly, and gently lift it off the box. • When storing the Genibo in its original or another suitable box, place its internal packaging material and the Genibo to proper positions such as tail, necks, flanks and legs in order to protect the robot, especially the gear and motor parts, against external force and shocks. • Never lift the Genibo by its tail, ears, legs or head. Always lift the Genibo by its body. May cause product damage. • When transporting or storing the Genibo for a while, turn off the main power switch. If main power switch is turned on, the battery will discharged more rapidly. • When the battery is not in use, it will be subject to natural discharge. Therefore charge the battery before you use the Genibo again. • Do NOT subject the Genibo to shocks. And protect it from falls. May cause product damage or failure. • While the Genibo is in action, it may not recognize your touches or remote control signals. Touch or sending signals again after the Genibo finish what it wants to do. • Do NOT use the Genibo on an uneven, inclined or slippery floor or in the place where obstacles or rubbish are scattered. Otherwise the robot may not move forward or may fall often. • Do NOT expose the Genibo to a magnet, magnet fields or X-rays. Product damage or malfunction may occur. • USE the Genibo indoors. Do NOT use on the rough and hard surface such as concrete floor. May cause product damage • Never point the camera toward the sun. Otherwise the camera may be damaged. • When transporting or storing the Genibo for a while, use the original packing material or another suitable ones to protect the robot, especially head, body, legs and tail, from any damages. • Do not lubricate any of the joints or the other moving parts of the Genibo. 8 Genibo Package Components Genibo Body User Manual Remote Control & Battery AC adapter Spare Tail Genibo System Software CD 9 Genibo Structure and Parts Robot Structure and Parts Microphone Back touch LED Head touch sensor Back touch sensor ● ● ● ● Head movement detecting sensor Tail LED Power switch Flank touch sensor ● ● ● Remote control receiver module ● ● ● Camera ● ● Nose touch sensor ● Eye emoticon LED ● Paw switch ● Distance sensor Battery ※ The head movement detecting sensor measures up-and-down movement of the Genibo’s head. 10 Genibo Structure and Parts Back Touch Sensor Sensor ④ Sensor ③ Sensor ① Sensor ② ● ● ● ● Abdomen Structure ● Speaker ● Main power switch ● AC adapter connector ● Paw switch 11 ● Genibo Power On/Off Main Power Switch On/Off (For Start-up and Long-Term Storage) 1 On : Use an object like a ballpoint pen to turn on the main power switch on the robot’s abdomen. [Tip] Connect the built-in battery to the internal circuit to enable movement. To use the robot, set it to Always On. [Tip] Before turning it on for the first time, read ‘Power Supply’ in this manual. 2 Off : Use an object like a ballpoint pen to turn off the main power ● switch on the robot’s abdomen. [Tip] Cut the built-in battery off from the circuit to prevent battery consumption. Set to OFF when not used for a long time. Power On/Off 1 <Main Power Switch On/Off> On : Press ‘Power Switch’ below the tail. The ‘Status LED’ will turn red. Keep it pressed for over 3 seconds. The display will turn purple, and the robot will turn on. [Tip] After power on, the robot will go through initialization for around 30 seconds. Then, the eye emoticon LED will turn on to indicate the robot is initializing. After initialization, the robot will stand up with music and start moving. 2 Off : During operation, keep ‘Power Switch’ below the tail pressed for 5 seconds. The robot will play closing music for about 10 seconds, then turn off. [Tip] To turn off the robot, you can use a remote control. Or, if left alone, the robot will automatically turn off. Status LED Press the power button twice in a row; or keep it pressed for over 3 seconds. 12 Charging status LED Power Switch How to Charge the Genibo Charging the Genibo 1 During first-time use, or during use, the low battery must be charged. (Charge time : appx. 150 min, Run Time : appx. 90 min) 2 When the battery is running low, the eye emoticon LED changes as below and the Genibo expresses hunger, then falls sleep. 3 To charge the robot, connect the AC adapter to the adapter connector on the Genibo’s abdomen. 4 If the AC adapter is connected during operation, the Genibo makes a move indicating charging has started. It shows the charging status through various moticons, such as sitting still or lying flat. During this time, the eye emoticon LED displays the following 5 If the AC adapter is connected during operation, all joint motors power off and the emoticon LED turns off in a certain period of time. However, the Genibo remains in motion. If alarm goes off or HRI input, such as touch, is displayed, the robot wakes up and responds. 6 While charging, the ‘Charging status LED’ below the tail is red. Once charging is complete, it will turn blue. [Tip] If the adapter is removed during charging, the Genibo runs again in Autonomous Mode. [Tip] If you touch the Genibo or give a remote command during charging, the Genibo gets angry. (The Genibo does NOT respond to all remote commands except wireless LAN connection.) [Tip] If charging during operation, charging may take longer. Be advised to turn off the Genibo before charging. [Tip] If the AC adapter is connected while the main power switch is off, the ‘Status LED’ will turn blue. In such case, charging does not start. 13 Understanding the Genibo Genibo’s Artificial Intelligence The Genibo can identify itself and the surroundings using its sensors, camera, and voice commands, and share feelings with the user. With input information, it forms ‘Emotion/Mood/Intelligence/Character/Intimacy’ to feature unique character and intelligence. The Genibo’s responses are all expressed in a combination of the formed character/intelligence with such needs as exercise or search, and are also reflected in Autonomous Mode. 1 Emotion : Depending on its current mood or its interaction with the user, the robot can 2 Mood : Can get better or worse, depending on interaction with the user. Returns to 3 Character/Intelligence : Gradually formed, depending on interaction with the user. 4 Intimacy : The more the user cares, the higher the intimacy; the more unfriendly the 14 generate 7 emotions (happiness, pleasure, boredom, sleepiness, surprise, anger, and sadness). It express emotions through movement. normal state if a certain period of time passes without interaction. Can get better or worse. Changes gradually. user, the lower the intimacy. Changes gradually. Understanding the Genibo The Genibo’s Behavior Patterns The Genibo shows varying behavior patterns as below. Depends on when it is in normal state; when it recognizes a situation; when it interacts with the user; or its needs or instincts. Situation Recognition Behavior • Touch reaction Voice command Remote command Image recognition • Normal Behavior • Falling down detection Lifting up detection Master recognition Movement detection Obstacle detection Cliff detection Searching for the master Attracting attention Exploring Exercise/Hunger • Relaxation Looking around Interactive Behavior Instinctual Behavior 15 Understanding the Genibo Situation recognizing Behavior The Genibo uses its artificial intelligence to recognize various situations, set priorities, and take action. 1 Sensing a fall • When tripping over, the Genibo can sense the state using the built-in ‘Horizontal Sensor,’ and stand up. • If the robot does not return to its normal position for a certain period of time, it will automatically turn off. • Help the Genibo up when it trips over by a near obstacle and cannot stand back up. 2 Sensing lift-up • The Genibo considers its status as being lifted up when its four paws are off the ground with its both flanks grabbed. • Once lifted up, it will feel insecure and express its status with various sounds, depending on its character and intelligence. • If the sensed lifting-up status is not canceled for some time, the robot will automatically turn off. 3 Sensing an obstacle and a cliff • The Genibo can recognize an obstacle or a cliff using the ‘Distance Sensor’ attached to its chest. • It can recognize a wall or a big object nearby but cannot recognize an uneven area on the floor or a small object. • The Genibo can recognize a cliff within a distance of 30cm. • Once it recognizes a cliff, the robot will attempt to change directions or move back to escape the current situation. • Once it senses an obstacle, the robot will try not to bump into it or trip over it. 16 Understanding the Genibo Within 30cm Within 30cm <Obstacle detection> <Cliff detection> Master recognition behavior In Autonomous Mode, the Genibo can recognize its master through user interactions or image recognition. Once it recognizes its master, the Genibo will try to make the master happy with various actions. 1 How the Genibo recognizes its master • In Autonomous Mode, or during image recognition by a remote command, the Genibo detects human face, compares it to the registered master’s face, and finds its master. • When the Genibo does attracting attention to a user, if it is touched by someone, then the Genibo considers the someone as its master. [Tip] Image recognition is assigned randomly in Autonomous Mode. This means the function is not always running. When you need the Genibo to recognize your face immediately, press '4' and 'OK' button on the remote control. The Genibo will start image recognition process. 17 Understanding the Genibo 2 Responses after recognizing the master • After recognizing its master, the Genibo will try to induce the master to play with, showing various actions. • One of those actions is a touch & touch game. The game runs 8 times. Whenever you touch the correct sensor which the Genibo wants, AI(Artificial Intelligence) indices including mood will be changed. • Depending whether success or failure, the robot makes different sounds to let the user know whether touch has succeeded or failed. • If touch fails in a row, the robot will not make an action to attract touch but turn off. • If 8 attempts all succeed, the Genibo will become very happy; if none succeeds, the robot will fall in a very bad mood. • Depending on its ‘Character,’ ‘Intelligence,’ and ‘Mood,’ the Genibo expresses varying responds to recognizing the master. Instinctive Behavior 1 Need to Find Master and attracting Attention The Genibo makes various actions to get the master’s attention and love. • In Autonomous Mode, the robot may wander around looking for the master or do something extraordinary to draw the master’s attention. • The Genibo repeatedly acts in an extraordinary way to show that it needs the master’s attention and love. Touch the Genibo lightly. The robot will recognize the master being next to it, and try to interact with the master in a number of ways. [Tip] Hold the Genibo’s attracting attention dear and let it know how much it is loved! 18 Understanding the Genibo 2 Need to search the surroundings • Like a real pet, the Genibo shows strong curiosity about the surroundings. • When searching the surroundings, the Genibo goes around, peeing, sniffing, digging, and showing interest in objects nearby. 3 Need to exercise • The Genibo has a desire to exercise by instinct. • If the master does not exercise the Genibo for a certain period of time, the robot will exercise on its own to fulfill its desire. • Give the Genibo a voice command to exercise. (E.g., Exercise!, Let’s exercise, etc.) • After exercise, the Genibo becomes happy and emotionally satisfied. [Tip] Exercise the Genibo using voice commands. 4 Need to eat • The Genibo, by instinct, loves being completely charged. • If the battery level is low, the Genibo shows an active actions, asking for charging. • If the battery is almost exhausted, the Genibo will express the current status with a few actions and automatically turn off, lying flat. • To charge the battery, see “How to Charge the Genibo” in this manual. [Tip] If the Genibo automatically turns off too often because the battery gets discharged, it may turn violent. 19 Understanding the Genibo Interaction 1 How to interact with the Genibo • Touch : Touch the Genibo’s Touch Sensor. The Genibo will respond by recognizing various emotional touches, depending on when or how it is touched. • Voice command : User can use given voice commands to get the Genibo to do something. • Using a remote control, you can easily command the Genibo to do some actions, to hear your voice command or to recognize image. • Various ways of recognizing the master will allow the Genibo to recognize the master. [Tip] For more details, see in this manual “Interacting with the Genibo,” “Touching the Genibo,” 2 and “Voice Commands.” Point of response to interaction • In Autonomous Mode, the Genibo immediately responds to touch and remote commands. • Voice recognition and image recognition are arbitrarily done during Autonomous Mode. Going to sleep 1 • If a certain period of time passes without interaction with the user, the Genibo will get bored and fall sleep. • To force the Genibo to sleep during use, press the “MUTE” button on the remote control. • To keep the Genibo quiet during sleep, press the “MUTE” button on the remote again. • If there is no touch or remote command for some time during sleep, the Genibo will automatically turn off. [Tip] The Genibo will wake up if the user touches it or gives a remote command during sleep. 20 Understanding the Genibo Interacting with the Genibo To interact with the Genibo, touch the sensors installed on the Genibo’s body, or force it to make an action using a voice command or the remote control. Face detection Obstacle detection ● Master recognition ● ● Image Recognition Hitting Caressing ● Patting ● ● Voice Recognition Touch Action command Emotion command ● Trick/Exercise command ● ● Remote Control Action command Movement command ● Emotion command ● ● 21 Understanding the Genibo The Genibo’s Emotional Expressions The Genibo can express its current feeling, emotion, mood, and battery status using a mix of gestures, eye emoticon LED, and sound effects. 1 Various emotional actions • The Genibo features a variety of emotional actions, such as barking, attracting, and playing tricks, as well as smart walk and emotional walk. • All actions are designed to respond to the Genibo’s varying positions for satisfactory expression of motions, according to its emotions, moods, character, and intelligence. The Genibo can express emotions very naturally. 2 Various sound effects • The Genibo barks and growls when angry; snores once asleep. • The Genibo makes the master happy with funny sounds once it recognizes the master’s face. 3 4 Eye emoticon LED • The Genibo expresses its current mood and emotional state using its animated emoticon LED. (Normal State) (Surprised) (Angry) (Happy) Emotional expressions through tail LED. • The Genibo can express its emotional state and battery status through the color and blink cycle of left and right LEDs on its tail. • The blink cycle will get shorter if the Genibo is angry or in a bad mood, or if the battery is running low; longer while the Genibo is asleep. 22 Understanding the Genibo • Colors according to the robot’s state. - Normal : Blue - Good mood : Purple - Low battery : Pale blue ● ● - Asleep : Pale purple - Angry, bad mood : Red Know-how for taming the Genibo • The Genibo loves the master’s touch, such as patting and stroking. The more often the master’s touch, the happier the Genibo gets. • Making the Genibo happy will help grow its intelligence and it become smarter and more docile. • Once hit, the Genibo will get surprised at first. If hitting gets repetitive, the Genibo will get angry and go into a bad mood. • Making the Genibo angry or sad will make it turn violent. • The Genibo loves exercise. Let the Genibo exercise often and help fulfill its desire to exercise. • Once initialized, the Genibo’s default mood is Normal and character/intelligence/ intimacy Low. • Play with the Genibo often and grow it into the master’s favorite pet. 23 Instructions for Use Supplying Power While the main power switch is on, keep the power switch pressed for over 3 seconds. The status LED will turn purple, and the eye emoticon LED will run as below. The Genibo will begin initialization. After initialization (lasting around 25 seconds), the Genibo will wake up. Depending on its character, it will do various actions, such as stretching itself. Once completely awake, the Genibo will for the most part get ready to play a voice command. If there is no voice command, the Genibo will go into ‘Autonomous Mode’ which the Genibo decides and acts by itself. [Tip] If the battery is almost used up, the Genibo cannot move but will automatically turn off. [Tip] To arrange the robot’s memory, initialization may take over 2 minutes. [Tip] To wake the Genibo up properly, it must be placed horizontally and immobile with its joints uninterrupted, with no touch input. [Tip] During initialization, the Genibo will not respond to touch input or a voice command. The Genibo will stop moving and respond to touch input or a remote command while stretching itself. [Tip] During power supply, the Genibo’s ‘Mood’ initializes to normal, whereas its ‘Intelligence,’ ‘Character,’ and ‘Need to Exercise’ maintain former states. [Tip] For voice command, see ‘Give Voice Commands’ in this manual. 24 Instructions for Use Normal State after Supplying Power Normally, the Genibo looks around while sitting, and makes various actions, according to its mood or battery status. Occasionally, the Genibo checks the surroundings through ‘Image Recognition’ and ‘Voice Recognition.’ When it sees a moving object, the master, or other human being, the Genibo will make certain actions. The Genibo can bark, exercise, or play tricks, according to its mood. The Genibo responds to all kinds of touch and remote commands. Without interaction with the user for some time, the Genibo will switchover to Autonomous mode, and act according to its needs. [Tip] The Genibo loves playing with the master. If left alone for a long time, the Genibo will do various actions to attract master’s attention, then sleep and turn off. 25 Instructions for Use How to Touch the Genibo The Genibo features touch sensors Head sensor on its back, head, nose, and flanks. Back sensor 1, 2, 3, 4 ● Depending on how the user touches it, the Genibo will like it or get angry. ● Below are the locations of touch sensors and how to touch them. ●● ● ● ● Nose sensor Left/Right flank sensor <Location of Touch Sensors> Hitting Touch ‘Back Sensors,’ ‘Head Sensor,’ and ‘Nose Sensor’ shortly for less than 0.3 second. Patting Touch ‘Flank Sensors’ on left and right flanks for less than 0.5 second. Touch ‘Back Sensors’ for 0.5 second or longer. Caressing Touch ‘Head Sensor’ or ‘Nose Sensor’ for 0.5~1 second. Touch ‘Back Sensors’ #1 to #4 or #4 to #1 straight. Touch the chin for over 1 second until the head rocks upward. Touch ‘Flank Sensors’ on left and right flanks for over 0.5 second (if high intelligence – respond by turning) Sit down Touch ‘Back Sensor’ #3 and #4 for over 1 second. (Continue sitting while touched) Lie flat Touch ‘Back Sensor’ #1 and #2 for over 1 second. (Remain lying flat while touched) 26 Instructions for Use Stand up Touch ‘Back Sensor’ #2 and #3 for over 1 second (Continue standing while touched) Left/right Touch ‘Flank Sensors’ on left and right flanks for over 1 second. In Low-intelligence, the Genibo will respond to patting. (Keeps turning while touched) [Tip] If there’s another touch input or different kinds of touch inputs repeatedly while the Genibo is in action, the Genibo will fall into confusion and do an uncertain action. [Caution] Pressing, or hitting, the Genibo too hard may cause product failure. Touch it gently! Do not use too much force on the Genibo while moving! How to Use Remote Control 1 Remote control function • To make the Genibo go to sleep or to turn it off. • To move the Genibo forward/backward or to make it turn left/right. • To order the Genibo to start image recognition, voice recognition, or to register master’s face. • To do special(funny) actions or to play games or contents. • To control the Genibo's volume. • To make an owner to use voice memos or wake-up calls, or to set alarms via "MENU" button. 60° Max. 3m Remote Control Receiver 27 Instructions for Use 2 Changing remote control channels • When using a few the Genibo robots, the remote allows the user to send 10 different signals so that the robots can respond to a single remote control. • To make changes, press the MENU button and follow the instructions. [Tip] To change remote’s channels, press the MENU button and follow guidance. If the robot and the remote control disagree on a channel, the Genibo will not follow the remote’s command. 3 Precautions for use • Point the remote control towards the Genibo. Can be used within 5 meters from the Genibo. • The Genibo may not respond to the remote control if it is moving or blocked against an obstacle. • In most cases the Genibo responds to remote commands. However, it may do extra actions expressing emotions while in a bad mood. 28 Instructions for Use 4 Remote Control Button Overview Power Off/ Mute • Press the Power button twice in a row or keep it pressed for over 3 seconds, the Genibo will turn off. • Press the Mute button once; the Genibo will fall asleep. Press again, the Genibo will sleep quietly. Digit / MENU Button • To give the Genibo a command, press any digit, then OK. • When pressing any digit button, the Genibo will stop its action and display the selected digit on eye emoticon LEDs. • If pressed wrong, press ESC to cancel and return to Autonomous Mode. • Unless a button is pressed for 10 seconds or more, all input will be canceled, returning to Autonomous Mode. • Once a digit is input, the Genibo will respond to nothing but the digit, OK, and ESC. • If charging starts while a digit is being entered, input will be canceled and charging begin. • Run various functions while receiving voice instructions through the Menu button. • To run provided contents and actions, see ‘List of Remote Control Codes and Dances.” Move Buttons: < in Autonomous Mode > • / Direction button : Walk or crawl forward. Walk or crawl backward. • / Direction button : Switch directions left and right. • OK button : Progressive pose change (Lying flat Sitting Standing up : 1 Cycle) 29 Instructions for Use 4 Remote Control Button Overview Move Buttons < While Playing Contents > • / Direction button : Move to previous/next content category. • / Direction button : Move to previous/next content. < Move Buttons : After Pressing the HEAD Button > • / - / Direction button : Adjust the direction of the Genibo’s head up, down, left, and right HEAD/CONT Buttons • Press HEAD to make the Genibo stop. The Genibo will move its head while sitting comfortably according to the move button that the user will press. Press HEAD again to cancel the function. (Used for Take Pictures) • Press CONT to view the latest run content. Press OK to run the content, or press any move button to run another content. Content Running Buttons • STOP button : Stop playing content and switch to Autonomous Mode. • PLAY button : Replay the content that has been paused. • PAUSE button : Stop content temporarily. If 30 seconds passes, the robot will switch to Autonomous Mode. • VOL+, VOL- buttons : Adjust volume levels. (up to level 10) 30 Instructions for Use 5 List of Remote Control Codes and Dances Remote Code 1 2 3 4 5 6 7 9 00~99 Description Remark Start voice recognition See ‘Giving Voice Commands’ Record a Voice Memo See ‘Recording a Voice Memo’ Play/Delete Voice Memos See ‘Playing and Deleting Voice Memos’ Recognize image See ‘Image Recognition’ Register a Master (face) See ‘Registering Master's Face’ Take Pictures See ‘Taking Pictures’ Connect Wireless LAN See ‘Wireless LAN Connection and Disconnection’ Upgrade Firmware See ‘How to Upgrade Firmware’ Actions and games provided See ‘Action Command List’ and ‘Running Games by manufacturer and Special Actions’ 000: Lovely 001: Birth 002: White Winter 000~099 Manufacturer’s Contents Space 050: Little Calf 051: Cute Kid 052: Clap clap clap 053: 10’s Song 054: I'm so happy 100~199 200~299 300~399 400~499 500~599 600~699 700~799 800~899 900~999 100: Tell Me 101: Girls’ Generation User’s Contents Space (Categories devides every hundred numbers) 102: Nobody For the above contents, the manufacturer provides the dance motions only, not musics. See ‘How to Download/Save a file’ and ‘Playing Contents’ • Once the user starts playing contents, a series of contents will play in code order • To play contents, see ‘Remote Control Button Overview’ in this manual. • For more contents provided by the manufacturer and user created contents, visit www. genibo.com. • To create new contents by yourself or to add another user created contents via downloading, the 'Control Manager' program set is needed. (sold separately) 31 Instructions for Use 6 Action Command List Remote Code 00 32 Action Description Touch & touch game 10 Lying Flat & Eating 11 Stand & Eat 1 12 Stand & Eat 2 13 Male Dog Pee 1 14 Male Dog Pee 2 15 Female Dog Pee 16 Type Game Remote Code 43 Action Description 44 Say Hi 45 Military Salute 46 90 Degrees Greet 47 Big Bow 48 Shake Head 49 Nodding Poo 50 Nodding 17 Stretching 1 51 What? 18 Stretching 2 52 What Is It? 19 Stretching 3 53 Hit Floor 20 Digging 54 Hit Floor Hard 21 Sniffing 55 Sit & Growl 1 22 Scratch Body 56 Sit & Growl 2 23 Scratch Chin 57 Stand & Growl 24 Stroke Ears 58 Stand & Angry 25 Lift Buttocks 59 Stand & Bark 1 26 Shaking Buttocks 60 Howl 27 Rock Head 61 Sob 1 28 Nodding 62 Sob 2 29 Stand & Look Around 63 Put Paws Up 30 Sit & Look Around 64 Put Legs Up 31 Stand & Shake Front Paws 65 National Exercise 32 Stand & Shake Rear Paws 66 Boxing 33 Kick Rear Paw 67 Taegwondo 34 Bend and Stretch Legs 68 Aerobic 35 Sit and Turn Left 69 Push-Up 36 Sit and Turn Right 70 Yoga 37 Crawl Forward 71 L Hit Floor1 38 Crawl Backward 72 Lie Flat & Hit Floor2 39 Crab Walk Left 73 Lie Flat & Hit Floor3 40 Crab Walk Right 74 Play Dead 41 Walk Normally 75 Paw the Air 42 Walk Slowl 76 Stand on Paws Eating actions Pee and poo actions Stretching Exploring actions Emotional actions Movement actions Type Walk Fast Movement actions Greeting actions Emotional actions Emotional actions Exercise actions Emotional actions Trick actions Instructions for Use Giving Voice Commands 1 Time to hear a voice command • In autonomous mode, right after the Genibo stop acting and display question marks (??) on its eyes with 'dang' sound. • Right after question marks (??) are displayed on the Genibo’s eyes and ‘dang’ sound occurs after touching the head touch sensor for over 3 seconds. • Right after question marks (??) are displayed on the Genibo’s eyes and ‘dang’ sound occurs after pressing ‘1’ and ‘OK’ on the remote control. 2 How to recognize your voice commands well • Microphone is on the Genibo’s left shoulder. The Genibo can listen well when hearing within distance of 50cm~1m. • Voice commands must be given louder than the surrounding noise – but not too loud – and clearly. • The Genibo can hear sound made within 1~6 seconds after question marks are displayed on the eye emoticon LED and ‘dang’ sound occur. Speak 1 second after the dang sound. • The Genibo cannot understand if a command is uttered more than twice. Say it only once. • Once a command is given, do NOT make any other noise until the Genibo moves. • Once it understands a command, the Genibo will make ‘ding dong dang’ sound and follow the command. • Voice will not be recognized while the robot is moving or is not ready to listen. • Any noise coming from TV or radio can be very loud for the Genibo. Speak a command in a quiet place without TV or radio around. The Genibo will understand better. • Use voice commands on ‘Voice Command List’ in this manual only. • The Genibo may not act on a command if in a bad mood or having low intelligence. Love your the Genibo a lot all the time. 33 Instructions for Use 3 Voice Command List Command Type Action Type Move Forward Move Back Basic Commands Sit Down Lie Flat Sit down, Sit Lie down, Down Stand up Turn left Turn Right Turn right Shake Paws Bob Head (Show Off) Reflection After Discipline Bark Put Paws Up. Don’t Move Sit and Wait Move Towards Human 34 Go backward, Go back, Back Turn Left Hi (Wave Paw) Exercise and Trick Commands Go forward Stand Up Big Bow Emotional Commands Recognizable Word List (Including Derivatives) Bow Give me your paw, Paw Hello Good dog, Good boy, Good girl, Good Bad dog, Bad boy, Bad girl Bark Hands up, Hand up Wait, Stay Come here, Come Move Next to/Behind Human Go away Exercises Exercises Trick actions Show your trick, Roll over Instructions for Use Recording a Voice Memo Leave simple memos to your family via the Genibo. The Genibo will help show your love to your family. Press ‘2’, then OK, on the remote control. The Genibo will stop and sit and get ready to record a voice. If there is enough space to record a voice memo, the Genibo will display a (memo) code to be saved on the eye emoticon LED. A voice will say, “Leave your memo after the beep.” After the beep, start recording. Can be recorded up to 10 seconds. After finished, a voice says, “Ding dong dang~ Saving your recording data.” If there is a lot to record, divide it into several parts. Press “OK” again while recording, then recording will be finished immediately with a voice saying ‘Saving complete.’ Press “ESC” while recording, recording will be canceled with a voice, and the robot will switch to Autonomous Mode. Once Saving is complete, the robot will switch to Autonomous Mode. If there is not enough space, a voice will say, “Not enough space. Delete a memo and try again.” Then the robot will switch to Autonomous Mode. Up to 10 memos can be saved, and can be used as an alarm sound or a setting sound on Control Manager. 35 Instructions for Use Playing and Deleting Voice Memos To play or delete a recorded memo in the Genibo, follow the direction below. Click ‘3’ then ‘OK’ on the remote control. The Genibo will stop all actions and speak a recorded memo. It will play the memo first recorded, and show memo number on LED. Press OK to stop playing. A voice will say, “Do you want to delete the memo?” Press OK to delete it. To cancel the deletion, press ESC or wait for 3 seconds. After deletion is complete, the next data will be played. If the deletion was canceled, the previous memo will play after the point when OK was pressed. To skip the memo, use the / left/right button. Once the memo is played out, a voice says, “No more memo to play.” The Genibo will return to Autonomous Mode. Press “ESC” while playing a memo, play will be finished immediately and the robot will be back to Autonomous Mode. [Tip] While recording, playing, and erasing a voice memo, the Genibo will not respond to external touch, a voice or a cliff. Voice memo function will be stopped when the AC adapter is connected or the “Control Manager” program is connected. 36 Instructions for Use Image Recognition The Genibo performs image recognition through the camera installed on its nose and shows various reactions according to its result. The Genibo can recognize an object located within the 50-degree angle of vision from its head. Can recognize a human face, master’s face (if registered), and a moving object. At a certain point during Autonomous Mode, or if the user presses ‘4’ then OK on the remote control, the Genibo will attempt image recognition. During image recognition, the Genibo will remain sitting or standing for about 2 seconds. Can recognize the movement of an object within range of 1~3 meters from its nose. Master’s face can be best recognized within a distance of 1m. Face or master recognition is possibly done when the face looks straight at the camera. The Genibo cannot recognize profiles. Once an object is recognized through image recognition, the Genibo will make decisions on its own and show various behavior patterns. [Tip] In the dark, or in an environment where there is a backlight, the Genibo may not recognize well. Recognition depends heavily on environmental conditions. 3m 1m 50 degrees (Movement/-Face Detection) (Master recognition) Pressing ‘4’ and ‘OK’ button on the remote or at a certain point in Autonomous Mode 37 Instructions for Use Registering Master's Face The Genibo can recognize its master through image recognition after the camera takes a picture of the face. To recognize the master, the master’s face must be registered in the Genibo first. Place the Genibo facing the user. Keep them apart about 1 meter. Press ‘5’ then ‘OK’ on the remote control to start Register Master’s Face. The Genibo will stop what it is doing, facing the person’s face. The user must not move but look at the Genibo’s nose for about 10~15 seconds. Once the Genibo finds the face, it will register the user’s face as Master with a few ‘clicks’. Once Register is complete, the Genibo will play a sound that indicates Register is complete. Up to 10 faces can be registered. If more than 10 faces are registered, faces from the first registered face will begin to be deleted. 1m Press “5”→“OK” ‘Master Successfully Registered’ sound Is displayed Completion of master registeration [Tip] Register under bright light, not in the dark. Registering a face will take about 10 to 15 seconds. [Tip] If the recording face is the same one which is already registered, the Genibo will whine and rock its head, and go into the Autonomous Mode. 38 Instructions for Use Taking Pictures Take pictures using the camera installed at the tip of the Genibo’s nose. Using the remote control, send the Genibo to a desired place and take fun pictures. Press ‘6’ then ‘OK’ on the remote control. The Genibo will stop what it is doing and get ready to take pictures. Once ready, the Genibo will start taking pictures. A voice will say, “Adjust the camera in a desired direction and press OK.”. Using direction buttons, adjust the camera’s direction. (No need to press the ‘HEAD’ button) After adjusting, press OK. With a ‘click’ sound, the Genibo will start taking pictures. Keep pressing OK to continue taking pictures. If there is no remote control input for over 30 seconds, press ESC. The Genibo will switch to Autonomous Mode. [Note] After taken, pictures can be checked after being saved to PC using the Genibo Control Manager. [Tip] While taking pictures, the Genibo will not respond to external touch, a voice, or a cliff. If the user lifts up the Genibo or if the Genibo trips over, it will stop taking pictures and switch to Autonomous Mode. 39 Instructions for Use Wireless LAN Connection and Disconnection (Connecting Control Manager) To connect the Genibo and PC, connect to a wireless LAN of the Genibo first. (Available for optional purchase) Press ‘7’ then OK on the remote control. The Genibo will stop what it is doing and get ready to connect to a wireless LAN. Once ready, a voice will say, “Connecting to wireless LAN,” and wireless LAN connection will begin. Once connection is complete, a voice will say, “Wireless LAN connected,” and the robot will switch to Autonomous Mode. If connection fails, try again twice. If it still fails, a voice will say, “Wireless LAN cannot be connected. Check if AP is on and try again,” and the robot will switch to Autonomous Mode. While connection is being tried, press ESC to cancel. The robot will switch to Autonomous Mode. If wireless LAN is connected, the Genibo will speak, “Wireless LAN is already connected.” Once wireless LAN is connected, the tail LED will blink blue. [Tip] If 1 minute passes after Control Manager is closed, or if there is no PC connection for 5 minutes after wireless LAN connection, wireless LAN will automatically disconnect. Even if Control Manager is closed, and wireless LAN is not disconnected, it will be disconnected if there is a Play Contents command. 40 Instructions for Use Running Games and Special Actions Make the most of it with the Genibo through Touch & Touch Game and special actions. 1 Touch & Touch Game This game works when the Genibo’s touch sensors are touched. (To locate touch sensors, see ‘How to Touch the Genibo’ in this manual.) The Genibo makes an action asking to touch a certain area. When the area is touched, the Genibo will do a happy action; when another area is touched, sad action. The more areas the user touches right, the happier the Genibo gets. It will show tricks too. • Press ‘00 then OK’ on the remote control. The Genibo will make a sound and get ready to start a game. • Look at the Genibo’s action carefully. There are certain areas that want to be touched. Touch the right touch sensor quickly. 2 Running Special Actions The Genibo can do around 700 actions. Among them, only fun actions are grouped separately and can be run using the remote control. Try them when you want to show them off to your friends. • Find a desired action from the ‘Action Command List’ in this manual. Press the digit, then OK, on the remote control to see the special action. 41 Instructions for Use Playing Contents 1 Playing manufacturer’s contents The Genibo features pop music, child music, and dances offered by the manufacturer. Watch the Genibo’s extraordinary dance performance. • From the ‘List of Remote Control Codes and Dances’ find a desired content, press the digit, then OK, on the remote control to watch dance performance. 2 Adding and playing user created contents. (can be used when the Control Manager option is purchased) Using the Genibo Control Manager, the user can create their own contents. Or download contents made by other users from the Genibo website (www.genibo. com). Various contents will allow the user to make the most out of the Genibo. • Contents are assigned codes from 100 through 999 to be run. (3 basic dances from 100 to 102 are offered in the Genibo. The user must enter sounds directly. See ‘How to Add Download’ in this manual.) [Tip] To play contents, press ‘Content Code and OK. (The eye emoticon LED will display the code.) [Tip] Once contents start playing, series of contents will play in order until closed. [Tip] Use the PAUSE and PLAY buttons on the remote to pause or replay contents. Use the STOP button to stop and switch to Autonomous Mode. (Will switch to Autonomous Mode if 30 seconds passes with PAUSE pressed.) [Tip] Press Switch Direction button to stop the content playing. Play previous/next contents or contents in previous/next category. 42 Instructions for Use Utilizing the Genibo MENU Use the ‘MENU’ button on the Genibo remote control to use the Genibo’s various functions through voice guidance and play help. • Press the ‘MENU’ button in Autonomous Mode. The Genibo will stop what it is doing and directions will begin. • During the guide to ‘MENU,’ if the ESC button is pressed or no button is pressed for 10 seconds, the robot will switch to Autonomous Mode. • When the robot speaks directions, select a digit to cancel the directions and run a command accordingly. The Genibo Voice Directions 1 : Camera 2 : Voice MENU 3 : Alarm 4 : Connect Wireless LAN 5 : Game 6 : Channel Settings 1 : Start Image Recognition 2 : Take Pictures 3 : Register a Master 0 : Listen Again 0 : Help MENU : Listen Again 43 Instructions for Use The Genibo Voice Directions 1 : Camera 2 : Voice MENU 3 : Alarm 4 : Connect Wireless LAN 5 : Game 6 : Channel Settings 0 : Help MENU : Listen Again MENU 2 : Record 3 : Play Recordings / Delete Individual Recordings 4 : All Recordings 0 : Listen Again 1 : Add a Wake-up Call 2 : Voice 2 : Add an Alarm 3 : Alarm 3 : Listen to Wake-up 4 : Connect Wireless LAN 6 : Channel Settings 0 : Help MENU : Listen Again 1 : Camera 2 : Voice 3 : Alarm 4 : Connect Wireless LAN 5 : Game 6 : Channel Settings 0 : Help MENU : Listen Again 44 Command 1 : Camera 5 : Game MENU 1 : Start Voice Calls / Delete Wake-up Calls 4 : Listen to Alarms / Delete Alarms 0 : Listen Again Instructions for Use 1 : Camera MENU 1 : View the Details 2 : Voice of the Genibo 3 : Alarm 2 : See How to Play 4 : Connect Wireless LAN Contents 5 : Game 3 : See How to Run Motion 6 : Channel Settings 4 : See How to Give a 0 : Help MENU : Listen Again Voice Command 5 : See How to Recognize Image [Tip] If there is no additional command from the remote control for 10 to 15 seconds, it will be considered as the ESC button pressed. [Tip] Press the ESC button to move to the upper stage or get out of the MENU and switch to Autonomous Mode. [Tip] When changing remote's channels, changes must apply to both the Genibo and the remote control. If the Genibo does not understand a remote's command after channel changes, change the remote control only, up to the channel number used just before. (If change is made to the remote control only, press OK and click the channel number. At time of release, the default is set to 0.) 45 Instructions for Use How to Download/Save a file The Genibo features some dance contents (Tell Me, Girls’ Generation, Nobody) at time of release. The user can add their own mp3 files according to the following to see the Genibo’s great dance performance. See ‘Installing System Software’ in this manual and install the program on your PC. Using a cross-head driver, separate the Genibo’s abdomen case, separate USB memory, and connect it to the USB port of PC. [Tip] Cross-head screws are underneath the ‘Power Switch’ and ‘Main Power Switch’ respectively. [Tip] Once the abdomen case is separated, the user can see USB memory with a ribbon on the buttocks. Pull the ribbon to separate. Save mp3 files of Tell Me, Girls’ Generation, and Nobody to /mp3/ directory. Name mp3 files in English (No Korean), 15 characters long. e.g.) Tell Me : tellme.mp3 Girls’ Generation : girlsgeneration.mp3 Nobody : nobody.mp3 Once Save is complete, separate the USB memory from PC, put it back to the Genibo, and re-assemble the abdomen case. Turn on the Genibo, run the Control Manager Program, and select and set a remote code from the Edit Contents window and the action title provided. [Tip] Must run the Control Manager Program to connect the saved mp3 file to the remote code. [Note] Use caution not to allow foreign matter into the Genibo after separating the abdomen case. May cause electric shock or injury 46 Instructions for Use How to Upgrade Firmware The Genibo supports software upgrades to maintain the best condition. Follow the directions below to upgrade. See ‘Installing System Software’ in this manual and install the program on your PC. Using a cross-head driver, separate the Genibo’s abdomen case, separate USB memory, and connect it to the USB port of PC. [Tip] Cross-head screws are underneath the ‘Power Switch’ and ‘Main Power Switch’ respectively. [Tip] Once the abdomen case is separated, the user can see USB memory with a ribbon on the buttocks. Pull the ribbon to separate. Visit the Genibo’s website (www.genibo.com), register the product to download the latest S/W from the S/W Upgrade menu. Download S/W to your PC, extract it, and copy it to /updates/ directory in USB memory. Separate the USB memory from PC, put it back into the robot, and close the abdomen case. Turn on the Genibo. The Genibo will wake up and go into Autonomous Mode. When 3 minutes passes after Autonomous Mode started, press ‘9’ and ‘OK’ on the remote control. The Genibo will start upgrade. With a message “Please wait until upgrade is complete,” upgrade file install will begin. Once upgrade is complete, the Genibo will speak, “Upgrade is complete. Robot is restarting,” turn off, and automatically turn back on. 47 Instructions for Use Installing System Software This software allows user’s PC to recognize USB memory included in the Genibo. Install the the Genibo System Software CD included in the package to your computer. [Tip] The Genibo uses Linux as a basic operating system; all hardware is provided as supported by Linux. Software to be installed will allow the ext3 file system of Linux to be recognized on Windows. How to Install Run the installation CD. The window below will be displayed. Click Next to proceed to the next stage. Check the license agreement, click on ‘I agree’ if you agree, and proceed to the next stage. If you do not agree, cancel the installation. Click ‘Next’ while ‘Enable the Read-only Option’ is not checked. 48 Instructions for Use Click ‘Next’ while ‘Enable UTF-8 encoding’ is checked. Click ‘Next’ while ‘Enable the large-file feature’ is checked to install the program. ‘Installing program’ pop-up window Set ‘Select a Driver’ to default. Click ‘Next’ to proceed to the next stage. Check the program content. Click ‘Next’ to proceed to the final stage. 49 Instructions for Use Install is complete. Click ‘Finish’ to close Install Wizard. After install is complete, reboot to make the system work properly. 50 Genibo Specifications Category Size Weight Touch Sensor Built-in Sensors Specifications 192 x 334 x 300mm(W X L X H) 1.6kg 1 on the head, 1 on the nose, 4 on the back, 2 on the flank(left and right) Camera, Distance Sensor, Microphone Li-ion battery, 7.4V, 2,200mAh Battery Info. Charge Time : approximately 150 minutes Run Time : Approximately 90 minutes AC adapter Input Voltage : AC 100 ~ 240V at 50/60Hz Output Voltage : DC 9V, 2.5 ※ Battery charge time and run time may vary depending on term of use and conditions. 51 Troubleshooting Power does not turn on. • Check if the main power switch on the Genibo’s abdomen is on. • The battery may be completely discharged. Use an adapter and charge the battery. [Tip] Before charging, must check if the main power switch on the abdomen is on. Charging does not start. • Check if the main power switch on the Genibo’s abdomen is on. If the switch is not on, the battery will not be charged. • Check if the adapter is properly plugged. • Check the status of the Genibo’s tail LED. (LED is red if being charged; turns blue if charging is complete.) The Genibo does not move well but remains sitting or lying flat. • The battery may be running low. Or the Genibo may have run out of energy or be in a bad mood. Check the power status and charge the battery. • The Genibo may have switched to Sleep mode and be asleep. If not touched for some time, the Genibo will automatically turn off. The Genibo does not walk well; collapses often; does not move well. • The Genibo moves best on a flat, even floor, such as a wooden floor or floor covered with laminated paper. • On a rubber floor with too much friction, or on a carpeted floor, the Genibo may not move naturally because of pressure on its joints. Long-term use in such environment may result in failure. 52 Troubleshooting The Genibo’s legs are limp. • If left hanging up in the air too long, the Genibo may have limp legs. In this case place the Genibo down on the floor and keep it balanced. The Genibo will then wake up. • The Genibo’s joints get loosened as power turns off if charged or asleep for too long. The Genibo does not respond to the remote control. • Check the battery status of the remote control. • Check if there is an obstacle between the Genibo and remote control • The Genibo’s channel may not agree with that of the remote control. At time of release, the default is set to 0. If channels disagree, press 0 through 9 while OK is pressed, and remove hand from the OK button. Channel will change to the number pressed. Repeat this and find the right channel. The Genibo stopped and does not move even if eye emoticon LED is on. • Check if the Genibo has enough battery power. • Turn off the Genibo, then turn it back on. If the problem does not improve, contact our service center. The Genibo’s joints, such as legs, make a ‘cracking’ sound. • To protect the Genibo’s joints, a slip-gear mechanism is featured. When overloaded, a joint makes a ‘cracking’ sound because this slip gear works properly. • If the noise persists for no apparent reason, contact our service center. 53 Service Information Consumer Rights All consumers have ‘privileged rights’ to receive free-of-charge service for six (6) months from the purchase date in case the product suffers a failure during use. However, in the event of failure arising due to a mistake on consumer’s part or due to a natural disaster, any service related to the failure will be charged even during the free service period. Liability for Paid Service (Customer Liable for Costs) The service requested will be considered payable during the free service period in the event of the following: 1. Not product failure. • Any request for service that is not related to product failure will be chargeable. Please read your User Manual carefully. (If repair is impossible, it will be subject to special standards.) 2. Failure occurred due to a mistake on consumer’s part. • Failure occurred due to abnormal power supply or a defect in the power supply device. • Failure occurred because foreign matter was allowed in or absorbed in the product. • Product damage or functional failure because the product was dropped or shocked. • The user arbitrarily disassembled the product, thereby losing or damaging a part/parts. • The exterior was damaged or deformed by an organic solvent, such as thinner or benzene. • Failure occurred because the user did not abide by ‘Important Safety Instructions’ in User Manual. • Failure occurred due to an external cause or a user’s mistake, rather than a defect in the product. 3. Other reasons • Failure occurred due to natural disasters (lightening, fire, storm, floor, gas, sea wind, earthquake, etc.) • In the event that spare parts, such as a battery, are exchanged. 54 Service Information Product Warranty Product Description: Intelligent Pet Robot “Genibo” Date of Purchase: YY MM Model Name: Genibo-QD DD Serial No.: Customer Name: Telephone: Address: Retain this Warranty stating the date of purchase and provide it when asking for repair to receive satisfactory service. 1. Quality Assurance of this product is hereby stated and thus warranted. 2. Warranty period will be calculated including the purchase date; ensure that the purchase date has been written down. (If the purchase date cannot be confirmed, the warranty period will be considered as beginning 6 months after the manufacturing date.) 3. This Warranty will never be re-issued; carefully retain it with User Manual. 55 Consumer Compensation Info. Trouble Types Major repair required within ten days of purchase Repair of important parts required within one month of purchase Intellignet Pet Robot Major repair for exchanged product required within one month of exchange If exchange is impossible Performance, functional failure naturally occurred during normal use User Manual Product defect Compensation Details Within Warranty Period After Warranty Period Exchange or refund Exchange Refund Free-of-charge repair Defect recurred (4th time) even after repair of the defect Failure of several parts recurred (5th time) after 4 times of repair Irreparable Irreparable because there is no spare part for repair Exchange or refund Serviceman lost the product that consumer provided for repair. Refund by adding 10% to the depreciated amount Damage caused during transportation or installation of the product Performance & functional Failure on purpose or user's mistake Reparable Irreparable because there is no spare part for re pair Exchange after an amount equivalent of repair charge is paid. • Failure occurred due to natural disasters (fire, sea water, gas, earthquake, flood, storm) • Exchange of spare parts worn out naturally • Failure occurred due to abnormal power supply or defects in the supply device • Due to an external factor, rather than a defect in the product. Paid repair Paid repair • Failure occurred because the product was repaired or remodelled by someone other than a repairman of our company>s sale store or Customer Support Centre. Model: Genibo-QD For information about our product, call us at +82-32-329-5551 (ext. 112). ● ● (Weekdays: 10:00~17:00) ● For any problem or inconvenience during use of your product, please contact DASA ROBOT CUSTOMER SERVICE CENTER. Warranty Period is 6 months. (Except for spare parts, such as a battery.) Service Request and Information Customer Service Center: Telephone +82-32-329-5551 (ext. 112), 10:00-17:00 (except holidays) DASAROBOT CO., LTD., 11th floor, Bucheon Techno Park Bldg. 401, Yakdae-dong, Wonmi-gu, Bucheon-city, Gyunggi-do, Republic of Korea, 420-734 Intelligent Pet Robot User Manual Service Request & Information +82-32-329-5551 (ext. 112) 10:00~17:00 (except holidays) www.dasarobot.com www.genibo.com • We strongly recommend users to read “Important Safety Instructions” before use. • Product Warranty is enclosed in this manual.