1
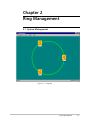
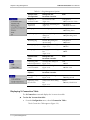
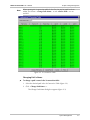
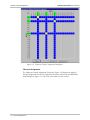
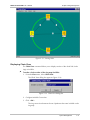
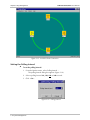
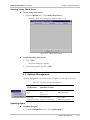
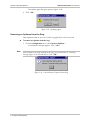
RADview-HPOV/TDM
Network Management System for TDM Applications
Optimux-T3 Ring
© 1994–2002 RAD Data Communications
Publication 11/02
Contents
Introduction .................................................................................................................... 1-1
1.1 Overview .......................................................................................................... 1-1
Opening the Application..........................................................................................1-1
Ring Management ........................................................................................................... 2-1
2.1 System Management ......................................................................................... 2-1
Displaying X-Connection Table ................................................................................2-2
Connecting Optimuxes ............................................................................................2-5
Polling Ring Status....................................................................................................2-8
Updating Ring Configuration....................................................................................2-8
Renaming Ring ........................................................................................................2-9
Closing the Ring.......................................................................................................2-9
Exiting the Application ...........................................................................................2-10
Viewing Paths ........................................................................................................2-10
Displaying Chain View ...........................................................................................2-11
Setting the Polling Interval......................................................................................2-12
Viewing Sanity Check Errors...................................................................................2-13
2.2 Optimux Management .................................................................................... 2-13
Updating Agent .....................................................................................................2-14
Removing an Optimux from the Ring .....................................................................2-14
RADview-HPOV/TDM User’s Manual
i
Table of Contents
List of Figures
1-1. Ring List .................................................................................................................... 1-2
1-2. Add Ring ................................................................................................................... 1-2
2-1. Ring Map .................................................................................................................. 2-1
2-2. X-Connection Table................................................................................................... 2-3
2-3. Change Path Name ................................................................................................... 2-4
2-4. Deleting Connections ................................................................................................ 2-4
2-5. Add/Delete Path Dialog Box...................................................................................... 2-5
2-6. Optimux Channel Assignment Dialog Box ................................................................. 2-6
2-7. Path Name Dialog Box .............................................................................................. 2-7
2-8. Disconnecting All Connections .................................................................................. 2-8
2-9. Update Ring Configuration ......................................................................................... 2-8
2-10. Rename Ring............................................................................................................ 2-9
2-11. Closing Application.................................................................................................. 2-9
2-12. Exiting Application................................................................................................. 2-10
2-13. Viewing Paths........................................................................................................ 2-11
2-14. Chain View Dialog Box.......................................................................................... 2-11
2-15. Invisible Chain Connection.................................................................................... 2-12
2-16. Polling Interval ...................................................................................................... 2-12
2-17. Sanity Check Errors................................................................................................ 2-13
2-18. Updating Agent ..................................................................................................... 2-14
2-19. Cannot Remove Optimux From Ring..................................................................... 2-14
List of Tables
2-1. Ring Management Options ........................................................................................ 2-2
2-2. Optimux Channel Assignment Color Coding.............................................................. 2-7
2-3. Optimux Management Options ............................................................................... 2-13
ii
RADview-HPOV/TDM User’s Manual
Chapter 1
Introduction
1.1 Overview
RADview-TDM Network Management System for Optimux-T3-Ring provides you
with all the necessary tools manage a number of Optimux-T3 units connected
together in a ring topology. The ring topology enables you to connect the
Optimux-T3 units without the need to connect them through an SDH network.
The application allows you to connect one channel of an Optimux-T3 to another
channel of an Optimux-T3 in the ring.
Note
You can check management of the Ring from two separated stations that are
connected to the same Node. However, you can’t check management of the Ring
from two separate stations that are connected to the different nodes on the same
Ring.
Opening the Application
To open the application:
1. From the HPOV map’s Misc menu, select RADview/OV followed by Service
Center and Optimux T3 Ring…
The Optimux T3 Ring Dialog Box (Figure 1-1) appears listing all existing
rings.
Figure 1-1. Ring List
Overview
1-1
RADview-HPOV/TDM User’s Manual
Chapter 1 Introduction
2. Select a ring from the list and click <Open>.
A window appears with the message “Initializing Ring”. A progression bar
indicates the status of the initialization process. When initialization
finishes, the Ring Map appears.
Adding a Ring to the Ring List
To add a ring to the ring list:
1. From the Ring List dialog box (Figure 1-1), click <Add>.
The Add Ring dialog box appears (Figure 1-2).
Figure 1-2. Add Ring
2. Configure the following parameters: Ring Name, Select Optimux and Select
Optimux ID.
3. Click <Set>.
The Optimux is added to the ring.
Removing a Ring from the Ring List
To remove a ring from the ring list:
1. Select a ring in the Ring List dialog box (Figure 1-1) and click <Remove>.
A confirmation dialog box appears.
2. Click <OK> to confirm remove.
Closing the Ring List
To close the ring list:
In the Ring List dialog box (Figure 1-1), click <Close>.
The ring list closes.
1-2 Overview
Chapter 2
Ring Management
2.1 System Management
Figure 2-1. Ring Map
System Management
2-1
RADview-HPOV/TDM User’s Manual
Chapter 2 Ring Management
Table 2-1. Ring Management Options
System Tasks –
Configuration
Dialog Box and
Parameter Location
Path
Displaying Xconnection table
X-Connection Table
(Figure 2-2)
Configuration
X-Connection Table…
Connecting
Optimuxes
Add/Delete Path dialog box
(Figure 2-5)
Configuration
Add/Delete Path…
Polling agent
See Polling Ring Status
Configuration
Poll Ring Status
Updating ring status
Update Ring Configuration
dialog box
(Figure 2-9)
Configuration
Update Ring Status
Renaming ring
Rename Ring dialog box
(Rename Ring)
Configuration
Rename
Closing ring map
Close Application dialog box
(Figure 2-11)
Configuration
Close
Exiting application
Exiting Application dialog
box
(Figure 2-12)
Configuration
Exit
System Tasks –
Fault
Dialog Box and
Parameter Location
Path
Displaying paths
between Optimuxes
Viewing Paths dialog box
(Figure 2-13)
Fault
Path
Making chain
sections invisible
Chain View dialog box
(Figure 2-14)
Fault
Chain View
System Tasks –
Options
Dialog Box and
Parameter Location
Path
Setting polling
interval
Polling Interval dialog box
(Figure 2-16)
Options
Polling Interval
Displaying Sanity
Check errors
Sanity Check Errors dialog
box
(Figure 2-17)
Options
Sanity Check Errors
Displaying X-Connection Table
The X-Connection command displays the X-connection table.
To view the X-connection table:
•
From the Configuration menu, select X-Connection Table…
The X-Connection Table appears (Figure 2-2).
2-2 System Management
RADview-HPOV/TDM User’s Manual
Note
Chapter 2 Ring Management
When opening the X-connection table for the first time and no path has been
added, the buttons <Change Path Name…> and <Delete Path> are not
enabled.
Figure 2-2. X-Connection Table
Changing Path’s Name
To change a path’s name in the X-connection table:
1. Select the desired path in the X-Connection Table (Figure 2-2).
2. Click <Change Path Name…>
The Change Path Name dialog box appears (Figure 2-3).
System Management
2-3
RADview-HPOV/TDM User’s Manual
Chapter 2 Ring Management
Figure 2-3. Change Path Name
3. Configure New Path Name and click <Set>.
The new path name appears in the X-Connection Table (Figure 2-2).
Deleting Paths from X-Connection Table
To delete a path from the X-connection table:
1. Select the desired path in the X-Connection Table (Figure 2-2).
2. Click <Delete Path>
A confirmation dialog box appears (Figure 2-4).
Figure 2-4. Deleting Connections
3. Click <OK>.
The path is deleted from the X-Connection Table (Figure 2-2).
Printing X-Connection Table
To print the X-connection table:
1. In the X-Connection Table (Figure 2-2), click <Print>.
The printer dialog box appears.
2. Select desired printer and click <OK>.
2-4 System Management
RADview-HPOV/TDM User’s Manual
Chapter 2 Ring Management
Connecting Optimuxes
The Add/Delete Path command allows you to connect one Optimux to another.
To Connect one Optimux to another:
1. From the Configuration menu, select Add/Delete Path.
The Add/Delete Path dialog box appears (Figure 2-6).
Or
2. On the Ring Map (Figure 2-1), drag and drop one Optimux to another
Optimux.
The Add/Delete Path dialog box appears (Figure 2-6).
Figure 2-5. Add/Delete Path Dialog Box
3. Configure desired parameters and click <Set>.
A window appears with the message “Collecting Data”. A progression bar
indicates the status of the process. When the process finishes the Optimux
Channel Assignment dialog box appears (Figure 2-6).
System Management
2-5
Chapter 2 Ring Management
RADview-HPOV/TDM User’s Manual
Figure 2-6. Optimux Channel Assignment Dialog Box
Channel Assignment
The Optimux Channel Assignment Dialog Box (Figure 2-6) displays the physical
channel assignments for the two Optimuxes that were selected in the Add/Delete
Paths dialog box (Figure 2-5). The cells of the table are color-coded.
2-6 System Management
RADview-HPOV/TDM User’s Manual
Chapter 2 Ring Management
Table 2-2. Optimux Channel Assignment Color Coding
Color
Remarks
Title Cells
Bright Green
Channel is connected to the opposite Optimux in the table
Dark Green
Channel is connected to another Optimux (not in the table)
Blue
Channel can not be selected (E1 group 4th channel)
Gray
Channel is disconnected
E1/T1/NA
Indicates channel type. NA for E1 group 4th channel
Inside Cells
Yellow
Channel is connected to the opposite Optimux in the table
Blue
Channel can not be selected (E1 group 4th channel, E1-T1 mismatch,
connected channel to another Optimux)
Gray
Channel is disconnected
Making Connections
To select a cell:
1. Using the mouse’s left button, click inside a cell in the Optimux Channel
Assignment dialog box (Figure 2-6).
2. Click <Connect>.
Note
Connect is available only when there is communication with the agent.
The cell becomes yellow (all other cells in the row and column line
become blue) and the Path Name dialog box appears.
Figure 2-7. Path Name Dialog Box
3. Configure the Path Name and click <Set>.
The Path Name dialog box closes.
4. Click <Close> in the Channel Assignment dialog box (Figure 2-6).
System Management
2-7
RADview-HPOV/TDM User’s Manual
Chapter 2 Ring Management
Disconnecting Connections
You can disconnect one connection or all connections.
To disconnect a connection:
1. Using the mouse’s left button, click inside a yellow cell in the Optimux
Channel Assignment dialog box (Figure 2-6).
2. Click <Disconnect>.
The connection is disconnected.
To disconnect all connections:
1. Using the mouse’s left button, click inside a yellow or gray (empty) cell in the
Optimux Channel Assignment dialog box (Figure 2-6).
2. Click <Disconnect All>.
A confirmation message appears (Figure 2-8).
Figure 2-8. Disconnecting All Connections
3. Click <OK>.
All connections between the Optimuxes are disconnected.
Polling Ring Status
To poll the agent:
•
From the Configuration menu, select Poll Ring Status.
The agent is polled immediately.
Updating Ring Configuration
To update the ring configuration:
1. From the Configuration menu, select Update Ring Configuration.
A confirmation message appears.
Figure 2-9. Update Ring Configuration
2-8 System Management
RADview-HPOV/TDM User’s Manual
Chapter 2 Ring Management
2. Click <OK>.
Renaming Ring
To rename the ring:
1. From the Configuration menu, select Rename...
The rename ring dialog box appears (Figure 2-10).
Figure 2-10. Rename Ring
Note
If you click <Set> before configuring a New Name the message: “Ring name
already exists!” appears (with red background) in the bottom part of the Rename
Ring dialog box.
2. Configure New Name.
3. Click <Set>.
Closing the Ring
To close the ring map (Figure 2-1):
1. From the Configuration menu, select Close.
A confirmation message appears.
Figure 2-11. Closing Application
2. Click <OK>.
The ring map closes and the Ring List appears.
System Management
2-9
RADview-HPOV/TDM User’s Manual
Chapter 2 Ring Management
Exiting the Application
To exit the application:
1. From the Configuration menu, select Close.
A confirmation message appears (Figure 2-12):
Figure 2-12. Exiting Application
2. Click <OK>.
The application closes.
Viewing Paths
The Path command displays paths between Optimuxes on the ring.
To display paths between Optimuxes on the ring map:
•
From the View menu, select Path.
The existing path between the Optimuxes is displayed on the map
(Figure 2-13).
2-10 System Management
RADview-HPOV/TDM User’s Manual
Chapter 2 Ring Management
Figure 2-13. Viewing Paths
Displaying Chain View
The Chain View command allows you to display sections of the chain link (in the
ring) as invisible.
To make a chain section (of the ring map) invisible:
1. From the View menu, select Chain View.
The Chain View dialog box appears (Figure 2-14).
Figure 2-14. Chain View Dialog Box
2. Configure Invisible Connection.
3. Click <OK>.
The ring connection between the two Optimuxes becomes invisible on the
ring map.
System Management
2-11
RADview-HPOV/TDM User’s Manual
Chapter 2 Ring Management
Figure 2-15. Invisible Chain Connection
Setting the Polling Interval
To set the polling interval:
1. From the Options menu, select Polling Interval…
The polling interval dialog box appears (Figure 2-16).
2. Select a polling interval: 60, 120, 180 or 240 seconds.
3. Click <Set>.
Figure 2-16. Polling Interval
2-12 System Management
RADview-HPOV/TDM User’s Manual
Chapter 2 Ring Management
Viewing Sanity Check Errors
To view sanity check errors:
•
From the Options menu, select Sanity Check Errors…
The sanity check errors dialog box appears (Figure 2-17).
Figure 2-17. Sanity Check Errors
To print the sanity check errors:
1. Click <Print>.
The printer dialog box appears.
2. Select desired printer and click <OK>.
2.2 Optimux Management
Optimux management is performed when an Optimux in the ring is selected.
Table 2-3. Optimux Management Options
System Tasks –
Configuration
Dialog Box and
Parameter Location
Path
Updating Optimux
agent
Updating Agent dialog
box
(Figure 2-18)
Configuration
Update Agent…
Removing
Optimux from ring
See Removing an
Optimux from the Ring
Configuration
Remove Optimux…
Updating Agent
To update the agent:
3. From the Configuration menu, select Update Agent…
Optimux Management
2-13
RADview-HPOV/TDM User’s Manual
Chapter 2 Ring Management
The update agent dialog box appears (Figure 2-18).
4. Click <OK>.
Figure 2-18. Updating Agent
Removing an Optimux from the Ring
Only Optimuxes that do not exist in other ring application can be removed.
To remove an Optimux from the ring:
5. From the Configuration menu, select Remove Optimux…
A confirmation message appears. Click <OK>.
Note
If the Optimux is currently working in the ring, you cannot delete it. A warning
message (Figure 2-19) will indicate so. Click <OK>.
Figure 2-19. Cannot Remove Optimux From Ring
2-14 Optimux Management