1
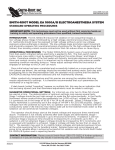
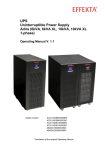
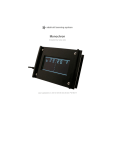
Since 1964, the leader in effective, safe and reliable products for fisheries conservation. Knowledgeable biologists depend upon Smith-Root equipment. USER’S MANUAL PES PORTABLE ELECTROANESTHESIA SYSTEM SMITH-ROOT, INC. Products for Fisheries Conservation WWW.SMITH-ROOT.COM 10166 USER’S GUIDE Contents Introduction................................................ 1 Getting Started........................................... 2 Front Panel Items........................................ 3 Hookup...................................................... 4 Anesthesia Tank.......................................... 5 Electrodes................................................... 6 Operations................................................. 7 Controls and Settings.................................. 9 PES™ Menu Guide................................... 11 • Status Display......................................................... 11 • Load Setup............................................................. 11 • Save Setup............................................................. 12 • Timer...................................................................... 12 • Pulse Type.............................................................. 13 • Volts....................................................................... 13 • Frequency.............................................................. 13 • Duty Cycle............................................................. 14 • Menu Button.......................................................... 15 System Menu Items.................................. 16 Pre-Programmed Doses............................ 17 Safety....................................................... 18 Specifications............................................ 19 Items manufactured by companies other than Smith-Root carry the original manufacturer’s warranty. Please contact product manufacturer for return instructions. All Smith-Root, Inc. manufactured products are covered by a one year warranty. Credit & Refund Policy: Customers returning equipment, in new condition, will be given credit to the applicable VISA/Master Card account within five days from the date of the return. A return authorization must accompany returns. Valid equipment returns include, but are not limited to, ordering incorrect equipment, funding deficits, and defective equipment returned for reimbursement. All returns are subject to a restocking fee and applicable shipping charges. The restocking fee is figured at 10% of the purchase price but not less than $20.00. Customers receiving equipment in damaged condition will be referred to the shipping company for insurance reimbursement. Rev. WARNING - Battery posts, terminals and related accessories contain lead compounds, chemicals known to the state of California to cause cancer and reproductive harm. Wash hands after handling. 2009 I PES PORTABLE ELECTROANESTHESIA SYSTEM INTRODUCTION The PES™ is a portable device intended for the generation of electrical energy to be used for the electrical stunning of aquatic organisms. It is designed for use in field applications, in hatcheries and on boats. The PESTM Electroanesthesia System consists of: •PESTM Control Unit •Anesthesia Tank (with electrodes) •Electrode cables •Remote Switch •Battery Charger •Manual The unit must be connected to an electrical outlet to charge the battery prior to use. The PES™ is connected to the anesthesia tank via the anode and cathode cables. The anode and cathode plates sit on either end of the anesthesia tank. Fish to be anesthetized are introduced to the water between the anode and cathode. The PES™ is operated by means of a remote Switch. A bright LED flasher and audible alarm provide a clear indication of when output is present. Attention!: The PES™ is designed for battery operation only! The PES™ should NOT be connected to an electrical outlet during operation. Operation of the PES™ while connected to an electrical outlet may damage internal components leading to failure of the system. Also, The device must be OFF when the battery is being charged. 1 www.smith-root.com USER’S GUIDE GEtt GE ttIInG St tt St tAR ARtED ARt PORTABLE ELECTROANESTHESIA INSTRUCTIONS INSTRUCTIONS FOR CHARGING THE BATTERY • Connect the external charging system to the PES via the Recharge Input plug. • Connect the external charging system to an AC electrical outlet. • Check the indicator lights on the external charging system to ensure that charge is being delivered. • Disconnect the charging system from the PES and AC outlet after the battery is fully charged. OPERATING INSTRUCTIONS The PES is designed for battery operation only. The PES should NOT be connected to an electrical outlet during operation. Red button – Device ON/OFF. For on, twist the button to the right. Press the button to turn the unit off. LOAD SETUP – Review and select dose. Press LOAD SETUP, use the 5 and 6 buttons to review the electrical parameters to be applied. Press SELECT to load the settings for use. The dose to be delivered is programmed by the user and is defined by PULSE TYPE, TIME, VOLTS, FREQ, and DUTY CYCLE. Use the 5 and 6 buttons to review the SELECT to load settings into memory. • Connect the external c • Connect the external c • Check the indicator lig parameters available us • Disconnect thefor chargin OPERATING INSTRU The PES is designed for Note: Any changes to the dose requires the user to review of ALL do connected to an electric parameters (PULSE TYPE, TIME, VOLTS, FREQ, DUTY CYCLE). Use Red button – Device ON to turn unit of 6 buttons to review the parameters and SELECT button to load thethe param LOAD SETUP – Review a memory. Display messages will prompt user for the required input. A Press LOAD SETUP, use parameters have been reviewed, press SAVE SETUP, use the 5applied and parameters to be to be delivered progra to select the memory location (page) where the newly definedisdose TIME, VOLTS, FREQ, and saved, press SELECT. Up to 10 doses can be saved into memory. ON/OFF TM bEfoRE yoU USE thE E PES : UNIT IS ACTIVE WHEN LIGHT IS FLASHING ON/OFF TURN RIGHT TO ACTIVATE INSTRUCTIONS FOR TURN RIGHT TO I-On I-On PUSH OFF 0-Off 0-Off RECHARGE INPUT Power button, showing ON and OFF positions. SWITCH 26.4VREMOTE DC 3 Amps & RECHARGE INPUT REMOTE OUTLET The PES™ must be fully charged before you can use it.ACTIVATE Make sure that the unit is OFF by verifying that the large red knob is in the downward position, PUSH OFF as shown in the diagram on the front panel. 0-Off 0-Off PORTABLE Charge the battery using the following instructions. Once the battery is fully RECHARGE INPUT ELECTROANESTHESIA charged, you may begin using the PES™ for anesthetizing fish. PES I-On I-On SYSTEM ChARGInG thE bAtt A ERy Att ER Prior to using the PES, connect the unit to the Load battery charger using theSave following procedure: Menu Setup Setup • Connect the external charging system to an AC electrical outlet. • Connect the external charging system to the Timer PES™ via the Recharge Input plug. • Check the indicator lights on the external charging system to ensure that charge is being delivered. Duty Pulse Volts system Freq. • Disconnect the charging from the PES™ Cycle Type and AC outlet after the battery is fully charged (RED indicates that the battery is charging and GREEN indicates that the battery is fully charged and ready for use. 2009 SWITCH 26.4VREMOTE DC 3 Amps & RECHARGE INPUT REMOTE OUTLET Select INDICATOR LIGHTS 2 PES PORTABLE ELECTROANESTHESIA SYSTEM fRont PA PAn nEl IIt tEMS PORTABLE ELECTROANESTHESIA INSTRUCTIONS INSTRUCTIONS FOR CHARGING THE BATTERY • Connect the external charging system to an AC electrical outlet. • Connect the external charging system to the PES via the Recharge Input plug. • Check the indicator lights on the external charging system to ensure that charge is being delivered. • Disconnect the charging system from the PES and AC outlet after the battery is fully charged. OPERATING INSTRUCTIONS The PES is designed for battery operation only. The PES should NOT be connected to an electrical outlet during operation. Red button – Device ON/OFF. For on, twist the button to the right. Press the button to turn the unit off. LOAD SETUP – Review and select dose. Press LOAD SETUP, use the 5 and 6 buttons to review the electrical parameters to be applied. Press SELECT to load the settings for use. The dose to be delivered is programmed by the user and is defined by PULSE TYPE, TIME, VOLTS, FREQ, and DUTY CYCLE. ON/OFF A I-On I-On PUSH OFF 0-Off 0-Off RECHARGE INPUT SWITCH 26.4VREMOTE DC 3 Amps Note: Any changes to the dose requires the user to review of ALL dose parameters (PULSE TYPE, TIME, VOLTS, FREQ, DUTY CYCLE). Use the 5 and 6 buttons to review the parameters and SELECT to load the parameters into memory. Display messages will prompt user for the required input. After all parameters have been reviewed, press SAVE SETUP, use the 5 and 6 buttons to select the memory location (page) where the newly defined dose will be saved, press SELECT. Up to 10 doses can be saved into memory. UNIT IS ACTIVE WHEN PES Menu LIGHT IS FLASHING ANNUNCIATOR PORTABLE ELECTROANESTHESIA SYSTEM Save Setup Load Setup ANODE Timer PUSH DOWN TO UNLOCK Select & RECHARGE INPUT REMOTE OUTLET E DEvICE on/off (A) The large red button located on the left side of the front panel turns the device on and off. For on, twist the button to the right. Press the button to turn the unit off. The battery charger must be disconnected from the PES™ prior to turning the device on. AD JUST TURN RIGHT TO ACTIVATE Use the 5 and 6 buttons to review the parameters available for use. Use SELECT to load settings into memory. D AnnUnCIAto CIA R (b) CIAto The annunciator provides an audible warning that electrical energy is being output by the PES. Volume of the audible warning can be adjusted by rotation of the annunciator. A test beep sounds at power up. CATHODE Pulse Type Volts Freq. Duty Cycle PUSH DOWN TO UNLOCK 26.4V DC 3 Amps PES™ front panel items InDICAto DICA R lIGht (C) DICAto A flashing light (located in the center of the front panel) provides a visual warning that electrical energy is being output by the PES. A test flash is given at power up. PULL UP AnoDE AnD CAtho CA DE ConnECtoRS (D) The receptacle labeled anOde is the connection for the lead attached to the positive plate of the exposure tank. The receptacle labeled cathOde is for connection of the lead attached to the negative plate of the exposure tank. Locking anode and cathode connectors REMOTE SWITCH The remote switch features a momentary push-button. CHARGER Remote switch and battery charger share a common, electrically isolated plug 3 OUTLET The anode and cathode cables use locking connectors. To unlock them, press downward to disengage the locking mechanism and then grasp the body of the plug and pull upwards. REMotE SWItCh/REChARGE ConnECtoR (E) Activation of the remote switch initiates the output of electrical energy. The remote switch must remain activated for continued output. Deactivation of the remote switch terminates output. Termination of electric current output by the PES™ may also be controlled automatically via the dose timer. The Remote Switch and the Recharger share a common connector, although their respective conductors are isolated (refer to chaRGInG the BatteRY for complete instructions). www.smith-root.com USER’S GUIDE hooK-UP SEtt SE ttIInG UP yo tt yoUR UR PES TM ANODE ANODE CATHODE CATHODE connectors firmly ANESTHESIA REMOTE SWITCH ELECTRODE CONNECTION hoo ooK K-U -UP PD DIREC IRECt IREC tIon onS 1. Ensure that the PES™ is OFF by pressing the red button and disconnect the unit from the battery charger. 2. Connect the Red cable to the red-ringed output connector on the control panel labeled anOde. 3. Connect the BLacK cable end to the black output connector labeled cathOde. Connect anode and cathode cables to each electrode REMOTE OUTLET 4. Connect the cables to the electrode assemblies on either side of the anesthesia tank using the connectors. It is unimportant which one is cathode or anode, but both cable ends must be electrically isolated from one another. 5. Connect the Remote Switch cable to the 4-pin connector labeled RemOte OUtLet. Plug in the remote switch IMPoRt RtA Rt tAnt! DO NOT CONNECT BATTERY CHARGER TO uNIT WHEN OPERATING THE uNIT! It is intended for charging the battery only. It cannot power the unit during operation. Charge the battery with unit shut down only. also, make sure you only use the supplied battery charger with the PeS. Using an incorrect charger will damage the unit. 2009 4 PES PORTABLE ELECTROANESTHESIA SYSTEM WARnInG: uNIT IS NOT WATERPROOF WITH THE LID OPEN. AVOID PLACING uNIT IN AN AREA WHERE IT MAY GET SPRAYED, SPLASHED OR BECOME IMMERSED IN WATER OR OTHER LIQuIDS. While we have taken great care to ensure that the PES™ is safe to use near water, it is not designed to be used in the rain, where it could be splashed with water and/or should never be immersed in water. Never use the PES™ if it is wet. Dry unit off with a dry cloth before operating. If necessary, wipe control panel surface with a moist towel. Solvents or cleansers may damage the control panel or controls. Avoid spilling liquids on the panel as they may damage internal components. AnESthESIA tA t nK The PES is available with a 150 quart tank (Part # 09879) The electroanesthesia tank has two electrode assemblies. One is permanently fixed to one end of the tank and the other may be placed at varying distances using the guides within the tank interior. The output cables are attached to each electrode by means of the corresponding connectors. It’s not important which electrode is assigned to either ANODE or CATHODE, as both are electrically isolated from one another. Both electrodes are enclosed within a non-conductive plastic screen to prevent direct accidental contact with the electrode surface. 5 www.smith-root.com USER’S GUIDE ElECtRoAnESthESIA tA t nK CARE & MAIntEnAnCE of thE ElECtRoDES It may become necessary to clean the electrodes after periods of extended use. Over time, the electrodes accumulate a build-up of oxidation, making settings unpredictable and shortening battery life between recharges. To clean the electrodes, remove the protective screen covering the electrode plate. On the movable electrode unit, carefully remove the two plastic screws on the outer edges of the top handle assembly. The electrode and handle can be slid out of the screen assembly. On the fixed electrode unit, carefully remove the four (4) screws that hold the screen to the electrode and put the screen aside. Remove the two (2) stainless steel screws holding the electrode plate to the top mounting bracket. Remove any oxidation with an abrasive pad or sandpaper. It is not recommended that you use any cleaning chemicals or solvents, as they may remain on the electrode assemblies and unintentionally contaminate the electroanesthesia tank. Assemble both units in reverse order, taking care not to damage or crossthread the plastic screws. ovERfloW StA t nDPIPE tA Screen MOVEABLE ELECTRODE Electrode Plastic screen Included with the PES™ anesthesia tank is a stand-pipe that allows users to replenish the fresh water in the tank by running a hose into it, while letting the over-flow water vent safely out the tank’s drain hole. Screen The 90˚ elbow is attached to the drain from the inside of the tank and the resulting overflow goes out the top of the standpipe, while maintaining desired water level. The amount of water in the tank can be adjusted accordingly using different lengths of vertical pipe. To attach the standpipe to the outlet drain, press the elbow over the drain tube until it can’t go any further. It is important that the standpipe is not in place when the PES tank is in transit. Otherwise, it may be damaged by items shifting around inside the tank during shipping./ StoRAGE PoUCh There is a pouch for the storage of the output cables, remote switch and manual for the PES™ located inside the lid. It is constructed of tough, water resistant nylon and features a hook-and-loop closure system on the protective flap. Care should be taken not to overfill the pouch with too many items as it could interfere with the closing of the lid. The pouch may be removed for cleaning and reattached using the hookand-loop retention system inside the lid. 2009 6 PES PORTABLE ELECTROANESTHESIA SYSTEM oPERAt PERAtIon onS S IntERACtInG WIth thE PES Once the unit is turned on, a series of buttons and the centrally located display on the front panel of the device are used to interact with the PES™ and to program the electrical doses to be output. loAD SEtUP, SElECt, t,, SA t SAv vE SEtUP The LOAD SETUP button is used to review the various electrical parameters defining a dose. The PES™ is pre-programmed with 10 stored, predefined doses (See PRe-PROGRammed dOSeS SPecS.). After pressing LOAD SETUP, the and buttons are used to scroll through the predefined doses (defined by sets of electrical parameters), and the SELECT button is used to load the set of parameters for use. These parameters can be modified by the user and, if desired, these new parameters can be stored for recall. The dose to be delivered is programmed by the user and is defined by PULSE TYPE, TIME, VOLTS, FREQ, and DUTY CYCLE. Use the and buttons to review the parameters and SELECT to load the parameters into memory. Display messages will prompt the user for the required input. After all parameters have been reviewed, press SAVE SETUP, use the and buttons to select the memory location (page) where the newly defined dose will be saved, press SELECT. Use the SAVE SETUP button to save the settings. Up to 10 sets of parameters (doses) can be saved into memory. Note: Because there is a potential for interactions among the electrical parameters defining a “dose”, a review of ALL dose parameters is required when a change is made to any of the parameters defining a dose (PULSE TYPE, TIMER, VOLTS, FREQ, DUTY CYCLE). PUlSE tyPE The “PULSE TYPE” button provides options for type of electric current output by the PES. After pressing PULSE TYPE use the and buttons to scroll through the choices. When the desired output is displayed on the screen, press SELECT to load the option into memory. Options for output: Ramped DC, Standard pulsed DC, and Bursts of pulses. 7 www.smith-root.com LOAD SETUP – Review and select dose. Press LOAD SETUP, use the 5 and 6 buttons to review the electrical parameters to be applied. Press SELECT to load the settings for use. The dose to be delivered is programmed by the user and is defined by PULSE TYPE, TIME, VOLTS, FREQ, and DUTY CYCLE. 6 buttons to review the parameters and SELECT to load memory. Display messages will prompt user for the requi parameters have been reviewed, press SAVE SETUP, use to select the memory location (page) where the newly de saved, press SELECT. Up to 10 doses can be saved into m USER’S GUIDE oPERAt PERA IonS PERAt RAMPED-DC ON/OFF UNIT IS ACTIVE WHEN TURN This is when the output ramps up from zero to RIGHT TO I-On I-On ACTIVATE maximum (voltage level programmed by the user) over a period of 1 second. This term applies to PUSH OFF continuous DC only and not to pulsed waveforms. When using the dose TIMER, upon completion RECHARGE of the exposure, the ramped DCINPUT output will also decrease back to zero over a period of 1 second. Total exposure time includes the periods for ramping the output up and down; minimum total exposure time is 226.4V seconds. REMOTE SWITCH DC 3 Amps PES LIGHT IS FLASHING PORTABLE ELECTROANESTHESIA SYSTEM 0-Off 0-Off & RECHARGE INPUT When output is controlled manually (via remote REMOTE OUTLET switch), upon activation of the remote switch the output current starts low and takes 1 second to reach the selected maximum; if the output voltage was set for 100 volts the output would take 1 second to raise the voltage to 100 volts level. The output will remain at this level until interrupted by release of the switch. Release of the remote switch deactivates the output immediately. Menu Save Setup Load Setup Timer Pulse Type Select Volts Freq. Duty Cycle example: If the pulse timer is disabled when using Ramped DC, the DC output increases from 0 to the prescribed voltage level over a period of 1 second, when the remote switch is activated. The output will remain at this level until the remote switch is deactivated (released). The output immediately decreases to zero upon release of the remote switch. If the pulse timer is enabled, the output increases from 0 to the prescribed voltage level over a period of 1 second, remains at that level for exposure time minus 1 second, then decreases to 0 over a period of the final second. If, however, the remote switch is released before the exposure-time has elapsed the output is immediately turned off. St nDARD PUlSED DC StA Output immediately goes to maximum voltage and stays constant for the entire pulse duration, then drops to zero. This type of pulse is known as “rectangular”. bURSt of PUlSES Output is a series of dual-frequency rectangular pulses. This type of output may be referred to as dualfrequency pulsed DC, gated burst pulsed DC, or Complex Pulsed System. The pulses occur at two frequencies, an inner (burst) frequency and an outer (cycle). voltS The amplitude of the PES™ output can be varied between 20 and 400 volts, in 5 volt increments. After pressing VOLTS, use the and buttons to scroll through the available voltages. Press SELECT to load the voltage setting into memory. 2009 8 PES PORTABLE ELECTROANESTHESIA SYSTEM CONTROLS & SETTINGS FREQ Multiple options available are for the frequency of the pulsed DC output by the PES. Pulse frequency can be varied between 5 Hz and 100 Hz, in increments of 5 Hz, and then 250Hz, 500Hz and 1000Hz. After pressing FREQ, use the and buttons to scroll through the frequency options. Press SELECT to load the desired frequency setting into memory. When the Pulse-Type is Burst-of-Pulses the Burst Frequency (inner frequency) is displayed first followed by the Cycle (outer) Frequency. Each frequency must be selected individually by using the and buttons. When the Pulse-Type is Standard Pulse, only the Cycle Frequency is displayed. When the Pulse-Type setting is Ramped-DC, the message “Not used in DC” is briefly displayed, the screen then returns to the previous menu. DUTY CYCLE Pressing DUTY CYCLE displays the calculated “percentage of time” for the selected pulse type and frequency. When the Pulse-Type is Standard Pulse, the calculated on-time (the ratio of the length of the pulse to the period of the waveform) is displayed. Options for duty cycle vary between 1 and 99%. After pressing DUTY CYCLE, use the UP () and DOWN () to scroll through the available options. Press SELECT to load the desired setting into memory. When the Pulse-Type is Burst-of-Pulse, the duty cycle of the two frequencies is displayed. The duty cycle of the inner burst is displayed first, followed by the frequency of the outer cycle and the duty cycle of the CYCLE frequency is displayed second. When the Pulse-Type is Ramped-DC the message “Not used in DC” is displayed. 9 www.smith-root.com USER’S GUIDE CONTROLS & SETTINGS TIMER Termination of the output of the PES™ can be automated with the TIMER or controlled manually. The TIMER can be adjusted from 1 to 255 seconds or “disabled”. The output of the PES™ is always controlled by the hand switch. When PULSE TYPE is STANDARD PULSES or GATED BURST the minimum time for output is 1 second and the maximum is 255 seconds. When PULSE TYPE is Ramped-DC the minimum time is 2 seconds and the maximum time is 256 seconds: One second is needed to ramp up the voltage and one second to ramp it back down. Dual Mode The PES™ can be configured to output two different doses, in sequence. In this configuration, a secondary dose is delivered following a primary dose, when the primary waveform TIMER elapses on a single activation of the remote switch. Each of the phases of the exposure the primary phase and the secondary phase are programmed by the user using the PULSE TYPE, DUTY CYCLE, FREQ, TIMER, and VOLTS buttons, as previously described for a single phase output. Releasing the remote switch at any time will stop the output of the PES. In Dual-Mode the prefix “Pri” is displayed for the Primary dose setting. Pressing “SELECT” advances to display the prefix “Sec” for the secondary dose. Pressing “SELECT” again sets the displayed option for the Secondary dose type. Dual mode requires the pulse TIMER for the primary waveform. Disabling the primary waveform timer disables the dual mode. Default Settings The PES™ comes with 10 sets of parameters pre-programmed as default doses. The individual parameters of the doses can be changed. The 10 storage locations (identified on the screen) can be reviewed, changed, and stored in memory for future use, by the user. To restore the factory default settings press the “MENU” button, press the “UP” arrow to cycle to “System Menu 9/10”, “Restore factory default settings?” and then press “SELECT”. Press the “UP” arrow to confirm the operation. When powered on, the unit initializes with the dose settings previously loaded by the user. The dose settings to be used should be reviewed prior to operation of the unit. 2009 10 PES PORTABLE ELECTROANESTHESIA SYSTEM PES™ Menu Guide 1 Status Display On Startup and at the end of various other menu operations the PES™ displays the current Status. There are 3 or 4 Status displays. If a menu button is pressed while in another menu the PES™ returns to the status display. The default is to display the current waveform settings such as these: The up or down arrow (or) will cycle the to one of the other Status displays like these: 2 Load Setup There are 10 settings in memory. Pressing LOAD SETUP will display one of these settings. The setting number is shown in the upper right corner of the display. The up and down arrows will cycle through all settings from 0 to 9. Pressing SELECT will load the displayed setting, display a message to that effect and return to the Status Display. Note: For the Dual mode settings the Primary (Pri) waveform is displayed first regardless of which arrow is pressed. The Secondary (Sec) wave form is only displayed if the up arrow is pressed while viewing the Primary waveform setting. Example settings: 11 www.smith-root.com USER’S GUIDE PES™ MenuS 3 Save Setup In the save setting menu only the setting number is display in the upper right corner. Pressing SELECT will overwrite the setting at that memory location with the current waveform parameter settings. The display will then return to a Status Display. Example: 4 Timer The TIMER button allows the pulse timer to be changed. When the pulse TIMER is enabled the output is only active for the set number of seconds after the output switch is pressed and then the output automatically stops. With the Wave Time disabled the output remains active for as long as the output button is held on. Pressing the Timer button displays the current setting which can be changed by pressing the up or down arrow until the desired setting is displayed and then pressing SELECT. After pressing SELECT the display will then return to Status Display. Like most wave settings menus if Dual mode waveform is enabled the first display will show the Primary waveform setting for that parameter. Pressing SELECT, whether or not a change is made, will switch the display to the Secondary waveform setting. Note: For dual waveform output to function the Dual mode setting must be enabled and the Primary Wave Timer must not be disabled. The PES™ switches from the Primary waveform to the secondary waveform when the Primary Wave Time expires. Even if Dual mode is enabled the output will not switch if the Primary Wave Time is disable. The Secondary Wave Time can be disabled. In that case the output will switch from the Primary waveform to the Secondary waveform when the Primary Wave Time expires and the PES™ will continue to output the Secondary waveform for as long as the REMOTE SWITCH is held. 2009 12 PES PORTABLE ELECTROANESTHESIA SYSTEM 5 Pulse Type Press the PULSE TYPE menu button to select one of the three output waveform types; Ramped DC, Standard (Rectangular Pulses), or Burst of Pulses. On pressing the PULSE TYPE menu button the current setting is displayed. Pressing the up or down arrows changed the display and pressing the SELECT button changes the setting to the one displayed and return the display to Status Display. If Dual mode waveform is enabled the first display will show the Primary Waveform pulse type. Pressing SELECT will set the type for the Primary waveform and the display will then show the Secondary waveform type. Pressing SELECT again would set the Secondary waveform type and the display will return to Status Display. Graphical display are shown only for example and are in no specific order. 6 Volts Pressing the VOLT menu button displays the current voltage setting. The up and down arrows change the voltage value in the display and the SELECT button sets that voltage for the waveform. If Dual mode is enabled the display first shows the Primary wave voltage. Pressing SELECT sets the voltage for the Primary and switches the display to show the Secondary waveform voltage setting which can be changed with the arrow buttons and set with the SELECT button. 7 Freq. Pressing the FREQ. button displays the current frequency setting, if the pulse type is set for DC, in which case the display moves to the next waveform of a Dual mode setting or briefly displays an error message and then returns to Status Display. With some frequency displays, the bottom line of the display also shows the calculated width of the pulse in milliseconds using the current setting for Duty Cycle. The displayed waveform frequency setting can be varied up or down with the up or down arrows and the setting of the waveform is changed to that displayed value when the SELECT button is pressed. The range of frequencies may be limited by the current Duty Cycle setting, as the PES™ has limits for pulse width. If BURST OF PULSES wave type is set, the first display in the frequency menu is for the Burst Frequency. Pressing SELECT sets that frequency and switches the display to the Cycle Frequency display where it can be raised, lowered or left unchanged. Pressing SELECT again would then set the Cycle Frequency and the display would return to Status Display. 13 www.smith-root.com USER’S GUIDE PES™ MenuS If Dual mode is enabled the first display shows the frequency setting of the Primary waveform. If that waveform is a Burst of Pulses type the display would show the setting of the Burst Frequency of the Primary Waveform otherwise the display will simply show the Cycle Frequency. Changes to the displayed setting can be made with the up or down arrows. Pressing SELECT would save that setting and change the display to the next menu item. Menu items follow the following order depending on the Dual mode setting and the Pulse Type settings. The display cycles to the next menu item when SELECT is pressed. • Cycle Frequency > Status Display • Burst Frequency > Cycle Frequency >Status Display • Primary Cycle Frequency > Secondary Cycle Frequency > Status Display • Primary Burst Frequency > Primary Cycle Frequency > Secondary Cycle Frequency > Status Display • Primary Cycle Frequency > Secondary Burst Frequency > Secondary Cycle Frequency > Status Display • Primary Burst Frequency > Primary Cycle Frequency > Secondary Burst Frequency > Secondary Cycle Frequency > Status Display • Primary Cycle Frequency > Status Display • Secondary Cycle Frequency > Status Display • Primary Burst Frequency > Primary Cycle Frequency > Status Display • Secondary Burst Frequency > Secondary Cycle Frequency > Status Display If one of the waveform types was set to Ramped DC in the last four sequences, the menu state that would have displayed and that set’s waveform frequency would be skipped. Note that in DUAL MODE, if the Primary wave Pulse Type is set to Ramped DC, the frequency menu starts with the frequency setting of the Secondary waveform. The following graphical displays are shown only for example and are in no specific order. 8 Duty Cycle The DUTY CYCLE button is use to view and set the duty cycle, percent of the wave cycle (where the output is at the set voltage). If the pulse type is BURST OF PULSES, the DUTY CYCLE button sets the number of pulses in a burst. The pulse width, calculated using the current frequency setting, is shown on the last line of the DUTY CYCLE display. If the wave type is set for DC and Dual mode is not enabled or the secondary wave type is also DC, an error message is shown briefly before returning to Status Display. If the wave type is set for Standard Pulse than the current waveform’s duty cycle setting is displayed. Changes to the displayed setting can be made with the arrow buttons, limited by the currently set frequency, and the PES’s pulse width limitations. The SELECT button saves that display setting and the display returns to the Status Display. 2009 14 PES PORTABLE ELECTROANESTHESIA SYSTEM Duty Cycle (Cont.) If the current pulse type is BURST OF PULSES, the first display shows the number of pulses per burst. The number shown can be changed with the arrow keys. After the parameter is set with the SELECT button, the display will show the current duty cycle setting. This displayed setting can also be changed with the arrow keys and selected with the SELECT button. As in other menus if Dual mode is enabled the display will show the setting(s) of the Primary waveform, which can be changed with the arrow keys. After pressing the SELECT button, the Secondary wave’s setting will be displayed. After pressing the SELECT button for the secondary waveform’s duty cycle, the display returns to Status Display. The menu cycles through the following items based on the setting of Dual mode and Pulse Type(s) with each press of the SELECT button. • Duty Cycle > Status Display • Pulses/Burst > Burst Duty > Status Display • Primary Duty Cycle > Secondary Duty Cycle > Status Display • Primary Pulses/Burst > Primary Burst Duty > Secondary Duty Cycle > Status Display • Primary Duty Cycle > Secondary Pulses/Burst > Secondary Burst Duty > Status Display • Primary Pulses/Burst > Primary Burst Duty > Secondary Pulses/Burst > Secondary Burst Duty > Status Display • Primary Duty Cycle > Status Display • Primary Pulses/Burst > Primary Duty Cycle > Status Display • Secondary Duty Cycle > Status Display • Secondary Pulses/Burst > Secondary Duty Cycle > Status Display The last four cycles occur when either the Primary or the Secondary wave type is set for DC. Graphical display are shown only for example and are in no specific order. 9 Menu The Menu Button allows access to a set of system operating parameters. The menu always starts with the same parameter and cycles forward with the up arrow and backward with the down arrow. In most menu items the display shows the parameter and the setting change that would occur if the SELECT Button is pressed. To leave the setting unchanged cycle to another menu parameter with the arrow buttons or abort the System Menu by pressing the menu button again and the display will return to Status Display. If the SELECT button is pressed the system setting is changed a message may be briefly displayed before the display returns to the Status Display. 15 www.smith-root.com USER’S GUIDE SYSTEM MenuS System Menu items are (in order): 1. Timer Reset Pressing SELECT in this menu will reset the seconds counter in the Status Display to 0. 2. Quick Setup Pressing SELECT will initiate the Quick Setup sequence. 3. Dual Mode Pressing SELECT will toggle the current setting of Dual Mode; enabling or disabling it. 4. Power Limit Press SELECT to enter the power limit menu where the max power setting can be changed. Pressing Select in this menu will return the display back to Status Display. 5. Limit Mode In Power Limiting or Thermal Fold-back the power is reduced by changing the voltage or the frequency, while retaining the pulse width. This menu allow the selection of which method us used. Note: Frequency limiting is not possible with a DC Pulse. 6. Thermal Foldback If the PES™ gets too hot this mode, if enabled, will reduce the output power like Power Limit mode. Press SELECT in this menu to toggle the current setting of this mode: Enabling or Disabling it. 7. Low Output Current As a safety feature; If the PES™ output is activated but the unit does not detect any significant output current the output will be shut off and an error message displayed. In this Menu the test for Low Output Current can be Disabled. Press SELECT in this menu to toggle this system setting; Disabling or Enabling it. 8. Extended Tests Pressing SELECT in this menu item will initiate a basic test of the PES™ unit. This should only be performed either by or under the direction of a engineer or technician. 9. Factory Defaults Pressing SELECT in this menu item will set the current waveform and all stored waveforms to the Default Factory Setting. 10. History Press SELECT in this menu item to access the event history of the PES™ unit. Press the up or down arrow buttons to go forward or backward in history. Press SELECT or Menu to return to the Status Display 2009 16 PES PORTABLE ELECTROANESTHESIA SYSTEM Pre-programmed doses Setting 0: Ramped-DC 100 Volts With the activation of the remote switch the unit outputs a low voltage that raises to 100 volts in 1 second and stays at that level until the remote switch is released. SETTING 1: Standard 100-Volt Pulse of 30Hz with a 25% duty The PES™ outputs 100 volts pulses 30 times a second. The pulse period is 33 1/3 milliseconds so the output voltage is 100 volts for 8 1/3 milliseconds and off for 25 milliseconds. SETTING 2: Standard 100-Volt Pulse of 60Hz with a 25% duty 60 time each second the unit outputs 100 volts for approximately 4.17 milliseconds with 12.5 milliseconds off time between pulses. SETTING 3: Standard 100-Volt Pulse of 15Hz with a 25% duty 15 pulses per second of at 100 volts for 16 2/3 milliseconds and output off for 50 milliseconds. SETTING 4: Standard 100-Volt Pulse of 90Hz with a 25% duty Approximately 2.78 milliseconds of 100 volts followed by no output for about 8.33 milliseconds 95 time each second. SETTING 5: Standard 100-Volt Pulse of 100Hz with a 25% duty 100 volts for 25 milliseconds and 75 milliseconds off time 100 time each second. SETTING 6: Burst of 3 100-Volt pulses of 250Hz with a 62% duty at 15Hz 3 pulses at 100 volts for 2.48 milliseconds with 1.52 milliseconds between pulses repeated 15 time each second. SETTING 7: Burst of 3 100-Volt pulses of 500Hz with a 62% duty at 30Hz 3 pulses of 1.24 milliseconds at 100 volts with 0.760 off time between pulses repeated 30 times each second. SETTING 8: Burst of 3 50-Volt pulses of 250Hz with a 62% duty at 15Hz for 1 second followed by a Burst of 3 100-Volt pulses of 250Hz with a 62% duty at 15Hz for 2 seconds. 3 pulses at 50 volts for 2.48 milliseconds with 1.52 milliseconds off time repeated 15 times a second for 1 second and then followed by similar pulses at 100 volts for 2 seconds and then the output stops. SETTING 9: Burst of 3 100-Volt pulses of 250Hz with a 62% duty at 15Hz for 2 second followed by a Burst of 3 50-Volt pulses of 250Hz with a 62% duty at 15Hz for 1 seconds. 3 pulses at 100 volts for 2.48 milliseconds with 1.52 milliseconds off time repeated 15 times a second for 2 second and then followed by similar pulses at 50 volts for 1 seconds and then the output stops. 17 www.smith-root.com USER’S GUIDE SAFETY Safety Checklist: Before operating unit, make sure that: • At least 2 people on the crew know how to administer first aid for electric shock. • Unit is clean and dry. • All cables are in good condition, with no cracks or abrasions and that all connectors are in place with no missing or damaged parts. • Safety control switches are in good condition and functioning properly. • Indicators and alarms are functioning properly. • All personal protective equipment is in good condition. • All electrical connections in the system are clean and tight. • Electrodes are clean and in good condition, with no loose or damaged parts. • Treatment tanks clean and in good condition, with no leaks or damaged areas. • Fish handling system is clean and in good condition, with no worn or damaged parts. • Power outlet is in good condition and is properly wired. • Work area is clear, with no trip hazards. • Floor has a non-slip surface. • ALL CREW MEMBERS know where the nearest phone is and the emergency services number is clearly posted by the phone. 2009 18 PES PORTABLE ELECTROANESTHESIA SYSTEM PES™ Specifications Conductivity Range Input Voltage Input Current Input Monitoring Output Voltage Output Current Output Waveforms Output Frequency Duty Cycle Waveform Storage Output Power Overload Protection Output Indicators Output Timer Dose Timer Safety Devices Dimensions Weight 19 100 to 1500 microsiemens 25.9VDC Nominal 20 Amps Max. Input voltage and current plus fuel gauge type display for battery voltage 20 to 400V in 5V steps 40A peak max. 4A continuous at 100V Ramped DC, Pulsed DC, Burst of Pulses DC 5 to 100Hz in 5Hz steps, 250, 500, and 1000Hz 1 to 99% in 1% steps Save voltage, frequency, duty cycle, and pulse type for 10 different waveforms 400W max. continuous, 16,000W peak max. Excessive peak current, average current, or temperature will shutdown the unit before damage can occur. Resets automatically when condition is corrected Audio tone with increasing pulse rate for output power, Flashing red light, Status display for output voltage both average and peak, output current both average and peak and output power 0 to 999,999 seconds reset-able via menu. 2 to 256 seconds in 1 second steps Low output current sensing, Remote safety hand switch, Emergency stop switch and Electronic circuit breaker 19.63”W X 15.5”H X 8.75”D 49.86mm X 39.37mm X 22.23mm 28.5lbs 12.96kg www.smith-root.com USER’S GUIDE NOTES Use this section to write down settings for future use or other notes. 2009 20 SMITH-ROOT, INC. 14014 NE Salmon Creek Ave. Vancouver, WA 98686 USA 360.573.0202 Voice 360.573.2064 FAX [email protected] www.smith-root.com