1
Building the kit
This is a simple soldering project but assumes some soldering experience. To find out more, do a search
on “how to solder electronics” using your favorite search engine. A few sites such as aaroncake,
ElectronixExpress, and Science Buddies have information on how to solder. Equipment needed is:
a)
b)
c)
d)
e)
Soldering iron intended for electronic assembly.
Solder can be leaded or lead free; however, do not use acid core solder
Wire cutters and needle nose pliers
A clean well lit workspace
A magnifying glass
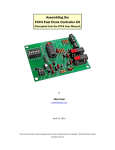
Verify all parts are available before starting construction. They should match this photograph
although some of the parts may have variations in colors and markings. Read through each of the
assembly steps before doing the work.
Quantity
Designator
Rating
Manufacturer
Part Number
1
5
C1, C2,
C3, C4, C5
0.1uF 50V X7R
Ceramic Radial
Capacitor
Murata
RDER71H104K0K1
C03B
2
2
D1, D2
Orange LED 2V
20mA
Kingbright
WP710A10SEC
3
1
J1
(Optional)
6-pin 2mm
Single Row
Header
Molex
53014-0610
4
1
J2
16-pin 0.1" Dual
Row Header
FCI
68602-116HLF
5
1
J4
DE9 9 pin Male
D-Connector
Amphenol
L717SDE09P
6
1
J5
DE9 9 pin
Female DConnector
Amphenol
L77SDE09S
RS232 to 3V/5V Logic Level Translator Kit – ©2012 Ferndale Labs
Photo