1
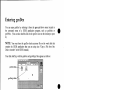
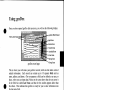
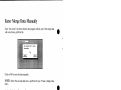
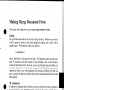
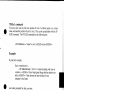
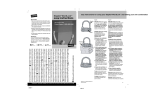
geoDex
User's Manual
------------- Berkeley Softworks
2150 Shattuck Avenue
Berkeley, California 94704
Update Policy
To participate in Berkeley Softworks' update service, fill out and return the geoDex
Registration card found at the back of the manual. Registered users will be sent
notices outlining the procedure for obtaining updates and revisions.
Warranty
Berkeley Softworks warrants that this product is free from defects in materials and
workmanship under normal use for a period of ninety (90) days from the date of
purchase. If a defect occurs during this period, you may return your disk to Berkeley
Softworks or its authorized dealer, along with a dated proof of purchase, where it will
be replaced free of charge.
There are no other warranties, express or implied regarding the disk and related
materials, their fitness for any purpose, their quality or merchantability. Berkeley
Softworks shall not be liable for any incidental, consequential, or direct damage
resulting from the breach of any express or implied warranty, including damage to
property.
GEOS, deskTop, geoDex, geoFile, geoMerge, geoWritc, is (C) Copyright Berkeley
Softworks, 1985, 1986.
Commodore 64 is a registered trademark of Commodore Electronics Ltd.
Commodore 128 is a trademark of Commodore Electronics Ltd.
License
This manual and software are copyrighted by Berkeley Softworks and are intended for
use on a single machine. You may not copy this manual or software whole or in
part, except in the normal use of the software or to make a backup copy. You may
not make copies to lend, rent or lease to others. You may transfer this program and
license it to another if (1) all of the materials purchased (including backup copies)
are sold, given or loaned to another person and (2) the transferee agrees to be bound
by all the terms and conditions of this agreement.
The software program(s) and manual in this package are provided "as is" without
warranty of any kind, either express or implied, including, but not limited to the
implied warranties of merchantability or fitness for a particular purpose.
geoDex by: Chris Hawley
Manual by: John Miller
Printed 10/86
geoDex
User's Manual
Berkeley Softworks
2150 Shattuck Avenue
Berkeley, California 94704
Welcome to geoDex
geoDex expands the "whole new world" created by GEOS. This manual is divided
into four chapters.
1. Before You Begin: instructs you on installing and making a backup copy
of your original geoDex disk.
2. geoDex: a filing system that stores miscellaneous infonnation together and
makes it available for instant recall.
3. geoMerge: a mail merge program allowing you to print out customized
form letters. Used with geoDex, geoMerge gives you a way to print phone
lists or address labels quickly and easily.
4. deskTop and Drivers: a new GEOS deskTop, new printer and input
drivers.
Table of Contents
e
Chapter 1: Before You Begin
Install geoDcx
1-1
Chapter 2: geoDex
Entcring geoDex
Using geoDex
Moving Between Records
Searching for a Record
Printing Records
geoDex Record Groups
Quitting geodex
Keyboard Shortcuts
geoDex Autodial Feature
Error Messages
e
2-2
2-3
2-6
2-7
2-8
2-10
2-11
2-12
2-13
2-14
Chapter 3: geoMerge
Entering geoMcrge
Using geoMerge-a Quick tutorial
Entering Merge Data Manually
Making Merge Document Forms
Using Merge Data Files
Create a Merge Data File
Use a Merge Data File with a Merge Form File
Use geoDex to Makc Merge Data Files
3-2
3-3
3-4
3-7
3-10
3-11
3-12
3-14
Chapter 4: deskTop and Drivers
New deskTop
New Printer and Input Drivers
e
Index
4-2
4-3
5-1
Chapter 1: Before Yon Begin
Before you start to use geoDex, follow these directions. This chapter walks you
through installing geoDex on your GEOS system, making a backup of your
geoDex disk, and making work disks.
Install geoDex !!
Make a Backup Copy!!
Make A Work Disk!!
Here's How...
1. Boot your GEOS boot disk as described in your GEOS manual.
2. Close your GEOS boot disk.
3. Insert the geoDex disk in the disk drive and open it.
4. Open the file geoDex by clicking on the geoDcx icon and selecting open [rom
the file menu, or by double clicking on the geoDex icon. The geoDex screen
will appear with a dialog box on top of it.
5. Select Quit to return to the deskTop.
6. Repeat steps 4 and 5 for the geoMerge icon.
7. Close the geoDex disk and place a write protect tab on it.
8. Use the BACKUP or DISK COpy program supplied on your GEOS disk to
make a backup copy of geoDex. Put this backup copy in a safe place. If you ever
have difficulty with your original geoDex disk, use this backup disk.
1-1
Before You Begin
geoDex is now installed on your GEOS system. Now you need to make a work
disk (work disks are fully described in your GEOS manual). There are several ways
to make work disks for using geoDex:
Use the BACKUP or DISK COpy program supplied on your GEOS disk. This
produces a copy of the entire geoDex disk.
D
Use the deskTop to format a new disk and to move the files from geoDex onto
this new disk. This method allows you to have just the files you need on a work
disk.
D
Before You Begin
1-2
_
•
Chapter 2: geoDex
geoDex icon
- The GEOS desk accessory, geoDex, is a small filing system suitable for keeping
names, addresses and other miscellaneous information together and available for
instant recall. You can also use geoDex to create merge document forms and,
when used with the geoMerge application, print phone lists or address labels
quickly and easily.
In this chapter you will learn about:
• geoDex records
• Searching for records
• Printing records
• Groups of records
2-1
geoDex
Entering geoDex
You can open geoDex by selecting it from the geos pull-down menu located in
the command menu of a GEOS application program, such as geoPaint or
geoWrite. (You can also double-click on the geoDex icon on the desktop to open
it.)
NOTE: You must have the geoDex desk accessory file on the work disk that
contains the GEOS application that you are using (see "Copy a File from One
Disk to Another" in the GEOS manual).
Your disk deskTop, with the geoDex and geoMerge files appears as follows:
geoDex Icon
geoMerge
geoDex deskTop
geoDex
2-2
e
Using geoDex
Once you have opened geoDex desk accessory, you will see the following display:
geoDex File Drawer
File Letter Tabs ......-li.....
Icon
Autodiallcon
geoDex record page
This is where you will create your geoDex records, which are like index cards of
related information. Each record can contain up to 10 separate fields such as
name, address, and phone. (For our purposes a field can be defined as an area, or
place, where you can input data.) Notice on the screen above that the text cursor is
in the field box called Last Name, and that the box outline appears darker than
the others. This indicates that geoDex is ready for you to enter information into
the last name field.
If you move the pointer into another of the field boxes (such as First), and click,
that box's outline will appear darker than the rest, and the text cursor will be in it.
This is called "selecting a field." (See "Moving Between Fields" later in this
chapter to learn other ways to move around a geoDex record.)
You can put any characters you wish into a field (except RETURN). The
following list shows you the maximum number of characters that can be in each
field:
Last Name -- 13 characters
First
-- 13 characters
-- 1 character
Middle
-- 17 characters
Address
-- 12 characters
City
-- 2 characters
State
-- 10 characters
Zip
-- 10 characters
Misc
-- 16 characters
Phone
Groups (3) -- 3 characters (for each group)
2-3
geoDex
If you type more than the maximum number of characters into one of the above
fields, geoDex will ignore those characters that are over the maximum.
NOTE: In some cases (especially if you are using the bold option), all of the
characters that you type will not fit into the box, even though the maximum
number of characters has not been reached. In this case, the characters that do not
fit will not be displayed, but they are still saved in the record. They can therefore
be printed out, or used in a merge data file.
Moving Between Fields in a Record
Besides positioning the pointer over a field and clicking to select it, you can use
the Return key to select the next field in the record. (See the field list above for
the order in which fields will be selected using this method.) Also, you can use
the keyboard cursor keys to move forward and backward through the list of fields.
For instructions on how to use the keyboard cursor keys, see the "Keyboard
Shortcuts" section later in this chapter.
Enter Data into a Field
Once you have selected the field that you want to fill, simply begin typing to enter
text into it. Below is a sample geoDex record:
Page Turn Icon
Save a Record
To save the current record , click on one of the file letter tabs in the geoDex
file drawer. geoDex saves the record alphabetically by last name. For example,
the record shown above will be saved under the 'F' tab.
geoDex
2-4
e
Delete a Record
To delete the current record, click on the Delete icon. This will delete only the
record that is displayed.
NOTE: There is no way to recover a record once you have deleted it.
Create a New Record
To create a new record, click on the tab marked New in the geoDex file drawer.
This will open a new record with empty field boxes.
2-5
geoDex
Moving Between Records
Records in geoDex are stored alphabetically at all times. Use the methods outlined
below to "call-up" the records you want to use.
e
Use the Page Turn Icon
The easiest way to move between records in geoDex is to use the page turn icon
(the "dog-ear" in the lower righthand comer of the geoDex record page). Click on
the upper (bent-over), righthand comer of the icon to view the next record in
geoDex. (All changes to the current record will be saved to the disk before the next
record is displayed.) To display the previous record, click on the lower lefthand
comer of the page turn icon.
If you are typing in a new record, clicking on the upper comer of the page tum
icon will display the first record in geoDex, namely the one closest to the
beginning of the alphabet. If the current record is the last record in geoDex, then
the program will "wrap" to the fIrst record, i.e., the fIrst one listed alphabetically.
Use the Cursor Keys
Pressing the down cursor key will also display the next record. To display the
previous record, press the up cursor key. (See "Keyboard Shortcuts" later in this
chapter.)
Click on a Letter Tab
In the geoDex file drawer are a set of tabs, each with a lettter of the alphabet on
it. These are called letter tabs. In order to see the records whose last names
begin with a particular letter, simply click on that letter. (The fIrst record
displayed will be the first record, alphabetically, in that letter tab file.) The
asterisk, *, tab contains all the records whose last names do not begin with a letter
(10 Downing, for example). The tab marked New is used to create new records
(see above, "Create a New Record").
NOTE: The tabs do not stay in the same place as you move between diferent
records. The first tab matches the last name of the current record. Succeeding tabs
are listed in alphabetical order and "wrap" back to the start of the alphabet. For
example, if the current record is for Francis Fishfinder, the tabs follow like this: G,
H, I, ... X, Y, Z, *, New, A, B, C, D, E.
geoDex
2-6
,
Searching for a Record
geoDex will search for a particular record if you know all or part of the last name
of the record(s). To perform a search, click on the Search icon. A dialog box
will appear asking you to type in the last name you want geoDex to find. After
typing in the name, press Return. geoDex will try to find the first person with a
last name that matches the one you typed in. geoDex searches in alphabetical
order, so that the first match will always be the one that comes first in the
alphabet. If a match is found, geoDex will display that record. To see other
records with the same last name, use the page tum icon or cursor keys.
If no match is found, a dialog box will appear telling you that there is no record
with that last name in your geoDex.
NOTE: geoDex makes no case distinctions when searching. For example,
given jaMes, geoDex will match a record with a last name of James.
Special Search Characters, ? and
*
If you insert a question mark(?) into the search name, it will act as a "wild-card"
character. In other words, geoDex will allow any character in a last name to match
this character. For example, if you type in R?th, geoDex will look for Roth,
Ruth, Rath, etc., and will display whichever it finds first.
You can type as many? as you like into a search name (J??es will match James,
Jones, or Jykes), but you cannot type ? in the first position of a name. For
example, ?ames is not allowed.
If you type an asterisk (*) at the end of a list of characters in a search name,
geoDex will only search for a match to the characters before the * and disregard any
subsequent characters in the name it matches. For example, if you type Da* as a
search name, geoDex will match Davis, Davenport, or any other name that starts
with Da.
NOTE: Do not begin a search word with *.
2-7
geoDex
Printing Records
To print your records in one of several formats, click on the Print icon. A dialog
box will appear asking you to choose one of four print formats:
Print
Select desired output dialog box
·Phone list
Prints a phone list of all the names in geoDex (or selected group). The
format is as follows:
Francis P. Fishfinder. . . . . .. . . ...
9 19 576-1212
Mosey Z. Pokeal ong. . . . . . . . . . . . .
Joseph Smith. . . . . . . .. . . . . . . .. .
214 323-1212
212 555-1212
·Address labels (1 inch), (1 1/2 inches)
Prints each record in geoDex (or selected group), on an address label with
the spacing either 1 or 1 1/2 inches between labels. The format is as
follows:
Francis P. Fishfinder
123 Sea Lane
El Pescadero, CA 921 12
Mosey Z. Pokealong
42 Sleepy Hollow Ct.
New York, TX. 75757
#
10
Joseph Smith
2343 1st Ave.
Big Apple, NY. 10010-0050
geoDex
2-8
e
•List all field data
Makes a quick listing of all the field data in each record of geoDex (or
selected group, see "geoDex Record Groups" below), for easy reference. The
format is as follows:
Francis P. Fishfinder
919 576-1212
123 Sea Lane
El Pescadero, CA 92122
boat charter
ACC REC
Mosey Z. Pokealong
214323-1212
42 Sleepy Hollow Ct.
New York, TX. 75757
fast photo
ph doc ACC
Joseph Smith
212555-1212
2343 1st Ave.
Big Apple, NY. 10012-0050
doc
2-9
geoDex
geoDex Record Groups
Records can be grouped by typing in some sort of group identifier (up to three
characters) into one of the Group field boxes near the bottom of the record page.
A record can belong to as many as three groups.
.,.,
Why Group Records?
There may be times that you are only interested in viewing, or printing a particular
set of records in geoDex. For example, suppose you are the secretary of the local
PTA, and you want to send a flyer to all PTA members. All the names of the
members are on records in your geoDex, but so are a lot of other names of people
who are not members. Or maybe you just want to page through the records of
PTA members in order to update their telephone numbers. To group these related
records, so that you can recall them all together at a later time, you might type
PTA, into one of the Group boxes whenever you want to indicate that a particular
record is also part of the PTA members group.
Viewing, Printing, or Merging a Group
To view or print the records of a group, click on the Group icon. A dialog box
will appear, asking you which group you want to work with. If you type in PTA
only those records with a group field that matches PTA will be displayed (or
printed). The field PTA can be in any of the three group field boxes of a record.
(to show that geoDex is selectively displaying the group PTA, the group field
name that is selected will appear in reverse video.)
While a group is being used, paging through the records will display only those
records that are in that group. If you click on Print, only the records of that
group will be printed. If you want to 'merge' (see next chapter) the records of a
group, clicking on the Merge icon will create a merge data file with only those
records that are in that group.
NOTE: You can work (i.e., view, print or merge), with more than one group at
a time.
geoDex
2-10
e
Quitting geoDex
To quit geoDex, click on the Quit icon. This will return you to the deskTop of
the GEOS application that you were using.
2-11
geoDex
Keyboard Shortcuts
The following shortcuts can be performed by holding down the Commodore key
C= (located lower righthand side of the keyboard), and pressing the indicated letter.
Autodial Feature
Delete the current record - Search for a record. - Create a merge file - Select a group - Print records - Quit geoDex - Change style between plain/bold face - (no equivalent on the screen)
C=, and
C=, and
C=, and
C=, and
C=, and
C=, and
C=, and
C=, and
Display first record of a letter's file - (equivalent to clicking on a tab)
C=, shift key and
one of A thm Z
Cursor Keys
right one character: cursor right
left one character: cursor left and the shift key
down one line: cursor down
up one line: cursor up and the shift key
geoDex
2-12
d
x
s
m
g
p
q
y
e
geoDex Autodial Feature
geoDex has autodialing capability which allows you to automatically dial the
phone number of the current geoDex record. To use Autodial follow the directions
below.
1: Make sure that your Commodore modem is plugged into the user port
of your Commodore computer. (The user port is located on the back
of the computer. It is the slot furthest to the left.) The modem must
be connected to your wall jack by a modular connector; you phone
should be plugged into the modem.
2: Page to the record of the person you want to call in the geoDex file
drawer (see above,"Moving Between Records").
3: Pick up your phone's receiver. You should hear a dial tone.
4: Click on the Telephone icon (or use the keyboard shortcut, see
above). The modem will dial the number listed in the current record.
2-13
geoDex
I
Error Messages
"There is insufficient room to save the previous entry."
There is no room on the disk to save the entry you just typed in.
It will be necessary to free up room on the disk to create
any more new records.
"There is insufficient room to save the merge file."
There was not enough room on the program disk to create the
merge file. You will need to return to the deskTop and delete
some files before you will be able to create the merge file.
"There is insufficient memory to save more than 24 names that start with that
letter."
geoDex is limited to 24 records for any single letter in the
geoDex file drawer. It will be necessary to keep two or more
geoDexes if your needs exceed this limit.
"There is no one with that last name in the geoDex file."
The search for a last name has failed; there was no record with a
last name matching the name entered. Check your spelling and
make sure that you are not currently viewing a group that does
not include the name you are searching for.
geoDex
2-14
Chapter 3: geoMerge
..
geoMerge icon
~
..
-- --...:-z.:.
•• ..
This chapter describes geoMerge, a program that will let you produce multiple
copies of a document, such as a form letter. Each copy can have unique names,
addresses, or other data. You can either enter the data yourself, or have it read from
another GEOS program such as geoDex, geoFile, or geoWrite.
In this chapter you will learn how to:
• Manually enter merge data
• Make a merge document form
• Create a merge data file
• Use a merge data file with a merge form file
• Use geoDex to produce merge data files
3-1
geoMerge
I
Entering geoMerge
You can enter geoMerge by opening it from the deskTop (as described in the
GEOS manual). But first you must create a "form" document, described in the
next section.
geoMerge
3-2
e
Using geoMerge - a Quick Tutorial
Create a Document
To enter and practice with geoMerge, first open geoWrite and create a document
called "test memo." Type the following data into it:
«frrstName», meet me at 2PM in the stairwell. Mike.
Select a Merge Form Document
Now exit geoWrite and open geoMerge from the deskTop. A dialog box will
appear asking you to select a file to use as the form document (for information on
how to create a merge document form, see below).
Choose form document dialog box
Select "test memo" and click on OK. (Select Cancel to return to the deskTop.)
Note: On a two disk drive system you may also select Drive to view files in
the other disk drive. If the file you want is on a different one from the one that is
in the other disk drive, select the Disk icon (it appears after you have selected
Drive), and put in the correct disk as requested by the dialog box. geoMerge will
not let you change disks in the disk drive that the program was run from.
3-3
geoMerge
Enter Merge Data Manually
Once "test memo" has been selected, the program will ask you if the merge data
will come from a geoWrite file.
_
•
Click on NO to enter the data manually.
NOTE:
Select Yes to load data from a geoWrite file (see "Create a Merge Data
File").
Another dialog box will appear asking:
Print Quality Options
Print Options
Select either high, draft, or NLQ printing mode depending on the format that
you want to use. For high quality output, use the high option. Select draft for
your rough drafts, and NLQ for letter quality printing. (Note: You cannot print
graphics or pictures in either the draft or NLQ modes. To print graphics, select
high print mode.)
geoMerge
3-4
e
The From Page and To Page boxes allow you to print a part of the file.
Nonnally the entire file is printed. To change the pages printed, click on either of
the boxes and enter a new value.
The Single Sheet and Tractor Feed buttons allow you to print with regular
continuous printer paper, or with single sheets fed in one at a time. geoMerge
will stop after printing each page if Single Sheet is selected.
Once you have made the changes that you want, select OK.
Since you are entering the merge data manually, the program will now start asking
you to supply data each time it encounters a label in the form document. For
example, when geoMerge encounters «firstName» the following dialog box
will appear:
Type in the name to be substituted for the label "firstName" (paulina, in the
example) and press RETURN. geoMerge continues to the next label and again
asks for replacement data.
NOTE: Clicking on Cancel here will stop the printing process.
then be asked to select another merge fonn name.
You will
Print Document
Once geoMerge makes all of the proper replacements, it will print the document
"test memo" with all of the substitutions made in the labels, provided that the
printer is on, and hooked up correctly. While geoMerge prints, you will see a
"cancel" dialog box. Select Cancel if you wish to stop printing for any reason.
3-5
geoMerge
The printed document should appear as follows:
Paulina, meet me at 2PM in the stairwel1. Mike.
Do Another Merge. ..
When geoMerge has printed the document, it will ask if you wish to do another
merge. If you select Yes, the program will again ask you to substitute for "first
name". You can then enter a different name, and geoMerge will print another copy
of "test memo" with the new name in place of the <<firstName» label. You can
do this for as many stairwell invitations as you care to make .
. . .Or Quit
Clicking on NO will return you to the initial file dialog box, where you can load
and print a different form, or quit out of the program.
geoMerge
3-6
Making Merge Document Forms
This section will explain how you can make merge document forms.
Labels
Any geoWrite document can be used as a merge document. Wherever you want a
word or group of words to vary from printing to printing, add a label with a
suitable name. The format for a label is as follows:
«labelName»
where "labeIName" is the name for the label. The label name cannot contain more
than 20 characters, and there cannot be any formatting, such as font changes,
within the label name itself. However, you can set the whole label in boldface (or
any other style) if you wish the data to appear bold. This label name can be
repeated as often as you wish throughout the document; geoMerge will ask you
once to supply the data for the label, and will then use that data each time that the
label appears.
'If' command
In addition to replacing labels with data, you may wish to have words or groups of
words included, or not, depending on the "value" of a label. For example, if you
are writing cover letters to prospective employers, you may want to include a
specific portion of text if you have previously spoken with them. This can be
done with an IF command. The format for an IF command is as follows:
«IF labelName = "value"»text«ENDIF»
What this means is, "If the data entered for labelName is exactly equal to 'value',
then leave 'text' in when printing the document; otherwise ignore 'text'.
3-7
geoMerge
Example
If you have the following form:
Dear «intervieweD>,
«IF talkedAlready = "true"» I enjoyed speaking with you on
«date». <<ENDIF» I look forward to interviewing with your
company in the future.
And when asked for data, you enter:
Mr. Tibbs for «interviewer»
false
for «ta1kedAlready»
June 9th for «date»
geoMerge will print the following:
Dear Mr. Tibbs,
I look forward to interviewing with your company in the
future.
If you enter true instead of false for "talkedAlready", geoMerge will print:
Dear Mr. Tibbs,
I enjoyed speaking with you on June 9. I look forward to
interviewing with your company in the future.
geoMerge
3-8
'If-Else' command
You may also want to print one portion of text if a label is equal to a certain
value, and another portion of text if it isn't. This can be accomplished with the IFELSE command. The IF-ELSE command has the following form:
«IF labelName = "value"» text! «ELSE»text2«ENDIF»
Example
If your form contains,
Dear «interviewer»,
«IF talkedAlready = "true"» I enjoyed speaking with you on
«date». «ELSE» I have heard great things about the salaries you
offer.«ENDIF» I look forward to interviewing with your
company in the future.
And when prompted for data, you enter,
Mr. Tibbs for «interviewer»
false
for «ta1kedAlready»
June 9th for «date»
geoMerge will print the following:
Dear Mr. Tibbs,
I have heard great things about the salaries you offer.
look forward to interyiewi ng with your company in the future.
NOTE: An IF or IF-ELSE command cannot start on one page of a geoWrite
document and end on a following page. Also, IF and IF-ELSE commands cannot
be "nested;" that is, an IF or IF-ELSE command could not have appeared in "text"
in the previous examples. However, labels can appear within an IF or IF-ELSE
command.
3-9
geoMerge
Using Merge Data Files
Entering the data to be substituted for each label is not the only way to merge
documents. The data can also come from a "merge data file." Merge data files are
simply geoWrite documents. These documents can be created with geoWrite, or
with other products from Berkeley Softworks, such as geoDex, or geoFile.
Creating merge data files with geoWrite is described in the next section.
geoMerge
3-10
e
Create a Merge Data File
A merge data file begins with the ~ record. This is a list of all of the labels to
be "substituted for" in the merge form document. Each label must appear on a line
by itself. For example, the label record for a form letter might be:
firstName
lastName
address
city
state
zipCope
*
The asterisk at the end of the label list indicates the end of the label record. There
is only one label record in a merge data file, and it is always the first record.
The next line after the asterisk is the first line of the first data record. Each data
entry in the data record is separated by a RETURN. Note that a data entry may be
up to 200 characters long, and include several lines of text, as long as RETURN is
not pressed within the data entry: let the work-wrap create a new line for long data
entries.
Whatever text appears in the first data entry, will be substituted for the first label
in the label record. the second data entry follows immediately after the first, and is
substituted for the second label in the label record, and so on for all of the labels in
the labes record. A blank line (i.e., a RETURN on a liqe by itself) in the data
record tells the merge program not to make a substitution for the corresponding
label in the label record. In other words, each data record must have corresponding
data entries, or blank lines, for every line in the label record.
An asterisk on a line by itself indicates the end of the data record. The next line is
the first line of the next data record. You may type in as many data records as you
like.
The last data record must be followed by an asterisk and a RETURN before the end
of the geoWrite file. Labels must not exceed 20 characters, and a data entry must
not exceed 200 characters in length.
3-11
geoMerge
Using a Merge Data File with a Merge
Form File
The following sample files and the print-out examples demonstrate using a merge
data file with a merge form file.
A Form letter for use with geoMerge (A Merge Form File)
«frrstName» «lastName»
«address»
«city», «state» «zipCode»
Dear «firstName»,
Thanks for the check.
A Merge Data File
firstName
lastName
address
city
state
zipCode
*
John
Smith
1234 Main Street
Any Town
PA
19152
*
Carl
Greenskeeper
141 Country Club Drive
Chicago
IL
60610
*
geoMerge
3-12
Documents Generated by geoMerge
First Document:
John Smith
1234 Main Street
Any Town, PA 19152
Dear John,
Thanks for the check.
Second Document:
Carl Greenskeeper
141 Country Club Drive
Chicago, IL 60610
Dear Carl,
Thanks for the check.
3-13
geoMerge
Use geoDex to Make Merge Data Files
Open geoDex, Create a geoDex Record
Open the geoDex desk accessory. If there are no entries in the geoDex, create some
now (see Chapter 2, geoDex).
Create a Merge Data File
Once you have done this, click on the Merge icon. geoDex will ask you for a
name to give the merge data file. Type in a filename and press Return. This
merge data file now contains the data from your geoDex record.
Create a Merge Document Form
Quit out of geoDex and create a merge document form in the GEOS application
geoWrite (see above "Create a Merge Document Form"). This document can
contain labels that will be replaced by data for each of the names in geoDex.
NOTE: Use only the following labels when you use geoDex to produce a merge
data file:
«first»
-first name of each person in geoDex
«middle»
-middle initial of each person in geoDex
<<last»
-last name of each person in geoDex
«addr»
-address of each person in geoDex
«city»
-city of each person in geoDex
«state»
-state of each person in geoDex
«zip»
-zip-code of each person in geoDex
«phone»
-phone number of each person in geoDex
«misc»
-miscellaneous data for each person in geoDex
geoMerge
3-14
e
Merge Your geoDex Merge Data File
Once you have made up your form, quit out of geoWrite and open the geoMerge
application. A dialog box will appear with the names of the merge document
forms that are on the disk.
Click on the merge document form name that you created for your geoWrite
merge document form above, and select Open. When geoMerge asks you whether
the substitution data is to come from a file, select YES. The following dialog
box will appear:
Click on the filename of the merge data file that you created while you were in
geoDex (see above), and select Open. A print option dialog box will appear (see
above "Print Options"). After setting the printing information click on OK.
geoMerge will automatically use the data from geoDex to replace labels like
«fIrst», «addr», etc., and start printing your document.
3-15
geoMerge
NOTE: Any labels that appear in your document form that are not in the list
above will cause an error in geoMerge. In order to add your own merge labels, you
must alter the merge file yourself (see "Making Merge Document Form" section
above).
Here is an example form using data created by geoDex:
To: «first» <<last»
From: Mike
Date: Aug 16, 1986
Addr:«addr»,«city»,«state» «zip»
«fIrst», meet me in the stairwell at 2PM. Mike.
With the following geoDex data;
this output results:
To: Paulina Smythe Addr:3426Hollywood B1Yd.,Los Angeles,CA 90027
From: Mike
Date: Aug 16, 1986
Paul ina, meet me in the stai rwell at 2PM. Mike.
geoMerge
3-16
e
Chapter 4: deskTop and Drivers
deskTop 1.3 icon
----==::::::1~1.3 a
-0
This chapter will infonn you about the improved GEOS deskTop, and newly added
GEOS supported printer and input drivers.
4-1
deskTop and Drivers
New GEOS deskTop
The new GEOS deskTop file, which is located on the back side of the geoDex disk,
contains added features that improve the perfonnance of GEOS.
Current Printer Driver Name Displayed
The new deskTop displays the name of the currently selected printer driver in a box
below the printer icon at the bottom of the disk notepad.
Keyboard Shortcuts to: Open/Close Disk, Move Cursor
If you should boot your GEOS disk and do not have the input device that is set as
the default device on that disk, you can use the following keyboard shortcuts to
move the cursor around the screen, and to open and close the disk.
To open the disk:
To close the disk:
To put up the "Select Input
Driver" dialog box:
(Commodore key)
C=, and 0
C=, and C
C=, and I
(This will allow you now to use the
keyboard cursor keys--next to the righthand
Shift key--to move the cursor. [See
"Keyboard Shortcuts," in Chapter 2].
Press the Return key to select an input
driver.)
You should use the latest version of deskTop with your GEOS applications. To
determine which deskTop version is the latest, select the deskTop icon, and click
on info in the file sub-menu (located in the command menu at the top of the
deskTop). The most recent date will be the latest version. Copy the file of the
latest version onto your work disks, replacing any copy of the older deskTop.
deskTop and Drivers
4-2
e
New Printer and Input Drivers
Several new printer and input drivers are now supported by GEOS. A list of them
is located in a Read Me file found on the back side of your disk. Copy this file
onto a work disk that contains any version of geoWrite and open it. Scroll
through the list to find detailed information· about your printer and its interface
setup.
The printer driver and input driver files are also located on the back side of the your
disk. You can copy anyone (or several) of these files onto your work disks in
order to print your documents, and to use new input devices.
NOTE: The new printer drivers are faster than the old drivers, and contain
additional features that will improve your printing performance. You should,
therefore, replace any old printer driver files that you may be using with copies of
the new ones.
4-3
deskTop and Drivers
Index
E
A
e
2-8
2-13
address labels
autodial
entering ...
data
geoDex
geoMerge
merge data
B
2-3
2-2
3-2
3-4
1-1,1-2
backup geoDex
F
C
e
Commodore key
close, disk
creating ...
merge document forms
records
curSOf. ..
text
screen
2-12
4-2
3-3
2-5
e
disk, close
disk copy
disk icon ...
in geoMerge
disks, work
drive icon ...
in geoMerge
driver...
input
printer
2-4,2-6
2-4
3-14,
3-15
3-11,
3-12
form letter
2-3
4-2
G
D
data entry
data record
deleting record
deskTop
2-3
field
file ...
drawer
letter tabs
filename ...
in geoMerge
3-1
3-11
2-5
4-7,6-1
6-2
4-2
1-1,1-2
geoDex ...
backup
install
group ...
merging
printing
viewing
3-3
1-2
1-1
1-1
2-10
2-10
2-10
I
If command
If-else command
input drivers
install geoDex
3-3
6-1,6-3
6-1,6-2
6-3
5-1
3-7
3-9
6-1,6-3
1-1
Index
P
K
2-12,4-2
keyboard shortcuts
L
3-11
3-5, 3-6
3-7,3-14
2-8
2-6
2-8
label record
labels
address
letter tab
list all field data
M
merge ...
data
data files
3-4
3-10,3-11
3-12,
3-14
3-15
3-3,3-7
3-14,
3-15
3-12
2-10
2-13
4-2
document form
form file
group
modem
move cursor
Index
2-8
3-6
3-6
2-8
2-10
3-5
3-5
e
R
record ...
data
geoDex
group
label
recover
search for
3-11
2-3,3-14
2-10
3-11
2-5
2-7
S
3-9
2-6
0
open, disk
3-4
3-4
3-4
6-1,6-2
6-3
printing ...
from geoDex
from geoMcrge
merge document
record
record group
single sheet
tractor feed
N
nested commands
new, tab
2-6
2-8
page tum icon
phone list
print mode...
draft quality
high quality
NLQ
printer drivers
4-2
search ...
characters
for record
shortcuts, keyboard
substitutions ...
merge
5-2
2-7
2-7
2-12,4-2
3-6,3-10
3-11
e
T
e
tab ...
letter
new
2-4,2-6
2-6
U
2-13
user port
V
2-10
view, group
W
word-wrap
work disks
3-11
1-2
5-3
Index
For customer service call:
(415) 644-0890
9am-5pm Pacific Time