1
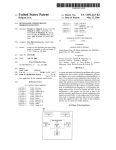
991756 WILDARMS PS MANUAL
3/29/00
11:28 AM
Page 1
®
WARNING: READ BEFORE USING YOUR PLAYSTATION GAME CONSOLE.
A very small percentage of individuals may experience epileptic seizures when exposed to certain light patterns or flashing lights.
Exposure to certain patterns or backgrounds on a television screen or while playing video games, including games played on the
PlayStation game console, may induce an epileptic seizure in these individuals. Certain conditions may induce previously undetected
epileptic symptoms even in persons who have no history of prior seizures or epilepsy. If you, or anyone in your family, has an epileptic
condition, consult your physician prior to playing. If you experience any of the following symptoms while playing a video game –
dizziness, altered vision, eye or muscle twitches, loss of awareness, disorientation, any involuntary movement, or convulsions –
IMMEDIATELY discontinue use and consult your physician before resuming play.
WARNING TO OWNERS OF PROJECTION TELEVISIONS:
Do not connect your PlayStation game console to a projection TV without first consulting the user manual for your projection TV, unless
it is of the LCD type. Otherwise, it may permanently damage your TV screen.
USE OF UNOFFICIAL PRODUCT:
The use of unofficial products and peripherals may damage your PlayStation game console and invalidate your console warranty.
HANDLING YOUR PLAYSTATION DISC:
• This compact disc is intended for use only with the PlayStation game console.
• Do not bend it, crush it or submerge it in liquids
• Do not leave it in direct sunlight or near a radiator or other source of heat.
• Be sure to take an occasional rest break during extended play.
• Keep this compact disc clean. Always hold the disc by the edges and keep it in its protective case when not in use. Clean the disc with
a lint-free, soft, dry cloth, wiping in straight lines from center to outer edge. Never use solvents or abrasive cleaners.
Wild
Arms®
2 Tips and Hints
PlayStation® Hint Line
Hints for all games produced by SCEA are available:
Within the US:
1-900-933-SONY (1-900-933-7669)
$0.95/min. auto hints, $1.40/min. live, $6.95-$16.95 for tips by mail*,
$5.00-$20.00 for card recharge (*Subject to availability)
Within Canada:
1-900-451-5757
$1.50/min. auto hints
For US callers, game counselors are available 8AM-5PM PST, Monday-Friday. Automated is available 24 hours a day, 7 days a week.
Live support for Canada not available at this time.
This hint line supports games produced by Sony Computer Entertainment America. No hints will be given on our Consumer Service Line.
Callers under 18 years of age, please obtain permission from a parent or guardian before calling. This service requires a touch-tone phone.
Consumer Service/Technical Support Line: 1-800-345-SONY (1-800-345-7669)
Call this number for help with technical support, installation or general questions regarding the PlayStation game console and
its peripherals. Representatives are available Monday-Friday, 7AM-6PM Pacific Standard Time.
Table of Contents
Using the Controller . . . . . . . . . . . . . . .5
Starting the Game . . . . . . . . . . . . . . . . .6
Starting a New Game . . . . . . . . . . . . . . . . .6
Continuing a Saved Game . . . . . . . . . . . .6
Walking in the Field . . . . . . . . . . . . . . .8
Character Actions . . . . . . . . . . . . . . . . .10
Using Tools . . . . . . . . . . . . . . . . . . . . . . . .11
Actions in Town . . . . . . . . . . . . . . . . . . .12
Getting Information . . . . . . . . . . . . . . . . .12
Using Shops and Services . . . . . . . . . . . .13
Weapons, Armor and Item Shops . . . . . . .13
ARM Upgrade Shops . . . . . . . . . . . . . . . .14
Personal Skill Shops . . . . . . . . . . . . . . . .15
Magic Guilds . . . . . . . . . . . . . . . . . . . . . .16
Inns . . . . . . . . . . . . . . . . . . . . . . . . . . . . . .17
Memory Service . . . . . . . . . . . . . . . . . . . .17
Using the Menu Screen . . . . . . . . . . .18
The Main Menu . . . . . . . . . . . . . . . . . . . .18
Using Menu Commands . . . . . . . . . . . . .19
Items . . . . . . . . . . . . . . . . . . . . . . . . . . . . .19
Equip . . . . . . . . . . . . . . . . . . . . . . . . . . . .20
Auto . . . . . . . . . . . . . . . . . . . . . . . . . . . . .21
Status . . . . . . . . . . . . . . . . . . . . . . . . . . . .22
Form . . . . . . . . . . . . . . . . . . . . . . . . . . . . .24
Call . . . . . . . . . . . . . . . . . . . . . . . . . . . . . .24
System . . . . . . . . . . . . . . . . . . . . . . . . . . .25
The Combat System . . . . . . . . . . . . . .26
Flow of Combat . . . . . . . . . . . . . . . . . . . .26
Combat Screens . . . . . . . . . . . . . . . . . . . .27
Combat Commands . . . . . . . . . . . . . . . . .28
Original Powers and Force Abilities . . . . . .30
Custom Commands . . . . . . . . . . . . . . . . .34
Character Status Abnormalities . . . . . . .35
Main Characters . . . . . . . . . . . . . . . . . .36
Ashley . . . . . . . . . . . . . . . . . . . . . . . . . . . .36
Lilka . . . . . . . . . . . . . . . . . . . . . . . . . . . . .38
Brad . . . . . . . . . . . . . . . . . . . . . . . . . . . . .40
Tim/Kanon . . . . . . . . . . . . . . . . . . . . . . . .42
Anastasia/Lucied . . . . . . . . . . . . . . . . . . .43
Other Characters . . . . . . . . . . . . . . . . . . .44
Enemy Characters . . . . . . . . . . . . . . . . . .46
Adventure Hints . . . . . . . . . . . . . . . . . .48
Credits . . . . . . . . . . . . . . . . . . . . . . . . . . .50
991756 WILDARMS PS MANUAL
3/29/00
11:28 AM
Page 3
Once, there was a Blaze of Disaster that stained Filgaia with
its crimson flames....The flames from the earth scorched the
heavens. The blazing whirlwinds threatened to consume the
very future of the planet. Mankind clung to its only hope of
surviving this life-or-death crisis: the Sword Magess. Born as
the daughter of a nameless petty nobleman, she was drawn
to the call of the Guardian Blade named “Argetlahm.” With
no way to fight, the people cast their hopes on the Magess’
sword and believed in the future.
The night of the seventh day after obtaining the sword —
wrapped in a torrent of light, the Magess vanished from
Filgaia together with the Blaze of Disaster, leaving
behind Argetlahm plunged deep in the earth....
— Time passed. The Guardian Blade Argetlahm
began to be treated as a symbol of power. The
battle of the Sword Magess remained in the hearts
of the people as a familiar, ubiquitous legend. But
the people had no reason to think that their familiar
legends of the past would have meaning in the
present — and in the future.
2
3
991756 WILDARMS PS MANUAL
3/29/00
11:28 AM
Page 5
Getting Started
Using the Controller
L2 BUTTON
R2 BUTTON
L1 BUTTON
R1 BUTTON
DIRECTIONAL BUTTONS
BUTTON
SELECT BUTTON
BUTTON
START BUTTON
BUTTON
ANALOG MODE SWITCH
BUTTON
(ANALOG MODE WHEN LED IS LIT)
LEFT STICK
RIGHT STICK
NOTE: Compatible only in Digital mode
Default Configuration
Buttons Used on the Field Screen
Directional
buttons
RESET BUTTON
POWER INDICATOR
OPEN BUTTON
POWER BUTTON
DISC COVER
CONTROLLER PORT 1
CONTROLLER PORT 2
ç
≈
MEMORY CARD SLOTS
(ABOVE CONTROLLER PORTS)
Set up your PlayStation® game console according to the instructions in its Instruction
Manual. Make sure the power is off before inserting or removing a compact disc. Insert
the WILD ARMS® 2 disc and close the Disc Cover. Insert game controllers and turn on the
PlayStation® game console. Follow on-screen instructions to start a game.
Ω
√
L1
R1
START
SELECT
4
Moves the character up, down,
left or right within the screen.
Diagonal movement is also
possible.
Displays the menu screen.
Talks to people or investigates
objects.
Used in dungeons to solve
various puzzles.
Hold down to perform a dash.
Activate Encounter Cancel System.
Uses lead character’s tools.
Activates the Search System.
Rotates the camera clockwise
Rotates the camera counterclockwise.
Changes the lead character and
the Tools that can be used.
Displays the world map.
Buttons Used on the Menu/Combat Screen
Directional
buttons
ç
≈
Ω
L1 or L2
R1 or R2
Moves the cursor to the desired
item when selecting items.
Displays a help message with an
explanation of a certain menu
item or attack.
Select a menu item.
Cancel a menu item selection.
Toggles character.
Scrolls pages up or down.
NOTE: You may have a controller that looks like this,
if so, the controller functions remain the same.
5
991756 WILDARMS PS MANUAL
3/29/00
11:28 AM
Page 7
Starting the Game
Starting a New Game
From the Title Screen, press the START button to display the
opening menu.
Select “New Game” and the message “Start a new game?”
will appear. Select “Yes.” This title consists of a two-disc set,
so you must use Disc 1 to start a new game. When you have
completed the story up to the end of Disc 1, a message
asking you to change to the appropriate disc will appear.
Open the Disc Cover without turning off the power and
replace Disc 1 with Disc 2.
Continuing a Saved Game
Insert a MEMORY CARD containing a previously saved game
and the correct disc into the PlayStation and turn on the
power. Then, select “Load” from the opening menu. A list of
games saved on the MEMORY CARD will appear. Select the
game you wish to resume. The opening movie will play and
then you can resume play from where you saved the game.
You can press the START button at any time during the
opening movie to start immediately.
6
Character Selection (Multi-Opening)
As the game starts, the character selection
screen appears. You can start the game with any
of the three characters: Ashley, Lilka or Brad.
Once you have completed an initial episode for
one character, you then select the next character.
The three characters are ranked in order of
difficulty: Ashley, Brad and Lilka.
Ashley
Brad
Lilka
Name Entry
Sometimes you can change the names of certain characters that you encounter in the game. Character
names can be up to nine letters long. While entering a name, use the directional buttons to select the
letter to enter and press ≈. When you are finished entering the name, highlight “OK” and press ≈.
A
Screen Explanation
A Name currently entered. Use the L1 and R1 buttons to move the
cursor left or right.
B Types of letters that can be selected. You can pick from among
uppercase and lowercase letters and numbers.
C Selecting ñ moves the cursor one letter to the right.
Selecting ∫ moves the cursor one letter to the left.
D Select “RESET” to return the name to the default.
E Select “OK” to complete the name selection and close the name
entry screen.
B
C
D
E
Use of MEMORY CARDS
To use a MEMORY CARD, insert a MEMORY CARD (sold separately) into either MEMORY CARD slot 1 or 2 of the PlayStation
game console. Saving one game requires 1 block of memory on the MEMORY CARD. Note that you can use the “MEMORY CARD
Management” option on the opening menu to copy or delete saved games.
7
991756 WILDARMS PS MANUAL
3/29/00
11:28 AM
Page 9
Walking in the Field
Field Screens
In the field, you can use L1 or R1 to rotate
the field view through a full 360-degree
range. Looking at a certain place from various
angles will help you see hard-to-find
passages and switches. A compass appears
on the screen to help you. The red end of the
needle always points north. You should keep
an eye on the compass to
keep your bearings in
complicated dungeons and
the like.
Moving in the Field
Use the directional buttons to move your character in any
direction. In addition, as your adventures proceed, you may get
around by using a hovercraft or other ways. There are also
vehicles that will let you soar freely through the skies of Filgaia.
North
West
East
South
The Search System
In the field outside of dungeons or towns, you can press √ to
use the Search System. Use this Search System to find towns
and dungeons when you are not sure of their locations. Talk
to people and look at signs to find out information about new
locations. Once you are familiar with the general area, use √
to find the destination of your choice. The Search System can
also be used to get hidden items laying on the ground.
Getting Into Towns/Dungeons
ñ
ñ
Viewing the World Map
Later in your adventures, you will be able to view a map of
the entire world. Press SELECT in the field to change how the
map display appears.
8
Once the destination is within
the range lit up by the Search
System, a building will appear
in the field.
When the character faces the
building and makes contact,
the name of the location will
appear on the screen.
Press ≈ while the name
appears on the screen to go in.
9
991756 WILDARMS PS MANUAL
3/29/00
11:29 AM
Page 11
Character Actions
Each character can do actions in towns and dungeons. Try various actions to obtain information
and items in town, or to solve various puzzles in the dungeons.
10
Talk to people
Investigate Items
Dash
To talk to someone, face
them, make contact and then
press ≈. If an arrow appears
at the bottom center of the
message window, press ≈ or
Ω to see the rest of the
message.
To investigate something,
face it, make contact and
then press ≈. This lets you
read signs or open treasure
chests. Check out the barrels
in houses and different areas
— you might just find
unexpected items.
Hold down ≈ and your
character will dash forward
Release ≈ and the character
slows down and stops. You
cannot change directions in a
dash, so be careful in places
where you might fall.
Using Tools
You will encounter many different types of
traps in dungeons such as falling floors or
closed doors. Puzzles or locks that cannot be
passed by ordinary means must be solved or
opened using the various characters’ Tools.
Pick up things
Throw things
Push things
Press ≈ while facing a wooden
crate or similar object and you
might be able to pick it up.
Some things cannot be picked
up, so when you find an
unfamiliar obstacle, try to do
various things with it.
Once you have picked up
something, you can press ≈ to
throw it forward. Try this when
objects block your path. You
might just find an item inside
something by throwing it and
breaking it open.
Press ≈ while facing a box or
statue and you might be able
to grab it. In this state, use the
directional buttons to push the
object in the direction that the
character is facing.
Jump down
Pull Things
When your character comes to the
edge of a cliff, the character will
make an “oops” animation. In this
state, press ≈ to jump down. You
can also jump down by dashing over
the edge.
Press ≈ while facing a box or
statue and you might be able
to grab it. Use the directional
buttons to pull the object in the
direction opposite than the
character is facing.
11
991756 WILDARMS PS MANUAL
3/29/00
11:29 AM
Page 13
Actions in Town
Using Shops and Services
You will find various shops around town. Shops let you buy items
you may need or restore your health for your next adventure.
Weapons, Armor and Item Shops
These shops sell weapons and armor worn by characters
and items that can be used in battle or while traveling.
You can also sell various pieces of equipment and items
you no longer need.
Getting Information
Talking to various people in town becomes very
important in developing the story, so that you can
obtain information regarding the next destination
or item. You may be presented with choices
depending on the content of the conversation.
If you are given a choice, use the up and down
directional buttons to select the response to the
question and then press ≈.
Buying and Selling Items:
1. Talk to the proprietor of the shop. A list of the available products will appear.
2. Select “Buy” to buy something or “Sell” to sell something.
3. Select the item to buy or sell from the list.
4. Enter the quantity of the selected item you want to buy or sell.
5. A message from the proprietor reporting the total amount will appear, so to
accept this, select “Yes.” If you select “No,” you can reselect the items.
Screen Explanation
12
Events
Information about Towns/Dungeons
Conversations may result in someone
asking you to do a favor or cause
events to occur. Even events that do
not seem related to the story may
have effects later or you might get
an item in gratitude.
Almost all information regarding locations
of towns or dungeons are found through
conversations. The information you get
from people may change over time, so
try having conversations with the same
people later in the game.
A Pressing ç with an item selected displays an explanation of the item here.
B Select here to buy or sell items.
C If “Buy” is selected, the names and prices of items sold in the shop appears. If “Sell” is
selected, the names and prices of items that can be sold by the party appears.
D This is the amount of money owned by the party.
E
D
B
E This is the quantity of the item to be bought or
A
sold. Press the right directional button to
increase the quantity by one. Press the left
directional button to decrease the quantity by
one. Press the up directional button to increase
the quantity by ten. Press the down directional
F
G
button to decrease the quantity by ten.
F This is the total amount of the transaction.
C
G If the party is already carrying a number of the
selected items, this quantity appears here.
H
H If a weapon or piece of armor is selected, the
change in parameters of the character if
equipped with that item is displayed.
13
991756 WILDARMS PS MANUAL
3/29/00
11:29 AM
Page 15
Actions in Town
To Upgrade ARMs:
ARM Upgrade Shops
The ARM Upgrade Shops
1. Talk to the proprietor of the
let you upgrade and powershop and he will ask whether
you want to reload your ammo
up the special weapons
or upgrade an ARM.
known as “ARMs” used by Ashley
2.
Select the character whose ARM
and Brad. You can also reload the
is to be upgraded.
“ARMs” with the ammunition
3. A list of ARMs will be displayed.
required.
Select the ARM to be upgraded.
4. Select which aspect of the ARM is to be upgraded.
Select from the following aspects:
ATP (attack points)
HIT (hit probability)
BLT (bullet capacity)
5. The cost of upgrading the ARM will be displayed. Press ≈ if you
want to make the upgrade. The level of the ARM goes up by 1
each time you upgrade. Once the level of the ARM reaches 10,
you cannot upgrade the ARM any further.
Replenishing Ammunition
Your “ARM” ammunition is not
replenished by staying at an inn,
so be careful. To replenish your
ammunition, you must use the
item called “Bullet Load” or select
“Replenish Ammo” at an ARM
Upgrade Shop. Note that there are
also merchants who specialize in
reloading ammo only.
Screen Explanation
A
B
C
D
14
E
F G H
I
A The character whose ARM is to be upgraded is
displayed here.
B This is the amount of money owned by the party.
C The cost of upgrading is displayed here.
D This is a graph that illustrates the performance of
the ARM.
E This is a list of the ARMs subject to upgrading.
F This is the current level of the ARM.
G This is the attack points of the ARM. The larger the
value here, the greater the attack power becomes.
H This is the hit probability of the ARM. The larger the
value here, the greater the hit probability becomes.
I This is the bullet capacity of the ARM.
Personal Skill Shops
The Personal Skill Shops let you customize the characters by
building up abilities known as Personal Skills. Building up
Personal Skills requires PS (Personal Skill) points. Each
character earns one PS point by going up one level.
To Build Up Personal Skills:
ñ
Once you talk to the proprietor,
select the character whose
Personal Skills you wish to
build up. A list of skills and the
PS points of the selected
character will appear.
ñ
Select the skill to build up. The
number of points required to
acquire the skill appears in the
upper right corner of the
screen, so select skills
according to the character’s
number of PS points.
To accept the skill, select “Yes.”
A red light will be turned on to
the right of the new skill
acquired. Note that you cannot
change skills once acquired.
Examples of Personal Skills that can be added
Restore HP
Up Param.
Critical
Convert HP
Auto Guard
Up P Attack
Up P Defend
Poison
Confusion
Petrify
Restores HP each time the Force level goes up.
Increases parameters each time the Force level goes up.
Increases the probability of a critical hit occurring.
FP remaining at the end of a battle are converted to HP.
Automatically takes a defensive position when the
character is near death.
Increases the amount of damage inflicted by physical attacks.
Decreases the amount of damage suffered from physical attacks.
Increases the resistance to poison/vile poison attacks.
Increases the resistance to confusion attacks.
Increases the resistance to petrification attacks.
15
991756 WILDARMS PS MANUAL
3/29/00
11:29 AM
Page 17
Actions in Town
Inns
Staying at an inn restores everyone’s Hit Points (HP)
and completely cures all status abnormalities. To stay
at an inn, talk to the clerk at the desk. Note that the
cost of staying at an inn depends on the inn and the
number of people in the party.
Magic Guilds
The Magic Guilds let you create magic spells used by Lilka. In the
world of Filgaia, magic spells can be created by combining the four
magic symbols. Different Magic Guilds have different levels, so
higher-level guilds let you create stronger magic spells.
To Create a Magic Spell you need a “Crest”
Creating a magic spell requires an item called a Crest upon which the magic symbols are combined.
You can find Crests in treasure chests in dungeons. You can inscribe one magic spell on a single
Crest. In addition, you can erase a previously inscribed magic spell and inscribe a new spell.
Magic Symbols Combined in Crests
Earth Magic Symbol “Geo”
Fire Magic Symbol “Flame”
Wind Magic Symbol “Wing”
Water Magic Symbol “Muse”
A
Memory Service
In town you may run into people who say that they can save a record of your
adventures onto a MEMORY CARD. Select “Save my game.” here to open a
game save screen. Use the directional buttons to select a block to save your
game. After saving, when you are asked “Do you want to continue your game?”
select “Yes” to return to your game. Selecting “No” starts a movie ending the
game. If you selected “Don’t save,” you can continue your game without saving.
B
To Create/Erase Magic Spells:
1. Once you have obtained a Crest, talk to a
Guild representative.
2. Select whether you want to create a new magic
spell or erase an existing spell.
3. To create a new magic spell, select the Crest
upon which it is to be created and then select
the magic symbols you wish to inscribe on it.
To erase an existing magic spell, a list of the
current magic spells available appears, so
select the spell to erase. Once you have
erased a magic spell, the Crest is returned to
its original, blank state.
4. Once you have selected the magic spell to
create, the confirmation message “Are you
sure?” will appear. To accept the spell, select
“Yes.”
5. You can change the name of a spell you
created. Note that you can rename a spell that
you had named previously by selecting
“Change Name” in the Magic Guild.
16
D
C
E
Screen Explanation
A Here you select whether to create, rename, or
erase a magic spell.
B The number of Crests you have appears here.
C The Magic Symbols to be combined appear here.
D The magic spells you already have appear here.
The combinations where a purple mark appears
are those spells that you already have. If the
combination is empty, this means that you do not
have that spell.
E The name of the magic spell created by
combining Magic Symbols appears here.
The women in blue you see in town
will help save your game. Be sure
to save your game before leaving
on a new adventure.
You can also save your game at an
“Amazing Stone” in dungeons. Go
up to the stone and press ≈ to
display a save message.
17
991756 WILDARMS PS MANUAL
3/29/00
11:30 AM
Page 19
Using the Menu Screen
Using Menu Commands
In this section, we will describe how to use the various menu commands. You
will use these commands frequently in your adventures, so study them well.
Items
Select this command to use or organize the items you have. If any of your characters is
low on HP or suffers from a status abnormality, try using items to restore his or her
health quickly.
The Main Menu
The menu screen is used to check on the status of
the party members or use items you have. To open
the menu screen, press ç from any screen except for
in combat.
A
A
B
Character Status
Displays the current status of
the characters including their
level and HP value and others
appear here.
C
Screen Explanation
Menu Commands
Displays the menu commands
that can be executed appear
here.
A Select an item or press ç to see
an explanation of the effects of that
item.
B Three item commands appear here.
For details of the commands, see
below.
C A list of the items the party has
appears here. The items with their
names grayed out are items that
cannot be used at that time.
B
A
C
Number of Continues
Displays the number of times
you can continue after a Game
Over. If you get an item called a
“Gimel Coin,” you will be able to
continue your game even after
all members of the party fall in
combat.
B
D
Currently Selected Tool
Displays the name of the tool
currently selected.
E
C
D
E
Money Owned by the Party
Displays the amount of money
currently owned by the party. In
the world of Filgaia, the “Gella”
is the coin of the realm.
F
F
Total Play Time
Displays the total playing time
in the game.
18
Use
Reorder
Organize
Use the directional buttons
and ≈ to select the item
to use and, if it is to be
used by a character, select
the character to use it.
Change the order of items.
Select the item to move
then select the destination
and press ≈.
This command reorganizes
the item list by category.
Select the type of item you
want to appear at the top of
the list.
19
991756 WILDARMS PS MANUAL
3/29/00
11:30 AM
Page 21
Auto
This command sets the actions of characters in combat. Checking the “Auto Battle
On” box lets the characters fight automatically in combat. Depending on the
situation of the party and the enemy, it is possible to have certain characters fight
automatically and have the player manually give directions to others.
Using the Menu Screen
Equip
A
Screen Explanation
A
B
This command is used to equip
a character with weapons or
armor. If you obtain a piece of
equipment in a treasure chest
that is better than your current
equipment, use this command
to equip a character.
C
A Select an item and press
ç to see a help message
for that item here.
B The equip commands
appear here.
C The types of equipment
and the current pieces of
equipment appear here.
Screen Explanation
A Select a command and press ç to see a
help message for that command here.
B This is the character whose actions are to
be modified.
C These commands can be set in Auto Battle
mode. The currently selected command is
highlighted in yellow.
B
C
Equipping a Character
ñ
ñ
Normal Attack
Manual
After selecting “Equip,” select
the character to be equipped
and then select the type of
equipment.
A list of the pieces of equipment
in the selected type of
equipment will appear. Select
the item to be equipped.
The change in parameters due
to equipping the character
with the item will be shown.
If this is acceptable, press ≈.
The player must enter all
combat commands in combat.
This setting is in effect at the
start of the game.
The character fights
automatically in combat.
However, only the “Attack”
command is used.
Balanced Battle
The character fights
automatically in combat. Each
character takes advantage of
his or her special abilities.
Types of Equipment
Weapon
A character uses this in combat.
Gear
This refers to special items a character can be equipped with.
Body
20
This equipment is armor for the body
Head
This equipment is armor for the head.
Guard
Characters can be equipped with Mediums, which are special
items that embody the powers of the Guardians. A character
equipped with a Medium is able to use Custom Commands in
combat and also has certain parameters boosted.
Optimizing Equipment
Executing the command “Optimize”
automatically equips a character
with the most powerful items
among all the equipment you have.
However, “Optimize” will optimize
only the Weapon, Body and Head
types of equipment.
Default Setting is Manual
The initial settings for the auto commands are
manual for each character. Once you have
gotten used to combat, try the Normal Attack
or Balanced Battle settings. Note that you can
press SELECT in combat to return to
command input at the end of a turn.
21
991756 WILDARMS PS MANUAL
3/29/00
11:30 AM
Page 23
Using the Menu Screen
On the Status screen, use the left and right directional buttons to switch between
different pages. Five different categories of abilities are shown: Parameters, Personal
Skills, Original Powers, Force Abilities and Custom Commands.
pg1
Parameters
pg2
The Personal Skills acquired
by the character are
displayed. The current PS
points of the character
appear on the bottom row.
Status
This command can be used to check the status of the characters
in the party. After selecting “Status,” use the directional buttons
to select the character whose status is to be checked.
A
B
C
D
Basic Status Information
Name This is the name of the character.
Class This is the occupation of the character.
LV
This is the level of the character. The character goes up a level by accumulating a fixed number of
experience points.
HP
This is the hit points of the character. The character falls if the HP value goes to zero in combat. The
number on the right is the maximum value and the number on the left is the current value.
FP
This is the force points of the character. Force Points (FP) are required to use Original Powers in combat.
EXP
This is the current value of the experience points. Experience points are earned by defeating enemies
in combat.
NXT
This is the number of experience points required to reach the next level.
Status Information Displayed on the Menu Screen
On the Menu Screen a simple status display appears. Six items are
displayed: the character name, HP, FP, status abnormalities, current level
and the number of experience points required to reach the next level.
22
pg3
Screen Explanation
A Select an item and press ç to see a help message for that
item here.
B The basic status information for the character appears here.
C The character’s equipment appears here.
D The various status of the character appear here.
Personal Skills
Original Powers
The Original Powers acquired
by the character are
displayed.
STR
Represents the character’s strength. The higher
this value, the greater one’s strength becomes.
VIT
Represents the character’s vitality. The higher
this value, the better one’s health becomes.
SOR Represents the character’s sorcery power. The
higher this value, the stronger the power of
magic spells becomes.
RES Represents the character’s response speed. The
higher this value, the quicker actions can be
taken.
ATP Represents the character’s attacking power. The
higher this value, the greater the damage
inflicted on the enemy becomes.
DFP Represents the character’s defensive power.
The higher this value, the lesser the damage
suffered from enemy attacks becomes.
MGR Represents the character’s magic resistance.
The higher this value, the lesser the damage
suffered from magic spells becomes.
PRY Represents the character’s parry probability.
The higher this value, the greater the
probability of avoiding enemy attacks becomes.
LCK Represents the character’s luck. There are five
levels of luck from WORST to BEST. Luck
affects the probability of critical hits and
surprise attacks.
pg4
Force Abilities
The Force Abilities acquired
by the character are
displayed.
pg5
Custom Command
The Custom Command
corresponding to the Medium
worn by the character is
displayed.
23
991756 WILDARMS PS MANUAL
3/29/00
11:30 AM
Page 25
Using the Menu Screen
System
This command lets you
customize the controller button
assignments, window design
and other system settings.
Controller
Sound
Compass
Form
This command changes the battle formation of the party. The party is divided into the forward
and back ranks, and only the characters in the forward rank participate in combat. Note that
after victory in battle, characters in the back rank earn the same amount of experience points as
those in the forward rank.
MotionView
BattleCommand
Screen Explanation
A
C
A Select “Change Places” to move the
characters individually. Select
“Change Party” to swap the entire
forward or back in the ranks.
B The characters in the forward rank
appear here.
C The characters in the back rank
appear here.
B
Call
This command lets you use your communicator to call
for help. While you cannot use this command at the
start of the game, you will be able to select it as the
game progresses. You may be able to obtain valuable
information, so check this resource often.
CursorLocation
Customizing the Windows
You can change the colors of the four
corners of your menu screen: Select
the corner you wish to change and
pick the color you want by setting
the level of each of the three colors
R (red), G (green) and B (blue). The
higher the value displayed to the
right of the color, the stronger that
aspect of the color becomes. Use
the up and down directional buttons
to increase or decrease the values.
ScreenLocation
Screensaver
WindowDesign
IconDesign
Load
24
The settings of controller buttons can be
changed. Change the button assignments
so that they are easy to use and then select
“Save and Quit” to accept the changes.
The sound settings can be changed to
either “Stereo” or “Monaural.”
You can toggle the compass on or off on the
field map.
This sets the camera in motion during
combat. Selecting “No” fixes the camera
angle during combat.
This switches the method of entering
commands in combat. Selecting “Neutral”
requires the directional button to be held
down while selecting a command. Choosing
“Fixed” means that the cursor does not
move back to the neutral position when the
directional button is released.
This changes the cursor system. Selecting
“Return” causes the cursor position to be
returned to the top command on the Menu
Screen each time. Selecting “Remember”
causes the cursor to go to the position of
the command used last.
This adjusts the display position on the
monitor. Use the directional buttons to adjust
the position and press ≈ to accept the
setting.
This turns on or off a screen saver function
that will prevent monitor burn-in which could
occur when the same image is displayed for
a long period. Select “On” to display an
animated sequence automatically after a
fixed length of time has passed without any
input from the controller. To resume the
game, press any controller button.
This lets you change the design of the
windows. You can select from the four pre-set
types A, B, C or D and press ≈ to accept. You
can also select “Custom” to design your own
combination of window colors.
This lets you change the design of the icons.
You can select from the five predefined
types A, B, C, D or E and press ≈ to accept.
This lets you load a saved game. Press ≈ to
open the Load Game screen. Select the game
to load.
25
991756 WILDARMS PS MANUAL
3/29/00
11:30 AM
Page 27
The Combat System
Combat Screens
Here we will describe the items that appear on the combat screens. Learn these well.
Screen Explanation
Flow of Combat
This section describes how combat proceeds. We will first present the general flow of combat.
ñ
ñ
A These are graphic images of the player
characters engaged in combat.
B These are graphic images of the enemy
characters.
C The combat commands appear here.
D The names of the player characters
engaged in combat appear here.
E The HP and FP values of the player
characters engaged in combat appear here.
B
A
Enemy Encountered
Selection of Action
Outcome of Combat
If an enemy is encountered in the
field or in a dungeon, a “!” symbol
appears above the head of the
character, and then a battle starts.
Decide upon the actions of the
characters. Combat begins upon
completion of command input.
Defeating all enemies results in
victory. This earns you experience
points, money and sometimes
items. If all party characters fall
in battle and there are no more
Continue chances left, a Game
Over results.
Encounter Cancel System
At the time of encountering an enemy, if a black
“!” symbol on a white background appears
above the head of the character, you can avoid
the encounter by pressing Ω immediately. If the
cancel is successful, you can escape without
entering combat. Note that if a white “!” symbol
on a red background appears, you cannot avoid
the encounter.
Avoidable
Encounter
26
Unavoidable
Encounter
Boss Battles
When you are fighting against a boss monster,
you may fight against not only the main body
but also arms or legs or other body parts.
Although the battle is over if you defeat the
main body, the experience points and money
earned can be increased by defeating the other
body parts first.
Also, some items
may not be
obtained unless
you defeat the
other body parts.
C
D
E
Command Selection
Selecting “Fight” changes to
Combat proceeds by selecting command icons.
The command icons are arranged in the shape
of a cross, correspond to the directional buttons,
so they can be selected using the up, down, left
and right directional buttons.
When combat starts, the Combat Commands 1
display shown in the figure at right appears.
When “Manual” or “Auto Battle Off” is set with
the Auto command the Combat Commands 2
display in the figure at right appears after
“Fight” is selected among the Combat
Commands 1 display.
Combat
Commands 1
Combat
Commands 2
27
991756 WILDARMS PS MANUAL
3/29/00
11:31 AM
Page 29
The Combat System
Combat Commands
Here we will describe the effects of the Combat Commands. Note that pressing ç with a
command selected displays a help message above the window.
Combat Commands 2
Attack: This command mounts a direct
attack on the enemy with the weapon the
character is equipped with. After selecting
the command, use the directional buttons
to select the enemy to attack and press ≈.
Items: Use this command for using an
item in combat. After selecting the
command, a list of items is displayed.
Select the item to use and the character
to use it.
Defend: This command guards against
enemy attacks. This reduces the damage
suffered from enemy attacks for one turn.
Custom Command: This command is
used to access the power of the Medium
a character is equipped with.
Combat Commands 1
Fight: This command initiates combat with
the enemy depending on the Auto settings.
The character attacks automatically unless
“Manual” is set with “Auto Battle On.” Note
that the SELECT button may be pressed
during auto combat to return to the Combat
Command 1 display.
Equip: This command is
used to change the
characters’ equipment
Auto: This command
changes the Auto
Battle settings.
Escape: This command allows the party to
escape from combat. If successful, you will
return from combat to the map screen. If
unsuccessful, you will be attacked by the
enemy from behind. In this case, the
Combat Command 1 display will return
after one turn has elapsed.
Form: This command
changes the party’s
battle formation.
Original Powers: This command uses
one of the character’s special abilities.
After selecting the command, use the
directional buttons to select a target.
Using Original Powers Requires “FP”
A certain number of Force Points (FP) is required in
order to use the Original Powers of each character.
28
29
991756 WILDARMS PS MANUAL
3/29/00
11:31 AM
Page 31
The Combat System
Original Powers and Force Abilities
Each character has special abilities that
correspond to his or her class. There are
two types of special abilities — Original
Powers and Force Abilities — both of
which can be used only in combat. If
you select “Original Powers” from
Combat Commands 2, the special
window at the right will be displayed.
Reading the FP Gage
The FP required to use Original Powers
is built up gradually in combat by
attacking the enemy or being attacked
by the enemy. Note that the FP level at
the end of combat is not carried over to
the next battle.
Original Powers
This a list of the Original
Powers acquired by the
character. FP and/or
ammunition are required to
use Original Powers. The
types of abilities increase as
your adventure proceeds.
Screen Explanation
A
B
C
Building Up the FP Gage
ñ
FP is accumulated by
attacking or being attacked.
The FP value increases even
when Defending.
30
ñ
Once a Force Ability can
be used, the red parts of
the lower gauge become
lighted.
Force Abilities
This is a list of the Force
Abilities acquired by the
character. There are four
levels of abilities, and you
can acquire higher-level
abilities as your adventure
proceeds. Force Abilities
consume FP when used.
Commands for Original
Powers corresponding to
the accumulated FP can
be used.
A The current FP level
is displayed here in
numerical form.
B The current FP level
is displayed here in
bar form.
C The FP level is
displayed in the form
of four stages
corresponding to the
Force Abilities. From
left to right, these are
Lv1, Lv2, Lv3 and Lv4,
so a Force Ability of a
level corresponding
to the highest redlighted stage is
usable.
Ashley Winchester
Abilities That Ashley Can Use
Bayonet
This is a special attack that makes use of Ashley’s favorite
weapon, his bayonet. Ammunition is required to attack.
The ammunition can be replenished by buying it at an
ARM Upgrade Shop or from a merchant specializing in
loading ammo, or by using the item called “Bullet Load.”
The special Bayonet attacks can be acquired by obtaining
special items found in dungeon treasure chests.
Name
ShotWeapon
MultiBlast
BoltAction
DeadOrAlive
Effect
Attacks a single enemy with the bayonet.
Attacks a group of enemies with special shells.
Attacks a single enemy with a shooting/slashing combo attack.
Has a certain probability of causing instant death to a single enemy.
Force Abilities
Accelerator
Full Clip
Boosts the response speed to be sure
to attack first. When you select an
action after entering this command,
the action will be executed first on
the next turn.
This attack fires at once all ammo
loaded in that ARM. After entering
this command, select the ARM to use.
Combine
Access
This ability summons the Guardian
embodied in the Medium worn by the
character.
This attack releases Ashley’s hidden
powers.
31
991756 WILDARMS PS MANUAL
3/29/00
11:32 AM
Page 33
Lilka Eleniak
Brad Evans
Abilities That Lilka Can Use
Crest Sorcery
Lilka can use the Crest Sorcery spells inscribed
on Crests. Using spells requires FP.
Name
Break
Flame
Freeze
Rise&Shine
Heal
MageWeapon
Protect
Revive
Effect
Attacks a single enemy with Earth elemental magic.
Attacks a single enemy with Fire elemental magic.
Attacks a single enemy with Ice elemental magic.
Wakes up a single sleeping friend and prevents sleeping.
Restores a small amount of HP for a single friend.
Raises the physical attack power of a single friend.
Raises the magical defense power of a single friend.
Revives a single fallen friend.
FP required
12
12
12
10
5
25
8
10
Force Abilities
32
Abilities That Brad Can Use
Heavy ARM
This is a special attack that makes use of heavy firearms.
Ammunition is required to attack. The ammunition can be
replenished by buying it at an ARM Upgrade Shop or from
a merchant specializing in loading ammo, or by using the
item called “Bullet Load.” The special Heavy ARM attacks
can be acquired by obtaining special items found in
dungeon treasure chests.
Name
Bazooka
AM Cluster
Mini Scud
Sky Eye
Effect
Attacks a single enemy by launching mini grenades.
Randomly attacks all enemies with an anti-monster missile unit.
Attacks a single enemy with a portable missile launcher.
Attacks a group of enemies with a satellite-based anti-ground beam weapon.
Force Abilities
Mystic
Extend
Lock On
ARM x 2
This ability brings out hidden effects
of items. After entering this
command, select the item whose
hidden ability is to be used.
This ability extends the range of
effect of magic spells. After entering
this command, select the magic spell
to use.
Increases the hit probability of the
Heavy ARM to 100% .
This is the ability to use two Heavy
ARM attacks at once. After entering
this command, select the two ARMs
to use.
Combine
DualCast
This ability summons the Guardian
embodied in the Medium worn by the
character.
This is the ability to cast two magic
spells at once. After entering this
command, select two spells to use.
Combine
Boost
This ability summons the Guardian
embodied in the Medium worn by the
character.
This ability triples the attack power
of a Heavy ARM with runaway power.
After entering this command, select
the ARM to use.
33
991756 WILDARMS PS MANUAL
3/29/00
11:32 AM
Page 35
The Combat System
Custom Commands
The Custom Commands can be used to invoke the ability of the
Medium that a character wears. Various effects will occur depending
on the characteristics of the Guardian embodied in the Medium.
Another method of curing Status Abnormalities is by
reaching full FP (or “CONDITION GREEN”).
Examples of the Effects of Mediums
Here are the custom effects of Mediums that you can obtain relatively
early in the game. There are also many other Mediums that you can
obtain as your adventure progresses.
Guardian of Earth
Character Status Abnormalities
When attacked by the enemy in battle, characters may suffer
status abnormalities. Status abnormality attacks can be
prevented by boosting the character’s Personal Skills. Once
a status abnormality occurs, it can be cured with magic spells
or items. Characters can also recover by staying at an inn.
Guardian of Water
Types of Status Abnormalities and Recovery Items
Poison/Vile Poison
Poison drains the character’s HP
gradually. Cured by using the item
“Antidote.”
Grudiev
Custom command name: Defencer
Effect: Protects your friends from the
physical attacks of the enemy.
Guardian of Fire
Guardian of Wind
Ability Block
Ability Block prevents a character
from using Original Powers or
Force Abilities. Cured by using the
item “Violet Rose.”
Nightmare/Sleep
Moor Gault
34
Forgetfulness
Forgetfulness prevents a character
from earning experience points in
battle. Cured by using the item “Toy
Hammer.”
Schturdark
Custom command name: Analyze
Effect: Analyzes and displays the parameters
of the enemy. Note that some Boss monsters
may be immune to Analyze.
These cause a character to go to
sleep. Cured by using the spell
“Rise&Shine.”
Custom command name: Smash Hit
Effect: Attacks a single enemy with 1.5
times the power of a normal attack.
Disease
Disease prevents a character’s HP
from being restored. Cured by
using the item “Medicine.”
Downhearted
Downhearted causes the FP value
to increase by no more than 1 point
at a time. Cured by using the item
“Peppy Acorn.”
Paralysis
Paralysis prevents a character from
moving. Cured by using the item
“Pixie Dust.”
Confusion
Confusion makes a character
uncontrollable. Cured by using the
item “Pinwheel.”
Petrification
The character is turned to stone
and is unable to fight. Cured by
using the item “Softener.”
Fengalon
Custom command name: Pickpocket
Effect: Steals items from the enemy.
35
991756 WILDARMS PS MANUAL
3/29/00
11:35 AM
Page 37
Main Characters
Personal Data
Ashley Winchester
Ashley is a young man belonging to a
Musketeer brigade in the seaside Town
of Meria. Strong willed with a fierce sense of
righteousness, Ashley set out to battle the
crisis facing Filgaia after being chosen to be
a member of the Agile Remote Mission Squad
(ARMS). Contrary to his gentle demeanor, he
has become quite skilled at wielding a
huge bayonet.
Name: Ashley Winchester Class: Gun Warrior Age: 19 Height: 5’ 8”
Birthplace: Town of Meria Favorite Hero: Anything Crimson
Tools Used by Ashley:
Hurl Knife
Throws a knife forward. The knife will fall straight down when it
hits an obstacle, so there may be times when you intentionally
throw a knife at an object.
Booty Call
This tool finds items hidden nearby. If an item is present
within the range of the sensor, its position will show up by
flashing.
Flare Gun
This tool launches a flare above your head. Use it in dark areas
to let you look around. You can also use it to push switches in
high places.
36
37
991756 WILDARMS PS MANUAL
3/29/00
11:36 AM
Page 39
Main Characters
Personal Data
Lilka Eleniak
Lilka is a sorceress just starting out. Though clumsy
and scatterbrained with a terrible sense of direction,
she still has a boundlessly cheery and forward-looking
disposition, so she dictates the mood of the party.
Ever since she was young, she has had an inferiority
complex when compared to her older sister who was
better at everything. She is now constantly struggling
to become a greater sorceress than her older sister.
Name: Lilka Eleniak Class: Crest Sorceress Age: 14
Birthplace: Sielje Region Favorite Food: Jelly Rolls
Height: 5’
Tools Used by Lilka:
Fire Rod
This rod shoots a ball of fire forward to help solve
puzzles. It can be used to set fire to obstacles, light
torches or melt frozen items.
Freeze Rod
This rod shoots a ball of ice forward to help solve
puzzles. It can be used to put out torches. It can also
temporarily freeze certain objects.
Change Rod
This rod can change certain blocks found in dungeons
into gems or vice versa. Touching gems will restore a
little of the characters’ HP.
38
39
991756 WILDARMS PS MANUAL
3/29/00
11:36 AM
Page 41
Main Characters
Personal Data
Brad Evans
Brad was a hero, a soldier in the Slayheim Liberation
Army. Certain circumstances drove him out of the army
until he was arrested and locked up in a high-security
prison filled with the hardest of criminals. An expert in
firearms, he also has much experience in handling
explosives. He is a brilliant warrior who faces difficulties
with cold, calculating judgment.
Name: Brad Evans Class: Prisoner No. 666 Age:: 32
Birthplace: Slayheim Favorite Insect: Beetle
Height: 6’6”
Tools Used by Brad:
Kick Boots
These boots can destroy or kick away obstacles.
Not only blocks and crates, but even unexpected items can
also be kicked, so try lots of things.
Bombs
These bombs can blow up obstacles. If a passageway or hole in
the wall is blocked with rocks, use these bombs to blow them
open.
Earthquake
This tool causes the ground to shake wildly, destroying
anything in the room that can collapse.
40
41
991756 WILDARMS PS MANUAL
3/29/00
11:36 AM
Page 43
Main Characters
Anastasia
Anastasia is the legendary heroine known as the “Sword
Magess.” She vanished together with the “Blaze of
Disaster” who had attacked the land of Filgaia.
Kanon
Kanon is a female warrior with
her eye on Ashley. Known as a
“Merc,” she is a bounty hunter
who wanders the land.
Tim Rhymeless
Tim is a boy with gentle features. He has
the amazing power of being able to
communicate with the Guardians.
42
ARMS
Lucied
Lucied is the Guardian of Desire. He is said to have
cooperated with the “Sword Magess” in the battle
against the “Blaze of Disaster.”
43
991756 WILDARMS PS MANUAL
3/29/00
11:36 AM
Page 45
Other Characters
Altaecia Rune Valeria
Altaecia is Irving’s twin sister. A woman with a
gentle and mild disposition, she has taken it upon
herself to pull cafeteria duty for ARMS.
Irving Vold Valeria
Irving is a nobleman who lives near the
Town of Meria. He bought the rights to
ARMS on the verge of its collapse and
built it into a private, independent
guerilla squad. He is a dependable
leader for Ashley & Co.
44
ARMS
Marina Irington
Marina is a childhood friend of Ashley’s. She
and Ashley have become aware of their feelings
for each other but they have not been able to
express themselves truthfully.
45
991756 WILDARMS PS MANUAL
3/29/00
11:36 AM
Page 47
Enemy Characters
Odessa is a terrorist organization that
is disturbing the peace of Filgaia. They
are facing off against Ashley & Co.
COCYTUS
This elite group takes
orders from only one
man: Vinsfeld
Ptolomea
Officer of Odessa and
member of Cocytus. He
excels at warfare with
modern weapons. He
is popular with his
subordinates.
ODESSA
Vinsfeld
Rhadamanthus
Leader of the terrorist organization
named Odessa. He is aiming to use
his powerful charisma and
overwhelming military power
as weapons to establish a
dictatorship over Filgaia.
Caina
Officer of Odessa and
member of Cocytus.
Although the youngest
member, she is a powerful
summoner who manipulates
Randolph the Magic Key.
Antenora
Officer of Odessa.
She excels at
assassination
and as a front-line
strategist.
46
Judecca
Officer of Odessa and
member of Cocytus. The
owner of an obstinate
personality, he is an
expert on guns.
47
991756 WILDARMS PS MANUAL
3/29/00
11:37 AM
Page 49
Adventure Hints
In dungeons, you may need to fall down intentionally.
In dungeons, there are passageways where you will fall if you lose your
footing. There may be levels where you must intentionally fall down in
order to get there. If you find a passageway that you can see but cannot get
to, try to find a place that you can drop down from.
What do I do if there is no way through?
If a passageway appears to come to a dead
end, try turning the map around to see if you
haven’t missed a switch that will open some
contraption. Floors of different colors may
become switches and walls of different patterns
may be destroyed to expose a passageway. In
addition, unfamiliar objects appearing on the
screen should be examined thoroughly using
various Tools and actions.
How do I operate switches I cannot reach?
Generally, expect to use the Tools to operate
switches. Take advantage of the fact that Ashley’s
Hurl Knife tends to drop straight down upon hitting
something, and make use of Lilka’s Rods. If the
switch is in a diagonal direction, adjust the angle of
the character and try to hit it.
48
Be sure to save your game when you see a Stone!
If you see an Amazing Stone within the dungeon, get in the habit
of saving your game. These Stones are generally located
immediately after you have solved a complex puzzle or roughly
midway in the total length of the dungeon. Be prepared for any
future dangers.
Take advantage of Personal Skills.
If you are having trouble in combat, try using Personal Skills to
enhance the abilities of the characters. Particularly if status
abnormalities occur due to enemy attacks; combat will tend to
drag out to your disadvantage. We recommend that once you
have mastered the Skills which prevent Poison, Confusion and
other status abnormalities, try the Skills to improve abilities.
What happens if I cannot figure out events?
Try talking to everyone in town. Even people that you have
talked to once may give you important information if you talk
to them again on a different occasion. Also, if someone asks
you to do a favor, be sure to do it. Some sort of development
is sure to happen.
In Boss battles, attack parts other than the main body first.
In the case of a Boss battle where you can attack its legs for
example, if you attack and defeat its legs first, the Boss can no
longer attack with its legs. You will also get extra experience
points, so in Boss battles be sure to attack the body parts
other than the main body, and then defeat the main body.
49
991756 WILDARMS PS MANUAL
3/29/00
11:37 AM
Page 51
Credits
SONY COMPUTER
ENTERTAINMENT AMERICA
•Producer
Peter Clark
•Assistant Producer
Jessi Harrison
•Senior Producer
Perry Rodgers
•Product Marketing Manager
Susan Nourai
•Product Marketing Specialist
Mark Valledor
•Public Relations Manager
Kirsten Merit
•QA Managers
Chris Caprio, Charles Delay
•QA Supervisors
Conner Morlang, Tim Duzmal
•Technical Coordinator
Sam Thompson
•Senior Lead Analyst
Corey Strock
•Assistant Lead Analysts
Scotte Kramer, Joel Ruff,
Charles Yang, Ben Wisyanski
•QA Analysts
JoAnne Larsen, David Meagher,
Joel Manzano, Garrick Ozanne,
Jim Harper, Andrew Woodworth,
Greg Phillips, Derek Rayla,
Michael Acay, Jerrod Simons,
Ryan Schleef, Brian Ida,
Charlie Huenergardt
50
•Package and Manual Design
Michael Jacobs
Beeline Group Inc.
•Manual Translation
Alan Siegrist
•Game Translation
Language Automation Inc.
David Lakritz
•Special Thanks to the SCEA
Marketing Team
Andrew Adams, Janeen Anderson,
Donna Armentor, Shelley Ashitomi,
Ami Blaire, Josh Bingham,
Kurtis Buckmaster, Lori Chase,
Ed DeMasi, John Diamonon,
Aimee Duell, Emily Franks,
Peggy Gallagher, Andrew House,
Stephanie Iwamasa, Ted Jalbert,
Cindy Johnson, Jennifer Jones,
Chuck Lacson, Marie Macaspac,
Colin MacLean, Letha Moore,
Dayton Paiva, Kristine Pepa,
Quinn Pham, Eileen Rodriquez,
Maggie Rojas, Sarai Sequeria,
Sharon Shapiro, Jack Siler,
Molly Smith, Heather Stroock,
Jamie Tica, Johanna Tordjman,
Michelle Vercelli, Michelle Wessner,
Marilyn Weyant, Kim Yuen
•And More Thank You’s
Kaz Hirai, Jack Tretton,
Glenn Nash, Todd Elhart,
Grace Kao, Jerry Gentile,
Sara Chenoweth, Doug Mukai,
Kirk Jue, TBWA Chiat/Day,
Jamison Gold, Kerry Hopkins,
Michelle Manahan, Lynda Vaitai
Bruce Adams, Joni Toney
SONY COMPUTER
ENTERTAINMENT INC.
• Production/Copyright
Sony Computer Entertainment Inc.
• Produced By
Contrail
• Executive Producer
Akira Sato
• Supervisor
Toshiyuki Miyata, Yukio
Nagasaki
• Producers
Takashi Fukushima
Takahiro Kaneko
• Directors
Nobukazu Satoh
Eitaro Nagano
• Total Game Design/Scenario
Akifumi Kaneko
• Event Assistance
Takayuki Kono
Takao Nishiyama
• Image Continuity
Masayuki Kaneko
• Chief Map Design
Hideyuki Kikuchi
• Map Design
Hiroyuki Tsutsumi
Takayuki Kono
Masayuki Kaneko
Hiroyuki Katano
Takao Nishiyama
Muneyoshi Satoh
• Battle Design
Naoki Ishikawa
• Battle Assistance
Hiroyuki Katano
• Character Graphics
Akihisa Watanabe, Yu Hik
• Chief Field Graphics
Keiko Matsushita
• Field Graphics
Nitaro Fujii
Norihisa Ono
Masahiro Yokoyama, Ken Iwata
Shinya Hirata
Yutaka Kobayashi
Masato Kobata
• Chief Battle Graphics
Tetsuya Okubo
• Battle Graphics
Yasuhiro Shibuya, Hiroki Ishii
Takayuki Yabubayashi
Yutaka Kunimoto
Sayaka Hozumi, Ginta
Nobuo Nakazawa
• Effect Graphics
Naoya Minemura
• Original Character Design
Nitaro Fujii
Akihisa Watanabe, Yu Hiki
Hiroki Ishii
• Monster Design
Tetsuya Okubo
Yasuhiro Shibuya, Hiroki Ishii
Takayuki Yabubayashi
Yutaka Kunimoto
Sayaka Hozumi
Nobuo Nakazawa
Norihisa Ono
• Field Programming
Takao Suzuki
Masanori Yamamoto
• Battle Programming
Yuichi Takabayashi
• Battle Effect Programming
Urabon, Masanori Yamamoto
• Event Script
Fumihiro Kanatani, Shinji Takeda
Takao Suzuki
• Utility Programming
Urabon
• Programming Support
Michelle Ahiko
• Game Developer
Media Vision, Inc.
• Sound Producer
Takashi Fujisawa
• Sound Effects
Yuko Araki
Hiroyuki Kasuya
• Sound Advisor
Masanori Takada
• Music
Michiko Naruke
• Recording Directors
Akihiko Shimizu
Seiichi Negi
Atsushi Yabe
• Recording Engineers
Kunihiko Aoto
Tatsuya Ishii
Maki Kosugi
Music Programming
Futoshi Shimohira
“WILD ARMS 2nd Ignition ~
Donna Toki Demo Hitori Ja Nai
~ [You are Never Alone]”
Words/Composition:
Michiko Naruke
Arrangement/Direction:
Kazuhiko Toyama
“Yozora [Night Sky]”
Words/Composition:
Michiko Naruke
Arrangement/Direction:
Michiko Naruke
Tsuyoshi Yamanaka
“ATOMIC ARMS”
Composition: Michiko Naruke
Arrangement:
Michiko Naruke
Tsuyoshi Yamanaka
Choral Arrangement:
The Gospellers
“Resistance Line”
Words by: Michiko Naruke
Tsuyoshi Yamanaka
Composition: Michiko Naruke
Arrangement: Yoshihiko Iwasaki
“Kiseki [Miracle]”
Words/Composition:
Michiko Naruke
“Zephyrs’s”
Words/Composition:
Michiko Naruke
Arrangement: CHOKKAKU
• Animation Producer
Hidekazu Terakawa
• Director
Tensai Okamura
51
991756 WILDARMS PS MANUAL
3/29/00
11:37 AM
Page 53
Credits
52
•Painting Continuity
Tensai Okamura
Masayuki Ando
•Animation Character
Design/Artwork Direction
Takuya Saitoh
•Original Artwork
Takahiro Kishida
Masahiro Koyama
Sei’ichi Nakatani
Masayuki Ando
Asako Nishida
Yoshiyuki Itoh
Tomoaki Kado, Toru Yoshida
Kenji Irie, Hiroyuki Nishimura
Itsuko Takeda
Takayuki Hamana
Takuya Saitoh, Tensai Okamura
•Art Direction
Hiromasa Ogura
•Blue Background
Ogura Kobo
•Animation Inspection
Chieko Ichimanda
•Animation: Production IG
Satomi Ishikawa
Kazuhiro Ohta
Yuki Nakajima
Hiroyo Izumi
Reiko Sakai, Miki Shimada
Mika Nakabayashi, Hiroki Itoh
•Animation: IG Niigata
Hiroyoshi Naitoh
Kazuya Ishizaki
Hiroyuki Oka
Daisuke Nakayama
Takeshi Morita
Yukiko Mita
•Animation: Studio Takuranke
Rie Kondoh
Kumiko Terada
Eiji Komatsu, Ryota
•Animation: A.P.P.P.
Yurika Higashisaka
Yuko Goseki
Miwako Yamamoto
Koji Ichikawa
•Animation: Jungle Gym
Akio Hirata
Yasuko Kajiyama
Sakiko Arai
•Animation
OH! Productions
AIC
•Color Setting/Color
Designation
Hayachika Shigeki
•Finishing
Tamaka Satoh
Mitsuko Itoh
Natsuko Mori
Miki Sakuma
•Photography
Makoto Furukawa
•3D Animation
Kaoru Matsumoto
Yoshimasa Yamazaki
•Effects
Shigenobu Kaihoko
•Color Painting
Nobuko Mizuta
•2D Work
Tsukasa Kakisaka
•Editing
Makiko Asano
Warranty
• Production
Masatomo Nishizawa
• Production Desk
Jun Takahashi
• Production Progress
Kanji Wakabayashi
• Advisor
Shinji Takagi
• Animation Production
Production IG
• Guest Monster Design
Hiroshi Maruyama
Noriko Nagano
Tetsuyaro Shinkaita
• Quality Management
Jun’ichi Akatsuka
Mika Endoh
Hiroshi Ishikawa
Hisami Fuji
Satoshi Uchida
Daisuke Hirowatari
Tatsuo Shimada
Kentaro Mitomo
• Special Thanks
Takami Kinoshita
Ryo Sugawara
Naoki Inoue
Naoko Tateuchi
Czar
Hiroyuki Wada
Toshiya Niino
Yoshitsugu Kawauchi
Soytzer Music
Fill In [Cafe]
Ki/oon Records
Sony Music Communications Inc.
Sony PCL Inc.
Sony Computer Entertainment America (SCEA) warrants to the original purchaser of this SCEA product that this
software is free from defects in material and workmanship for a period of ninety (90) days from the date of purchase.
SCEA agrees for a period of ninety (90) days to either repair or replace, at its option, the SCEA product. You must call
1-800-345-SONY to receive instructions to obtain repair/replacement services.
This warranty shall not be applicable and shall be void if the defect in the SCEA product has arisen through abuse,
unreasonable use, mistreatment or neglect. THIS WARRANTY IS IN LIEU OF ALL OTHER WARRANTIES AND NO
OTHER REPRESENTATIONS OR CLAIMS OF ANY NATURE SHALL BE BINDING ON OR OBLIGATE SCEA. ANY IMPLIED
WARRANTIES APPLICABLE TO THIS SOFTWARE PRODUCT, INCLUDING WARRANTIES OF MERCHANTABILITY AND
FITNESS FOR A PARTICULAR PURPOSE, ARE LIMITED TO THE NINETY (90) DAY PERIOD DESCRIBED ABOVE. IN NO
EVENT WILL SCEA BE LIABLE FOR INCIDENTAL OR CONSEQUENTIAL DAMAGES RESULTING FROM POSSESSION,
USE OR MALFUNCTION OF THE SCEA SOFTWARE PRODUCT.
Some states do not allow limitations as to how long an implied warranty lasts and/or exclusions or limitations of
consequential damages, so the above limitations and/or exclusions of liability may not apply to you. This warranty gives
you specific legal rights, and you may also have other rights which vary from state to state.
53