1
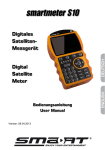
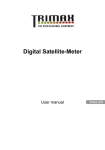
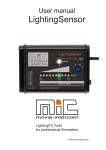
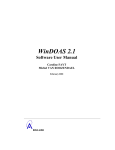
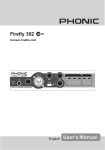
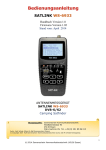
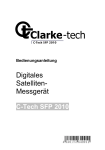
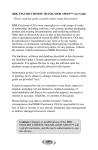
Digital SatelliteMeter Manual Version: 15.06.2010 Preface Preface Dear Customer, Thank you for purchasing this digital satellite meter smartmeter S10. Before operating this digital satellite meter, please read the manual of the smartmeter S10 carefully. This manual helps you with the • designated, • safe and • advantageous use of the digital satellite meter smartmeter S10. Everyone who • installs, • connects, • operates, • cleans or • disposes of this receiver must have familiarised himself with the complete contents of this manual. Please keep this manual always at hand near the digital satellite meter. We hope you enjoy using your smartmeter S10. Your smart electronic GmbH 2 EN smartmeter S10 Contents Contents Preface ............................................................................................................. 2 Contents........................................................................................................... 3 Description....................................................................................................... 5 Safety instructions.......................................................................................... 5 Safety of persons .............................................................................................. 5 General information........................................................................................... 6 Appropriate Usage .......................................................................................... 7 Delivery range.................................................................................................. 7 Device overview .............................................................................................. 8 Start of operation .......................................................................................... 10 Battery ............................................................................................................. 10 Switch-on the Device ...................................................................................... 10 Lithium-ions-battery ..................................................................................... 10 Charging the battery........................................................................................ 11 Storing of the batteries .................................................................................... 11 Align satellite dish ........................................................................................ 12 TP Search....................................................................................................... 13 Remove satellite from list ................................................................................ 13 Move satellite in list ......................................................................................... 14 Rename satellite in list .................................................................................... 14 Search Transponder ....................................................................................... 15 Satellite Identify............................................................................................. 17 Packet Control ............................................................................................... 18 DiSEqC Search .............................................................................................. 19 DiSEqC Motor Search ................................................................................... 20 Spectrum........................................................................................................ 21 Watch TV ........................................................................................................ 22 Settings .......................................................................................................... 23 OSD Transparency ......................................................................................... 24 smartmeter S10 EN 3 Contents Signal Audio Tone........................................................................................... 24 Volume ............................................................................................................ 24 Language ........................................................................................................ 24 Factory Reset .................................................................................................. 24 PC Update ...................................................................................................... 25 System Info ..................................................................................................... 25 USB Menu ....................................................................................................... 26 Compass ........................................................................................................ 29 Capture Video ................................................................................................ 30 Save Screenshot ........................................................................................... 30 Angle Calculation.......................................................................................... 31 Blind Search .................................................................................................. 32 Blind Scan ....................................................................................................... 32 Satellite Search ............................................................................................... 32 Software-Update............................................................................................ 33 Cleaning ......................................................................................................... 34 Storing the Product....................................................................................... 34 Trouble shooting........................................................................................... 35 Disposal ......................................................................................................... 36 Technical specifications............................................................................... 37 Supplier .......................................................................................................... 38 Warrenty......................................................................................................... 39 Declaration of conformity............................................................................ 39 4 EN smartmeter S10 Description Description The smartmeter S10 is a handy digital antenna measuring device for a quick and easy alignment of satellite antennas. If a satellite is found, the smartmeter S10 shows it on the display and emits a audible signal. Signal strength and quality are displayed as numerical values and bar graphs. Another measurement value is the forward error correction (FEC) and the bit error rate (BER). In addition, the picture quality can be revised on the highresoluted 8.9-inch TFTLCD screen. Many satellites are pre-programmed in order to an quick antenna adjustment. The scope of supply contains, among the charger, a USB cable which allows you to update the smartmeter S10 software. Safety instructions Attention! Please read the safety instructions carefully before operating the device. Please follow all warnings and instructions on the equipment and in the operating manual. Safety of persons Ensure that nobody can be hurt by falling tools or parts of the satellite antenna during the adjustment and installation of the antenna. For your own security use a rope on sloping roofs. smartmeter S10 EN 5 Safety instructions General information Attention! The devise should only be operated with the supplied AC adapter at the mains. Do not open the meter or the included AC adapter. There is danger of life through electric shock! Wrong usage of the ports can lead to the destruction of the measuring device. Proceed carefully with the measuring device: • Avoid low temperatures (below 0 °C) or to high hum idity. • The TFT display can be damaged by mechanical impacts. • Avoid excessive input voltages. Please refer to the technical data starting from page 37. Do not operate with the device: • if it has visible damage, • if there are loose parts in the device, • if the device was located outdoors or in damp rooms a extended period of time. 6 EN smartmeter S10 Appropriate Usage Appropriate Usage The measuring device smartmeter S10 was developed to measure signals of digital satellite antennas and satellite systems. It is exclusively for this purpose and should only be used for this purpose. Use the equipment only for the purpose, which is described in this manual. Follow all information in this manual, particularly the safety instructions on page 5. Any other usage is rated as not properly and can result in damage or even injury. There will be no liability for damages caused by a non-intended use. Delivery range Please check if the delivery is complete. Included in delivery: • device smartmeter S10, • a carrying bag, • a car adapter cable 12 V, • an extern charger, • an Euro-mains cable. • an user manual, If the delivery should be incomplete, contact your specialist dealer or smart electronic GmbH Industriestraße 29 78112 St. Georgen GERMANY Service Hotline: 00 49 7724 / 94 78 339 Telefax: 00 49 7724 / 94 78 333 E-Mail: [email protected] smartmeter S10 EN 7 Device overview Device overview Figure 1: 8 EN Front of the smartmeter S10 smartmeter S10 Device overview No. Description 1 2 LNB-IN LC-Display 3 FUNCTION keys 4 POWERLED LOCK-LED 22K/13V/18V -LED POWER Numeric keys AC adapter port NavigationCross 5 6 7 8 9 10 11 OK MENU EXIT ANGLE 12 SYSTEM 13 14 15 FIND SCAN USB-Port smartmeter S10 Digital satellite signal input Display of the TV picture, the menu and the measured values Different functions depending on the menu The functions are at the bottom of Screen display red the meter is on off the meter is turned off LED lights when a signal is received Lights if 22K/13V/18V signals are received Switch devise on/off Direct enter of numbers Low volt port – for power supply connection Navigation through menus, switching programs ▲, ▼ volume control ◄, ► OK button: confirmation of a selection Display the main menu Leave the current menu, cancel operation Open the menu for the calculation of azimuth, Elevation and Polarization Configuration of all system parameter. Display current software version. Open the menu satellite detection Open the Autoscan Menu USB port for USB-storage device EN 9 Start of operation Start of operation Battery Before the first operation with the measuring device charge the battery completely. (see also chapter “Lithium-Ion battery” on page 11). Load the accumulator during the first loading procedure at least 5 hours. The maximum battery charging time is approximately 12 hours. Switch-on the Device Ö Press 2 seconds the red power button on the Smartmeter. Lithium-ions-battery Explosion danger! Never the two poles (+ and -) connect with each other! Attention! Storing or operating accumulator no more than 40° C. Not burning or damaging accumulator. Not taking accumulator to contact with water. 10 EN smartmeter S10 Lithium-ions-battery Charging the battery The maximum battery charging time is approximately 12 hours. A charging circuit in the measuring device provides an optimal charge of the battery. The device is charged if it is switched off. Ö Ö Ö Ö Turn the device off, if it is not already off. Connect the Euro-main cable with the external AC adapter. Connect the external AC adapter to the power grid. Connect the AC adapter to the low-voltage port at the bottom. The battery is charged as soon as you connect the AC adapter to the smartmeter S10 Charging is displayed by the cycling display of the battery symbol: When fully charged the battery symbol shows permanently four bars. Storing of the batteries Storing the batteries between 0° Celsius and 40° Celsius. Loading the accumulator at a longer storage every two weeks to avoid a depth discharge. smartmeter S10 EN 11 Align satellite dish Align satellite dish Ö Press the MENU-button. Ö Use the buttons ◄ / ► and ▲ / ▼ select the menu item TP SEARCH and confirm your selection with the OK button. Ö Choose the desired satellite in the setting field with the buttons ◄ / ►. Ö Turn the dish until the LOCK-LED lights, or the bargrapgh displays signalstrength and signalquality. Ö Fixate the Dish in the position with the best signalstrength. Ö Vary the angle of inclination until the bargrapgh displays even more signalstrength and signalquality. Ö Fixate the Dish in the position with the best BER quality. The BER value behind “10E” is important. The higher, the better. The value should be minimal 10E-4. The optimum is > 10E-6. In the menu Settings Æ Signal Audio Tone you can chose wheteher an acoustic signal is represented once a signal is found or not. 12 EN smartmeter S10 TP Search TP Search Ö Press the MENU-button. Ö Use the buttons ◄ / ► and ▲ / ▼ select the menu item TP SEARCH and confirm your selection with the OK button. Figure 2: Transponder Search In the menu TP Search a list of the stored satellites is shown. Eight satellites are displayed on each page. To display further satellites use the buttons ▲ and ▼. Remove satellite from list Ö Chose the satellite you’d like to delete from the list with the buttons ▲ and ▼. Ö Press F1. Ö Mark the item YES with the buttons ◄ and ► confirm by pressing OK. smartmeter S10 EN 13 TP Search Move satellite in list Ö Chose the satellite you’d like to move in the list with the buttons ▲ and ▼. Ö Press F2. Ö Use the numeric keys to enter the position you’d like the satellite to be moved to. Ö Confirm by pressing OK. Rename satellite in list Ö Chose the satellite you’d like to rename in the list with the buttons ▲ and ▼. Ö Press F3. A screen keyboard opens. Ö Use the buttons ◄/► and ▲/▼ to mark a letter and confirm each letter with OK. Ö Repeat until you have the desired name. Standard show special letters Caps on switch between capital and small letters Back delete last letter OK Save satellite name Cancel exit without saving Ö Mark the item OK and confirm with the OK-button. 14 EN smartmeter S10 TP Search Search Transponder Ö Chose the satellite you’d like to search transponders on with the buttons ▲ and ▼. Ö Confirm by pressing OK. Setting fields Signal display Figure 3: Transponder Search In this menu you can see the signal quality of single transponders. Use this menu to allign a satellite dish. By pressing F1 you can delete a marked transponder. By pressing F2 you start the transponder search and after aprox. 5 sec can watch the TV signal of the marked transponder. By pressing F3 or F4 you can choose the DiSEqC-Port or the LNB-Type. smartmeter S10 EN 15 TP Search Setting fields Use the buttons ▲ and ▼ to mark one of the setting fields and then use the buttons ◄ und ► to choose different settings. Example: To choose another DiSEqC-Port press the button ▼ or ▲ until the setting field DiSEqC Port is marked. Now press the buttons ◄ or ► until the desired DiSEqC-Port is shown. Signal display Signal strength (S), Signal quality (Q) and Bit Error Rate (BER) are shown. 16 EN smartmeter S10 Satellite Identify Satellite Identify Ö Press the MENU-button. Ö Use the buttons ◄ / ► and ▲ / ▼ select the menu item SATELLITE IDE and confirm your selection with the OK button. Figure 4: Ö Ö Ö Ö Satellite identify Press F1 to watch TV on the chosen transponder. Change the transponder with the button F3. Chose the DiSEqC-Port with the button F3. Chose the LNB-Type with the button F4. The name of the satellite from which you receive signal is displayed. Also the signal strength of this satellite is displayed. smartmeter S10 EN 17 Packet Control Packet Control Ö Press the MENU-button. Ö Use the buttons ◄ / ► and ▲ / ▼ select the menu item PACKET CONTROL and confirm your selection with the OK button. Figure 5: Ö Ö Ö Ö Packet control Press OK to display the list of satellites. Use the buttons ▲ and ▼ to chose a satellite. Chose the DiSEqC-Port wit the button F3. Chose the LNB-Type wit the button F4. Now you can see the signal strenth (S) and signal quality (Q) of five transponders. By pressing the buttons ◄ and ► you can jump from page to page. 18 EN smartmeter S10 DiSEqC Search DiSEqC Search Ö Press the MENU-button. Ö Use the buttons ◄ / ► and ▲ / ▼ select the menu item DiSEqC Search and confirm your selection with the OK button. Figure 6: DiSEqC Suche Ö Chose the DiSEqC-Port wit the button F1. Ö With F2 the allocation of the 16 DiSEqC-Ports is displayed. Ö Chose the LNB-Type wit the button F4. The DiSEqC-Search starts automatically. At every port the name of the received satellite is displayed. You can selcet single ports by pressing F1 and can the switch to the menu Transponder Search by pressing OK. smartmeter S10 EN 19 DiSEqC Motor Search DiSEqC Motor Search Ö Press the MENU-button. Ö Use the buttons ◄ / ► and ▲ / ▼ select the menu item DiSEqC Motor Search and confirm your selection with the OK button. Figure 7: DiSEqC Motor Search Setting Fields Use the buttons ▲ and ▼ to mark one of the setting fields and then use the buttons ◄ und ► to choose different settings. Signal display Signal strength (S), Signal quality (Q) and Bit Error Rate (BER) are shown. Turn Satellite Dish By pressing F1 or F2 you can turn the satellite dish to the west or to the east. Watch the green signal quality bar. This graph shows you, if you receive a signal from the satellite. 20 EN smartmeter S10 Spectrum Spectrum Ö Press the MENU-button. Ö Use the buttons ◄ / ► and ▲ / ▼ select the menu item Spectrum and confirm your selection with the OK button. Figure 8: Spectrum In this menu you can control the signal quality of different transponders over the whole spectrum. Ö Ö Ö Ö Chose the LNB-Type with the button F1. Switch 22KHz On or Off with F2. Chose the polarisation with the button F3. Chose the sampling steps with the button F4. 4M STEP: precise scan, duration approx. 10sec. 16 M STEP: duration approx. 3sek., medium precise smartmeter S10 EN 21 Watch TV Watch TV Ö Press the MENU-button. Ö Use the buttons ◄ / ► and ▲ / ▼ select the menu item WATCH TV and confirm your selection with the OK button. Figure 9: Watch TV In this menu you can check the TV reception. Ö Chose the satellite by pressing F1. Ö Chose the desired channel by pressing F2 and confirm with OK. Ö Press F3 for full screen mode. You can switch through the channels with ▲ and ▼. Adjust the volume with ◄ and ►. 22 EN smartmeter S10 Settings Figure 10: Watch TV On every channel switching detailed information about the channel are shown. Settings Ö Press the MENU-button. Ö Use the buttons ◄ / ► and ▲ / ▼ select the menu item SETTINGS and confirm your selection with the OK button. Figure 11: smartmeter S10 Settings EN 23 Settings OSD Transparency Ö Use the buttons ◄ and ► to chose the transparency of the On Screen Display. You can chose from 10 (no transparency) to 1 (nearly transparent). Signal Audio Tone Ö Use the buttons ◄ and ► to chose whether you like to have a signal tone while adjusting an antenna or not. Volume Ö Use the buttons ◄ and ► to set the volume. Language Ö Use the buttons ◄ and ► to chose a display language. Factory Reset Ö Mark this item to reset the device to factory settings. Ö Confirm with OK. Ö Mark the item YES with the buttons ◄ and ► confirm by pressing OK. 24 EN smartmeter S10 PC Update PC Update Ö Press the MENU-button. Ö Use the buttons ◄ / ► and ▲ / ▼ select the menu item PC Update and confirm your selection with the OK button. Figure 12: PC Update System Info Ö To show the System Info enter the menu PC Update and press the button F1. Figure 13: smartmeter S10 System Info EN 25 PC Update USB Menu Ö To open the USB menu enter the menu PC Update and press the button F2. Figure 14: USB-Menu In the USB menu all files are shown that are stored on the connectes USBdevice. Ö Use the buttons ◄ and ► to limit the number of shown files. Example: If you want to see all the music files on the connected USB device: press the button ► until the item music is marked on the top of the screen. Only music files are shown now. Ö Use the buttons ▲ and ▼ to chose a file an press OK to open it. Load Database Ö Press F4 to save the channel list ro your USB-device. Ö You can modify the channel list on your PC with the Settings Editor. You’ll find the Setting-Editor on the website www.smart-electronic.de in the category Support. Ö Save the modified channel list as Version 100 onto your USB device. Ö You can load the modified channel list via the USB-menu by marking it and then pressing OK. 26 EN smartmeter S10 PC Update Rename file Ö Mark the file you want to rename in the USB-Menu. Ö Press F2 to open the Tools. Ö Mark the option Rename and press OK. A screen keyboard opens. Ö Use the buttons ◄/► and ▲/▼ to mark a letter and confirm each letter with OK. Ö Repeat until you have the desired name. Standard show special letters Caps on switch between capital and small letters Back delete last letter OK Save satellite name Cancel exit without saving Ö Mark the item OK and confirm with the OK-button. Delete file Ö Ö Ö Ö Mark the file you want to delete in the USB-Menu. Press F2 to open the Tools. Mark the option Delete and press OK. Mark the item YES with the buttons ◄ and ► confirm by pressing OK. Move file Ö Ö Ö Ö Mark the file you want to move in the USB-Menu. Press F2 to open the Tools. Mark the option Move and press OK. Mark the folder you’d like to save the file in with the buttons ▲ and ▼ and confirm with OK. smartmeter S10 EN 27 PC Update Create folder Ö Open the Folder in which you want to create the new folder. Ö Press F2 to open the Tools. Ö Mark the option Create Folder and press OK. A screen keyboard opens. Ö Use the buttons ◄/► and ▲/▼ to mark a letter and confirm each letter with OK. Ö Repeat until you have the desired name. Standard show special letters Caps on switch between capital and small letters Back delete last letter OK Save satellite name Cancel exit without saving Ö Mark the item OK and confirm with the OK-button. Disk Info Ö Open the USB-menu and press F2 to open the Tools. Ö Mark the option DISK INFO and press OK. Format Disk Ö Open the USB-menu and press F2 to open the Tools. Ö Mark the option Format Disk and press OK. Ö Mark the item YES with the buttons ◄ and ► confirm by pressing OK. WARNING! All data will be lost after formatting the USB-storage device!! 28 EN smartmeter S10 Compass Compass Ö Press the MENU-button. Ö Press the Exit. button. Ö Press F1. The internal digital compass is displayed Ö Lay the smartmeter S10 on a flat ghorizontal surface. Ö Turn the smartmeter S10 on the surface a few times for calibration Figure 15: Compass The red side of the compass-needle shows to the north. smartmeter S10 EN 29 Capture Video Capture Video Ö Press the MENU-button. Ö Press the Exit. button. Ö Press F4. The TV picture gets captured on the connected USB-storage device. Ö Press EXIT to stop the recording. Recorded broadcasts can be played via the USB-Menu. Save Screenshot When there is a connected USB-storage device you can save screenshots directly to USB. Ö Press the button . The Message Catch Picture is shown. The Screen is saved as bmp-file on the usb-storage device. 30 EN smartmeter S10 Angle Calculation Angle Calculation Ö Drücken Sie die Taste ANGLE. Der Bildschirm zur Winkelberechnung öffnet sich. Figure 16: Angle calculation Ö Set the name of the satellite you’d like to receive. Ö Enter the longitude and latitude and the respective direction of your position. Ö Mark the item Angle calculation and press OK.. In the three fields at the bottom the correct allignment of the satellite dish is shown: Azimuth Shows the azimuth of the satellite Elevation Shows the elevation of the satellite Pol Shows the angle of polarisation of the satellite smartmeter S10 EN 31 Blind Search Blind Search Ö Press SCAN. The screen BLIND SEARCH opens. Figure 17: Blind search Blind Scan Ö Chose the satellite you’d like to search with the buttons ◄ and ► Ö Press F1. The scanning over the entire frequency range of the satellite is performed. Satellite Search Ö Chose the satellite you’d like to search with the buttons ◄ and ► Ö Press F2. The scanning over the common transponder of the satellite is performed. 32 EN smartmeter S10 Software-Update Software-Update Required equipment • smartmeter S10 • USB-storage device • Current Firmware You’ll find the current firmware on www.smart-electronic.de in the section Support. Warning! Secure, that during the update the is provided with electricity. During the update supply the smartmeter S10with electrical power by power supply unit. Ö Ö Ö Ö Ö Ö Ö Ö Save Software on USB-storage device.. Connect USB-storage device with smartmeter S10 Press MENU. Use the buttons ◄ / ► and ▲ / ▼ select the menu item PC Update and confirm your selection with the OK button. Press F2 to open the USB-Menu. Chose with the buttons ◄ and ► the filetype Software. Mark the Firmware with the buttons ▲ and ▼ and press OK. Mark the item YES with the buttons ◄ and ► confirm by pressing OK. The update starts automatically. After the update the smartmeter S10 asks you to restart the device. Ö Mark the item YES with the buttons ◄ and ► confirm by pressing OK. Warning! Never switch off the Smartmeter during the update processes smartmeter S10 EN 33 Cleaning Cleaning Danger of electric shock! No liquid may reach in the device. Never clean it with a wet cloth. Drawing before the cleaning all plugs. Attention! Never use solvet-containing agents like benzene or similar. Agents like these can damage the surface of the housing. Ö Pull all plugs from the device (USB-, antenna cable) before cleaning. Ö Clean the housing and the display using a soft, lint-free cloth. In case of stronger dirt you can use a mild soap sud or spirit. Ö The keys can be cleaned using compressed air (max. 2 Bar). Do not use any solvents. Storing the Product Ö Ö Ö Ö Ö Ö 34 Unplug the device from the mains. Unscrew the LNB cable from the device. Pull all plugs out of the sockets. Pack the device and all cables into the original carton. Store the device and all accessories at a dry and dust-free location. Protect the device from frost. EN smartmeter S10 Trouble shooting Trouble shooting Fault phenomenon Probabable reasons Solutions Device does not react. The battery is empty. Charge the battery. Bad picture , block defect The antenna is not adjusted to the satellite. Adjust the antenna. The LNB is defect No or onlly fait signal. No picture, no sount. Display/ Sounds turned off Replace the LNB. Please check all cable connections. Adjust the antenna. Turn on the display by pushing the F1 button. Turn on the sound by pushing the F2 or ► button. If you cannot find out what is wrong with your device please contact your local specialized dealer. At www.smart-electronic.de find the area „Support“ a FAQ being provided in the topical problem solutions. smartmeter S10 EN 35 Disposal Disposal Attention! Never throw the receiver and the batteries in normal household waste. They may contain toxic agents that are hazardous to health and environment. Therefore dispose of the device and the batteries immediately according to the prevailing statutory regulations. Never throw the batteries in normal household waste. Figure 13: WEEE-Symbol Used devices contain valuable materials that should be recycled. Electronic equipment is not household waste - in accordance with directive 2002/96/EC OF THE EUROPEAN PARLIAMENT AND THE COUNCIL of 27th January 2003 on used electrical and electronic equipment it must be disposed of properly. At the end of its service life take this unit for disposal at a relevant official collection point. Help to keep our environment clean which we are living in! 36 EN smartmeter S10 Technical specifications Technical specifications LNB/Tuner input F-type connector IEC 169-24 Frequency range 950 MHz ~ 2150 MHz Input level -65 dBm bis -25 dBm LNB power supply 13/18 V, max. 700 mA LNB control signal 22 kHz DiSEqC control yes Demodulator Front-end-modul QPSK Symbol rate 2 Mbps bis 45 Mbps System resource CPU 216MHz SDRAM 1PC 16M X16bit/16Mbyte DDR FLASH 1PC 16bit/4MByte Video-Decoder Data rate bis zu 15 Mbit/s Video resolution 720×576(PAL) 720×480(NTSC) Video format PAL, NTSC, SECAM Connectors Serial data interface smartmeter S10 USB EN 37 Supplier Power supply Supply voltage 12,6 V Li-oN battery 2700 mAh Supply voltage (charger) 100 - 240 V ~, 50/60 Hz Dimensions Length x width x height 10,3 x 16,7x 4,5 cm Weight 0,5 Kg Temperature Operating temperature 0° C to +40° C Storage temperature -40° C to +65° C Supplier smart electronic GmbH Industriestraße 29 78112 St. Georgen GERMANY Service Hotline: Telefax: E-Mail: Internet: 38 EN 00 49 7724 / 94 78 339 00 49 7724 / 94 78 333 [email protected] www.smart-electronic.de smartmeter S10 Warrenty Warrenty The warranty for the digital satellite receiver Smart smartmeter of the company smart electronic GmbH is in conformity with the prevailing statutory regulations at the time of purchasing the product.. Declaration of conformity The company smart electronic GmbH, Industriestraße 29, 78112 St. Georgen hereby declares conformity with the following guidelines and standards for this product: • Guideline for low voltage 2006/95/EG • EN 60 335-1 • EN 60 335-2-15 • Guideline for electromagnetic compatibility 2004/108/EG • EN 55 013:2001 • EN 55 020 • EN 61 000-3-2:2000 • EN 61 000-3-3:1995+A1:2001 • EN 61 938 • Equipment type / model: Digital Smartmeter smart electronic GmbH smartmeter S10 EN 39