1
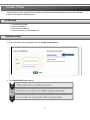
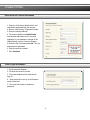
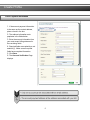
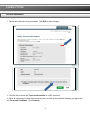
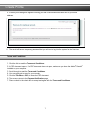
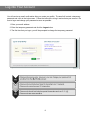
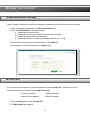
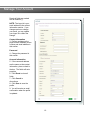
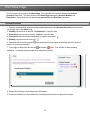
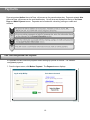
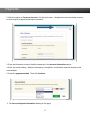
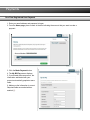
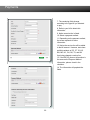
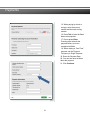
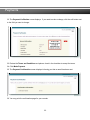
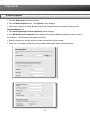
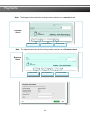
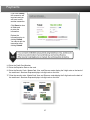
Payer User Manual eCheck & Card Payments 1 Table of Contents See the appendix for recent updates as of 10/25/2014 CREATE PROFILE ..................................................................................................................................................... 3 You Will Need .............................................................................................................................................................. 3 Create an Account ....................................................................................................................................................... 3 Enter Account Contact Information ............................................................................................................................ 4 Enter Login Information .............................................................................................................................................. 4 Enter Payment Information ......................................................................................................................................... 5 Account Verification .................................................................................................................................................... 6 Terms and Conditions.................................................................................................................................................. 7 LOG INTO YOUR ACCOUNT ................................................................................................................................... 8 MANAGE YOUR ACCOUNT ..................................................................................................................................... 9 Change Password after First Logon ............................................................................................................................. 9 Edit Your Profile ........................................................................................................................................................... 9 Forgot Password ........................................................................................................................................................ 11 Forgot Email Address................................................................................................................................................. 12 THE HOME PAGE ....................................................................................................................................................13 Account Overview ..................................................................................................................................................... 13 Account Number ....................................................................................................................................................... 14 Description ................................................................................................................................................................ 14 Amount Due .............................................................................................................................................................. 14 Due Date .................................................................................................................................................................... 15 View the Payment History ......................................................................................................................................... 15 PAYMENTS ...............................................................................................................................................................16 One-Time Unregistered User Payment ..................................................................................................................... 16 One-Time Registered User Payment ......................................................................................................................... 19 E-Check Payments ..................................................................................................................................................... 23 Credit Card Payments ................................................................................................................................................ 25 Partial Credit Card Payment ...................................................................................................................................... 28 Editing & Deleting a Pending Payment...................................................................................................................... 29 HELP ...........................................................................................................................................................................30 APPENDIX .................................................................................................................................................................31 2 Create Profile Create a profile to save your account information in the system and avoid having to re-enter the information each time you make an online payment. You Will Need Your Account Number Valid Email Address Current mailing Address Current version of an Internet browser Create an Account 1. From the Online Payment Website, click the Create an Account link. 2. The Create Profile page displays. 3 Create Profile Enter Account Contact Information 1. Enter the First Name, Middle Initial, and Last Name associated with the account. 2. Enter a valid Primary Telephone Number. 3. Enter the mailing address. 4. The country defaults to United States. International addresses are not currently supported. If your address is outside of the United States, contact Customer Support. 5. Enter the Zip Code and press tab. The city and state auto-populates. 6. Enter the account number. 7. Click Continue. Enter Login Information 1. Enter the email address. 2. Re-enter the email to confirm. 3. The email address will be used as the login id. 4. After the profile is set-up, a confirmation email will be sent. 5. The email will contain a temporary password. 4 Create Profile Enter Payment Information 1. If the account payment information is the same as the contact address, place a check in the box. 2. The address information autopopulates in the fields below. 3. Enter the account information from your most recent billing statement in the remaining fields. 4. Required fields are marked by a red asterisk (*). Make sure all required fields have complete information. 5. Click Save. 6. The Account Verification Page displays. 5 Create Profile Account Verification 1. Review the information that you entered. Click Edit to make changes. 2. Click the link to review the Terms and Conditions in a PDF document. 3. When all information is verified and corrected, place a check in the checkbox indicating you agree with the Terms and Conditions. Click Continue. 6 Create Profile 4. A thank you message will appear informing you that a confirmation has been sent to your email address. 5. The email will have a temporary password that you will use to log into the system for the first time. Terms and Conditions 1. Click the link to read the Terms and Conditions. 2. A PDF document opens. If a PDF document does not open, make sure you have the Adobe® Reader® installed on your computer. 3. Scroll through to read the Terms and Conditions. 4. You may also print a copy for your records. 5. Click the File Menu > Exit, to close the PDF document. 6. The screen returns to the Payment Verification page. 7. Place a check in the check box to accept and agree with the Terms and Conditions. 7 Log into Your Account You will receive an email confirmation after you create your profile. The email will contain a temporary password and a link to the login screen. Follow the instructions to log in and activate your account. Be sure to logon and change your password as soon as possible. 1. Enter your email address. 2. Enter the temporary password and click the Logon button. 3. The first time that you logon, you will be prompted to change the temporary password. 8 Manage Your Account Change Password after First Logon Steps 1 through 4 below show you how to change your password the first time you log into the system. 1. Enter the temporary password in the Current Password field. 2. Enter the New Password in the correct format. a. Passwords are case sensitive. b. Passwords must include at least 8 characters and 1 numeral. c. Passwords cannot exceed 16 characters. d. Passwords should not include special characters such as %, &, @. 3. Re-enter the password to confirm the password. Click Continue. 4. Once logged in, you will be directed to the Home page. Edit Your Profile If you did not set-up an account, you will not be able to view the Profile Tab. Users who set up an account can change the following from the My Profile page: Contact Information, Change Password Logon Id/Email Address Billing Information 1. From the Home page, click the Profile Tab. 2. The My Profile page displays. 9 Manage Your Account Required fields are marked with an asterisk (*). NOTE: The logon id is your email address in the contact information section. If you change carriers or change your email, you can update your logon id to reflect the change. Contact Information 3. Perform updates on the payer’s name, address, phone number and email address in this section. Password 4. Change the password in this section. Account Information 5. If the name and address are the same as the contact information, place a check in the box. The fields will autopopulate. 6. Click Reset to clear all fields. 7. Click Cancel to discontinue. 8. Click Save to save the profile. 9. You will receive an email confirmation when the profile is updated. 10 Manage Your Account Forgot Password 1. From the Logon Screen, click the “Forgot your email or password?” link found beneath the password field. 2. The logon screen displays “Forgot Email Address?” on the left and “Forgot Password?” on the right. 3. 11 Manage Your Account 4. In the Forgot Password section, enter the account number found on your statement in the Account Number field. 5. Enter your Email address and click Reset Password. 6. A temporary password will be emailed to you. 7. Log into your email account to retrieve the password. 8. Follow the instructions to log into the online payment system and change your password. Forgot Email Address 1. From the Logon screen, click the “Forgot your email or password?” link found beneath the password field. 2. The logon screen displays “Forgot Email Address?” on the left and “Forgot Password?” on the right. 3. From the Forgot Email section, enter the account number found on your statement. 4. Enter your Password and click Logon. 5. Once you are logged in, you will be at the Home Page. 6. Proceed to the Profile to obtain your email address. 12 The Home Page The first screen you log into is the Home Page. The right side of the screen displays the Account Overview information. The main section of the Home Page displays the Account Number and Description. Some accounts may also display Amount Due and Due Date information. Account Overview 1. You can review pending payments and processed payments in the Account Overview section located on the right side of the Home page. 2. Pending payments list an amount “scheduled for” a specific date. 3. Processed payments list an amount “paid on” a specific date. 4. Processed payments are also designated by a green checkmark. 5. Pending payments have a clock icon 6. Payments with a recurring symbol section on recurring payments). . have been scheduled to repeat at specified intervals. (See the 7. To the right of each listing are the edit and delete icons. You can edit or delete pending payments. Processed payments cannot be changed or deleted. 8. Double-click a listing to view the payment information. 9. Payment information is only available for internet payments made over the past two years. 13 The Home Page Account Number 1. Check to make sure the correct account number displays on the screen. 2. Only one account can be associated with your email/logon id. 3. The option to view specific billing information is only available to select accounts. 4. If you can view your billing information, make sure it matches your records. Description 1. Place a check in the checkbox that describes the payment. 2. The Make Payment button is activated and turns green. 3. Click the Make Payment button if you want to make a payment. Amount Due Only select accounts will display the Amount Due information. 1. Verify that the amount due matches your statement. 2. If the amount does not match, review the pending and processed payments which are located in the Account Overview section on the right side of the screen. 14 The Home Page Due Date Only select accounts will display the Due Date information. 1. Verify that the due date matches your statement. 2. If the dates do not match, check the pending payments and processed payments located in the Account Overview section to determine if the payment has been processed. View the Payment History 1. From the Home Page, click the View All link. 2. The Payment History displays. 3. The Payment History only displays payments made online. 4. Contact Customer Support for information on payments made in person, by phone or by mail. 5. You can double-click a listing to display the payment information. 6. You can ONLY change or delete pending payments. 7. Click the Edit button to the right of the field you want to change. 8. Click Submit. 15 Payments Payments entered before the cut-off time, will process on the same business day. Payments entered after the cut-off time, will process on the next business day. Cut-off times are displayed at the top of the Home Page and Make Payment screen. Payments can be made with a checking, savings or credit card accounts. One-Time Unregistered User Payment It is possible to make a one-time payment without setting up a profile or account. It is called an unregistered payment. 1. From the logon screen, click Make a Payment. The Payment screen displays. 16 Payments 2. Notice the option to Create an Account in the top right corner. Unregistered users can choose to set up an account prior to beginning the payment process. 3. Enter the information found on the billing statement in the Account Information section. 4. Enter your email address. When the transaction is completed, a confirmation email will be sent to this email address. 5. Select the payment method. Then click Continue. 6. The Account Payment Information displays on the page. 17 Payments 7. Enter the information associated with the checking, savings, or credit card account in the Account Payment Information section. 8. Click Continue. The screen changes to the Payment Verification page. 9. Review your information carefully. 10. If you need to make a change, click the Edit button located to the right of the field you want to change. 11. Place a check in the checkbox to accept the Terms and Conditions. 12. If all information is correct, click Make Payment. 13. The Payment Confirmation screen opens informing you that an email has been sent. 14. You can still register or set-up an account for future use. 15. You cannot make changes after the payment has been submitted, if you have not registered your account. If there is an error, contact Customer Support at the number listed at the bottom of the page. 18 Payments One-Time Registered User Payment 1. Enter your email address and password to logon. 2. From the Home page, place a check in the box indicating the account that you want to make a payment. 3. Click the Make Payment button. 4. The My Bill Pay screen displays. 5. If you already have an account, the information associated with your account automatically populates some fields. 6. Make sure the information is correct. Required fields are marked with an asterisk (*). 19 Payments 7. The remaining fields change according to the type bill you selected to pay. 8. Refer to your bill to obtain this information. 9. Notice a service fee is listed. 10. Select a payment method. 11. Depending on the payment method, the screen expands for more information. 12. Notice the service fee will be added to the bill amount. However, state laws prohibit residents of CO, CT, ID, KS, MA, ME, NY, OH, OK, TX, and WV from being charged a service fee. 13. If the Bill Pay Account information is the same as the Payment Method information, place a check in the checkbox. 14. The information will populate the fields. 20 Payments 15. When paying by check or savings, enter the account number and the bank routing number 16. Press Tab to have the Bank Name auto-populate. 17. Do not press Enter. Pressing enter submits the payment before you have completed all fields. 18. When making a “One-Time” payment, set the Payment Frequency to Single Payment. 19. Enter the Payment Date. 20. You can also enter a Memo about the payment. 21. Click Continue. 21 Payments 22. The Payment Verification screen displays. If you need to make a change, click the edit button next to the field you want to change. 23. Review the Terms and Conditions and place a check in the checkbox to accept the terms. 24. Click Make Payment. 25. The Payment Confirmation screen displays informing you that an email has been sent. 26. You may print the confirmation page for your records. 22 Payments E-Check Payments 1. From the Home page, select the account. 2. Click the Make Payment button. The Payment screen displays. 3. Select from Personal Checking, Business Checking, Personal Savings or Business Savings in the Payment Method field. 4. The Checking/Savings Account Information screen displays. 5. If the Bill Pay Account information is the same as the Payment Method information, place a check in the checkbox. The information will populate the fields. 6. Enter the checking or savings account number and the bank routing number. 7. Press Tab. The system verifies the routing number and the bank name will auto-populate. 23 Payments Note: The diagram below shows the routing number locations on a personal check. Personal Check Routing Number Account Number Check Number Note: The diagram below shows the routing number locations on a Business check Business Check Check Number Routing Number 24 Account Number Payments 11. Click Continue. The Payment Verification screen displays. If you need to make a change, click the edit button next to the field you want to change. 12. Review the Terms and Conditions and place a check in the checkbox to accept the terms. 13. The payment confirmation screen displays. You will receive an email confirming the payment. Credit Card Payments 1. From the Home page, select the account you want to pay. 2. Select the type bill you want to pay. 3. Click the Make Payment button. The Payment screen displays. 4. If the account profile has not been set-up, enter the account contact information: a. Enter the First Name, Middle Initial, and Last Name associated with the account. b. Enter a valid Primary Telephone Number. c. Enter the mailing address. d. The country defaults to USA. International addresses are not currently supported. e. Enter the Zip Code and press Tab. The city and state auto-populates. f. Enter the billing account number. g. Depending on the type bill, you may have to enter additional information. 5. Select Credit Card in the Payment Method field. 6. The screen expands to display additional fields needed to enter credit card information. 25 Payments 7. Place a check in the checkbox indicating the contact information is the same as the name and address associated with the credit card. The information will auto-populate in the fields. 8. If different, enter the name and address associated with the credit card. Click Continue. 9. The Credit Card Payment Verification screen displays. 10. Review the information. Notice the total amount billed includes a service fee. However state laws prohibit residents of CO, CT, ID, KS, MA, ME, NY, OH, OK, TX, and WV from being charged a fee. 11. Review the Terms and Conditions and place a check in the checkbox to accept the terms. 12. If all information is correct, click Make Payment. 13. The Credit Card Information screen displays. 26 Payments If you click Cancel, the transaction will terminate and you will have to start another transaction. Click Reset to clear all fields and re-enter the information. Review the information prior to clicking Submit. You cannot edit the transaction after clicking Submit. 14. Enter the Credit Card Number 15. Enter the Expiration Date on the card. 16. Enter the Security Code. MasterCard, Visa, and Discover cards display the 3-digit code on the back of the credit card. American Express displays a 4-digit code on the front. 17. Enter the security code. MasterCard, Visa, and Discover cards display the 3-digit code on the back of the credit card. American Express displays a 4-digit code on the front. 3- Digit Code 3- Digit Code 3- Digit Code 4- Digit Code 27 Payments 18. After keying the card information, review the information carefully. 19. If you need to make a change, you cannot edit the transaction. However, you may delete the transaction and begin a new credit card payment. 20. The system verifies that funds are available to cover the payment. 21. If funds are available, the Payment Confirmation screen displays informing you that an email has been sent. 22. Click Submit to complete the payment. You may print the confirmation page for your records. 23. If funds are insufficient, the system uses whatever amount is available towards a partial payment. A dialogue box then displays with three payment options: 24. Cancel partial payment and select a new payment method. (Select this option to return to the Make Payment screen and select another payment method.) 25. Continue with partial payment of ($00.00) and add an additional method to pay balance. (Select this option to return to the Credit Card Processing screen to enter other credit card accounts to satisfy the balance.) 26. Cancel bill payment transaction. (Select this option to end the transaction and return to the Home page.) Partial Credit Card Payment If the credit balance is insufficient, you can use another credit card to complete the transaction. The partial payment feature is only available after the system verifies that the initial credit card has insufficient funds. You cannot mix a credit card payment with a check or savings account payment. You can only use another credit card to complete the transaction. 1. Select the second option on the Partial Payment dialogue box. 2. Note the balance due amount. 3. Enter the correct name and address associated with the second credit card. 4. Be sure to enter the correct account information, credit card account number, expiration date, and security code for each card used. 5. Click Make Payment. 6. The system computes the remaining balance. 7. If there are not enough funds to cover the balance on the new card, you will receive a prompt to enter another credit card. 8. When the balance is satisfied, the payment confirmation screen displays. 9. If you need to make a change, you cannot edit the transaction. However, you may delete the transaction and begin a new credit card payment. 28 Payments Editing & Deleting a Pending Payment Pending payments can be edited or deleted as long as they have not passed the cut-off time for processing. To delete a payment click the delete 1. To edit a pending payment, click the icon icon by the payment you want to delete. located to the right of the payment. 2. The Edit Pending Payment screen opens displaying all previously entered information. 3. After making changes, click the Verify Changes button. 4. The Confirmation Page opens and an email confirmation is sent to your email address. 29 Help 1. From the Home page, click the Help Tab to access the Help Menu. 2. The Help Menu contains three links: User Manual, FAQ, and Contact Us. 3. Click User Manual to access a manual with step-by-step instructions. 4. Click FAQ for answers to frequently asked questions. 5. Click Contact Us to display customer support contact information. 30 Appendix **Application changes effective 10/25/2014 Multiple Accounts ‘Create a Bill Pay Account’ Page After selecting ‘Create an Account’ from the login screen, the payer will have the ability to register up to 5 additional accounts by selecting ‘+ Add Another Account’ at the bottom of each account entry. Note: Existing users can add additional accounts by modifying their profile. Verify Account Information Page On the ‘Verify Account Information’ page, the Payer reviews their information for accuracy. 31 Appendix Continued Verify Account Information Page Continued Each account entry will be listed. The ‘-‘ before Account 1 and Account 2 labels, indicates that the information can be collapsed if needed. Each account registered will be displayed on the Home page. Once you have selected the applicable accounts, select ‘Make Payment’. Payments submitted will appear in the right navigational panel. 32 Appendix Continued If multiple accounts are selected for payment, only the first account will be displayed completely. To see the additional accounts, the Payer must click on the ‘+’ to expand the account information. The Payer will also see both accounts listed in the ‘Total Amount Summary’ section. If there is a fee associated with the payment then it will appear in this section as well. 33 Appendix Continued Recurring Payments – eCheck/ACH only Make Payment Page On the Make Payment Page, you can choose the payment frequency: - Single Payment - Weekly - Bi-Weekly - Semi-Monthly - Monthly Then choose the ‘End Date’ or ‘Number of Payments’ along with the ‘Day of the Week’ and ‘Start Date’. Under the Payment History section on the Account Profile page, the following icon indicates a recurring payment. 34