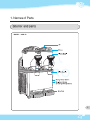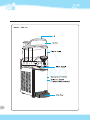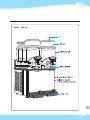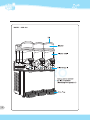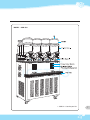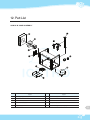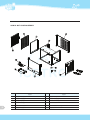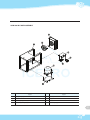
1
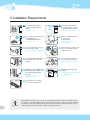
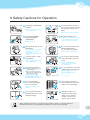
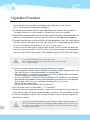
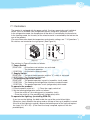
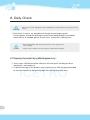
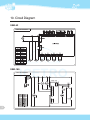
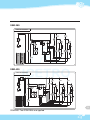
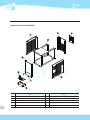
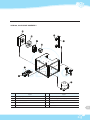
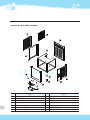
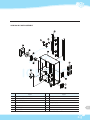
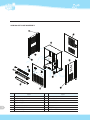
Slush & Smoothie Machine User Manual SSM-180, 280, 420, 560, 52(MINI) ·The product has been designed for indoor use only. So do not use it outdoors. ·Before use of the product, be sure to become familiar with this manual. Keep the manual in a convenient place for quick and easy reference. ·This manual contains the product warranty card. ·The product design is subject to change for performance enhancement without prior notice. Contents 1.Names of Parts 3~7 2.Overview 8 3.Safety Signs, Symbols, and Labels 8 4.Safety Instructions 9 5.Installation Requirements 10 6.Safety Cautions for Operation 11 7.Operation Procedure 12~19 7.1 Controllers 7.2 Operations 7.3 Cleaning and sterilization procedure 7.3.1 Disassembling the product 7.3.2 Cleaning the product 7.3.3 Sterilizing the product 7.3.4 Assembling the product 7.3.5 Sterilizing the site 8.Daily Check 20 8.1 Repairing the product (by qualified engineer only) 9.Specifications 10.Circuit Diagram 11.Before Calling Service 12.Part List 13.When Receiving Service Product Warranty Card 2 - Keep the manual in a convenient place for quick and easy reference. - 21 22~23 24 25~33 34 35 1. Names of Parts Exterior and parts MODEL : SSM-52 3 MODEL : SSM-180 4 MODEL : SSM-280 5 MODEL : SSM-420 6 MODEL : SSM-560 SSM-52 : See the part list. 7 2.Overview To become familiar with this product, be sure to read this manual carefully. This product requires cleaning and maintenance activities as in other machines. Any disassembly or cleaning mistakes may cause a product failure. It is highly recommended for the person in charge to have immersion training for activities. 3.Safety Signs, Symbols, and Labels The warnings and safety instructions in this manual do not cover all possible conditions and situations. While operating, moving or cleaning this product, manipulate it carefully based on common sense. If a bad and non-understandable symptom happens, feel free to contact the purchased site or service agency. This is the safety warning symbol. It is used to warn users of any potential risk of injuries. To evade from the risk of injury or death, comply with the safety requirements for the symbol. Danger Warning Caution Caution 8 Important If you neglect this symbol and wrongly use the product, it may cause death or serious injury. If you neglect this symbol and wrongly use the product, it may cause a potential risk of death or serious injury. If you neglect this symbol and wrongly use the product, it may cause a potential risk of injury. If you neglect this with no caution symbol and wrongly use the product, it may cause a potential risk of property damage. You must check the electrical rating on the nameplate of the product. The nameplate is attached on the rear of the product. The nameplate specification has priority over information in this manual. The electric circuit diagram of the product is attached inside of the panel. In addition, the product specification is subject to change without prior notice. 4.Safety Instructions Be sure to use the grounded consent. Do not pull off the power plug. It may cause a failure or electric shock. It may cause a failure or electric shock. Do not move the product by pulling the power plug. Do not contact the power plug with wet hands. It may cause a failure or electric shock. It may cause an electric shock or fire. Do not forcibly bend the power plug or place any heavy material on it. When the power plug is removed from the outlet, insert it after 5 minutes. It may cause an electric shock or fire. Otherwise, It may cause a product failure. Remove water or dust from the power plug and insert it fully into the outlet. When repairing the product or replacing the parts, remove the power plug from the outlet. It may cause a fire or electric shock. It may cause an electric shock or fire. When not using the product for a long time, remove the power plug from the outlet. Do not connect multiple products to a single outlet. It may cause an electric shock or fire. It may cause a fire. When the power plug is damaged, do not replace it arbitrarily and contact the service agency. Do not connect the power plug arbitrarily or nor modify it. It may cause an electric shock or fire. It may cause an electric shock or fire. Caution! ■ Use this product as described in the user manual. - If you do not follow the instructions, it may cause an electric shock or property loss. - When transferring the product to another person, transfer the user manual also. - Before supplying power, check whether the voltage is the same as the one of the nameplate. According to applicable electric code regulations and machine specifications, ground the product and connect to the single phase power. If the product has no plug, install the grounded plug to meet at least 15 A 250 V (220 to 230 V, 50 to 60 Hz). For directly connecting the product to the main power, connect the power cord to the 2 pole circuit breaker. Never use the extension cord with no grounding. 9 5. Installation Requirements Do not install the product near the heat generating source. Do not install the product in a humid, dusty, or water (e.g. rain) splashing place. It may cause a fire. It may cause an electric shock or fire. Do not install the product near combustible gases or inflammable materials. When moving the product, be careful not to slip and fall. It may cause a fire. It may cause an injury or product damage. Do not forcibly apply force or shock to the product. This product is for indoor use only. So install the product inside the house. It may cause damage to the product. Keep at least 30 cm distance for the side and rear of the product. Do not install the product on a weak or uneven floor. Adjust the vertical balance of the product not to shake and then adjust the horizontal balance. Check any damage of the product. It may cause vibration and noise. If found, contact the delivery agency to request claims on it. Firmly fix the product. The drain hose is located on the top of the drain box. Caution! 10 This product is for indoor use only. So do not install the product outdoors. Inevitably, when the product is installed outside, prepare a shade to block direct sunlight, rain, wind, and dust for sanitary control and optimal performance. Install the product in the place where you can easily manage it to prevent robbery and loss by dangerous play. 6.Safety Cautions for Operation Keep away any flammable materials. ▶It may cause a fire or explosion due to electric spark. If the product makes heavy noise or does not operate properly, remove the power plug and contact the service agency. ▶It may cause an electric shock or fire. Do not use any flammable spray such as pesticide and air freshener. ▶It may cause a fire. Operate the product in a nonhumid place. ▶In a humid place, the product easily gets rusty or has an electric leak. ▶If the floor gets humid, wipe it with soft cloth. Use the product in a well vented place. ▶Gas or smoke can discolor the surface of the product. Be cautioned of gases! ◆When gas leak happens, do not touch the product. ◆If you open the door or remove the power plug, it may cause an explosion due to spark. ▶Do not touch the product. ▶Fully close the gas burner. ▶Open the window for ventilation. Do not forcibly apply force to the slush supply lever nor hang on it. Check the supplied power. ▶When the PVC coating of the power cable is stripped off or the shunt socket is used, it may cause a fire. Do not use the product in the ambient temperature of 5℃ or below for a long time. ▶It may cause a product failure. Do not spray water and wipe the product with a clean wet towel. ▶If you directly spray water, it may cause an electric leak or product failure. For food sanitation, clean and sterilize the product every day ▶Before cleaning, remove the power plug from the outlet. Do not insert your finger or other materials into the panel rubber or the slush supply. ▶It may cause damage to the product. Do not operate the product while all panels are not well fastened enough. When the product is not separated from the power supply, do not clean the product nor remove the canister, spiral or panel. While operating the product, do not hold the product using the canister or evaporator drum. The manufacturer assumes no responsibility for any damage caused by careless handling. Caution 11 7.Operation Procedure ① Clean and sterilize the product according to the instructions in this manual. See“7.3 Cleaning and sterilization procedure.” ② Fill up the liquid material up to the level specified on the canister. Do not overfill it. The optimal quantity (in liter or gallon) is written on the surface of canister. ③ When diluting the liquid material, fill water into the canister first and pour the liquid material for dilution. In case of natural materials, do not make the slush supply get clogged up. ④ For optimal performance, use the base that has been designed for use in the slush machine. The base contains the sugar level of 34。(Baume) that is corresponded with 64。(Brix). In case of soft drinks, dilute the base 1 to 5 or 5.5 using water. In some cases, for both granita and soft drink recipes, you must follow the directions from the syrup manufacturer. If natural juices (e.g. lemon, orange) are used together with non-sugar material (e.g. coffee), 150 to 200 g of sugar per liter must be dissolved. Caution! - Food or edible materials must be used in the product. - When using the granita (smoothie, slush) mix, be sure to have at least 13% of sugar level (Brix). ⑤ In case of using the liquid material, keep the following instructions: - After mixing the one liter of liquid material (juice pack with 50% of sugar level) with four liters of water, fill the mixed liquid in the material box. - Note that when any machine failure occurs due to use of liquid material or powder, the manufacturer assumes no responsibility. ·In case of soft drinks (1.5 liters of fruit juices bottled in PET plastic) that can be easily purchased, fill three of bottles (4.5 liters) in the material box. (in case of 13 to 15% of sugar level) (e.g. orange soda, fanta, etc.-soft drinks including 10% of fruit juices) ·Do not use low calorie drinks. ·Do not use fruit nectar that includes fruit particles. ⑥ Set the control switch as described in“7.1 Controllers.” ⑦ When the thickness of granita (smoothie, slush) reaches the optimal value, freezing automatically stops. So always keep the product turned on. The spiral keeps rotating. ⑧ In case of using other materials such as sweet rice drink, contact the service agency or distributor for inquiry. 12 Caution! This product must not be used by the persons with poor mental or physical condition, or the persons without experience or knowledge (including children). If those persons use the product, a responsible person must manage the use of the product. Guide children not to play with the product. 7.1 Controllers The product is equipped with the power switch. Canisters operate by each individual switch. You can use both soft (refrigeration) drinks and granita (smoothie, slush). In the refrigeration mode, the temperature of the drink is controlled by the thermostat. In the freezing mode, the viscosity of the mixed material is controlled by the bolt on the rear of the product. ) (For more information about the temperature and viscosity settings, see“7.2 Operations.” All switches are located on the right panel. (See Figure 2.) (Figure 2) (Figure 3) The switches in Figure 3 function as follows: Ⓐ Power Switch |POSITION ○ POSITION : All functions and switches are activated. The fan motor operates. : All functions are deactivated. Ⓑ Supply Switch |POSITION ○ POSITION : The spiral motor operates and the“C”switch is activated. : The fan motor is turned off. Ⓒ Freezing/Refrigeration Switch |POSITION ○ POSITION ‖ POSITION : The product operates in granita (smoothie, slush) mode. : The freezing and refrigeration functions are deactivated. : The product operates in soft (refrigeration) drink mode. To operate the product: ① Place the power switch to I. ② Place the supply switch to I. ③ Set the freezing/refrigeration switch as follows: - Place the switch to I for making granita (smoothie, slush). - Place the switch to II for providing soft (refrigeration) drink. To operate the lighting: (excluding SSM-52) ·If you turn on the lighting, the bulb inside the cap of the material box lights. ·Otherwise, check whether the spring cord on the top of the cap is properly inserted. ·If the life of the lighting is expired, remove the bottom panel of the cap and replace the lamp (12 V & 21 W). (If the life of the lamp is expired, replace it with the provided part.) 13 7.2 Operations ① Adjusting the granita viscosity: The optimal granita viscosity is set by the manufacturer. To change the viscosity, rotate the control bolt on the rear of the product as follows: (See Figure 4.) - To make thicker granita, rotate the control bolt to the right (clockwise). - To make watery granita, rotate the control bolt to the left (counter-clockwise). (Figure 4) ② Adjusting the drink temperature: The optimal temperature is set by the manufacturer. For setting it again, rotate the temperature controller inside the rear panel as follows: - To lower the temperature, rotate it to the right (clockwise). - To increase the temperature, rotate it to the left (counter-clockwise). Important 14 The drink temperature is controlled by the thermostat, only when the freezing/refrigeration switch is located in“II”(soft drink mode). ③ The granita forming time is affected by various factors such as ambient temperature, initial material temperature, sugar level (Brix level) and viscosity setting. Though the conditions are the same, the forming time may vary depending on the canister. ④ To reduce the granita forming time and increase the productivity, it is recommended to use the refrigerated materials. ⑤ To reduce the granita forming time and increase the productivity, when the remaining material level drops below half, fill the material in the canister. ⑥ To preserve the material safely, be sure to operate the product in soft drink mode. To leave the material in the canister during all night without refrigeration, operate the product for at least one hour while the freezing/refrigeration switch is in II before switching off the product. It can prevent forming lumps of ice that can give damage to the spiral and motor. ⑦ Before operating the product again, check whether lumps of ice have been formed. If any lumps of ice are in the canister, remove them before switching on the product. If you operate the product in refrigeration mode during all night, it can prevent accumulation of the condensed ice ⑧ When the granita is in the canister, do not turn off the slush supply switch. It is because hard ice can form if the spiral does not rotate. If you turn on the slush supply switch at this time, the spiral and motor can have damage. Therefore, turn on the slush supply switch after melting the frozen granita. ⑨ The product has the shaft so that the gear motor (outside the canister) can drive the spiral (inside the canister). ⑩ The product must be located in a well vented place. If the temperature of the product is hot, check whether there is any heat generating source, or air flow through the panel with a hole is blocked by the wall or box. Keep at least 30 cm distance between the product and other materials. 7.3 Cleaning and sterilization procedure ① To maintain optimal taste and guarantee the maximum product performance, periodically perform cleaning and sterilization. Only the procedural instructions are provided here. ② Before disassembly and cleaning, be sure to remove all materials from the product. For this, follow the procedure below. - Place the power switch to I. - Place the freezing/refrigeration switch to O. - Place the containers beneath each slush supply and extract all materials from the canisters. - Place all control switches to O. 7.3.1 Disassembling the product Before disassembly and cleaning, remove the power plug to block power supply. Warning ① Remove the cover of the canister. 15 ② Lift the front of the canister to unlock the latch (Figure 5) and pull out the canister to the front. (See Figure 6) (Figure 5) (Figure 6) ③ Remove the spiral by pulling out (Figure 7) and remove the packing cushion. (See Figure 8) (Figure 7) (Figure 8) (Figure 9) (Figure 10) ④ Remove the rubber cushion. (See Figure 9). ⑤ Remove the slush supply as shown in the figure. (See Figure 10). ⑥ Lift the drip tray and pull it out, and empty the remaining water. 16 7.3.2 Cleaning the product Never clean the parts in the dish washer. Warning ① Prepare the solution mixed with five liters of warm water and kitchen detergent. Do not use a strong detergent. ② After inserting the mixed solution that does not harm the food, turn on the slush supply switch to extract the solution. ③ Frequently empty the remaining materials in the material box and drain box and clean them. Turn off the freezing switch. Caution Warning It may cause spiral freezing and motor failure. In order not to give damage to the product, use the washing detergent for cleaning plastic parts. ④ Use the proper brushes to clean the disassembled parts using the washing detergent. Caution When cleaning the product, be careful not to insert water in the electrically running parts. It may cause an electric shock or product failure. ⑤ Do not spill any liquid on the cover of the motor that is on the rear of the product. ⑥ Likewise, use a soft bristle brush to clean the evaporator’ s cylinder. ⑦ Use clean cold water for cleaning the parts. ⑧ Be sure to clean the filter. As shown in the figure, on a monthly basis, open the cover of the condenser, clean the filter with lukewarm water (about 25℃) or neutral detergent solution, dry it, and attach it back to its original position. If ventilation is not made due to accumulated dust, slush is not smoothly formed and machine failure may follow. When the troubles are caused by careless use or user faults such as no filter cleaning, you can get a charged service. Cleaning the condenser 1. Separate the SIDE PANEL L 2. Use a vacuum cleaner or hand cleaner to remove dust from the condenser 17 7.3.3 Sterilizing the product Sterilization is performed before operating the product. After sterilization, do not leave the product for a long time. ① Wash your hands with an anti-bacterial soap. ② According to the food safety regulations and manufacturer specifications, prepare five liters of warm (45 to 60℃) sterilization solution (dilute a spoon of chloride condense liquefaction or sodium chlorate with two liters of water (100 ppm)). ③ Soak the parts in the sterilization solution for five minutes. ④ Place the sterilized parts on a clean and dry place for drying them. ⑤ Wipe all the surfaces of the product. ⑥ Do not spill any liquid on the cover of the motor that is on the rear of the product. 7.3.4 Assembling the product ① Attach the drip tray to its original position. ② Paint two piston rings and spiral with the grease provided by the manufacturer or the approved edible grease. (See A and B in Figure 11.) ③ Attach the slush supply in the reverse order of disassembly. (See Figure 10.) (Figure 11) ④ Attach the rubber cushion. Caution : Be sure for the wide border of the gasket to face the wall. (See Figure 12). (Figure 12) ⑤ Attach the packing cushion and spiral. (See Figure 13.) 18 Caution Before attaching the packing cushion, paint the inner part with edible grease. After assembly, paint the outer area with edible grease. Packing Cushion (Figure 13) ⑥ Push the canister fully into the canister to fix in the packing cushion and fixing latch. (See Figure 14). (Figure 14) ⑦ Use fresh material to remove the remaining sterilization solution on the surface of the canister. Afterwards, do not rinse the product. Caution To reuse the product after a long time, paint the packing cushion with edible grease as in ⑤. Otherwise, noise may be heard from the product. For correction, you have to get a charged service. 7.3.5 Sterilizing the site The site sterilization can be performed additionally after parts sterilization but it cannot replace the parts sterilization. ① According to the food safety regulations and manufacturer specification, prepare five liters of warm (45 to 60℃) sterilization solution (remaining chloride 100 ppm). ② Fill the solution in the canister. ③ Use the proper brushes to wipe the surfaces projected above the solution level and the lower area of the canister cover with the solution. ④ Attach the canister cover and operate the product for mixing the solution for about two minutes. Drain the solution from the canister. ⑤ Use fresh material to remove the remaining sterilization solution on the surface of the canister. Afterwards, do not rinse the product. 19 8. Daily Check Warning If the power cord is damaged, only the qualified person must replace it to prevent electric shock. ① Daily check: It checks any possible leak through the packing or gasket. If leak happens through the packing or gasket even though properly assembled, check the use of improper grease or parts wear. If necessary, replace parts. - Before disassembly and cleaning, remove the power plug to block power supply. Caution - The pin of the condenser is very sharp. Be careful while cleaning it. 8.1 Repairing the product (by qualified engineer only) ① Yearly repair: Remove the panel and clean the inner parts including the base, side panels, and condenser. ② To prevent damage to the product, paint all plastic parts with the grease provided by the manufacturer or the grease proper for cleaning the plastic parts. 20 9. Specifications Description Model Name Product Name Size B o d y E l e c t r i c SSM-180 SSM-280 SSM-420 SSM-52 SSM-560 (MINI) Slush & Smoothie Machine (W×D×H) 213×480×832 400×480×895 600×480×895 900×480×1350 417×386×705 Case Stainless Steel Stainless Steel Stainless Steel Stainless Steel Stainless Steel Insulation Urethane Foam Urethane Foam Urethane Foam Urethane Foam Urethane Foam Power Consumption Current F e Consumption a t Geared u Motor r e Fan F Motor 110V 220V 440W 320W 1020 1350 1000×2EA 500 5.8A 5.0A 6.4A 5.0A×2EA 3.5A 1EA 2EA 3EA 4EA 2EA 9 W or below 16W 16W~34W 16W~34W×2EA 10W 1.8A r Compressor e e Condenser z i Evaporator n Cooling g Type Refrigerant Proper 220V Fully Closed Pin tube type Tube-launched Drum Type Capillary Tube R-134a M Material 10ℓ×1TANK Quantity i Control s Torque and TC Control Method c e User Manual (1 EA) l Edible Grease (1 EA) l Provisions Rubber Ring 1EA a Rubber Packing 1EA n Lamp 1 EA e o Operation u Environs R-404A R-404A R-404A R-134A 10ℓ×2TANK 10ℓ×3TANK 10ℓ×4TANK 5ℓ×2TANK Torque and TC Control Torque and TC Control Torque and TC Control MICOM Control User Manual (1 EA) User Manual (1 EA) Edible Grease (1 EA) Edible Grease (1 EA) Rubber Ring 2EA Rubber Ring 3EA Rubber Packing 2EA Rubber Packing 3EA Lamp 1 EA Lamp 1 EA User Manual (1 EA) Edible Grease (1 EA) Rubber Ring 4EA Rubber Packing 4EA User Manual (1 EA) Edible Grease (1 EA) Rubber Ring 4EA Rubber Packing 4EA Lamp 1 EA Ambient Temperature : 10~38℃ ment Important 21 The raw material quantity may vary by the material type and sugar content. If the slush touches the cover, reduce the quantity of the raw material. 10. Circuit Diagram SSM-52 CIRCUIT DIAGRAM SSM-180 CIRCUIT DIAGRAM 22 SSM-280 CIRCUIT DIAGRAM SSM-420 CIRCUIT DIAGRAM 23 SSM-560: Two SSM-280s are applied 11. Before Calling Service Failure If power is not supplied The spiral rotation is stopped. (Noise is generated.) Cause 1. Power is not supplied from the outlet. 2. The power switch is turned off. 1. Check the outlet connection status. 3. The fuse is disconnected. 3. Replace the fuse. Low sugar level in the material. (The spiral is frozen.) Turn off the power switch and melt the ice. (At this time, do not use a sharp tool such as ice pick.) After that, retry. 1. The material level is too low. While operation, water flowing sound is heard. It is too much frozen. 24 2. Turn on the power switch. Deformation of the spiral and canister. (It can happen when hot water (80℃ or Replace the spiral and canister. above) is used while cleaning and sterilizing the product.) Spiral rotation shaft wear (wear of the part that meets the spiral Replace the spiral. rotation shaft in the middle of the cylinder) The material does not The material level is too low. come out from the slush supply. The material is too much frozen. The granita is not formed. Action 2. The sugar level is set to Weak (Level 1). 3. It is set to Stop or Refrigeration. The sound is heard when the refrigerant flows. The freezing switch is turn on continually. Fill the material up to three litters. Adjust the control screw on the cover of the motor (on the rear of the product). 1. Replace the material (sugar level: 13 to 15%) 2. Connect the cord of the cap. 3. Set it to Freezing. Normal operation Adjust the freezing and refrigeration switch to have optimal temperature. In this case, set the switch to Refrigeration or Stop. 12. Part List SSM-52 IN CASE ASSEMBLY NO ITEM NO ITEM 1 CONDENSER A’SSY 6 CONTROL BOX 2 FAN 7 COMP 3 BKT FAN MOTOR 8 TC 4 FAN MOTOR BKT 9 COLUMN BACK 5 PCB A’SSY 10 A’SSY SOLENOID VALVE 25 SSM-52 OUT CASE ASSEMBLY NO 26 ITEM NO ITEM 1 FILTER GUIDE 7 BOLT WRENCH 2 SIDE PANEL L 8 FOOT RUBBER 3 BASE PLATE 9 FRONT PANEL 4 BACK PANEL 10 DRAIN BOX 5 SWITCH A’SSY 11 DRAIN BOX COVER 6 SIDE PANEL R 12 FILTER SSM-180 IN CASE ASSEMBLY NO ITEM NO ITEM 1 BASE PLATE 5 TRANS 2 FAN 6 PCB 3 CONDENSER A’SSY 7 COMP 4 BRACKET PCB MG 8 COMP BASE 27 SSM-180 OUT CASE ASSEMBLY NO 28 ITEM NO ITEM 1 SIDE PANEL L 6 DRAIN BOX 2 BASE PLATE 7 DRAIN BOLT 3 BACK PANEL 8 DRAIN BOX COVER 4 FILTER 9 FRONT PANEL 5 SIDE PANEL R SSM-280, 420 IN CASE ASSEMBLY NO ITEM NO ITEM 1 CONDENSER A’SSY 6 COLUMN BACK 2 FAN 7 ASS’Y SOLENOID VALVE 3 FAN MOTOR BKT 8 COMP 4 FAN MOTOR 9 TRANS 5 TC 10 PCB ASS’Y 29 SSM-280, 420 OUT CASE ASSEMBLY NO 30 ITEM NO ITEM 1 FILTER GUIDE 8 DRAIN BOX 2 FILTER 9 DRAIN BOLT 3 BACK PANEL 10 BOLT WRENCH 4 BASE PLATE 11 FOOT BUBBER 5 SIDE PANEL L 12 SIDE PANEL SWITCH 6 FRONT PANNEL 13 SIDE PANEL R 7 DRAIN BOX COVER SSM-560 IN CASE ASSEMBLY NO ITEM NO ITEM 1 ASS’ Y SOLENOID VALVE 8 TRANS 2 BKT SOL V/V 9 COMP 3 COLUMN BACK 10 FAN MOTOR 4 TC 11 BASE PLATE 5 AXIAL FAN 12 FAN MOTOR BKT 6 BKT PCB 13 FAN 7 PCB ASS’ Y 14 CONDENSER A’SSY 31 SSM-560 OUT CASE ASSEMBLY NO 32 ITEM NO ITEM 1 COLUMN COVER B-L 8 BRACKET DRAIN BOX 2 BASE PLATE 9 DRAIN BOX 3 BACK PANEL 10 DRAIN BOX UP 4 SIDE PANEL R 11 SWITCH ASS’ Y 5 COLUMN COVER B-R 12 RUBBER 6 FOOT CASTER 13 SIDE PANEL L 7 FRONT PANEL CANISTER ASSEMBLY NO ITEM NO 1 Canister Cover 9 Moter cover 17 Packing Redenar One 2 Canister 10 Geared Motor 18 Pin Lever 3 Spiral 11 Micro switch 19 Packing Down 4 Packing back 12 ASS'Y Drum 20 O-ring down 5 Dasher Shaft 13 Base Canister 21 Lever Shaft 6 Tension Bolt 14 Packing Cushion 22 Lever Spring Slush 7 Joint Spring 15 Redenar 23 Lever Label 8 Insert Joint Spring 16 Redenar Bushing 24 Lever ITEM NO ITEM 33 13. When Receiving Service 1. A product failure has occurred while operation. 2. First turn off the power switch and remove the power plug. 3. Contact the service agency. 4. The service engineer visits and performs service upon call. 5. The repair is finished! ! 34 6. When you are using the clover service of the manufacturer, the service history is logged in the system for more efficient services. Product Warranty Card Name Slush & Smoothie Machine Model Name SSM-180, 280, 420, 560, 52 Product Serial Number Purchased 1 year after purchasing the Date Year____ Month______ Day____ Warranty Expiration Year____ Month______ Day____ Customer Address Customer Name Phone Warranty Period product Year____ Month______Until Number 1. The free-of-charge service is provided within the warranty period about the failures issued while normal operations. 2. After checking the user manual, contact the service agency for the failures. 3. Charged service is provided even within the warranty period in the following cases: - Failure caused by careless use or improper repair/modification. - Failure caused by not following the instructions in this user manual. 4. Repair after warranty expiration: Charged service is provided. 5. For repair, provide the product warranty card to the service engineer. 6. This product warranty card is applied in the local area. 7. This card is not reissued so please keep it in a safe place. ●After-sales contact: : ■Manufacturer : www.icetro.com 78BL 3 LT 2nd Namdong Insdustrial Complex (Hogupo Road) Namdong-gu Incheon, Korea 35 Online Internet Service http://www.icetro.com 001 3240193-00